目的是将maya中的相机无缝导入到pytorch3d中
坑1: 直接导出maya中相机的欧拉角以及Trans, 然后直接导入pytorch3d中
问题所在: maya中直接导出的相机旋转角以及Trans是 c2w, 而根据文档https://pytorch3d.org/docs/cameras 中的一句话, 经过R可以实现world to view的变换, 所以可以确定这个地方需要输入的参数其实是w2c
M c 2 w = R T 0 1 M_{c2w} = \begin{bmatrix} R & T \\ 0 & 1 \end{bmatrix} Mc2w=R0T1, M w 2 c = M c 2 w − 1 = R T − R T T 0 1 M_{w2c} =M_{c2w} ^{-1}= \begin{bmatrix} R^T & -R^T T \\ 0 & 1 \end{bmatrix} Mw2c=Mc2w−1=RT0−RTT1
转换后输入即可
坑2: 坐标系不同, 需要先进行坐标系变换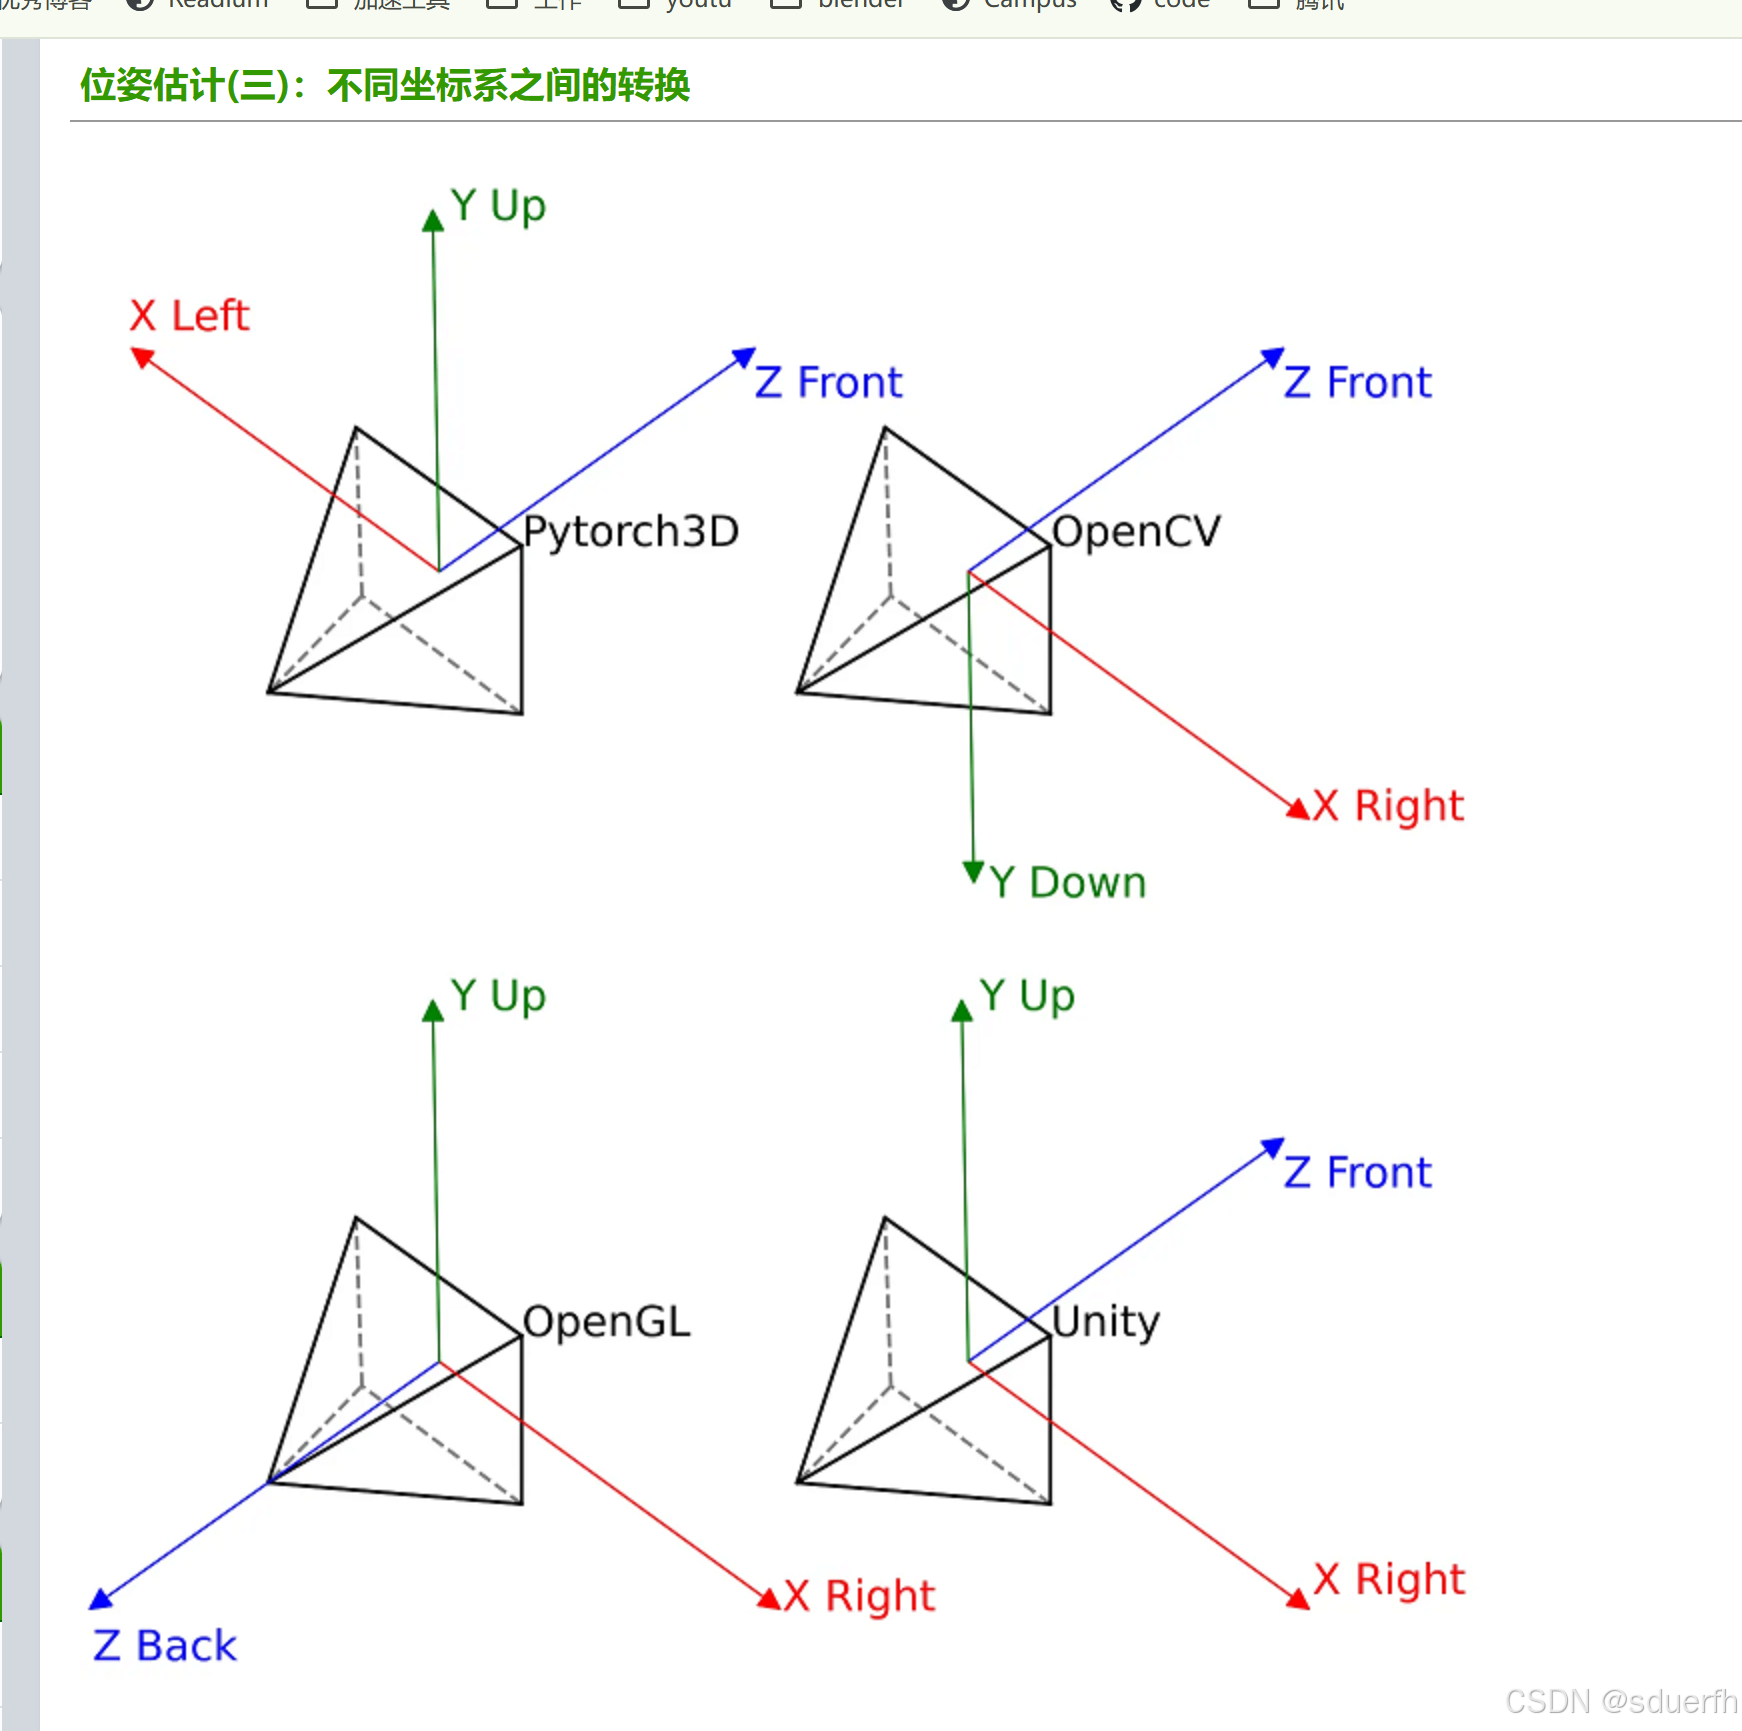
各个系统的坐标系如上图所示, 其中maya的坐标系与OpenGL相同, pytorch3d的坐标系需要将xz轴反向, 具体实现代码如下:
python
        R_py3d = R.clone().T
        T_py3d = T.clone()
        R_py3d[:, [0, 2]] *= -1  # 变换坐标系
        T_py3d[[0, 2]] *= -1
这里的实现参考了 pytorch3d/renderer/camera_conversions.py 中的_cameras_from_opencv_projection 方法, 这个方法是将opencv的相机变成pytorch3d, 这2个变换的相似点是都有一个轴固定, 然后旋转180°
python
def _cameras_from_opencv_projection(
    R: torch.Tensor,
    tvec: torch.Tensor,
    camera_matrix: torch.Tensor,
    image_size: torch.Tensor,
) -> PerspectiveCameras:
    focal_length = torch.stack([camera_matrix[:, 0, 0], camera_matrix[:, 1, 1]], dim=-1)
    principal_point = camera_matrix[:, :2, 2]

    # Retype the image_size correctly and flip to width, height.
    image_size_wh = image_size.to(R).flip(dims=(1,))

    # Screen to NDC conversion:
    # For non square images, we scale the points such that smallest side
    # has range [-1, 1] and the largest side has range [-u, u], with u > 1.
    # This convention is consistent with the PyTorch3D renderer, as well as
    # the transformation function `get_ndc_to_screen_transform`.
    scale = image_size_wh.to(R).min(dim=1, keepdim=True)[0] / 2.0
    scale = scale.expand(-1, 2)
    c0 = image_size_wh / 2.0

    # Get the PyTorch3D focal length and principal point.
    focal_pytorch3d = focal_length / scale
    p0_pytorch3d = -(principal_point - c0) / scale

    # For R, T we flip x, y axes (opencv screen space has an opposite
    # orientation of screen axes).
    # We also transpose R (opencv multiplies points from the opposite=left side).
    R_pytorch3d = R.clone().permute(0, 2, 1)
    T_pytorch3d = tvec.clone()
    R_pytorch3d[:, :, :2] *= -1
    T_pytorch3d[:, :2] *= -1

    return PerspectiveCameras(
        R=R_pytorch3d,
        T=T_pytorch3d,
        focal_length=focal_pytorch3d,
        principal_point=p0_pytorch3d,
        image_size=image_size,
        device=R.device,
    )
其他变换相关的参考资料
blender to pytorch3d camera: https://github.com/facebookresearch/pytorch3d/issues/1105
坑3: 内参的导入问题
读取代码
python
        focal_length = torch.tensor([K[0, 0], K[1, 1]], dtype=torch.float32).unsqueeze(0)
        principal_point = torch.tensor([K[0, 2], K[1, 2]], dtype=torch.float32).unsqueeze(0)
        cameras = PerspectiveCameras(device=self.device, R=R_py3d.unsqueeze(0), T=T_py3d.unsqueeze(0),focal_length=focal_length, principal_point=principal_point, in_ndc=False, image_size=[[1024, 1024]])
这里需要注意, 当输入focal_length与principal_point时, 一定要注意 in_ndc 这个选项!
还需要注意分辨率要与maya设置的渲染分辨率对上, 根据目前的观测, 就是K02 * 2
最终完整代码:
maya相机参数通过如下代码获得:
python
    def query_cam_pos(self, camera_name):
        cam, cam_shape = self.scene["cameras"][camera_name]
        focal_length = cmds.camera(cam_shape, q=True, fl=True)

        inches_to_mm = 25.4
        app_horiz = cmds.camera(cam_shape, q=True, hfa=True) * inches_to_mm
        app_vert = cmds.camera(cam_shape, q=True, vfa=True) * inches_to_mm
        pixel_width = self.config['resolution'][0]
        pixel_height = self.config['resolution'][1]
        focal_length_x_pixel = pixel_width * focal_length / app_horiz
        focal_length_y_pixel = pixel_height * focal_length / app_vert

        translate = cmds.getAttr(cam + ".translate")[0]
        eular_rot = cmds.getAttr(cam + ".rotate")[0]

        # convert_to_opencv_matrix
        K = np.eye(3)
        K[0, 0] = focal_length_x_pixel
        K[1, 1] = focal_length_y_pixel
        K[0, 2] = pixel_width / 2.0
        K[1, 2] = pixel_height / 2.0

        R = utils.eulerAngleToRoatationMatrix(
            (math.radians(eular_rot[0]), math.radians(eular_rot[1]), math.radians(eular_rot[2])))
        return K, R, translate
pytorch3d中相机参数的读取代码
python
		# 将c2w变成w2c
        R = R.T
        T = - R @ T
        # 然后变换坐标轴, 绕y轴转180°
        R_py3d = R.clone().T
        T_py3d = T.clone()
        R_py3d[:, [0, 2]] *= -1  # 变换坐标系
        T_py3d[[0, 2]] *= -1

        focal_length = torch.tensor([K[0, 0], K[1, 1]], dtype=torch.float32).unsqueeze(0)
        principal_point = torch.tensor([K[0, 2], K[1, 2]], dtype=torch.float32).unsqueeze(0)
        cameras = PerspectiveCameras(device=self.device, R=R_py3d.unsqueeze(0), T=T_py3d.unsqueeze(0),
        							focal_length=focal_length, principal_point=principal_point, in_ndc=False,
        							 image_size=[[1024, 1024]])