
前言:零基础学Python:Python从0到100最新最全教程。 想做这件事情很久了,这次我更新了自己所写过的所有博客,汇集成了Python从0到100,共一百节课,帮助大家一个月时间里从零基础到学习Python基础语法、Python爬虫、Web开发、 计算机视觉、机器学习、神经网络以及人工智能相关知识,成为学习学习和学业的先行者!
欢迎大家订阅专栏:零基础学Python:Python从0到100最新最全教程!今天来学习一下如何使用OpenCV实现手势虚拟拖拽,欢迎大家一起前来探讨学习~
一、主要步骤及库的功能介绍
1.主要步骤
要实现本次实验,主要步骤如下:
- 导入OpenCV库。
- 通过OpenCV读取摄像头的视频流。
- 使用肤色检测算法(如色彩空间转换和阈值分割)来识别手部区域。
- 对手部区域进行轮廓检测,找到手的轮廓。
- 根据手的轮廓,获取手指关键点的像素坐标。对于拖拽手势,可以关注食指和中指的位置。
- 计算食指和中指指尖之间的距离并判断是否满足条件触发拖拽动作。
- 如果满足条件,可以使用勾股定理计算距离,并将矩形区域变色以示触发拖拽。
- 根据手指的位置更新矩形的坐标,使矩形跟随手指运动。
- 当手指放开时停止矩形的移动。
2.需要的库介绍
导入的库在实现手势虚拟拖拽的代码中起着重要的作用,下面是对每个库的简要介绍:
-
OpenCV (cv2): OpenCV是一个开源的计算机视觉库 ,提供了丰富的图像和视频处理功能,使用OpenCV来读取摄像头视频流、进行图像处理和计算。
-
mediapipe (mp): mediapipe提供一系列预训练的机器学习模型和工具 ,用于实现计算机视觉和机器学习任务。我们使用mediapipe来进行手部关键点检测和姿势估计。
-
time: 我们使用time库来计时和进行时间相关的操作。
-
math: 在本次实验我们使用math库来计算距离和角度。
二、导入所需要的模块
python
# 导入OpenCV
import cv2
# 导入mediapipe
import mediapipe as mp

# 导入其他依赖包
import time
import math
三、方块管理类
(SquareManager)是一个方块管理器,用于创建、显示、更新和处理方块的相关操作。
1.初始化方块管理器
初始化方块管理器,传入方块的长度(rect_width)作为参数,并初始化方块列表、距离、激活状态和激活的方块ID等属性。
python
class SquareManager:
    def __init__(self, rect_width):
        # 方框长度
        self.rect_width = rect_width

        # 方块列表
        self.square_count = 0
        self.rect_left_x_list = []
        self.rect_left_y_list = []
        self.alpha_list = []

        # 中指与矩形左上角点的距离
        self.L1 = 0
        self.L2 = 0

        # 激活移动模式
        self.drag_active = False

        # 激活的方块ID
        self.active_index = -1
2.创建一个方块
创建一个方块,将方块的左上角坐标和透明度添加到相应的列表中。
python
# 创建一个方块,但是没有显示
    def create(self, rect_left_x, rect_left_y, alpha=0.4):
        # 将方块的左上角坐标和透明度添加到相应的列表中
        self.rect_left_x_list.append(rect_left_x)
        self.rect_left_y_list.append(rect_left_y)
        self.alpha_list.append(alpha)
        self.square_count += 1
3.更新显示方块的位置
根据方块的状态,在图像上绘制方块,并使用透明度将叠加图像叠加到原始图像上。
python
 # 更新显示方块的位置
    def display(self, class_obj):
        # 遍历方块列表
        for i in range(0, self.square_count):
            x = self.rect_left_x_list[i]
            y = self.rect_left_y_list[i]
            alpha = self.alpha_list[i]

            overlay = class_obj.image.copy()
             # 如果方块处于激活状态,绘制紫色方块;否则绘制蓝色方块
            if (i == self.active_index):
                cv2.rectangle(overlay, (x, y), (x + self.rect_width, y + self.rect_width), (255, 0, 255), -1)
            else:
                cv2.rectangle(overlay, (x, y), (x + self.rect_width, y + self.rect_width), (255, 0, 0), -1)

            # 使用透明度将叠加图像叠加到原始图像上
            class_obj.image = cv2.addWeighted(overlay, alpha, class_obj.image, 1 - alpha, 0)
4.判断落点方块
判断给定的坐标是否在方块内,并返回方块的ID。
python
    # 判断落在哪个方块上,返回方块的ID
    def checkOverlay(self, check_x, check_y):
        # 遍历方块列表
        for i in range(0, self.square_count):
            x = self.rect_left_x_list[i]
            y = self.rect_left_y_list[i]

            # 检查指定点是否在方块内
            if (x < check_x < (x + self.rect_width)) and (y < check_y < (y + self.rect_width)):
                # 保存被激活的方块ID
                self.active_index = i
                return i

        return -1
5.计算距离、更新位置
setLen 方法:计算激活方块与指尖的距离。
updateSquare 方法:根据给定的新坐标更新激活方块的位置。
python
    # 计算与指尖的距离
    def setLen(self, check_x, check_y):
        # 计算距离
        self.L1 = check_x - self.rect_left_x_list[self.active_index]
        self.L2 = check_y - self.rect_left_y_list[self.active_index]

    # 更新方块位置
    def updateSquare(self, new_x, new_y):
        self.rect_left_x_list[self.active_index] = new_x - self.L1
        self.rect_left_y_list[self.active_index] = new_y - self.L2
三、识别控制类
1.初始化识别控制类
python
class HandControlVolume:
    def __init__(self):
        # 初始化mediapipe
        self.mp_drawing = mp.solutions.drawing_utils
        self.mp_drawing_styles = mp.solutions.drawing_styles
        self.mp_hands = mp.solutions.hands

        # 中指与矩形左上角点的距离
        self.L1 = 0
        self.L2 = 0

        # image实例,以便另一个类调用
self.image = NoneHandControlVolume用于初始化mediapipe以及存储中指与矩形左上角点的距离和image实例。
__init__方法:在初始化对象时,初始化mediapipe,包括drawing_utils、drawing_styles和hands。此外,还初始化了中指与矩形左上角点的距离和image实例。
通过mediapipe,可以进行手部关键点检测和姿势估计,进而进行手势识别和处理。为了使其他类能够调用image实例,将其作为该类的属性进行存储,方便地处理手势识别和控制操作。
2.主函数
这部分代码主要用于初始化和准备处理视频流以进行手势识别和交互。
python
    def recognize(self):
        # 计算刷新率
        fpsTime = time.time()

        # OpenCV读取视频流
        cap = cv2.VideoCapture(0)
        # 视频分辨率
        resize_w = int(cap.get(cv2.CAP_PROP_FRAME_WIDTH))
        resize_h = int(cap.get(cv2.CAP_PROP_FRAME_HEIGHT))

        # 画面显示初始化参数
        rect_percent_text = 0

        # 初始化方块管理器
        squareManager = SquareManager(150)

        # 创建多个方块
        for i in range(0, 5):
            squareManager.create(200 * i + 20, 200, 0.6)

        with self.mp_hands.Hands(min_detection_confidence=0.7,
                                 min_tracking_confidence=0.5,
                                 max_num_hands=2) as hands:
            while cap.isOpened():

                # 初始化矩形
                success, self.image = cap.read()
                self.image = cv2.resize(self.image, (resize_w, resize_h))

                if not success:
                    print("空帧.")
continue-
resize_w和resize_h:根据摄像头分辨率获取的视频帧的宽度和高度,并作为后续处理的图像尺寸进行缩放。 -
rect_percent_text:画面显示初始化参数,可能被用于屏幕上的文本显示。 -
squareManager:初始化了方块管理器类的实例,并设置方块的长度为150。
使用一个循环,创建了五个方块,并通过create方法将其添加到方块管理器中。进入循环,从视频流中读取帧图像,并将其调整为指定的尺寸。如果成功读取帧图像,则会进一步处理,否则将输出错误消息。
3.提高性能和处理图像
python
                self.image.flags.writeable = False
                # 转为RGB
                self.image = cv2.cvtColor(self.image, cv2.COLOR_BGR2RGB)
                # 镜像
                self.image = cv2.flip(self.image, 1)
                # mediapipe模型处理
                results = hands.process(self.image)

                self.image.flags.writeable = True
self.image = cv2.cvtColor(self.image, cv2.COLOR_RGB2BGR)-
self.image.flags.writeable = False:设置图像为不可写,以提高性能并避免数据拷贝。 -
self.image = cv2.cvtColor(self.image, cv2.COLOR_BGR2RGB):将BGR格式的图像转换为RGB格式,因为mediapipe模型处理的输入图像需要是RGB格式。 -
self.image = cv2.flip(self.image, 1):将图像进行镜像翻转,以与mediapipe模型期望的手部位置对应。 -
results = hands.process(self.image):将处理后的图像传递给mediapipe的hands模型,进行手势识别和处理。 -
self.image = cv2.cvtColor(self.image, cv2.COLOR_RGB2BGR):将图像从RGB格式转换回BGR格式,以便后续的显示和处理。
4.检测手掌,标记关键点和连接关系
python
                if results.multi_hand_landmarks:
                    # 遍历每个手掌
                    for hand_landmarks in results.multi_hand_landmarks:
                        # 在画面标注手指
                        self.mp_drawing.draw_landmarks(
                            self.image,
                            hand_landmarks,
                            self.mp_hands.HAND_CONNECTIONS,
                            self.mp_drawing_styles.get_default_hand_landmarks_style(),
self.mp_drawing_styles.get_default_hand_connections_style())-
if results.multi_hand_landmarks::检查是否检测到手掌。如果有检测到手掌,则进入下一步处理;否则跳过。 -
for hand_landmarks in results.multi_hand_landmarks::遍历检测到的每个手掌。 -
self.mp_drawing.draw_landmarks:使用mediapipe的draw_landmarks方法,在图像上标记手指的关键点和连接关系。
self.image:输入的图像。hand_landmarks:手掌的关键点。
self.mp_hands.HAND_CONNECTIONS:手指之间的连接关系。
5.解析检测到的手掌并提取手指的关键点
检测到的手掌并提取手指的关键点,然后将手指的坐标存储起来。
python
                        landmark_list = []

                        # 用来存储手掌范围的矩形坐标
                        paw_x_list = []
                        paw_y_list = []
                        for landmark_id, finger_axis in enumerate(
                                hand_landmarks.landmark):
                            landmark_list.append([
                                landmark_id, finger_axis.x, finger_axis.y,
                                finger_axis.z
                            ])
                            paw_x_list.append(finger_axis.x)
                            paw_y_list.append(finger_axis.y)
                        if landmark_list:
                            # 比例缩放到像素
                            ratio_x_to_pixel = lambda x: math.ceil(x * resize_w)
                            ratio_y_to_pixel = lambda y: math.ceil(y * resize_h)

                            # 设计手掌左上角、右下角坐标
                            paw_left_top_x, paw_right_bottom_x = map(ratio_x_to_pixel,
                                                                     [min(paw_x_list), max(paw_x_list)])
                            paw_left_top_y, paw_right_bottom_y = map(ratio_y_to_pixel,
                                                                     [min(paw_y_list), max(paw_y_list)])

                            # 给手掌画框框
                            cv2.rectangle(self.image, (paw_left_top_x - 30, paw_left_top_y - 30),
                                          (paw_right_bottom_x + 30, paw_right_bottom_y + 30), (0, 255, 0), 2)

                            # 获取中指指尖坐标
                            middle_finger_tip = landmark_list[12]
                            middle_finger_tip_x = ratio_x_to_pixel(middle_finger_tip[1])
                            middle_finger_tip_y = ratio_y_to_pixel(middle_finger_tip[2])

                            # 获取食指指尖坐标
                            index_finger_tip = landmark_list[8]
                            index_finger_tip_x = ratio_x_to_pixel(index_finger_tip[1])
                            index_finger_tip_y = ratio_y_to_pixel(index_finger_tip[2])
                            # 中间点
                            between_finger_tip = (middle_finger_tip_x + index_finger_tip_x) // 2, (
                                        middle_finger_tip_y + index_finger_tip_y) // 2

                            thumb_finger_point = (middle_finger_tip_x, middle_finger_tip_y)
index_finger_point = (index_finger_tip_x, index_finger_tip_y)-
landmark_list:一个列表,用于存储手指的关键点信息。 -
paw_x_list和paw_y_list:用于存储手掌范围的矩形框的横纵坐标。 -
在循环中,将每个手指的关键点的索引、x坐标、y坐标和z坐标存储在
landmark_list中,同时将手掌范围的横纵坐标存储在paw_x_list和paw_y_list中。
如果landmark_list不为空,即有手指的关键点被检测到ratio_x_to_pixel 和 ratio_y_to_pixel:两个lambda函数,用于将相对比例转换为像素坐标的函数。根据手掌范围的矩形坐标,计算手掌区域的左上角和右下角坐标,并画出方框。使用landmark_list中的信息获取中指指尖坐标和食指指尖坐标,并将它们转换为像素坐标。计算中指指尖坐标和食指指尖坐标的中间点。将中指指尖的坐标和食指指尖的坐标存储在thumb_finger_point和index_finger_point中。
解析检测到的手掌信息,并提取手指的关键点坐标,将手指坐标转换为像素坐标,并将中指指尖和食指指尖的位置标记在图像上。
6.绘制指尖圆圈和连接线,计算距离
python
                            circle_func = lambda point: cv2.circle(self.image, point, 10, (255, 0, 255), -1)
                            self.image = circle_func(thumb_finger_point)
                            self.image = circle_func(index_finger_point)
                            self.image = circle_func(between_finger_tip)
                            # 画2点连线
                            self.image = cv2.line(self.image, thumb_finger_point, index_finger_point, (255, 0, 255), 5)
                            # 勾股定理计算长度
                            line_len = math.hypot((index_finger_tip_x - middle_finger_tip_x),
                                                  (index_finger_tip_y - middle_finger_tip_y))
                            # 将指尖距离映射到文字
rect_percent_text = math.ceil(line_len)-
cv2.line函数,在图像上绘制中指指尖和食指指尖之间的连接线。 -
math.hypot函数计算直角三角形斜边的长度。 -
将指尖之间的距离映射到
rect_percent_text变量中,用作后续文本显示的参数。
7.跟踪手指之间的距离
python
                            if squareManager.drag_active:
                                # 更新方块
                                squareManager.updateSquare(between_finger_tip[0], between_finger_tip[1])
                                if (line_len > 100):
                                    # 取消激活
                                    squareManager.drag_active = False
                                    squareManager.active_index = -1

                            elif (line_len < 100) and (squareManager.checkOverlay(between_finger_tip[0],
                                                                                  between_finger_tip[1]) != -1) and (
                                    squareManager.drag_active == False):
                                # 激活
                                squareManager.drag_active = True
                                # 计算距离
squareManager.setLen(between_finger_tip[0], between_finger_tip[1])如果squareManager的drag_active属性为True,即矩形的移动模式已经激活,使用squareManager.updateSquare方法更新矩形的位置。如果两个手指之间的距离大于100,即手指之间的距离超过了阈值,取消矩形的激活模式,将drag_active设置为False,将active_index设置为-1。
否则,如果两个手指之间的距离小于100,且手指之间存在重叠的矩形,并且矩形的移动模式未激活。激活矩形的移动模式,将drag_active设置为True。根据手指之间的距离,计算并设置矩形的长度,使用squareManager.setLen方法。
8.显示图像
python
                squareManager.display(self)

                # 显示距离
                cv2.putText(self.image, "Distance:" + str(rect_percent_text), (10, 120), cv2.FONT_HERSHEY_PLAIN, 3,
                            (255, 0, 0), 3)

                # 显示当前激活
                cv2.putText(self.image, "Active:" + (
                    "None" if squareManager.active_index == -1 else str(squareManager.active_index)), (10, 170),
                            cv2.FONT_HERSHEY_PLAIN, 3, (255, 0, 0), 3)

                # 显示刷新率FPS
                cTime = time.time()
                fps_text = 1 / (cTime - fpsTime)
                fpsTime = cTime
                cv2.putText(self.image, "FPS: " + str(int(fps_text)), (10, 70),
                            cv2.FONT_HERSHEY_PLAIN, 3, (255, 0, 0), 3)
                # 显示画面
                cv2.imshow('virtual drag and drop', self.image)

                if cv2.waitKey(5) & 0xFF == 27:
                    break
            cap.release()

control = HandControlVolume()
control.recognize()主函数(recognize)的结尾部分,用于显示图像、矩形的状态和刷新率,并等待按键响应。使用squareManager.display方法显示矩形。cv2.waitKey函数等待按键输入,如果按下的键是ESC键(对应的ASCII码为27),则退出循环。
在屏幕上显示处理后的图像、矩形的状态和刷新率,并等待按键响应。这样可以实现交互式的虚拟拖放功能。接下来我们看一下实际的操作效果。
四、实战演示
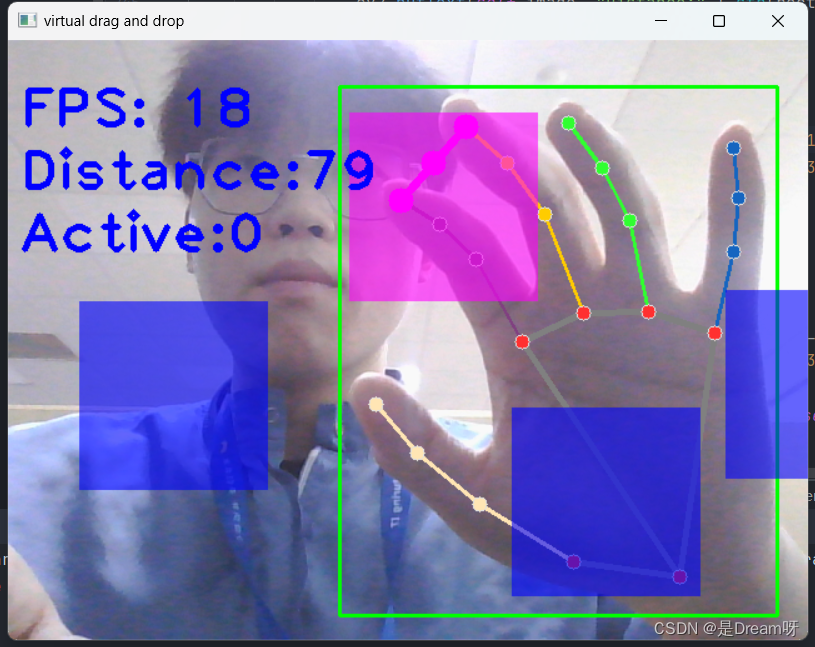


通过演示我们可以实现通过手部对方块进行拖拽,效果可以达到良好的状态。
五、源码分享
python
import cv2
import mediapipe as mp
import time
import math
class SquareManager:
    def __init__(self, rect_width):

        # 方框长度
        self.rect_width = rect_width

        # 方块list
        self.square_count = 0
        self.rect_left_x_list = []
        self.rect_left_y_list = []
        self.alpha_list = []

        # 中指与矩形左上角点的距离
        self.L1 = 0
        self.L2 = 0

        # 激活移动模式
        self.drag_active = False

        # 激活的方块ID
        self.active_index = -1

    # 创建一个方块,但是没有显示
    def create(self, rect_left_x, rect_left_y, alpha=0.4):
        self.rect_left_x_list.append(rect_left_x)
        self.rect_left_y_list.append(rect_left_y)
        self.alpha_list.append(alpha)
        self.square_count += 1

    # 更新位置
    def display(self, class_obj):
        for i in range(0, self.square_count):
            x = self.rect_left_x_list[i]
            y = self.rect_left_y_list[i]
            alpha = self.alpha_list[i]

            overlay = class_obj.image.copy()

            if (i == self.active_index):
                cv2.rectangle(overlay, (x, y), (x + self.rect_width, y + self.rect_width), (255, 0, 255), -1)
            else:
                cv2.rectangle(overlay, (x, y), (x + self.rect_width, y + self.rect_width), (255, 0, 0), -1)

            # Following line overlays transparent rectangle over the self.image
            class_obj.image = cv2.addWeighted(overlay, alpha, class_obj.image, 1 - alpha, 0)

    # 判断落在哪个方块上,返回方块的ID
    def checkOverlay(self, check_x, check_y):
        for i in range(0, self.square_count):
            x = self.rect_left_x_list[i]
            y = self.rect_left_y_list[i]

            if (x < check_x < (x + self.rect_width)) and (y < check_y < (y + self.rect_width)):
                # 保存被激活的方块ID
                self.active_index = i

                return i

        return -1

    # 计算与指尖的距离
    def setLen(self, check_x, check_y):
        # 计算距离
        self.L1 = check_x - self.rect_left_x_list[self.active_index]
        self.L2 = check_y - self.rect_left_y_list[self.active_index]

    # 更新方块
    def updateSquare(self, new_x, new_y):
        # print(self.rect_left_x_list[self.active_index])
        self.rect_left_x_list[self.active_index] = new_x - self.L1
        self.rect_left_y_list[self.active_index] = new_y - self.L2


# 识别控制类
class HandControlVolume:
    def __init__(self):
        # 初始化medialpipe
        self.mp_drawing = mp.solutions.drawing_utils
        self.mp_drawing_styles = mp.solutions.drawing_styles
        self.mp_hands = mp.solutions.hands

        # 中指与矩形左上角点的距离
        self.L1 = 0
        self.L2 = 0

        # image实例,以便另一个类调用
        self.image = None

    # 主函数
    def recognize(self):
        # 计算刷新率
        fpsTime = time.time()

        # OpenCV读取视频流
        cap = cv2.VideoCapture(0)
        # 视频分辨率
        resize_w = int(cap.get(cv2.CAP_PROP_FRAME_WIDTH))
        resize_h = int(cap.get(cv2.CAP_PROP_FRAME_HEIGHT))

        # 画面显示初始化参数
        rect_percent_text = 0

        # 初始化方块管理器
        squareManager = SquareManager(150)

        # 创建多个方块
        for i in range(0, 5):
            squareManager.create(200 * i + 20, 200, 0.6)

        with self.mp_hands.Hands(min_detection_confidence=0.7,
                                 min_tracking_confidence=0.5,
                                 max_num_hands=2) as hands:
            while cap.isOpened():

                # 初始化矩形
                success, self.image = cap.read()
                self.image = cv2.resize(self.image, (resize_w, resize_h))

                if not success:
                    print("空帧.")
                    continue

                # 提高性能
                self.image.flags.writeable = False
                # 转为RGB
                self.image = cv2.cvtColor(self.image, cv2.COLOR_BGR2RGB)
                # 镜像
                self.image = cv2.flip(self.image, 1)
                # mediapipe模型处理
                results = hands.process(self.image)

                self.image.flags.writeable = True
                self.image = cv2.cvtColor(self.image, cv2.COLOR_RGB2BGR)
                # 判断是否有手掌
                if results.multi_hand_landmarks:
                    # 遍历每个手掌
                    for hand_landmarks in results.multi_hand_landmarks:
                        # 在画面标注手指
                        self.mp_drawing.draw_landmarks(
                            self.image,
                            hand_landmarks,
                            self.mp_hands.HAND_CONNECTIONS,
                            self.mp_drawing_styles.get_default_hand_landmarks_style(),
                            self.mp_drawing_styles.get_default_hand_connections_style())

                        # 解析手指,存入各个手指坐标
                        landmark_list = []

                        # 用来存储手掌范围的矩形坐标
                        paw_x_list = []
                        paw_y_list = []
                        for landmark_id, finger_axis in enumerate(
                                hand_landmarks.landmark):
                            landmark_list.append([
                                landmark_id, finger_axis.x, finger_axis.y,
                                finger_axis.z
                            ])
                            paw_x_list.append(finger_axis.x)
                            paw_y_list.append(finger_axis.y)
                        if landmark_list:
                            # 比例缩放到像素
                            ratio_x_to_pixel = lambda x: math.ceil(x * resize_w)
                            ratio_y_to_pixel = lambda y: math.ceil(y * resize_h)

                            # 设计手掌左上角、右下角坐标
                            paw_left_top_x, paw_right_bottom_x = map(ratio_x_to_pixel,
                                                                     [min(paw_x_list), max(paw_x_list)])
                            paw_left_top_y, paw_right_bottom_y = map(ratio_y_to_pixel,
                                                                     [min(paw_y_list), max(paw_y_list)])

                            # 给手掌画框框
                            cv2.rectangle(self.image, (paw_left_top_x - 30, paw_left_top_y - 30),
                                          (paw_right_bottom_x + 30, paw_right_bottom_y + 30), (0, 255, 0), 2)

                            # 获取中指指尖坐标
                            middle_finger_tip = landmark_list[12]
                            middle_finger_tip_x = ratio_x_to_pixel(middle_finger_tip[1])
                            middle_finger_tip_y = ratio_y_to_pixel(middle_finger_tip[2])

                            # 获取食指指尖坐标
                            index_finger_tip = landmark_list[8]
                            index_finger_tip_x = ratio_x_to_pixel(index_finger_tip[1])
                            index_finger_tip_y = ratio_y_to_pixel(index_finger_tip[2])
                            # 中间点
                            between_finger_tip = (middle_finger_tip_x + index_finger_tip_x) // 2, (
                                        middle_finger_tip_y + index_finger_tip_y) // 2
                            # print(middle_finger_tip_x)
                            thumb_finger_point = (middle_finger_tip_x, middle_finger_tip_y)
                            index_finger_point = (index_finger_tip_x, index_finger_tip_y)
                            # 画指尖2点
                            circle_func = lambda point: cv2.circle(self.image, point, 10, (255, 0, 255), -1)
                            self.image = circle_func(thumb_finger_point)
                            self.image = circle_func(index_finger_point)
                            self.image = circle_func(between_finger_tip)
                            # 画2点连线
                            self.image = cv2.line(self.image, thumb_finger_point, index_finger_point, (255, 0, 255), 5)
                            # 勾股定理计算长度
                            line_len = math.hypot((index_finger_tip_x - middle_finger_tip_x),
                                                  (index_finger_tip_y - middle_finger_tip_y))
                            # 将指尖距离映射到文字
                            rect_percent_text = math.ceil(line_len)

                            # 激活模式,需要让矩形跟随移动
                            if squareManager.drag_active:
                                # 更新方块
                                squareManager.updateSquare(between_finger_tip[0], between_finger_tip[1])
                                if (line_len > 100):
                                    # 取消激活
                                    squareManager.drag_active = False
                                    squareManager.active_index = -1

                            elif (line_len < 100) and (squareManager.checkOverlay(between_finger_tip[0],
                                                                                  between_finger_tip[1]) != -1) and (
                                    squareManager.drag_active == False):
                                # 激活
                                squareManager.drag_active = True
                                # 计算距离
                                squareManager.setLen(between_finger_tip[0], between_finger_tip[1])

                # 显示方块,传入本实例,主要为了半透明的处理
                squareManager.display(self)

                # 显示距离
                cv2.putText(self.image, "Distance:" + str(rect_percent_text), (10, 120), cv2.FONT_HERSHEY_PLAIN, 3,
                            (255, 0, 0), 3)

                # 显示当前激活
                cv2.putText(self.image, "Active:" + (
                    "None" if squareManager.active_index == -1 else str(squareManager.active_index)), (10, 170),
                            cv2.FONT_HERSHEY_PLAIN, 3, (255, 0, 0), 3)

                # 显示刷新率FPS
                cTime = time.time()
                fps_text = 1 / (cTime - fpsTime)
                fpsTime = cTime
                cv2.putText(self.image, "FPS: " + str(int(fps_text)), (10, 70),
                            cv2.FONT_HERSHEY_PLAIN, 3, (255, 0, 0), 3)
                # 显示画面
                cv2.imshow('virtual drag and drop', self.image)

                if cv2.waitKey(5) & 0xFF == 27:
                    break
            cap.release()

control = HandControlVolume()
control.recognize()
文末送书
Dream送书活动------第四十五期
《Python数据分析、挖掘与可视化从入门到精通》免费包邮送三本! 参与方式:1.点赞收藏文章
2.在评论区留言:人生苦短,我用Python!(多可评论三条)
3.随机抽取3位免费送出!
4.截止时间: 2024-11-26
5.上期中奖名单:一寸星河、Ws_、霁雨485,请三天内私信我提供获奖信息
本期推荐:
Python数据分析、挖掘与可视化从入门到精通
京东链接:https://item.jd.com/12740890.html
当当链接:http://product.dangdang.com/28476522.html
13个知识模块+60个实操场景+AI工具使用方法,多场景落地新手辅助入门,轻松调教出24小时工作助手,让一人胜过一个团队。
关键点:(1)理论讲解与实践结合。每个理论都有对应的实践代码讲解,读者参考源代码,完成实例,就可以看到实验效果。
(2)知识教学与课后练习。大部分章节末尾都配备思考与练习题,旨在帮助读者巩固所学知识,并达到学以致用的目的。
(3)综合实战,学以致用。通过最后两章完整案例的学习,可以帮助读者针对特定场景快速设计数据分析与挖掘的方案。
(4)配套资源,轻松学会。赠送书中同步实例的相关源代码文件+重点知识的教学视频+制作精美的PPT课件。
内容简介笔者根据自己多年的数据分析与挖掘经验,从零基础读者的角度,详尽地介绍了Python数据分析与挖掘的基础知识及大量的实战案例。
全书分为4篇,第1篇是基础入门篇,主要介绍数据分析与挖掘的基本概念及Python语言的数据分析基础;第2篇是数据分析篇,主要介绍常用的数据分析方法;第3篇是数据挖掘篇,主要介绍常用的数据挖掘方法;第4篇是实战应用篇,介绍两个完整的数据分析与挖掘案例,让读者了解如何系统地应用前面学到的各种方法解决实际问题。对于书中的大部分章节,笔者还结合实际工作及面试经验,精心配备了大量高质量的练习题,供读者边学边练,以便更好地掌握本书内容。
本书配备所有案例的源码,适合有一定数学基础的读者使用,但不要求读者具备编程基础,适合刚入行的数据分析人员或从事与数据相关工作、对数据感兴趣的人员,也适合从事其他岗位但想掌握一定的数据分析能力的职场人员,还可以作为大中专院校相关专业的教学参考用书。
作者简介熊熙,博士,成都信息工程大学网络空间安全学院副教授,硕士研究生导师,成都电子行业新经济产业专家,CCF会员,CCF计算机应用专委会执行委员。曾在大唐移动通信设备有限公司担任高级软件工程师,研究方向包括数据挖掘与分析、自然语言处理与知识图谱、信息抽取与推荐算法、工业互联网等。主持和主研国家级和省部级以上项目8项。
张雪莲,硕士,四川大学锦江学院讲师,大学计算机基础教研室主任助理,CCF会员。多年来一直从事软件工程相关课程的教学工作,具有丰富的实践教学经验。
