#本篇只是随笔小记
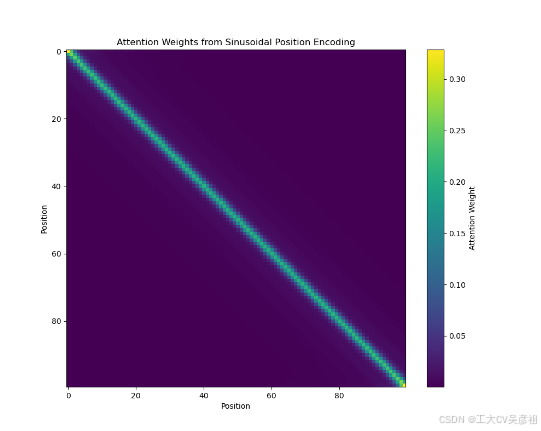
试了一下,拿正弦位置编码直接做自注意力,如果手算注意力权重,应该是这样的:
python
attention_scores = torch.matmul(pos_x, pos_x.T)/512**0.5  # (seq_len, seq_len)

# 应用 softmax 来获得注意力权重
attention_weights = torch.softmax(attention_scores, dim=-1)
可视化的效果是这样的:
如果用nn.MultiheadAttention返回注意力权重矩阵,应该是这样的:
python
q = torch.tensor(pos_x)
q = q.reshape(100,512)
q = q[:,None,:]
print(q.shape)
self_attn = nn.MultiheadAttention(num_pos_feats, num_heads=2)
# 手动设置权重和偏置为单位矩阵和零
#identity = torch.eye(512)
#self_attn.in_proj_weight.data = torch.cat([identity, identity, identity])
#self_attn.in_proj_bias.data = torch.zeros(3 * 512)
temp = self_attn(q, q, q)[1]
print(temp)
temp = temp.squeeze().detach().numpy()
#temp = temp.detach().numpy()
print(temp.shape)
可视化结果是这样的
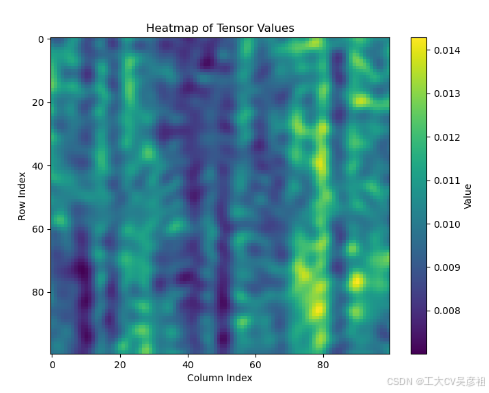
显然不对,问题出在哪?
原因是nn.MultiheadAttention中对QKV有各自的投射层改变了向量,现在将投射向量全改成单位矩阵,偏置全置为0,代码如下
python
q = torch.tensor(pos_x)
q = q.reshape(100,512)
q = q[:,None,:]
print(q.shape)
self_attn = nn.MultiheadAttention(num_pos_feats, num_heads=2)
# 手动设置权重和偏置为单位矩阵和零
identity = torch.eye(512)
self_attn.in_proj_weight.data = torch.cat([identity, identity, identity])
self_attn.in_proj_bias.data = torch.zeros(3 * 512)
temp = self_attn(q, q, q)[1]
print(temp)
temp = temp.squeeze().detach().numpy()
#temp = temp.detach().numpy()
print(temp.shape)
可视化如下
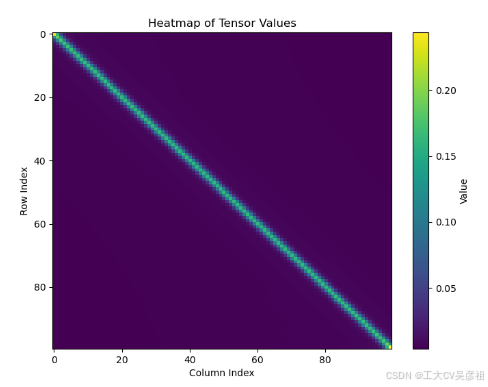
ok,即为所得,总体代码如下:
python
import torch
import numpy as np
import math

from torch import nn
import matplotlib.pyplot as plt

torch.manual_seed(0)
np.random.seed(0)

# 正余弦位置编码
num_pos_feats = 512
temperature = 10000
normalize = False
scale = 2 * math.pi#圆周率

a = np.array([[1, 2, 3], [4, 5, 6], [7, 8, 9]])
a = torch.tensor(a)
#mask = [[False, False, False, True], [False, False, False, True], [False, False, False, True], [True, True, True, True]]
#mask = [[False, False, False, False], [False, False, False, False], [False, False, False, False], [False, False, False, False]]
mask = [[False for _ in range(100)] for _ in range(100)]
mask = torch.tensor(mask)
#print(mask)
assert mask is not None
not_mask = ~mask
#print(not_mask)
y_embed = not_mask.cumsum(0, dtype=torch.float32)
x_embed = not_mask.cumsum(1, dtype=torch.float32)
#print(y_embed)
print(x_embed)

if normalize:
    eps = 1e-6
    # b = a[i:j:s]表示:i,j与上面的一样,但s表示步进,缺省为1.
    # 所以a[i:j:1]相当于a[i:j]
    # 当s<0时,i缺省时,默认为-1. j缺省时,默认为-len(a)-1
    # 所以a[::-1]相当于 a[-1:-len(a)-1:-1],也就是从最后一个元素到第一个元素复制一遍,即倒序。
    # 对于X[:,:,m:n]是取三维矩阵中第m维到第n-1维的所有数据
    # 归一化
    y_embed = y_embed / (y_embed[-1:, :] + eps) * scale  # y_embed[:, -1:, :]代表取三维数据中的最后一行数据
    x_embed = x_embed / (x_embed[:, -1:] + eps) * scale  # x_embed[:, :, -1:]代表取三维数据中的最后一列数据
    #print(y_embed)
    print(x_embed)
dim_t1 = torch.arange(num_pos_feats, dtype=torch.float32, device=a.device)
#print(dim_t1)
dim_t = temperature ** (2 * (dim_t1 // 2) / num_pos_feats)  # i=dim_t1 // 2
#print(dim_t)
pos_x = x_embed[:, :, None] / dim_t
pos_x = pos_x[0]
pos_y = y_embed[:, :, None] / dim_t
print(pos_x)
#print(pos_y)
pos_x = torch.stack((pos_x[ :, 0::2].sin(), pos_x[ :, 1::2].cos()), dim=2).flatten(1)  # 不降维
pos_y = torch.stack((pos_y[ :, 0::2].sin(), pos_y[ :, 1::2].cos()), dim=2).flatten(1)  # 不降维
print(pos_x)
#print(pos_y)
#pos = torch.cat((pos_y, pos_x), dim=2)
#print(pos)
#print(pos.shape)

attention_scores = torch.matmul(pos_x, pos_x.T)/512**0.5  # (seq_len, seq_len)

# 应用 softmax 来获得注意力权重
attention_weights = torch.softmax(attention_scores, dim=-1)

# 可视化注意力权重
plt.figure(figsize=(10, 8))
plt.imshow(attention_weights.detach().numpy(), cmap='viridis', aspect='auto')
plt.colorbar(label='Attention Weight')
plt.title('Attention Weights from Sinusoidal Position Encoding')
plt.xlabel('Position')
plt.ylabel('Position')
plt.show()


q = torch.tensor(pos_x)
q = q.reshape(100,512)
q = q[:,None,:]
print(q.shape)
self_attn = nn.MultiheadAttention(num_pos_feats, num_heads=2)
# 手动设置权重和偏置为单位矩阵和零
identity = torch.eye(512)
self_attn.in_proj_weight.data = torch.cat([identity, identity, identity])
self_attn.in_proj_bias.data = torch.zeros(3 * 512)
temp = self_attn(q, q, q)[1]
print(temp)
temp = temp.squeeze().detach().numpy()
#temp = temp.detach().numpy()
print(temp.shape)


# 绘制热图
plt.figure(figsize=(8, 6))

plt.imshow(temp, cmap='viridis', aspect='auto')
plt.colorbar(label='Value')  # 添加颜色条
plt.title('Heatmap of Tensor Values')
plt.xlabel('Column Index')
plt.ylabel('Row Index')

# 显示图形
plt.show()