1.介绍
VuePress 由两部分组成:第一部分是一个极简静态网站生成器 (opens new window),它包含由 Vue 驱动的主题系统和插件 API,另一个部分是为书写技术文档而优化的默认主题,它的诞生初衷是为了支持 Vue 及其子项目的文档需求。
每一个由 VuePress 生成的页面都带有预渲染好的 HTML,也因此具有非常好的加载性能和搜索引擎优化(SEO)。同时,一旦页面被加载,Vue 将接管这些静态内容,并将其转换成一个完整的单页应用(SPA),其他的页面则会只在用户浏览到的时候才按需加载。2.创建项目
# 安装
yarn global add vuepress # 或者:npm install -g vuepress
# 初始化项目
npm init -y
# 创建一个 docs文件夹
mkdir docs
# 新建一个 markdown 文件
echo '# Hello VuePress!' > README.md
# 在 package.json 中 配置
{
"scripts": {
"docs:dev": "vuepress dev docs",
"docs:build": "vuepress build docs"
}
}
# 启动项目
yarn docs:dev # npm run docs:dev
# 构建静态文件
vuepress build .3.配置首页
在docs\README.md文件
---
home: true
# heroImage: /hero.png
heroText: Hero 标题
tagline: Hero 副标题
actionText: 快速上手 →
actionLink: /zh/guide/
features:
- title: 简洁至上
  details: 以 Markdown 为中心的项目结构,以最少的配置帮助你专注于写作。
- title: Vue驱动
  details: 享受 Vue + webpack 的开发体验,在 Markdown 中使用 Vue 组件,同时可以使用 Vue 来开发自定义主题。
- title: 高性能
  details: VuePress 为每个页面预渲染生成静态的 HTML,同时在页面被加载的时候,将作为 SPA 运行。
footer: MIT Licensed | Copyright © 2018-present Evan You
---
4.默认页面路由地址如下:
| 文件的相对路径 | 页面路由地址 |
|---|---|
/README.md |
/ |
/guide/README.md |
/guide/ |
/config.md |
/config.html |
5.导航栏配置
在.vuepress/config.js
module.exports = {
themeConfig: {
logo: '/assets/img/hero.png', //设置图标 图片存放位置docs\.vuepress\public\assets\img\hero.png
navbar: true, //是否显示导航栏 false 不显示 true 显示
// 设置导航栏
nav: [
{ text: 'Home', link: '/' },
{ text: 'vue', link: '/vue/' },
{ text: 'External', link: 'https://google.com' }, //跳转页面
// 配置存在下拉框的
{
text: 'Languages',
items: [
{ text: 'Group1', items: [{ text: 'vue', link: '/vue/' }] },
{ text: 'Group2', items: [{ text: 'vue', link: '/vue/' }] }
]
}
]
}
}
注意可以在某个页面添加如下代码表示当前页面不存在导航栏
---
navbar: false
---6.侧边栏配置
在.vuepress/config.js配置
module.exports = {
themeConfig: {
sidebar: 'auto', // 侧边栏是否自动生成 false 关闭 true 自动生成
}
}
注意可以在某个页面添加如下代码表示当前页面不显示侧边栏
---
sidebar: false //表示当前页面不显示侧边栏
---
---
sidebar: auto //表示当前页面自动生成侧边栏
---
显示多个侧边栏
创建文件目录结构
├─ README.md
├─ contact.md
├─ about.md
├─ foo/
│ ├─ README.md
│ ├─ one.md
│ └─ two.md
└─ bar/
├─ README.md
├─ three.md
└─ four.md
在.vuepress/config.js配置
module.exports = {
themeConfig: {
sidebar: {
'/foo/': [
'', /* /foo/ */
'one', /* /foo/one.html */
'two' /* /foo/two.html */
],
'/bar/': [
'', /* /bar/ */
'three', /* /bar/three.html */
'four' /* /bar/four.html */
],
// fallback
'/': [
'', /* / */
'contact', /* /contact.html */
'about' /* /about.html */
]
}
}
}7.基础配置
在.vuepress/config.js配置
module.exports = {
  base: '/docs/', //部署站点的基础路径
  title: '小陈同学', // 网站标题
  description: '学习笔记', // 描述
   head: [
     ['link', { rel: 'icon', href: '/favicon.ico' }]
    ['meta', { name: 'author', content: '小陈同学' }],
    ['meta', { name: 'keywords', content: '学习笔记' }],
  ],
}
8.配置更新时间
1.下载插件
npm i moment
2.在.vuepress/config.js配置
const moment = require('moment')
module.exports = {
    plugins: [
        [
          '@vuepress/last-updated',
          {
            transformer: (timestamp) => {
              moment.locale('zh-CN')
              return moment(timestamp).format('YYYY-MM-DD HH:mm:ss')
            }
          }
        ]
      ],
    themeConfig: {
        lastUpdated: '更新时间', // 显示更新时间
    }
}
9.发布到Github上
1.在package.json配置
"scripts": {
"docs:build": "vuepress build docs",
"deploy": "bash deploy.sh"
},
2.创建deploy.sh文件
# 确保脚本抛出遇到的错误
set -e
# 生成静态文件
npm run docs:build
# 进入生成的文件夹
cd docs/.vuepress/dist
# 如果是发布到自定义域名
# echo 'www.example.com' > CNAME
git init
git add -A
git commit -m 'deploy'
# 如果发布到 https://<USERNAME>.github.io/<REPO>
# git push -f git@github.com:<USERNAME>/<REPO>.git master:gh-pages
cd -10.配置pwd
1.安装插件
npm install -D @vuepress/plugin-pwa
2.本地安装
npm install -D vuepress
3.在 .vuepress/public 提供 Manifest 和 icons
4.在 .vuepress/config.js配置
module.exports = {
  head: [
    ['link', { rel: 'icon', href: '/logo.png' }],
    ['link', { rel: 'manifest', href: '/manifest.json' }],
    ['meta', { name: 'theme-color', content: '#3eaf7c' }],
    ['meta', { name: 'apple-mobile-web-app-capable', content: 'yes' }],
    ['meta', { name: 'apple-mobile-web-app-status-bar-style', content: 'black' }],
    ['link', { rel: 'apple-touch-icon', href: '/icons/apple-touch-icon-152x152.png' }],
    ['link', { rel: 'mask-icon', href: '/icons/safari-pinned-tab.svg', color: '#3eaf7c' }],
    ['meta', { name: 'msapplication-TileImage', content: '/icons/msapplication-icon-144x144.png' }],
    ['meta', { name: 'msapplication-TileColor', content: '#000000' }]
  ],
  plugins: [
  	...,
  	[
      '@vuepress/pwa',
      {
        serviceWorker: true,
        updatePopup: {
          message: '发现新内容可用',
          buttonText: '刷新'
        }
      }
    ]
   ],
}
11.Vssus使用
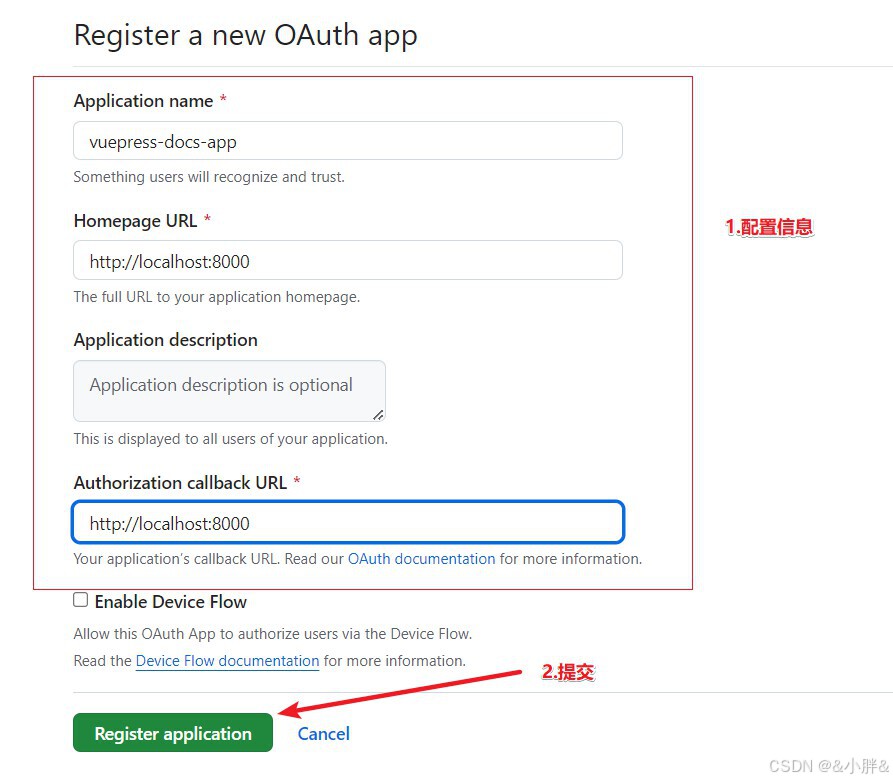
1.创建一个OAuth APP
2.填写信息
3.下载依赖
npm install @vssue/vuepress-plugin-vssue
npm install @vssue/api-github-v4
4.配置 .vuepress/config.js
module.exports = {
  plugins: {
  	...,
    '@vssue/vuepress-plugin-vssue': {
      platform: 'github-v4', //您应该设置platform而不是api包本身。
      // 其他vssue配置
      owner: 'OWNER_OF_REPO',  //对应 repository 的拥有者帐号或者团队
      repo: 'NAME_OF_REPO', //用来存储评论的 repository
      clientId: 'YOUR_CLIENT_ID',  //OAuth App 的 client id
      clientSecret: 'YOUR_CLIENT_SECRET', //OAuth App 的 client secret
      autoCreateIssue: true // 自动创建评论,默认是false,最好开启,这样首次进入页面的时候就不用去点击创建评论的按钮了。
    },
  },
};
5.使用
<Vssue />12.back to top
1.介绍
 返回顶部按钮
2.下载依赖
npm install -D @vuepress/plugin-back-to-top
3.配置.vuepress/config.js
module.exports = {
  plugins: {
  	...,
  	'@vuepress/back-to-top': true
  }
}
13.MarKdown使用
1.创建docs\.vuepress\components文件夹
2.在components中创建vue文件
3.创建一个.md文件
	<CountUp />  // 使用创建的vue文件
	<<< @/docs/.vuepress/components/CountUp.vue  //显示vue文件中的代码
14.使用图片缩放
1.下载插件
npm install -D @vuepress/plugin-medium-zoom
2.配置
plugins: [
...,
[
'@vuepress/medium-zoom',
{
selector: 'img',
}
]
]
3.使用
方法一: <img :src="$withBase('./assets/image/vuess.jpg')" alt="foo">
方法二: 15.配置自动生成侧边栏
1.下载依赖
npm i vuepress-plugin-auto-sidebar -D
2.配置
 plugins: [
   ...,
     [
    	'vuepress-plugin-auto-sidebar',
    	{
     	 // options
     	 nav: true //生成导航栏文件
   		}
  	 ]
 ]
3.去掉配置中的sidebar属性
 themeConfig: {
 // sidebar: 'auto', // 侧边栏是否自动生成 false 关	闭 true 自动生成
  }
4.配置package.json
  "scripts": {
    "docs:nav": "vuepress nav docs" // 创建导航栏文件
  },
5.执行npm run docs:nav生成nav.js文件存放导航栏数据
6.配置docs\.vuepress\config.js
    // 导入导航栏
    const navConfig = require('./nav.js')
    module.exports = {
      themeConfig: {
      	...,
        // 设置导航栏
        nav: navConfig
      }
    }