一、插槽
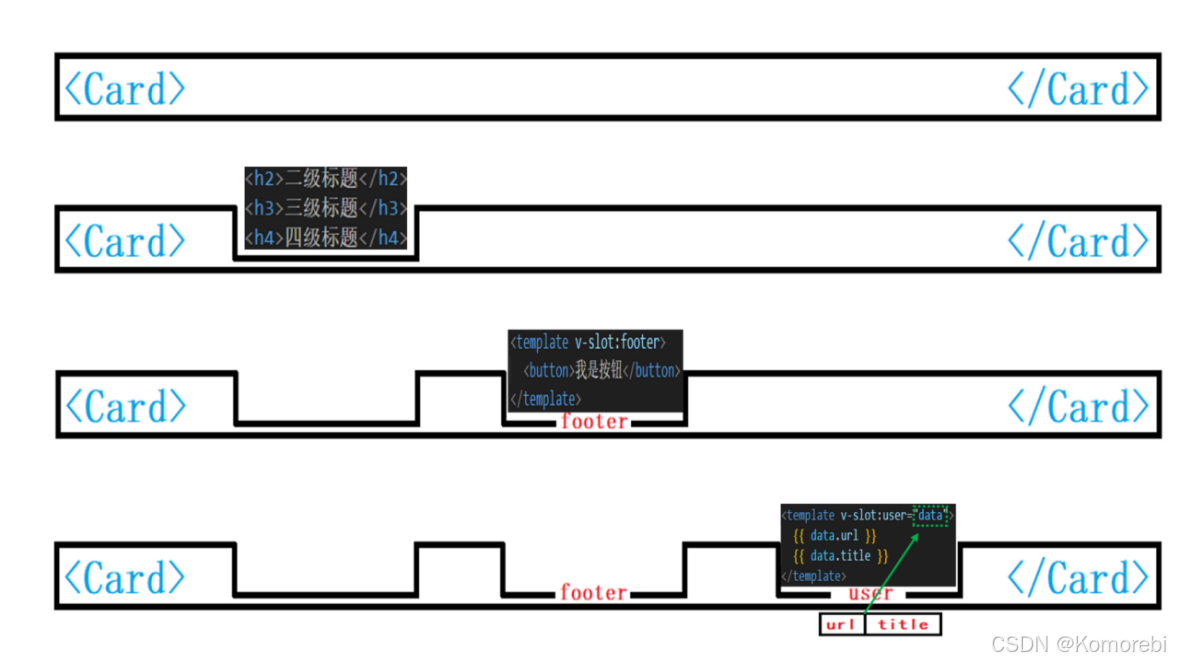
在Vue中,插槽(slot)是一种让父组件能够向子组件指定位置插入HTML结构的机制,它是组件间通信的一种方式,适用于父组件向子组件传递内容。插槽分为默认插槽、具名插槽和作用域插槽。
二、默认插槽
默认插槽是插槽中最基础、常用 的一种类型。它允许父组件向子组件内部的特定位置插入自定义内容 ,就好像在子组件中"预留"了一块空白区域,父组件可以按需往这个区域填充不同的元素或文本等内容。
可以在插槽中放入需要显示的内容;再在App.vue中使用;我们可以插入普通的内容、html元素、组件元素等。
(1)Card.vue(子组件)
在<template>中通过插入一个<slot></slot>标签定义一个默认插槽,为了方便显示,我在插槽的上下均添加一个<h3>标签。
html
<template>
    <div>
    <h3>我下面挖一个默认插槽</h3>
        <!-- 在这里挖一个默认插槽 -->
        <slot></slot>
        <h3>我上面挖一个默认插槽</h3>
    </div>
</template>
<script setup>

</script>
<style>
</style>
目前Card组件主要功能就是提供一个带有默认插槽的简单结构,供给外部使用填充内容,<script>无具体的逻辑代码。
(2)App.vue(父组件)
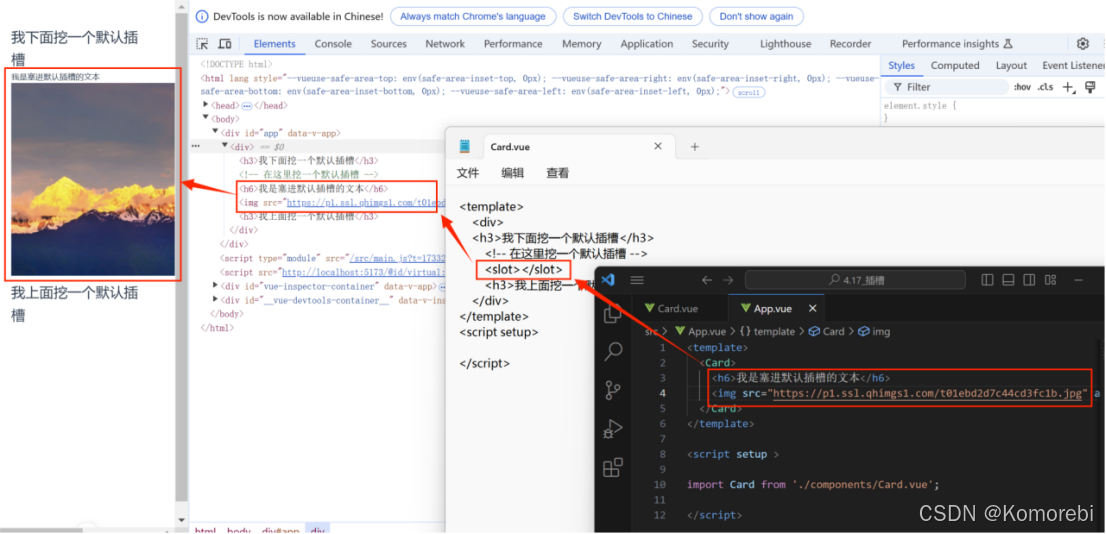
在<template>中使用<Card>组件标签,并在该组件标签内写要放于插槽内的内容(文本、图片、按钮等)。这样里面的内容便会被插入到Card.vue组件中定义的<solt>标签的所在位置。
html
<template>
  <Card>
<h6>我是塞进默认插槽的文本</h6>
<img src="https://p1.ssl.qhimgs1.com/t01ebd2d7c44cd3fc1b.jpg" alt="照片">

  </Card>
</template>
<script setup >
import Card from './components/Card.vue';
</script>
<style>
</style>
在<script>中只需简单的引用Card组件即可。
当整个组件被渲染后,App组件里的Card标签内的内容会替换掉Card.vue中<solt>标签而显示出来。
三、具名插槽
具名插槽是Vue中用于更精准地进行内容分发的一种插槽机制。与默认插槽不同,它允许在一个子组件中定义多个不同名称的插槽,父组件在使用时可以根据这些名称将相应内容准确地插入到对应的插槽位置,这样能让子组件的内容布局和定制更加灵活、精细。
(1)Card.vue(子组件)
与默认插槽不同的是,这里给<solt>标签定义了一个name为footer,后续父组件就可以根据这个名称在此处插入内容。
html
<template>

      <!-- 定义一个具名插槽(需要通过name命名,最常用) -->
      <div class="named-slot">
        <slot name="footer"></slot>
      </div>

  </template>

  <script setup></script>

  <style>
  </style>
(2)APP.vue(父组件)
首先先引用Card.vue组件,在<card>标签内使用<template>标签进行封装,并通过v-slot:footer(简写形式为:#footer)来指定要插入内容的插槽。
html
<template>
  <div>
    <Card>
      <template v-slot:footer>
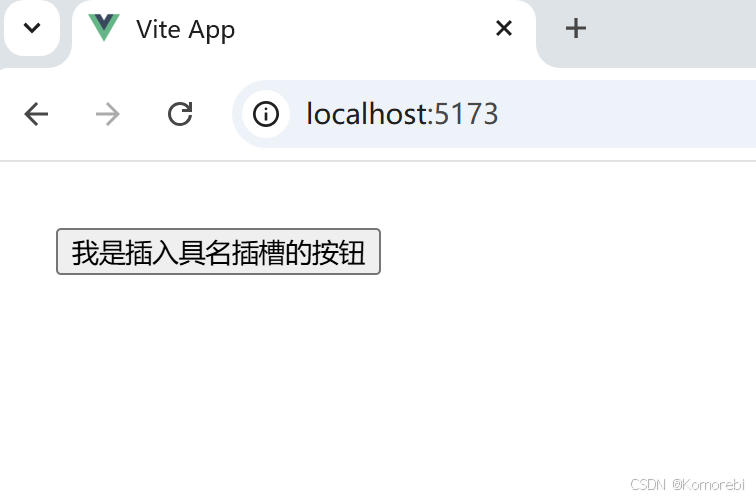
        <button @click="handleClick">我是插入具名插槽的按钮</button>
      </template>


    </Card>
  </div>
</template>
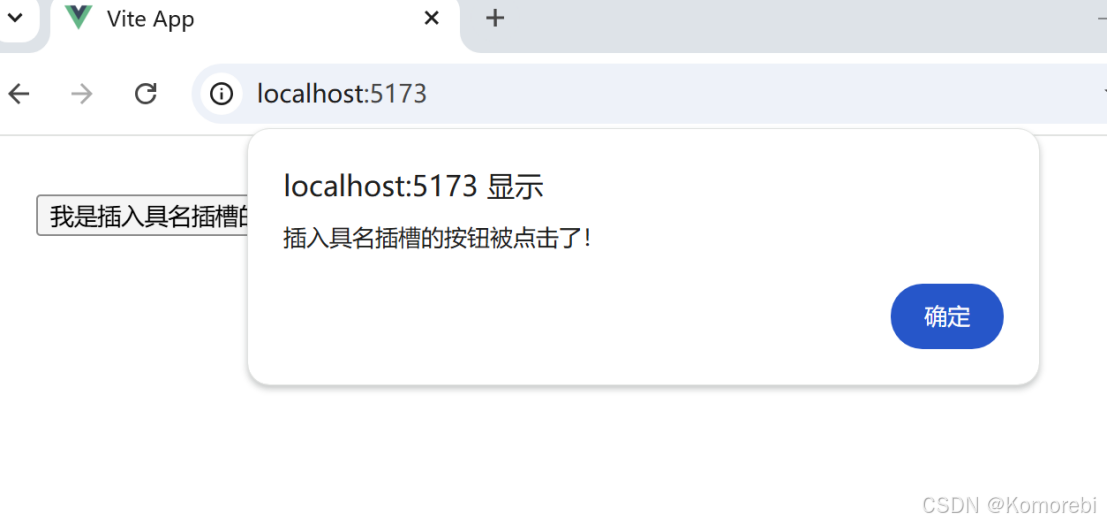
定义一个函数,使按钮被点击时弹出弹窗提示
javascript
<script setup>
  import Card from './components/Card.vue';
  const handleClick = () => {
    alert('插入具名插槽的按钮被点击了!');
  };
</script>
这样设计可以让父组件更精准的在子组件内插入内容。
点击按钮后
四、作用域插槽
作用域插槽是一种特殊的具名插槽,它不仅能让父组件向子组件的特定位置插入内容,还能实现子组件向父组件传递数据(但在JavaScript中无法使用),从而使得父组件在插入内容时可以根据子组件提供的数据进行动态展示或进一步的逻辑处理。简单来说,它搭建起了子组件与父组件之间数据交互的桥梁,同时完成内容分发与数据传递的功能。
(1)Card.vue(子组件)
定义了一个名为 user 的插槽,同时通过在 <slot> 标签上直接添加属性(url 和 title 属性及对应的值)的方式,向这个插槽绑定了相关数据,也就是在子组件层面准备了要传递给父组件的数据,此处相当于声明了"我这个名为 user 的插槽会附带 url 和 title 这两个数据一起传递出去"。
html
<template>
      <div class="scoped-slot">
        <slot name="user" url="www.baidu.com" title="复制网址打开百度"></slot>
      </div>

  </template>

  <script setup></script>

  <style>
    .scoped-slot{
      background-color: pink;
    }
  </style>
(2)APP.vue(父组件)
先通过v-slot:user="data"来指定要插入内容的插槽以及接收子组件传递过来的数据。相当于说,我要往名为user的插槽插入数据并准备好接收这个插槽传递过来的数据。
html
<template>
  <div>
    <Card>
      <template v-slot:user="data">
        子组件通过作用域插槽传来的数据: {{ data.url }} , {{ data.title }}
      </template>
    </Card>
  </div>
</template>
<script setup>
  import Card from './components/Card.vue';

</script>
作用域插槽在分发内容的基础上实现了数据的反向传递,让父组件和子组件之间的配合更加灵活,也满足了页面开发的多种需求。
五、插槽的练习---商品卡
当你需要子组件规定结构和样式,而父组件负责注入内容时,就可以使用插槽。比如,淘宝的商品列表中,每个商品项可能都有相似的结构,只是具体内容(如:图片、标题、价格等)不一样。通过使用Vue插槽,可以创建一个通用的商品列表组件,并通过插槽将不同商品的具体内容动态插入到组件中。
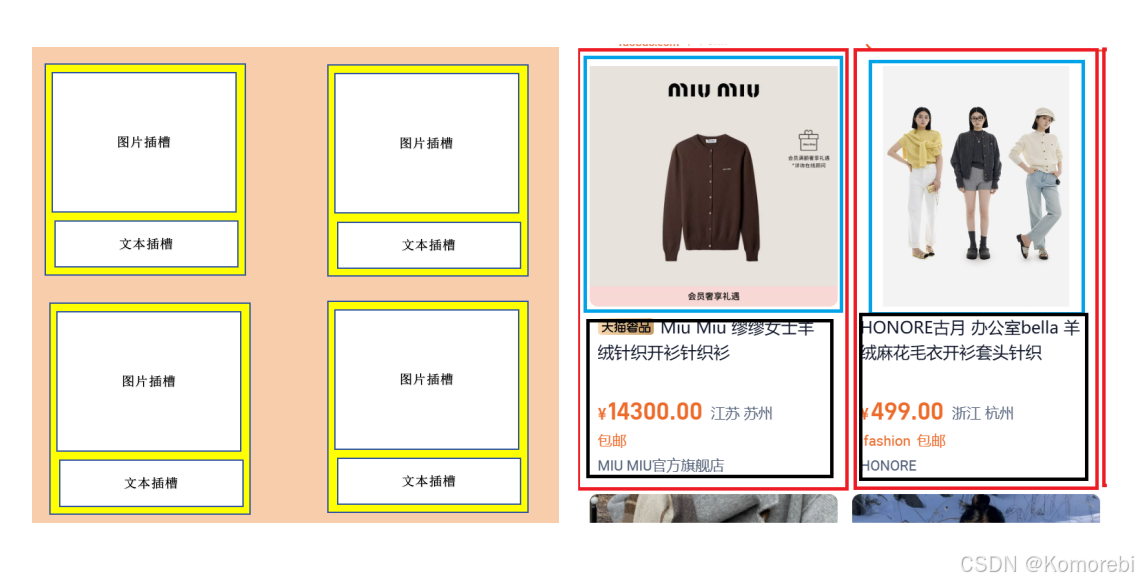
(1)ProductCard.vue
html
<template>
  <div>
   <div class="scoped-slot">
      <button @click="change">修改货币单位</button>
     <slot name="product_image"></slot>
      <slot name="product_text" v-bind:money_show="money_show" v-bind:exchange_rate="exchange_rate"></slot>
  </div>

  </div>
</template>
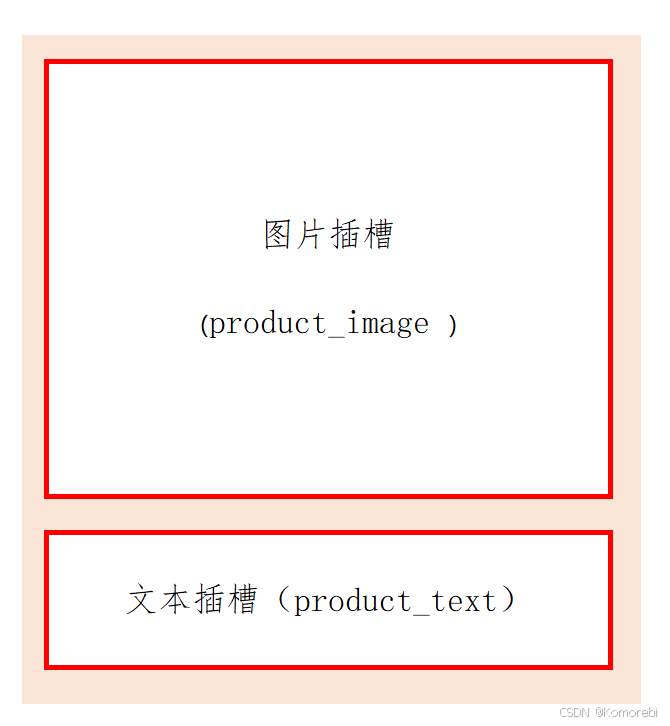
在<template>中,定义一个按钮,点击触发change函数切换价格的单位(人民币或美元),设置两个具名插槽 product_image 和 product_text 来接收外部传入的对应内容,并且向 product_text 插槽绑定了 money_show 和 exchange_rate 这两个数据,用于外部插槽使用来展示价格相关信息(商品名称、价格等)。如下图:
在<script>中,通过import {ref} from 'vue'引入ref,创建两个响应式数据,用于表示货币符号和汇率(初始值分别为"¥"和"1.0")。
再定义一个布尔值,用于判断当前货币状态,change函数在通过取反切换货币单位,实现货币单位切换的功能。
javascript
<script setup>
  import {ref} from 'vue';
  const money_show = ref('¥');
  const exchange_rate = ref('1.0');
  let isCNY = true;
  const change = () => {
   isCNY = !isCNY;
  if(isCNY){
      money_show.value = '¥';
      exchange_rate.value = 1.0;
    }else{
     money_show.value = '$';
     exchange_rate.value = 0.137;
   }
  }
</script>
设置边框的外边框与大小
css
<style>
 .scoped-slot{
    border: 2px red solid;
   width: 250px;
    height: 250px;
  }
</style>
(2)App.vue
建立四个ProductCard组件,每个组件都通过具名插槽分别传入对应的图片和文字信息(展示水果名称以及根据传入的 exchange_rate 和固定价格数值相乘后的价格),增加商品就增加具名插槽。
html
 <ProductCard  class="product">
      <template v-slot:product_image>
        <img src="https://img1.baidu.com/it/u=1738279230,1263399102&fm=253&fmt=auto&app=138&f=JPEG?w=800&h=1067" alt="">
      </template>

      <template v-slot:product_text="data">
        苹果 <br>
        <b>{{ data.money_show }}</b> : {{ data.exchange_rate * 4 }}
      </template>
    </ProductCard>

    <ProductCard  class="product">
      <template v-slot:product_image>
        <img src="https://p2.ssl.qhimgs1.com/t01c15bb2177aefa422.jpg" alt="">
      </template>

      <template v-slot:product_text="data">
        香蕉 <br>
        <b>{{ data.money_show }}</b>: {{ data.exchange_rate * 4 }}
      </template>
    </ProductCard>

    <ProductCard  class="product">
      <template v-slot:product_image>
        <img src="https://pic.5tu.cn/uploads/allimg/2109/pic_5tu_big_6326010_dfac3de791d2175c054534d49c9f327b.jpg" alt="">
      </template>

      <template v-slot:product_text="data">
        草莓<br>
        <b>{{ data.money_show }}</b> : {{ data.exchange_rate * 15 }}
      </template>
    </ProductCard>

  </div>
</template>
<script>只要简单引入了 ProductCard 组件,使得可以在 App.vue 中使用该组件进行页面展示。
javascript
<script setup>
  import ProductCard from './components/ProductCard.vue';
</script>
最后设置图片的大小,设置浮动以及边距,实现商品的布局。
css
<style>
  img{
    width: 250px;
    height: 150px;
  }

  .product{
    float: left;
    margin-right: 20px;
  }

  b{
    color: red;
  }

</style>
通过插槽的使用实现了组件内容的灵活定制,实现商品的排列和货币单位的转换。
在浏览器打开效果如下:
水果超市