其他地方和上一篇大致相同,上一篇地址点击进入,
改动点1:在setting.py中最后再添加如下配置:
py
#  多人聊天
CHANNEL_LAYERS = {
    "default":{
        "BACKEND": "channels.layers.InMemoryChannelLayer"
    }
}
因此完整的settings.py文件如下:
py
"""
Django settings for ws_demo project.

Generated by 'django-admin startproject' using Django 4.2.

For more information on this file, see
https://docs.djangoproject.com/en/4.2/topics/settings/

For the full list of settings and their values, see
https://docs.djangoproject.com/en/4.2/ref/settings/
"""

from pathlib import Path

# Build paths inside the project like this: BASE_DIR / 'subdir'.
BASE_DIR = Path(__file__).resolve().parent.parent


# Quick-start development settings - unsuitable for production
# See https://docs.djangoproject.com/en/4.2/howto/deployment/checklist/

# SECURITY WARNING: keep the secret key used in production secret!
SECRET_KEY = 'django-insecure-&62q15t&-it1jwy4o^&xsh(!fj3cm)#7=r+z12yw3j@x@kox2x'

# SECURITY WARNING: don't run with debug turned on in production!
DEBUG = True

ALLOWED_HOSTS = []


# Application definition

INSTALLED_APPS = [
    'django.contrib.admin',
    'django.contrib.auth',
    'django.contrib.contenttypes',
    'django.contrib.sessions',
    'django.contrib.messages',
    'django.contrib.staticfiles',
    "channels",  # 添加channels
    "app01.apps.App01Config" # 添加app01
]

MIDDLEWARE = [
    'django.middleware.security.SecurityMiddleware',
    'django.contrib.sessions.middleware.SessionMiddleware',
    'django.middleware.common.CommonMiddleware',
    'django.middleware.csrf.CsrfViewMiddleware',
    'django.contrib.auth.middleware.AuthenticationMiddleware',
    'django.contrib.messages.middleware.MessageMiddleware',
    'django.middleware.clickjacking.XFrameOptionsMiddleware',
]

ROOT_URLCONF = 'ws_demo.urls'

TEMPLATES = [
    {
        'BACKEND': 'django.template.backends.django.DjangoTemplates',
        'DIRS': [],
        'APP_DIRS': True,
        'OPTIONS': {
            'context_processors': [
                'django.template.context_processors.debug',
                'django.template.context_processors.request',
                'django.contrib.auth.context_processors.auth',
                'django.contrib.messages.context_processors.messages',
            ],
        },
    },
]

WSGI_APPLICATION = 'ws_demo.wsgi.application'


# Database
# https://docs.djangoproject.com/en/4.2/ref/settings/#databases

DATABASES = {
    'default': {
        'ENGINE': 'django.db.backends.sqlite3',
        'NAME': BASE_DIR / 'db.sqlite3',
    }
}


# Password validation
# https://docs.djangoproject.com/en/4.2/ref/settings/#auth-password-validators

AUTH_PASSWORD_VALIDATORS = [
    {
        'NAME': 'django.contrib.auth.password_validation.UserAttributeSimilarityValidator',
    },
    {
        'NAME': 'django.contrib.auth.password_validation.MinimumLengthValidator',
    },
    {
        'NAME': 'django.contrib.auth.password_validation.CommonPasswordValidator',
    },
    {
        'NAME': 'django.contrib.auth.password_validation.NumericPasswordValidator',
    },
]


# Internationalization
# https://docs.djangoproject.com/en/4.2/topics/i18n/

LANGUAGE_CODE = 'en-us'

TIME_ZONE = 'UTC'

USE_I18N = True

USE_TZ = True


# Static files (CSS, JavaScript, Images)
# https://docs.djangoproject.com/en/4.2/howto/static-files/

STATIC_URL = 'static/'

# Default primary key field type
# https://docs.djangoproject.com/en/4.2/ref/settings/#default-auto-field

DEFAULT_AUTO_FIELD = 'django.db.models.BigAutoField'


ASGI_APPLICATION = "ws_demo.asgi.application"

#  多人聊天
CHANNEL_LAYERS = {
    "default":{
        "BACKEND": "channels.layers.InMemoryChannelLayer"
    }
}
2、app01下view.py中的内容如下:
py
from django.shortcuts import render
# Create your views here.

def index(request):
    qq_group_num = request.GET.get("num")
    return render(request, 'index.html', {"qq_group_num": qq_group_num})
3、index.html中的内容如下:
html
<!DOCTYPE html>
<html lang="en">
<head>
    <meta charset="UTF-8">
    <title>Title</title>
    <style>
        .message {
            height: 300px;
            border: 1px solid #dddddd;
            width: 100%;
        }
    </style>
</head>

<body>
<div class="message" id="message"></div>
<div>
    <input type="text" placeholder="请输入" id="txt">
    <input type="button" value="发送" onclick="sendMsg()">
    <input type="button" value="关闭连接" onclick="closeConn()">
    <input type="button" value="重新建立连接" onclick="connect()">
</div>

<script>
    var socket = null;
    function connect() {
        socket = new WebSocket("ws:/127.0.0.1:8000/room/{{qq_group_num}}/");

        // 连接完成以后 客户端自动触发
        socket.onopen = function (event) {
            let tag = document.createElement("div")
            tag.innerHTML = "连接已建立"
            document.getElementById("message").appendChild(tag)
        }

        // 回调函数 当服务端有消息发送到时,自动触发
        socket.onmessage = function (event) {
            console.log(event.data);
            let tag = document.createElement("div");
            tag.innerText = event.data;
            document.getElementById("message").appendChild(tag)
        }

        // 当连接关闭时,触发
        socket.onclose = function (event) {
            let tag = document.createElement("div")
            tag.innerHTML = "连接已断开"
            document.getElementById("message").appendChild(tag)

        }
    }
    function sendMsg() {
        let tag = document.getElementById("txt")
        socket.send(tag.value)
    }
    function closeConn() {
        // 向服务端发送断开连接
        socket.close();
    }
    connect()
</script>
</body>
</html>
consumers.py中的内容如下:
py
from channels.generic.websocket import WebsocketConsumer
from channels.exceptions import StopConsumer
from asgiref.sync import async_to_sync

class ChatConsumer(WebsocketConsumer):  # 继承WebsocketConsumer
   def websocket_connect(self, message):
       print("有人进行连接了。。。。")
       # 有客户端向后端发送 WebSocket 连接的请求时,自动触发(握手)
       self.accept()

       #  获取群号,获取路由匹配中的群号
       group = self.scope["url_route"]["kwargs"].get("group")


       # 将这个客户端连接对象加入到某个组里边(内存 or redis) async_to_sync 将异步方法转换为同步方法
       async_to_sync(self.channel_layer.group_add)(group, self.channel_name)

   def websocket_receive(self, message):
       # 浏览器基于 WebSocket 向后端发送数据,自动触发接收消息
       print(message)
       group = self.scope["url_route"]["kwargs"].get("group")
       # #  一对一聊天
       # if message["text"] == "close":
       #     self.send("服务端主动关闭连接")
       #     #  服务端主动关闭连接
       #     self.close()
       # self.send(message["text"])
       # 通知组内的所有客户端,执行xx_oo方法,在此方法中自己可以去定义任意的功能 下边是xx.oo没问题
       async_to_sync(self.channel_layer.group_send)(group,{"type": "xx.oo","message": message})

   #  为组内的每个人回复消息
   def xx_oo(self, event):
       text = event["message"]["text"]
       self.send(text)

   def websocket_disconnect(self, message):
       # 客户端向服务端断开连接时,自动触发
       print("连接断开!!")
       group = self.scope["url_route"]["kwargs"].get("group")
       async_to_sync(self.channel_layer.group_discard)(group, self.channel_name)
       raise StopConsumer()
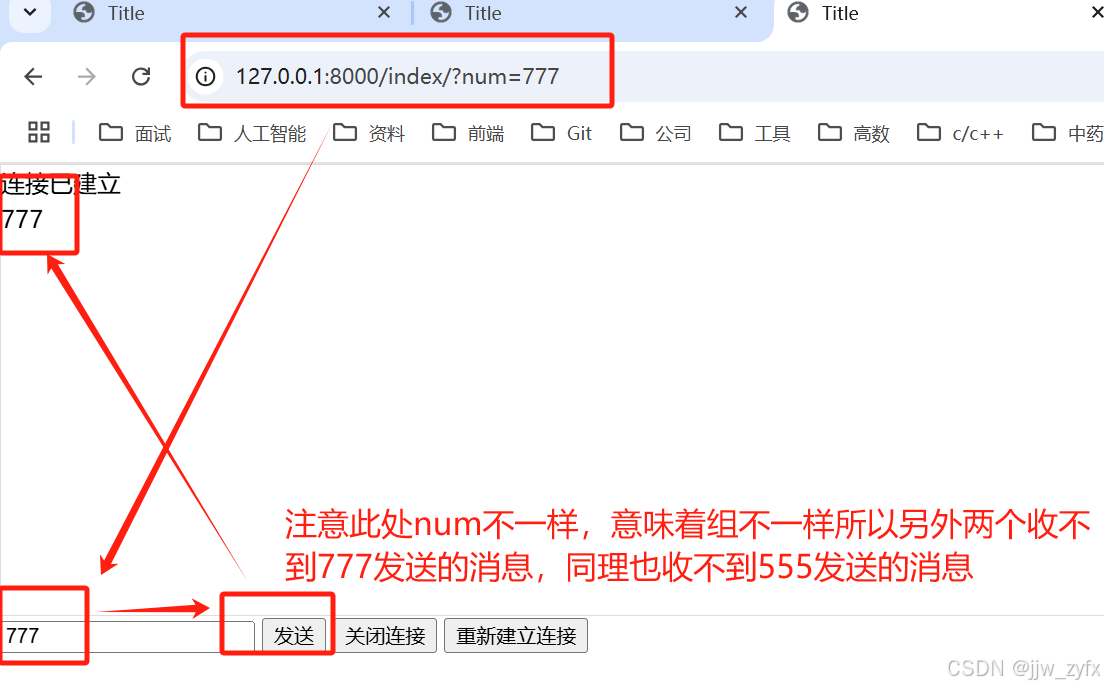
其他无变化,结果展示如下:


以上两个属于同一组(num值相同) 所以能相互间接收消息,而下边这个和上边不属于同一组所以接收不到上边的消息
