SPI的全称是Service Provider Interface, 直译过来就是"服务提供接口", 听起来挺别扭的, 所以我试着去理解了一下, 就将它翻译为"服务提供商接口"吧.
我们都知道, 一个接口是可以有很多种实现的. 例如搜索,可以是搜索系统的硬盘,也可以是搜索数据库.系统的设计者为了降低耦合,并不想在硬编码里面写死具体的搜索方式,而是希望由服务提供者来选择使用哪种搜索方式, 这个时候就可以选择使用SPI机制.
JDK中的SPI
让我们通过一个非常简单的例子,来认识一下java里面的SPI机制.
-
定义一个搜索接口Search
package com.north.spilat.service;
import java.util.List;
public interface Search {
Listsearch(String keyword);
} -
实现接口从数据库查询
package com.north.spilat.service.impl;
import com.north.spilat.service.Search;
import java.util.List;/** * @author laihaohua */
public class DatabaseSearch implements Search {@Override public List<String> search(String keyword) { System.out.println("now use database search. keyword:" + keyword); return null; } } -
实现接口从文件系统查询
package com.north.spilat.service.impl;
import com.north.spilat.service.Search;
import java.util.List;
/** * @author laihaohua */
public class FileSearch implements Search {@Override public List<String> search(String keyword) { System.out.println("now use file system search. keyword:" + keyword); return null; }}
-
- 在
src\main\resources创建一个目录META-INF\services\com.north.spilat.service.Search - 然后 在
com.north.spilat.service.Search下面创建两个文件,以上面接口的具体实现类的全限定名称为文件名,即:
com.north.spilat.service.impl.DatabaseSearch
com.north.spilat.service.impl.FileSearch
整个工程目录如下:
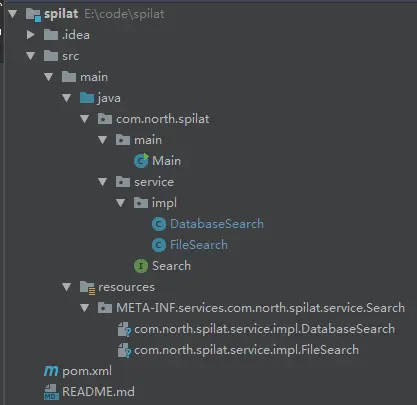
image
- 在
-
新建一个main方法测试一下
package com.north.spilat.main;
import com.north.spilat.service.Search;
import java.util.Iterator;
import java.util.ServiceLoader;
public class Main { public static void main(String[] args) {
System.out.println("Hello World!");
ServiceLoaders = ServiceLoader.load(Search.class);
IteratorsearchList = s.iterator(); while (searchList.hasNext()) {
Search curSearch = searchList.next();
curSearch.search("test");
}
}
}
运行一下,输出如下:
Hello World!now use database search. keyword:testnow use file system search. keyword:test如你所见, SPI机制已经定义好了加载服务的流程框架, 你只需要按照约定, 在META-INF/services目录下面, 以接口的全限定名称为名创建一个文件夹(com.north.spilat.service.Search), 文件夹下再放具体的实现类的全限定名称(com.north.spilat.service.impl.DatabaseSearch), 系统就能根据这些文件,加载不同的实现类.
再回到上面的main方法,其实没有什么特别的,除了一句
ServiceLoader.load(Search.class);
ServiceLoader.class是一个工具类,根据META-INF/services/xxxInterfaceName下面的文件名,加载具体的实现类.
从load(Search.class)进去,我们来扒一下这个类
-
可以看到,里面并没有很多逻辑,主要逻辑都交给了LazyIterator这类
/* *入口, 获取一下当前类的类加载器,然后调用下一个静态方法 */
public staticServiceLoaderload(Classservice) {
ClassLoader cl = Thread.currentThread().getContextClassLoader(); return ServiceLoader.load(service, cl);
}
/* *这个也没有什么逻辑,直接调用构造方法 */
 public static <S> ServiceLoader<S> load(Class<S> service, ClassLoader loader)
 {
    return new ServiceLoader<>(service, loader);
 }

/** * 也没有什么逻辑,直接调用reload */
 private ServiceLoader(Class<S> svc, ClassLoader cl) {
     service = Objects.requireNonNull(svc, "Service interface cannot be null");
     loader = (cl == null) ? ClassLoader.getSystemClassLoader() : cl;
     acc = (System.getSecurityManager() != null) ? AccessController.getContext() : null;
     reload();
 }

/** * 直接实例化一个懒加载的迭代器 */
 public void reload() {
     providers.clear();
     lookupIterator = new LazyIterator(service, loader);
}-
LazyIterator这个迭代器只需要关心hasNext()和next(), hasNext()里面又只是单纯地调用hasNextService(). 不用说, next()里面肯定也只是单纯地调用了nextService();
private boolean hasNextService() {
if (nextName != null) {
// nextName不为空,说明加载过了,而且服务不为空
return true;
}
// configs就是所有的实现类文件名字
if (configs == null) {
try {
// PREFIX是 /META-INF/services
// service.getName() 是接口的全限定名称
String fullName = PREFIX + service.getName();
// loader == null, 说明是bootstrap类加载器
if (loader == null)
configs = ClassLoader.getSystemResources(fullName);
else
// 加载该目录下的所有文件资源
configs = loader.getResources(fullName);
} catch (IOException x) {
fail(service, "Error locating configuration files", x);
}
}
while ((pending == null) || !pending.hasNext()) {
if (!configs.hasMoreElements()) {
// 该目录下什么文件都没有
return false;
}
//就是判断一下configs.nextElement()的格式是不是对的
pending = parse(service, configs.nextElement());
}
nextName = pending.next();
return true;
} -
再来看看nextService干了啥
private S nextService() {
// 校验一下
if (!hasNextService()) throw new NoSuchElementException();
String cn = nextName;
nextName = null;
Class<?> c = null;
try {
// 尝试一下是否能加载该类
c = Class.forName(cn, false, loader);
} catch (ClassNotFoundException x) {
fail(service,"Provider " + cn + " not found");
}
// 是不是service的子类,或者同一个类
if (!service.isAssignableFrom(c)) {
fail(service,"Provider " + cn + " not a subtype");
}
try {
// 实例化这个类, 然后向上转一下
S p = service.cast(c.newInstance());
// 缓存起来,避免重复加载
providers.put(cn, p);
return p;
} catch (Throwable x) {
fail(service,"Provider " + cn + " could not be instantiated",x);
} throw new Error();
// This cannot happen
}
从上面的代码就可以看出来, 所谓的懒加载,就是等到调用hasNext()再查找服务, 调用next()才实例化服务类.
JDK的SPI大概就是这么一个逻辑了, 服务提供商安装约定,将具体的实现类名称放到/META-INF/services/xxx下, ServiceLoader就可以根据服务提供者的意愿, 加载不同的实现了, 避免硬编码写死逻辑, 从而达到解耦的目的.
当然, 从上面这个简单的例子可能大家会看不出来,SPI是如何达到解耦的效果的. 所以下面, 我们一起来看看,开源框架中是怎么利用SPI机制来解耦的. 体会一下SPI的魅力.
springboot 中的SPI
以前还在实习的时候,老大就跟我说过一段话,他说你没事可以多点研究开源框架,因为这些开源代码每天都不知道被人撸几遍,所以他们的代码从设计到实现,都是非常优秀的,可以从中学到不少东西.
而spring框架这些年来,基本上可以说是开源界扛把子,江湖上无人不知无人不晓.其源码的设计也是出了名的优雅,超高拓展性超低耦合性.
那它是怎么解耦的呢? 拓展点机制便是其中法宝之一(注意用词,是之一 哈-_-)
从神奇的starter说起
刚刚接触springboot的时候, 真的觉得各种spring-xx-starter和xx-spring-starter非常的神奇. 为什么在pom文件添加一个依赖就能引入一个复杂的插件了呢? 带着这个疑问,我开始了我的走进科学之旅.
dubbo框架听说在国内用的公司挺多的,所以这里, 我们就以dubbo-spring-boot-starter为例,来看看springboot中是如何高效解耦的.
回想一下, 如果我们要在springboot工程里面引入dubbo模块, 需要怎么做.
-
在pom文件引入dubbo-spring-boot-starter的依赖.
com.alibaba.spring.boot dubbo-spring-boot-starter 2.0.0
在application.properties文件配置好dubbo相关参数
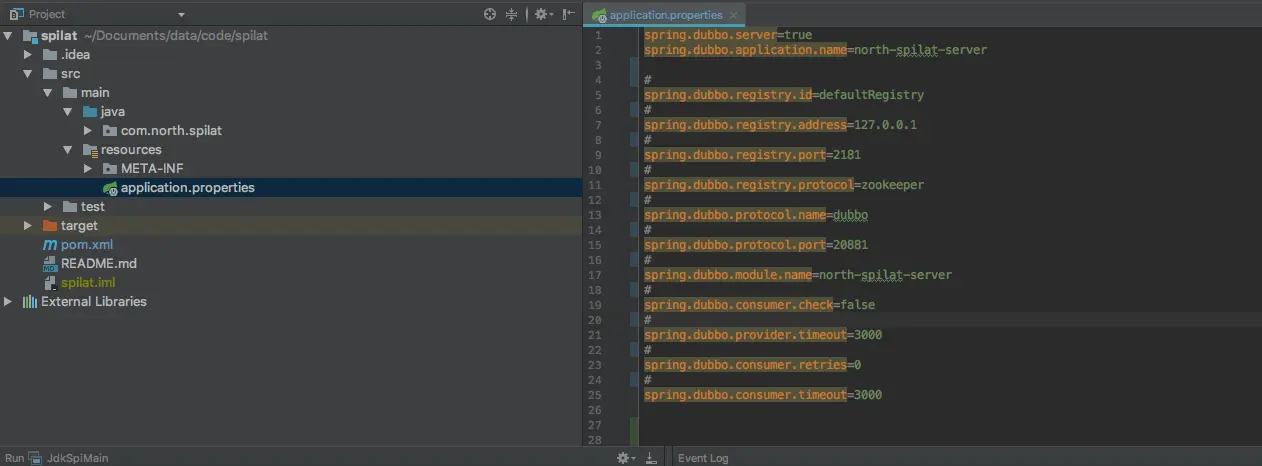
image.png
spring.dubbo.server=true spring.dubbo.application.name=north-spilat-server

#
spring.dubbo.registry.id=defaultRegistry
#
spring.dubbo.registry.address=127.0.0.1 #
spring.dubbo.registry.port=2181 #
spring.dubbo.registry.protocol=zookeeper
#
spring.dubbo.protocol.name=dubbo
#
spring.dubbo.protocol.port=20881 #
spring.dubbo.module.name=north-spilat-server
#
spring.dubbo.consumer.check=false #
spring.dubbo.provider.timeout=3000 #
spring.dubbo.consumer.retries=0 #
spring.dubbo.consumer.timeout=3000-
在spring-boot的启动类加上对应的注解
package com.north.spilat.main;
import com.alibaba.dubbo.spring.boot.annotation.EnableDubboConfiguration;
import org.springframework.boot.SpringApplication;
import org.springframework.boot.autoconfigure.SpringBootApplication;
import org.springframework.context.annotation.ComponentScan;
/** * @author laihaohua /
@SpringBootApplication
@ComponentScan(basePackages = {"com.north."})
@EnableDubboConfiguration public class SpringBootMain { public static void main(String[] args) {
SpringApplication.run(SpringBootMain.class, args);
}
} -
定义接口, 实现并调用
接口
package com.north.spilat.service;
/** * @author laihaohua */
public interface DubboDemoService {
    String test(String params);
}
实现接口
package com.north.spilat.service.impl;
import com.alibaba.dubbo.config.annotation.Service;
import com.north.spilat.service.DubboDemoService;
import org.springframework.stereotype.Repository;
/** * @author laihaohua */
@Service
@Repository("dubboDemoService")
public class DubboDemoServiceImpl implements DubboDemoService {
    @Override
    public String test(String params) {
        return System.currentTimeMillis() + "-" + params ;
    }
}
写个controller调用dubbo接口
package com.north.spilat.controller;
import com.north.spilat.service.DubboDemoService;
import org.springframework.web.bind.annotation.RequestMapping;
import org.springframework.web.bind.annotation.RestController;
import javax.annotation.Resource;
/** * @author laihaohua */
@RestController public class HelloWorldController {
    @Resource
    private DubboDemoService dubboDemoService;

    @RequestMapping("/saveTheWorld")
    public String index(String name) {
          return dubboDemoService.test(name);
    }
}
做完以上4步(zookeeper等环境自己装一下)后, 启动SpringBootMain类, 一个带有dubbo模块的springboot工程就这样搭好了, 真的就这么简单.
但是事情越简单,背后就越不简单.一定是有人默默地为我们做了很多事. 这个人就是"dubbo-spring-boot-starter"
dubbo-spring-boot-starter的奥秘
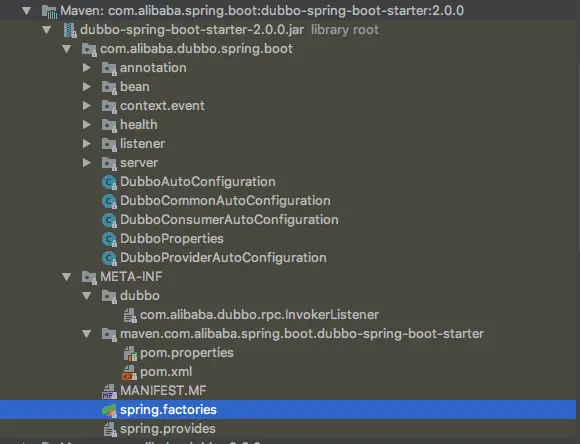
image
上图是dubbo-spring-boot-starter.jar包的结构. 内容还真不少, 但是聪明的你肯定想到了, 既然我们上一节说到了SPI是跟META-INF息息相关的,那我们这一节也必然是这样. 因此, 这里我们先看一下META-INF目录下面有什么.
dubbo/com.alibaba.dubbo.rpc.InvokerListener

dubbosubscribe=com.alibaba.dubbo.spring.boot.listener.ConsumerSubscribeListener
这个目录下的文件只有一行,看着和上面的jdk的SPI真的是像.没错, 这的确是一种拓展点, 是dubbo里面的一种拓展点约定, 但是我们这里也不深入, 有机会可以另开一篇讨论一下(这题超纲了)
-
spring.factories
org.springframework.boot.autoconfigure.EnableAutoConfiguration=
com.alibaba.dubbo.spring.boot.DubboAutoConfiguration,
com.alibaba.dubbo.spring.boot.DubboProviderAutoConfiguration,
com.alibaba.dubbo.spring.boot.DubboConsumerAutoConfigurationorg.springframework.context.ApplicationListener=
com.alibaba.dubbo.spring.boot.context.event.DubboBannerApplicationListener
哇哇哇,文件就是以spring命名,文件内容还涉及到这么多spring类. 确认过眼神, 我遇上对的...文件. 但是别急, 下面还有一个spring.providers文件
-
spring.providers
provides: dubbo-spring-boot-starter
spring.providers就这么简单的一句, 有点失望了.所以我们还是来关注一下spring.factories吧.

image
在IDEA里面搜一下spring.factories这个文件. 不搜不知道, 一搜吓一跳. 原来基本上每一个springboot相关的jar包里面都会有一个这样的文件.
物理学家在做实验之前, 总是喜欢推理一番, 得到一个预测的结论, 然后再通过实验结果来证实或推翻预测的结论.
因此, 基于JDK里面的SPI机制, 在这里我们也可以做一个大胆的预测:spring框架里面一定是有一个类似于ServiceLoader的类, 专门从META-INF/spring.factories里面的配置,加载特定接口的实现.
结果不用说, 这个预测肯定是准确, 不然我上面这么多字不就白写啦. 但是怎么证明我们的预测是准确的呢. 让我们也来做一次"实验".
springboot的启动过程
要弄清楚springboot的启动过程, 最好的办法就研读它的源码了.
而springboot的代码还是非常"人性化"的, 不像其他开源框架,不知道从何看起.springboot明明确确地告诉你了, 它的入口就是main方法.因此, 读springboot的代码, 还算是比较惬意的.
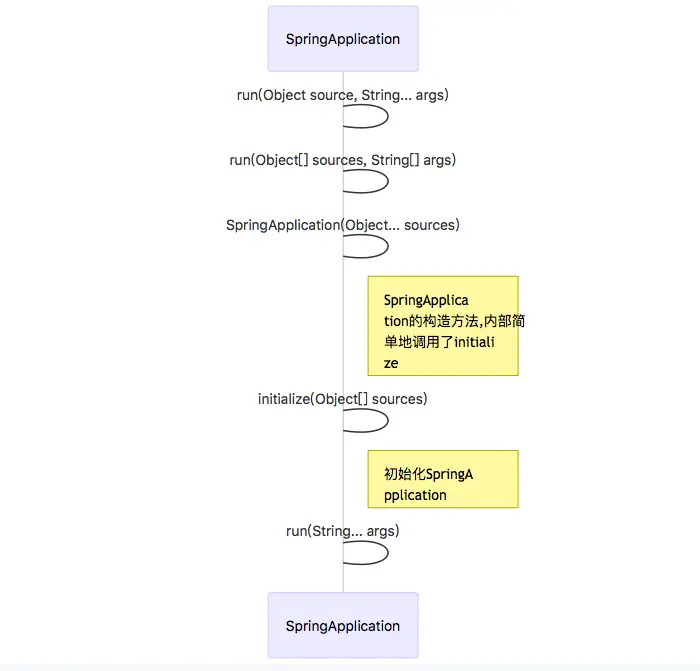
image
上图就是一个springboot工程的启动过程.首先是连续两个重载的静态run方法, 静态run方法内部会调用构造方法实例化SpringApplication对象, 构造方法内部是调用initialiaze()进行初始化的,实例化,再调用一个成员方法run()来正式启动. 可见, 整个启动过程主要的逻辑都在initialiaze方法和成员run方法内部了.
看一下initialiaze()的逻辑
@SuppressWarnings({ "unchecked", "rawtypes" })
private void initialize(Object[] sources) {
    // sources一般是Configuration类或main方法所在类 // 可以有多个
    if (sources != null && sources.length > 0) {
        this.sources.addAll(Arrays.asList(sources));
    }
// 判断是否是web环境
// classLoader能加载到
// "javax.servlet.Servlet",
// "org.springframework.web.context.ConfigurableWebApplicationContext"
// 这两个类就是web环境
    this.webEnvironment = deduceWebEnvironment();
// 加载initializers 和listeners // getSpringFactoriesInstances顾名思义,
// 就是加载某个接口的工厂实例,
// 看起来像是我们要找的"ServiceLoader"了
    setInitializers((Collection) getSpringFactoriesInstances(ApplicationContextInitializer.class));
    setListeners((Collection) getSpringFactoriesInstances(ApplicationListener.class));
// 找到main方法所在的类
    this.mainApplicationClass = deduceMainApplicationClass();
}
运气还算不错,"嫌疑犯"getSpringFactoriesInstances就露出水面了, 来看看它的逻辑
/** * 参数type就是要加载的接口的class */
    private <T> Collection<? extends T> getSpringFactoriesInstances(Class<T> type) { // 直接调用重载方法
        return getSpringFactoriesInstances(type, new Class<?>[] {});
    }
  private <T> Collection<? extends T> getSpringFactoriesInstances(Class<T> type,Class<?>[] parameterTypes, Object... args) {
        // 获取当前线程的classLoader
        ClassLoader classLoader = Thread.currentThread().getContextClassLoader();
        // Use names and ensure unique to protect against duplicates
        // 翻译一下原文注释就是用names来去重
        // 注意这里, 我们寻找的"ServiceLoader"终于出现了
        // 就是SpringFactoriesLoader
        Set<String> names = new LinkedHashSet<String>(
                SpringFactoriesLoader.loadFactoryNames(type, classLoader)); // 是用java反射来实例化
        List<T> instances = createSpringFactoriesInstances(type, parameterTypes,
                classLoader, args, names);
        // 根据@Order注解来排一下序
       AnnotationAwareOrderComparator.sort(instances);
        // 返回这个接口的所有实现实例
        return instances;
    }
然后很快就找到了我们想找的SpringFactoriesLoader, 而且这个类非常小, 代码比JDK的ServiceLoader还少. 那我们仔细看一下他里面都有啥.
- FACTORIES_RESOURCE_LOCATION 正是指向我们上面所说的
META-INF/spring.factories - loadFactories, 从META-INF/spring.factories查找指定的接口实现类并实例化, 其中查找是通过调用loadFactoryNames
- loadFactoryNames从指定的位置查找特定接口的实现类的全限定名称
- instantiateFactory 实例化
这个类就是springboot里面的"ServiceLoader",它提供了一种机制,可以让服务提供商指定某种接口的实现(可以是多个),例如上面的ApplicationContextInitializer.class和ApplicationListener.class接口, 如果我们想在我们的模块里面指定我们的实现,或者想在现有的代码上加上我们的某个实现,就可以在/META-INF/spring.factories里面指定. 等一下下面我会写一个具体的例子, 可以让大家更好的理解一下.
/** * 省略import**/
public abstract class SpringFactoriesLoader {
    private static final Log logger = LogFactory.getLog(SpringFactoriesLoader.class);
  /** * The location to look for factories.
     *  查找工厂实现类的位置
     * <p>Can be present in multiple JAR files.
     *   可以在多个jar包中
     * 这不就是我们一直在寻找的META-INF/spring.factories嘛
     * 终于找到了 */
    public static final String FACTORIES_RESOURCE_LOCATION ="META-INF/spring.factories";

    /** * 查找    并实例化指定的工厂类实现 */
    public static <T> List<T> loadFactories(Class<T> factoryClass, ClassLoader classLoader) {
        Assert.notNull(factoryClass, "'factoryClass'
        must not be null");
        ClassLoader classLoaderToUse = classLoader; if (classLoaderToUse == null) {
            classLoaderToUse = SpringFactoriesLoader.class.getClassLoader();
      }

      // 最终是调用loadFactoryNames
        List<String> factoryNames = loadFactoryNames(factoryClass, classLoaderToUse);
        if (logger.isTraceEnabled()) {
            logger.trace("Loaded [" + factoryClass.getName() + "] names: " + factoryNames);
        }
        List<T> result = new ArrayList<T>(factoryNames.size()); for (String factoryName : factoryNames) {
        // 一个个的实例化
         result.add(instantiateFactory(factoryName, factoryClass, classLoaderToUse));
        }
    // 排序
     AnnotationAwareOrderComparator.sort(result);
    return result;
    }
/** * 从META-INF/spring.factories查找指定接口的实现类的
     * 全限定类名称 */
    public static List<String> loadFactoryNames(Class<?> factoryClass, ClassLoader classLoader) {
        // 接口的类名称
        String factoryClassName = factoryClass.getName();
        try {
            //从META-INF/spring.factories加载文件资源
            Enumeration<URL> urls = (classLoader != null ?classLoader.getResources(FACTORIES_RESOURCE_LOCATION) :
            ClassLoader.getSystemResources(FACTORIES_RESOURCE_LOCATION));
            List<String> result = new ArrayList<String>();
            while (urls.hasMoreElements()) {
                // 一个url代表一个spring.factories文件
                URL url = urls.nextElement();
                // 加载所有的属性, 一般是 xxx接口=impl1,impl2 这种形式的
                Properties properties = PropertiesLoaderUtils.loadProperties(new UrlResource(url));
                // 根据接口名获取的类似"impl1,impl2"的字符串
                String factoryClassNames = properties.getProperty(factoryClassName)
                // 以逗号分隔,转化成列表
                 result.addAll(Arrays.asList(StringUtils.commaDelimitedListToStringArray(factoryClassNames)));
            }
            // 返回实现类名的列表
            return result;
        } catch (IOException ex) {
            throw new IllegalArgumentException("Unable to load [" + factoryClass.getName() +
                    "] factories from location [" + FACTORIES_RESOURCE_LOCATION + "]", ex);
        }
    }
    /** * 根据类名的全限定名称实例化 */
    @SuppressWarnings("unchecked")
    private static <T> T instantiateFactory(String instanceClassName, Class<T> factoryClass, ClassLoader classLoader) {
        try {
            // 查找类
            Class<?> instanceClass = ClassUtils.forName(instanceClassName, classLoader);
            // 校验是不是该接口类或该接口类的实现类
            if (!factoryClass.isAssignableFrom(instanceClass)) {
                  throw new IllegalArgumentException( "Class [" + instanceClassName + "] is not assignable to [" + factoryClass.getName() + "]");
            }
            Constructor<?> constructor = instanceClass.getDeclaredConstructor();
            ReflectionUtils.makeAccessible(constructor); // 反射实例化
            return (T) constructor.newInstance();
        } catch (
            Throwable ex) { throw new IllegalArgumentException("Unable to instantiate factory class: " + factoryClass.getName(), ex);
        }
    }

}
看完SpringFactoriesLoader这个类, initialize()方法的逻辑也就看完了. 接着再看另外一个重要方法run(String... args)
/** * Run the Spring application, creating and refreshing a new
     * {@link ApplicationContext}.
     * @param args the application arguments (usually passed from a Java main method)
     * @return a running {@link ApplicationContext} */
    public ConfigurableApplicationContext run(String... args) {
        // 用于监测启动时长等等
        StopWatch stopWatch = new StopWatch();
        stopWatch.start(); // springboot的上下文
        ConfigurableApplicationContext context = null;
        FailureAnalyzers analyzers = null;
        // 配置headless模式
         configureHeadlessProperty();
        // 启动监听器, 可以配置到spring.factories中去
        SpringApplicationRunListeners listeners = getRunListeners(args);
        listeners.starting();
         try {
            // 封装参数
            ApplicationArguments applicationArguments = new DefaultApplicationArguments(
                    args);
            // 配置environment
            ConfigurableEnvironment environment = prepareEnvironment(listeners,
                    applicationArguments);
            // 打印banner
            Banner printedBanner = printBanner(environment);
            // 创建上下文
            context = createApplicationContext();
            analyzers = new FailureAnalyzers(context);
            // 先初始化上下文
             prepareContext(context, environment, listeners, applicationArguments,
                    printedBanner);
             // spring 经典的refresh()过程, 大部分的逻辑都在里面
            // 这里不再深入, 读者可以自行研读代码或搜索引擎
            refreshContext(context);
            afterRefresh(context, applicationArguments);
            listeners.finished(context, null);
            stopWatch.stop();
            if (this.logStartupInfo) {
                  new StartupInfoLogger(this.mainApplicationClass).logStarted(getApplicationLog(), stopWatch);
            } return context;
        } catch (Throwable ex) {
            handleRunFailure(context, listeners, analyzers, ex); throw new IllegalStateException(ex);
        }
    }
这个方法就是springboot启动的主要逻辑了,内容很多,如果要全部说清楚的话, 恐怕再写几遍博客也说不完(给人家springboot一点最起码的尊重好不好, 想一篇文章就理解透彻人家整个框架,人家不要面子的呀).所以这里就不会再深入,对于本文,只要知道这个run()方法是启动的主要逻辑就可以了, 另外记住
context = createApplicationContext();
refreshContext(context);
这两行代码,等下我们还会看到它的.
dubbo-spring-boot-starter的原理
上面说了很多, 但是为什么springboot引入一个starter的依赖,就能引入一个复杂的模块内. 这里通过dubbo-spring-boot-starter来研究一下.
我们回顾一下dubbo-spring-boot-starter里面spring.factories. 可以发现里面配置了两个接口, 一个是EnableAutoConfiguration,一个是ApplicationListener.
org.springframework.boot.autoconfigure.EnableAutoConfiguration=\
com.alibaba.dubbo.spring.boot.DubboAutoConfiguration,\
com.alibaba.dubbo.spring.boot.DubboProviderAutoConfiguration,\
com.alibaba.dubbo.spring.boot.DubboConsumerAutoConfiguration

org.springframework.context.ApplicationListener=\
com.alibaba.dubbo.spring.boot.context.event.DubboBannerApplicationListener
监听器看名称就知道了是用于启动的时候打印banner, 所以这里暂时不看, 我们先来看一下EnableAutoConfiguration是哪里用到的.
从main方法开始一路debug,终于在AutoConfigurationImportSelector类中发现了一行代码:
SpringFactoriesLoader.loadFactoryNames( getSpringFactoriesLoaderFactoryClass(), getBeanClassLoader()) 其中getSpringFactoriesLoaderFactoryClass()就是返回EnableAutoConfiguration.class
protected List<String> getCandidateConfigurations(AnnotationMetadata metadata,
        AnnotationAttributes attributes) {
    List<String> configurations = SpringFactoriesLoader.loadFactoryNames(
            getSpringFactoriesLoaderFactoryClass(), getBeanClassLoader());
    Assert.notEmpty(configurations, "No auto configuration classes found in META-INF/spring.factories. If you "
                    + "are using a custom packaging, make sure that file is correct.");
    return configurations;
}
/** * Return the class used by {@link SpringFactoriesLoader} to load configuration
 * candidates.
 * @return the factory class */
protected Class<?> getSpringFactoriesLoaderFactoryClass() {
    return EnableAutoConfiguration.class;
}
如下图可以发现,EnableAutoConfiguration.class的实现会有很多, 只要你在spring.fatories配置了,它都会给你加载进来
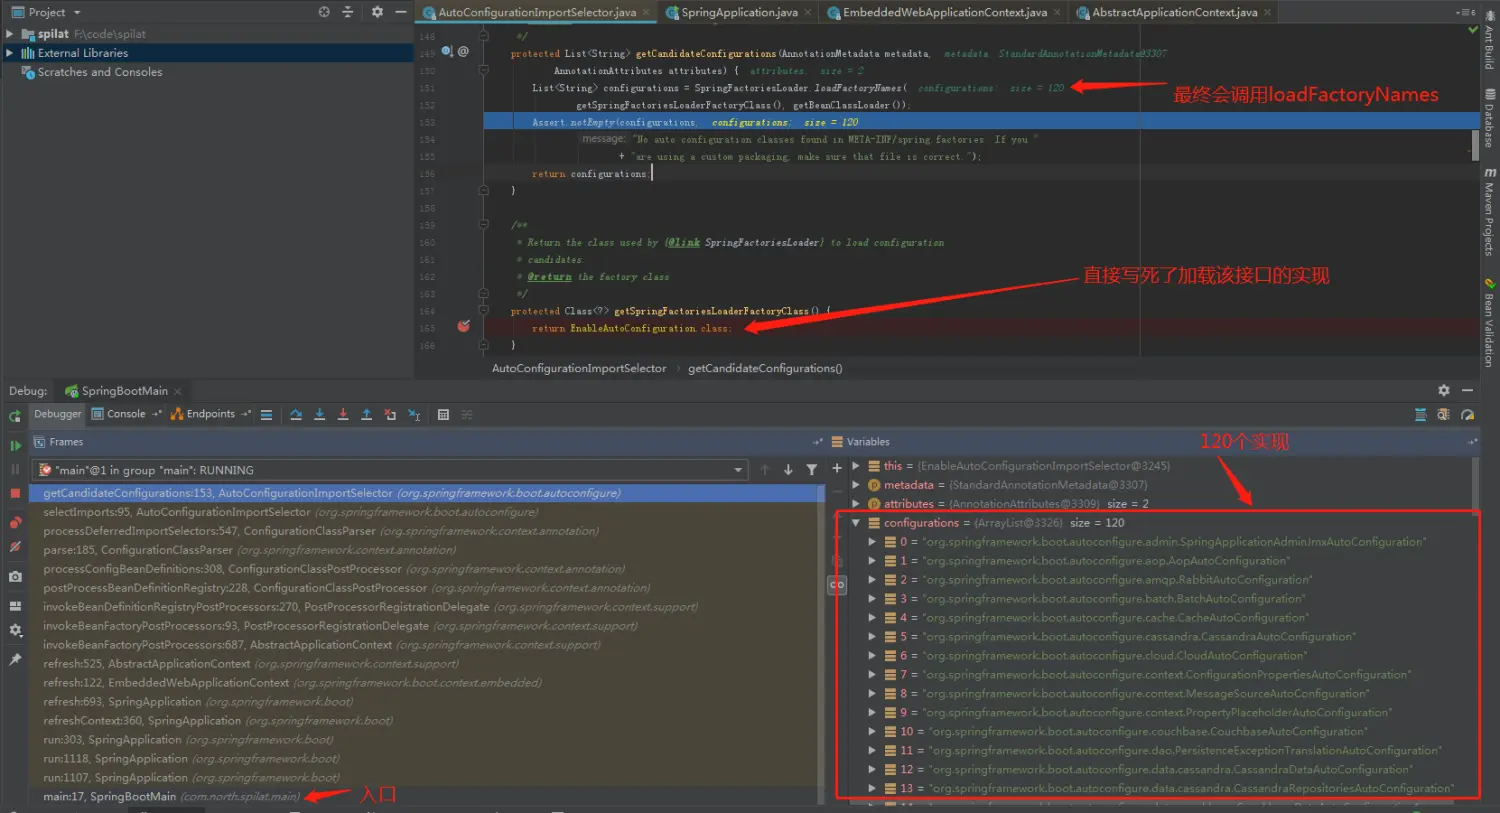
image
加载了之后,又干嘛呢, 往下看,可以发现大概流程是这样:
- this.reader.loadBeanDefinitions(configClasses); 把这些类读进来准备解析
- registerBeanDefinition注册到beanDefinitionNames
- spring的refresh()最后有一步是finishBeanFactoryInitialization(beanFactory), 这一步时初始化所有的单例对象, 最后会从beanDefinitionNames读取所有的BeanDefinition,也包括了上面的所有EnableAutoConfiguration实现, 进行实例化
- 实例化EnableAutoConfiguration的具体实现的时候,会执行里面的具体逻辑, 以DubboAutoConfiguration为例, 会定义DubboServer和DubboHealthIndicator两个bean, 就可以把dubbo接入进来了.
实现一个spring-boot-starter
清楚了原理之后, 要实现一个自己的starter就很简单了.
假设我有一个组件,非常牛逼,具有拯救世界的能力, 你的系统接入后,也就具有了拯救世界的能力了. 那怎么让你的spring-boot系统可以快速接入这个牛逼的组件呢. 我来实现一个starter, 你依赖我这个starter就可以了
首先定义一个拯救世界的接口
package com.north.lat.service; /** * @author laihaohua */
public interface SaveTheWorldService { /** *  拯救世界
  * @param name 留名
  * @return
  */ String saveTheWorld(String name);
}
抽象类
package com.north.lat.service;

import lombok.extern.log4j.Log4j;
import java.util.Random;
/** * @author laihaohua */
@Log4j
public abstract  class AbstractSaveTheWorldService implements SaveTheWorldService {
      private final static Random RANDOM = new Random();
      private final static String SUCCESS_MSG = "你不要问这是什么, 总之就好厉害.";
      private final static String FAIL_MSG = "拯救世界是个高风险行业";

    @Override public String saveTheWorld(String name) {
        int randomInt = RANDOM.nextInt(100);
        String msg; if((randomInt +  1) > getDieRate()){
            msg = SUCCESS_MSG +"," + name + "拯救了这个世界!";
        }else{
            msg = FAIL_MSG + "," + name + ",你失败了,下辈子再来吧";
        }
        log.info(msg);
        return msg;
    }
    /** * 指定死亡率
     * @return
     */
    public abstract int getDieRate();
}
以英雄角色去拯救世界
package com.north.lat.service.impl; import com.north.lat.service.AbstractSaveTheWorldService;
/** * 英雄拯救世界
 * @author laihaohua */
public class HeroSaveTheWorldImpl extends AbstractSaveTheWorldService {
      private final static int DIE_RATE = 1;

      @Override
      public int getDieRate() {
          return DIE_RATE;
      }
}
普通人去拯救世界
package com.north.lat.service.impl;
import com.north.lat.service.AbstractSaveTheWorldService;
/** * 普通人拯救世界
 * @author laihaohua */
public class CommonSaveTheWorldServiceImpl extends AbstractSaveTheWorldService {
      private final static int DIE_RATE = 99;

      @Override
      public int getDieRate() {
        return DIE_RATE;
      }
}
好, 我们这个超级牛逼的组件就诞生了, 下面为接入springboot准备一下, 实现一个NbAutoConfiguration如下:
package com.north.lat;

import com.north.lat.service.SaveTheWorldService;
import org.springframework.beans.BeansException;
import org.springframework.beans.factory.config.ConfigurableListableBeanFactory;
import org.springframework.beans.factory.support.BeanDefinitionRegistry;
import org.springframework.beans.factory.support.BeanDefinitionRegistryPostProcessor;
import org.springframework.beans.factory.support.GenericBeanDefinition;
import org.springframework.boot.autoconfigure.condition.ConditionalOnClass;
import org.springframework.context.ApplicationContext;
import org.springframework.context.ApplicationContextAware;
import org.springframework.context.EnvironmentAware;
import org.springframework.context.annotation.Configuration;
import org.springframework.core.env.Environment;
import org.springframework.core.io.support.SpringFactoriesLoader;
import java.util.List;
/**
 * @author laihaohua
 * 注入environment和applicationContext 以便做一些后续操作
*/
@Configuration
@ConditionalOnClass(SaveTheWorldService.class)
public class NbAutoConfiguration implements EnvironmentAware,ApplicationContextAware,BeanDefinitionRegistryPostProcessor {
      private Environment environment;

      private ApplicationContext applicationContext;

      @Override
      public void setEnvironment(Environment environment) {
          this.environment = environment;
      }

      @Override
       public void setApplicationContext(ApplicationContext applicationContext) throws BeansException {
             this.applicationContext = applicationContext;
       }

      @Override
      public void postProcessBeanDefinitionRegistry(BeanDefinitionRegistry registry) throws BeansException {
        // 我这里是从spring.factories加载了SaveTheWorldService的所有实现,
        List<SaveTheWorldService> saveTheWorldServices = SpringFactoriesLoader.loadFactories(SaveTheWorldService.class, this.getClass().getClassLoader());
        // 然后用BeanDefinitionRegistry 注册到BeanDefinitions
        saveTheWorldServices.forEach(saveTheWorldService->{
            GenericBeanDefinition beanDefinition = new GenericBeanDefinition();
            beanDefinition.setBeanClass(saveTheWorldService.getClass());
            beanDefinition.setLazyInit(false);
            beanDefinition.setAbstract(false);
            beanDefinition.setAutowireCandidate(true);
            beanDefinition.setScope("singleton");
            registry.registerBeanDefinition(saveTheWorldService.getClass().getSimpleName(), beanDefinition);
        });
    }

    @Override
    public void postProcessBeanFactory(ConfigurableListableBeanFactory beanFactory) throws BeansException {

    }
}
再配置一下spring.factories
org.springframework.boot.autoconfigure.EnableAutoConfiguration=\
com.north.lat.NbAutoConfiguration
com.north.lat.service.SaveTheWorldService=\
com.north.lat.service.impl.CommonSaveTheWorldServiceImpl,com.north.lat.service.impl.HeroSaveTheWorldImpl
这样就完成了,项目结构如下图所示:
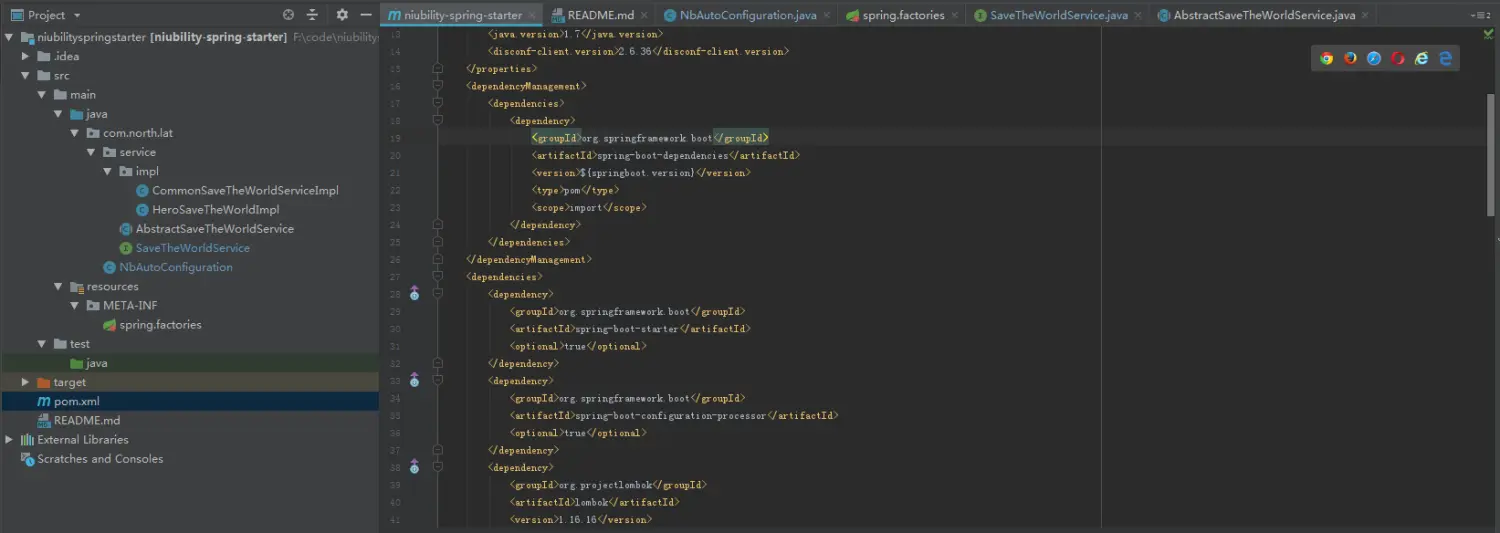
image
那该怎么接入呢? 我们在刚刚的spilat工程接入一下试试:
依赖jar包,这样就完成接入了
<dependency>
            <groupId>com.north.lat</groupId>
            <artifactId>niubility-spring-starter</artifactId>
            <version>1.0-SNAPSHOT</version>
   </dependency></pre>
所谓的完成接入是指, spring中已经注入了SaveTheWorldService的所有实现, 即CommonSaveTheWorldServiceImpl和HeroSaveTheWorldImpl. 我们在controller中调用一下
package com.north.spilat.controller;
import com.north.lat.service.SaveTheWorldService;
import com.north.lat.service.impl.CommonSaveTheWorldServiceImpl;
import com.north.lat.service.impl.HeroSaveTheWorldImpl;
 import com.north.spilat.service.DubboDemoService;
 import org.springframework.web.bind.annotation.RequestMapping;
import org.springframework.web.bind.annotation.RestController;
import javax.annotation.Resource;
/** * @author laihaohua */
@RestController
public class HelloWorldController {

    @Resource
    private CommonSaveTheWorldServiceImpl commonSaveTheWorldService;

    @Resource
    private HeroSaveTheWorldImpl heroSaveTheWorld;

    @Resource
     private DubboDemoService dubboDemoService; private static final String HERO = "laihaohua";

    @RequestMapping("/saveTheWorld")
     public String index(String name) {
        SaveTheWorldService saveTheWorldService;
        if(HERO.equals(name)){
            saveTheWorldService = heroSaveTheWorld;
        }else {
            saveTheWorldService = commonSaveTheWorldService;
        }
        dubboDemoService.test(name);
        return saveTheWorldService.saveTheWorld(name);
    }
}
运行结果如下:
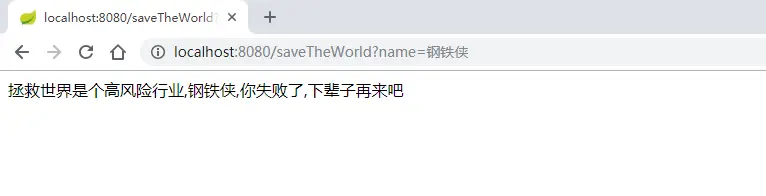
image
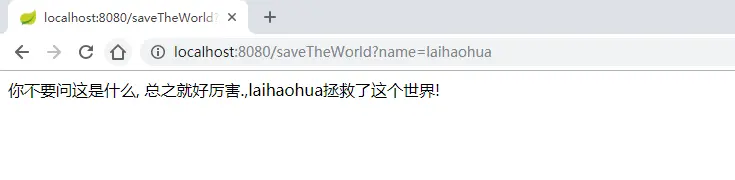
image
最后,如果后续版本有了一个更厉害的SaveTheWorldService的实现, 那我直接就spring.factories里面新增一个配置,然后调用方只需要改动版本号即可, 从而实现了高度解耦
总结
SPI机制在各种开源框架中都是非常常见的, 有的简单点的就直接采用了JDK中的ServiceLoader,如IntelliJ IDEA的插件开发中就应用到了. 有些框架复杂一点的, JDK的SPI已经满足不了, 就自己改造一下, 如spring-boot的SpringFactoriesLoader和dubbo中的ExtensionLoader等, 但是其实背后的原理都是大同小异.
因此, 了解熟悉一下这些机制, 一方面可以让我们更清楚开源框架的运行原理,少走弯路; 另一方面,也可以作为我们日常写代码和系统设计的一种参考,从而写出更加优雅的代码.
最后,毕竟个人认知有限, 若文中有错误之处,还望提出,谢谢大家支持。
原文:https://www.cnblogs.com/lhh-north/p/9571441.html
本文所有代码可以参见:
https://github.com/NorthWard/spilat
https://github.com/NorthWard/niubility-spring-starter
最后编辑于:2024-12-09 22:14:25
© 著作权归作者所有,转载或内容合作请联系作者

喜欢的朋友记得点赞、收藏、关注哦!!!