微信小程序常用API练习 - 头像上传小程序开发笔记
目录
头像上传
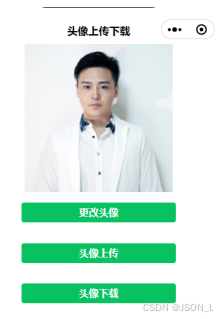
头像上传下载"微信小程序展示了头像信息,并提供了3个按钮,依次为"更改头像""头像上传""头像下载"。点击"更改头像"按钮,可以重新选择头像图片;点击"头像上传"按钮,可以将头像上传到服务器;点击"头像下载"按钮,可以从服务器中下载头像图片并预览。
准备工作
在开发前,需要先完成一些准备工作,主要包括创建项目、配置导航栏、复制素材和启动服务器,具体步骤如下:
创建项目
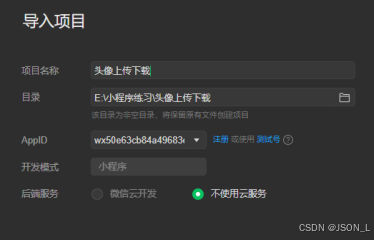
在微信开发者工具中创建一个新的微信小程序项目,项目名称为"头像上传下载",模板选择"不使用模板"。
配置导航栏
在pages/index/index.json文件中配置页面导航栏,具体代码如下:
javascript
{
  "usingComponents": {
    "navigation-bar": "/components/navigation-bar/navigation-bar"
  },
  "navigationBarTitleText": "头像上传下载"
}
图片资源
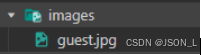
创建images文件夹,并准备一张头像图片。
启动服务器
启动本地HTTP服务器apache和php程序。
服务端具体代码如下:
php
<?php

// 创建文件夹
function createPath(string $dirName)
{
    if (!$dirName) return '';

    $dirName = './' . $dirName . '/' . date('Ymd') . '/';
    if (!file_exists($dirName)) {
        mkdir($dirName, 0755, true);
    }

    return $dirName;
}

// 文件路径处理
function replacePath(string $filePath)
{
    if (!$filePath) return '';

    $currentPath = dirname($_SERVER['PHP_SELF']);

    return 'http://127.0.0.1' . $currentPath . ltrim($filePath, '.');
}

$file = $_FILES['image'];
$return = ['state' => 0, 'msg' => 'error', 'file' => null];
if (!empty($file)) {
    $upload_dir = createPath('uploads');
    $filePath = $upload_dir . basename($file['name']);
    if (move_uploaded_file($file['tmp_name'], $filePath)) {
        $return['state'] = 1;
        $return['msg'] = 'success';
        $return['file'] = replacePath($filePath);
    }

}

echo json_encode($return);在微信开发者工具的本地设置中勾选"不校验合法域名、web-view(业务域名)、TLS版本以及HTTPS证书"复选框。
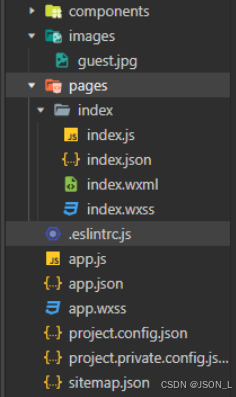
目录结构
头像上传下载"微信小程序的目录结构如下图所示:
至此,准备工作已经全部完成。
头像上传下载页面结构
在pages/index/index.wxml文件中编写页面结构,具体代码如下:
XML
<!--index.wxml-->
<navigation-bar title="头像上传下载" back="{{false}}" color="black" background="#FFF"></navigation-bar>
<view class="imgbox">
    <image src="{{ imgUrl }}" mode="aspectFit" />
    <button type="primary" size="mini" bindtap="changeImg">更改头像</button>
    <button type="primary" size="mini" bindtap="upload">头像上传</button>
    <button type="primary" size="mini" bindtap="download">头像下载</button>
</view>
头像上传下载页面逻辑
在pages/index/index.js文件的Page({})中编写逻辑代码,具体代码如下:
javascript
// index.js
Page({
    data: {
        imgUrl: '/images/guest.jpg', // 头像的初始显示图片
        tempFilePath: null // 用于保存图片文件临时路径
    },
    uploadFileUrl: null, // 保存图片上传之后的图片路径
    // 实现图片选择
    changeImg: function () {
        wx.chooseMedia({
            count: 1,
            mediaType: ['image'],
            sourceType: ['album', 'camera'],
            success: res => {
                var tempFilePath = res.tempFiles[0].tempFilePath
                this.setData({
                    tempFilePath: tempFilePath,
                    imgUrl: tempFilePath
                })
            }
        })
    },
    // 实现头像的上传
    upload: function () {
        // 如果没有更改照片提示更改后再上传
        if (!this.data.tempFilePath) {
            wx.showToast({
                title: '请您更改头像之后再进行上传操作',
                icon: 'none',
                duration: 2000
            })
            return
        }
        // 确认更改头像之后再上传
        wx.uploadFile({
            filePath: this.data.tempFilePath,
            name: 'image',
            url: 'http://127.0.0.1/mini/upload/service.php',
            success: res => {
                this.uploadFileUrl = JSON.parse(res.data).file
                console.log('上传成功', this.uploadFileUrl)
            }
        })
    },
    // 实现图片下载
    download: function () {
        if (!this.uploadFileUrl) {
            wx.showToast({
                title: '请您上传头像之后再进行下载操作',
                icon: 'none',
                duration: 2000
            })
            return
        }
        wx.showLoading({
            title: '图片下载中,请稍后......',
        })
        wx.downloadFile({
            url: this.uploadFileUrl,
            success: res => {
                wx.hideLoading()
                console.log('下载完成')
                wx.previewImage({
                    urls: [res.tempFilePath]
                })
            }
        })
    }
})
头像上传页面样式
在pages/index/index.wxss文件中对页面样式进行美化。具体代码如下:
css
/**index.wxss**/
.imgbox {
    display: flex;
    flex-direction: column;
    text-align: center;
}
.imgbox image {
    margin: 0 auto;
}

.imgbox button {
    margin: 2vh 18vw;
}
功能截图
总结
微信小程序常用API练习 - 头像上传小程序开发笔记