1、下载mysql
Downloads->MySQL Community (GPL) Downloads ->MySQL Community Server
MySQL :: Download MySQL Community Server
查看系统版本
root@localhost mysql# cat /etc/redhat-release CentOS Linux release 7.9.2009 (Core)
查看硬件架构类型
root@localhost mysql# uname -m x86_64
首先查看系统版本
rpm -qa | grep glibc
glibc-devel-2.17-326.el7_9.3.x86_64
glibc-2.17-326.el7_9.3.x86_64
glibc-headers-2.17-326.el7_9.3.x86_64
glibc-common-2.17-326.el7_9.3.x86_64
Select Version: 8.0.40
Select Operating System:Linux-Generic
Select OS Version:Linux-Generic(glibc)(x86,64-bit)
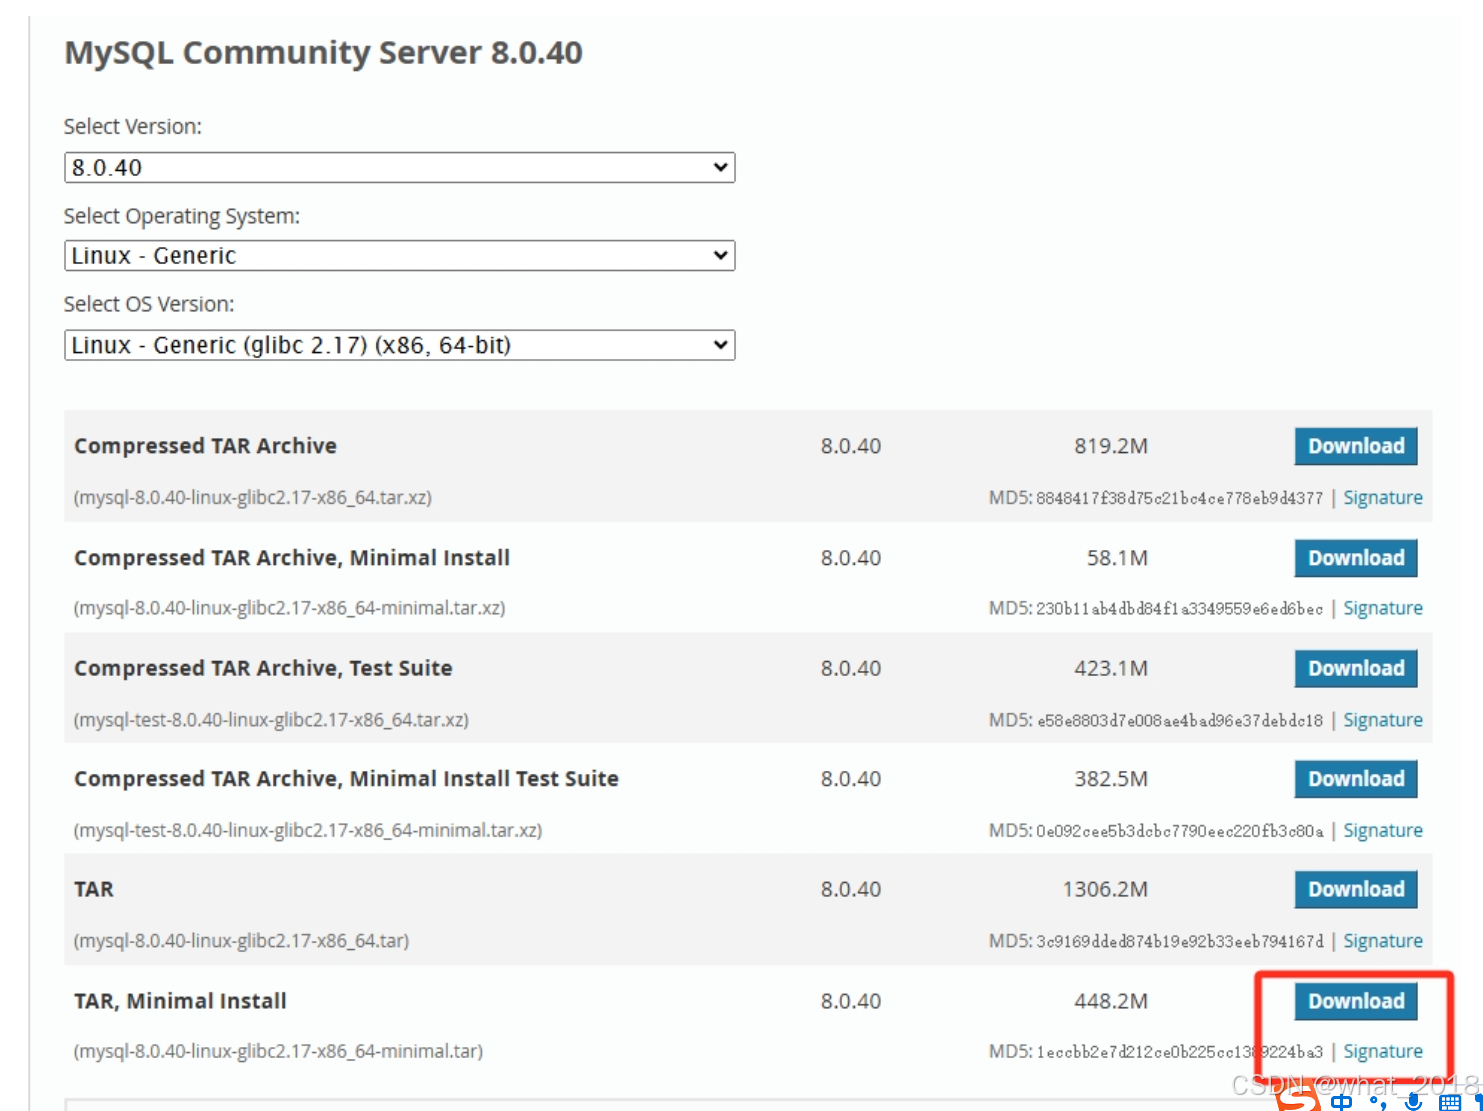
1、下载安装包
[root@localhost mysql]# wget https://cdn.mysql.com//Downloads/MySQL-8.0/mysql-8.0.40-linux-glibc2.17-x86_64-minimal.tar查看下载文件安装包:
[root@localhost mysql]# ll
总用量 458972
-rw-r--r--.  1 root  root  469985280 9月  21 02:30 mysql-8.0.40-linux-glibc2.17-x86_64-minimal.tar
解压mysql-8.0.40-linux-glibc2.17-x86_64-minimal.tar 安装包
[root@localhost mysql]# tar -xvf mysql-8.0.40-linux-glibc2.17-x86_64-minimal.tar
mysql-test-8.0.40-linux-glibc2.17-x86_64-minimal.tar.xz
mysql-8.0.40-linux-glibc2.17-x86_64-minimal.tar.xz
mysql-router-8.0.40-linux-glibc2.17-x86_64-minimal.tar.xz
查看解压文件
[root@localhost mysql]# ll
总用量 917940
drwxr-xr-x. 10 mysql mysql       141 12月 19 10:02 mysql8
-rw-r--r--.  1 root  root  469985280 9月  21 02:30 mysql-8.0.40-linux-glibc2.17-x86_64-minimal.tar
-rw-r--r--.  1  7155 31415  60957800 9月  21 00:57 mysql-8.0.40-linux-glibc2.17-x86_64-minimal.tar.xz
-rw-r--r--.  1  7155 31415   7981904 9月  21 01:41 mysql-router-8.0.40-linux-glibc2.17-x86_64-minimal.tar.xz
-rw-r--r--.  1  7155 31415 401035692 9月  21 02:24 mysql-test-8.0.40-linux-glibc2.17-x86_64-minimal.tar.xz
解压 mysql-8.0.40-linux-glibc2.17-x86_64-minimal.tar.xz
[root@localhost mysql]# tar -xvf mysql-8.0.40-linux-glibc2.17-x86_64-minimal.tar.xz
mysql-8.0.40-linux-glibc2.17-x86_64-minimal/bin/
mysql-8.0.40-linux-glibc2.17-x86_64-minimal/bin/myisam_ftdump
mysql-8.0.40-linux-glibc2.17-x86_64-minimal/bin/myisamchk
- 卸载mariadb
在 Linux 系统中,如果已经安装了 MariaDB,并且想要安装 MySQL,需要先卸载 MariaDB 以避免冲突。
#先列出MariaDB相关的包:
[root@localhost bin]# rpm -qa | grep mariadb
 mariadb-libs-6.0-2.el7.x86_64
 mariadb-server-5.5.56-2.el7.x86_64
卸载列出的包:
rpm -e --nodeps  mariadb-libs-6.0-2.el7.x86_64
rpm -e --nodeps  mariadb-server-5.5.56-2.el7.x86_64
检查是否卸载成功:(无任何返回值,则表示卸载成功)
rpm -qa | grep mariadb2、查看文件并且重名文件夹名
[root@localhost mysql]# ll
总用量 917940
drwxr-xr-x. 9 root root 129 12月 19 09:52 mysql-8.0.40-linux-glibc2.17-x86_64-minimal
[root@localhost mysql]# mv mysql-8.0.40-linux-glibc2.17-x86_64-minimal mysql8
cd到mysql解压后的目录中:
[root@localhost mysql]# cd /home/tools/mysql/mysql83、创建存储初始化数据目录
[root@localhost mysql8]# mkdir data
[root@localhost mysql8]# ll
总用量 268
drwxr-xr-x. 2 7161 31415 4096 9月 18 19:35 bin
drwxr-xr-x. 2 root root 6 12月 18 17:42 data
drwxr-xr-x. 2 7161 31415 38 9月 18 19:35 docs
drwxr-xr-x. 3 7161 31415 4096 9月 18 19:35 include
drwxr-xr-x. 6 7161 31415 201 9月 18 19:35 lib
-rw-r--r--. 1 7161 31415 257478 9月 18 18:08 LICENSE
drwxr-xr-x. 4 7161 31415 30 9月 18 19:35 man
-rw-r--r--. 1 7161 31415 666 9月 18 18:08 README
drwxr-xr-x. 28 7161 31415 4096 9月 18 19:35 share
drwxr-xr-x. 2 7161 31415 77 9月 18 19:35 support-files4、创建 MySQL 用户和用户组并设置目录权限
创建用户和用户组:
groupadd mysql
useradd -g mysql mysql
groupadd mysql:创建一个名为 mysql 的用户组,以便于管理 MySQL 用户。
useradd -g mysql mysql:创建一个名为 mysql 的用户,并将其添加到 mysql 用户组,以提高安全性。
设置目录权限:
[root@localhost mysql8]# chown -R mysql:mysql /home/tools/mysql/mysql8
[root@localhost mysql8]# chmod 750 /home/tools/mysql/mysql8/datachown -R mysql:mysql /home/tools/mysql/mysql8:递归地将 MySQL 安装目录的所有权更改为 mysql 用户和用户组。
chmod 750 /home/tools/mysql/mysql8/data:设置数据目录的权限为 750,表示所有者有读、写、执行权限,组用户有读和执行权限,其他用户无权限。
5、创建配置文件
MySQL所需的配置文件放在/etc下叫my.cnf(原本没有,直接创建)
[root@localhost mysql8] vim /etc/my.cnf[mysqld]
bind-address=0.0.0.0 # 允许从任何 IP 地址连接
port=3306 # MySQL 默认端口
user=mysql # 运行 MySQL 的用户
basedir=/home/tools/mysql/mysql8 # MySQL 安装根目录
datadir=/home/tools/mysql/mysql8/data # 数据存储目录
[mysqld_safe]
socket=/home/tools/mysql/mysql8/data/tmp/mysql.sock # socket 文件路径
log-error=/home/tools/mysql/mysql8/data/error/mysql.log # 错误日志路径
pid-file=/home/tools/mysql/mysql8/data/RR.pid # 进程 ID 文件路径
character_set_server=utf8mb4 # 设置服务器字符集为 utf8mb4
symbolic-links=0 # 是否支持符号链接
explicit_defaults_for_timestamp=ON # 时间戳处理模式
sql_mode=STRICT_TRANS_TABLES,NO_ZERO_IN_DATE,NO_ZERO_DATE,ERROR_FOR_DIVISION_BY_ZERO,NO_ENGINE_SUBSTITUTION # SQL 模式设置
lower_case_table_names=1 # 忽略表名大小写
[client]
default-character-set=utf8mb4 # 客户端默认字符集
socket=/home/tools/mysql/mysql8/data/tmp/mysql.sock # 客户端 socket 文件路径
6、创建mysql服务
将 MySQL 服务脚本复制到 /etc/init.d/:
cp -a /home/tools/mysql/mysql8/support-files/mysql.server /etc/init.d/mysql
授权并添加服务:
- 给服务脚本执行权限
chmod +x /etc/init.d/mysql
- 将 MySQL 服务添加到系统管理工具中
chkconfig --add mysql
7、初始化mysql
./mysqld --user=mysql --basedir=/home/tools/mysql/mysql8 --datadir=/home/tools/mysql/mysql8/data/ --initialize
2024-12-19T02:02:42.439684Z 0 [System] [MY-013169] [Server] /home/tools/mysql/mysql8/bin/mysqld (mysqld 8.0.40) initializing of server in progress as process 15266
2024-12-19T02:02:42.520016Z 1 [System] [MY-013576] [InnoDB] InnoDB initialization has started.
2024-12-19T02:02:44.027181Z 1 [System] [MY-013577] [InnoDB] InnoDB initialization has ended.
2024-12-19T02:02:48.155762Z 6 [Note] [MY-010454] [Server] A temporary password is generated for root@localhost: 1zN*IUOpc#qs
./mysqld:指向 MySQL 服务器的可执行文件。通常位于 MySQL 安装目录中的 bin 子目录下,比如 /usr/local/mysql/mysql8/bin/mysqld。
--user=mysql:指定以 mysql 用户的身份运行 MySQL 服务器。这是为了确保 MySQL 进程具有适当的文件权限,特别是对于数据目录的读写权限。
--basedir=/usr/local/mysql/mysql8:指定 MySQL 的安装根目录。MySQL 将根据此路径找到二进制文件和其他相关资源(如 share 目录中的支持文件)。
--datadir=/usr/local/mysql/mysql8/data/:指定 MySQL 的数据存储目录。在初始化过程中,MySQL 会在此目录下创建系统数据库和必要的文件,以便 MySQL 服务能够正常运行。
--initialize:执行初始化操作。这会在指定的数据目录中创建 MySQL 系统表和其他必要的系统文件,此外还会生成一个随机的 root 初始密码。注意,该操作只能在数据目录为空时运行。
6、创建MySQL数据文件
创建用于存储 MySQL 数据的目录,包括数据文件、错误日志和临时文件目录,这些目录能够管理和故障排查
mkdir -p /home/tools/mysql/mysql-8.0.40/data/error
chown -R mysql:mysql /home/tools/mysql/mysql-8.0.40/data/error
chmod 755 /home/tools/mysql/mysql-8.0.40/data/error
touch /home/tools/mysql/mysql-8.0.40/data/error/mysql.log
chown mysql:mysql /home/tools/mysql/mysql-8.0.40/data/error/mysql.log
chmod 644 /home/tools/mysql/mysql-8.0.40/data/error/mysql.log
chown -R mysql:mysql /home/tools/mysql/mysql-8.0.40/data
chmod -R 755 /home/tools/mysql/mysql-8.0.40/data
mkdir -p /home/tools/mysql/mysql-8.0.40/data/tmp
chown -R mysql:mysql /home/tools/mysql/mysql-8.0.40/data/tmp
chmod 755 /home/tools/mysql/mysql-8.0.40/data/tmp7、启动mysql
[root@localhost data]# service mysql start
Starting MySQL.. SUCCESS!
#查看mysql进程
[root@localhost data]# ps -ef|grep mysql
root 30069 1 0 10:08 pts/3 00:00:00 /bin/sh /home/tools/mysql/mysql8/bin/mysqld_safe --datadir=/home/tools/mysql/mysql8/data --pid-file=/home/tools/mysql/mysql8/data/localhost.localdomain.pid
mysql 30349 30069 5 10:08 pts/3 00:00:01 /home/tools/mysql/mysql8/bin/mysqld --basedir=/home/tools/mysql/mysql8 --datadir=/home/tools/mysql/mysql8/data --plugin-dir=/home/tools/mysql/mysql8/lib/plugin --user=mysql --log-error=/home/tools/mysql/mysql8/data/error/mysql.log --pid-file=/home/tools/mysql/mysql8/data/localhost.localdomain.pid --socket=/home/tools/mysql/mysql8/data/tmp/mysql.sock --port=3306
root 31125 14690 0 10:08 pts/3 00:00:00 grep --color=auto mysql
8、修改数据库密码
[root@localhost data]# mysql -uroot -p
#将刚才初始化的密码输入进去 1zN*IUOpc#qs
Enter password:
Welcome to the MySQL monitor. Commands end with ; or \g.
Your MySQL connection id is 8
Server version: 8.0.40
Copyright (c) 2000, 2024, Oracle and/or its affiliates.
Oracle is a registered trademark of Oracle Corporation and/or its
affiliates. Other names may be trademarks of their respective
owners.
Type 'help;' or '\h' for help. Type '\c' to clear the current input statement.
mysql> ALTER USER 'root'@'localhost' IDENTIFIED BY '123456';
Query OK, 0 rows affected (0.01 sec)
#刷新一下权限
mysql> flush privileges;
Query OK, 0 rows affected (0.00 sec)
#退出
mysql> quit
-bash: mysql: 未找到命令
#解决方案:
vim /etc/profile或者 su - mysql
#添加环境变量
export PATH=$PATH:/usr/local/mysql/bin
#然后执行:
source /etc/profile命令,使环境变量配置生效。之后再尝试输入 mysql -uroot -p 命令,看是否能正常运行。
重启数据库
 [root@localhost bin]# service mysql restart
 Shutting down MySQL.. SUCCESS!
 Starting MySQL.. SUCCESS!
9、设置远程登录
#新密码登录
[root@localhost bin]# mysql -uroot -p
Enter password:
Welcome to the MySQL monitor. Commands end with ; or \g.
Your MySQL connection id is 8
Server version: 8.0.40 MySQL Community Server - GPL
Copyright (c) 2000, 2024, Oracle and/or its affiliates.
Oracle is a registered trademark of Oracle Corporation and/or its
affiliates. Other names may be trademarks of their respective
owners.
Type 'help;' or '\h' for help. Type '\c' to clear the current input statement.
#查看数据库
mysql> show databases
-> ;
+--------------------+
| Database |
+--------------------+
| information_schema |
| mysql |
| performance_schema |
| sys |
+--------------------+
4 rows in set (0.01 sec)
#user 表在mysql库中,先进mysql
mysql> use mysql;
Reading table information for completion of table and column names
You can turn off this feature to get a quicker startup with -A
Database changed
#远程登录设置:更新 MySQL 数据库中 mysql 库的 user 表,将 root 用户的 host 字段设置为 %,意味着 root 用户可以从任何主机连接到 MySQL 服务。% 是 MySQL 中的通配符,表示任何 IP 地址。
mysql> UPDATE user SET host='%' WHERE user='root';
Query OK, 1 row affected (0.01 sec)
Rows matched: 1 Changed: 1 Warnings: 0
#刷新一下权限
mysql> flush privileges;
Query OK, 0 rows affected (0.00 sec)
#退出
mysql> exit
重启数据库
[root@localhost bin]# service mysql restart
Shutting down MySQL.... SUCCESS!
Starting MySQL.. SUCCESS!
9、添加防火墙
[root@localhost bin]# firewall-cmd --zone=public --add-port=3306/tcp --permanent
Warning: ALREADY_ENABLED: 3306:tcp
success
[root@localhost bin]# firewall-cmd --reload
success
[root@localhost bin]# firewall-cmd --zone=public --query-port=3306/tcp
yes10、远程验证
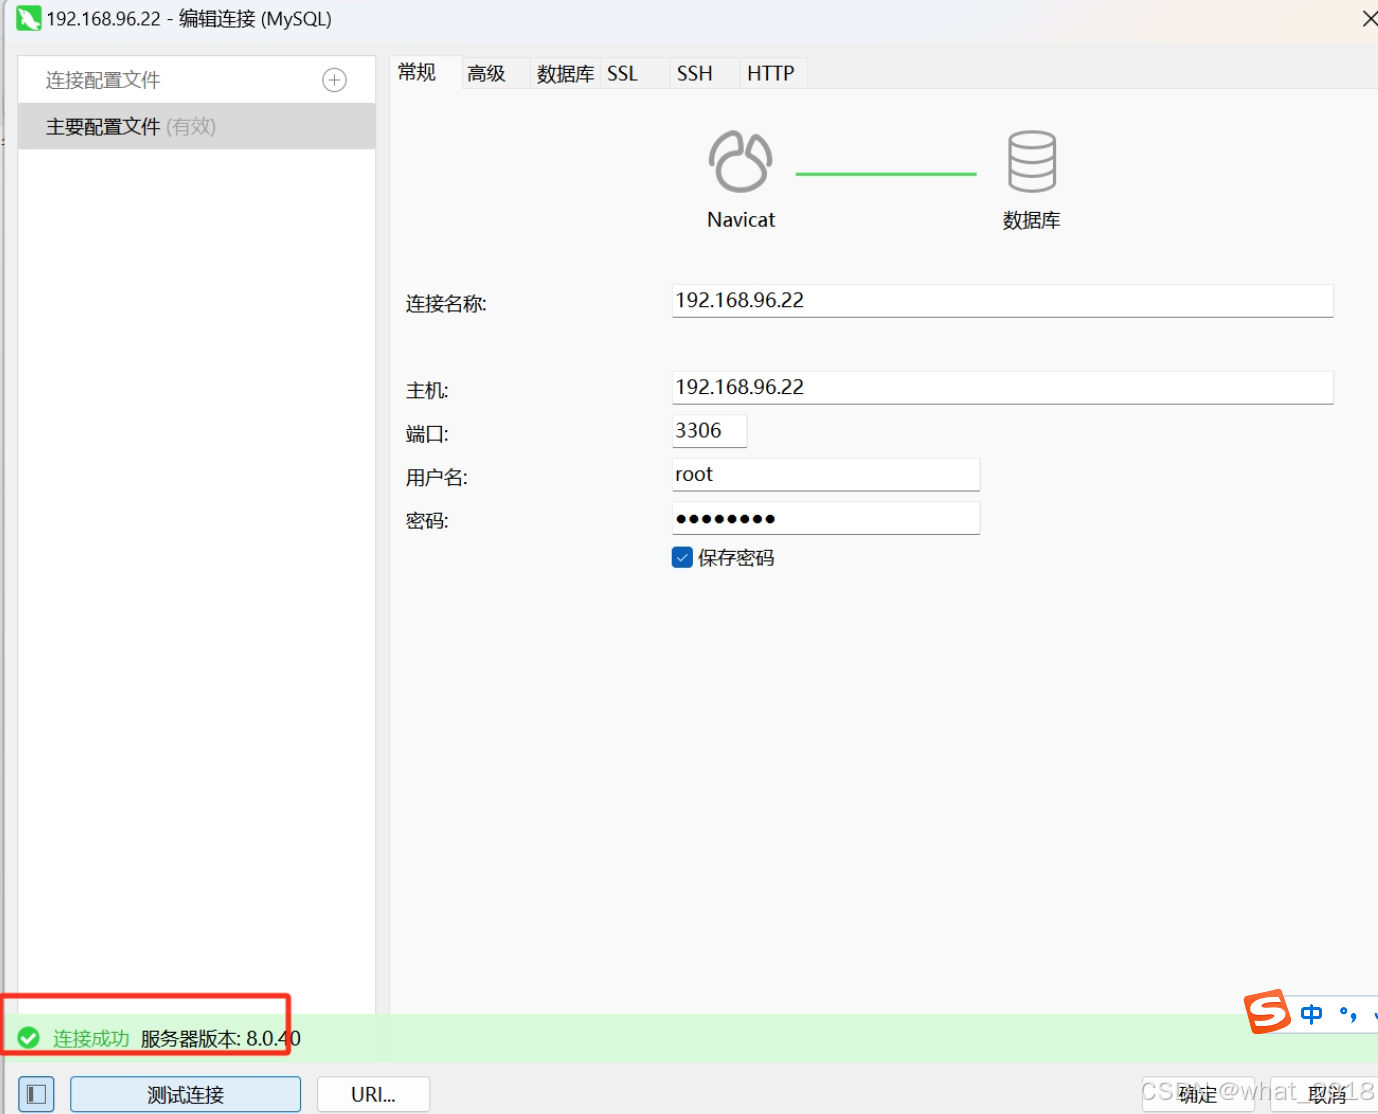
11、维护命令
[root@localhost bin]# service mysql stop
Shutting down MySQL.. SUCCESS!
[root@localhost bin]# service mysql start
Starting MySQL.. SUCCESS!
12、卸载重装
1.查询本机安装的mysql rpm -qa |grep -i mysql
2.使用 yum remove ...删除每一个安装 删除后再使用 rpm -qa |grep -i mysql 进行验证
3.查找mysql相关目录 find / -name mysql
4.对这些目录一个个的进行删除 rm -rf
5.删除/etc/my.cnf 文件 rm -rf /etc/my.cnf
删除 /var/log/mysql/mysqld.log文件 rm -rf /var/log/mysql/mysqld.log
6.卸载mariadb
在 Linux 系统中,如果已经安装了 MariaDB,并且想要安装 MySQL,需要先卸载 MariaDB 以避免冲突。
#先列出MariaDB相关的包:
[root@localhost bin]# rpm -qa | grep mariadb
 mariadb-libs-6.0-2.el7.x86_64
 mariadb-server-5.5.56-2.el7.x86_64
卸载列出的包:
rpm -e --nodeps  mariadb-libs-6.0-2.el7.x86_64
rpm -e --nodeps  mariadb-server-5.5.56-2.el7.x86_64
检查是否卸载成功:(无任何返回值,则表示卸载成功)
rpm -qa | grep mariadb参考链接: