本文介绍Airflow模板技术,包括用于场景,jinja基本语法,以及Airflow中如何使用模板实现灵活的任务配置实现,最后通过示例展示如何使用Airflow模板。
模板应用场景
让我们从典型场景开始。假设你有DAG流程,需要从目录中抽取数据,目录的名称是按日期定义的。如何实现从这些目录中提取数据的任务?我相信我们都同意下面的代码是行不通的:

python
@task
def extract_data():
  date = '2025-01-01'
  extract(date)
硬编码日期意味着每天更改它,这没有意义。那这个版本呢?
python
from datetime import date

@task
def extract_data():
  current_date = date.today()
  extract(current_date)
稍微好一点,因为日期不再是硬编码的,而是基于当前日期。然而,这个解决方案有一个严重的限制。如果你错过了一天,想要重新运行当天的任务,该怎么办?你要把日期硬编码到今天吗?如果你错过了一周呢?一个月?你懂的。我们需要一个更好的解决方案。
jinja模板! 你将在本文后面发现解决方案。跟着我😉
jinja简介
Jinja 是一个现代的、功能强大的模板引擎,它是用 Python 语言编写的。模板引擎是一种工具,用于将数据与模板文件结合起来,生成最终的文本输出。Jinja 主要用于 Web 开发,但也在其他许多场景下发挥作用,比如在代码生成、配置文件管理等领域。

在 Jinja 模板中,可以使用双花括号{``{ variable_name }}来表示变量。例如,在一个 HTML 模板中,如果有一个变量page_title,可以在模板中这样使用:<title>{``{ page_title }}</title>。当模板被渲染时,{``{ page_title }}会被替换为实际的变量值。
过滤器(Filters)
Jinja 提供了过滤器来修改变量的值。过滤器通过管道符|连接变量和过滤器名称。例如,{``{ variable_name | filter_name }}。
常见的过滤器包括upper(将字符串转换为大写)、lower(转换为小写)、date(格式化日期)等。例如,将一个日期变量格式化:
{{ post.published_date | date('%Y-%m-%d') }}宏(Macros)
宏类似于函数,用于在模板中重复使用代码片段。通过{% macro macro_name(arg1, arg2,...) %}...{% endmacro %}来定义宏。
例如,定义一个用于生成按钮的宏:
python
# 宏定义

{% macro button(text, href) %}
    <a href="{{ href }}" class="button">{{ text }}</a>
{% endmacro %}

# 调用宏
{{ button('点击我', '/about') }}
jinja还支持条件判断和循环语句,有兴趣读者可以查看官方文档。
使用Airflow模板
现在你已经了解了什么是Jinja模板,让我们回到前节应用场景。没有忘记吧,我们的目标是从以日期命名的目录中提取数据。然而,我们既不能硬编码日期,因为我们将始终提取相同的数据块,也不能使用datetime.now(),因为我们将无法重试/重新运行DAG运行。那么,解决方案是什么呢?无论何时重新运行DAG,我们如何使用附加到DAG运行的日期始终从正确的目录中提取数据?模板!
具体方法如下:
python
@task
def extract_data(ds=None):
  current_dag_run_date = ds
  extract(current_dag_run_date)
参数ds是一个内置参数,用于访问当前DAG运行的data_interval_start/logical_date,格式为YYYY-MM-DD。说实话,这不是模板,因为我们在这里没有使用Jinja🥹,但这是:
python
def _extract_data(current_dag_run_date):
  print(current_dag_run_date)

PythonOperator(
  task_id="extract_task",
  python_callable=_extract_data,
  op_kwargs={
    "current_dag_run_date": "{{ds}}"
  }
)
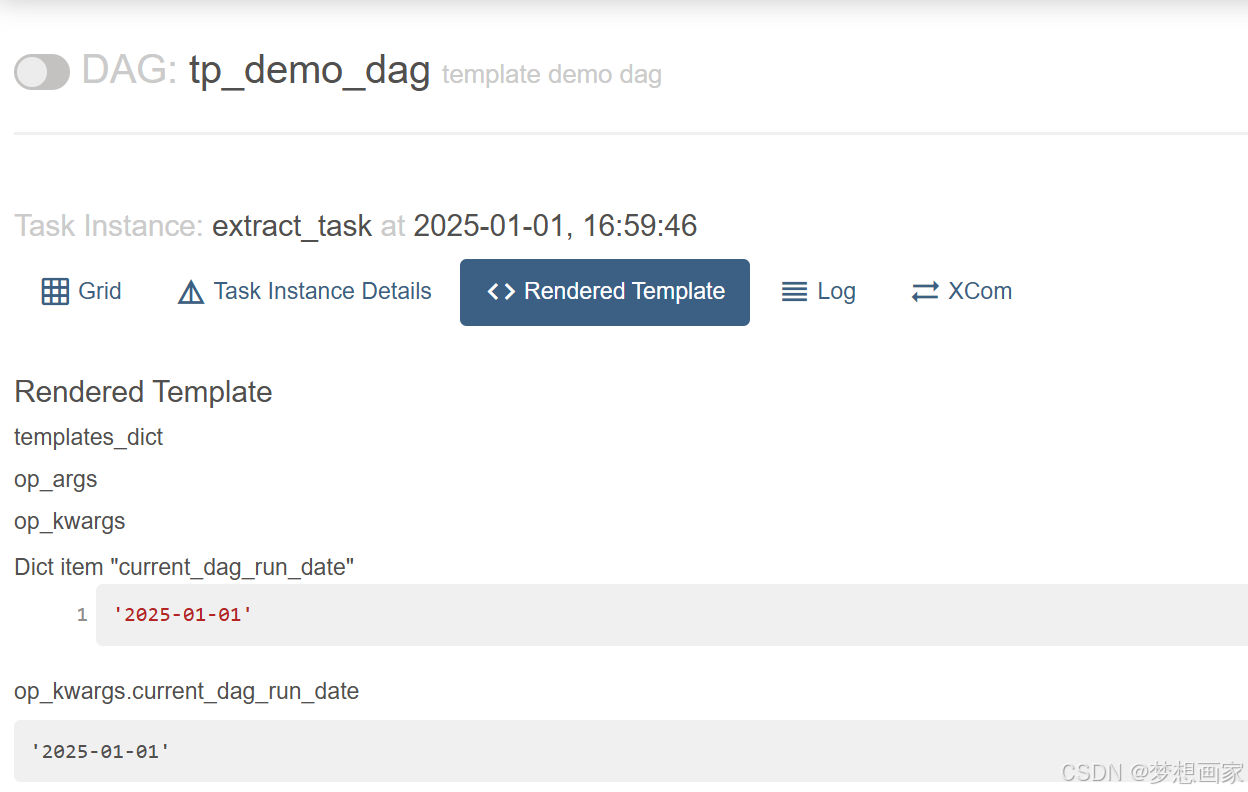
这段代码相当于没有Taskflow API的前一个任务(另一个主题)。关键部分是op_kwargs中的{{ds}}。这告诉Airflow在运行时用相应的值替换大括号之间的占位符。你可以在Airflow界面中查看这个模板的输出:

从上面的屏幕截图中可以看到,ds被DAG运行的实际日期所取代。神奇吧,如果我们想使用另一个操作符,比如BashOperator呢?
Airflow模板与Bash脚本
假设我们希望运行Bash脚本而不是Python函数。因此,我们希望呈现BashOperator执行的Bash脚本。下面是Bash脚本的例子:
sh
#!/bin/sh
echo "Extract data for the {{ ds }}"
注意,Airflow模板位于Bash脚本中的echo命令中。下面是DAG中相应的任务:
python
extract_data = BashOperator(
    task_id="extract_data",
    bash_command="script.sh",
)
默认情况下,Airflow在相对于DAG文件所在目录的目录中搜索脚本文件。因此,如果DAG位于/my/airflow/dags/my_dag.py中,而脚本位于/my/airflow/scripts/extract.sh中,则必须使用:
python
extract_data = BashOperator(
  task_id="extract_data",
  bash_command="scripts/extract.sh",
)
也可以在Dag中指定template_searchpath参数:
python
with DAG(..., template_searchpath=["/my/airflow/scripts"]):

  extract_data = BashOperator(
    task_id="extract_data",
    bash_command="extract.sh",
  )
如果我们运行此任务,我们将在标准输出中看到"提取2025-01-01的数据",该日期根据DAG run运行的时间而变化。这与Python脚本或SQL文件的工作原理相同。Airflow模板允许你在运行时在任务中注入DAG运行和任务实例元数据。
内置变量和宏
Airflow提供了许多变量和宏,你可以在你的模板中使用。
最常用的是:
| Variable | Type | Description |
|---|---|---|
{``{ data_interval_start }} |
pendulum.DateTime | Start of the data interval for the current DAG run |
{``{ data_interval_end }} |
pendulum.DateTime | End of the data interval for the current DAG run |
{``{ ds }} |
str | The DAG run's logical date as YYYY-MM-DD. (same as data_interval_start) |
{``{ ds_nodash }} |
str | Same as ds with YYYYMMDD |
{``{ prev_data_interval_start_success }} |
pendulum.DateTime | None | Start of the data interval of the prior successful DAG run. It is helpful to prevent running the current DAG run if the previous one failed. |
{``{ params }} |
dict[str, Any] | The user-defined params from the DAG object. |
{``{ var.value.my_var }} |
Access Airflow Variables |
此外,Airflow宏有助于修改这些变量的输出。假设您想要以不同的格式设置日期;然后你可以这样做:
python
extract_data = BashOperator(
  task_id="extract_data",
  bash_command="echo 'The date is {{ macros.ds_format(ds, '%Y-%m-%d', '%Y/%m/%d') }}'",
)不要犹豫,查看文档以获取这些宏和变量的详尽信息。
使用模板和宏的完整示例
最后,我们写一个DAG示例,混合本文学习的内容:
python
from airflow import DAG
from airflow.operators.bash import BashOperator
from airflow.operators.python import PythonOperator
from airflow.providers.postgres.operators.postgres import PostgresOperator
from datetime import datetime

class CustomPostgresOperator(PostgresOperator):
    template_fields = ('sql', 'parameters')

def _process_logs(logFile):
    pass

templated_log_dir = """{{ var.value.source_path }}/data/{{ macros.ds_format(ts_nodash, "%Y%m%dT%H%M%S", "%Y-%m-%d-%H-%M") }}"""

with DAG("my_dag", start_date=datetime(2023, 1, 1), schedule="@daily", template_searchpath=["/my/path/scripts", "/my/path/sql"]):
    t1 = BashOperator(
            task_id="generate_new_logs",
            bash_command="generate_new_logs.sh ",
    )

    t2 = BashOperator(
            task_id="logs_exist",
            bash_command=f"test -f {{{{templated_log_dir}}}}/log.csv",
    )

    t3 = PythonOperator(
            task_id="process_logs",
            python_callable=_process_logs,
            op_args=[templated_log_dir + "log.csv"]
    )

    t4 = CustomPostgresOperator(
            task_id="save_logs",
            sql="insert_log.sql",
            parameters={
            'log_dir': templated_log_dir + '/processed_log.csv'}
    )

t1 >> t2 >> t3 >> t4
下面是简短的解释:
- 首先,我们用Airflow变量source_path创建一个变量templated_log_dir。然后,使用宏ds_format更改ts_nodash的输出格式。渲染后,路径看起来像这样:my_var_value/data/2025-01-01-20-55/
- T1使用BashOperator生成日志,BashOperator调用脚本generate_new_logs.sh。该脚本在以下位置创建一个日志文件:my_var_value/data/2025-01-01-20-55/log.csv。
- T2通过运行bash命令检查"log.csv"是否存在。注意这里使用了四对花括号。这是因为我们在f字符串中使用模板,并且需要为Jinja留出花括号。更多信息请点击这里。
- T3执行Python脚本" process_log.py "来处理和清理" log.csv "。我们通过op_args形参给出了文件的路径,它是可模板化的。
- 最后,T4创建一个表来加载Postgres中处理过的日志。注意,我们用CustomPostgresOperator扩展PostgresOperator来覆盖template_fields变量,并使参数可模板化,因为它不是默认的。
总结
如果PostgresOperator不熟悉,请继续关注我的Airflow系列主题;这就是Airflow模板和宏的内容。我希望你喜欢这个教程。这些概念是Airflow的基础知识,你总是会在dag中使用模板。