1 官网下载
下载网址:https://code.visualstudio.com/Download
如下图所示,可以分别下载Windows,Linux,macOS版本

历史版本下载链接: https://code.visualstudio.com/updates!载链接: https://code.visualstudio.com/updates
2 安装Python扩展工具
打开 VS Code,安装 Microsoft 提供的官方 Python 扩展工具:
-
打开 VS Code
-
点击左侧活动栏中的扩展图标(四个小方块的图标)

-
在搜索栏中输入 Python和Python Debugger
-
找到由 Microsoft 提供的 Python 扩展工具和Python Debugger扩展工具,并分别点击 Install 进行安装

等待安装结束,如下:

3 配置 vscode 使用 Anaconda 环境
-
打开
vscode,并打开你要开发的工作区或文件夹,比如E盘train_code中的一个python文件夹

-
按快捷键
Ctrl+Shift+P打开命令面板,输入并选择Python: Select Interpreter打开命令面板也可以通过在搜索框输入符号
>进行打开 -
在弹出的列表中,选择你使用Anaconda所创建的虚拟环境(例如 pytorch)

注意:
如果没有看到虚拟环境,点击 Enter interpreter path 并浏览到 Anaconda 环境中的 Python 可执行文件路径,本例中虚拟环境所在路径为
C:\others\my_software\anaconda\envs\pytorchpython.exe查看虚拟环境路径也可以通过命令
conda env list进行查看
点击
Enter interpreter path并浏览到 Anaconda 环境中的 Python 可执行文件路径:
点击"Find",然后找到 Python 可执行文件,点击"Select Interpreter"即可


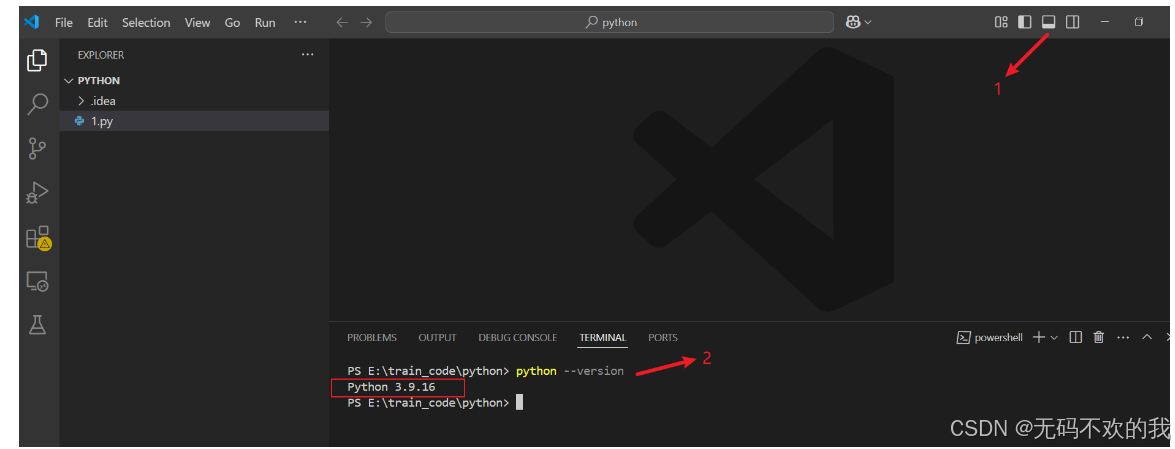
- 验证环境配置
在 VS Code 中打开一个新的终端窗口,输入 python 版本检查命令:
python --version确保终端使用的是你选择的 Anaconda 环境:
正确显示虚拟环境对应的 Python 版本号,即配置成功。
- 运行第一个 python 程序

4.代码调试方法
4.1 简单的调试
它适用于不需要在命令行传递参数的情况
方式一:

方式二:
方式三:

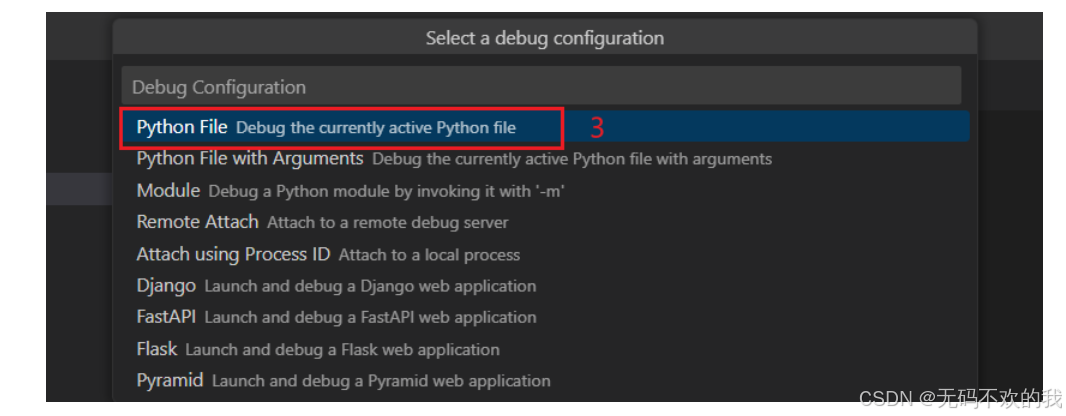
注意: 当VS code第一次进行调试时,会要求用户选择调试器,如下图所示

示例:
假如需要调试的代码如下所示,使用方式一进行调试
python
def calculate_area(length, width):
    return length * width

def main(length=5, width=10,prints=True):

    # 计算矩形面积
    area = calculate_area(length, width)

    # 输出结果
    if prints:
        print(f"The area of the rectangle is: {area}")

if __name__ == "__main__":
    main()

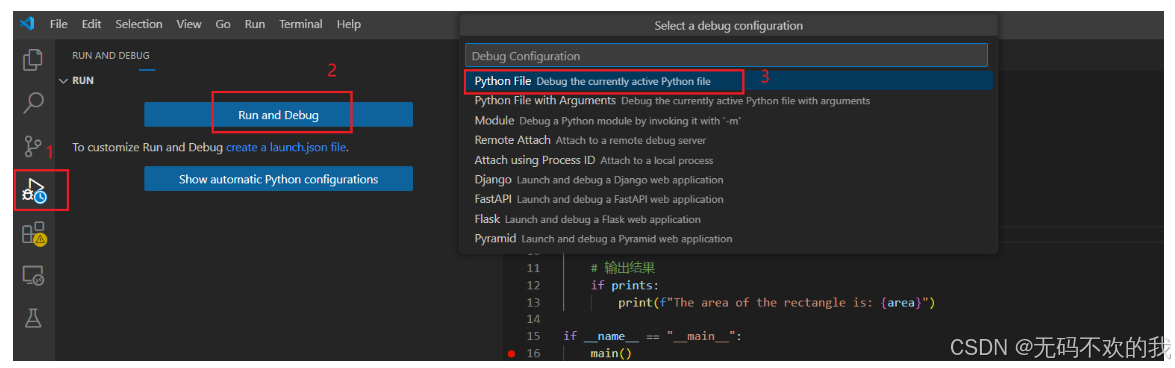
4.2 使用launch.json进行调试
它适用于需要在命令行传递参数的情况:
步骤1,2,3如下图所示:

步骤4如下图所示:

执行完步骤4,会新建一个launch.json文件,如下所示:

这里可以解释一下该文件中一些重要参数的含义
json
{
    // Use IntelliSense to learn about possible attributes.
    // Hover to view descriptions of existing attributes.
    // For more information, visit: https://go.microsoft.com/fwlink/?linkid=830387
    "version": "0.2.0",
    "configurations": [

        {
            "name": "Python Debugger: Current File with Arguments",
            "type": "debugpy",
            "request": "launch",
            "program": "${file}",//指定当前正在运行的文件,它的默认值为"${file}",表示当前所运行的文件为鼠标所选中的文件,你也可以将其设置为指定位置的脚本文件,例如"${workspaceFolder}/your_script.py", 其中${workspaceFolder}表示当前工作空间的根目录
            "cwd":"${workspaceFolder}",//设置工作目录,它的默认值为"${workspaceFolder}",即当前工作空间的根目录,你也可以将其设置为"${fileDirname}",表示工作目录为当前打开文件所在目录,或者也可以自定义其他目录,例如"${workspaceFolder}/src"
            "console": "integratedTerminal",
            "args": [
                "${command:pickArgs}"
            ]
        }
    ]
}
假如此时需要调试的代码如下:
python
import argparse

def calculate_area(length, width):
    return length * width

def main():
    # 创建 ArgumentParser 对象
    parser = argparse.ArgumentParser(description="Calculate the area of a rectangle.")

    # 添加命令行参数,使用 -- 来指定可选参数
    parser.add_argument('--length', type=float, required=True, help="Length of the rectangle")
    parser.add_argument('--width', type=float, required=True, help="Width of the rectangle")
    parser.add_argument('--print', action='store_true', help="print the Area of the rectangle")

    # 解析命令行参数
    args = parser.parse_args()

    # 计算矩形面积
    area = calculate_area(args.length, args.width)

    # 输出结果
    if args.print:
        print(f"The area of the rectangle is: {area}")

if __name__ == "__main__":
    main()
launch.json文件内容如下:
json
{
    // Use IntelliSense to learn about possible attributes.
    // Hover to view descriptions of existing attributes.
    // For more information, visit: https://go.microsoft.com/fwlink/?linkid=830387
    "version": "0.2.0",
    "configurations": [

        {
            "name": "Python Debugger: Current File with Arguments",
            "type": "debugpy",
            "request": "launch",
            "program": "${file}",
            "console": "integratedTerminal",
            "args": [
               "--length","10","--width","5","--print"
            ]
        }
    ]
}
此时我们可以先打断点然后进行调试:
注意:此时1.py为鼠标所选中的文件,所以1.py为当前正在运行(调试)的文件,所以launch.json中"program": "${file}"所指的文件就是1.py
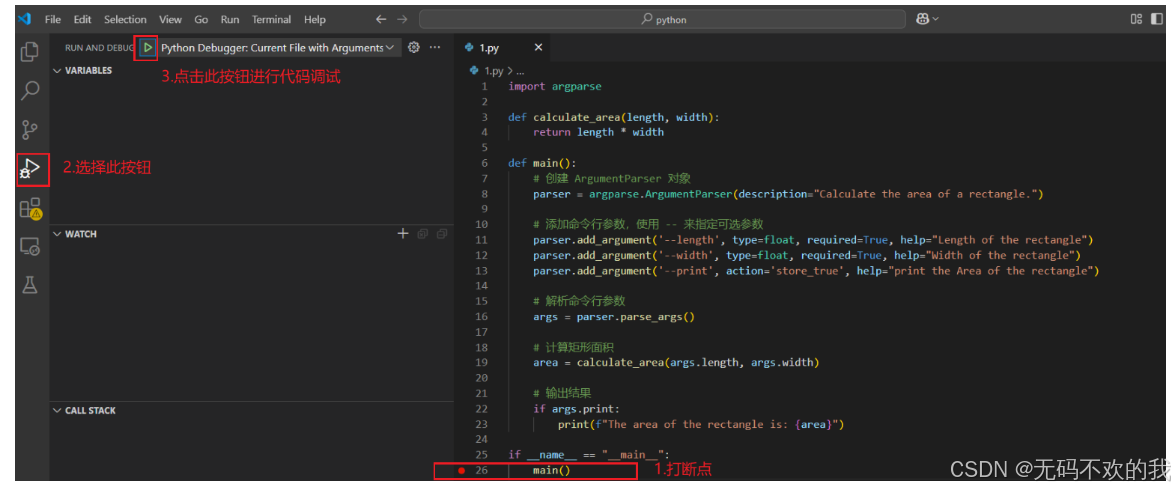
调试结果如下:


4.3 使用debugpy方式
它适用于需要在命令行传递参数的情况,当需要传递的参数非常多时,使用该方式要比使用launch.json方法要简单很多
1. 安装包
pip install debugpy -U2. 写配置
- 在需要调试的代码中的最前面加上下面的try语句
python
# 导入 debugpy 库,debugpy 是一个用于在 Python 中进行调试的库,通常与 Visual Studio Code 配合使用
import debugpy
try:
    # 调用 debugpy 的 listen 方法,使调试器开始监听指定的主机和端口。在这里,监听的主机是 'localhost',端口是 9501。默认情况下,VS Code 调试配置会使用 5678 端口,但这里使用了 9501。
    debugpy.listen(("localhost", 9501))
     # 输出信息,提示用户调试器正在等待附加连接
    print("Waiting for debugger attach")
    # 等待调试器(例如 VS Code)连接到当前 Python 进程。程序会在这一行暂停,直到调试器附加进来。
    debugpy.wait_for_client()
# 捕获所有异常,若有异常发生,进入 except 块
except Exception as e:
    # 如果发生异常,则什么也不做,直接跳过
pass- 在vscode的launch.json的configuration里面,加上下面的内容
json
{
    "name": "file_debug",
    "type": "debugpy",
    "request": "attach",
    "connect": {
        "host": "localhost",
        "port": 9501
    }
},
注意:
这里的"name"的值可以自定义,本例设为file_debug
这里的"host"和"port"的值要与前面的try语句中的值保持一致。
3. 启动
- 找到需要调试的python文件,然后打上断点。
- 正常运行代码,此时终端打印出Waiting for debugger attach`。
- 在vscode的调试页面,选择
file_debug进行调试。 - 调试结束之后,别忘记把代码里面的 添加的代码注销掉
示例:
-
假如此时需要调试的代码如下:
pythonimport argparse def calculate_area(length, width): return length * width def main(): # 创建 ArgumentParser 对象 parser = argparse.ArgumentParser(description="Calculate the area of a rectangle.") # 添加命令行参数,使用 -- 来指定可选参数 parser.add_argument('--length', type=float, required=True, help="Length of the rectangle") parser.add_argument('--width', type=float, required=True, help="Width of the rectangle") parser.add_argument('--print', action='store_true', help="print the Area of the rectangle") # 解析命令行参数 args = parser.parse_args() # 计算矩形面积 area = calculate_area(args.length, args.width) # 输出结果 if args.print: print(f"The area of the rectangle is: {area}") if __name__ == "__main__": main() -
我们首先要在需要调试的代码前面加上前面所提到的try语句,添加后的结果如下所示:
pythonimport argparse import debugpy # 导入 debugpy 库,debugpy 是一个用于在 Python 中进行调试的库,通常与 Visual Studio Code 配合使用 import debugpy try: # 调用 debugpy 的 listen 方法,使调试器开始监听指定的主机和端口。在这里,监听的主机是 'localhost',端口是 9501。默认情况下,VS Code 调试配置会使用 5678 端口,但这里使用了 9501。 debugpy.listen(("localhost", 9501)) # 输出信息,提示用户调试器正在等待附加连接 print("Waiting for debugger attach") # 等待调试器(例如 VS Code)连接到当前 Python 进程。程序会在这一行暂停,直到调试器附加进来。 debugpy.wait_for_client() # 捕获所有异常,若有异常发生,进入 except 块 except Exception as e: # 如果发生异常,则什么也不做,直接跳过 pass def calculate_area(length, width): return length * width def main(): # 创建 ArgumentParser 对象 parser = argparse.ArgumentParser(description="Calculate the area of a rectangle.") # 添加命令行参数,使用 -- 来指定可选参数 parser.add_argument('--length', type=float, required=True, help="Length of the rectangle") parser.add_argument('--width', type=float, required=True, help="Width of the rectangle") parser.add_argument('--print', action='store_true', help="print the Area of the rectangle") # 解析命令行参数 args = parser.parse_args() # 计算矩形面积 area = calculate_area(args.length, args.width) # 输出结果 if args.print: print(f"The area of the rectangle is: {area}") if __name__ == "__main__": main() -
创建launch.json文件


执行完步骤1,2,3,4后,会新建一个launch.json文件,如下所示:

-
在vscode的launch.json的configuration里面,加上下面的内容
json{ "name": "file_debug", "type": "debugpy", "request": "attach", "connect": { "host": "localhost", "port": 9501 } }, -
添加后的效果如下所示:

-
打断点,并运行需要调试的代码,本例中需要运行的代码文件名为1.py,直接在终端输入运行的命令
python 1.py --length 5 --width 10 --print
-
代码调试

5 连接远程服务器
-
vscode安装remote ssh插件

安装之后侧边栏会出现一个远程连接标识

-
配置ssh连接信息


-
连接服务器


-
将远程服务器的文件目录同步在vscode界面


-
将本地文件通过拖拽的方式上传到远程服务器

-
将远程服务器文件下载到本地

-
在远程服务器上安装Python和Python Debugger等扩展工具
注意:在本地已经安装的扩展工具并不能在远程服务器上使用,所以需要在远程服务器上再次安装相应的扩展工具,这样才可以在远程服务器上运行和调试代码


- 选择Python解释器
方法和第3节的相同,
按快捷键 Ctrl+Shift+P 打开命令面板,输入并选择 Python: Select Interpreter
打开命令面板也可以通过在搜索框输入符号
>进行打开
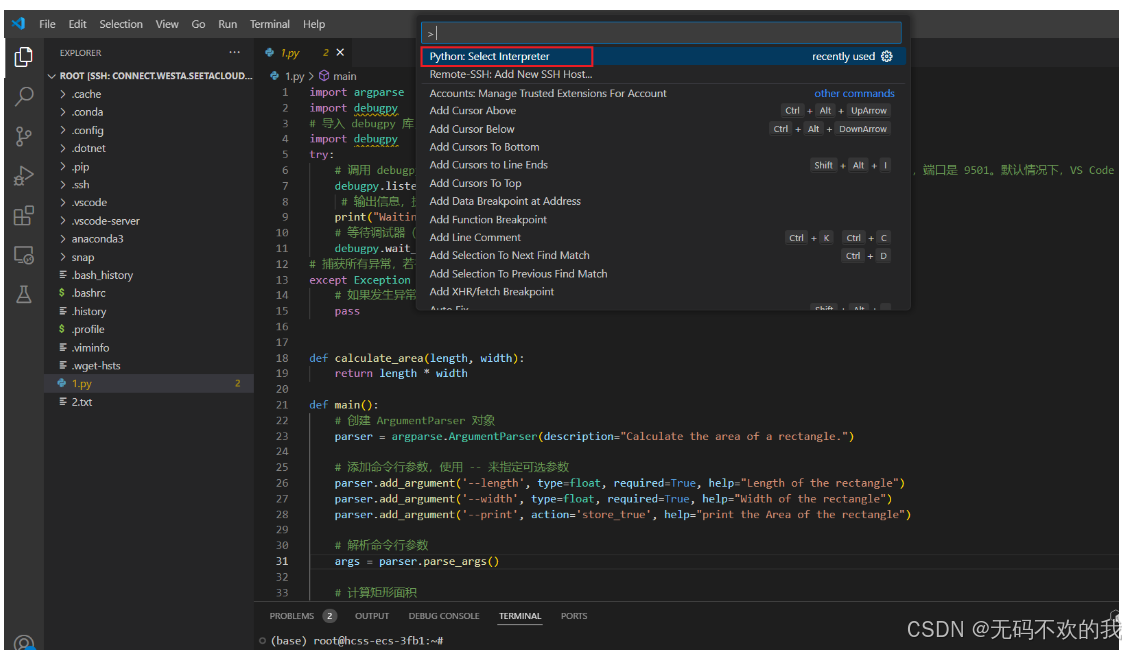
然后在弹出的列表中,选择你使用Anaconda所创建的虚拟环境(例如 pytorch)

如果没有看到虚拟环境,点击 Enter interpreter path 并浏览到 Anaconda 环境中的 Python 可执行文件路径
具体过程可以参考第3节