1、概述
前面我们学习了 Netty 的基本用法,以及内部涉及到的一些组件的概念,最后还开发了一款 HTTP 应用服务器,相信你已经知道了 Netty 是什么,可以用来做什么了。今天我们就重新回到 Cheese 中,我们今天的学习目标是 使用 Netty 替代 NIO,去设计 Chesse 的远程调用的功能,并且还会编码实操 落地成一款 RPC 通信组件。
2、从一个案例开始
首先我们先从简单的案例开始,回忆一下我们前面设计cheese的远程调用的功能的理论依据:**客户端和服务器可以通过 Socket 建立网络连接 然后使用Socket对象的输入输出流 进行数据交换。**我们之前是通过 Socket + NIO 实现的这个过程。今天我们就研究一下 Netty 如何实现。
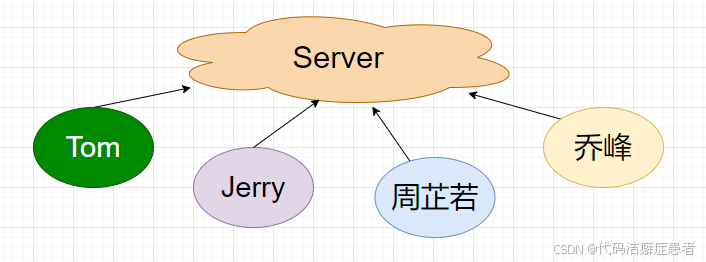
想了很久,觉得还是先通过一个 聊天的程序开始吧,不过这次聊天的案例不是一对一这种简单的单聊模式,我们要研究的是更复杂一些的多人聊天,具体需求是
1、可以启动多个客户端,连接服务端,服务端需要支持多人在线
2、客户端可以选择点对点的聊天
3、客户端不退出的话 服务端需要保持会话
4、当客户端下线后 服务端需要优雅的释放连接
大家可以先想想怎么实现,如果你能搞懂了这些,那么你就已经能够理解市面上的一些 RPC 框架的远程调用的原理了。
3、多人聊天设计
3.1、服务端会话设计
首先我们的服务端需要具备的功能就是要支持多人会话保持,也就是假设同时登陆了 Tom & Jerry,这个时候需要分别维护这两个会话。
3.2、请求转发设计
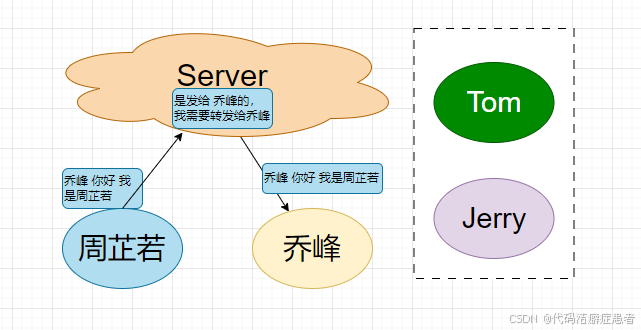
假设同时在线的有4个人,其中的一个人可以分别给另外三个人发消息,并且需要做会话隔离。也就是说假设周芷若给乔峰发了一条消息,这条消息对 Tom & Jerry 来说是不可见的。
3.3、消息体设计
客户端将消息发送给服务端,服务端再将消息转发给客户端。在这个过程中客户端还需要告诉服务端将这条消息发给谁,因此消息结构中需要携带目标用户,此时我们按照以下格式放松消息
目标用户:消息体

eg: 乔峰:你好我是周芷若
3.4、整体设计思路
首先服务端我们可以使用一个Map保存所有的客户端连接,当有连接断开后 我们从Map中移除这个客户端,那么 key 怎么 设计呢,一个最简单的办法就是 将用户名当成 key 作为用户 id 就行了。当客户端上线后先发一个消息进行注册,服务端根据用户名判断是否存在这个用户,存在的话 就拒绝连接 提示用户名被占用。
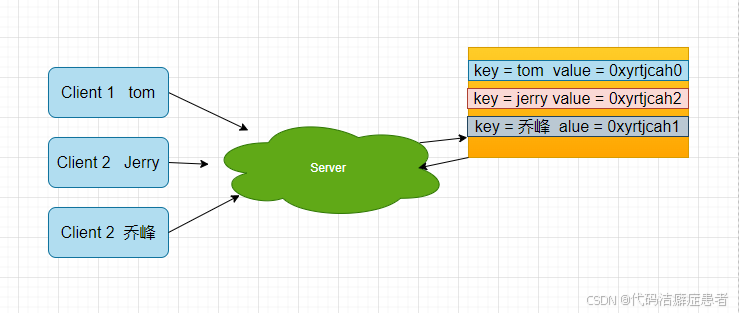
这部分设计好了,后面的就很容易实现了,客户端只管往服务端发消息就行了 ,然后服务端收到客户端发来的消息,查询会话中的用户列表,取出对应的连接通道,把消息转发给目标用户就好了。
4、编码落地
4.1、服务端会话保持实现
首先定义会话类,这个类中需要有一个线程安全的容器存放客户端会话,这里我们选择使用ConcurrentHashMap,然后分别提供新增(注册),移除等方法。
java
package org.wcan.netty._04_demo;

import io.netty.channel.Channel;

import java.util.concurrent.ConcurrentHashMap;

/**
 * @ClassName SessionManager
 * @Description 客户端连接管理器 存储客户端连接信息
 * @Author wcan
 * @Date 2025/2/24 下午 13:01
 * @Version 1.0
 */
public class SessionManager {
    private static final ConcurrentHashMap<String, Channel> clients = new ConcurrentHashMap<>();

    public static ConcurrentHashMap<String, Channel> getClients() {
        return clients;
    }

    // 注册客户端
    public static void registerClient(String clientId, Channel channel) {
        clients.put(clientId, channel);
        System.out.println(clientId + " 已上线");
    }

    // 获取目标客户端通道
    public static Channel getClientChannel(String targetId) {
        return clients.get(targetId);
    }

    // 移除客户端
    public static void removeClient(String clientId) {
        clients.remove(clientId);
        System.out.println(clientId + " 已下线");
    }
}
4.2、服务端Handler 实现
具体的业务就是监听客户端上线、下线和发消息事件,根据不同的事件做出对应的处理逻辑
java
package org.wcan.netty._04_demo;

import io.netty.channel.Channel;
import io.netty.channel.ChannelHandlerContext;
import io.netty.channel.ChannelInboundHandlerAdapter;

import java.util.Map;

public class ChatServerHandler extends ChannelInboundHandlerAdapter {

    // 连接建立时要求客户端注册
    @Override
    public void channelActive(ChannelHandlerContext ctx) {
        ctx.writeAndFlush("[系统] 请输入你的用户ID进行注册:\n");
    }

    @Override
    public void channelRead(ChannelHandlerContext ctx, Object msg) {
        String message = (String) msg;
        Channel channel = ctx.channel();
        // 注册逻辑
        if (!SessionManager.getClients().containsValue(channel)) {
            SessionManager.registerClient(message.trim(), channel);
            return;
        }
        // 消息格式:目标用户ID:消息内容
        if (message.contains(":")) {
            String[] parts = message.split(":", 2);
            String targetId = parts[0].trim();
            String content = parts[1].trim();

            Channel targetChannel = SessionManager.getClientChannel(targetId);
            if (targetChannel != null && targetChannel.isActive()) {
                targetChannel.writeAndFlush("[来自 " + getClientId(channel) + "] " + content + "\n");
            } else {
                channel.writeAndFlush("[系统] 用户 " + targetId + " 不在线\n");
            }
        }
    }

    // 获取发送者ID
    private String getClientId(Channel channel) {
        return SessionManager.getClients().entrySet().stream()
                .filter(entry -> entry.getValue() == channel)
                .map(Map.Entry::getKey)
                .findFirst()
                .orElse("未知用户");
    }

    // 连接断开处理
    @Override
    public void channelInactive(ChannelHandlerContext ctx) {
        String clientId = getClientId(ctx.channel());
        SessionManager.removeClient(clientId);
        ctx.close();
    }
}
4.3、服务端引导类
最后就是引导类了,代码就不解释了,完全可以copy之前的代码,然后将我们自己的 handler 添加进去就可以了,需要注意的是 这次我们使用 Netty 官方推荐的方式创建 2个 EventLoopGroup 。后面给大家解释原因。
java
package org.wcan.netty._04_demo;

import io.netty.bootstrap.ServerBootstrap;
import io.netty.channel.*;
import io.netty.channel.nio.NioEventLoopGroup;
import io.netty.channel.socket.SocketChannel;
import io.netty.channel.socket.nio.NioServerSocketChannel;
import io.netty.handler.codec.LineBasedFrameDecoder;
import io.netty.handler.codec.string.StringDecoder;
import io.netty.handler.codec.string.StringEncoder;
import io.netty.util.CharsetUtil;

public class ChatServer {
    public static void main(String[] args) throws Exception {
        //负责处理连接事件
        EventLoopGroup bossGroup = new NioEventLoopGroup();
        //负责处理 I/O 事件
        EventLoopGroup workerGroup = new NioEventLoopGroup();
        try {
            ServerBootstrap b = new ServerBootstrap();
            b.group(bossGroup,workerGroup)
                    .channel(NioServerSocketChannel.class)
                    .childHandler(new ChannelInitializer<SocketChannel>() {
                        @Override
                        protected void initChannel(SocketChannel ch) {
                            ch.pipeline()
                                    .addLast(new LineBasedFrameDecoder(1024))
                                    .addLast(new StringDecoder(CharsetUtil.UTF_8))
                                    .addLast(new StringEncoder(CharsetUtil.UTF_8))
                                    .addLast(new ChatServerHandler());
                        }
                    });
            ChannelFuture f = b.bind(8080).sync();
            f.channel().closeFuture().sync();
        } finally {
            workerGroup.shutdownGracefully();
            bossGroup.shutdownGracefully();
        }
    }
}
StringDecoder 和 StringEncoder 是字符串编码器和解码器,后面单独给大家介绍。
4.4、客户端设计
客户端的功能相对简单,仅仅就是消息的收发,相关代码如下
java
package org.wcan.netty._04_demo;

import io.netty.bootstrap.Bootstrap;
import io.netty.channel.Channel;
import io.netty.channel.ChannelFuture;
import io.netty.channel.ChannelInitializer;
import io.netty.channel.EventLoopGroup;
import io.netty.channel.nio.NioEventLoopGroup;
import io.netty.channel.socket.SocketChannel;
import io.netty.channel.socket.nio.NioSocketChannel;
import io.netty.handler.codec.LineBasedFrameDecoder;
import io.netty.handler.codec.string.StringDecoder;
import io.netty.handler.codec.string.StringEncoder;
import io.netty.util.CharsetUtil;

import java.util.Scanner;

public class ChatClient {
    public static void main(String[] args) throws Exception {
        EventLoopGroup group = new NioEventLoopGroup();
        try {
            Bootstrap b = new Bootstrap();
            b.group(group)
             .channel(NioSocketChannel.class)
             .handler(new ChannelInitializer<SocketChannel>() {
                 @Override
                 protected void initChannel(SocketChannel ch) {
                     ch.pipeline()
                       .addLast(new LineBasedFrameDecoder(1024))
                       .addLast(new StringDecoder(CharsetUtil.UTF_8))
                       .addLast(new StringEncoder(CharsetUtil.UTF_8))
                       .addLast(new ChatClientHandler());
                 }
             });

            ChannelFuture f = b.connect("localhost", 8080).sync();
            Channel channel = f.channel();

            // 控制台输入线程
            new Thread(() -> {
                Scanner scanner = new Scanner(System.in);
                while (true) {
                    System.out.print("请输入消息(格式:目标用户:消息内容): ");
                    String input = scanner.nextLine();
                    if ("exit".equalsIgnoreCase(input)) {
                        channel.close();
                        break;
                    }
                    channel.writeAndFlush(input + "\n");
                }
            }).start();

            channel.closeFuture().sync();
        } finally {
            group.shutdownGracefully();
        }
    }
}
业务处理器也很简单,就是打印消息内容。
java
package org.wcan.netty._04_demo;

import io.netty.channel.ChannelHandlerContext;
import io.netty.channel.ChannelInboundHandlerAdapter;

/**
 * @ClassName ChatClientHandler
 * @Description 客户端消息处理器
 * @Author wcan
 * @Date 2025/2/24 下午 13:08
 * @Version 1.0
 */
public class ChatClientHandler extends ChannelInboundHandlerAdapter {
    @Override
    public void channelRead(ChannelHandlerContext ctx, Object msg) {
        System.out.println((String) msg);
    }
}
好了,到这里我们已经实现了一个聊天的软件了。
4.5、功能测试
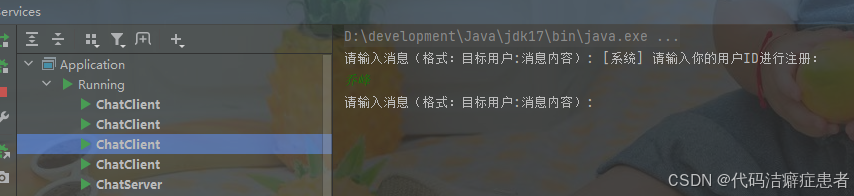
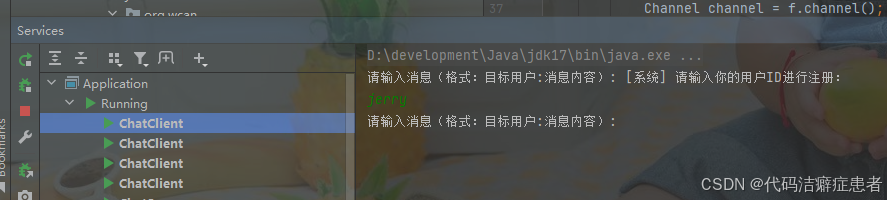
我们先运行服务端,接着可以启动 4个客户端.,服务端分别先进行注册
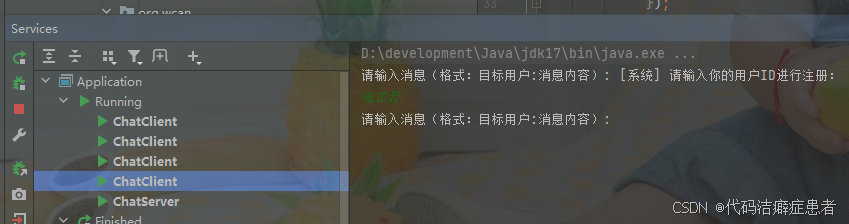

然后观察服务端输出的日志信息
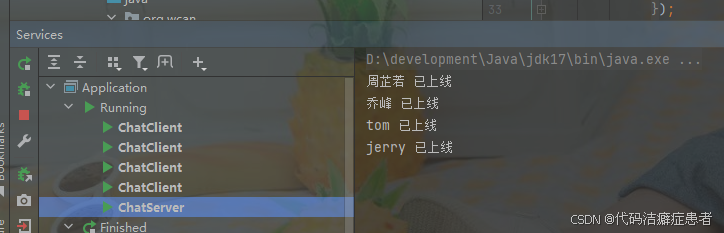
好了,4个用户已经上线了,就可以来试试发送消息的功能了。
5、Netty 线程模型
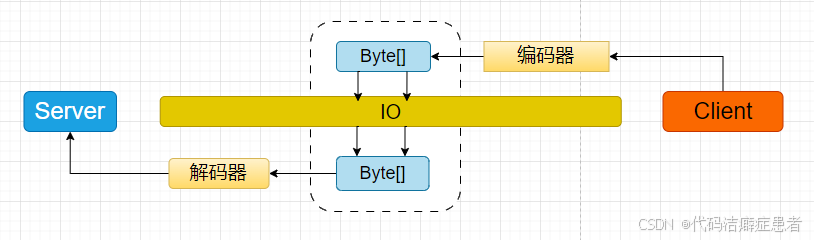
你可能有疑问,上面的案例中并没有编写任何管理线程的代码,但是服务端却实现了多个客户端的线程管理,这主要得益于 Netty 自己的线程模型了,也就是 Netty 已经帮我们实现了,并且还和我们的业务解耦了。下面是一张图,本篇文章的核心就是这张图 。我在这张图里描述了 Netty 内部是怎么处理的请求的,图中我用虚线表示循环。
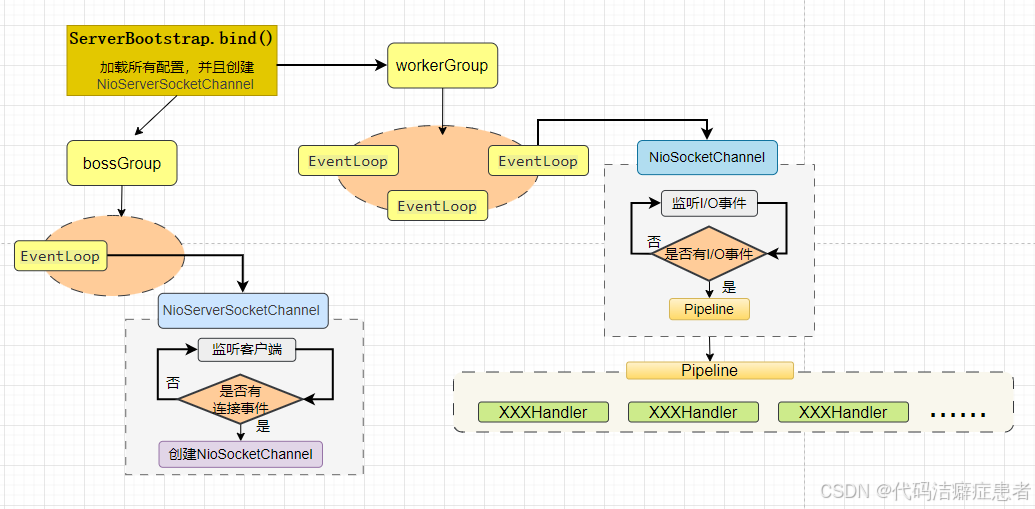
首先服务器绑定端口后会创建一个 NioServerSocketChannel ,它的作用是 监听指定的端口,处理客户端连接请求,工作在 bossGroup 中。
当有新的客户端连接请求来了的时候,他会创建给这个客户端创建一个 NioSocketChannel ,用来处理该客户端的 I/O 事件,NioSocketChannel 是工作在 workerGroup 中。
当客户端发起了一次 I/O 请求的时候,NioSocketChannel 会异步 执行 Pipeline 上的业务处理器,开始处理业务逻辑,整个过程都是非阻塞的。
Netty 认为处理连接事件是一件很快的动作,而处理 I/O 事件大概率很慢,取决于具体业务。因此将这两类的事件分别放在不同的线程组里执行,这也就是为什么 Netty 官方推荐的做法是初始化两个线程组 bossGroup 和 workerGroup 来共同协作。 这就是为什么都说 Netty 是一款优秀的网络编程的框架的原因了。
6、高性能RPC组件设计
6.1、编码器和解码器概念
前面我们使用 NIO 设计了 Cheese 的远程调用的组件,满足了基本的远程调用的功能。今天我们重新使用 Netty 来设计这个组件。
通过前面的案例相信我们都知道 Netty 中我们需要将业务实现放在 Handler 中,Netty 内部会帮我们处理业务逻辑,我们不需要过度关注 线程和 I/O 相关的细节操作。那么就有一个问题,**我们发送出去的请求报文 Netty 要怎么解析呢。**NIO的阶段是我们自己去控制,但是 Netty 中我们没办法编写这部分逻辑。
既然我们都能想到这个问题,那么 Netty 官方肯定也会想到。Netty 内部埋点了一些编码器和解码器的API 我们只需要按照规则去编写自己的报文解析逻辑就可以了。
上图中我们不需要关注虚线标注的部分,但是我们要编写 编码器和解码器的逻辑 告诉 Netty 怎么从 IO 流里面 读数据。再说直白点 就是 当客户端发送一个请求的时候 需要告诉服务端 怎么读这个请求,假设一个请求的结构是这样的
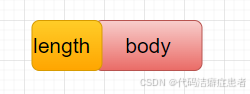
编码的过程就是 客户端将消息的长度放在 length 字段,将消息的内容放在 body 字段上。解码的过程是 服务端会先取出 length 字段 获取消息的长度,然后再按照长度读取 body 内容,这样就能保证内容的完整性了。这就是一种编码和解码的过程。
6.2、序列化和反序列化
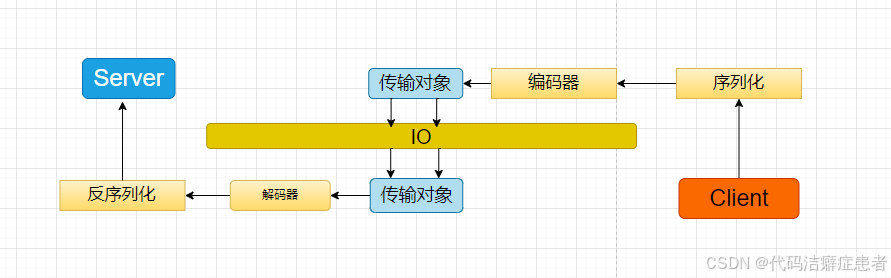
有了编码器和解码器,我们还需要考虑序列化的问题,我们应该将序列化放在哪一步呢,其实也简单,按照前面 编码和解码的过程,我们应该在编码之前将请求数据对象 转换成 byte数组 然后 再封装成 传输对象 。服务端收到了 传输对象 ,从传输对象 的 body 字段读取对应的 byte数组 内容,然后再将 byte 数组内容转成 原始的请求数据对象,这样服务端就解析出了请求的数据了。
序列化的代码 我们可以直接使用之前设计的 序列化组件,支持多种序列化方式,大家可以自己尝试。 传送门
6.3、传输对象的设计
如果我们要使用 Netty 我们之前设计的 Cheese 协议可能需要做调整,为了方便起见我么本次设计引入一个新的传输对象,这个传输对象的结构就是 消息体的内容和消息体的长度信息。
java
/**
 * @Description
 * @Author wcan
 * @Date 2025/2/25 下午 20:53
 * @Version 1.0
 */
public class CheeseProtocol {
    private Integer msgLength;
    private byte[] msgBody;

    //TODO  get  set .....
}
6.4、编码器和解码器设计
按照前面描述的流程 编码器的逻辑如下
java
package org.wcan.netty._05_demo.protocol;

import io.netty.buffer.ByteBuf;
import io.netty.channel.ChannelHandlerContext;
import io.netty.handler.codec.MessageToByteEncoder;

/**
 * @Description 编码器
 * @Author wcan
 * @Date 2025/2/25 下午 20:56
 * @Version 1.0
 */
public class CheeseEncoder extends MessageToByteEncoder<CheeseProtocol> {
    @Override
    protected void encode(ChannelHandlerContext ctx, CheeseProtocol msg, ByteBuf out) throws Exception {
        out.writeInt(msg.getMsgLength());
        out.writeBytes(msg.getMsgBody());
    }
}
这里需要注意的是我们要和 Netty 集成就需要按照 Netty 的规范去编写,所以需要继承 MessageToByteEncoder 这个组件,然后按自己业务重写 encode 方法。
解码器的写法也类似,相关代码如下
java
package org.wcan.netty._05_demo.protocol;

import io.netty.buffer.ByteBuf;
import io.netty.channel.ChannelHandlerContext;
import io.netty.handler.codec.ReplayingDecoder;

import java.util.List;

/**
 * @Description
 * @Author wcan
 * @Date 2025/2/25 下午 20:57
 * @Version 1.0
 */
public class CheeseDecoder extends ReplayingDecoder<Void> {
    @Override
    protected void decode(ChannelHandlerContext ctx, ByteBuf in, List<Object> out) throws Exception {
        int length = in.readInt();
        byte[] bytes = new byte[length];
        in.readBytes(bytes);
        CheeseProtocol cheeseProtocol = new CheeseProtocol();
        cheeseProtocol.setMsgLength(length);
        cheeseProtocol.setMsgBody(bytes);
        out.add(cheeseProtocol);
    }
}
6.5、服务端设计
服务端的程序主要有引导类和 业务 Handler ,其中引导类的代码 和之前的案例都一样,不同的是我们需要将自己的编码器和解码器也添加到 pipeline 上,Netty 会根据我们定义的逻辑去处理消息。
java
package org.wcan.netty._05_demo.server;

import io.netty.bootstrap.ServerBootstrap;
import io.netty.channel.Channel;
import io.netty.channel.ChannelInitializer;
import io.netty.channel.nio.NioEventLoopGroup;
import io.netty.channel.socket.SocketChannel;
import io.netty.channel.socket.nio.NioServerSocketChannel;
import org.wcan.netty._05_demo.protocol.CheeseDecoder;
import org.wcan.netty._05_demo.protocol.CheeseEncoder;

public class RpcServer {
    public static void main(String[] args) {
        NioEventLoopGroup boss = new NioEventLoopGroup();
        NioEventLoopGroup worker = new NioEventLoopGroup();
        try {
            ServerBootstrap serverBootstrap = new ServerBootstrap();
            serverBootstrap.channel(NioServerSocketChannel.class);
            serverBootstrap.group(boss, worker);
            serverBootstrap.childHandler(new ChannelInitializer<SocketChannel>() {
                @Override
                protected void initChannel(SocketChannel ch) throws Exception {
                    ch.pipeline().addLast(new CheeseEncoder())
                            .addLast(new CheeseDecoder());
                    ch.pipeline().addLast(new CheeseRequestHandler());
                }
            });
            Channel channel = serverBootstrap.bind(9000).sync().channel();
            channel.closeFuture().sync();
        } catch (InterruptedException e) {
            e.printStackTrace();
        } finally {
            boss.shutdownGracefully();
            worker.shutdownGracefully();
        }
    }
}
服务端的业务处理 Handler 主要就是解析请求数据然后反射调用 目标方法,再将结果封装成传输对象 返回给客户端。
java
package org.wcan.netty._05_demo.server;

import io.netty.channel.ChannelHandlerContext;
import io.netty.channel.SimpleChannelInboundHandler;
import org.wcan.cheese.CheeseRequest;
import org.wcan.cheese.CheeseResponse;
import org.wcan.netty._05_demo.protocol.CheeseProtocol;
import org.wcan.serialize.SerializePlus;
import org.wcan.server.ReflectionExecute;


public class CheeseRequestHandler extends SimpleChannelInboundHandler<CheeseProtocol> {

    @Override
    public void channelReadComplete(ChannelHandlerContext ctx) throws Exception {
        System.out.println("server read complete");
//        super.channelReadComplete(ctx);

    }
    @Override
    public void channelActive(ChannelHandlerContext ctx) throws Exception {
        System.out.println("server active");
    }
    @Override
    protected void channelRead0(ChannelHandlerContext ctx, CheeseProtocol message) {
        System.out.println("server receive msg");
        byte[] msgBody = message.getMsgBody();
        CheeseRequest deserialize = SerializePlus.deserialize("java", msgBody, CheeseRequest.class);
        CheeseResponse cheeseResponse = ReflectionExecute.execute(deserialize);
        byte[] javas = SerializePlus.serializer("java", cheeseResponse, CheeseResponse.class);
        CheeseProtocol cheeseProtocol = new CheeseProtocol();
        cheeseProtocol.setMsgBody(javas);
        cheeseProtocol.setMsgLength(javas.length);
        ctx.writeAndFlush(cheeseProtocol);
    }
}
6.6、客户端设计
客户端的引导类代码如下
java
package org.wcan.netty._05_demo.client;

import io.netty.bootstrap.Bootstrap;
import io.netty.channel.ChannelFuture;
import io.netty.channel.ChannelInitializer;
import io.netty.channel.nio.NioEventLoopGroup;
import io.netty.channel.socket.SocketChannel;
import io.netty.channel.socket.nio.NioSocketChannel;
import org.wcan.netty._05_demo.protocol.CheeseDecoder;
import org.wcan.netty._05_demo.protocol.CheeseEncoder;

public class RpcClient {
    public static void main(String[] args) {
        NioEventLoopGroup group = new NioEventLoopGroup();
        // rpc 响应消息处理器
        CheeseResponseHandler RPC_HANDLER = new CheeseResponseHandler();
        try {
            Bootstrap bootstrap = new Bootstrap();
            bootstrap.channel(NioSocketChannel.class);
            bootstrap.group(group);
            bootstrap.handler(new ChannelInitializer<SocketChannel>() {
                @Override
                protected void initChannel(SocketChannel ch) throws Exception {
                    ch.pipeline().addLast(new CheeseEncoder())
                            .addLast(new CheeseDecoder());
                    ch.pipeline().addLast(RPC_HANDLER);
                }
            });
            ChannelFuture future = bootstrap.connect("localhost", 9000).sync();
            future.channel().closeFuture().sync();
        } catch (Exception e) {
            e.printStackTrace();
        } finally {
            group.shutdownGracefully();
        }
    }
}
我们在业务Handler 中 构造一个请求数据,
java
package org.wcan.netty._05_demo.client;
import io.netty.channel.ChannelHandlerContext;
import io.netty.channel.SimpleChannelInboundHandler;
import org.wcan.cheese.CheeseRequest;
import org.wcan.cheese.CheeseResponse;
import org.wcan.netty._05_demo.protocol.CheeseProtocol;
import org.wcan.serialize.SerializePlus;
public class CheeseResponseHandler extends SimpleChannelInboundHandler<CheeseProtocol> {
@Override
protected void channelRead0(ChannelHandlerContext ctx, CheeseProtocol msg) throws Exception {
byte[] msgBody = msg.getMsgBody();
CheeseResponse deserialize = SerializePlus.deserialize("java", msgBody, CheeseResponse.class);
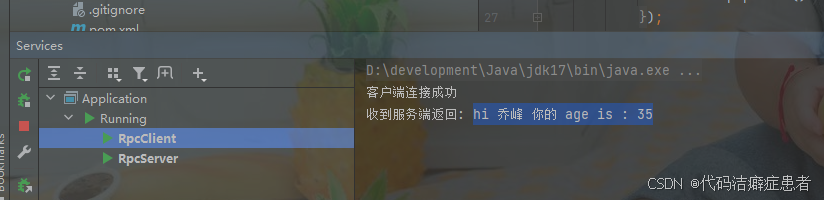
System.out.println("收到服务端返回: " + deserialize.getReturnValue());
}
@Override
public void channelActive(ChannelHandlerContext ctx) throws Exception {
System.out.println("客户端连接成功");
CheeseRequest cheeseRequest = new CheeseRequest("org.wcan.test.TestDemo", "demoTest", String.class,
new Class[]{String.class, Integer.class}, new Object[]{"乔峰", 35});
byte[] requestBytes = SerializePlus.serializer("java", cheeseRequest, CheeseRequest.class);
CheeseProtocol cheeseProtocol = new CheeseProtocol();
cheeseProtocol.setMsgBody(requestBytes);
cheeseProtocol.setMsgLength(requestBytes.length);
ctx.writeAndFlush(cheeseProtocol);
}
}目标执行类和方法还是上次的
java
package org.wcan.test;

/**
 * @Description
 * @Author wcan
 * @Date 2025/1/21 下午 17:53
 * @Version 1.0
 */
public class TestDemo {
    public String demoTest(String userName,Integer age){
        return "hi "+ userName +" 你的 age is : "+age;
    }
}
6.7、功能测试
整个 RPC 组件的功能都已经编写完了,下面我们来测试一下 ,首先我们先启动 服务端,服务端启动完成后我再启动客户端,
观察控制台输出
7、总结
本篇文章通过一个多人聊天的案例引入了 Netty 中的线程模型,接着通过图解的形式给大家分析了 Netty 内部线程模型的结构,以及 Netty 内部的一些组件是怎么协同工作的,这些都是 Netty 高性能的技术基础。最后结合 Netty 中的编码和解码机制,以及前面开发的序列化组件 设计了一款基于 Netty 的 RPC 通信的组件,希望对大家有帮助。