1.服务熔断组件--sentinel
熔断组件
1.1使用
1.引入依赖
<dependency>
<groupId>com.alibaba.cloud</groupId>
<artifactId>spring-cloud-starter-alibaba-sentinel</artifactId>
</dependency>
#允许feign采用sentinel熔断器
feign.sentinel.enabled=true
#设置懒加载springboot3.0.0
spring.cloud.openfeign.lazy-attributes-resolution=true
3.修改openfeign接口
package com.ghx.order.feig;

import com.ghx.common.entity.Product;
import com.ghx.order.vo.R;
import org.springframework.cloud.openfeign.FeignClient;
import org.springframework.web.bind.annotation.GetMapping;
import org.springframework.web.bind.annotation.RequestParam;

/**
 * @author :guo
 * @date :Created in 2025/3/3 11:34
 * @description:
 * @version:
 */
@FeignClient(value = "springcloud-product",fallbackFactory = ProductFeignFactory.class)
public interface ProducFeign {
    @GetMapping("/product/getById")
    public Product getById(@RequestParam Integer pid);
}
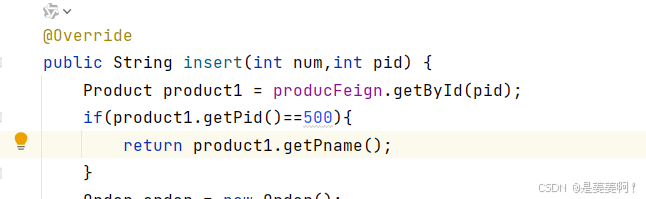
package com.ghx.order.feig;

import com.ghx.common.entity.Product;
import com.ghx.order.vo.R;
import org.springframework.cloud.openfeign.FallbackFactory;
import org.springframework.stereotype.Component;

/**
 * @author :guo
 * @date :Created in 2025/3/7 14:05
 * @description:
 * @version:
 */
@Component
public class ProductFeignFactory implements FallbackFactory<ProducFeign> {

    @Override
    public ProducFeign create(Throwable cause) {
        return new ProducFeign() {
            @Override
            public Product getById(Integer pid) {
                Product product = new Product();
                product.setPid(500);
                product.setPname("商品服务故障");
                return product;
            }

        };
    }
}
1.2 通过图形化界面为指定的微服务设置限流规则
1.启动控制台界面
java -jar -Dserver.port=端口号 xxx.jar
2.查看界面
3.微服务接入界面
#sentinel控制台界面
spring.cloud.sentinel.transport.dashboard=localhost:8088
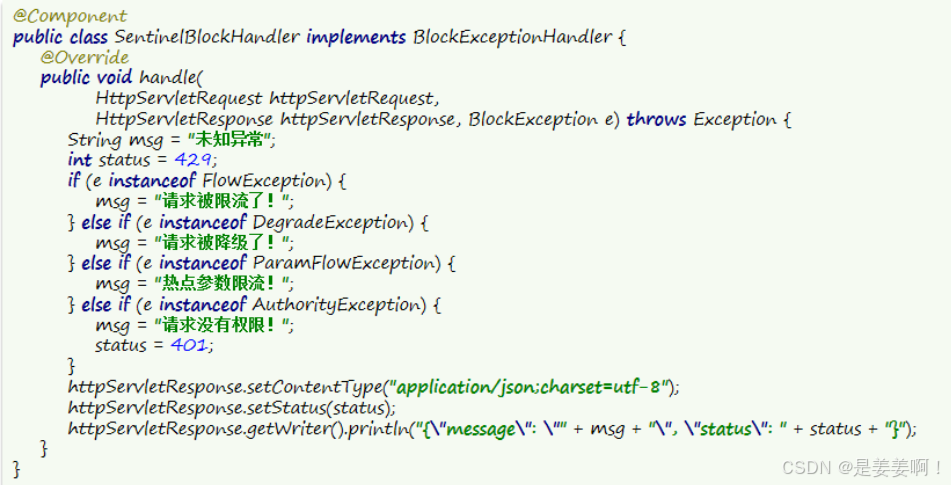
设置流量控制统一的json格式
java
package com.ghx.order.config;

import com.alibaba.csp.sentinel.adapter.spring.webmvc.callback.BlockExceptionHandler;
import com.alibaba.csp.sentinel.slots.block.BlockException;
import jakarta.servlet.http.HttpServletRequest;
import jakarta.servlet.http.HttpServletResponse;
import org.springframework.stereotype.Component;

/**
 * @author :guo
 * @date :Created in 2025/3/7 14:48
 * @description:
 * @version:
 */
@Component
public class SentinelBlockHandler implements BlockExceptionHandler {

    @Override
    public void handle(HttpServletRequest httpServletRequest, HttpServletResponse httpServletResponse, BlockException e) throws Exception {
        String msg="未知异常";
        if(e instanceof BlockException){
            msg="被限流了";
        }
        httpServletResponse.setContentType("application/json;charset=utf-8");
        httpServletResponse.getWriter().write("{\"code\":\"500\",\"msg\":\""+msg+"\"}");
    }
}
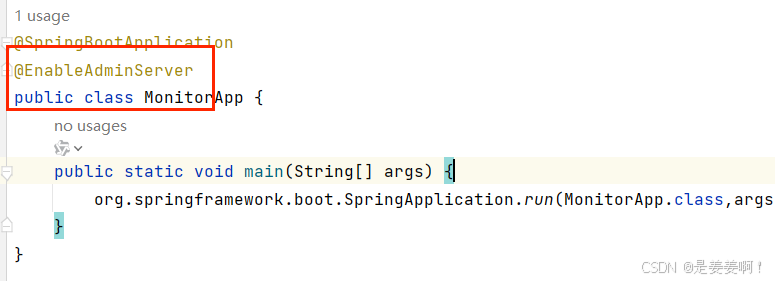
2.监控服务-springboot-admin-ui
2.1创建监控微服务
1.引入依赖
    <dependency>
        <groupId>org.springframework.boot</groupId>
        <artifactId>spring-boot-starter-web</artifactId>
    </dependency>
    <dependency>
        <groupId>de.codecentric</groupId>
        <artifactId>spring-boot-admin-starter-server</artifactId>
        <version>3.0.0</version>
    </dependency>
    <dependency>
        <groupId>com.alibaba.cloud</groupId>
        <artifactId>spring-cloud-starter-alibaba-nacos-discovery</artifactId>
    </dependency>
2.配置
spring.application.name=springcloud-monitor

server.port=8888
spring.cloud.nacos.discovery.server-addr=localhost:8848
3.开启服务监控的注解
2.2让微服务交于admin服务器端监控
修改的是微服务端
1.添加依赖
<dependency>
    <groupId>de.codecentric</groupId>
    <artifactId>spring-boot-admin-starter-client</artifactId>
    <version>3.0.0</version>
</dependency>
<dependency>
    <groupId>org.springframework.boot</groupId>
    <artifactId>spring-boot-starter-actuator</artifactId>
</dependency>
2.修改配置
#指定admin服务器的地址
spring.boot.admin.client.url=http://localhost:8888
# 暴露健康信息
management.endpoint.health.show-details=always
# 指定监控的端点所有信息
management.endpoints.web.exposure.include=*
2.3监控的配置类,并通过发送邮件通知
修改的是监控微服务端
1.配置类
java
package com.ghx.config;

import de.codecentric.boot.admin.server.domain.entities.Instance;
import de.codecentric.boot.admin.server.domain.entities.InstanceRepository;
import de.codecentric.boot.admin.server.domain.events.InstanceEvent;
import de.codecentric.boot.admin.server.domain.events.InstanceStatusChangedEvent;
import de.codecentric.boot.admin.server.notify.AbstractStatusChangeNotifier;
import org.springframework.beans.factory.annotation.Autowired;
import org.springframework.mail.SimpleMailMessage;
import org.springframework.mail.javamail.JavaMailSender;
import org.springframework.stereotype.Component;
import reactor.core.publisher.Mono;

/**
 * 自定义通知
 * 继承 AbstractStatusChangeNotifier 类,实现了 doNotify 方法,
 * 当应用状态改变的时候会回调 doNotify 方法。
 */
@Component
public class CustomNotifierConfig extends AbstractStatusChangeNotifier {

    public CustomNotifierConfig(InstanceRepository repository) {
        super(repository);
    }
    @Autowired
    private JavaMailSender mailSender;


    public final void sendSimpleMail(String subject,String msg) throws Exception {
        SimpleMailMessage message = new SimpleMailMessage();
        // 配置发送者邮箱
        message.setFrom("xx");
        // 配置接受者邮箱
        message.setTo("xx");
        // 配置邮件主题
        message.setSubject(subject);
        // 配置邮件内容
        message.setText(msg);
        // 发送邮件
        mailSender.send(message);
    }
    @Override
    protected Mono<Void> doNotify(InstanceEvent event, Instance instance) {
        return Mono.fromRunnable(() -> {
            if (event instanceof InstanceStatusChangedEvent) {
                System.out.println("实例名称:"+instance.getRegistration().getName());
                System.out.println("实例服务地址:"+instance.getRegistration().getServiceUrl());
                String status = ((InstanceStatusChangedEvent) event).getStatusInfo().getStatus();
                switch (status) {
                    case "DOWN":
                        System.out.println("健康检查没通过!");
                        break;
                    case "OFFLINE":
                        //发送短信  邮箱信息
                        try {
                            sendSimpleMail("服务型故障",
                                    "服务名称:"+instance.getRegistration().getName()+"\n"+"服务地址:"+instance.getRegistration().getServiceUrl());
                        } catch (Exception e) {
                            throw new RuntimeException(e);
                        }
                        break;
                    case "UP":
                        System.out.println("服务上线!");
                        break;
                    case "UNKNOWN":
                        System.out.println("服务未知异常!");
                        break;
                    default:
                        System.out.println(status);
                        break;
                }

            }
        });
    }
}
邮件发送信息要先生成授权码
2.依赖
<dependency>
    <groupId>org.springframework.boot</groupId>
    <artifactId>spring-boot-starter-mail</artifactId>
</dependency>
3.修改配置
#设置邮箱的主机地址
spring.mail.host=smtp.qq.com
# 发送邮件的邮箱
spring.mail.username=xx
# 邮箱的授权码
spring.mail.password=xx
# 发送短信的端口
spring.mail.port=465
spring.mail.protocol=smtp
spring.mail.default-encoding=utf-8
spring.mail.properties.mail.smtp.auth=true
spring.mail.properties.mail.smtp.starttls.enable=true
spring.mail.properties.mail.smtp.starttls.required=true
spring.mail.properties.mail.smtp.ssl.enable=true
spring.mail.properties.mail.smtp.socketFactory.port=465
spring.mail.properties.mail.smtp.socketFactory.class=javax.net.ssl.SSLSocketFactor