1.Mybatis简介
Mybatis 是一个开源的、基于 Java 的持久层框架,它主要用于在 Java 应用程序中实现对数据库的操作。它位于Java 应用程序与数据库之间,充当数据持久化的桥梁,帮助开发人员更方便、高效地处理数据库交互。
**持久层:**持久层指持久化操作的层,一般是数据访问层(dao),用来操作数据库的
2.创建工程
创建一个SpringBoot工程,导入Mybatis依赖和mysql驱动包,lombok依赖是方便些类的get和set方法,SpringWeb是方便测试使用
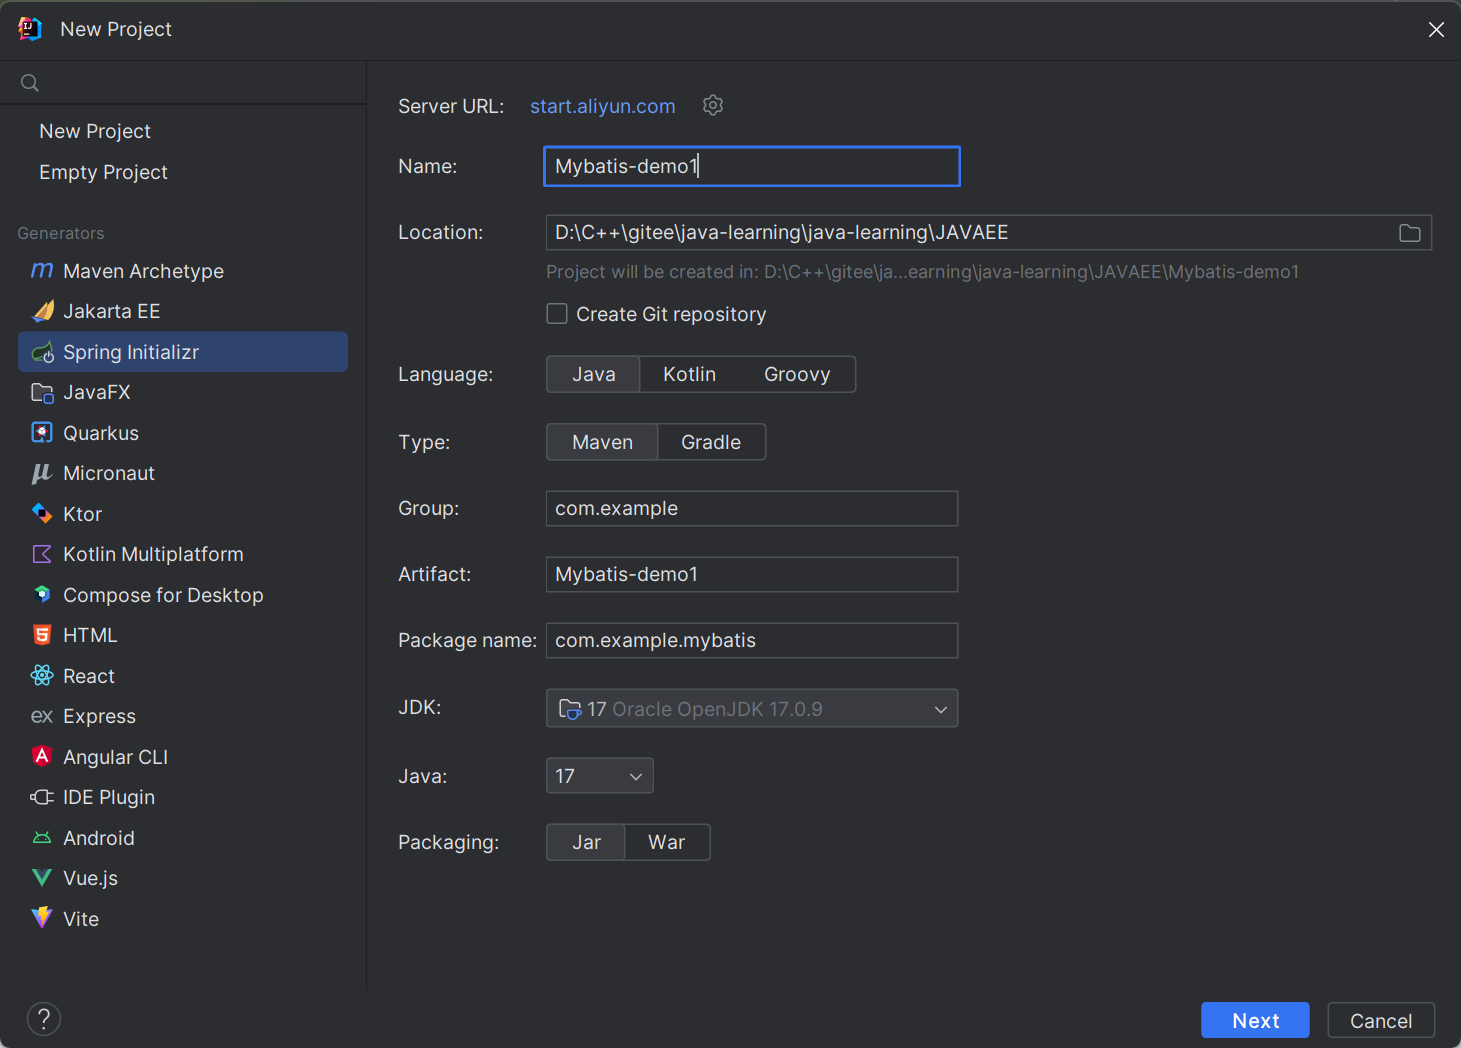
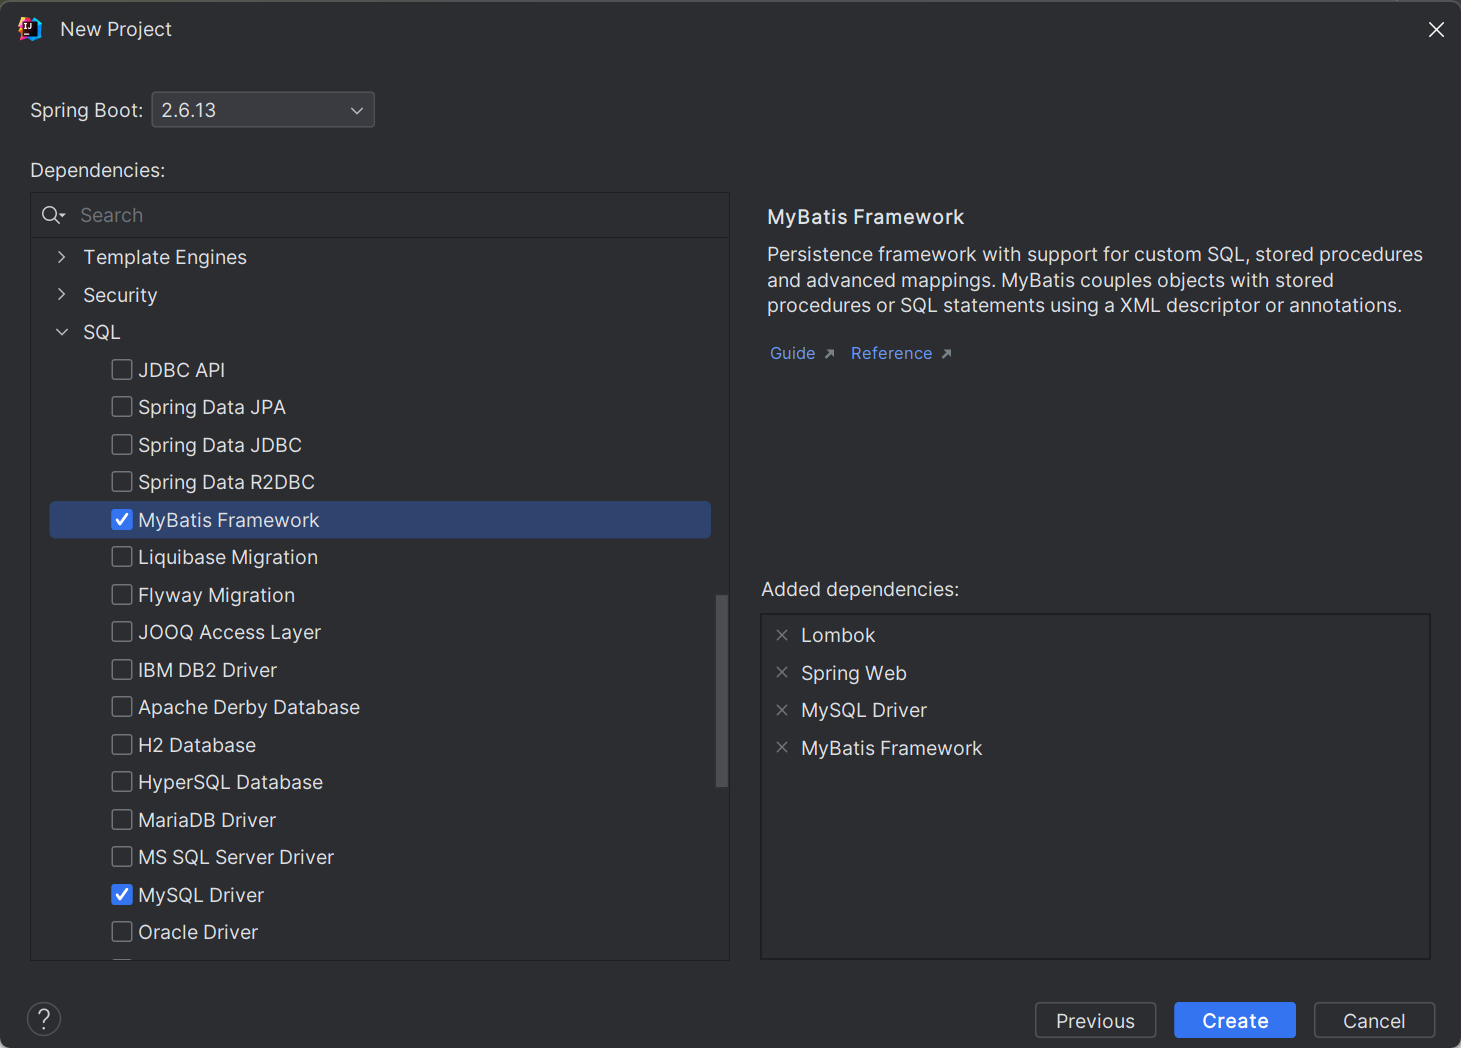
Mybatis 是⼀个持久层框架, 具体的数据存储和数据操作还是在MySQL中操作的, 所以需要添加MySQL驱动
创建好项目后,我们会在pom.xml文件中看见Mybatis依赖包和mysql驱动包
<!--        Mybatis依赖包-->
        <dependency>
            <groupId>org.mybatis.spring.boot</groupId>
            <artifactId>mybatis-spring-boot-starter</artifactId>
            <version>2.2.2</version>
        </dependency>
<!--mysql驱动包-->
        <dependency>
            <groupId>com.mysql</groupId>
            <artifactId>mysql-connector-j</artifactId>
            <scope>runtime</scope>
        </dependency>
3.数据库的数据准备
2.1创建数据库
CREATE DATABASE mybatis_test1 DEFAULT CHARACTER SET utf8mb4;在mysql中创建一个名为mybatis_test1的数据库,并设置默认字符集为utf8mb4
utf8mb4 是 UTF - 8 字符集的超集,它支持更广泛的字符范围
2.2使用数据库
USE mybatis_test1;2.3创建一个用于练习的表
CREATE TABLE `user_info` (
`id` INT ( 11 ) NOT NULL AUTO_INCREMENT,
`username` VARCHAR ( 127 ) NOT NULL,
`password` VARCHAR ( 127 ) NOT NULL,
`age` TINYINT ( 4 ) NOT NULL,
`gender` TINYINT ( 4 ) DEFAULT '0' COMMENT '1-男 2-⼥ 0-默认',
`phone` VARCHAR ( 15 ) DEFAULT NULL,
`delete_flag` TINYINT ( 4 ) DEFAULT 0 COMMENT '0-正常, 1-删除',
`create_time` DATETIME DEFAULT now(),
`update_time` DATETIME DEFAULT now() ON UPDATE now(),
PRIMARY KEY ( `id` )
) ENGINE = INNODB DEFAULT CHARSET = utf8mb4;
表中sql语句的含义:
AUTO_INCREMENT:自增
NOT NULL:字段不为空
DEFAULT:默认值
COMMENT:对该字段的注释,说明该字段的含义
DEFAULT now():默认使用当前时间
ON UPDATE now():表示当该记录的任何字段被更新时,该字段的值会自动更新为当前的日期和时间。
ENGINE=INNODB:表示使用 InnoDB 存储引擎
DEFAULT CHARSET = utf8mb4:表示表的默认字符集为
utf8mb4
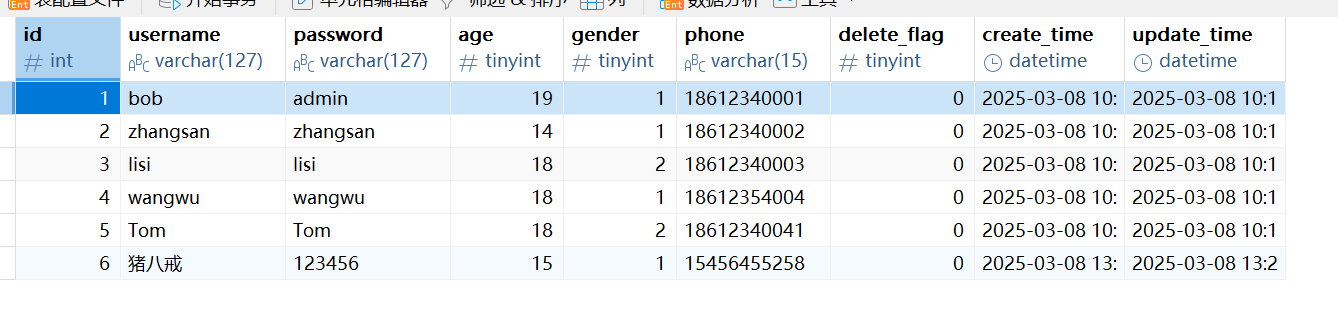
2.4插入测试的数据
INSERT INTO mybatis_test.user_info( username, `password`, age, gender, phone )
VALUES ( 'bob', 'admin', 19, 1, '18612340001' );
INSERT INTO mybatis_test.user_info( username, `password`, age, gender, phone )
VALUES ( 'zhangsan', 'zhangsan', 14, 1, '18612340002' );
INSERT INTO mybatis_test.user_info( username, `password`, age, gender, phone )
VALUES ( 'lisi', 'lisi', 18, 2, '18612340003' );
INSERT INTO mybatis_test.user_info( username, `password`, age, gender, phone )
VALUES ( 'wangwu', 'wangwu', 18, 1, '18612354004' );
INSERT INTO mybatis_test.user_info( username, `password`, age, gender, phone )
VALUES ( 'Tom', 'Tom', 18, 2, '18612340041' );
2.5创建与测试数据对应的实体类
数据库中的字段是蛇形命名(单词全部小写,单词与单词之间使用 "_" 进行分割)
java中的属性使用的是小驼峰进行命名
@Data
public class UserInfo {
    private Integer id;
    private String username;
    private String password;
    private Integer age;
    private Integer gender;
    private String phone;
    private Integer deleteFlag;
    private Date createTime;
    private Date updateTime;
}
4.配置数据库连接
这是yml的配置文件
spring:
  datasource:
    url: jdbc:mysql://127.0.0.1:3306/mybatis_test1?characterEncoding=utf8&useSSL=false
    username: root
    password: 123456
    driver-class-name: com.mysql.cj.jdbc.Driver
一般需要复制application.properties文件然后粘贴在resources文件下,将后缀名改为.yml,不复制也可以,在application.properties添加配置只需将配置文件的格式改为properties的格式就行
yml的格式,注意每个级别之间都需要空两格
这是properties的配置文件
#驱动类名称
spring.datasource.driver-class-name=com.mysql.cj.jdbc.Driver
#数据库连接的url
spring.datasource.url=jdbc:mysql://127.0.0.1:3306/mybatis_test1?
characterEncoding=utf8&useSSL=false
#连接数据库的⽤⼾名
spring.datasource.username=root
#连接数据库的密码
spring.datasource.password=123456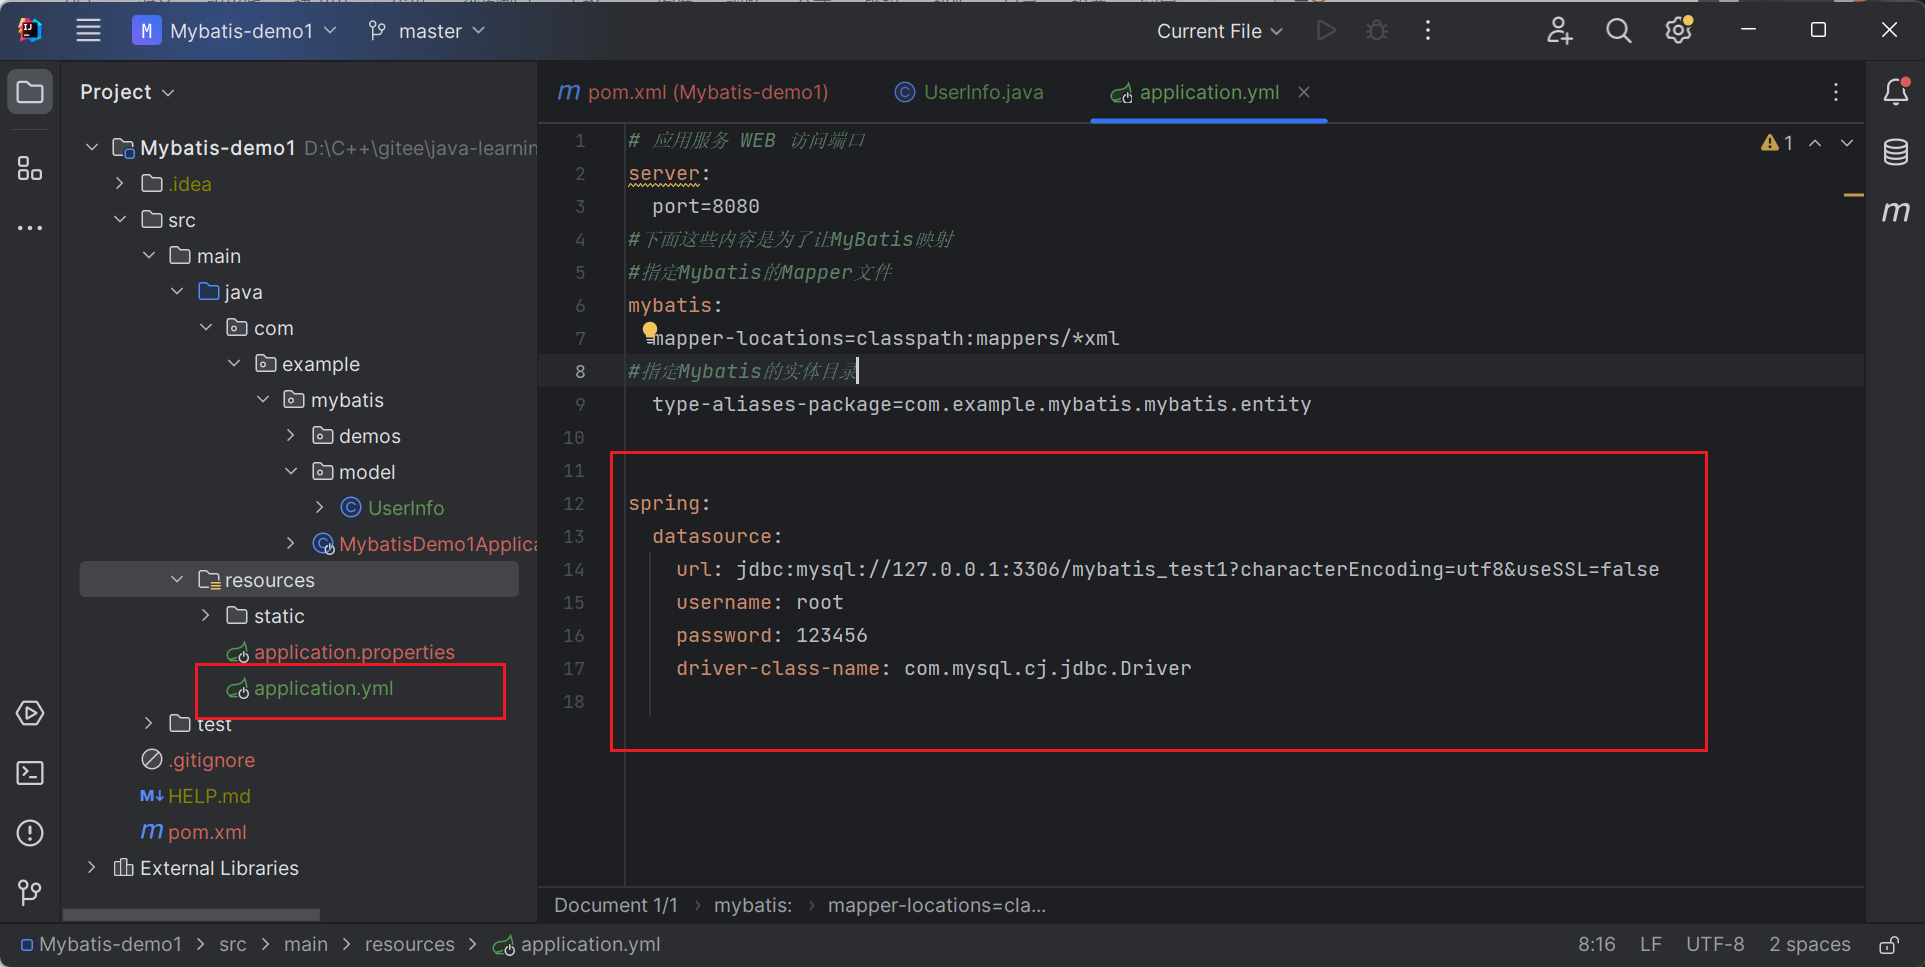
spring.datasource.url:指定要连接的数据库的 URL,其中包含数据库的地址、端口、数据库名以及一些连接参数(如字符编码和是否使用 SSL)。spring.datasource.username:指定连接数据库时使用的用户名。spring.datasource.password:指定连接数据库时使用的密码。spring.datasource.driver-class-name:指定使用的数据库驱动类,这里使用的是 MySQL 8.x 及以上版本的驱动。
**注意:**用户名和密码是你数据库的用户名和密码,我这里使用的数据库是mysql;
5.注解操作
5.1@Mapper
在使用 MyBatis 与 Spring Boot 集成时,Mapper是一个非常关键的概念,它主要用于定义数据库操作的接口,Mapper通常是一个 Java 接口,在接口中定义数据库操作方法
5.2@Select
@Select是 MyBatis 框架中用于定义 SQL 查询语句的注解,它允许你在 Mapper 接口的方法上直接编写 SQL 查询语句,从而简化数据库查询操作的开发。
@Mapper
public interface UserInfoMapper {
    @Select({"select *from user_info"})
    List<UserInfo> SelectAll();
}
5.3@Delete
    @Delete("DELETE FROM user_info WHERE id=#{id}")
Integer Delete(Integer id);
5.4@Update
    @Update("UPDATE user_info SET username='白龙马' WHERE id=#{id}")
Integer Update(Integer id);
5.4单元测试
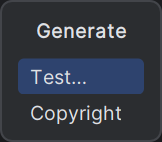
在接口里面右键点击Generate,然后点击Test
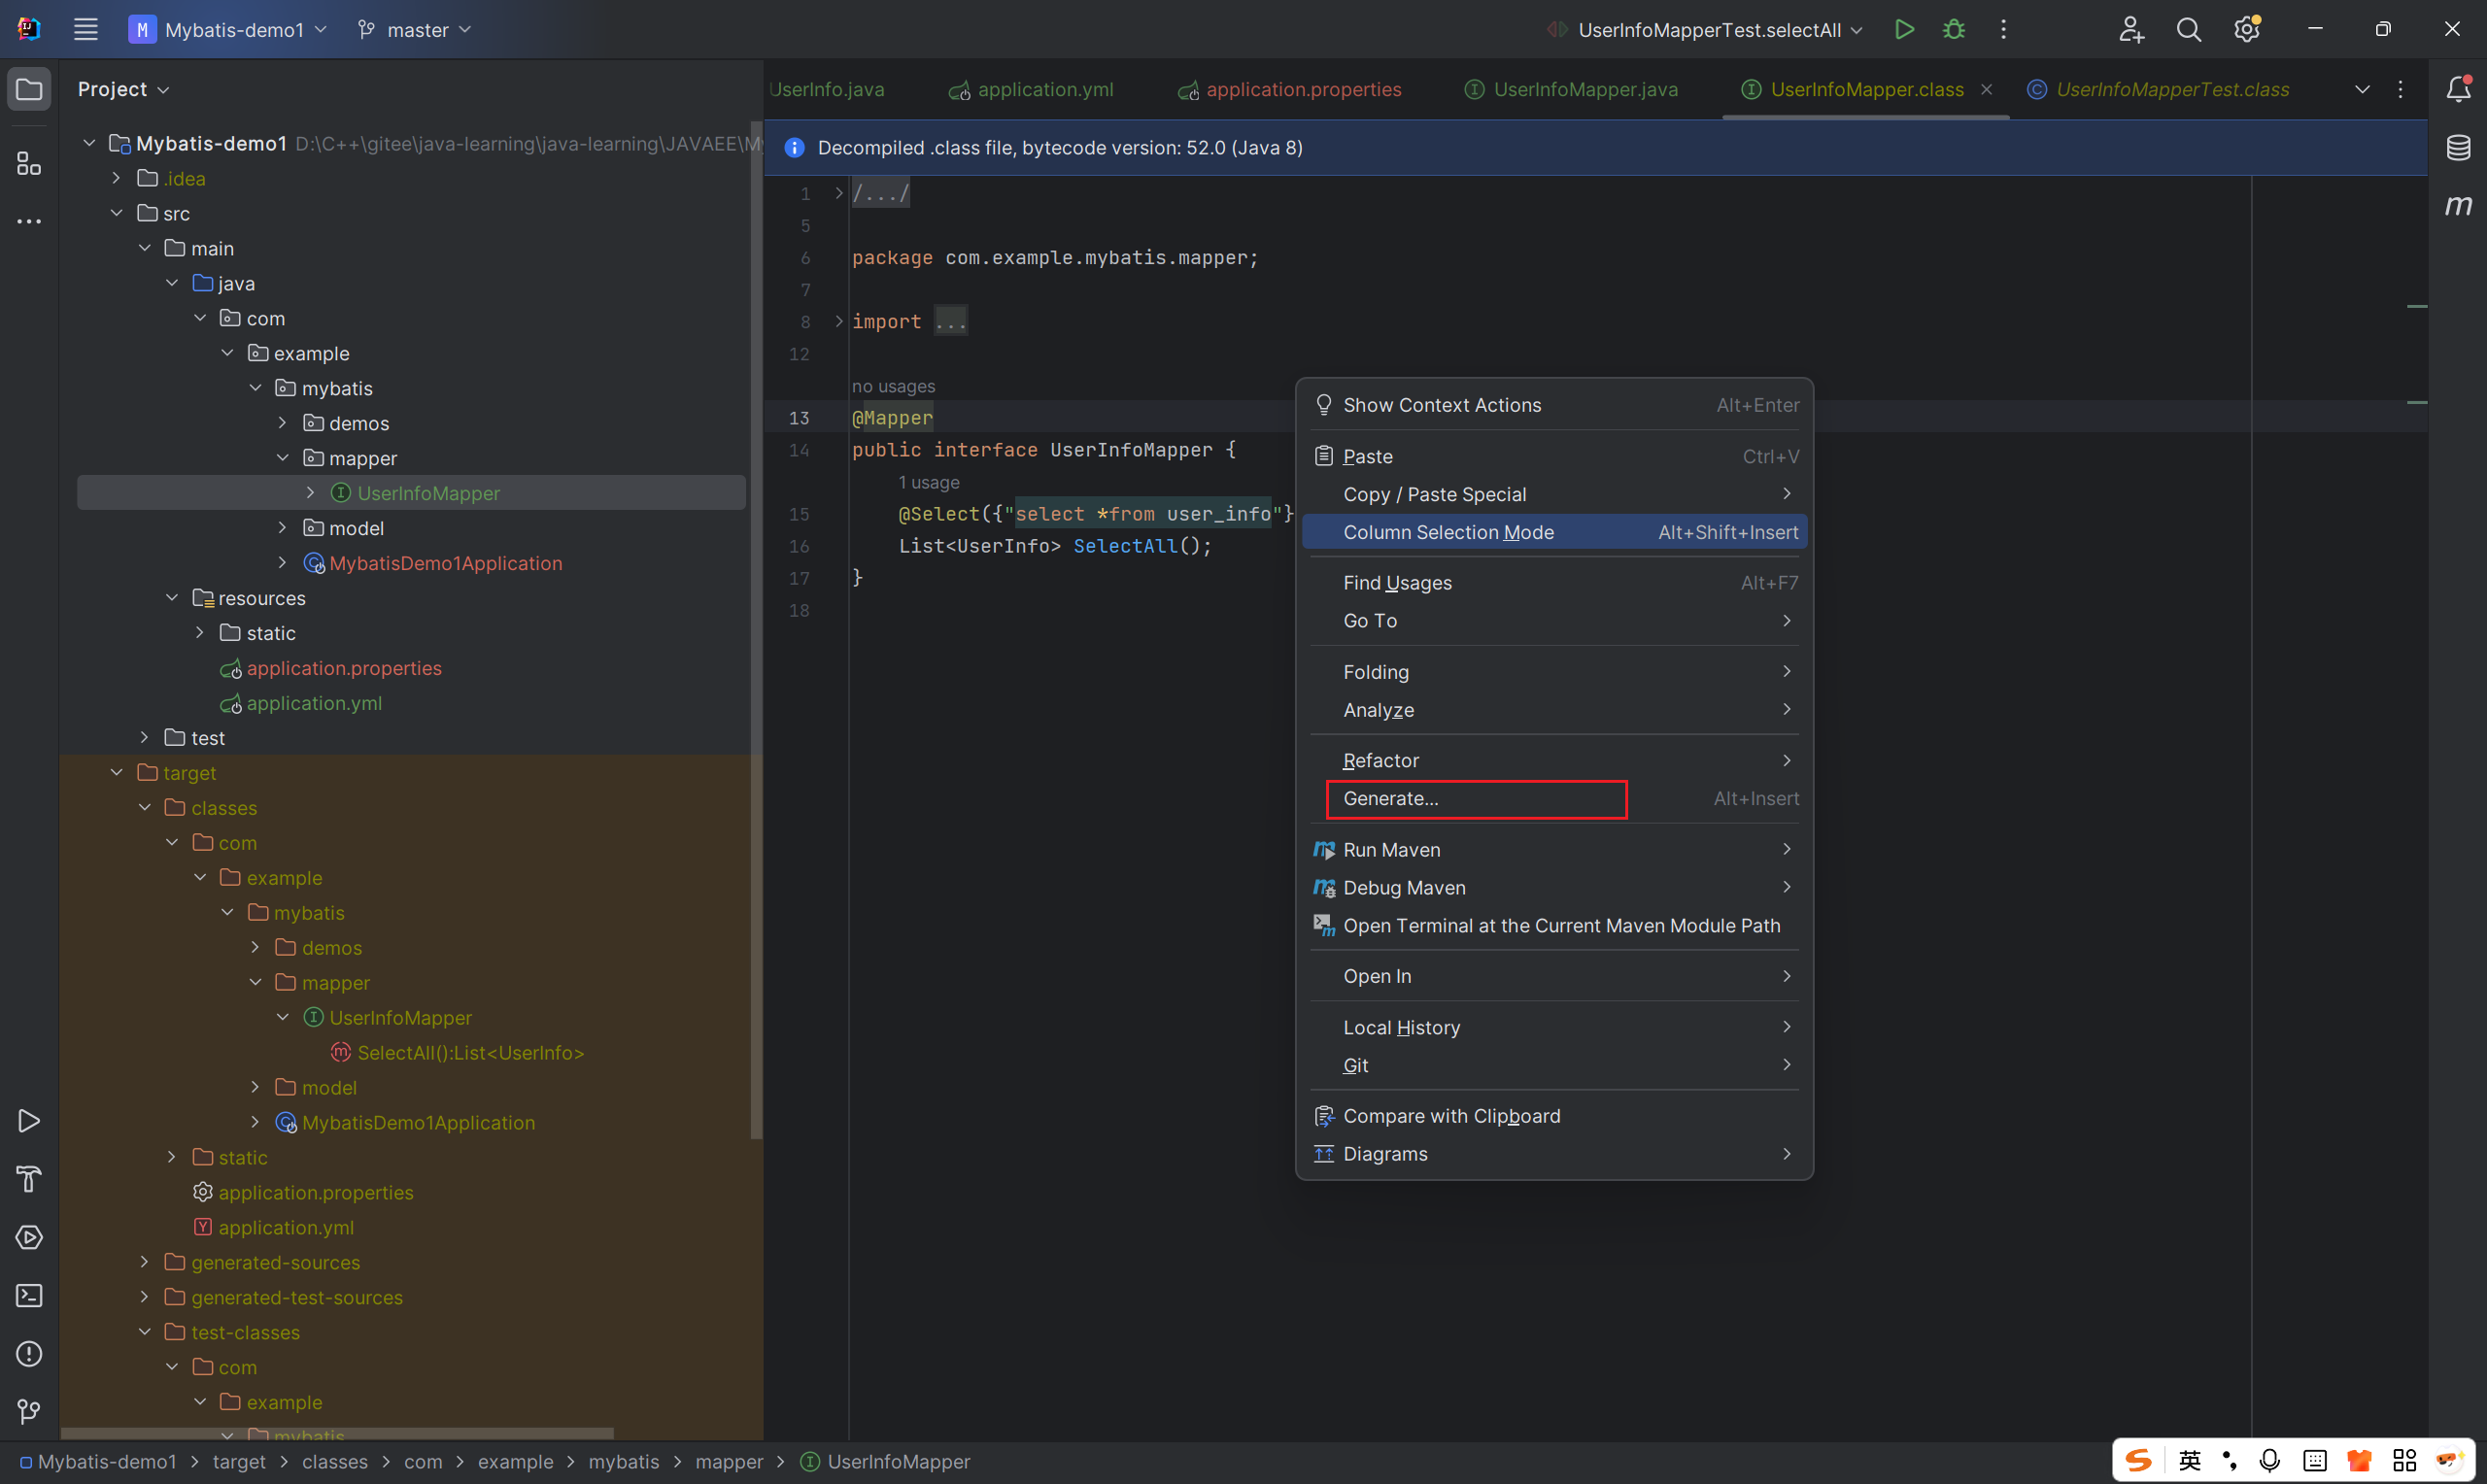
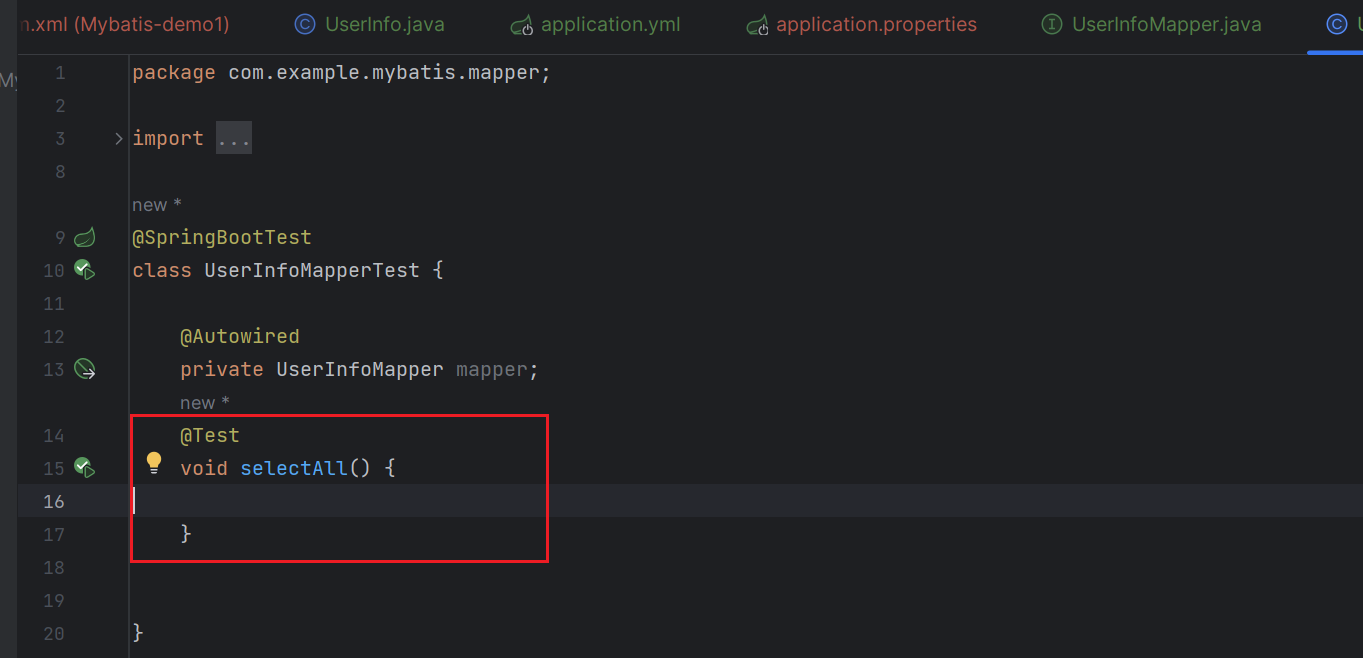
@SpringBootTest注解加载整个 Spring 应用上下文,这样可以注入需要测试的 Mapper 等组件。@Autowired用于注入要测试的UserInfoMapper。@Test注解标记测试方法,selectAll方法中调用userInfoMapper的方法并进行断言验证。
@Mapper已经将将接口交给了Spring进行管理,直接注入进来就可以了
    @Test
    void selectAll() {
mapper.SelectAll().stream().forEach(x-> System.out.println(x));
    }
在测试方法旁边有一个运行按钮,点击方法旁边的是运行单个方法,点击类旁边的是运行整个类的方法
运行结果如下:

6.Mybatis打印日志
mybatis:
  configuration:
    log-impl: org.apache.ibatis.logging.stdout.StdOutImpl
logging:
  level:
    com.example.mybatis.mapper: DEBUG
logging是设置日志级别:
日志级别从低到高一般包括TRACE、DEBUG、INFO、WARN、ERROR等,级别越低打印的日志信息越多
再次运行测试方法,日志箭头向右表示输入,向左表示输出
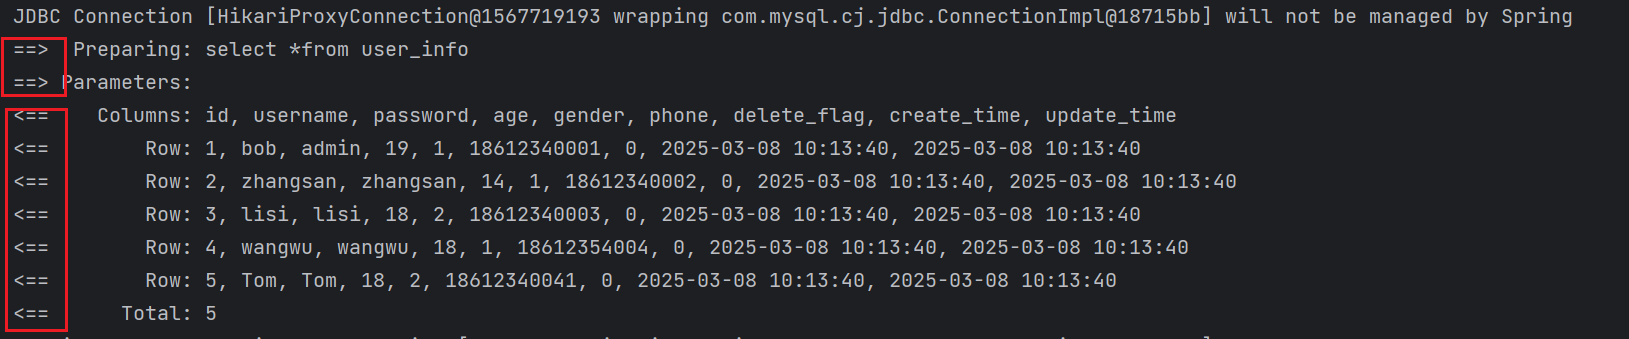
Preparing:sql语句
Parameters:传递的参数
Columns:数据库返回的表的字段
Row:返回的数据
Total:返回的数据量
7.参数传递
想要根据id查询对应的结果,对于下面这种代码,每次查询都需要修改条件,很是麻烦
    @Select("select *from user_info where id<3")
    List<UserInfo>Select();
参数传递:将参数部分用#{}代替,{}写上对应的参数
@Select("select *from user_info where id<#{id}")
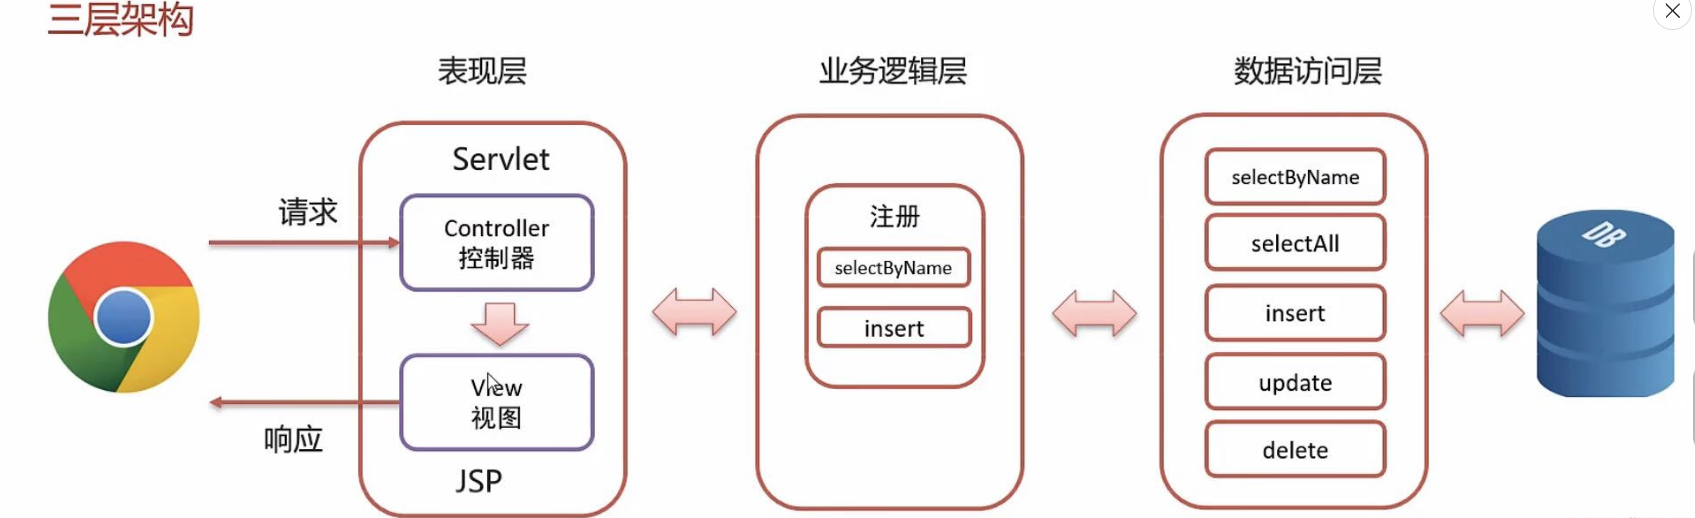
List<UserInfo>Select(Integer id);通过网页来进行测试:
创建两个包,分别是表现层(Controller),业务逻辑层(Service)
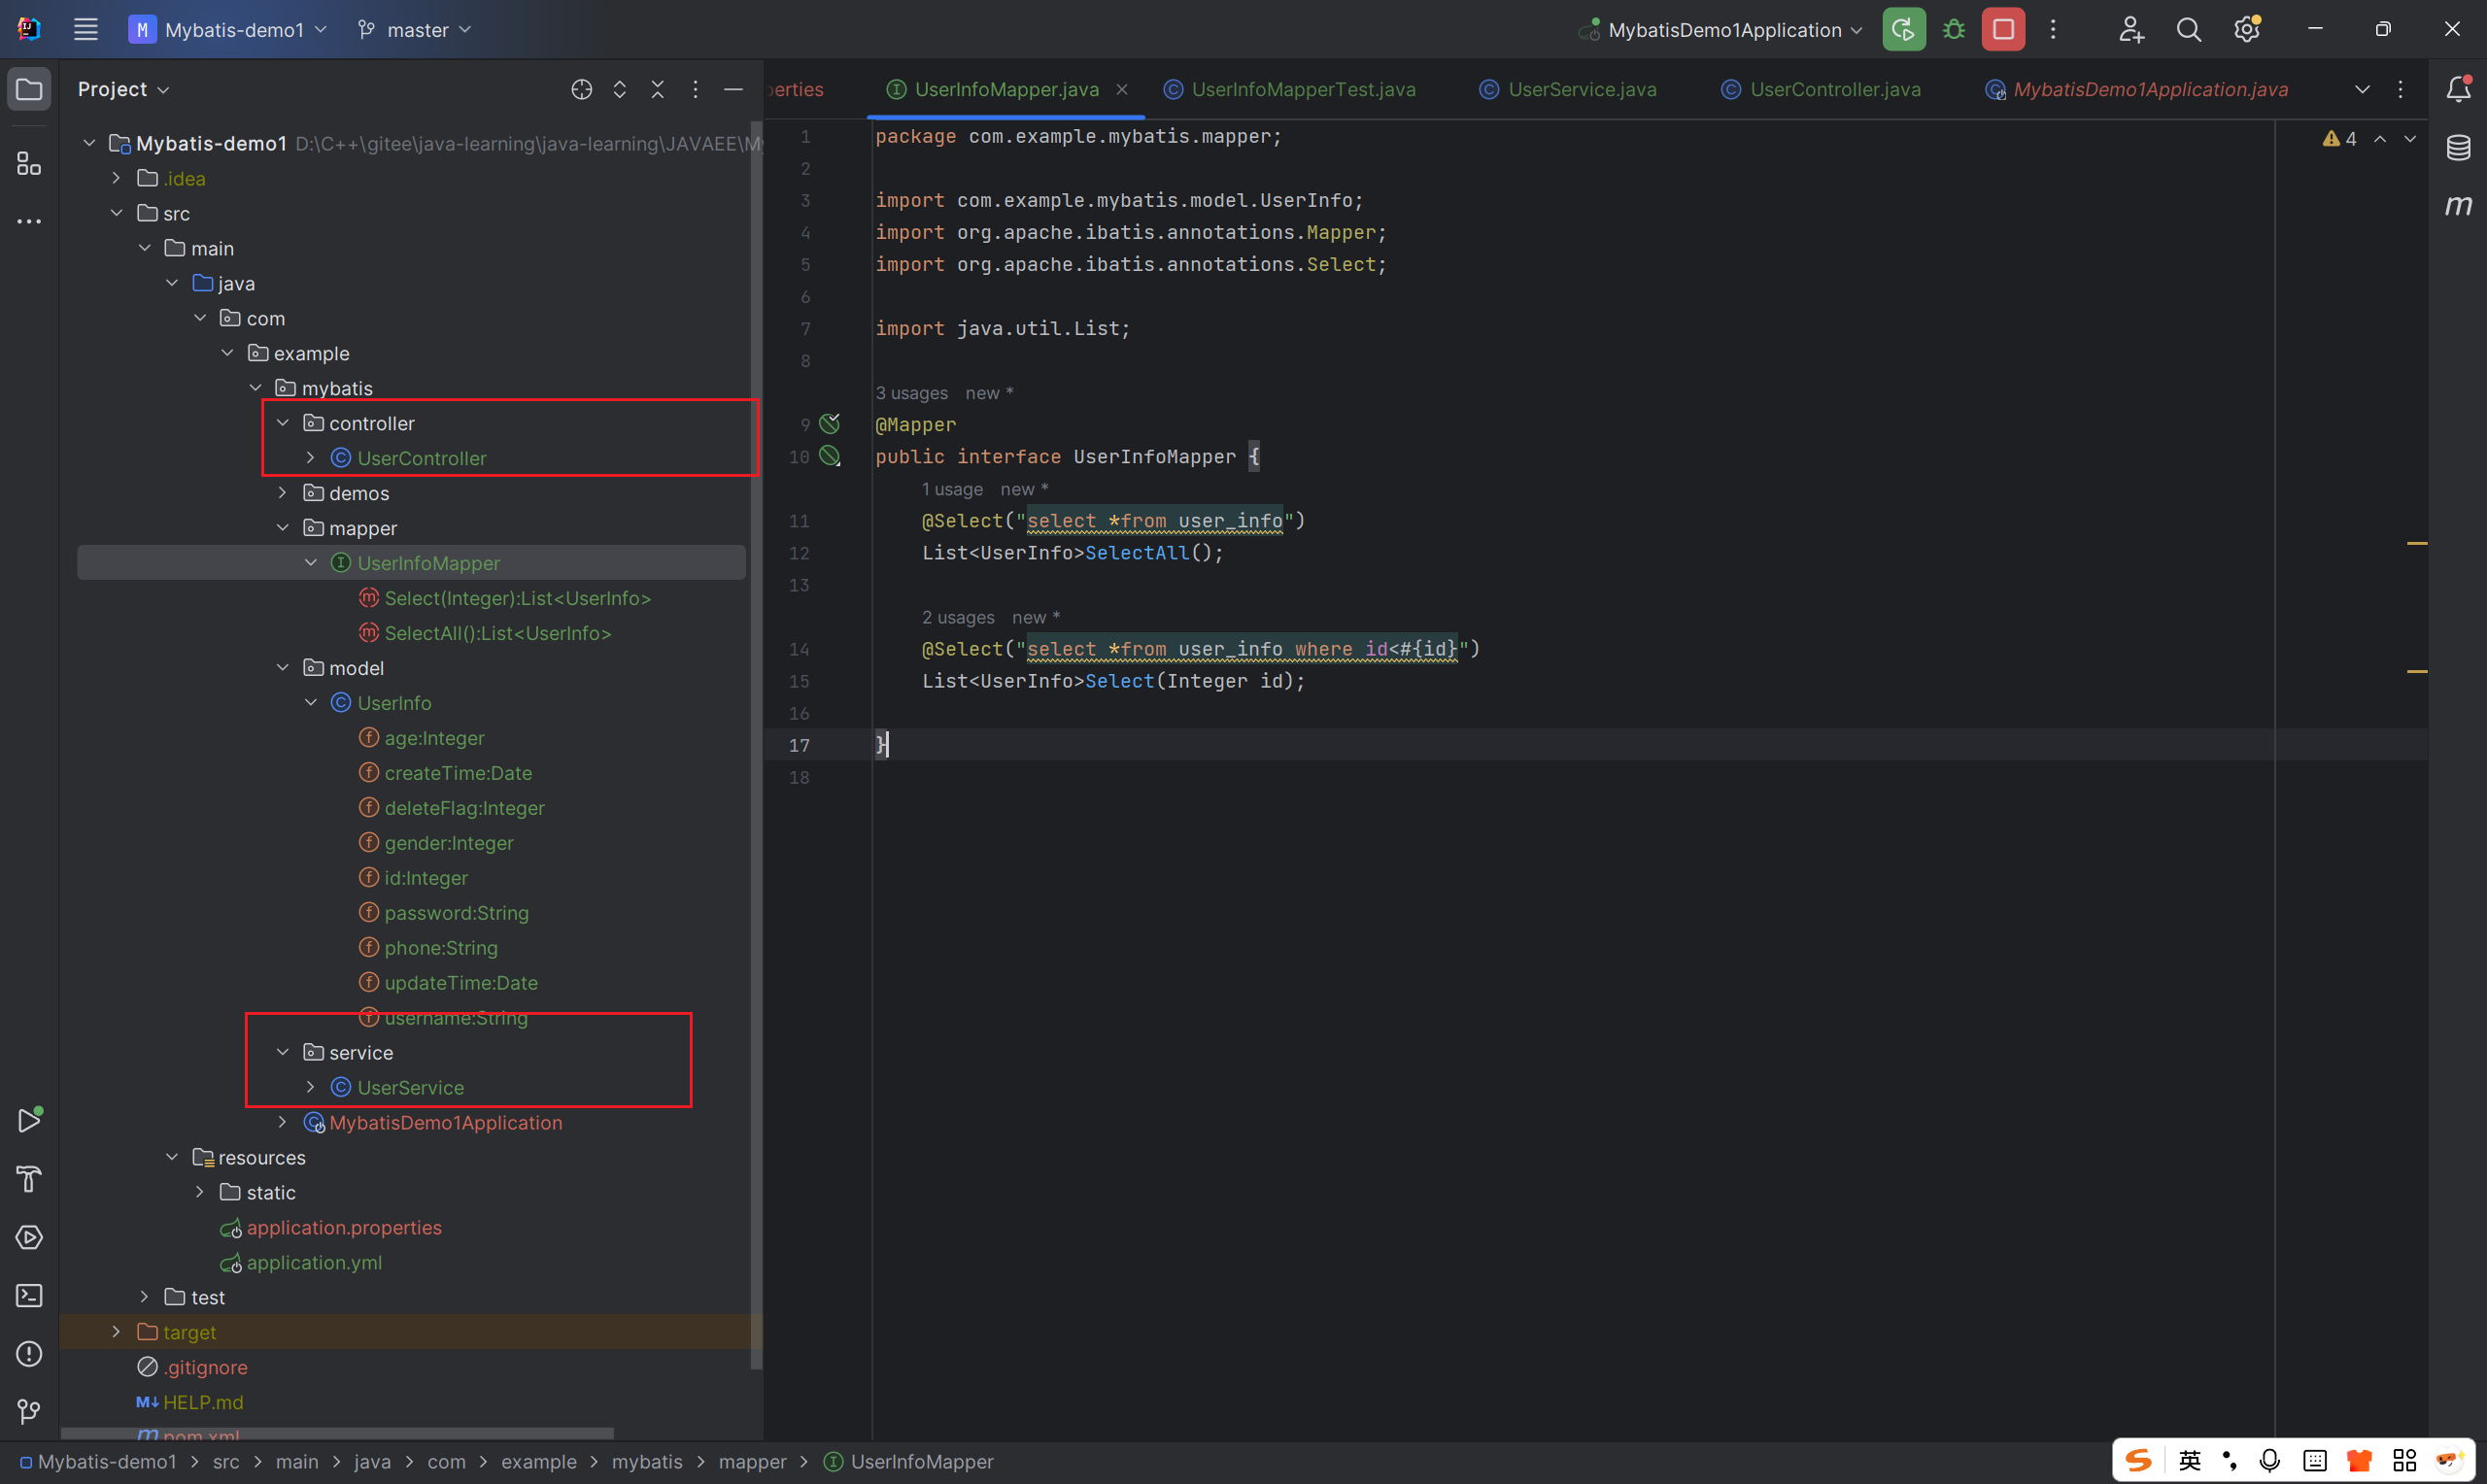
业务逻辑层:
@Service
public class UserService {
    @Autowired
    private UserInfoMapper mapper;
    public List<UserInfo>getUserInfo(Integer id){
        return mapper.Select(id);
    }
}
表现层:
@RequestMapping("/user")
@RestController
public class UserController {
    @Autowired
    private UserService userService;

    @RequestMapping("/getUser")
    public List<UserInfo>getUser(Integer id){
        return userService.getUserInfo(id);
    }

}
运行程序:
在网页输入url便可进行测试
http://127.0.0.1:8080/user/getUser?id=3
传递单个参数时:参数不一致也没关系,代码能正常运行
    @Select("select *from user_info where id<#{id}")
    List<UserInfo>Select(Integer x);
但是传递多个参数时,需要使用@Param注解来进行参数绑定
    @Select("select *from user_info where username=#{username} and password=#{password}")
    List<UserInfo>SelectByNameAndPassword(@Param("username") String username,@Param("password") String password);
#{}需要与@Param中的参数参数保存一致
方法参数写什么都可以
否则就会报BindingException,BindingException是数据绑定相关的异常
错误信息Parameter 'username' not found. Available parameters are [arg1, arg0, param1, param2]表明 MyBatis 找不到username参数
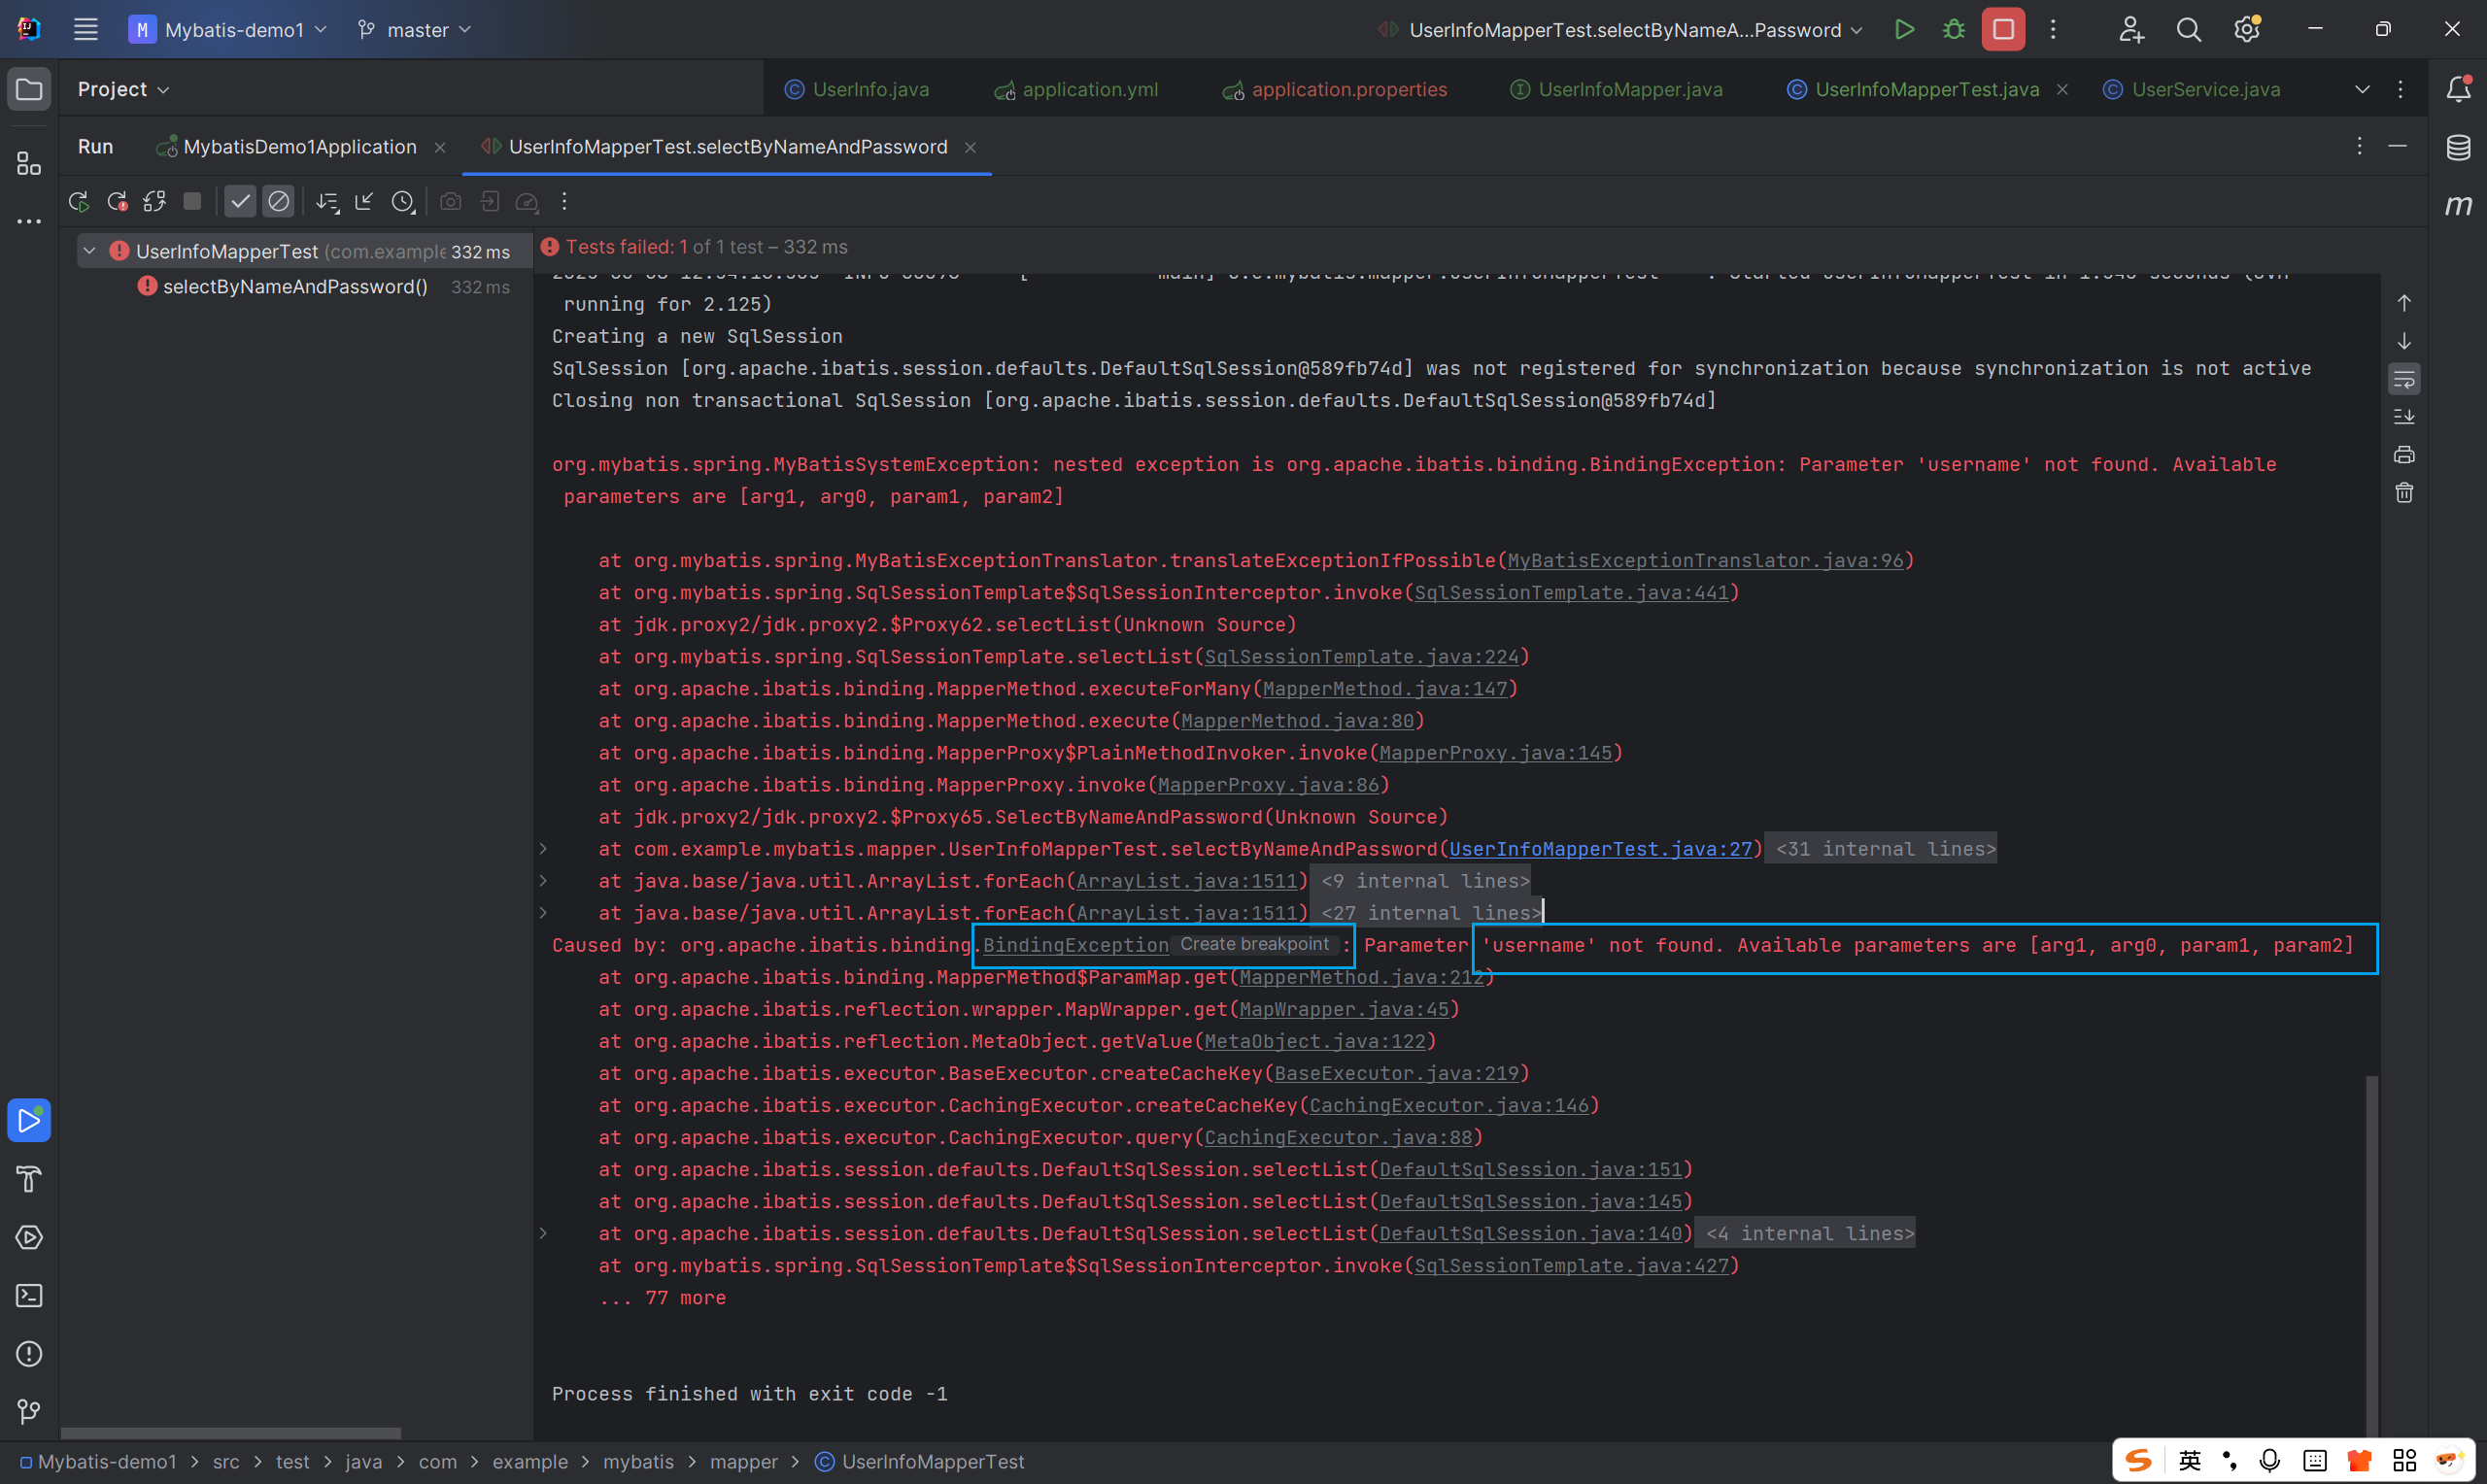
他说username和password找不到,可以使用arg1,arg0,param1,param2
什么意思:就是将#{}中的值换成arg1和arg0,或param1,param2,注意顺序

7.1@Insert+传递对象
    @Insert("INSERT INTO user_info ( username, `password`, age, gender, phone )VALUES (#{username},#{password},#{age},#{gender},#{phone} );")
Integer Insert(UserInfo userInfo);
多个对象时,使用@Param,在参数部分需要使用对象.属性
    @Insert("INSERT INTO user_info ( username, `password`, age, gender, phone )VALUES (#{userInfo.username},#{userInfo.password},#{userInfo.age},#{userInfo.gender},#{userInfo.phone} )")
Integer Insert(@Param("userInfo") UserInfo userInfo);

    @Test
    void insert() {
        UserInfo userInfo=new UserInfo();
        userInfo.setUsername("猪八戒");
        userInfo.setPassword("123456");
        userInfo.setAge(15);
        userInfo.setGender(1);
        userInfo.setPhone("15456455258");
        mapper.Insert(userInfo);
    }
这样就把数据添加了
插入数据默认返回的是受影响的行数
在一些特殊的情况下,我们希望获取到增添后,数据的id
7.2Options
@Options(useGeneratedKeys=true,keyProperty = "id")useGeneratedKeys:
其作用是指定是否使用数据库自动生成的主键。当你把它设置为true时,MyBatis 会尝试从数据库获取自动生成的主键值
keyProperty:
该参数是一个字符串类型,它指定了将自动生成的主键值映射到 Java 对象的哪个属性上。
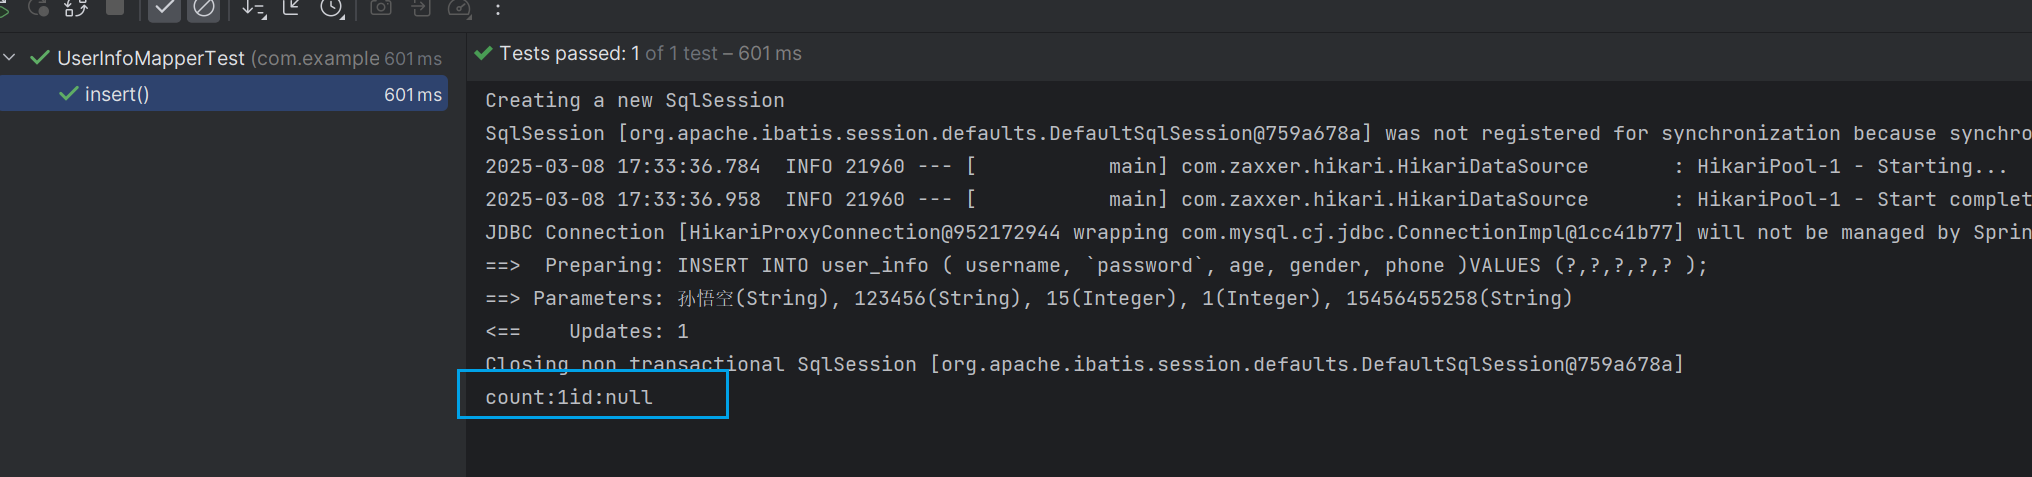
未加@Options时:
  @Test
    void insert() {
        UserInfo userInfo=new UserInfo();
        userInfo.setUsername("孙悟空");
        userInfo.setPassword("123456");
        userInfo.setAge(15);
        userInfo.setGender(1);
        userInfo.setPhone("15456455258");
        Integer count=mapper.Insert(userInfo);
        System.out.println("count:"+count+"id:"+userInfo.getId());
}
加上@Options后:
    @Options(useGeneratedKeys=true,keyProperty = "id")
    @Insert("INSERT INTO user_info ( username, `password`, age, gender, phone )VALUES (#{username},#{password},#{age},#{gender},#{phone} );")
Integer Insert(UserInfo userInfo);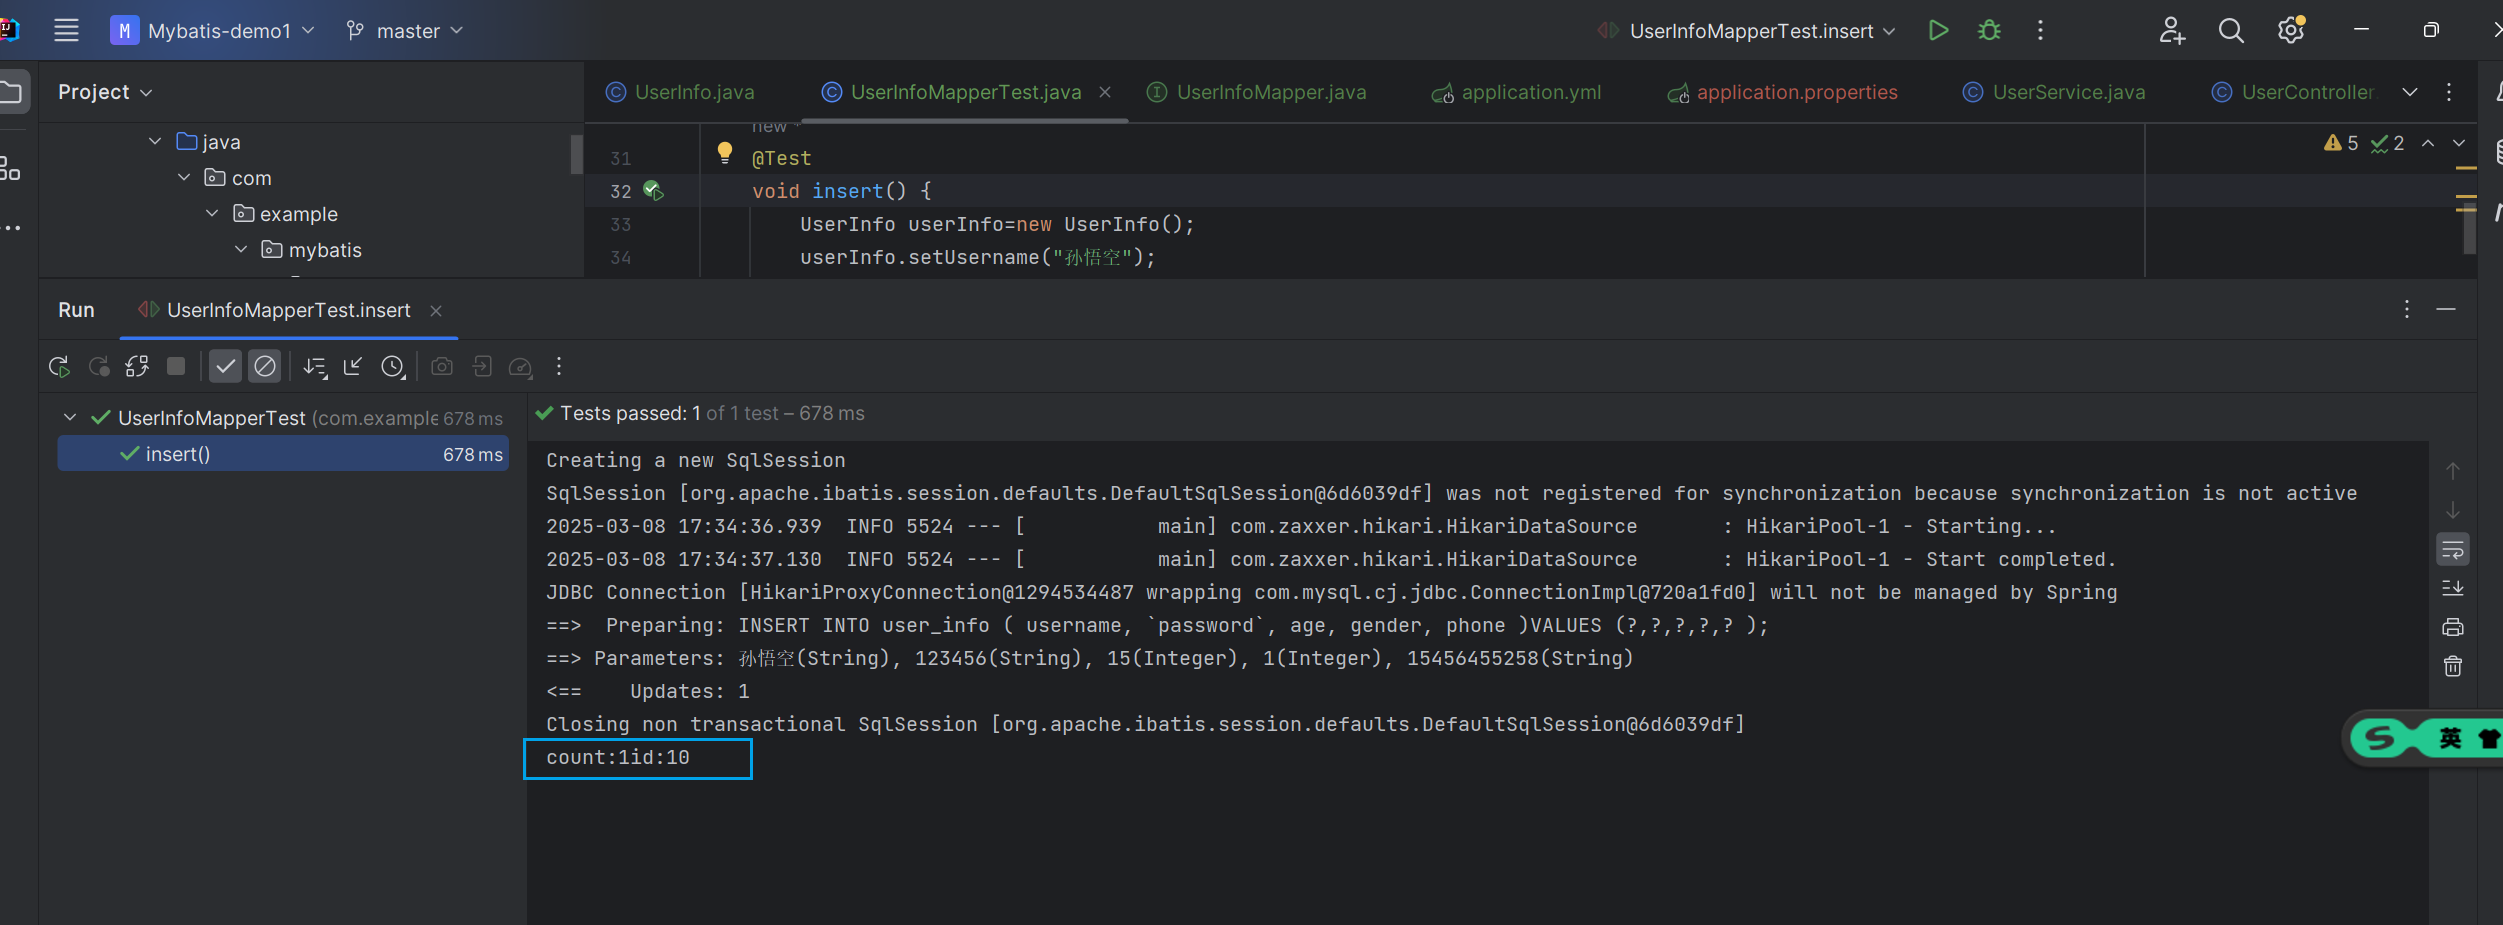
在没有使用@Options注解时,通过userInfo.getId()获取到的值为null,而加上@Options注解后,获取到的值就是数据主键自增的值
注意: 设置 useGeneratedKeys=true 之后, 方法返回值依然是受影响的行数, 自增id 会设置在上述 keyProperty 指定的属性中.
8.查询时数据库字段与java属性不一致问题
    @Test
    void selectAll() {
mapper.SelectAll().stream().forEach(x-> System.out.println(x));
    }
我们发现deleteFlag,createTime,uodateTime的值都为null
解决方法:
8.1起别名
在查询语句中,将数据库中对应的字段名起别名,别名和java中对象的属性名一样,这样进行单元测试时,对应的属性就有值了
    @Select("SELECT id,username,`password`,age,gender,phone,delete_flag AS deleteFlag," +
            "create_time AS createTime,update_time AS updateTime from user_info;")
    List<UserInfo>SelectAll1();
8.2@Results
查看@Results的源码,可以看到有一个Result类型的数组,然而这个Result也是一个注解
继续查看Result的源码,就可以找到我们需要的属性,column,property

 @Results({
            @Result(column = "delete_flag",property = "deleteFlag"),
            @Result(column = "create_time",property = "createTime"),
            @Result(column = "update_time",property = "updateTime")
    })
    @Select("select *from user_info")
    List<UserInfo>SelectAll2();
column对应数据库的字段,property对应java中对象的字段
这样写有一个坏处,就是没写一个sql语句,都需要在其上面写一遍,很是麻烦
8.3@ResultMap
    @Results(id = "resultMap",value = {
            @Result(column = "delete_flag",property = "deleteFlag"),
            @Result(column = "create_time",property = "createTime"),
            @Result(column = "update_time",property = "updateTime")
    })
    @Select("select *from user_info")
    List<UserInfo>SelectAll2();

    @ResultMap("resultMap")
    @Select("select *from user_info where id<#{id}")
    List<UserInfo>Select(Integer x);
设置@Results的id属性,当那个抽象方法需要转换时,就加上@ResultMap注解,并加上对应@Results的id
8.4添加配置文件
通常数据库列使用蛇形命名法进行命名(下划线分割各个单词), 而Java 属性⼀般遵循驼峰命名法约定. 为了在这两种命名方式之间启用自动映射,需要将 mapUnderscoreToCamelCase 设置为 true
mybatis:
  configuration:
    log-impl: org.apache.ibatis.logging.stdout.StdOutImpl
    map-underscore-to-camel-case: true #配置驼峰⾃动转换
9.XML配置文件
注解和xml是可以共存的,但是一般使用一种就行了
9.1添加依赖
<!--        Mybatis依赖包-->
        <dependency>
            <groupId>org.mybatis.spring.boot</groupId>
            <artifactId>mybatis-spring-boot-starter</artifactId>
            <version>2.2.2</version>
        </dependency>

<!--mysql驱动包-->
        <dependency>
            <groupId>com.mysql</groupId>
            <artifactId>mysql-connector-j</artifactId>
            <scope>runtime</scope>
        </dependency>
9.2配置数据库信息
spring:
  datasource:
    url: jdbc:mysql://127.0.0.1:3306/mybatis_test1?allowPublicKeyRetrieval=true&characterEncoding=utf8&useSSL=false
    username: root
    password: 123456
    driver-class-name: com.mysql.cj.jdbc.Driver

mybatis:
  configuration:
    log-impl: org.apache.ibatis.logging.stdout.StdOutImpl
    map-underscore-to-camel-case: true #配置驼峰⾃动转换
logging:
  level:
    com.example.mybatis.mapper: info
第一步和第二步在使用注解的时候已经完成了
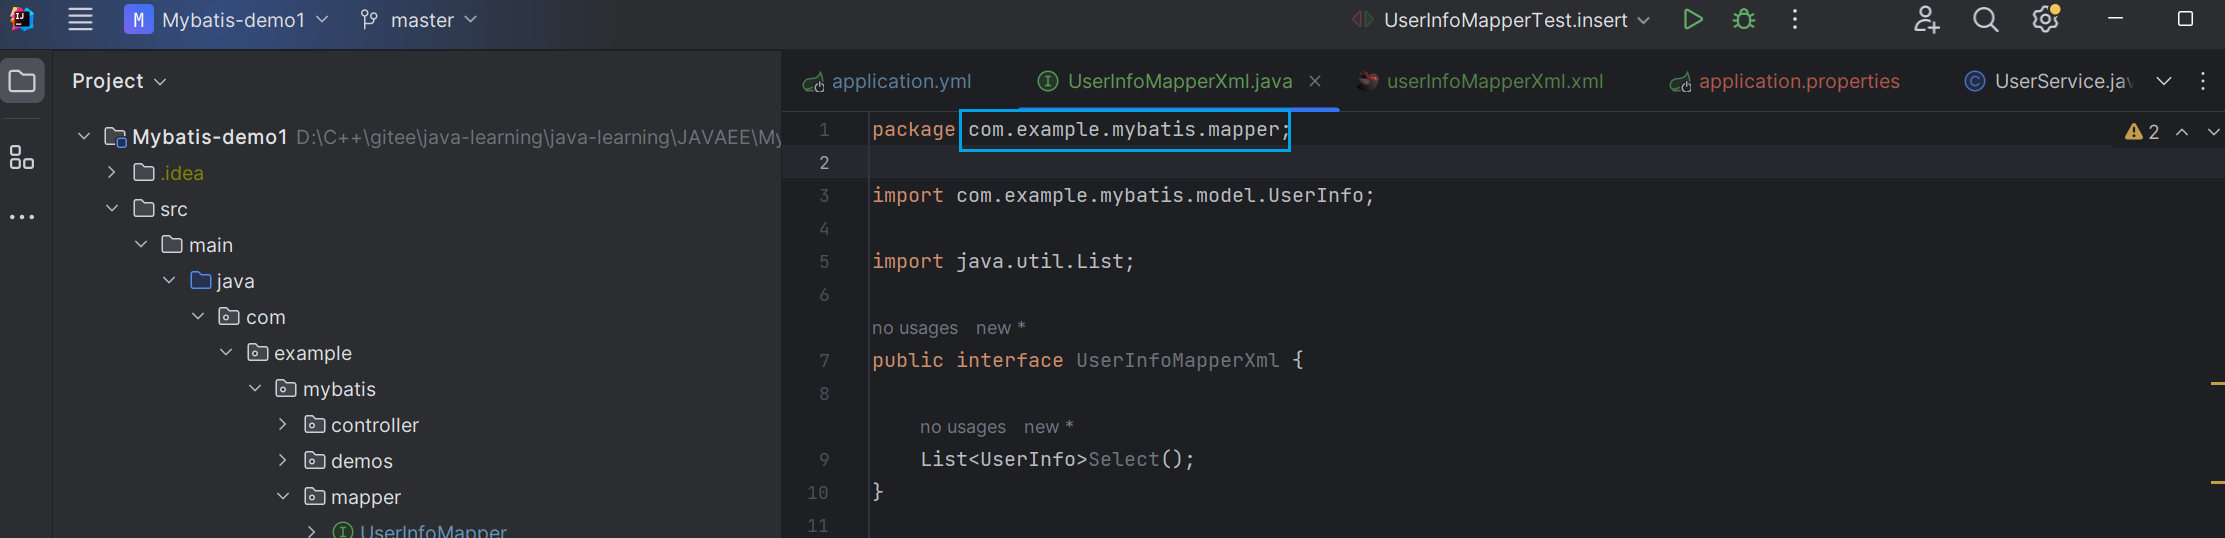
9.3定义接口
创建一个练习的接口
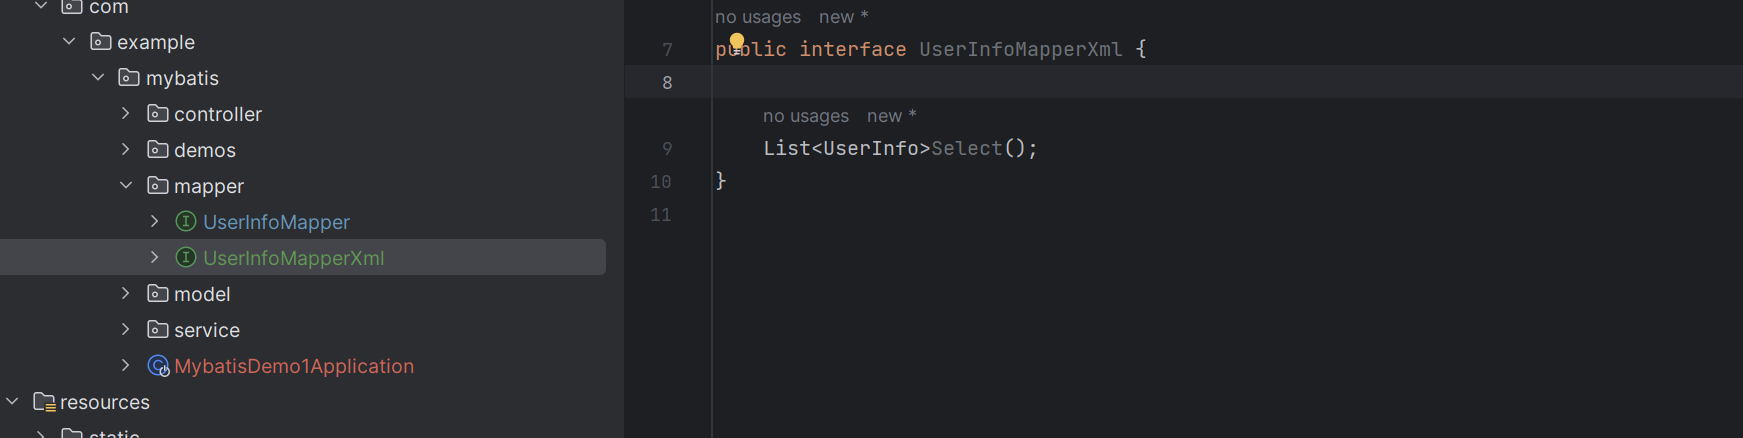
在resources下创建一个xml的文件,只要是在resources下就行,文件名一般与接口名对应
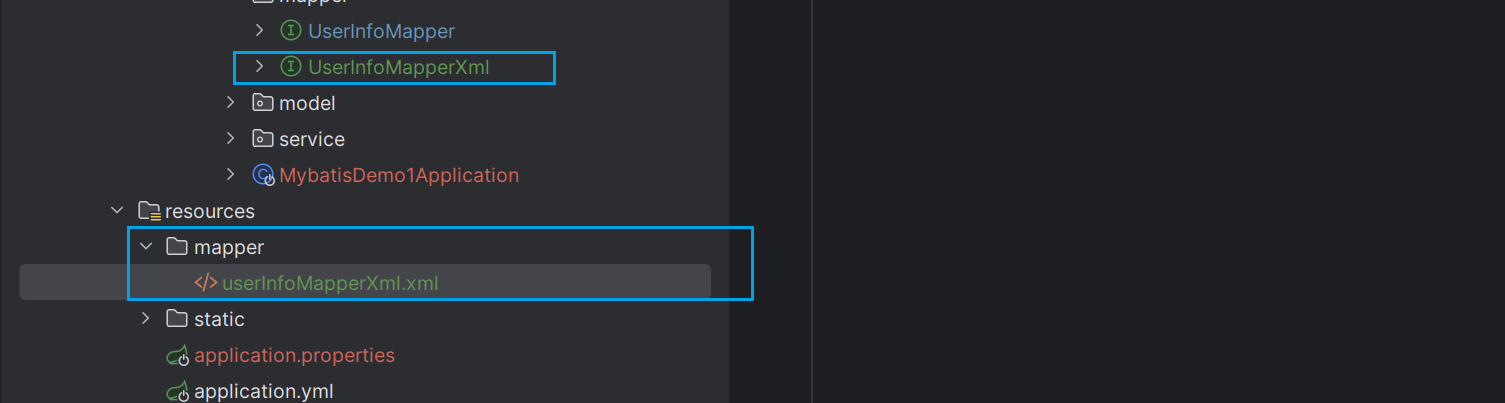
接口和xml文件是两个不同的文件,怎么才能让他们对应起来呢
在yml文件中配置
mybatis:
  mapper-locations: classpath:mapper/**Mapper.xml
classpath表示resources,mapper表示mapper文件夹,**是通配符,Mapper.xml是文件,就是找到以Mapper.xml结尾的文件
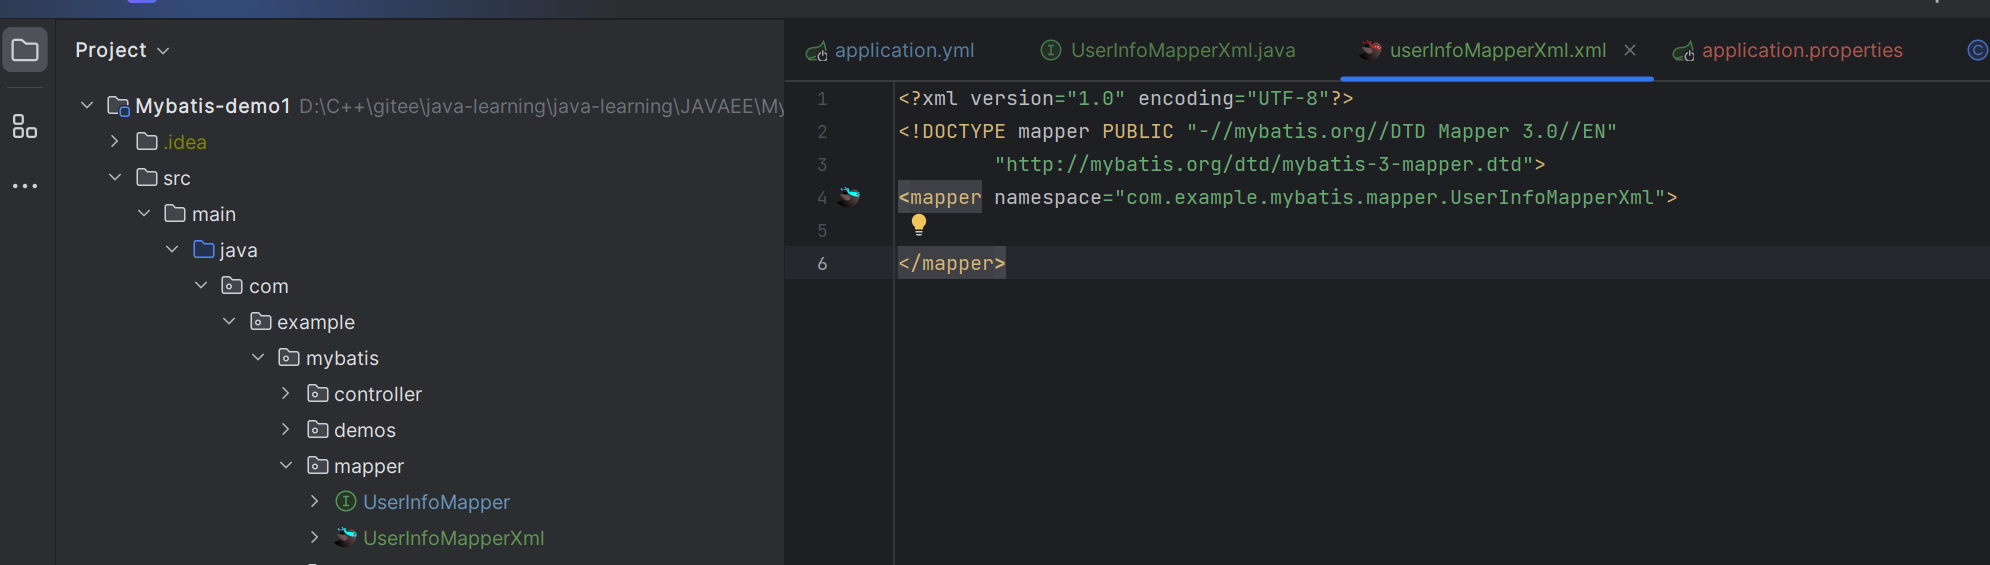
在xml文件中添加固定格式
<?xml version="1.0" encoding="UTF-8"?>
<!DOCTYPE mapper PUBLIC "-//mybatis.org//DTD Mapper 3.0//EN"
        "http://mybatis.org/dtd/mybatis-3-mapper.dtd">
<mapper namespace="com.example.demo.mapper.UserInfoMapper">

</mapper>
将<mapper namespace="com.example.demo.mapper.UserInfoMapper">修改为接口路径
9.4使用xml实现接口
安装插件
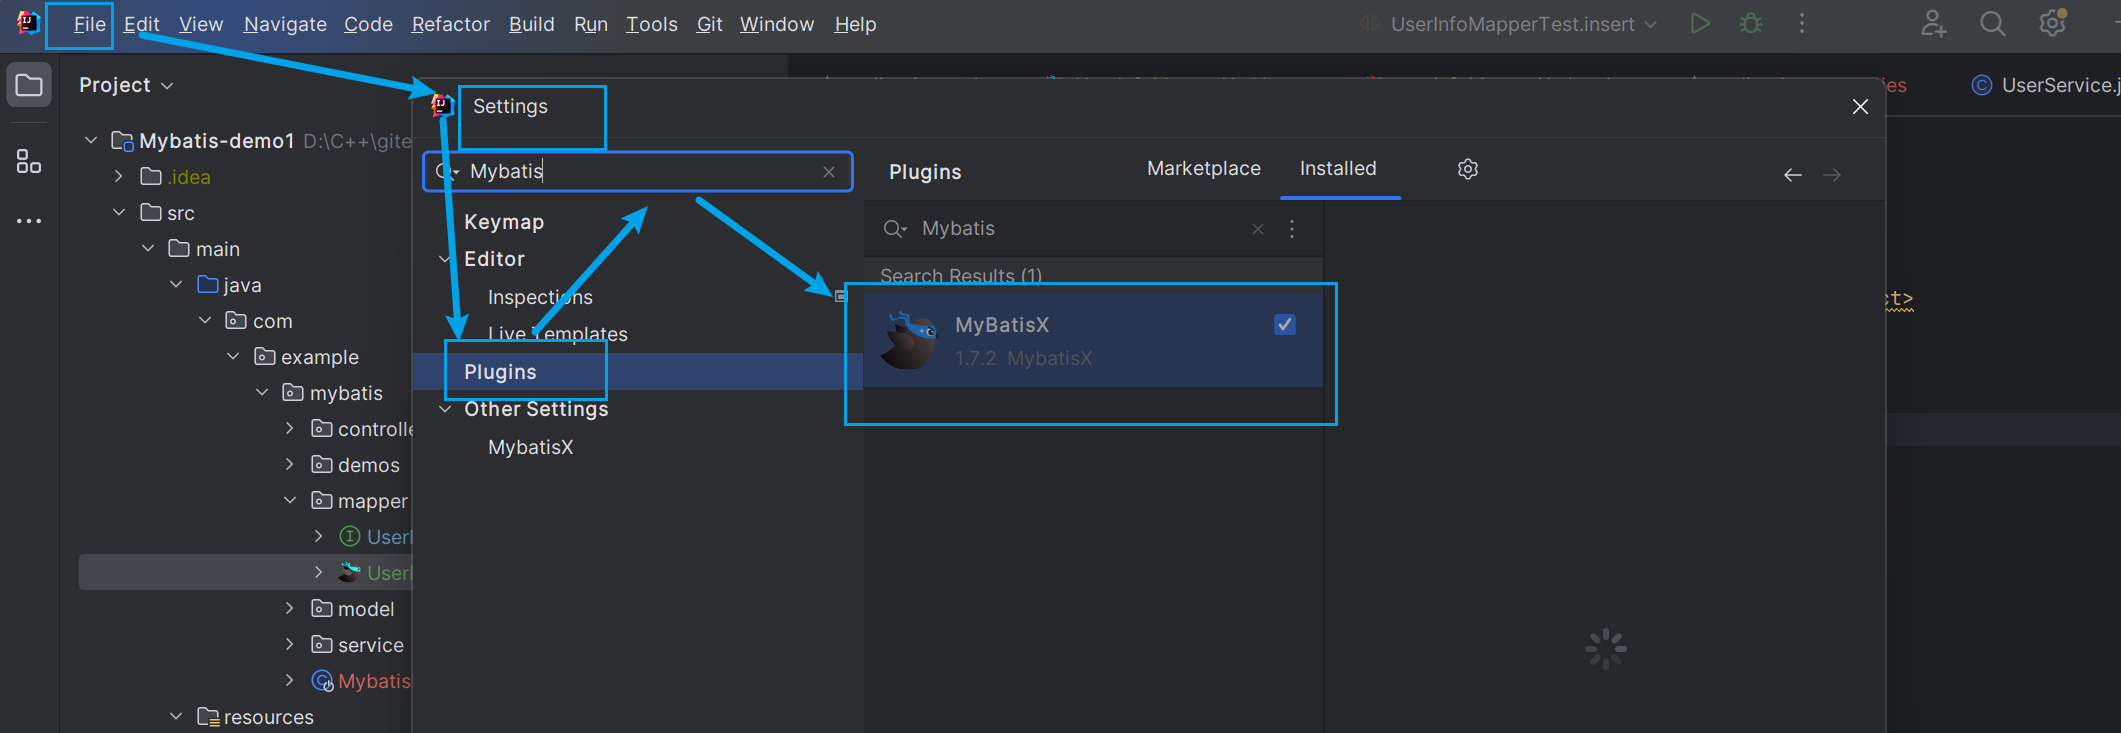
这个插件方便xml文件和接口之间来回跳
点击这个小鸟,就可以在xml和接口之间来回跳
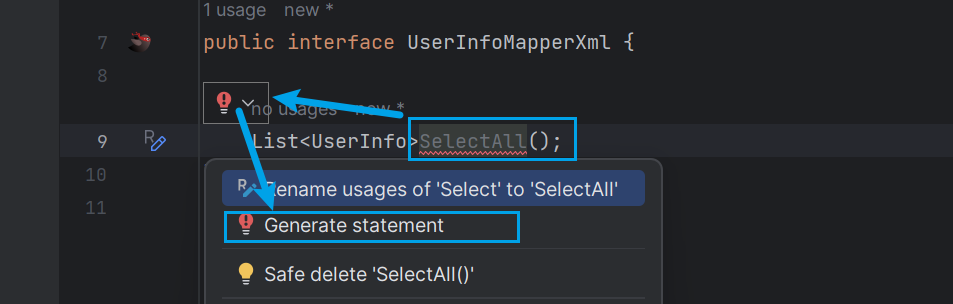
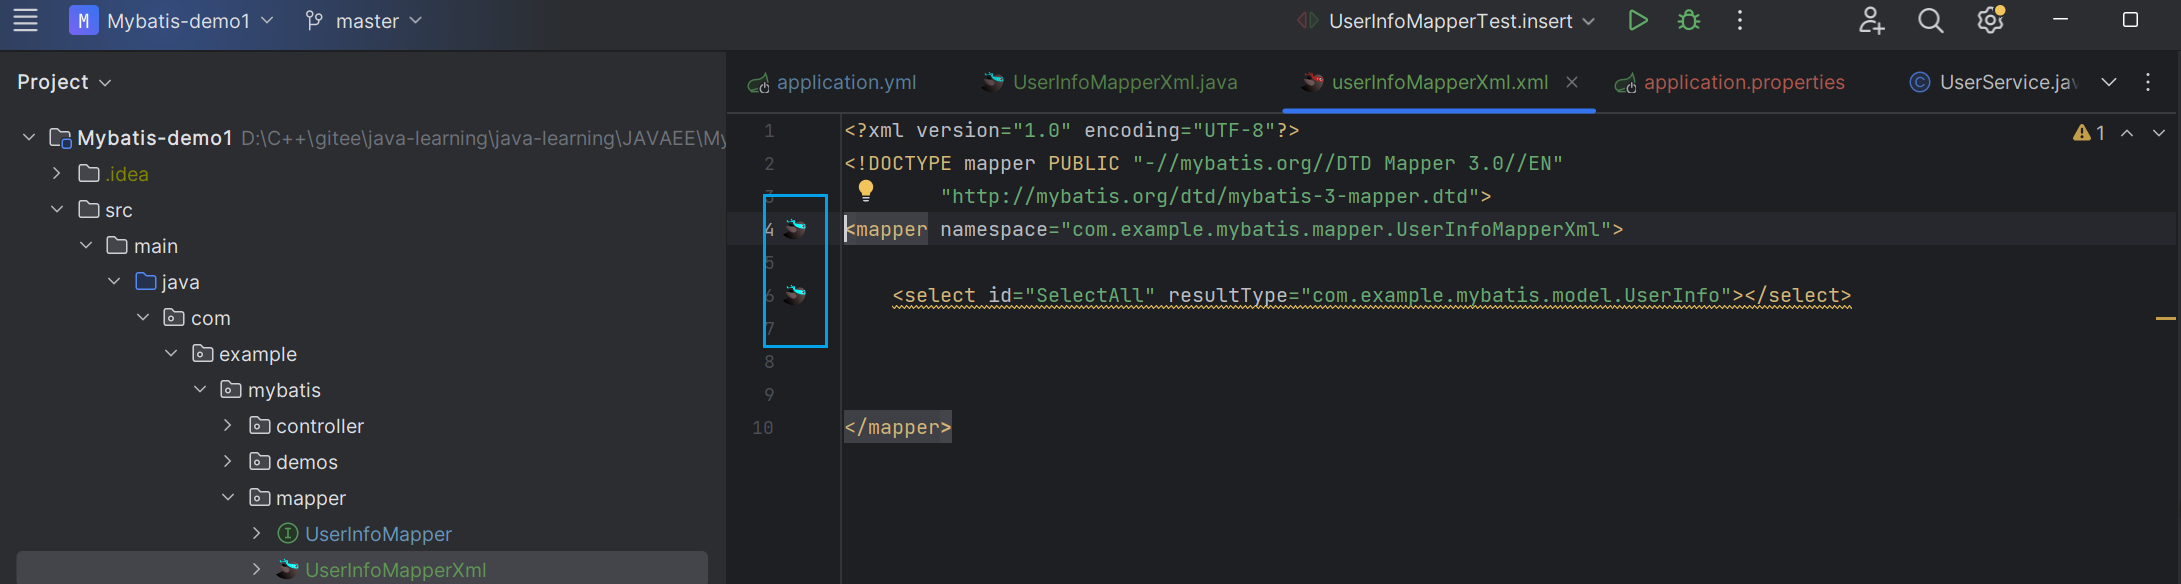
写上方法后,会标红,点击小灯泡,然后点击Generate,然后在选择对应的增删改查的sql
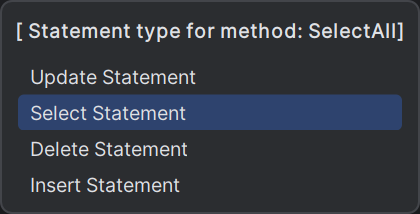
之后就跳转到xml文件里面,并写了一些方法声明
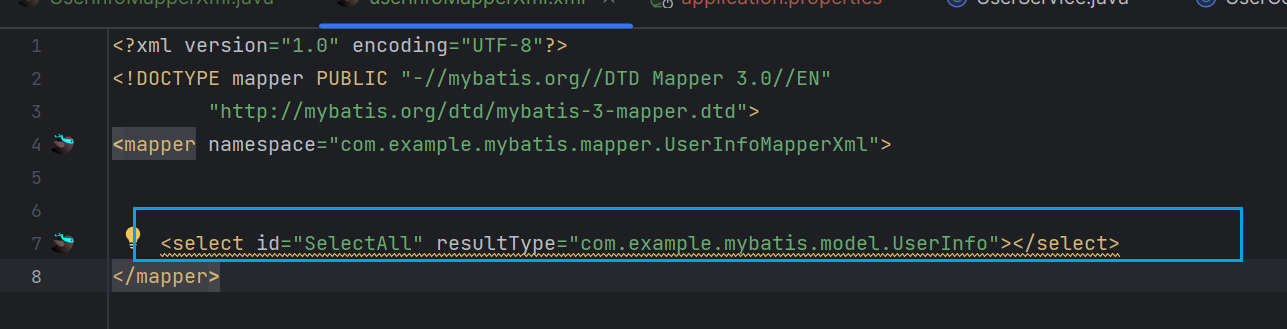
namespace指的是哪个接口
id指接口的哪个方法
resultType指返回结果元素的类型
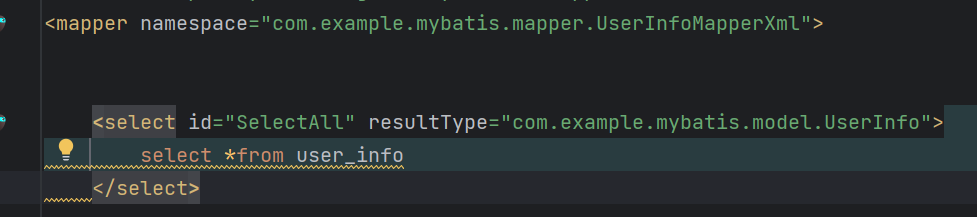
在select标签中书写sql语句,注意使用什么样的标签就进行什么样的sql语句
写上一个单元测试看看结果
@SpringBootTest
class UserInfoMapperXmlTest {

    @Autowired
    private UserInfoMapperXml userInfoMapperXml;
    @Test
    void selectAll() {
        userInfoMapperXml.SelectAll().stream().forEach(x-> System.out.println(x));
    }
}
9.5解决xml中属性映射的问题
9.5.1起别名
   <select id="SelectAll1" resultType="com.example.mybatis.model.UserInfo">
        SELECT id,username,`password`,age,gender,phone,delete_flag AS deleteFlag,
               create_time AS createTime,update_time AS updateTime from user_info
    </select>
9.5.2Result
    <resultMap id="resultMap" type="com.example.mybatis.model.UserInfo">
        <id column="id" property="id"></id>
        <result column="delete_flag" property="deleteFlag"></result>
        <result column="create_time" property="createTime"></result>
        <result column="update_time" property="updateTime"></result>
    </resultMap>

    <select id="SelectAll" resultMap="resultMap">
        select * from user_info
    </select>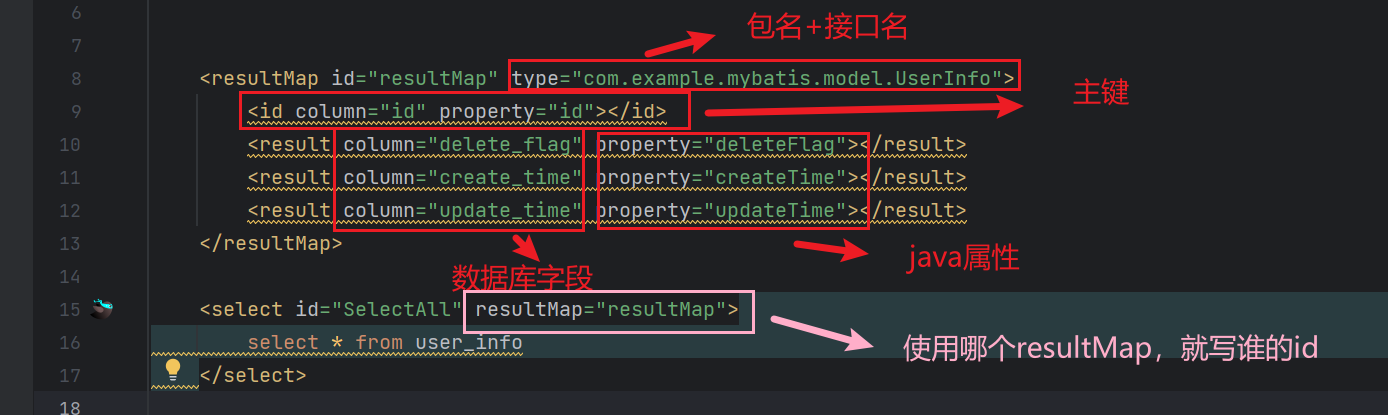
9.5.3开启驼峰命名
添加配置文件
mybatis:
  configuration:
    log-impl: org.apache.ibatis.logging.stdout.StdOutImpl
    map-underscore-to-camel-case: true #配置驼峰⾃动转换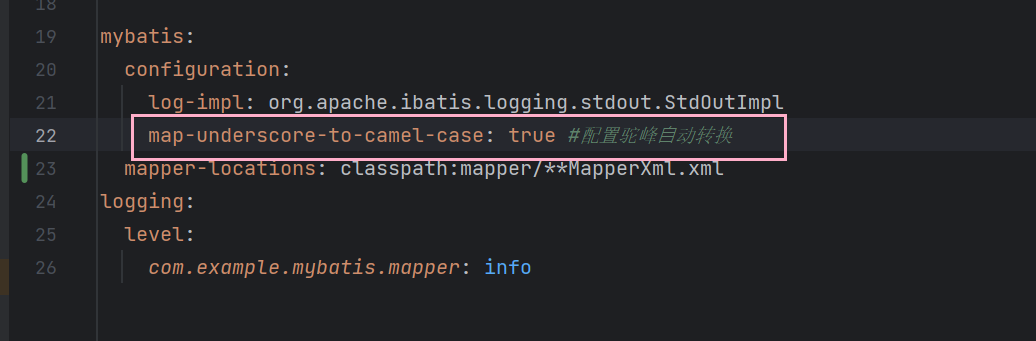
9.6添加数据
接口
Integer Innsert(UserInfo userInfo);xml文件
 <insert id="Innsert">
        INSERT INTO user_info ( username, `password`, age, gender, phone )
        VALUES (#{username},#{password},#{age},#{gender},#{phone} )
    </insert>
使用@Param注解
接口:
Integer Insert(@Param("userInfo") UserInfo userInfo);xml文件:
    <insert id="Insert">
        INSERT INTO user_info ( username, `password`, age, gender, phone )
        VALUES (#{userInfo.username},#{userInfo.password},#{userInfo.age},#{userInfo.gender},#{userInfo.phone} )
    </insert>
使用@Param注解时,传递参数时需要加上对象名.属性
9.7修改数据
接口:
Integer Update(Integer id);xml:
    <update id="Update">
        UPDATE user_info set username='哪吒' where id=#{id}
    </update>
9.8删除数据
接口
Integer Delete(Integer id);xml:
    <delete id="Delete">
        delete from user_info where id=#{id}
    </delete>
9.9返回主键自增id
在Insert标签中添加useGeneratedKeys="true" keyProperty="id"
   <insert id="Insert" useGeneratedKeys="true" keyProperty="id">
        INSERT INTO user_info ( username, `password`, age, gender, phone )
        VALUES (#{userInfo.username},#{userInfo.password},#{userInfo.age},#{userInfo.gender},#{userInfo.phone} )
    </insert>