一、Spring框架介绍

Spring优点:
1、方便解耦,简化开发,IOC控制反转
Spring 就是一个大工厂,可以将所有对象创建和依赖关系维护交给Spring
2、AOP 编程的支持
Spring 提供面向切编程,可以方便的实现对序进行权限拦截、运监控等功能
3、声明式事务的支持(张三给李四转账,要么同时成功,要么同时失败)
只需要通过配置就可以完成对事务的管理,而无手动编程
4、方便集成各种优秀框架
Spring 不排斥各种优秀的开源框架,其内部提供了对各种优优秀框架的支持(如Struts,Mybatis,Hibernate)。
SSH SSM
二、IOC和DI
控制反转(Inversion on Control)IOC:对象的创建交给外部容器来完成(这里就是交给Spring容器),这就叫控制反转。
IOC:Spring就是一个大的内存容器(一块内存区域),三层架构里面上一层不需要再去new下一层对象,在上一层只需要写下一层的接口,new对象由Spring容器帮我们完成,各层直接向Spring容器要对象就可以。
class StudentController{
    // 需要什么,就去创建什么(自己去new),这就叫"控制正转"(通俗一点就是自己控制new哪个对象)
    private IStudentService studentService = new StudentServiceImpl();
}

class StudentController{
     // 对象的创建交给别人去new(现在交给Spring容器new StudentServiceImpl(),new出来对方放在Spring容器),这就叫控制反转"IOC"
     private IStudentService studentService;

     // 将Spring容器中new出来的对象通过set方法赋值给studentService,这个过程叫依赖注入:DI
     public void setStudentService(IStudentService studentService) {
             this.studentService = studentService;
     }
}
依赖注入:Dependency injection (DI)
现在new这个对象不是由自己new,是由Spring容器帮我们new对象,现在要得到这个Spring容器new出来的对象,就要"依赖"Spring容器,"注入"Spring容器new出来的对象。
IOC和DI区别:
IOC:解决对象创建的问题(对象的创建交给别人)Inversion of Control。
DI:在创建完对象后,对象关系的处理就是依赖注入(通过set方法实现依赖注入)Dependency injection。
先有IOC(对象创建),再有DI(处理对象关系)
在三层架构中最终实现的效果是:在Controller不会出现Service层具体的实现类代码,只会看到Service层接口,Service层也不会出现Dao层具体实现类的代码,也只会看到Dao层的接口
四、Bean的属性: scope范围
1、singleton
是scope的默认值,单例模式,在Spring容器中只存在一个实例。
public void test3() {
    ApplicationContext context = new ClassPathXmlApplicationContext("applicationContext.xml");
    Student student1 = (Student) context.getBean("student");
    Student student2 = (Student) context.getBean("student");
    System.out.println(student1 == student2);// true
}
2、prototype
多例,会创建多个对象,每次去容器里面拿会创建一个新的实例
<bean scope="prototype" name="student" class="com.situ.spring.pojo.Student"/>

public void test3() {
    ApplicationContext context = new ClassPathXmlApplicationContext("applicationContext.xml");
    Student student1 = (Student) context.getBean("student");
    Student student2 = (Student) context.getBean("student");
    System.out.println(student1 == student2);// false
}
五、Spring属性注入方式
1、set方法注入
<bean name="banji" class="com.situ.spring.pojo.Banji">
    <property name="id" value="1"/>
    <property name="name" value="Java2023"/>
</bean>
<bean name="student" class="com.situ.spring.pojo.Student">
    <!-- 值类型注入 -->
    <property name="id" value="1"/>
    <property name="name" value="张三"/>
    <property name="age" value="23"/>
    <property name="gender" value="男"/>
    <!-- ref:reference参考、引用
       引用类型的注入
    -->
    <property name="banji" ref="banji"/>
</bean>
2、构造方法注入
argument:参数
parameter:参数
<bean name="banji" class="com.situ.spring.pojo.Banji">
    <constructor-arg name="id" value="1"/>
    <constructor-arg name="name" value="Java2023"/>
</bean>
<bean name="student" class="com.situ.spring.pojo.Student">
    <constructor-arg name="id" value="1"/>
    <constructor-arg name="name" value="李四"/>
    <constructor-arg name="age" value="23"/>
    <constructor-arg name="gender" value="男"/>
    <constructor-arg name="banji" ref="banji"/>
</bean>
3、注解方式注入
@Resource @Autowired
六、三层架构使用Spring来管理
1、set方法注入
三层架构使用Spring来管理,达到一个目的:在上层只看到下一层的接口就可以,不需要出现具体的实现类。
使用set方式注入:
<bean name="studentDao" class="com.situ.spring.dao.impl.StudentDaoImpl"/>
<bean name="studentService" class="com.situ.spring.service.impl.StudentServiceImpl">
    <property name="studentDao" ref="studentDao"/>
</bean>
<bean name="studentController" class="com.situ.spring.controller.StudentController">
    <property name="studentService" ref="studentService"/>
</bean>
2、注解开发方式
<!--base-package:是要扫描的包,扫描这个包下面类上带有注解@Controller @Service @Repositioy  -->
<context:component-scan base-package="com.situ.spring"/>
@Controller @Service @Repository 本身没有区别,都是new一个对象放到Spring容器中
@Component new一个对象放到Spring容器中,不起名字,放到容器中默认的名字是类名首个单词首字母小写
@Target(ElementType.TYPE)
@Retention(RetentionPolicy.RUNTIME)
@Documented
@Component
public @interface Controller {

    /**
     * The value may indicate a suggestion for a logical component name,
     * to be turned into a Spring bean in case of an autodetected component.
     * @return the suggested component name, if any (or empty String otherwise)
     */
    @AliasFor(annotation = Component.class)
    String value() default "";

}

/*
<bean name="courseController" class="com.situ.spring.controller.CourseController">
</bean>
@Controller 这个注解相当于在applicationContext.xml中写的上面的bean,
默认的名字是类名的首个单词小写courseController
*/
@Controller("courseController")
public class CourseController {

   // <property name="courseService" ref="courseService"/>
   // @Resource:从Spring容器中根据名字拿出指定的对象注入进来
   @Resource(name = "courseService")
   private ICourseService courseService;

   public void  selectAll() {
      System.out.println("CourseController.selectAll()");
      courseService.selectAll();
   }
}

/*
<bean name="courseService" class="com.situ.spring.service.impl.CourseServiceImpl">
</bean>
*/
@Service("courseService")
public class CourseServiceImpl implements ICourseService{

   //<property name="courseDao" ref="courseDao"/>
   @Resource(name = "courseDao")
   private ICourseDao courseDao;

   @Override
   public void selectAll() {
       System.out.println("CourseServiceImpl.selectAll()");
       courseDao.selectAll();
   }
}

// <bean name="courseDao" class="com.situ.spring.dao.impl.CourseDaoImpl"></bean>
@Repository("courseDao")
public class CourseDaoIml implements ICourseDao{
   @Override
   public void selectAll() {
       System.out.println("CourseDaoIml.selectAll()");
   }
}
@Controller、@Service、@Repository这三个注解的作用和@Component是一样的,都是new一个对象放到Spring容器中,目的是为了表明三层架构中不同的层。
七、Autowired 自动装配
1、@Autowired和@Resource区别
- @Resource默认是按照名称装配的,是JDK提供的。
byName 通过参数名自动装配,如果一个bean的name 和另外一个bean的 property 相同,就自动装配。 - @Autowired是默认按照类型装配的 ,是Spring提供的。
byType 通过参数的数据类型自动自动装配,如果一个bean的数据类型和另外一个bean的property属性的数据类型兼容,就自动装配。
2、@Autowired一个接口有多个子类情况
@Service
public class BanjiServiceImpl implements IBanjiService {}

@Service
public class BanjiServiceImpl2 implements IBanjiService{}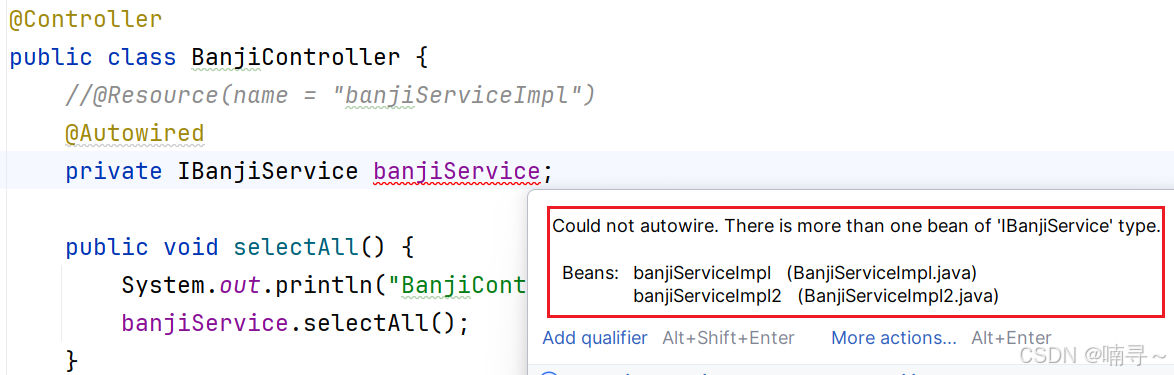
这样会报错: expected single matching bean but found 2: banjiServiceImpl,banjiServiceImpl2
因为在容器中子类对象有两个,而且变量的名字是banjiService和任何一个容器中对象的名字都不一致,所以找不到(只有一个子类对象情况下变量名可以随便写)
也同时证明,@Controller、@Service、@Repository不起名字,默认的名字是类的名字首字母变小写。
解决方法:
-
方法一:IBanjiService banjiServiceImpl2;
根据变量名去容器中找相同名字的bean对象,所以注入过来的是new BanjiServiceImpl2()的对象 -
方法二:还是希望写成IBanjiService banjiService,@Qualifier中限定名字
// @Resource(name = "banjiServiceImpl2")
@Autowired
@Qualifier(value = "banjiServiceImpl2")
private IBanjiService banjiService;
3、@Autowired注入bean
@Controller
public class StudentController {

    // <property name="studentService" ref="studentService"/>
    // @Resource(name = "studentService")
    @Autowired
    private IStudentService studentService;

}

//@Service("studentService")
@Service
public class StudentServiceImpl implements IStudentService{
    // @Resource(name = "studentDao")
    @Autowired
    private IStudentDao studentDao;

}

//@Repository("studentDao")
@Repository
public class StudentDaoImpl implements IStudentDao{

}