Ansible架构:

一.部署主机清单 前期环境准备:
管理端:
192.168.60.128
被管理端:
client1:192.168.60.129
client2:192.168.60.131
1.1 所有被管理端配置ssh密钥 (1.免密登陆 2.允许root远程登陆) 脚本如下:
bash
#!/bin/bash

# 检查 sshpass 是否已安装
if ! command -v sshpass &> /dev/null; then
    echo "请先安装 sshpass 工具!"
    exit 1
fi

# 固定的 IP 地址列表
ip_list="192.168.60.129 192.168.60.131"

# 检查并生成 SSH 密钥
if [ ! -f ~/.ssh/id_rsa ]; then
    echo '----------------'
    echo '1. 创建 key'
    echo '----------------'
    if ! ssh-keygen -f ~/.ssh/id_rsa -t rsa -P ''; then
        echo "生成 SSH 密钥失败!"
        exit 1
    fi
else
    echo "SSH 密钥已存在,跳过生成步骤。"
fi

echo '----------------'
echo '2. 分发 key'
echo '----------------'

for ip in $ip_list; do
    echo "----------------"
    echo "分发 key 到 $ip"
    echo "----------------"
    if sshpass -p2004129 ssh-copy-id -i ~/.ssh/id_rsa.pub -o StrictHostKeyChecking=no root@$ip; then
        echo "分发公钥到 $ip 成功!"
    else
        echo "分发公钥到 $ip 失败!"
    fi
done
运行效果:

1.2 控制端安装ansible
2.1安装 EPEL 源:sudo dnf install epel-release
sudo dnf install ansible
ansible --version
ok~~~~~~~~~~~~~~~~~~~~~~~~~~~

3.安装完成之后 配置主机清单~ 配置文件地址:/etc/ansible/hosts
Server1 为组名 将.129 和.131分配在一个组~~~~~~~~~~

4.测试使用:
测试1 # ansible Server1 -m ping //测试主机是否通~~~~~~~~
出现绿色就说明通了~~~~~~
测试2 # ansible Server1 -m command - a 'hostname' // -m 指定模块 -a 执行的命令 command命令执行模块

测试3 #ansible Server1 -m shell -a 'ip addr | grep inet'
注意command不能识别管道!!!!!!

1.3 ansible 核心配置文件:
就最前面这两个
ansible.cfg # ansible核心配置文件

hosts #主机清单
如何设置子组(就是将多个组 合并在一个组)
在host文件下这样写:
data:children // children关键字
组名
组名
~n

测试一下看
ansible data -m ping

测试所有主机是否ping通
ansible all -m ping

ansibel核心模块

如何查询命令帮助: ansible-doc -s command
ansible官方文档:Ansible Documentation

模块使用:
二.命令脚本相关模块
1.command 支持简单的命令 不支持管道符号!!!! 默认模块 不写 也是他
ansible all -m command -a '命令'
2.shell模块 支持 一些特殊的符号!
ansible all -m shell -a 'ip a s ens160 | grep inet'

3.script模块 传输脚本到被管理端 并执行
3.1比如我们在管理端写一个安装nmap软件脚本
脚本内容 名称:

执行命令:ansible all -m script -a '/home/test/script-ans/nmapins.sh'

看一下被控端受否安装(直接在管理端测试nmap这个工具)
ansible all -m shell -a 'nmap localhost'

二.文件相关模块

2.1创建目录和文件

目录:ansible all -m file -a 'path=/home/ansible-test state=directory'

文件:ansible all -m file -a 'path=/home/ansible-test/hello.txt state=touch'

2.2创建软连接
ansible all -m file -a 'src=/home/ansible-test/hello.txt path=/home/test/hello.txt.soft state=link'

看看是否成功:ansible all -a 'ls -l /home/test'

删除(都是加一个参数就可以 state=ansent)
删除一个文件:ansible all -m file -a 'path=/home/ansible-test/hello.txt state=absent'
注意是:state=absent 不是 state:absent

案例:创建一个txt文件 所有者是:root 组:root 权限:755
ansible all -m file -a 'path=/tmp/xxw.txt state=touch group=root owner=root'

三. 文件传输copy模块

ansible all -m copy -a 'src=/home/test/400.txt dest=/home/'

如果当遇到同名的文件 可以备份一下:添加参数:backup=yes
ansible all -m copy -a 'src=/home/test/400.txt dest=/home/ backup=yes'
执行后备份路径为:

备份了原先的内容:

四.服务管理模块
涉及到命令:systemctl 主要就是 服务启动 关闭 开机自/不启动。。。。
1.模块名:systemctld
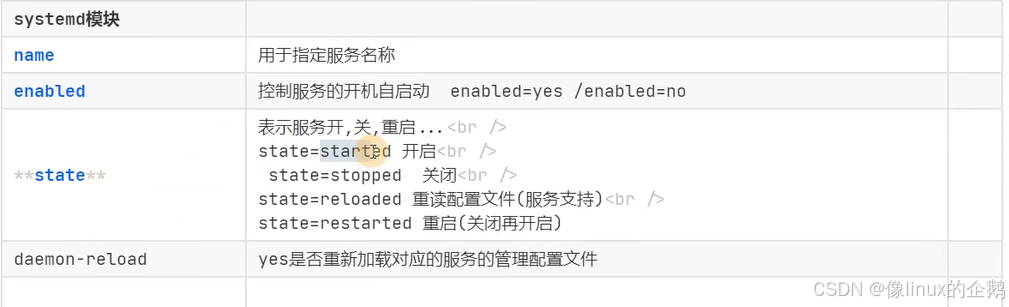
2.案例: firewalld
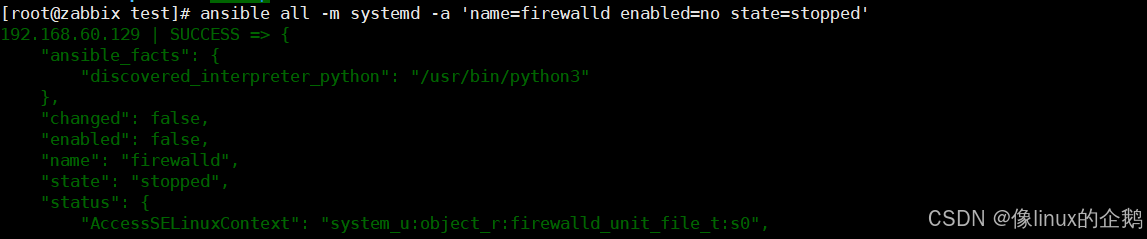
2.1关闭
ansible all -m systemd -a 'name=firewalld enabled=no state=stopped'
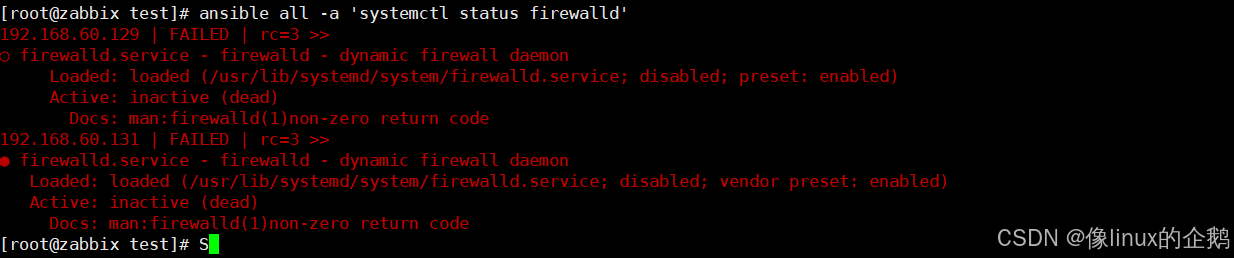
查看是否关闭:
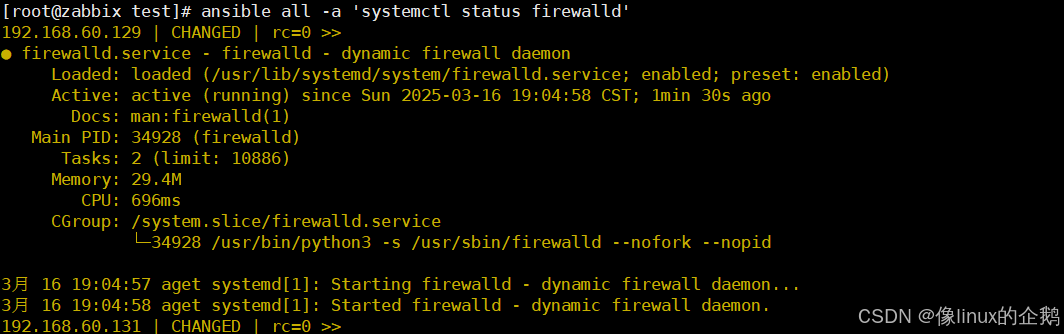
ansible all -a 'systemctl status firewalld'
注意这不是报错 服务已经关闭 注意看!!!!!
2.2开启
ansible all -m systemd -a 'name=firewalld enabled=yes state=started'
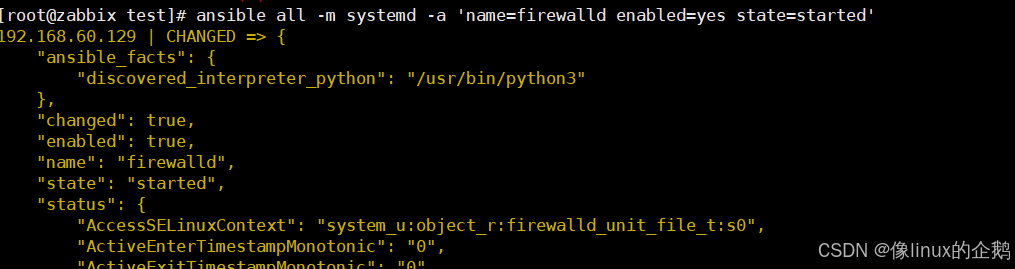
查看是否开启:
ansible all -a 'systemctl status firewalld'
五.磁盘挂载模块 & 定时任务模块
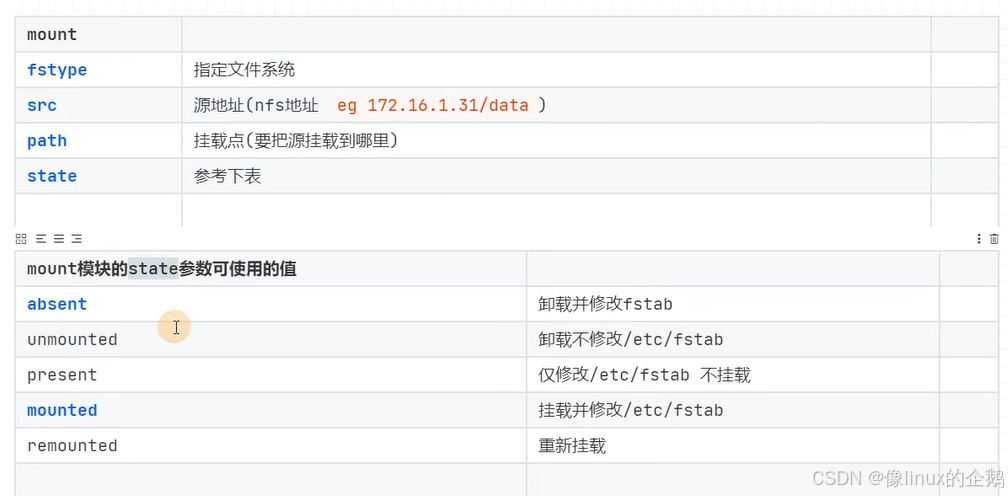
1.mount 挂载nfs
mount模块参数
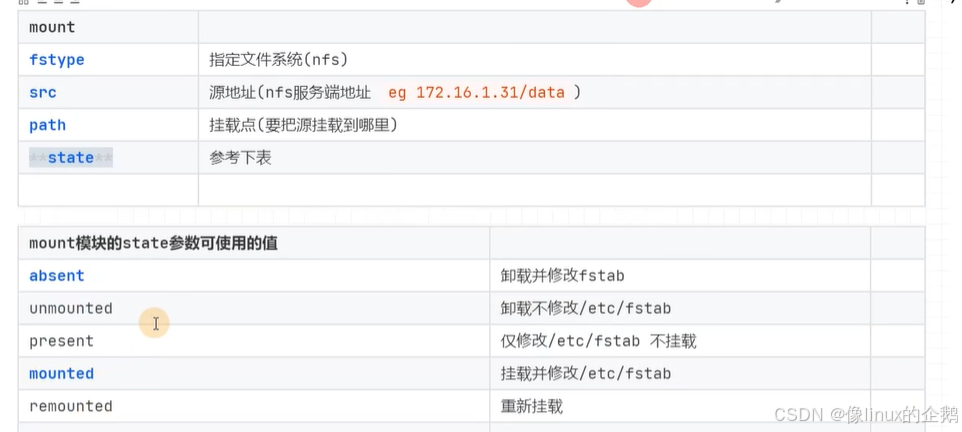
1.1挂载nfs
1.2卸载nfs挂载
ansible all -m mount -a 'fstype=nfs src="192.168.60.129:/nfs-test" path=/mnt/nfs-gx129 state=absent'

六.用户管理模块 user
6.1参数:
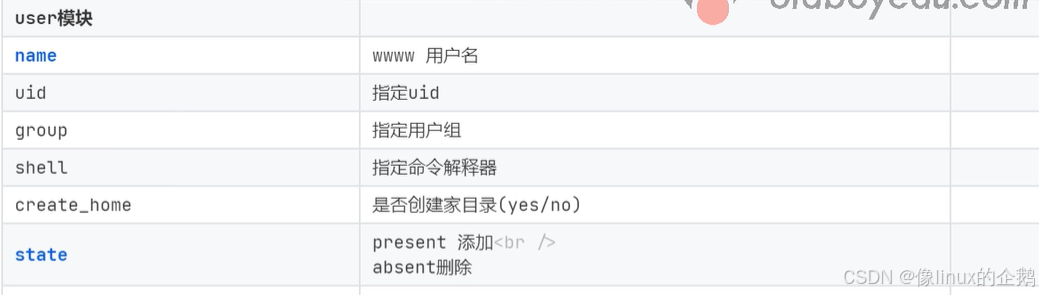
6.2案例:
创建用户xxw
普通命令

ansible:
ansible all -m user -a 'name=xxw uid=8888 shell=/bin/bash home=/home/xxw create_home=yes state=present'

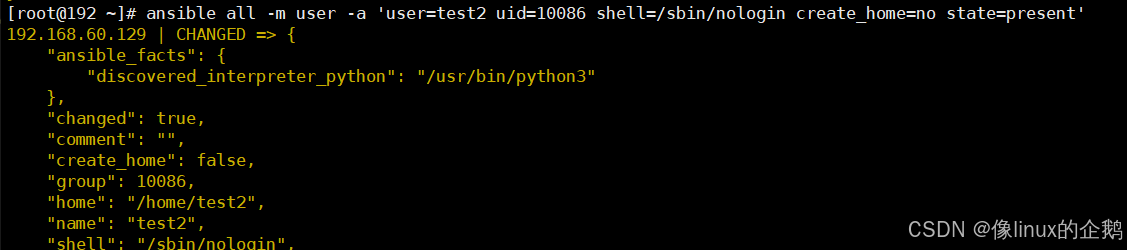
创建虚拟用户test1(不创建家目录 && 命令解释器/sbin/nologin 指定uid=2004)
普通命令: useradd -u2004 -s /sbin/nologin -M test1
ansible:
ansible all -m user -a 'user=test2 uid=10086 shell=/sbin/nologin create_home=no state=present'