ok,我们今天了解一下Linux中的文件
理解"文件"
狭义理解
- ⽂件在磁盘⾥
- 磁盘是永久性存储介质,因此⽂件在磁盘上的存储是永久性的
- 磁盘是外设(即是输出设备也是输⼊设备)
- 磁盘上的⽂件本质是对⽂件的所有操作,都是对外设的输⼊和输出简称 IO
广义理解
- Linux下⼀切皆⽂件(键盘、显⽰器、⽹卡、磁盘......这些都是抽象化的过程)
文件操作的归类认知
- 对于0KB的空⽂件是占⽤磁盘空间的
- 文件=内容 + 属性
- 文件是⽂件属性(元数据)和⽂件内容的集合(⽂件=属性(元数据)+内容)
- 所有的⽂件操作本质是⽂件内容操作和⽂件属性操作
系统角度
- 对⽂件的操作本质是进程对⽂件的操作
- 磁盘的管理者是操作系统
- ⽂件的读写本质不是通过C语⾔/C++的库函数来操作的(这些库函数只是为⽤⼾提供⽅便),⽽ 是通过⽂件相关的系统调⽤接⼝来实现的
访问文件前,都必须先打开它 ,没有被打开之前,文件是在磁盘上面。
访问文件是谁在访问/打开?是进程在访问文件而不是程序。
根据冯诺依曼体系,CPU无法直接访问磁盘,文件必须加载到内存中!
也就是说,访问文件,就是将文件加载到内存中。
一个进程可以打开多个文件,多个进程也可以打开一个文件。
OS必须要管理加载到内存中的文件。
如何管理文件?先描述再组织
文件的内核结构 + 文件的内容
C文件接口
hello.c打开⽂件
cpp
 #include <stdio.h>
 int main()
 {
     FILE *fp = fopen("myfile", "w");
     if(!fp){
         printf("fopen error!\n");
     }
     while(1);
     fclose(fp);
     return 0;
}
打开的myfile⽂件在哪个路径下?
在程序的当前路径下,那系统怎么知道程序的当前路径在哪⾥呢?
可以使⽤ ls / proc / 进程 id -l 命令查看当前正在运⾏进程的信息:
bash
[hyb@VM-8-12-centos io]$ ps ajx | grep myProc
506729  533463  533463  506729 pts/249   533463 R+     1002   7:45 ./myProc
536281  536542  536541  536281 pts/250   536541 R+     1002   0:00 grep --
 color=auto myProc
 [hyb@VM-8-12-centos io]$ ls /proc/533463 -l
 total 0
 ......
-r--r--r-- 1 hyb hyb 0 Aug 26 17:01 cpuset
 lrwxrwxrwx 1 hyb hyb 0 Aug 26 16:53 cwd -> /home/hyb/io
-r-------- 1 hyb hyb 0 Aug 26 17:01 environ
 lrwxrwxrwx 1 hyb hyb 0 Aug 26 16:53 exe -> /home/hyb/io/myProc
 dr-x------ 2 hyb hyb 0 Aug 26 16:54 fd
......- cwd:指向当前进程运⾏⽬录的⼀个符号链接。
- exe:指向启动当前进程的可执⾏⽂件(完整路径)的符号链接
打开⽂件,本质是进程打开,所以,进程知道⾃⼰在哪⾥,即便⽂件不带路径,进程也知道。由此OS 就能知道要创建的⽂件放在哪⾥。
hello.c写⽂件
cpp
 #include <stdio.h>
 #include <string.h>
 int main()
 {
     FILE *fp = fopen("myfile", "w");
     if(!fp){
         printf("fopen error!\n");
     }
     const char *msg = "hello bit!\n";
     int count = 5;
     while(count--)
    {
         fwrite(msg, strlen(msg), 1, fp);
     }
     fclose(fp);
     return 0;
 }
hello.c读⽂件
cpp
 #include <stdio.h>
 #include <string.h>
 int main()
 {
     FILE *fp = fopen("myfile", "r");
     if(!fp){
         printf("fopen error!\n");
     return 1;
     }
     char buf[1024];
     const char *msg = "hello bit!\n";
    while(1){
        //注意返回值和参数,此处有坑,仔细查看man⼿册关于该函数的说明
        ssize_t s = fread(buf, 1, strlen(msg), fp);
        if(s > 0){
            buf[s] = 0;
            printf("%s", buf);
        }
        if(feof(fp)){
            break;
        }
    }
    fclose(fp);
    return 0;
 }
稍作修改,实现简单cat命令:
cpp
 #include <stdio.h>
 #include <string.h>
 int main(int argc, char* argv[])
 {
    if (argc != 2)
    {
        printf("argv error!\n");
        return 1;
    }
    FILE *fp = fopen(argv[1], "r");
    if(!fp){
        printf("fopen error!\n");
        return 2;
    }
    char buf[1024];
    while(1){
        int s = fread(buf, 1, sizeof(buf), fp);
        if(s > 0){
            buf[s] = 0;
            printf("%s", buf);
        }
        if(feof(fp)){
            break;
        }
        fclose(fp);
     return 0;
 }
输出信息到显示器
cpp
 #include <stdio.h>
 #include <string.h>
 int main()
 {
     const char *msg = "hello fwrite\n";
     fwrite(msg, strlen(msg), 1, stdout);

     printf("hello printf\n");
     fprintf(stdout, "hello fprintf\n");
     return 0;
}
stdin & stdout &stderr
- C默认会打开三个输⼊输出流,分别是stdin,stdout,stderr
- 仔细观察发现,这三个流的类型都是FILE*,fopen返回值类型,⽂件指针
cpp
#include <stdio.h>
 extern FILE *stdin;
 extern FILE *stdout;
 extern FILE *stderr;
打开文件的操作
bash
r    Open text file for reading.
    The stream is positioned at the beginning of the file.

r+   Open for reading and writing.
    The stream is positioned at the beginning of the file.

w    Truncate(缩短) file to zero length or create text file for writing.
    The stream is positioned at the beginning of the file.
w+   Open for reading and writing.
    The file is created if it does not exist, otherwise it is truncated.
    The stream  is  positioned at the beginning of the file.
a    Open for appending (writing at end of file).
    The file is created if it does not exist.
    The stream is positioned at the end of the file.
a+   Open for reading and appending (writing at end of file).
    The file is created if it does not exist.  The initial file  position
    for reading is at the beginning of the file,
    but output is always appended to the end of the file
w 如果原文件有内容,会将原文件清空(截流在0字符位置)
a 以追加的形式打开文件,再写入的话直接追加在尾部
如上,是⽂件相关操作。还有 fseek ftell rewind 的函数
系统文件 I/O
打开文件的⽅式不仅仅是fopen,ifstream等流式,语⾔层的⽅案,其实系统才是打开⽂件最底层的方案。不过,在学习系统⽂件IO之前,先要了解下如何给函数传递标志位,该⽅法在系统⽂件IO接口中会使用到:
一种传递标志位的方法
cpp
#include <stdio.h>
#define ONE    0001 //0000 0001
#define TWO    0002 //0000 0010
#define THREE  0004 //0000 0100

 void func(int flags) {
     if (flags & ONE) printf("flags has ONE! ");
     if (flags & TWO) printf("flags has TWO! ");
     if (flags & THREE) printf("flags has THREE! ");
     printf("\n");
}

 int main() {
     func(ONE);
     func(THREE);
     func(ONE | TWO);
     func(ONE | THREE | TWO);
     return 0;
}
操作⽂件,除了上⼩节的C接⼝(当然,C++也有接⼝,其他语⾔也有),我们还可以采⽤系统接⼝ 进⾏⽂件访问,先来直接以系统代码的形式,实现和上⾯⼀模⼀样的代码:
hello.c 写⽂件:
cpp
#include <stdio.h>
 #include <sys/types.h>
 #include <sys/stat.h>
 #include <fcntl.h>
 #include <unistd.h>
 #include <string.h>

 int main()
 {
     umask(0);//更新默认权限
     int fd = open("myfile", O_WRONLY|O_CREAT, 0644);
     if(fd < 0){
     perror("open");
     return 1;
 }
     int count = 5;
     const char *msg = "hello bit!\n";
     int len = strlen(msg);
     while(count--){
      write(fd, msg, len);//fd: 后⾯讲,msg:缓冲区⾸地址, len: 本次读取,期望写⼊多少个字节的数据。返回值:实际写了多少字节数据
    }

    close(fd);
    return 0;
 }
hello.c读⽂件
cpp
#include <stdio.h>
#include <sys/types.h>
#include <sys/stat.h>
#include <fcntl.h>
#include <unistd.h>
#include <string.h>

int main()
 {
    int fd = open("myfile", O_RDONLY);
    if(fd < 0){
        perror("open");
        return 1;
    }
    const char *msg = "hello bit!\n";
    char buf[1024];
    while(1){
        ssize_t s = read(fd, buf, strlen(msg));//类⽐write
        if(s > 0){
            printf("%s", buf);
        }else{
            break;
        }
    }
    close(fd);
    return 0;
 }
接口介绍
open man open
cpp
 #include <sys/types.h>
 #include <sys/stat.h>
 #include <fcntl.h>

 int open(const char *pathname, int flags);
 int open(const char *pathname, int flags, mode_t mode);

pathname: 要打开或创建的⽬标⽂件
flags: 打开⽂件时,可以传⼊多个参数选项,⽤下⾯的⼀个或者多个常量进⾏"或"运算,构成flags。
参数:
                O_RDONLY: 只读打开
                O_WRONLY: 只写打开
                O_RDWR  : 读,写打开
                        这三个常量,必须指定⼀个且只能指定⼀个
                O_CREAT : 若⽂件不存在,则创建它。需要使⽤mode选项,来指明新⽂件的访问权限
                O_APPEND: 追加写
返回值:
                成功:新打开的⽂件描述符
                失败:-1
mode_t理解:直接man手册,比什么都清楚
open函数具体使用哪个,和具体应用场景相关,如目标文件不存在,需要open创建,则第三个参数白哦是创建文件的默认权限,否则,只用两个参数的open。
write read close lseek ,类比C文件相关接口
open函数返回值
系统调用和库函数
- 上⾯的 fopen fclose fread fwrite 都是C标准库当中的函数,我们称之为库函数 (libc)。
- open close read write lseek 都属于系统提供的接⼝,称之为系统调⽤接⼝
- 回忆⼀下我们讲操作系统概念时,画的⼀张图

系统调⽤接⼝和库函数的关系,⼀⽬了然。
所以,可以认为, f# 系列的函数,都是对系统调⽤的封装,⽅便⼆次开发。
⽂件描述符fd
通过对open函数的学习,我们知道了⽂件描述符就是⼀个⼩整数
fd 数组下标
0 &1&2
- stdin 标准输入 键盘 0
- stdout 标准输出 显示器 1
- stderr 标准错误 显示器 2
进程默认会打开三个输入输出流g
- Linux进程默认情况下会有3个缺省打开的⽂件描述符,分别是标准输⼊0,标准输出1,标准错误2.
- 0,1,2对应的物理设备⼀般是:键盘,显⽰器,显⽰器
所以输⼊输出还可以采⽤如下⽅式:
cpp
#include <stdio.h>
#include <sys/types.h>
#include <sys/stat.h>
#include <fcntl.h>
#include <string.h>
int main()
 {
     char buf[1024];
     ssize_t s = read(0, buf, sizeof(buf));
     if(s > 0){
         buf[s] = 0;
         write(1, buf, strlen(buf));
         write(2, buf, strlen(buf));
     }
     return 0;
 }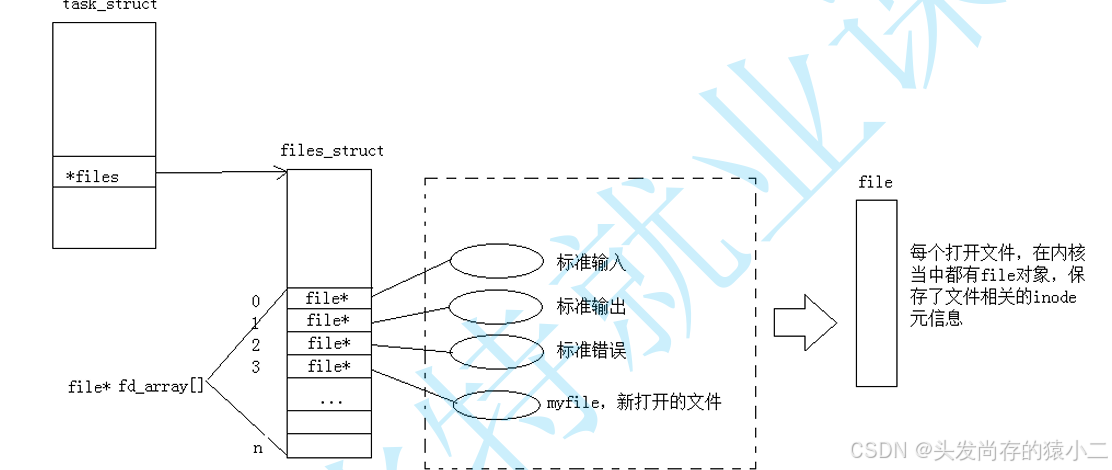
⽽现在知道,⽂件描述符就是从0开始的⼩整数。当我们打开⽂件时,操作系统在内存中要创建相应的 数据结构来描述⽬标⽂件。于是就有了file结构体。表⽰⼀个已经打开的⽂件对象。⽽进程执⾏open系 统调⽤,所以必须让进程和⽂件关联起来。每个进程都有⼀个指针*files,指向⼀张表files_struct,该表 最重要的部分就是包含⼀个指针数组,每个元素都是⼀个指向打开⽂件的指针!所以,本质上,⽂件 描述符就是该数组的下标。所以,只要拿着⽂件描述符,就可以找到对应的⽂件。
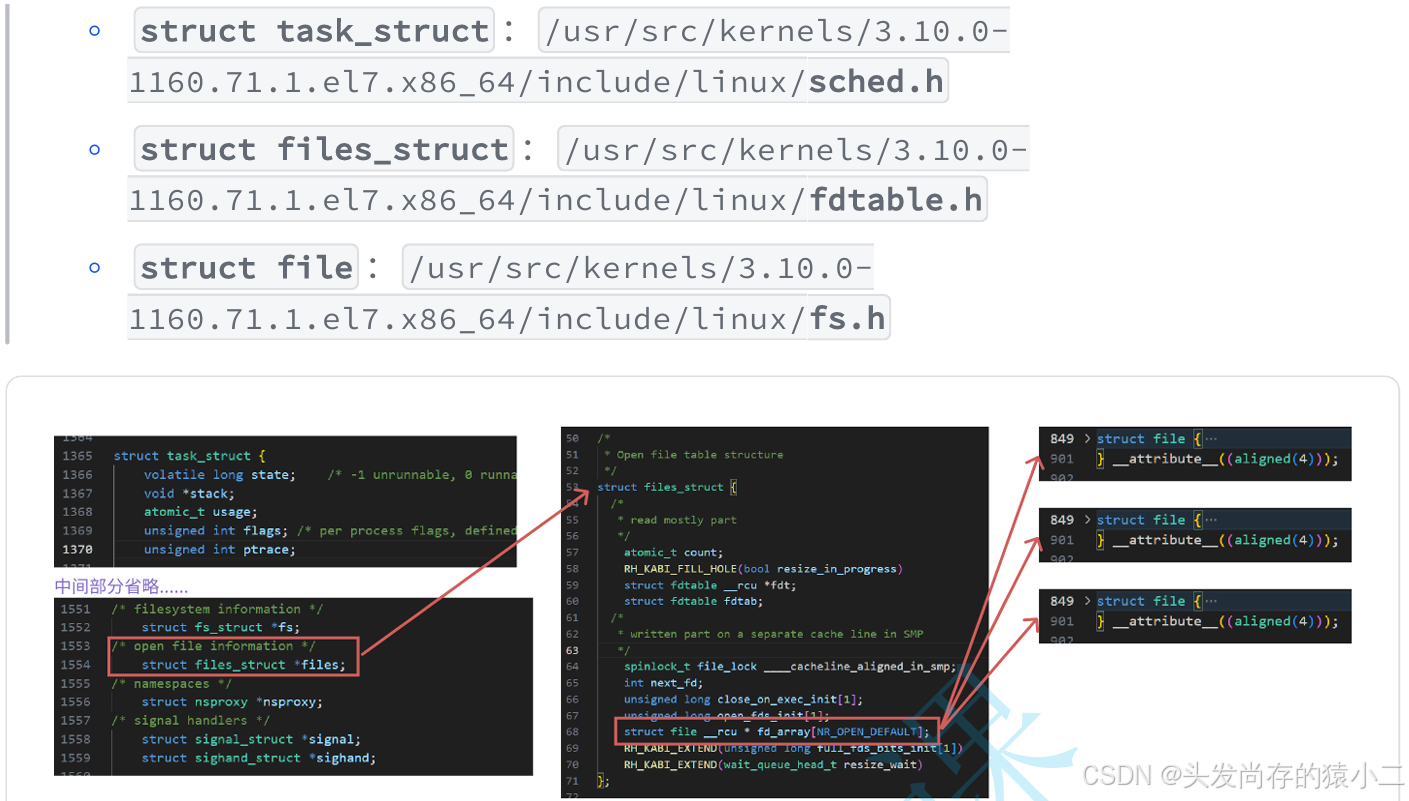
对于以上原理结论我们可通过内核源码验证:
⾸先要找到 task_struct 结构体在内核中为位置,地址为: 1160.71.1.el7.x86_64/include/linux/ 本,可使⽤ /usr/src/kernels/3.10.0 sched.h (3.10.0-1160.71.1.el7.x86_64是内核版 uname -a ⾃⾏查看服务器配置,因为这个⽂件夹只有⼀个,所以也不⽤刻意去分辨, 内核版本其实也随意)
- 要查看内容可直接⽤vscode在windows下打开内核源代码
- 相关结构体所在位置

少年没有乌托邦,心向远方自明朗!
如果这个博客对你有帮助,给博主一个免费的点赞就是最大的帮助❤
欢迎各位点赞,收藏 和关注 哦❤
如果有疑问或有不同见解,欢迎在评论区留言❤
后续会继续更新大连理工大学 相关课程和有关Linux 的内容和示例
点赞加关注,学习不迷路,好,本次的学习就到这里啦!!!
ok,我们下次再见!