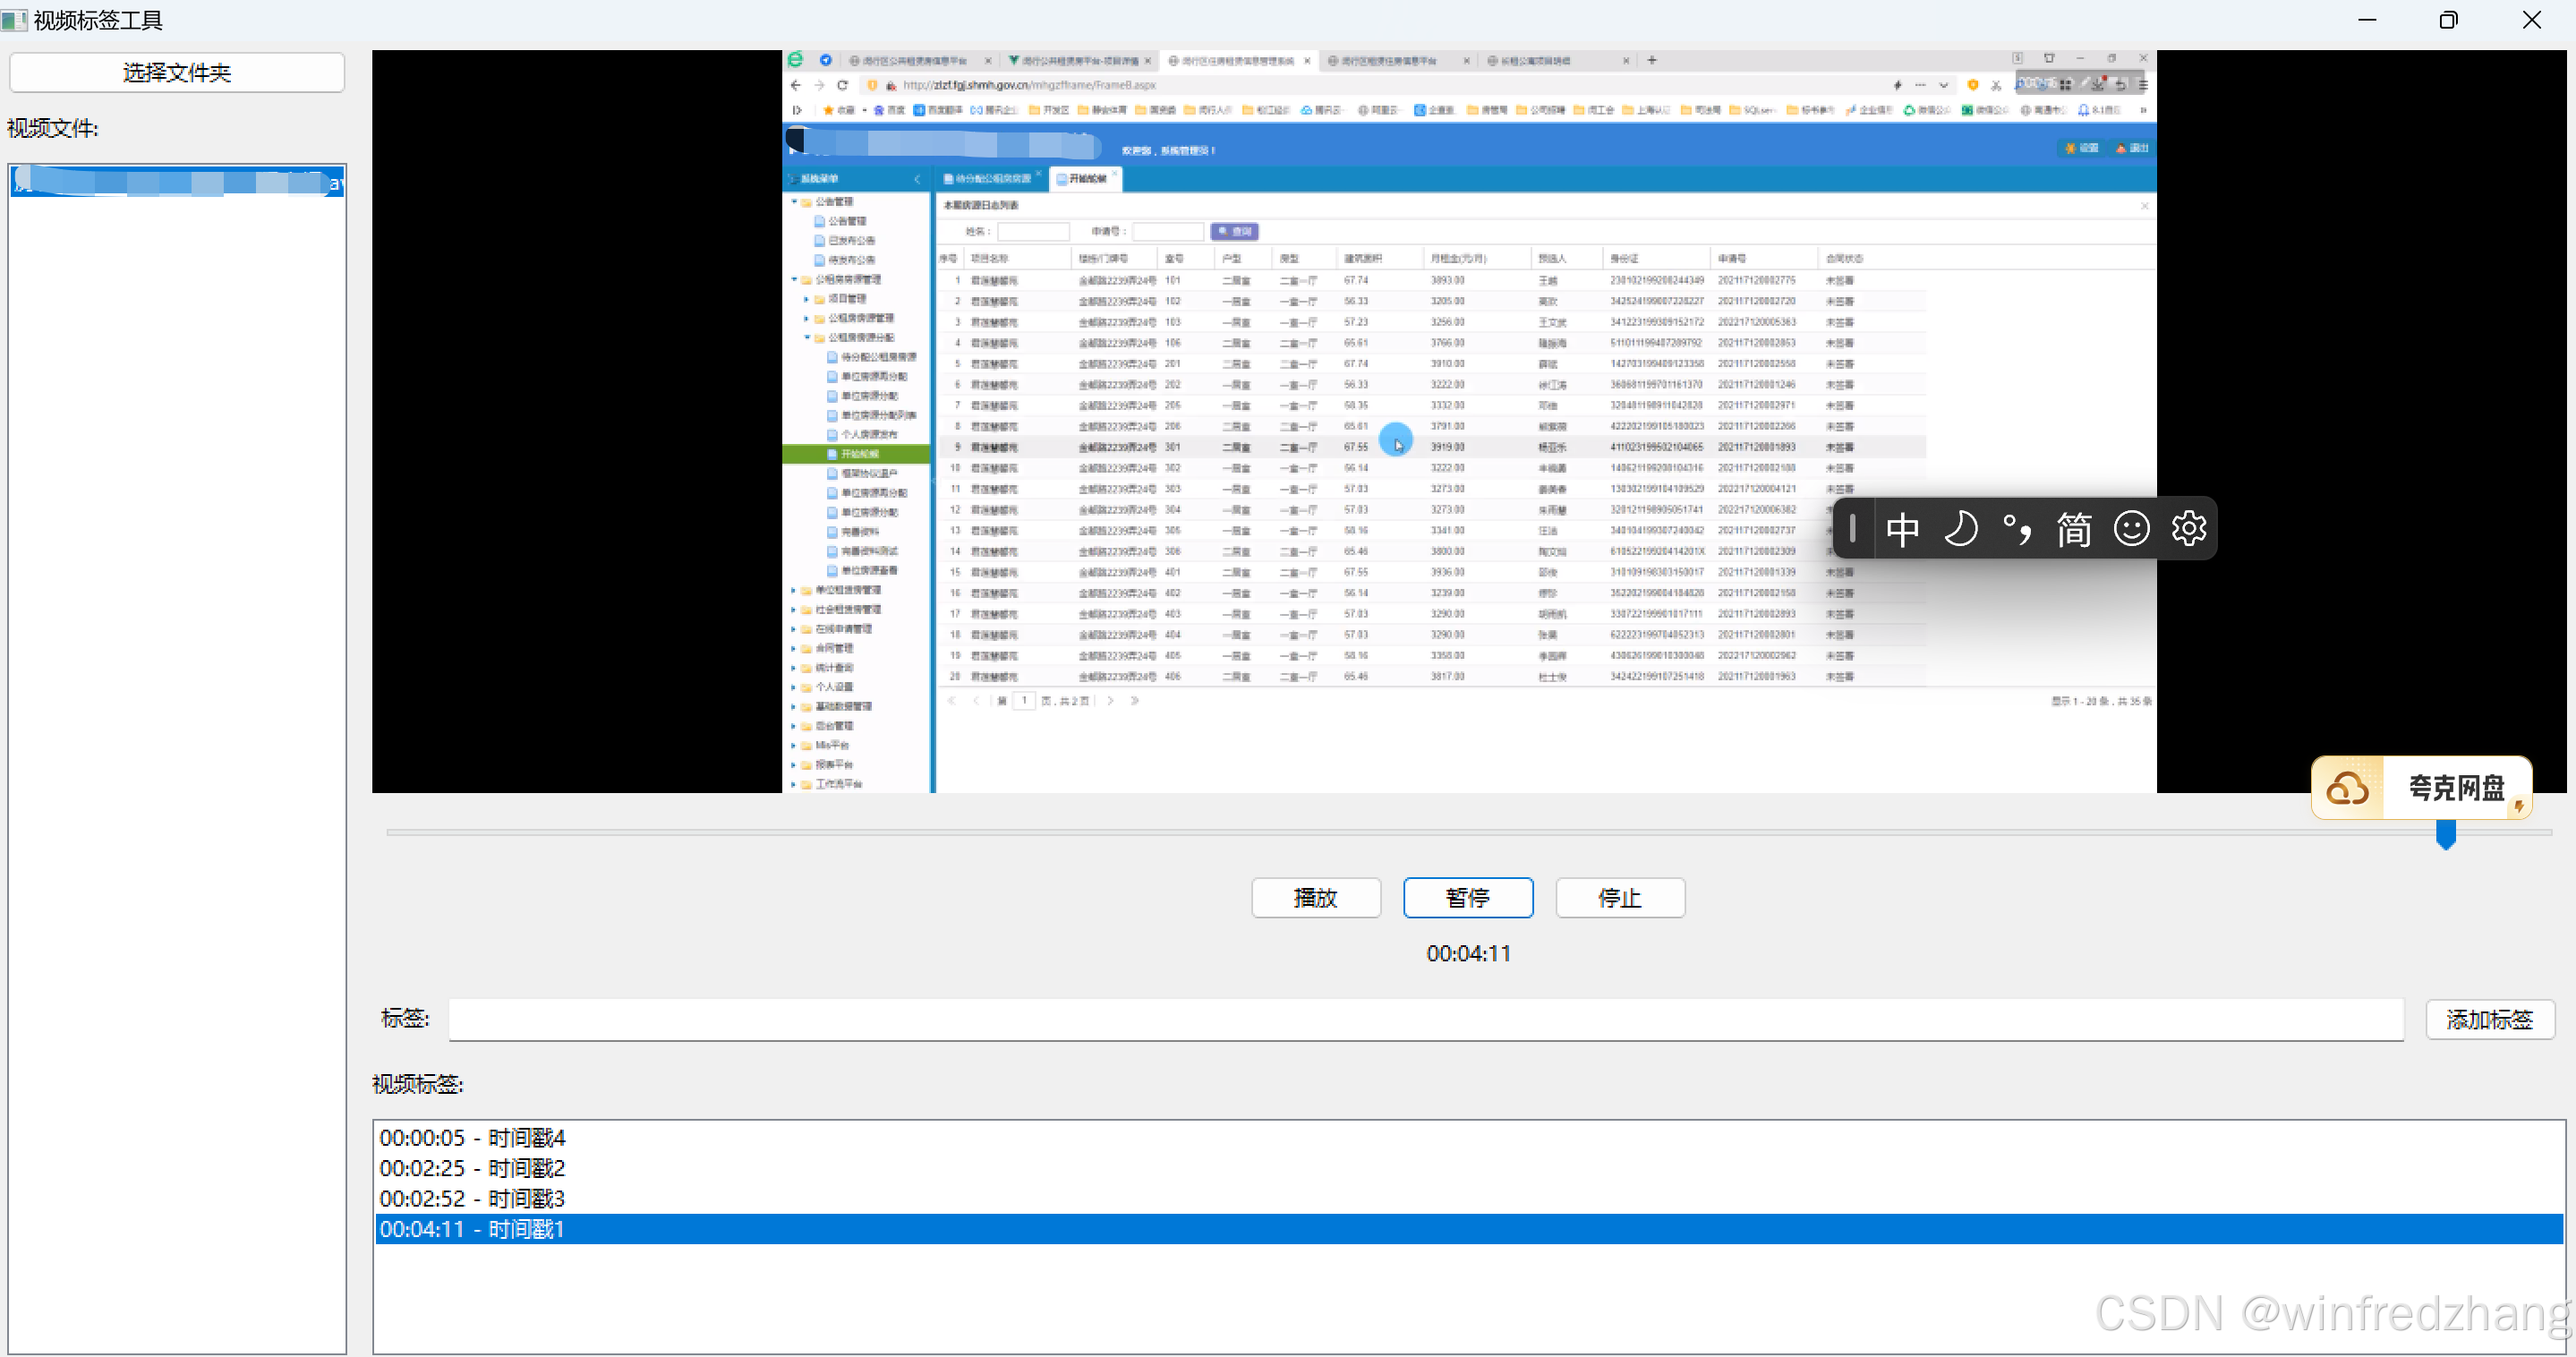
在当今数字媒体时代,视频内容的管理和标记变得越来越重要。无论是研究人员需要对实验视频进行时间点标记,教育工作者需要对教学视频添加注释,还是个人用户希望对家庭视频进行分类整理,一个高效的视频标签工具都是不可或缺的。本文将详细分析一个基于Python、wxPython和FFmpeg开发的视频标签工具,探讨其设计思路、实现细节及核心功能。
C:\pythoncode\new\ManageVideoLabel.py
1. 应用概述
这个视频标签工具是一个桌面应用程序,具有以下核心功能:
- 浏览并选择包含视频文件的文件夹
- 在左侧列表框中显示所有视频文件
- 点击选择视频进行播放,支持基本的播放控制
- 通过进度条拖动来定位到视频的特定时间点
- 在特定时间点添加自定义标签
- 将标签信息存储在SQLite数据库中
- 显示视频的所有标签,并支持通过点击标签快速定位视频
这个应用采用了分割窗口设计,左侧用于文件浏览,右侧用于视频播放和标签管理,界面直观且功能完备。
2. 技术栈分析
2.1 核心库和模块
该应用使用了多个Python库和模块,每个都有其特定的功能和优势:
- wxPython:GUI框架,提供了丰富的窗口部件和事件处理机制
- wx.media:wxPython的媒体播放组件,用于视频播放
- FFmpeg(通过Python绑定):用于视频信息提取,如时长
- SQLite3:轻量级数据库,用于存储视频标签信息
- threading:多线程支持,用于非阻塞文件扫描
- os 和 pathlib:文件系统操作
- datetime:日期和时间处理
2.2 wxPython作为GUI选择的优势
wxPython是一个功能强大的跨平台GUI工具包,它在此应用中的优势包括:
- 原生外观和感觉:wxPython应用在不同操作系统上都能呈现出原生应用的外观
- 功能丰富的部件:内置了大量实用的控件,如列表框、媒体播放器、分割窗口等
- 强大的事件系统:允许程序响应用户交互
- 成熟稳定:长期发展和维护的项目,有良好的文档和社区支持
3. 代码结构详解
我们将从整体架构到具体实现,逐层分析这个应用的代码结构和设计思路。
3.1 类设计与继承关系
整个应用围绕一个主要的类VideoTaggingFrame展开,该类继承自wx.Frame:
python
class VideoTaggingFrame(wx.Frame):
    def __init__(self, parent, title):
        super(VideoTaggingFrame, self).__init__(parent, title=title, size=(1200, 800))
# ...这种设计体现了面向对象编程的继承特性,通过继承wx.Frame,我们获得了窗口框架的基本功能,并在此基础上扩展出视频标签应用的特定功能。
3.2 UI布局设计
应用采用了嵌套的布局管理器(Sizer)来组织界面元素:
python
# Create sizers
self.main_sizer = wx.BoxSizer(wx.VERTICAL)
self.left_sizer = wx.BoxSizer(wx.VERTICAL)
self.right_sizer = wx.BoxSizer(wx.VERTICAL)
使用分割窗口(SplitterWindow)将界面分为左右两部分:
python
# Create a splitter window
self.splitter = wx.SplitterWindow(self.panel)

# Create panels for left and right sides
self.left_panel = wx.Panel(self.splitter)
self.right_panel = wx.Panel(self.splitter)

# Split the window
self.splitter.SplitVertically(self.left_panel, self.right_panel)
self.splitter.SetMinimumPaneSize(200)
这种设计有几个优点:
- 灵活性:用户可以调整左右面板的宽度
- 组织清晰:相关功能分组在不同区域
- 空间利用:充分利用可用屏幕空间
3.3 数据库设计
应用使用SQLite数据库存储视频标签信息,数据库结构简单而有效:
python
def setup_database(self):
    """Set up the SQLite database with the required table."""
    self.conn = sqlite3.connect('video_tags.db')
    cursor = self.conn.cursor()
    cursor.execute('''
    CREATE TABLE IF NOT EXISTS video (
        id INTEGER PRIMARY KEY AUTOINCREMENT,
        file_path TEXT,
        video_date TEXT,
        video_time TEXT,
        tag_description TEXT,
        timestamp INTEGER
    )
    ''')
    self.conn.commit()
这个表设计包含了所有必要的字段:
- id:自增主键
- file_path:视频文件的完整路径
- video_date:视频日期
- video_time:视频时间
- tag_description:标签描述
- timestamp:标签所在的视频时间点(毫秒)
3.4 视频文件处理
应用通过递归扫描指定文件夹及其子文件夹来查找视频文件:
python
def scan_video_files(self, folder_path):
    """Scan for video files in a separate thread."""
    video_extensions = ['.mp4', '.avi', '.mkv', '.mov', '.wmv', '.flv']
    video_files = []

    for root, dirs, files in os.walk(folder_path):
        for file in files:
            if any(file.lower().endswith(ext) for ext in video_extensions):
                full_path = os.path.join(root, file)
                video_files.append(full_path)

    # Update the UI in the main thread
    wx.CallAfter(self.update_video_list, video_files)
值得注意的是,扫描过程在单独的线程中进行,这避免了在处理大量文件时界面冻结:
python
def load_video_files(self, folder_path):
    """Load video files from the selected folder."""
    self.video_list.Clear()
    self.video_durations = {}

    # Start a thread to scan for video files
    thread = threading.Thread(target=self.scan_video_files, args=(folder_path,))
    thread.daemon = True
thread.start()同时,使用wx.CallAfter确保UI更新在主线程中进行,这是wxPython多线程编程的最佳实践。
4. 核心功能实现分析
4.1 视频播放与控制
视频播放功能主要通过wx.media.MediaCtrl实现:
python
# Video player (right top)
self.mediactrl = wx.media.MediaCtrl(self.right_panel)
self.mediactrl.Bind(wx.media.EVT_MEDIA_LOADED, self.on_media_loaded)
self.mediactrl.Bind(wx.media.EVT_MEDIA_FINISHED, self.on_media_finished)
播放控制通过一组按钮和相应的事件处理函数实现:
python
def on_play(self, event):
    """Handle play button click."""
    self.mediactrl.Play()

def on_pause(self, event):
    """Handle pause button click."""
    self.mediactrl.Pause()

def on_stop(self, event):
    """Handle stop button click."""
    self.mediactrl.Stop()
    self.timer.Stop()
    self.slider.SetValue(0)
    self.time_display.SetLabel("00:00:00")
4.2 进度条和时间显示
进度条的实现结合了wx.Slider控件和定时器:
python
# Slider for video progress
self.slider = wx.Slider(self.right_panel, style=wx.SL_HORIZONTAL)
self.slider.Bind(wx.EVT_SLIDER, self.on_seek)

# Timer for updating slider position
self.timer = wx.Timer(self)
self.Bind(wx.EVT_TIMER, self.on_timer, self.timer)
定时器每100毫秒更新一次进度条位置和时间显示:
python
def on_timer(self, event):
    """Update UI elements based on current video position."""
    if self.mediactrl.GetState() == wx.media.MEDIASTATE_PLAYING:
        pos = self.mediactrl.Tell()
        self.slider.SetValue(pos)

        # Update time display
        seconds = pos // 1000
        h = seconds // 3600
        m = (seconds % 3600) // 60
        s = seconds % 60
        self.time_display.SetLabel(f"{h:02d}:{m:02d}:{s:02d}")
用户可以通过拖动滑块来改变视频播放位置:
python
def on_seek(self, event):
    """Handle slider position change."""
    if self.mediactrl.GetState() != wx.media.MEDIASTATE_STOPPED:
        pos = self.slider.GetValue()
        self.mediactrl.Seek(pos)
4.3 视频信息提取
应用使用FFmpeg获取视频的时长信息:
python
def get_video_duration(self, video_path):
    """Get the duration of a video file using ffmpeg."""
    try:
        probe = ffmpeg.probe(video_path)
        video_info = next(s for s in probe['streams'] if s['codec_type'] == 'video')
        return float(probe['format']['duration'])
    except Exception as e:
        print(f"Error getting video duration: {e}")
        return 0
这个信息用于设置进度条的范围:
python
# Set slider range based on duration (in milliseconds)
duration_ms = int(self.video_durations[video_path] * 1000)
self.slider.SetRange(0, duration_ms)
4.4 标签添加与管理
标签添加功能允许用户在当前视频位置添加描述性标签:
python
def on_add_tag(self, event):
    """Add a tag at the current video position."""
    if not self.current_video_path:
        wx.MessageBox("请先选择一个视频文件", "提示", wx.OK | wx.ICON_INFORMATION)
        return

    tag_text = self.tag_input.GetValue().strip()
    if not tag_text:
        wx.MessageBox("请输入标签内容", "提示", wx.OK | wx.ICON_INFORMATION)
        return

    # Get current timestamp
    timestamp = self.mediactrl.Tell()  # in milliseconds

    # Get video creation date (use file creation time as fallback)
    video_date = datetime.datetime.now().strftime("%Y-%m-%d")
    video_time = datetime.datetime.now().strftime("%H:%M:%S")

    try:
        file_stats = os.stat(self.current_video_path)
        file_ctime = datetime.datetime.fromtimestamp(file_stats.st_ctime)
        video_date = file_ctime.strftime("%Y-%m-%d")
        video_time = file_ctime.strftime("%H:%M:%S")
    except:
        pass

    # Save to database
    cursor = self.conn.cursor()
    cursor.execute(
        "INSERT INTO video (file_path, video_date, video_time, tag_description, timestamp) VALUES (?, ?, ?, ?, ?)",
        (self.current_video_path, video_date, video_time, tag_text, timestamp)
    )
    self.conn.commit()

    # Refresh tag list
    self.load_tags(self.current_video_path)

    # Clear tag input
    self.tag_input.SetValue("")
标签加载和显示:
python
def load_tags(self, video_path):
    """Load tags for the selected video."""
    self.tag_list.Clear()

    cursor = self.conn.cursor()
    cursor.execute(
        "SELECT tag_description, timestamp FROM video WHERE file_path = ? ORDER BY timestamp",
        (video_path,)
    )

    tags = cursor.fetchall()

    for tag_desc, timestamp in tags:
        # Format timestamp for display
        seconds = timestamp // 1000
        h = seconds // 3600
        m = (seconds % 3600) // 60
        s = seconds % 60
        time_str = f"{h:02d}:{m:02d}:{s:02d}"

        display_text = f"{time_str} - {tag_desc}"
        self.tag_list.Append(display_text)

        # Store the timestamp as client data
        self.tag_list.SetClientData(self.tag_list.GetCount() - 1, timestamp)
标签导航功能允许用户点击标签跳转到视频的相应位置:
python
def on_tag_select(self, event):
    """Handle tag selection from the list."""
    index = event.GetSelection()
    timestamp = self.tag_list.GetClientData(index)

    # Seek to the timestamp
    self.mediactrl.Seek(timestamp)
    self.slider.SetValue(timestamp)

    # Update time display
    seconds = timestamp // 1000
    h = seconds // 3600
    m = (seconds % 3600) // 60
    s = seconds % 60
    self.time_display.SetLabel(f"{h:02d}:{m:02d}:{s:02d}")
5. 编程技巧与设计模式
5.1 事件驱动编程
整个应用采用事件驱动模型,这是GUI编程的基本范式:
python
# 绑定事件
self.folder_button.Bind(wx.EVT_BUTTON, self.on_choose_folder)
self.video_list.Bind(wx.EVT_LISTBOX, self.on_video_select)
self.mediactrl.Bind(wx.media.EVT_MEDIA_LOADED, self.on_media_loaded)
self.slider.Bind(wx.EVT_SLIDER, self.on_seek)
self.tag_list.Bind(wx.EVT_LISTBOX, self.on_tag_select)
每个用户操作都触发相应的事件,然后由对应的处理函数响应,这使得代码结构清晰,易于维护。
5.2 多线程处理
应用使用多线程来处理可能耗时的操作,如文件扫描:
python
thread = threading.Thread(target=self.scan_video_files, args=(folder_path,))
thread.daemon = True
thread.start()设置daemon=True确保当主线程退出时,所有后台线程也会自动终止,避免了资源泄漏。
5.3 错误处理
代码中多处使用了异常处理来增强健壮性:
python
try:
    probe = ffmpeg.probe(video_path)
    video_info = next(s for s in probe['streams'] if s['codec_type'] == 'video')
    return float(probe['format']['duration'])
except Exception as e:
    print(f"Error getting video duration: {e}")
    return 0
这种做法可以防止程序因为外部因素(如文件损坏、权限问题等)而崩溃。
5.4 客户数据(Client Data)的使用
wxPython的SetClientData和GetClientData方法被巧妙地用于存储和检索与UI元素相关的额外数据:
python
# 存储完整路径作为客户数据
self.video_list.SetClientData(self.video_list.GetCount() - 1, file_path)

# 存储时间戳作为客户数据
self.tag_list.SetClientData(self.tag_list.GetCount() - 1, timestamp)
这样避免了使用额外的数据结构来维护UI元素与相关数据之间的映射关系。
运行结果
