大家好,我是农村程序员,独立开发者,行业观察员,前端之虎陈随易。
- 关注公众号:
陈随易,获取最新观察和思考。 - 个人网站 1️⃣:chensuiyi.me
- 个人网站 2️⃣:me.yicode.tech
如果本文能给你提供启发或帮助,欢迎动动小手指,一键三连 (点赞、评论、转发),给我一些支持和鼓励,谢谢。
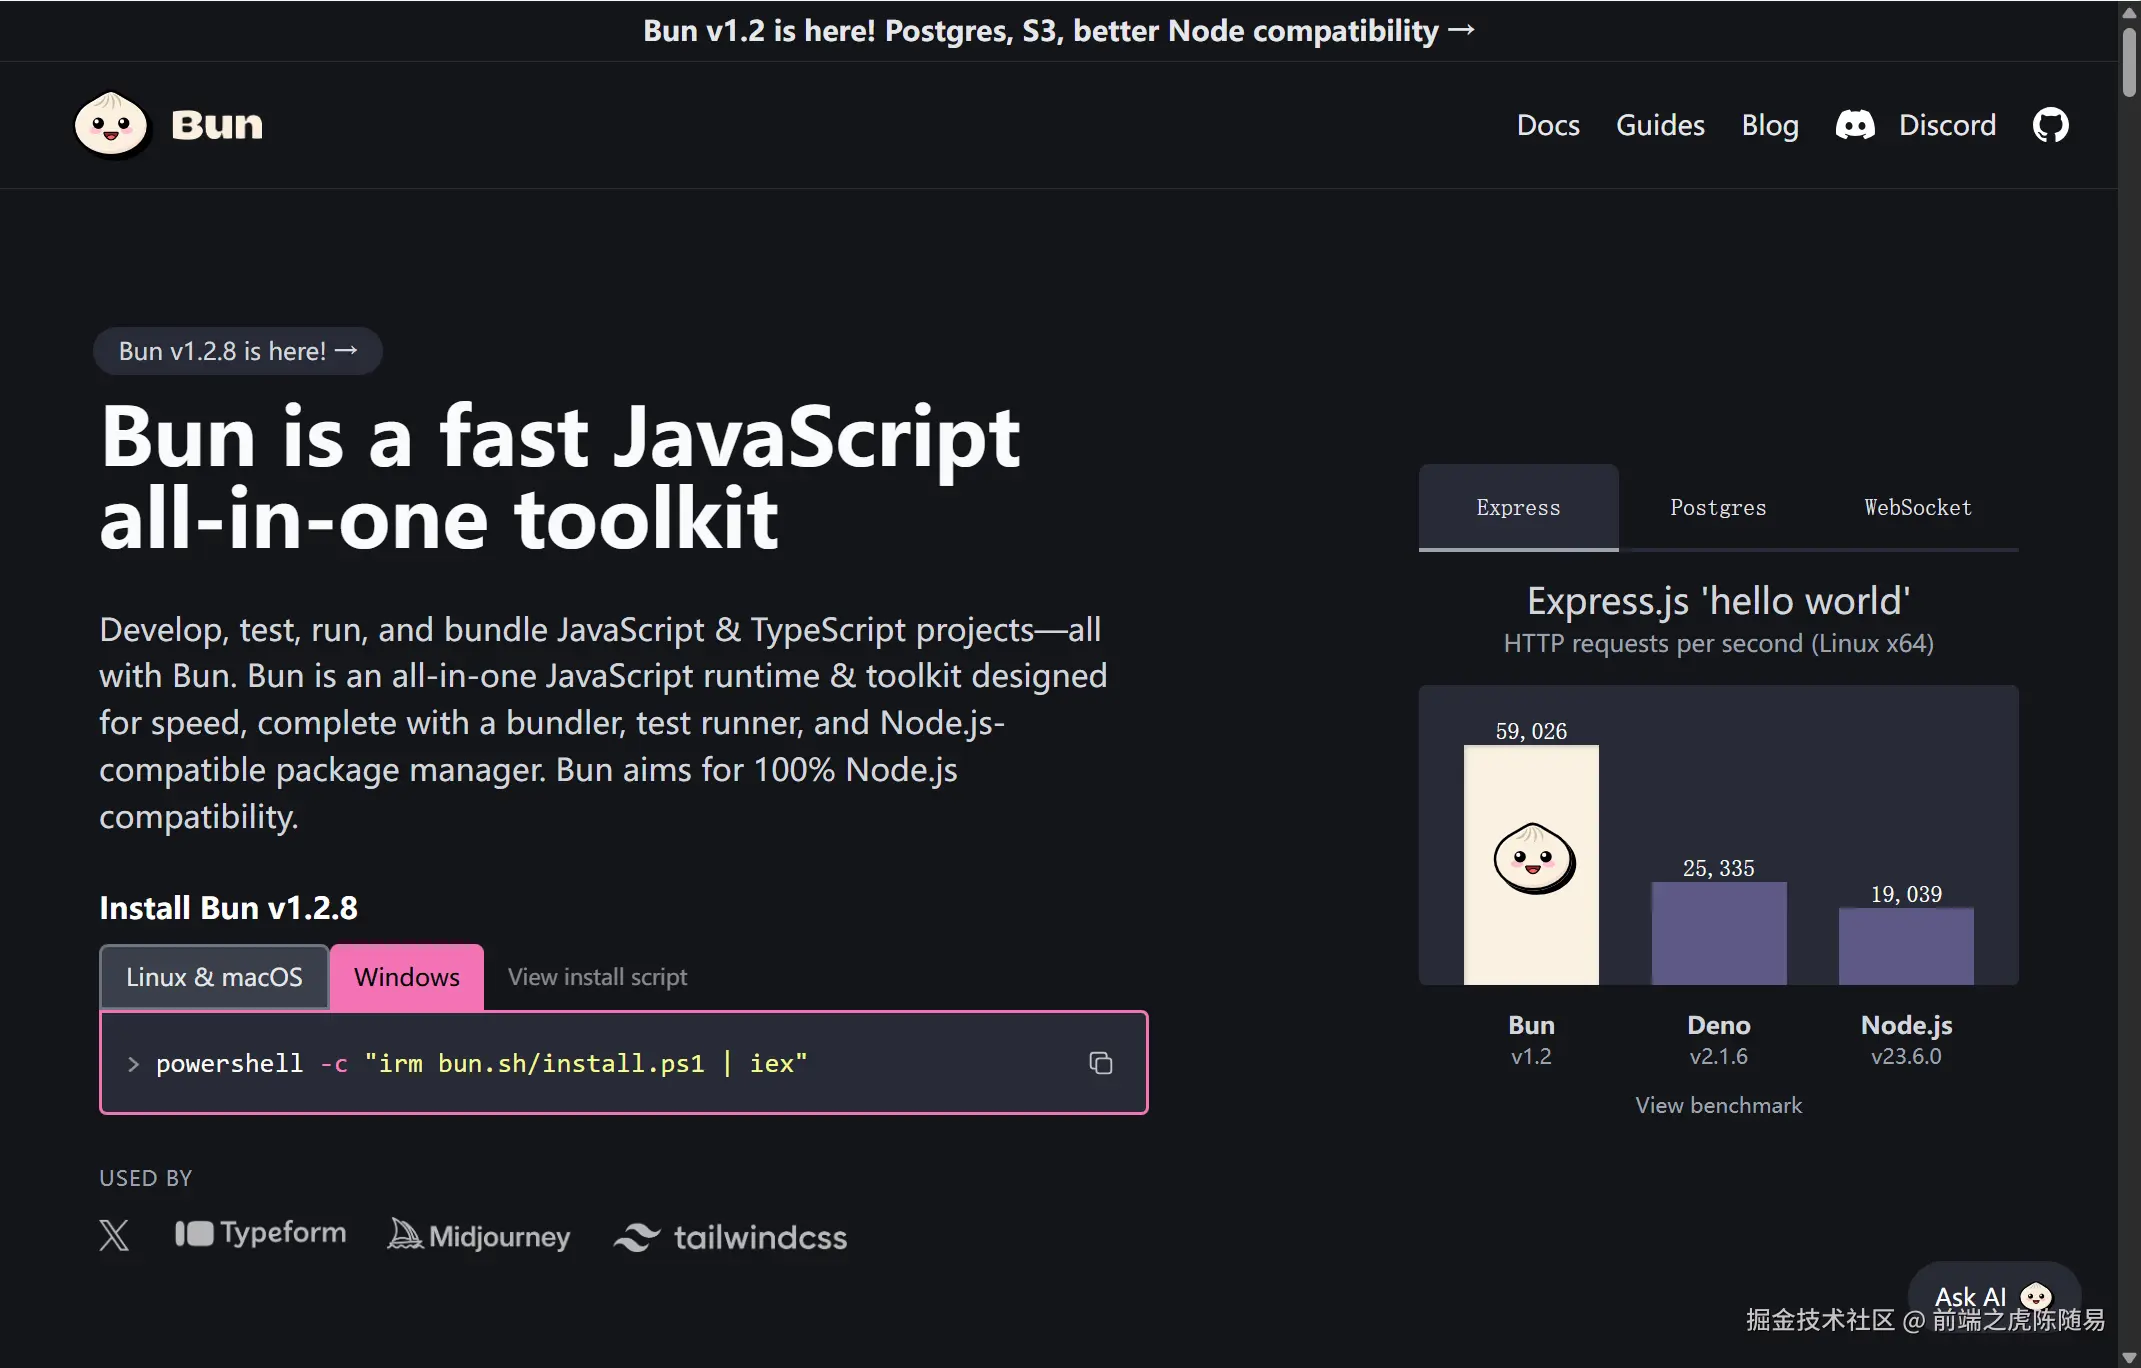
从 Node..js 切换到 Bun 有一段时间了,目前感觉良好。
从体验上来说,Bun 和 Node.js 有一种 TypeScript 和 JavaScript 的感觉,前者是后者的超集,同时也进一步提供了很多更好用,更实用的功能。
本文就来盘点一下,那些在 Bun 中好用的功能。
包管理
Bun 自带了包管理功能,命令如下:
bash
bun install # 安装所有依赖,比 npm install 快25倍
bun add # 添加新依赖
bun remove # 移除依赖
bun update # 更新依赖
bun publish # 发布包
bun outdated # 检测包更新
bun link # 链接包
bun pm # 包管理工具集
由于这些命令都是 Bun 自带,就不需要额外的 npm、pnpm 和 yarn 了。
项目管理
Bun 有如下项目管理命令:
bash
bun init # 初始化项目
bun create # 使用项目模板
可以一键从 React 组件、npm 仓库、github、本地创建一个组件或项目模板。
自动安装
js
import { foo } from 'foo';

foo();
需要什么包直接写,Bun 自动为你安装到 package.json。
二进制包
bash
# 打包为一个二进制包
bun build ./cli.ts --compile --outfile mycli

$ ./mycli
Hello world!

# 跨平台编译
bun build --compile --target=bun-linux-x64 ./index.ts --outfile myapp
bun build --compile --target=bun-windows-x64 ./path/to/my/app.ts --outfile myapp
bun build --compile --target=bun-darwin-arm64 ./path/to/my/app.ts --outfile myapp

# 部署编译
bun build --compile --minify --sourcemap ./path/to/my/app.ts --outfile myapp

# 字节码编译
bun build --compile --minify --sourcemap --bytecode ./path/to/my/app.ts --outfile myapp
打包 Sqlite 编译
js
import db from './my.db' with { type: 'sqlite' };

db.query('select * from users LIMIT 1').get();
嵌入文件和目录编译
bash
bun build --compile ./index.ts ./public/**/*.png
js
// 嵌入文件
import icon from './icon.png' with { type: 'file' };
import { file } from 'bun';

export default {
    fetch(req) {
        return new Response(file(icon));
    }
};
编译为二进制可执行包这个功能,目前 Bun 和 Deno 相差无几,而 Nodejs 由于历史包袱和其他原因,迟迟没有推出稳定版。
根据我的个人判断,Nodejs 有可能会放弃二进制包的编译推进。
环境变量
bash
FOO=world
BAR=hello$FOO
DB_USER=postgres
DB_PASSWORD=secret
DB_HOST=localhost
DB_PORT=5432
DB_URL=postgres://$DB_USER:$DB_PASSWORD@$DB_HOST:$DB_PORT/$DB_NAME
Bun 会自动读取项目中的 .env、.env.development、.env.development、.env.test、.env.local 等环境变量。
也会自动展开环境变量,实现环境变量的复用。
JSX
JSX
function Component(props: {message: string}) {
  return (
    <body>
      <h1 style={{color: 'red'}}>{props.message}</h1>
    </body>
  );
}

console.log(<Component message="Hello world!" />);
Bun 默认支持 JSX 语法。
工作空间
JSON
{
    "name": "my-project",
    "version": "1.0.0",
    "workspaces": ["packages/*"],
    "devDependencies": {
        "example-package-in-monorepo": "workspace:*"
    }
}
在 package.json 文件中设置 workspaces,就能开启单仓库,多包模式。
插件和加载器
js
import { plugin } from "bun";

await plugin({
    name: "YAML",
    async setup(build) {
        const { load } = await import("js-yaml");

        // when a .yaml file is imported...
        build.onLoad({ filter: /\.(yaml|yml)$/ }, async (args) => {

        // read and parse the file
        const text = await Bun.file(args.path).text();
        const exports = load(text) as Record<string, any>;

        // and returns it as a module
        return {
            exports,
            loader: "object", // special loader for JS objects
        };
        });
    },
});
Bun 支持导入 js、jsx、ts、tsx、toml、json、napi、wasm 等文件类型。
也支持自己写加载器和插件,支持任意类型,要不是试试加载个 PHP?
构建打包
js
await Bun.build({
    entrypoints: ['./index.tsx'],
    outdir: './build',
    target: 'browser',
    format: 'esm',
    splitting: true,
    plugins: [
        /* ... */
    ],
    env: 'inline',
    minify: true,
    external: ['lodash', 'react'],
    naming: '[dir]/[name].[ext]',
    root: '.',
    publicPath: 'https://cdn.example.com/'
});一句话总结:Bun自带了一个Rollup。
HTML 和静态站点
HTML
<!doctype html>
<html>
    <head>
        <link rel="stylesheet" href="./styles.css" />
        <script src="./app.ts" type="module"></script>
    </head>
    <body>
        <img src="./logo.png" />
    </body>
</html>
这是一个 html 文件。
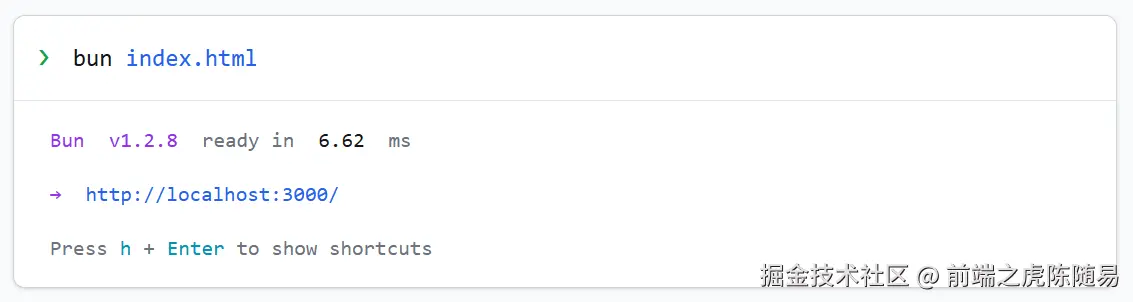
可以使用 Bun 直接运行。
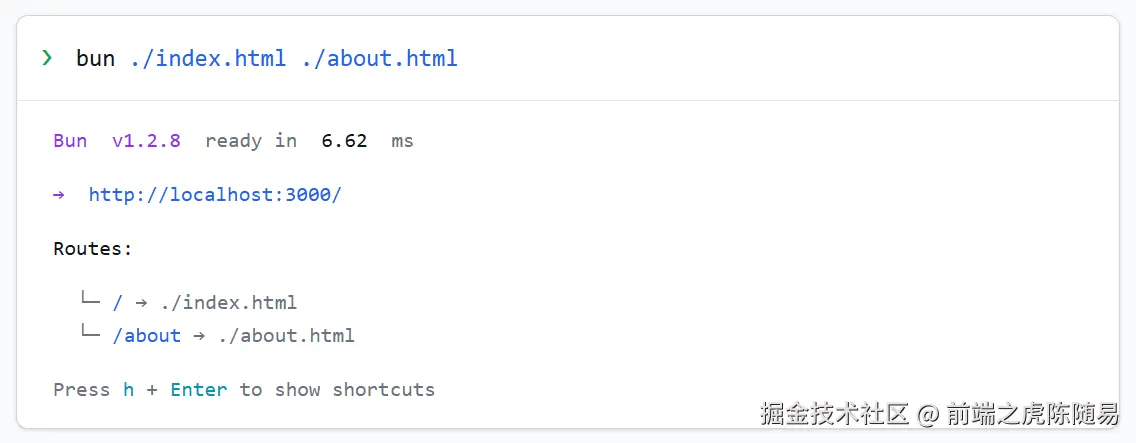
如果有多个页面,或者指定模糊匹配 ./**/*.html,还能自动生成访问路由,这在一定程度上,替代了部分 Nginx 的功能,实现了一个静态网站。
不仅如此,直接使用 ESM 语法、导入 CSS、导入 JSX、导入图片等,Bun 都会自动编译,处理,打包。
CSS 现代语法
默认提供包括但不限于以下特性:
- 转译现代化 CSS 语法
- 兼容不同浏览器
- 压缩
- CSS Modules
- Tailwind
层叠语法
CSS
/* With nesting */
.card {
    background: white;
    border-radius: 4px;

    .title {
        font-size: 1.2rem;
        font-weight: bold;
    }

    .content {
        padding: 1rem;
    }
}
👇
css
/* Compiled output */
.card {
    background: white;
    border-radius: 4px;
}

.card .title {
    font-size: 1.2rem;
    font-weight: bold;
}

.card .content {
    padding: 1rem;
}
媒体查询
CSS
.responsive-element {
    display: block;

    @media (min-width: 768px) {
        display: flex;
    }
}
👇
CSS
.responsive-element {
    display: block;
}

@media (min-width: 768px) {
    .responsive-element {
        display: flex;
    }
}
颜色混合
CSS
.button {
    background-color: color-mix(in srgb, blue 30%, red);

    &:hover {
        background-color: color-mix(in srgb, blue 30%, red, white 20%);
    }
}
👇
css
.button {
    background-color: #b31a1a;
}

.button:hover {
    background-color: #c54747;
}
明暗度
CSS
:root {
    color-scheme: light dark;
}

.themed-component {
    background-color: light-dark(#ffffff, #121212);
    color: light-dark(#333333, #eeeeee);
    border-color: light-dark(#dddddd, #555555);
}

.light-theme {
    color-scheme: light;
}

.dark-theme {
    color-scheme: dark;
}
👇
css
:root {
    --lightningcss-light: initial;
    --lightningcss-dark: ;
    color-scheme: light dark;
}

@media (prefers-color-scheme: dark) {
    :root {
        --lightningcss-light: ;
        --lightningcss-dark: initial;
    }
}

.light-theme {
    --lightningcss-light: initial;
    --lightningcss-dark: ;
    color-scheme: light;
}

.dark-theme {
    --lightningcss-light: ;
    --lightningcss-dark: initial;
    color-scheme: dark;
}

.themed-component {
    background-color: var(--lightningcss-light, #ffffff) var(--lightningcss-dark, #121212);
    color: var(--lightningcss-light, #333333) var(--lightningcss-dark, #eeeeee);
    border-color: var(--lightningcss-light, #dddddd) var(--lightningcss-dark, #555555);
}
以上仅列举一小部分,更多 CSS 特性支持可以前往官方文档查看,写到这里,我只想给 Bun 说一个字:绝。
在 技术提高生产力 这个问题上,Bun 远远走在了时代的前言。
依赖补丁
bash
bun patch <package>@<version> flags or options如果你的项目有一个依赖包,但是这个依赖包有点问题,你直接修改了在 node_modules 中这个依赖包的源码,项目运行正常了。
但是,你提交代码后,同时那边并没有修改,还是会有错误,那么此时,你可以用 bun patch 来给依赖打补丁后提交,那么同事那边也能正常使用。
bun 把补丁功能内置,先不说好还是不好,在 技术提高生产力 这个问题上,再次一骑绝尘。
很多事情,能做 和 敢做 是两码事,Bun 的出现,让 Node 和 Deno 都加快了前进的脚步,三足鼎立,盛世嫣然。
全栈开发
js
import { sql, serve } from 'bun';
import dashboard from './dashboard.html';
import homepage from './index.html';

const server = serve({
    routes: {
        // ** HTML imports **
        // Bundle & route index.html to "/". This uses HTMLRewriter to scan the HTML for `<script>` and `<link>` tags, run's Bun's JavaScript & CSS bundler on them, transpiles any TypeScript, JSX, and TSX, downlevels CSS with Bun's CSS parser and serves the result.
        '/': homepage,
        // Bundle & route dashboard.html to "/dashboard"
        '/dashboard': dashboard,

        // ** API endpoints ** (Bun v1.2.3+ required)
        '/api/users': {
            async GET(req) {
                const users = await sql`SELECT * FROM users`;
                return Response.json(users);
            },
            async POST(req) {
                const { name, email } = await req.json();
                const [user] = await sql`INSERT INTO users (name, email) VALUES (${name}, ${email})`;
                return Response.json(user);
            }
        },
        '/api/users/:id': async (req) => {
            const { id } = req.params;
            const [user] = await sql`SELECT * FROM users WHERE id = ${id}`;
            return Response.json(user);
        }
    },

    // Enable development mode for:
    // - Detailed error messages
    // - Hot reloading (Bun v1.2.3+ required)
    development: true

    // Prior to v1.2.3, the `fetch` option was used to handle all API requests. It is now optional.
    // async fetch(req) {
    //   // Return 404 for unmatched routes
    //   return new Response("Not Found", { status: 404 });
    // },
});

console.log(`Listening on ${server.url}`);
服务端代码。
bash
bun run app.ts直接运行。
我是在 Bun v1.1 开始使用的,因为这个版本开始,Bun 才真正支持 windows。
Bun v1.1 到 Bun v1.2 期间,我用过几次,每次都有报错,无法正常把项目跑起来。
v1.2 后,兼容性逐渐提高,以前不能跑的前后端项目,都能正常跑起来。
pm2 v6.0.5 版本,正式支持了 Bun 的生产环境部署,于是我便 All in Bun 了。
作为一个在 技术的人性化 上面有一点追求的人,Bun 真的让人动容。
不需要任何第三方依赖,使用极其简单的语法,就能通过 Bun 内置的 Web 服务接口,创建一个带路由、带数据库操作、带模板的 Web 服务。
曾经的我,极度追求技术的 高级性,要看起来高大上。
现在的我,更加追求技术的 人性化,给开发者大开方便之门。
测试套件
js
import { expect, test } from 'bun:test';

test('2 + 2', () => {
    expect(2 + 2).toBe(4);
});
现在 Node.js 也支持测试用例,貌似已经成为了运行时的标配。
Bun 的测试套件支持以下特性:
- TypeScript 和 JSX 测试
- 生命周期钩子
- 快照测试
- UI 和 DOM 测试
- 使用
--watch参数修改代码自动测试 - 使用
--preload参数进行脚本预加载
WebSockets
js
// WebSocket 后端
Bun.serve({
    fetch(req, server) {
        const cookies = parseCookies(req.headers.get('Cookie'));
        server.upgrade(req, {
            data: {
                createdAt: Date.now(),
                channelId: new URL(req.url).searchParams.get('channelId'),
                authToken: cookies['X-Token']
            }
        });

        return undefined;
    },
    websocket: {
        async message(ws, message) {
            const user = getUserFromToken(ws.data.authToken);

            await saveMessageToDatabase({
                channel: ws.data.channelId,
                message: String(message),
                userId: user.id
            });
        }
    }
});

// WebSocket 前端
const socket = new WebSocket('ws://localhost:3000/chat');

socket.addEventListener('message', (event) => {
    console.log(event.data);
});
比 Node.js 的 ws 包快 7 倍。
Sqlite
Bun 内置了 Sqlite 数据库操作。
js
import { Database } from 'bun:sqlite';

const db = new Database(':memory:');
const query = db.query("select 'Hello world' as message;");
query.get(); // => { message: "Hello world" }
比 npm 包 better-sqlite3 快 3-6倍,比 deno.land/x/sqlite 快 8-9倍。
文件系统路由
js
const router = new Bun.FileSystemRouter({
  style: "nextjs",
  dir: "./pages",
  origin: "https://mydomain.com",
  assetPrefix: "_next/static/"
});
router.match("/");

// =>
{
  filePath: "/path/to/pages/index.tsx",
  kind: "exact",
  name: "/",
  pathname: "/",
  src: "https://mydomain.com/_next/static/pages/index.tsx"
}
后端开发福利,如果你想开发一个只用于 Bun 的后端框架,用文件系统路由就会非常方便。
这个功能直接兼容 Next.js 的路由风格。
Shell
js
import { $ } from 'bun';

const response = await fetch('https://example.com');

await $`cat < ${response} | wc -c`; // 1256
无需任何依赖,直接在 Bun 中导出 $ 执行 Shell 命令,运维利器,写脚本方便了。
Cookie
使用案例:
js
// Empty cookie map
const cookies = new Bun.CookieMap();

// From a cookie string
const cookies1 = new Bun.CookieMap('name=value; foo=bar');

// From an object
const cookies2 = new Bun.CookieMap({
    session: 'abc123',
    theme: 'dark'
});

// From an array of name/value pairs
const cookies3 = new Bun.CookieMap([
    ['session', 'abc123'],
    ['theme', 'dark']
]);
在 Http 服务中使用:
js
const server = Bun.serve({
    routes: {
        '/': (req) => {
            // Access request cookies
            const cookies = req.cookies;

            // Get a specific cookie
            const sessionCookie = cookies.get('session');
            if (sessionCookie != null) {
                console.log(sessionCookie);
            }

            // Check if a cookie exists
            if (cookies.has('theme')) {
                // ...
            }

            // Set a cookie, it will be automatically applied to the response
            cookies.set('visited', 'true');

            return new Response('Hello');
        }
    }
});

console.log('Server listening at: ' + server.url);
Cookie 是 Web 开发的基础概念,Bun 直接内置了 Cookie 的操作,很实用。
版本号
js
import { semver } from 'bun';

semver.satisfies('1.0.0', '^1.0.0'); // true
semver.satisfies('1.0.0', '^1.0.1'); // false
semver.satisfies('1.0.0', '~1.0.0'); // true
semver.satisfies('1.0.0', '~1.0.1'); // false
semver.satisfies('1.0.0', '1.0.0'); // true
semver.satisfies('1.0.0', '1.0.1'); // false
semver.satisfies('1.0.1', '1.0.0'); // false
semver.satisfies('1.0.0', '1.0.x'); // true
semver.satisfies('1.0.0', '1.x.x'); // true
semver.satisfies('1.0.0', 'x.x.x'); // true
semver.satisfies('1.0.0', '1.0.0 - 2.0.0'); // true
semver.satisfies('1.0.0', '1.0.0 - 1.0.1'); // true
版本号在现代化开发中是一个基本的共识,把版本号操作对比也内置了,有点意思。
颜色
格式化颜色:
js
Bun.color('red', 'css'); // "red"
Bun.color(0xff0000, 'css'); // "#f000"
Bun.color('#f00', 'css'); // "red"
Bun.color('#ff0000', 'css'); // "red"
Bun.color('rgb(255, 0, 0)', 'css'); // "red"
Bun.color('rgba(255, 0, 0, 1)', 'css'); // "red"
Bun.color('hsl(0, 100%, 50%)', 'css'); // "red"
Bun.color('hsla(0, 100%, 50%, 1)', 'css'); // "red"
Bun.color({ r: 255, g: 0, b: 0 }, 'css'); // "red"
Bun.color({ r: 255, g: 0, b: 0, a: 1 }, 'css'); // "red"
Bun.color([255, 0, 0], 'css'); // "red"
Bun.color([255, 0, 0, 255], 'css'); // "red"
格式化终端颜色:
js
Bun.color('red', 'ansi'); // "\u001b[38;2;255;0;0m"
Bun.color(0xff0000, 'ansi'); // "\u001b[38;2;255;0;0m"
Bun.color('#f00', 'ansi'); // "\u001b[38;2;255;0;0m"
Bun.color('#ff0000', 'ansi'); // "\u001b[38;2;255;0;0m"
Bun.color('rgb(255, 0, 0)', 'ansi'); // "\u001b[38;2;255;0;0m"
Bun.color('rgba(255, 0, 0, 1)', 'ansi'); // "\u001b[38;2;255;0;0m"
Bun.color('hsl(0, 100%, 50%)', 'ansi'); // "\u001b[38;2;255;0;0m"
Bun.color('hsla(0, 100%, 50%, 1)', 'ansi'); // "\u001b[38;2;255;0;0m"
Bun.color({ r: 255, g: 0, b: 0 }, 'ansi'); // "\u001b[38;2;255;0;0m"
Bun.color({ r: 255, g: 0, b: 0, a: 1 }, 'ansi'); // "\u001b[38;2;255;0;0m"
Bun.color([255, 0, 0], 'ansi'); // "\u001b[38;2;255;0;0m"
Bun.color([255, 0, 0, 255], 'ansi'); // "\u001b[38;2;255;0;0m"
16 进制颜色:
js
Bun.color('hsl(0, 0%, 50%)', 'HEX'); // "#808080"
Bun.color('red', 'HEX'); // "#FF0000"
Bun.color(0xff0000, 'HEX'); // "#FF0000"
Bun.color({ r: 255, g: 0, b: 0 }, 'HEX'); // "#FF0000"
Bun.color([255, 0, 0], 'HEX'); // "#FF0000"
看起来,Bun 有一种囊括万物的意味,把颜色操作也收入囊中,不免会担心,核心包会不会越来越臃肿,但就像 golang 一样,从另一个方面来说,也让开发工作更加统一。
对象存储
js
const client = new Bun.S3Client({
    accessKeyId: 'your-access-key',
    secretAccessKey: 'your-secret-key',
    endpoint: 'https://s3.us-east-1.amazonaws.com',
    bucket: 'my-bucket'
});
await client.write('my-file.txt', 'Hello World!');
await client.write('my-file.txt', new Response('Hello World!'));

// 等于如下写法:
// await client.file("my-file.txt").write("Hello World!");这个功能之前单独分享过,一句话总结:阿里云和腾讯云的静态存储,不需要第三方依赖了。
SQL
js
import { sql } from 'bun';

const users = await sql`
  SELECT * FROM users
  WHERE active = ${true}
  LIMIT ${10}
`;

// Select with multiple conditions
const activeUsers = await sql`
  SELECT *
  FROM users
  WHERE active = ${true}
  AND age >= ${18}
`;
目前只支持 PostgreSQL,Mysql 和 Sqlite 的支持,随后就来。
感谢阅读,本文由编程记者 前端之虎陈随易 撰稿,转载请保留顶部信息。