ESP32+Arduino入门教程(二):连接OLED屏
前言
文中视频效果可在此次观看:ESP32+Arduino入门教程(二):连接OLED屏
接线
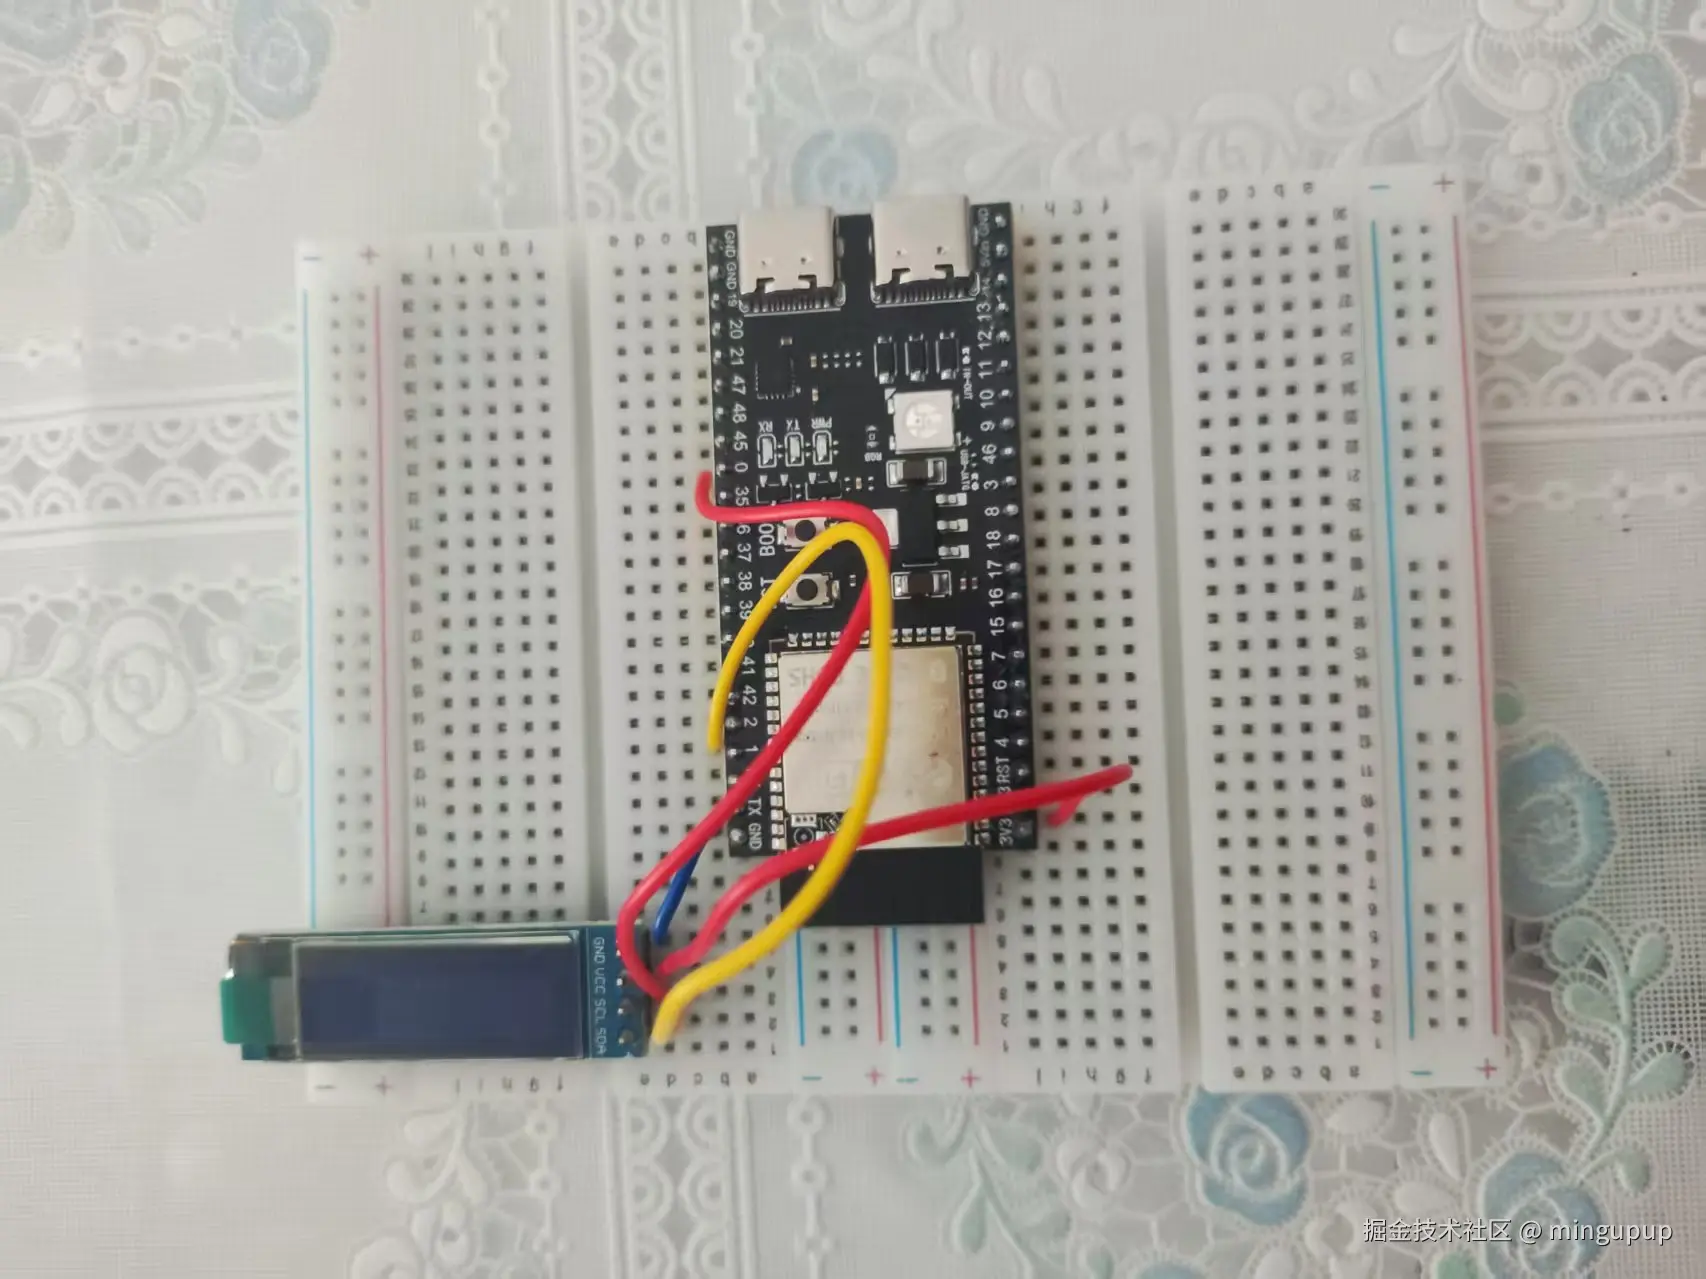
现在先来看看接线。
我的是0.91寸的4针OLED屏。
| OLED引脚 | ESP32-S3引脚 |
|---|---|
| GND | GND |
| VCC | 3.3V |
| SCL | 0 |
| SDA | 1 |
接线完成之后如下所示:
安装库
连接OLED屏使用的是这个库:
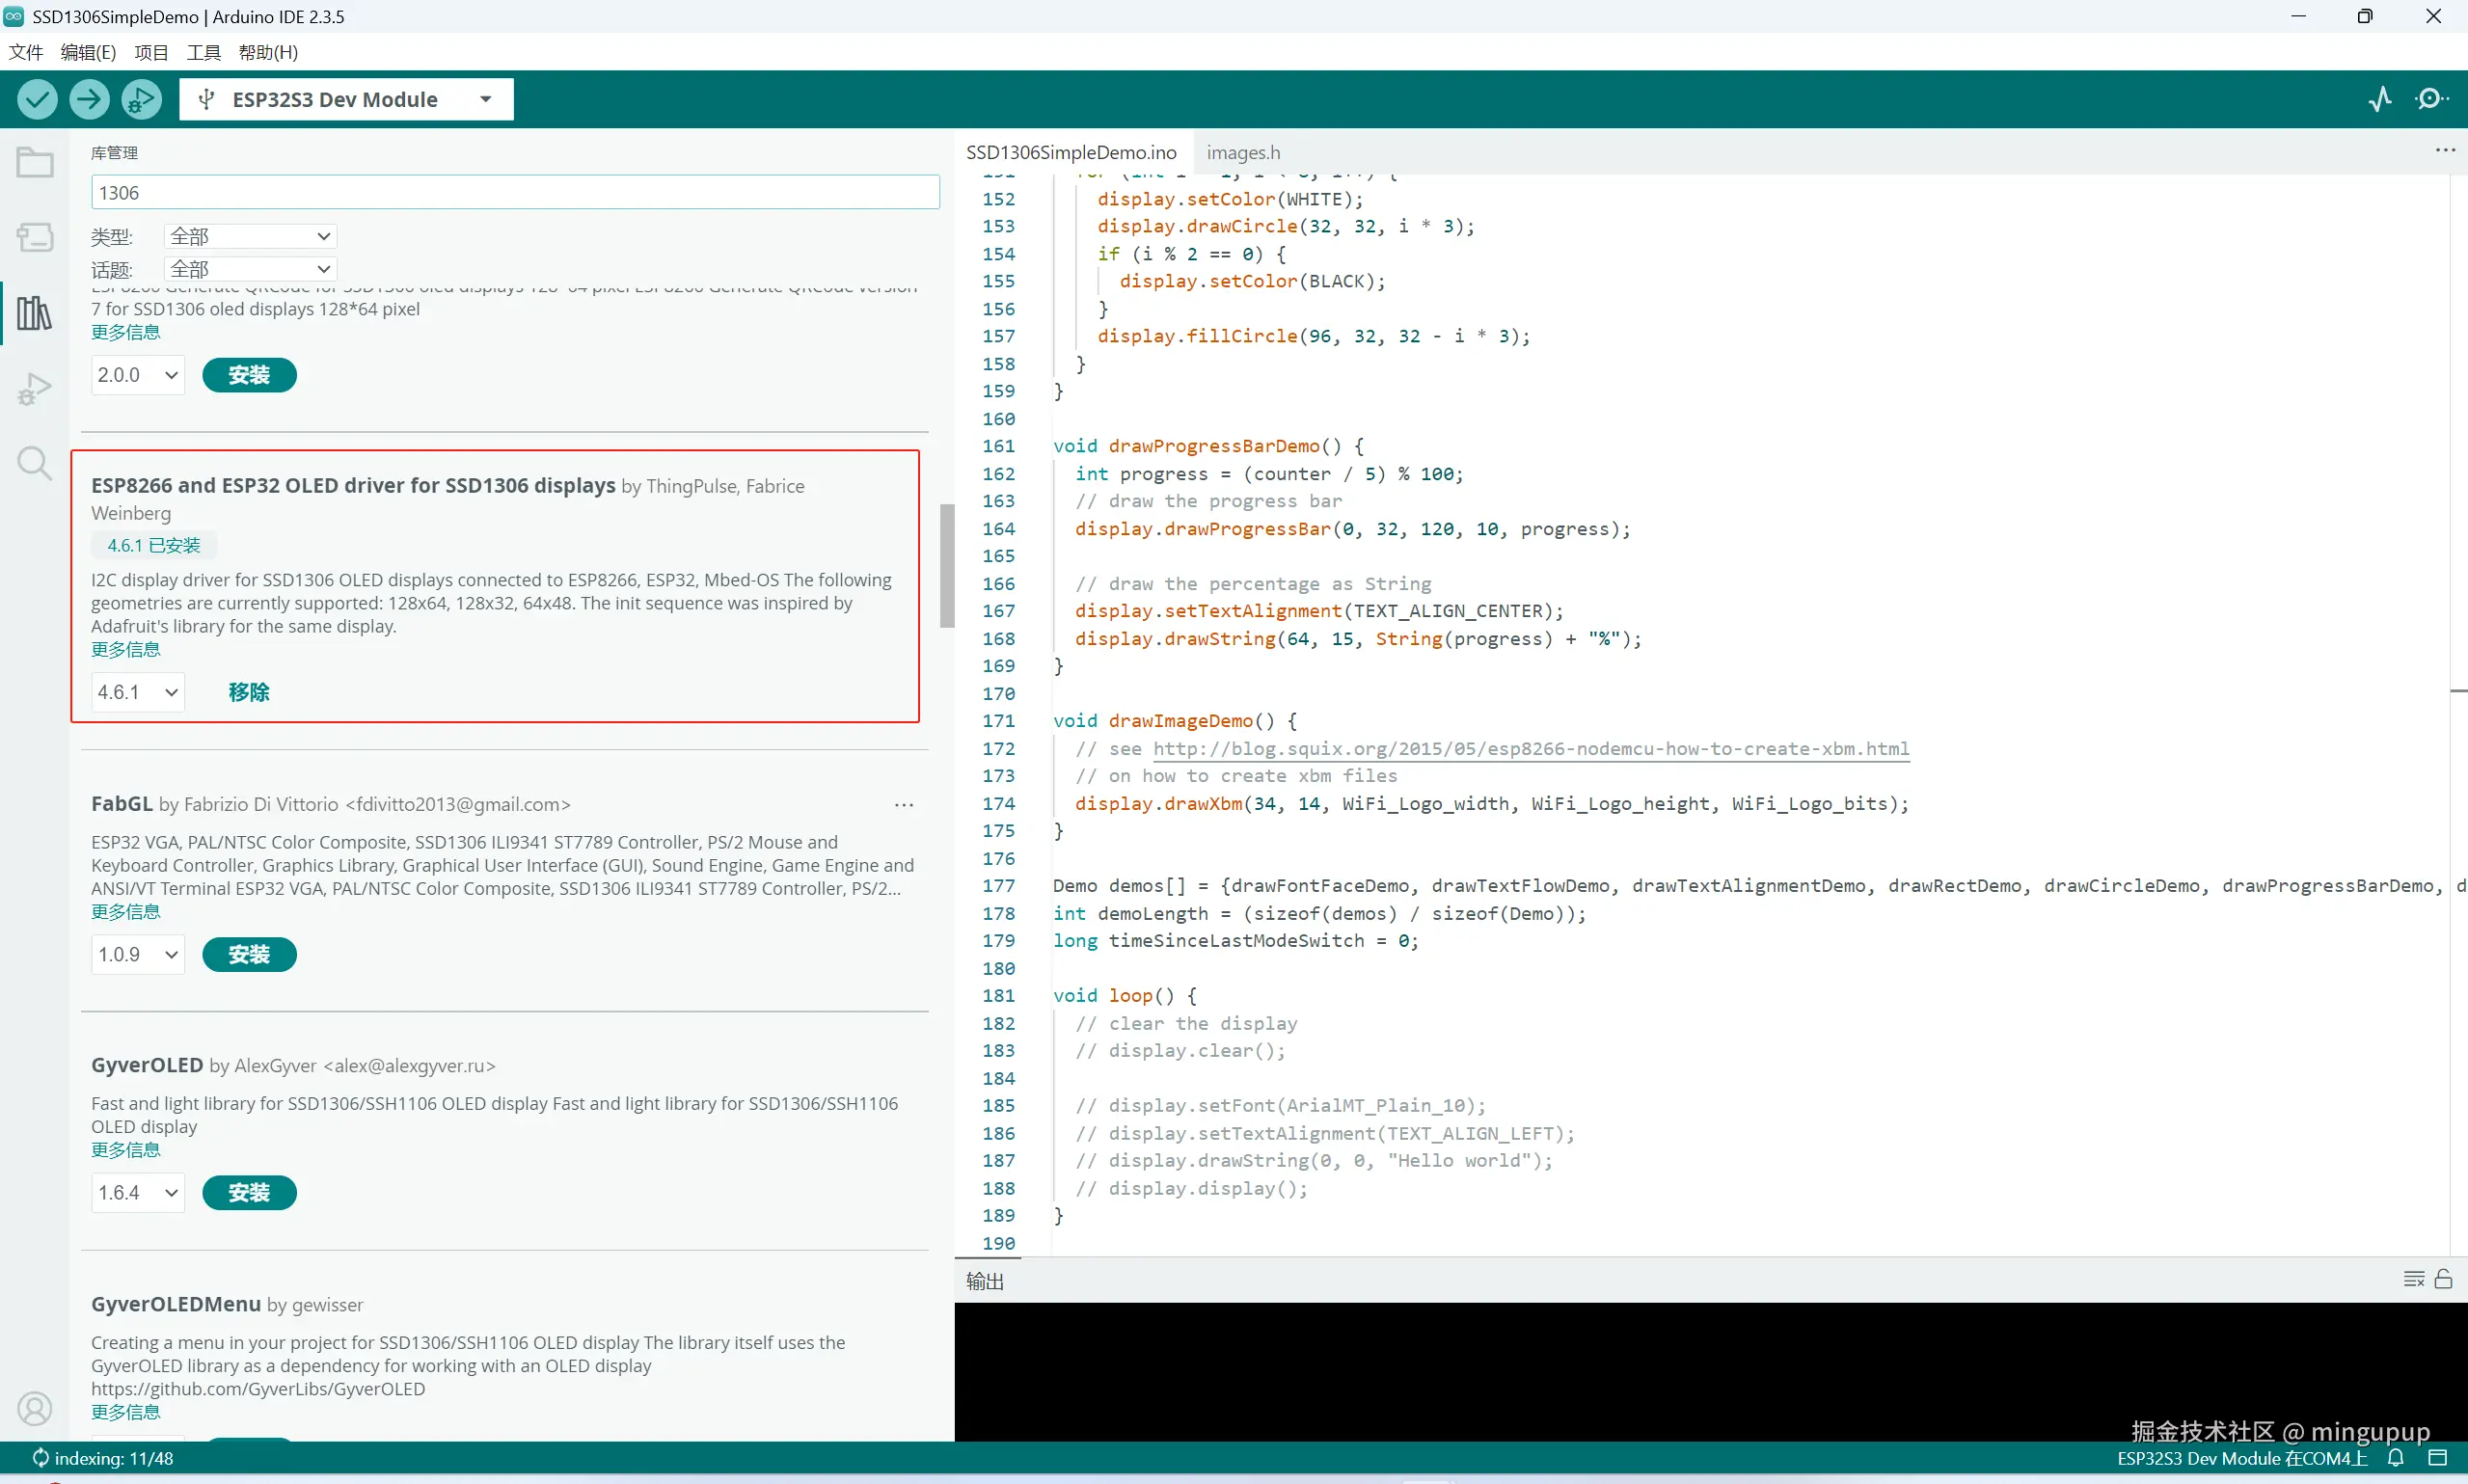
GitHub地址:github.com/ThingPulse/...
介绍
基于 SSD1306 和 SH1106 的 128x64、128x32、64x48 像素 OLED 显示屏在 ESP8266/ESP32 上的驱动程序。
这是一个适用于 Arduino/ESP8266 & ESP32 和 mbed-os 平台的 SSD1306 和 SH1106 128x64、128x32、64x48 和 64x32 OLED 显示屏的驱动程序。可以使用 I2C 或 SPI 版本的显示屏。
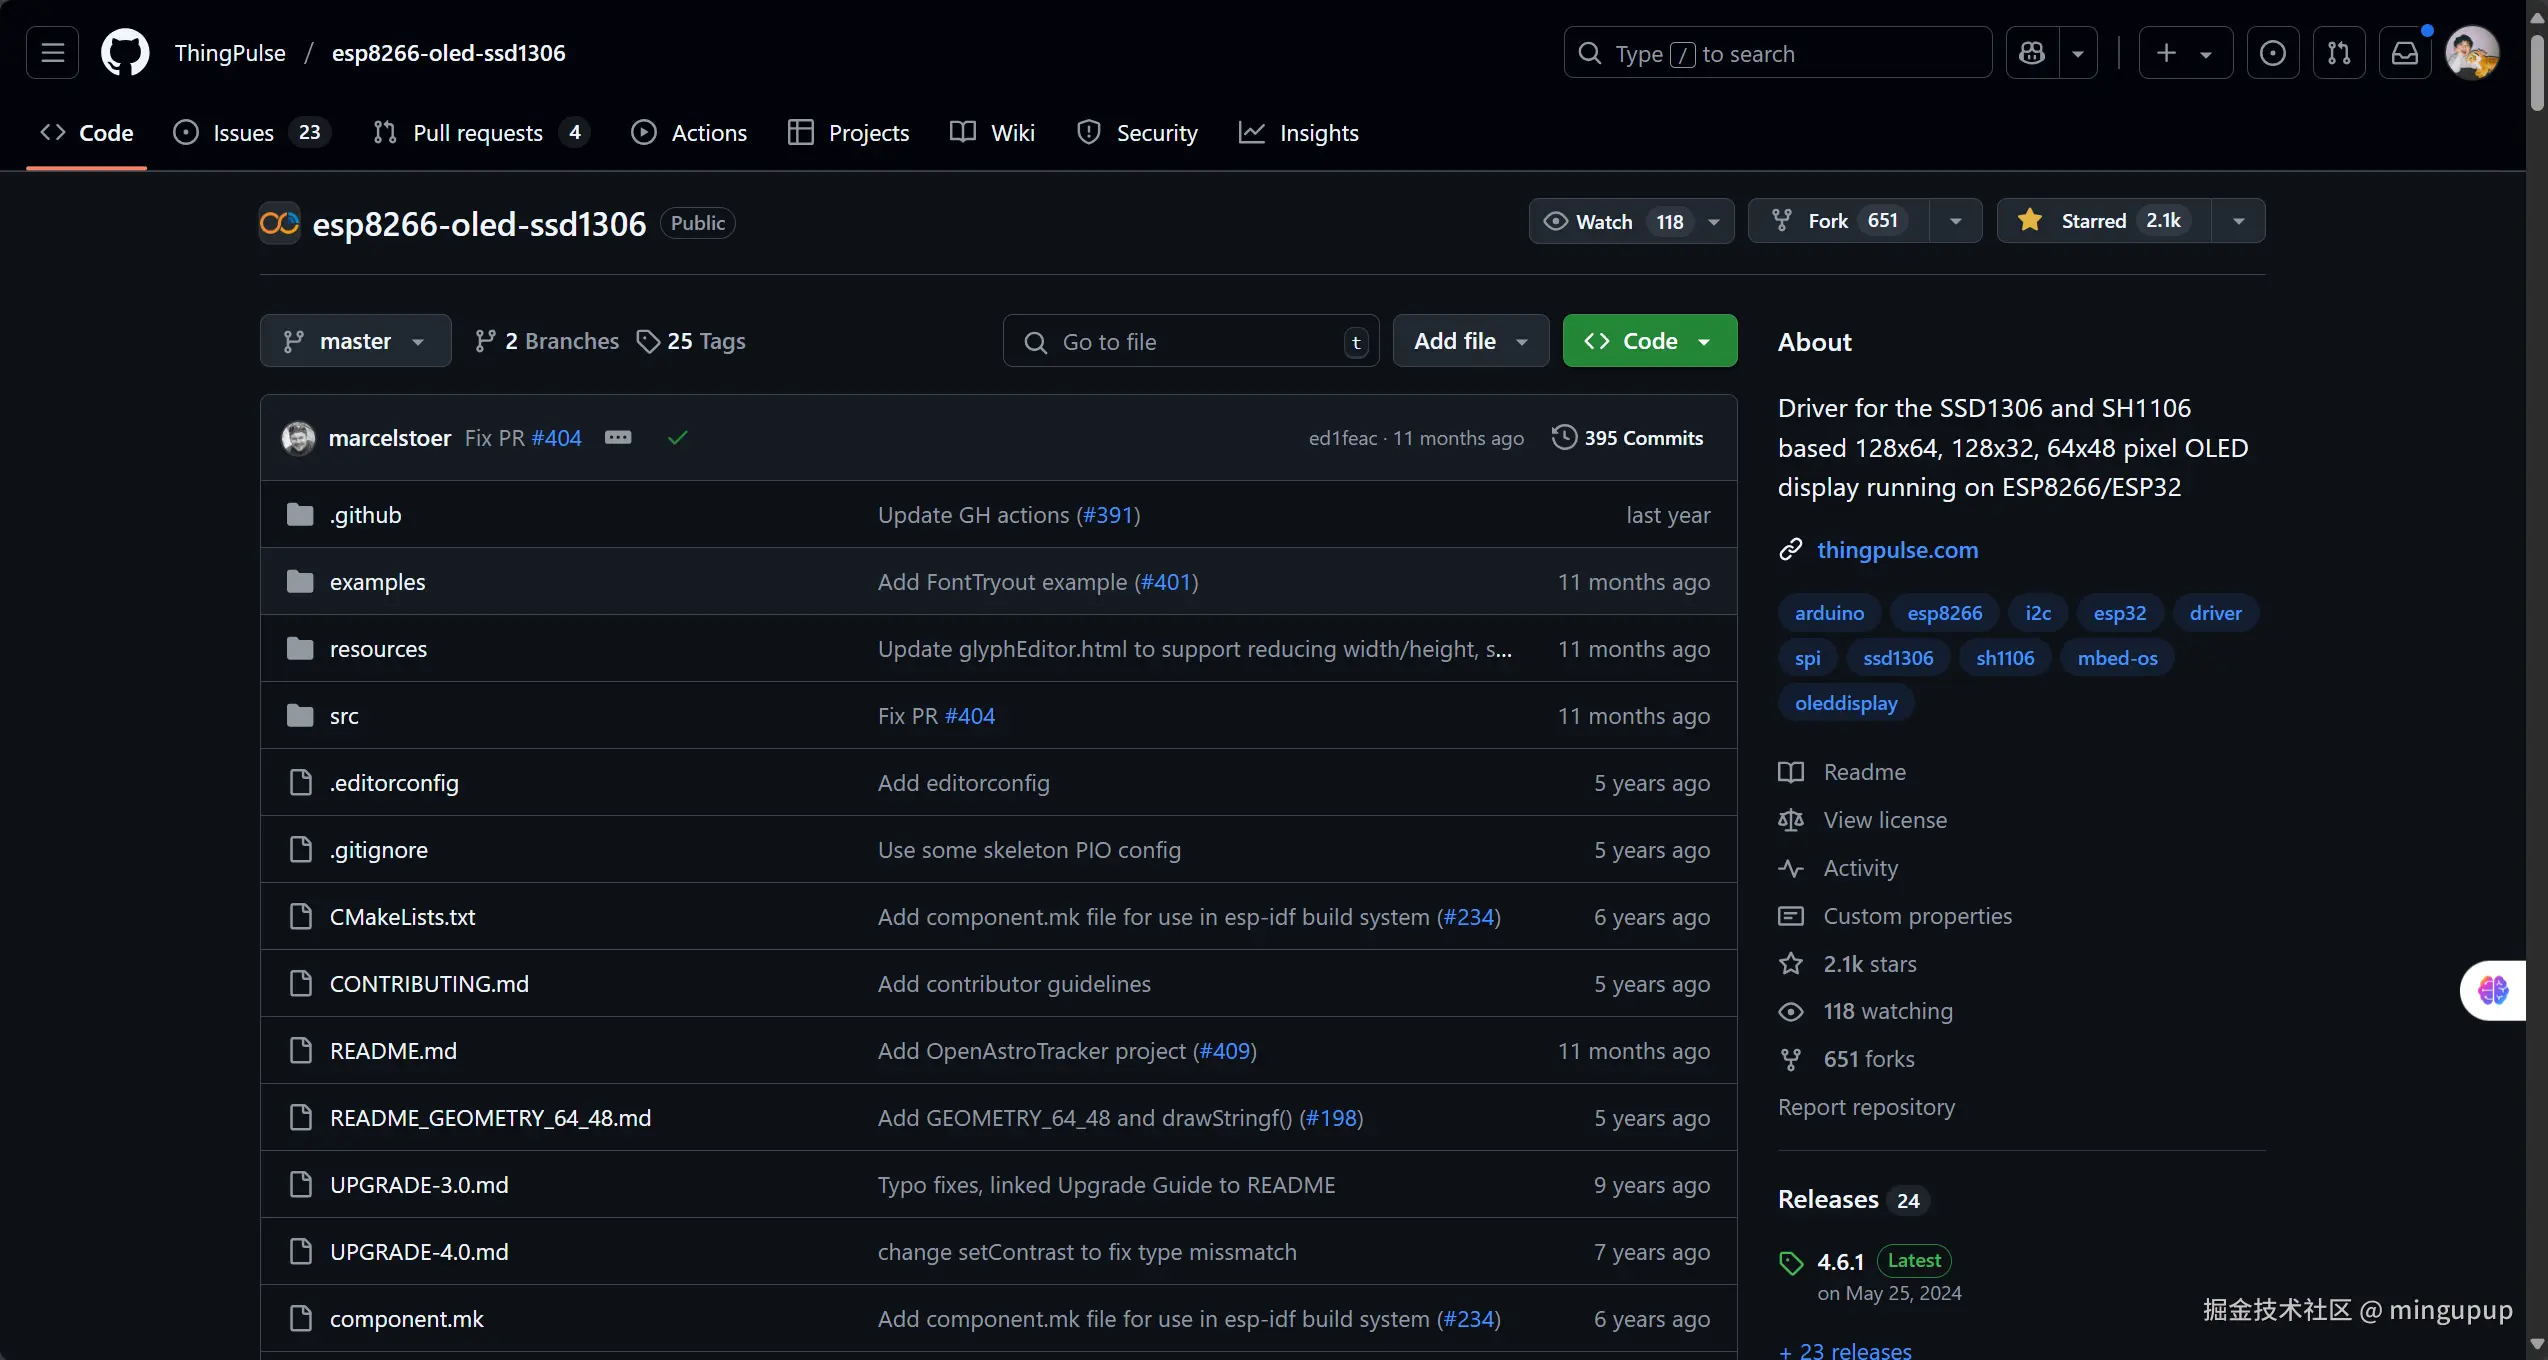
安装成功之后打开示例:
运行示例
修改示例中的这个位置:
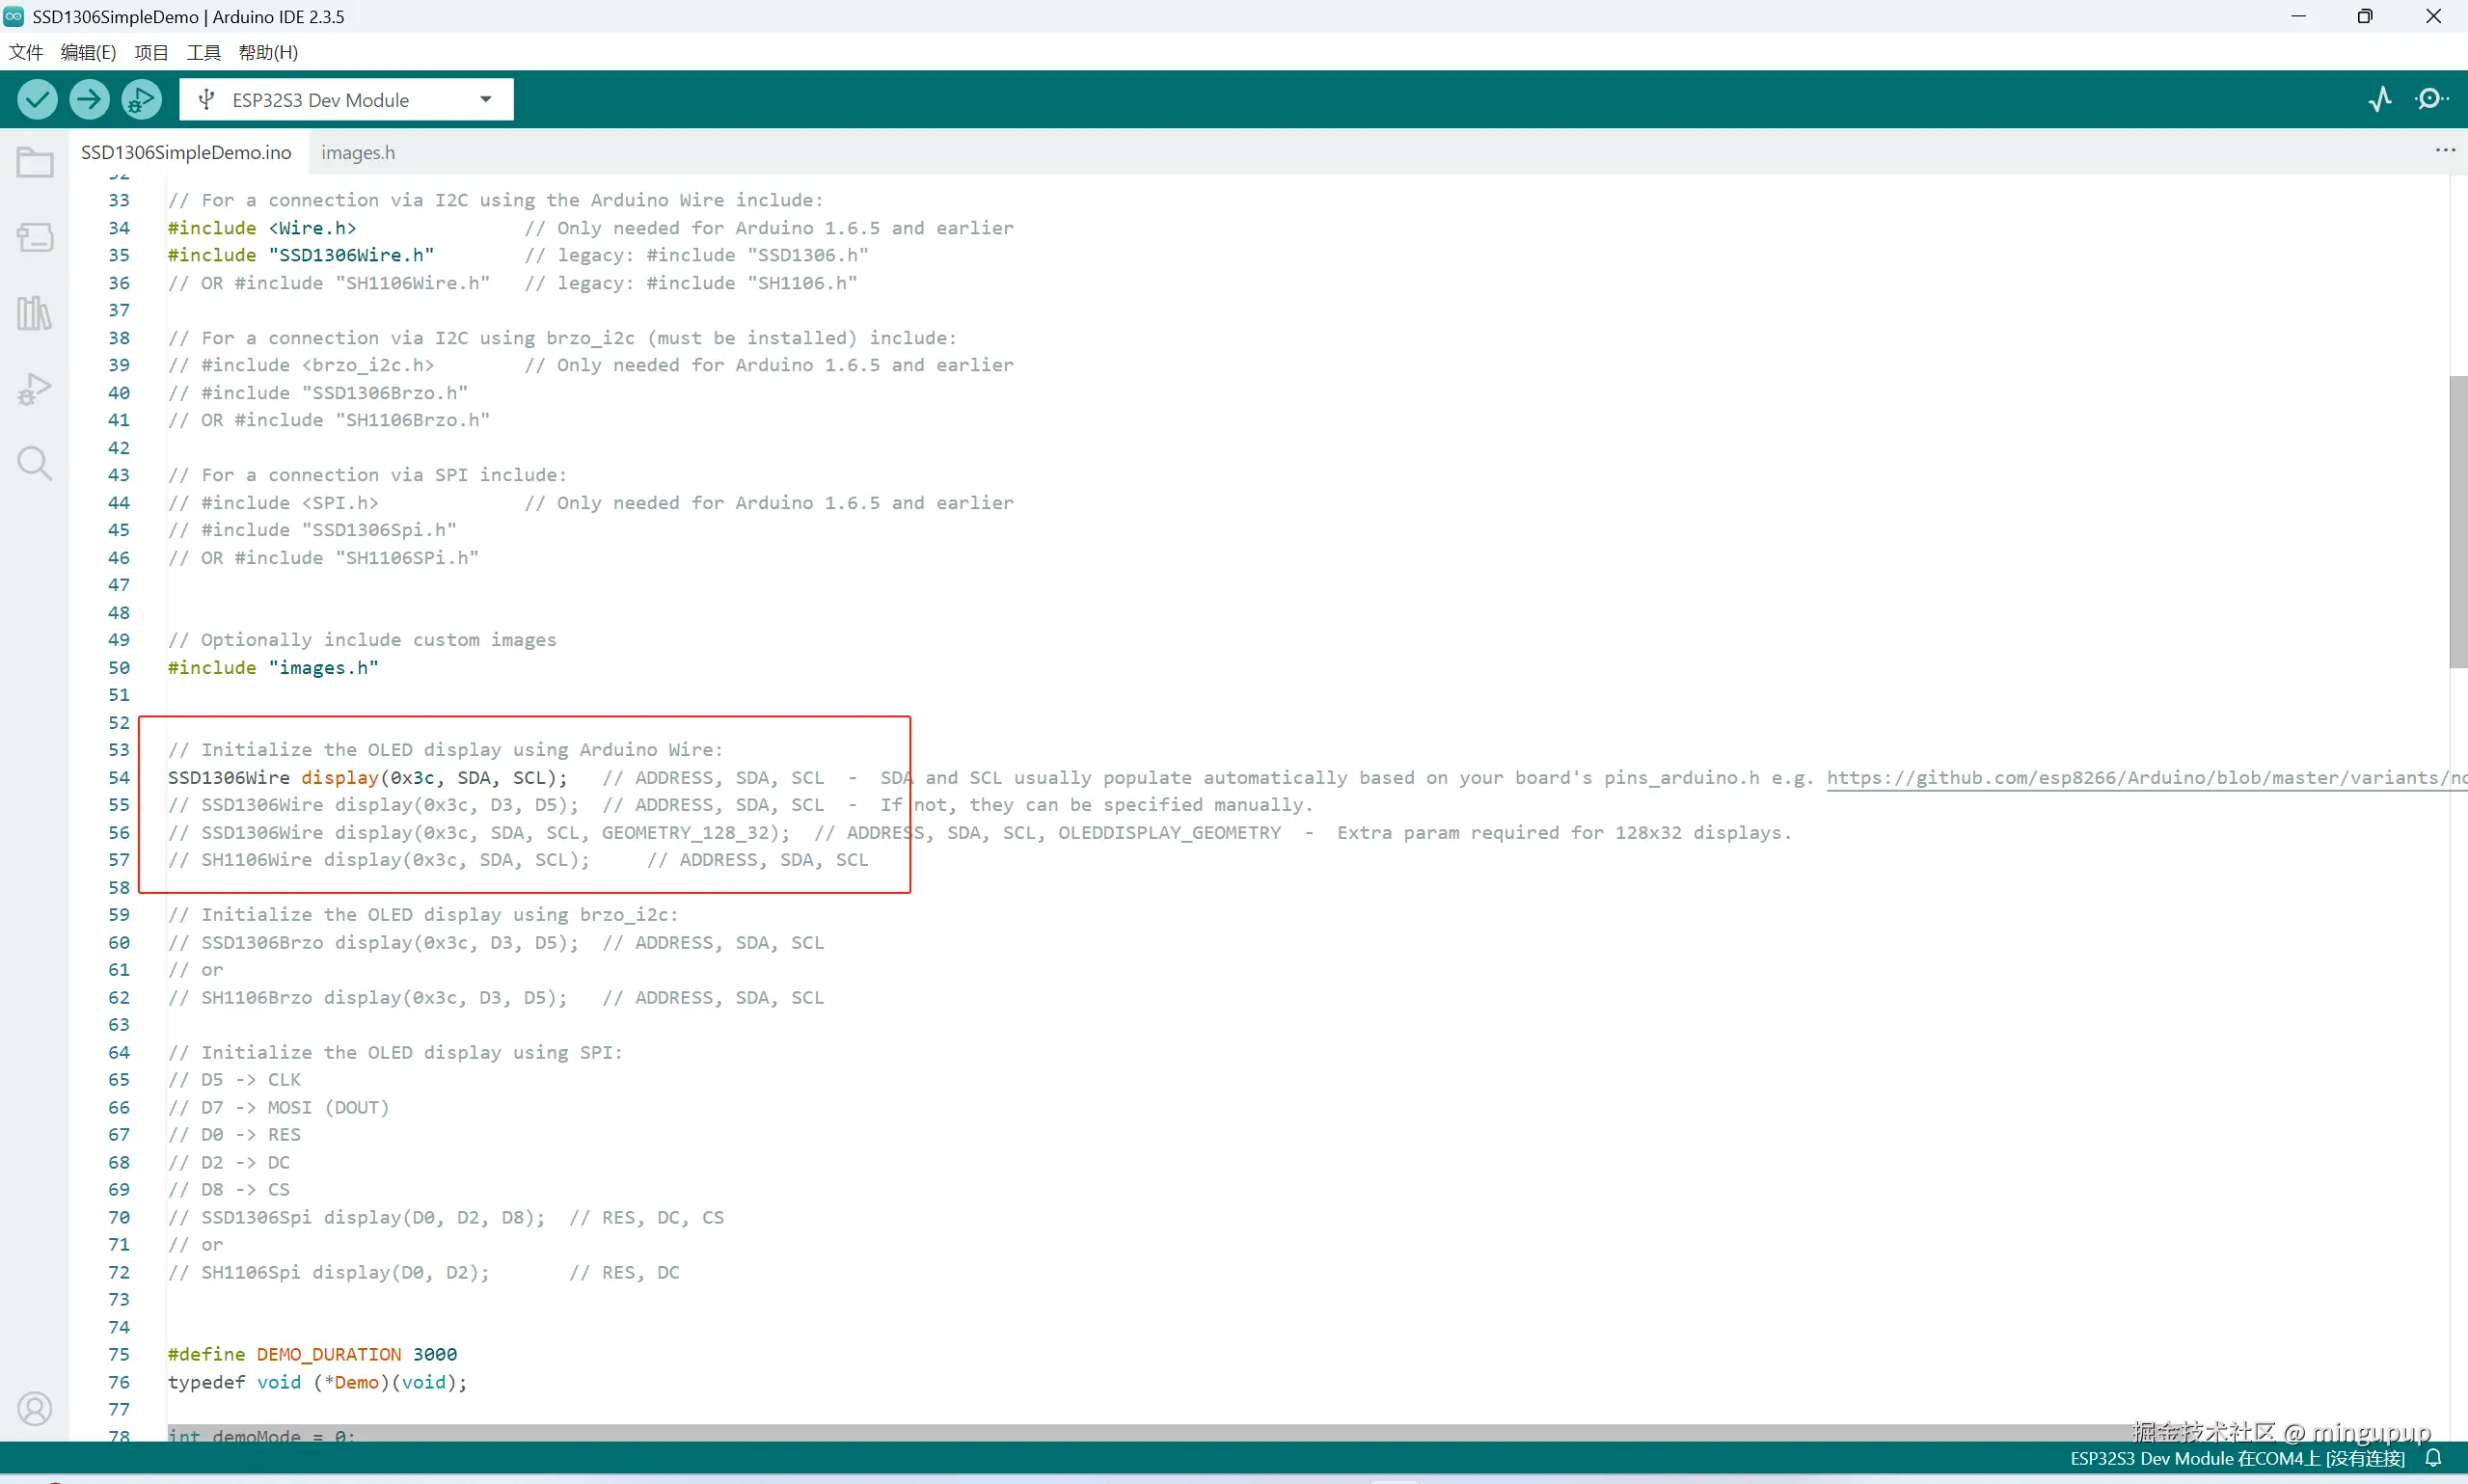
修改为:
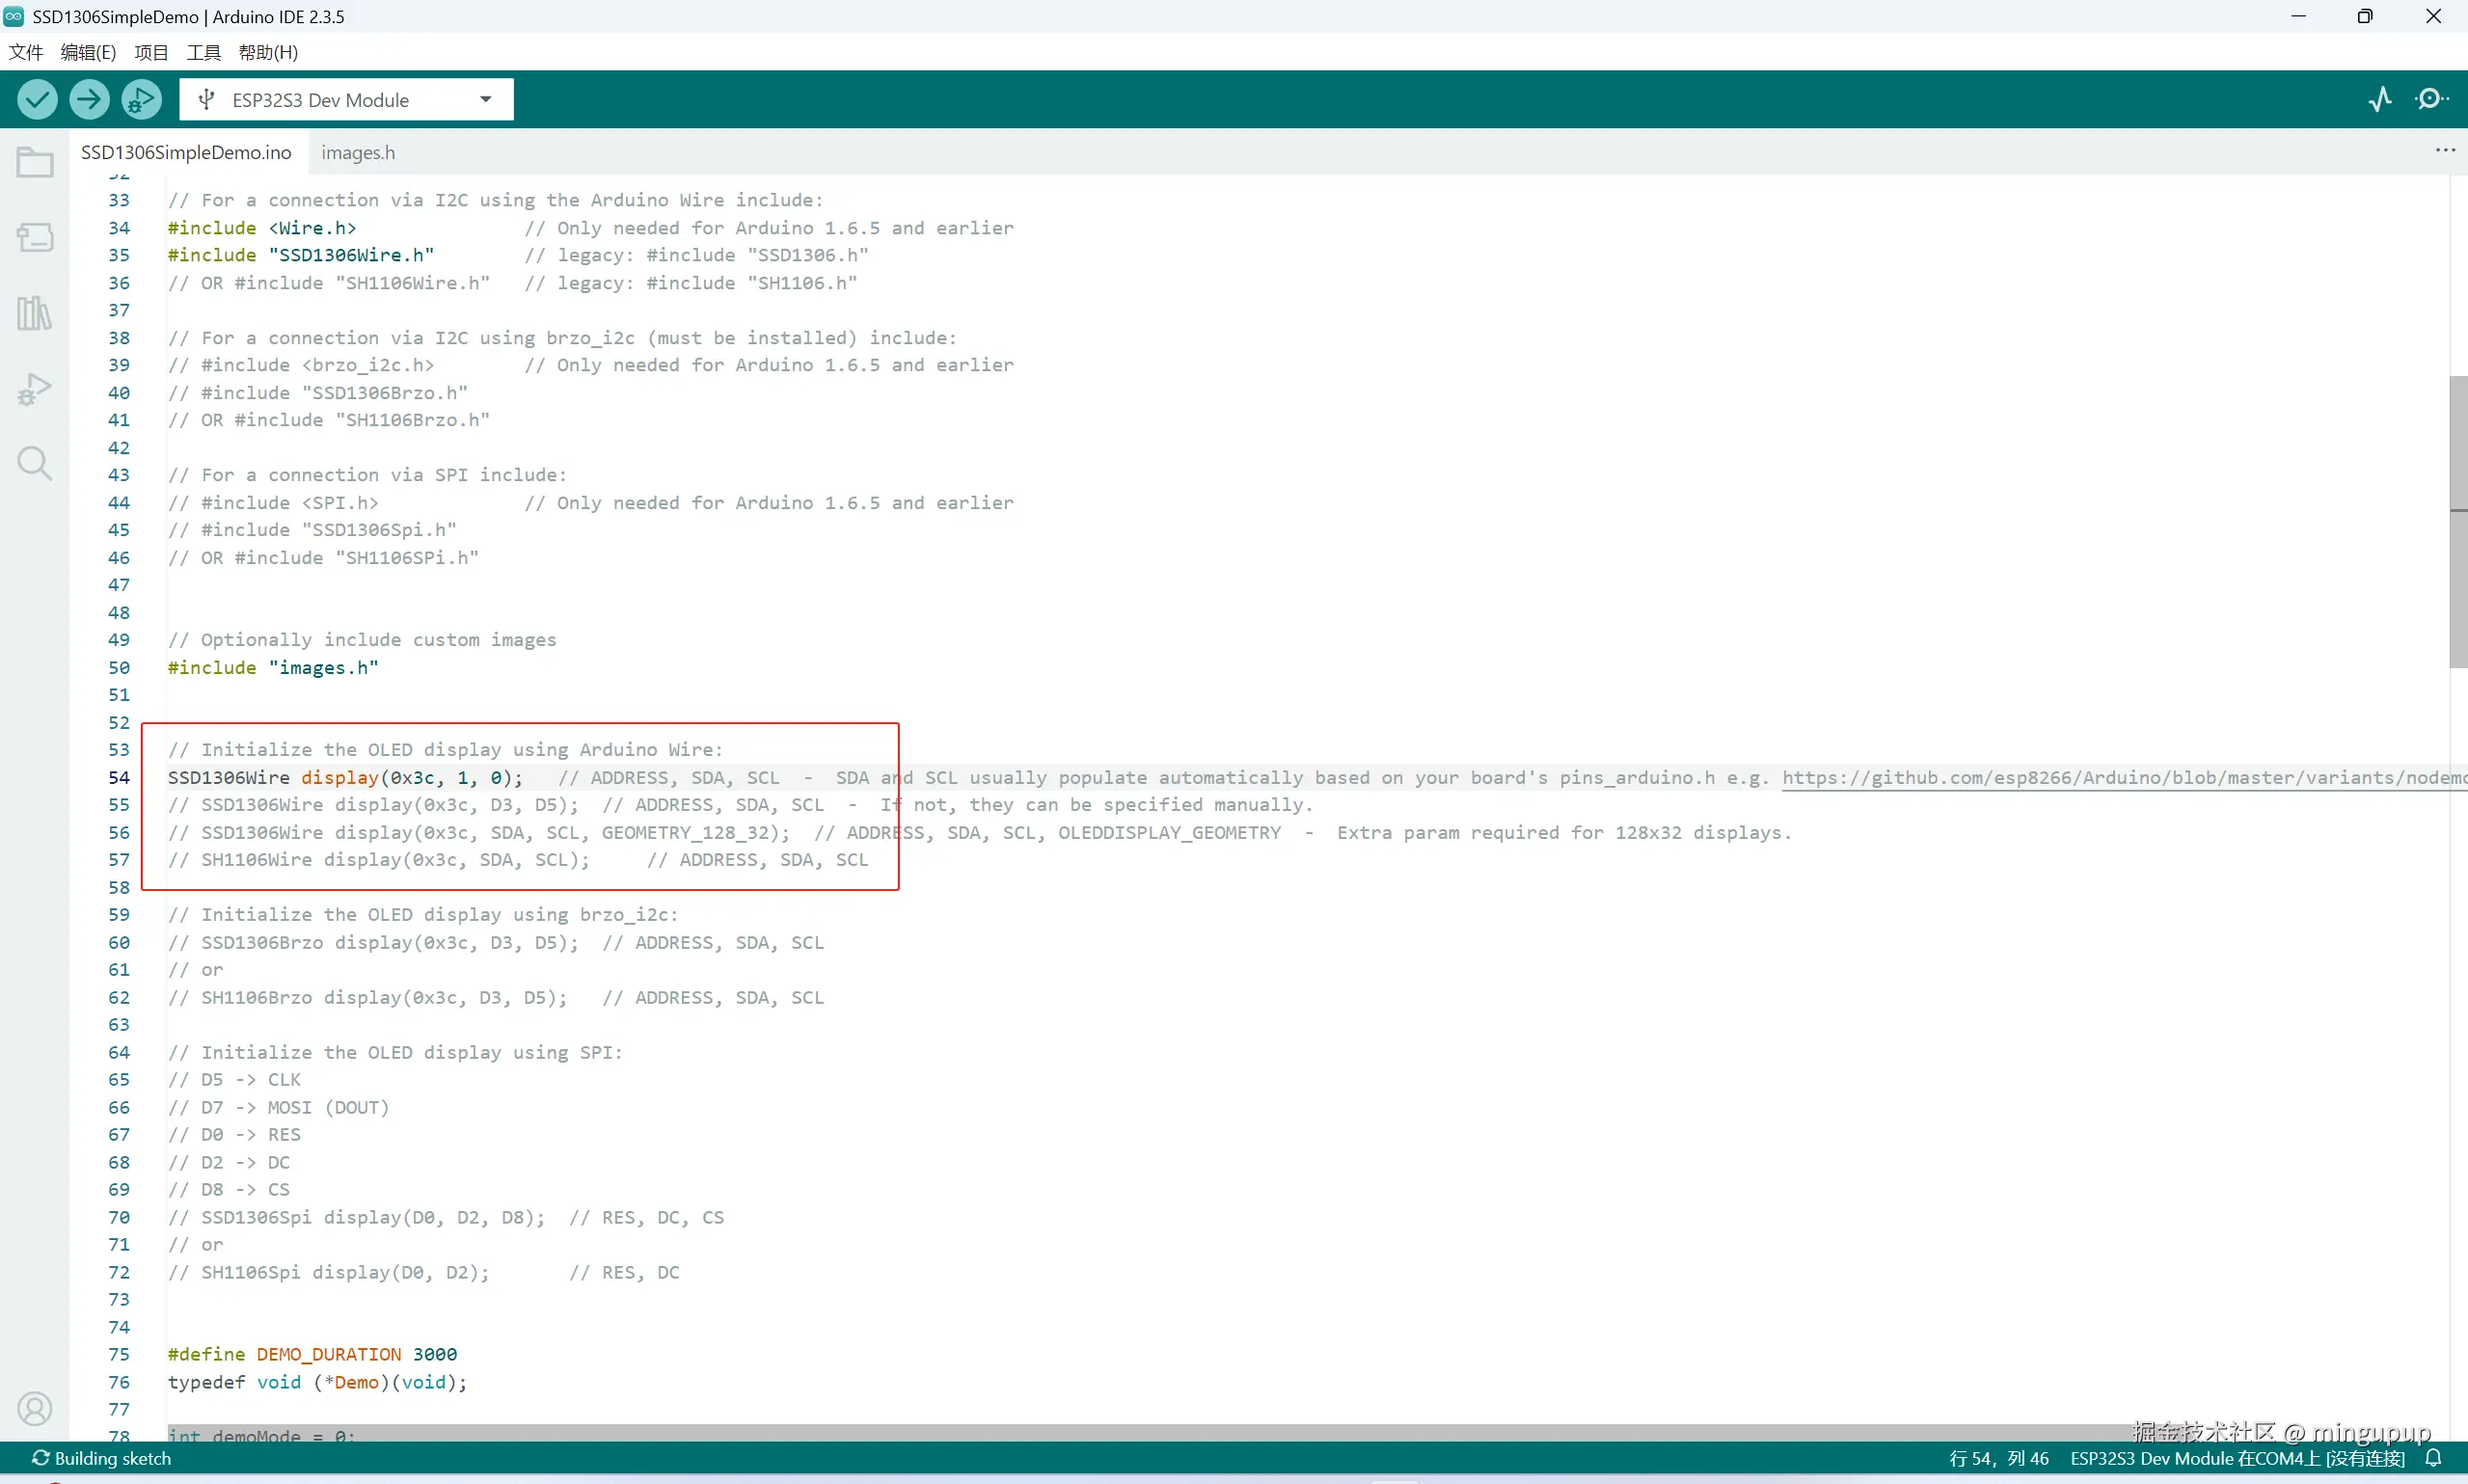
也就是修改为SDA与SCL连接的引脚。
现在编译并烧录一下查看效果:
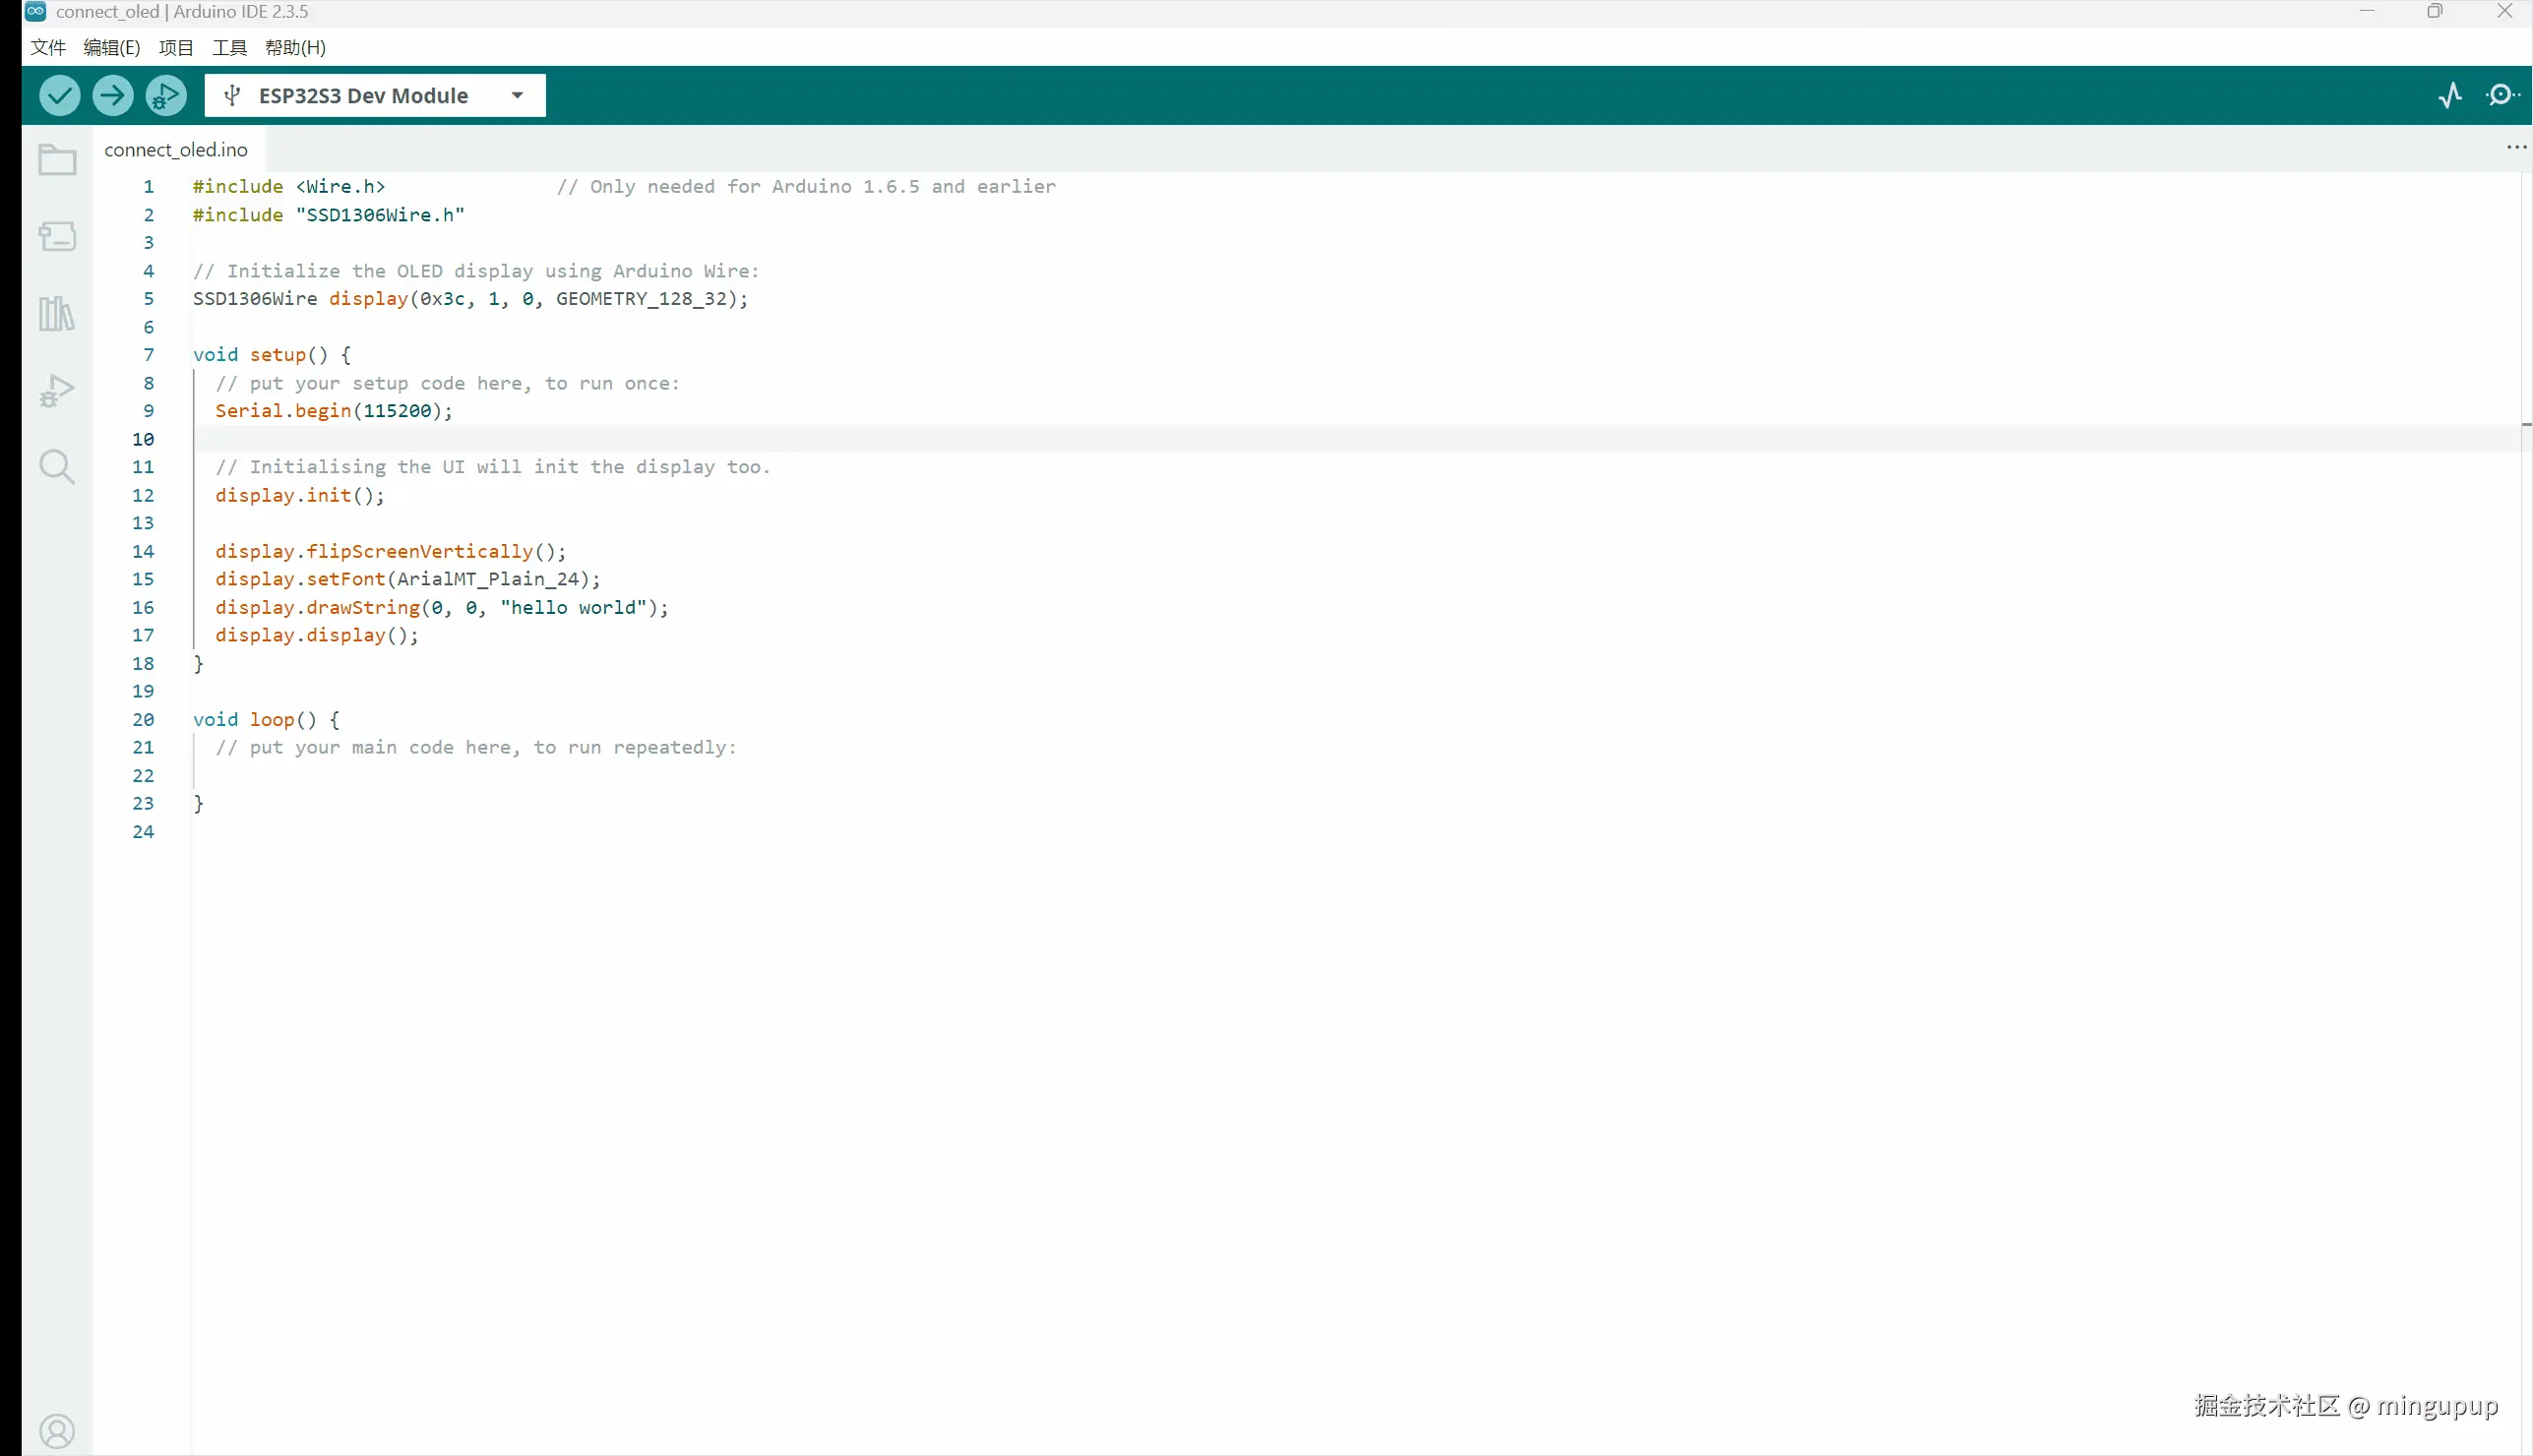
显示英文
现在成功运行了示例,就可以看示例进行学习。
先学着显示英文。
新建一个项目:
arduino
#include <Wire.h> // Only needed for Arduino 1.6.5 and earlier
#include "SSD1306Wire.h"
// Initialize the OLED display using Arduino Wire:
SSD1306Wire display(0x3c, 1, 0, GEOMETRY_128_32);
void setup() {
// put your setup code here, to run once:
Serial.begin(115200);
// Initialising the UI will init the display too.
display.init();
display.flipScreenVertically();
display.setFont(ArialMT_Plain_24);
display.drawString(0, 0, "hello world");
display.display();
}
void loop() {
}
效果:
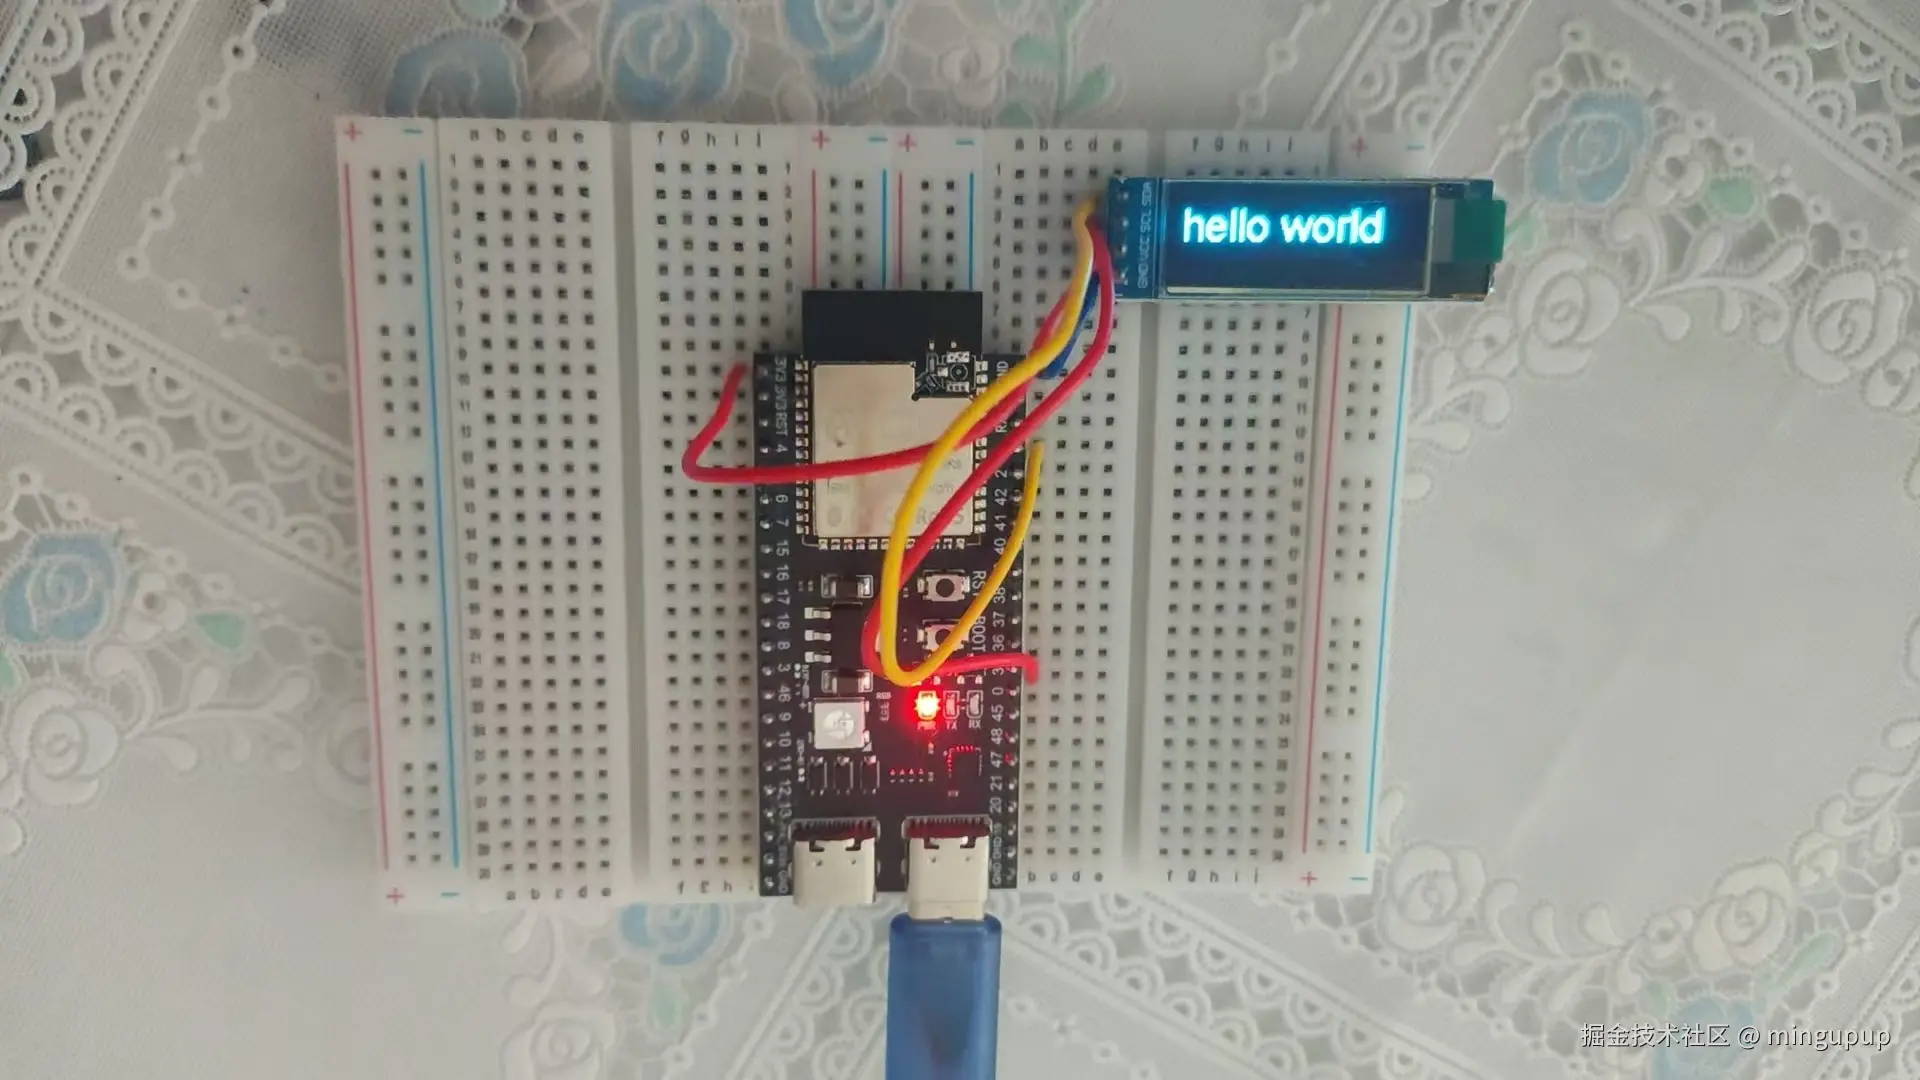
比如现在我想要在显示"hello world"之后从1%到100%循环显示。
代码如下:
scss
#include <Wire.h>               // Only needed for Arduino 1.5 and earlier
#include "SSD1306Wire.h"
// Initialize the OLED display
SSD1306Wire display(0x3c, 1, 0, GEOMETRY_128_32);
bool showHelloWorld = true;     // 初始显示 "hello world"
int percentage = 1;             // 从 1% 开始
unsigned long lastUpdate = 0;   // 记录上次更新时间
const int updateInterval = 200; // 更新间隔(毫秒)
void setup() {
  Serial.begin(115200);
  display.init();
  display.flipScreenVertically();
  display.setFont(ArialMT_Plain_24);

  // 初始显示 "hello world"
  display.clear();
  display.drawString(0, 0, "hello world");
  display.display();

  lastUpdate = millis(); // 记录初始时间
}
void loop() {
  unsigned long currentTime = millis();

  // 如果当前时间 - 上次更新时间 >= 间隔时间,则更新显示
  if (currentTime - lastUpdate >= updateInterval) {
    lastUpdate = currentTime;

    if (showHelloWorld) {
      // 显示 "hello world" 后,切换到百分比显示
      showHelloWorld = false;
    } else {
      // 更新百分比(1% ~ 100%)
      display.clear();
      display.drawString(0, 0, String(percentage) + "%");
      display.display();

      percentage++;
      if (percentage > 100) {
        percentage = 1; // 循环显示
      }
    }
  }
}
滚动播放
代码如下:
arduino
#include <Wire.h>
#include "SSD1306Wire.h"
SSD1306Wire display(0x3c, 1, 0, GEOMETRY_128_32);
String longText = "This is a very long text that cannot fit on the screen at once. It will scroll horizontally.";
int textPosition = 0;  // 当前滚动位置
unsigned long lastScrollTime = 0;
const int scrollDelay = 150;  // 滚动速度(毫秒)
void setup() {
  Serial.begin(115200);
  display.init();
  display.flipScreenVertically();
  display.setFont(ArialMT_Plain_10);  // 使用小字体以显示更多内容
}
void loop() {
  if (millis() - lastScrollTime >= scrollDelay) {
    lastScrollTime = millis();

    display.clear();
    display.drawString(-textPosition, 0, longText);  // 负坐标实现左滚动
    display.display();

    textPosition++;  // 每次移动1像素

    // 如果文本完全滚出屏幕,重置位置
    if (textPosition > display.getStringWidth(longText)) {
      textPosition = 0;
    }
  }
}
显示中文
显示中文需要安装额外的库:U8g2lib
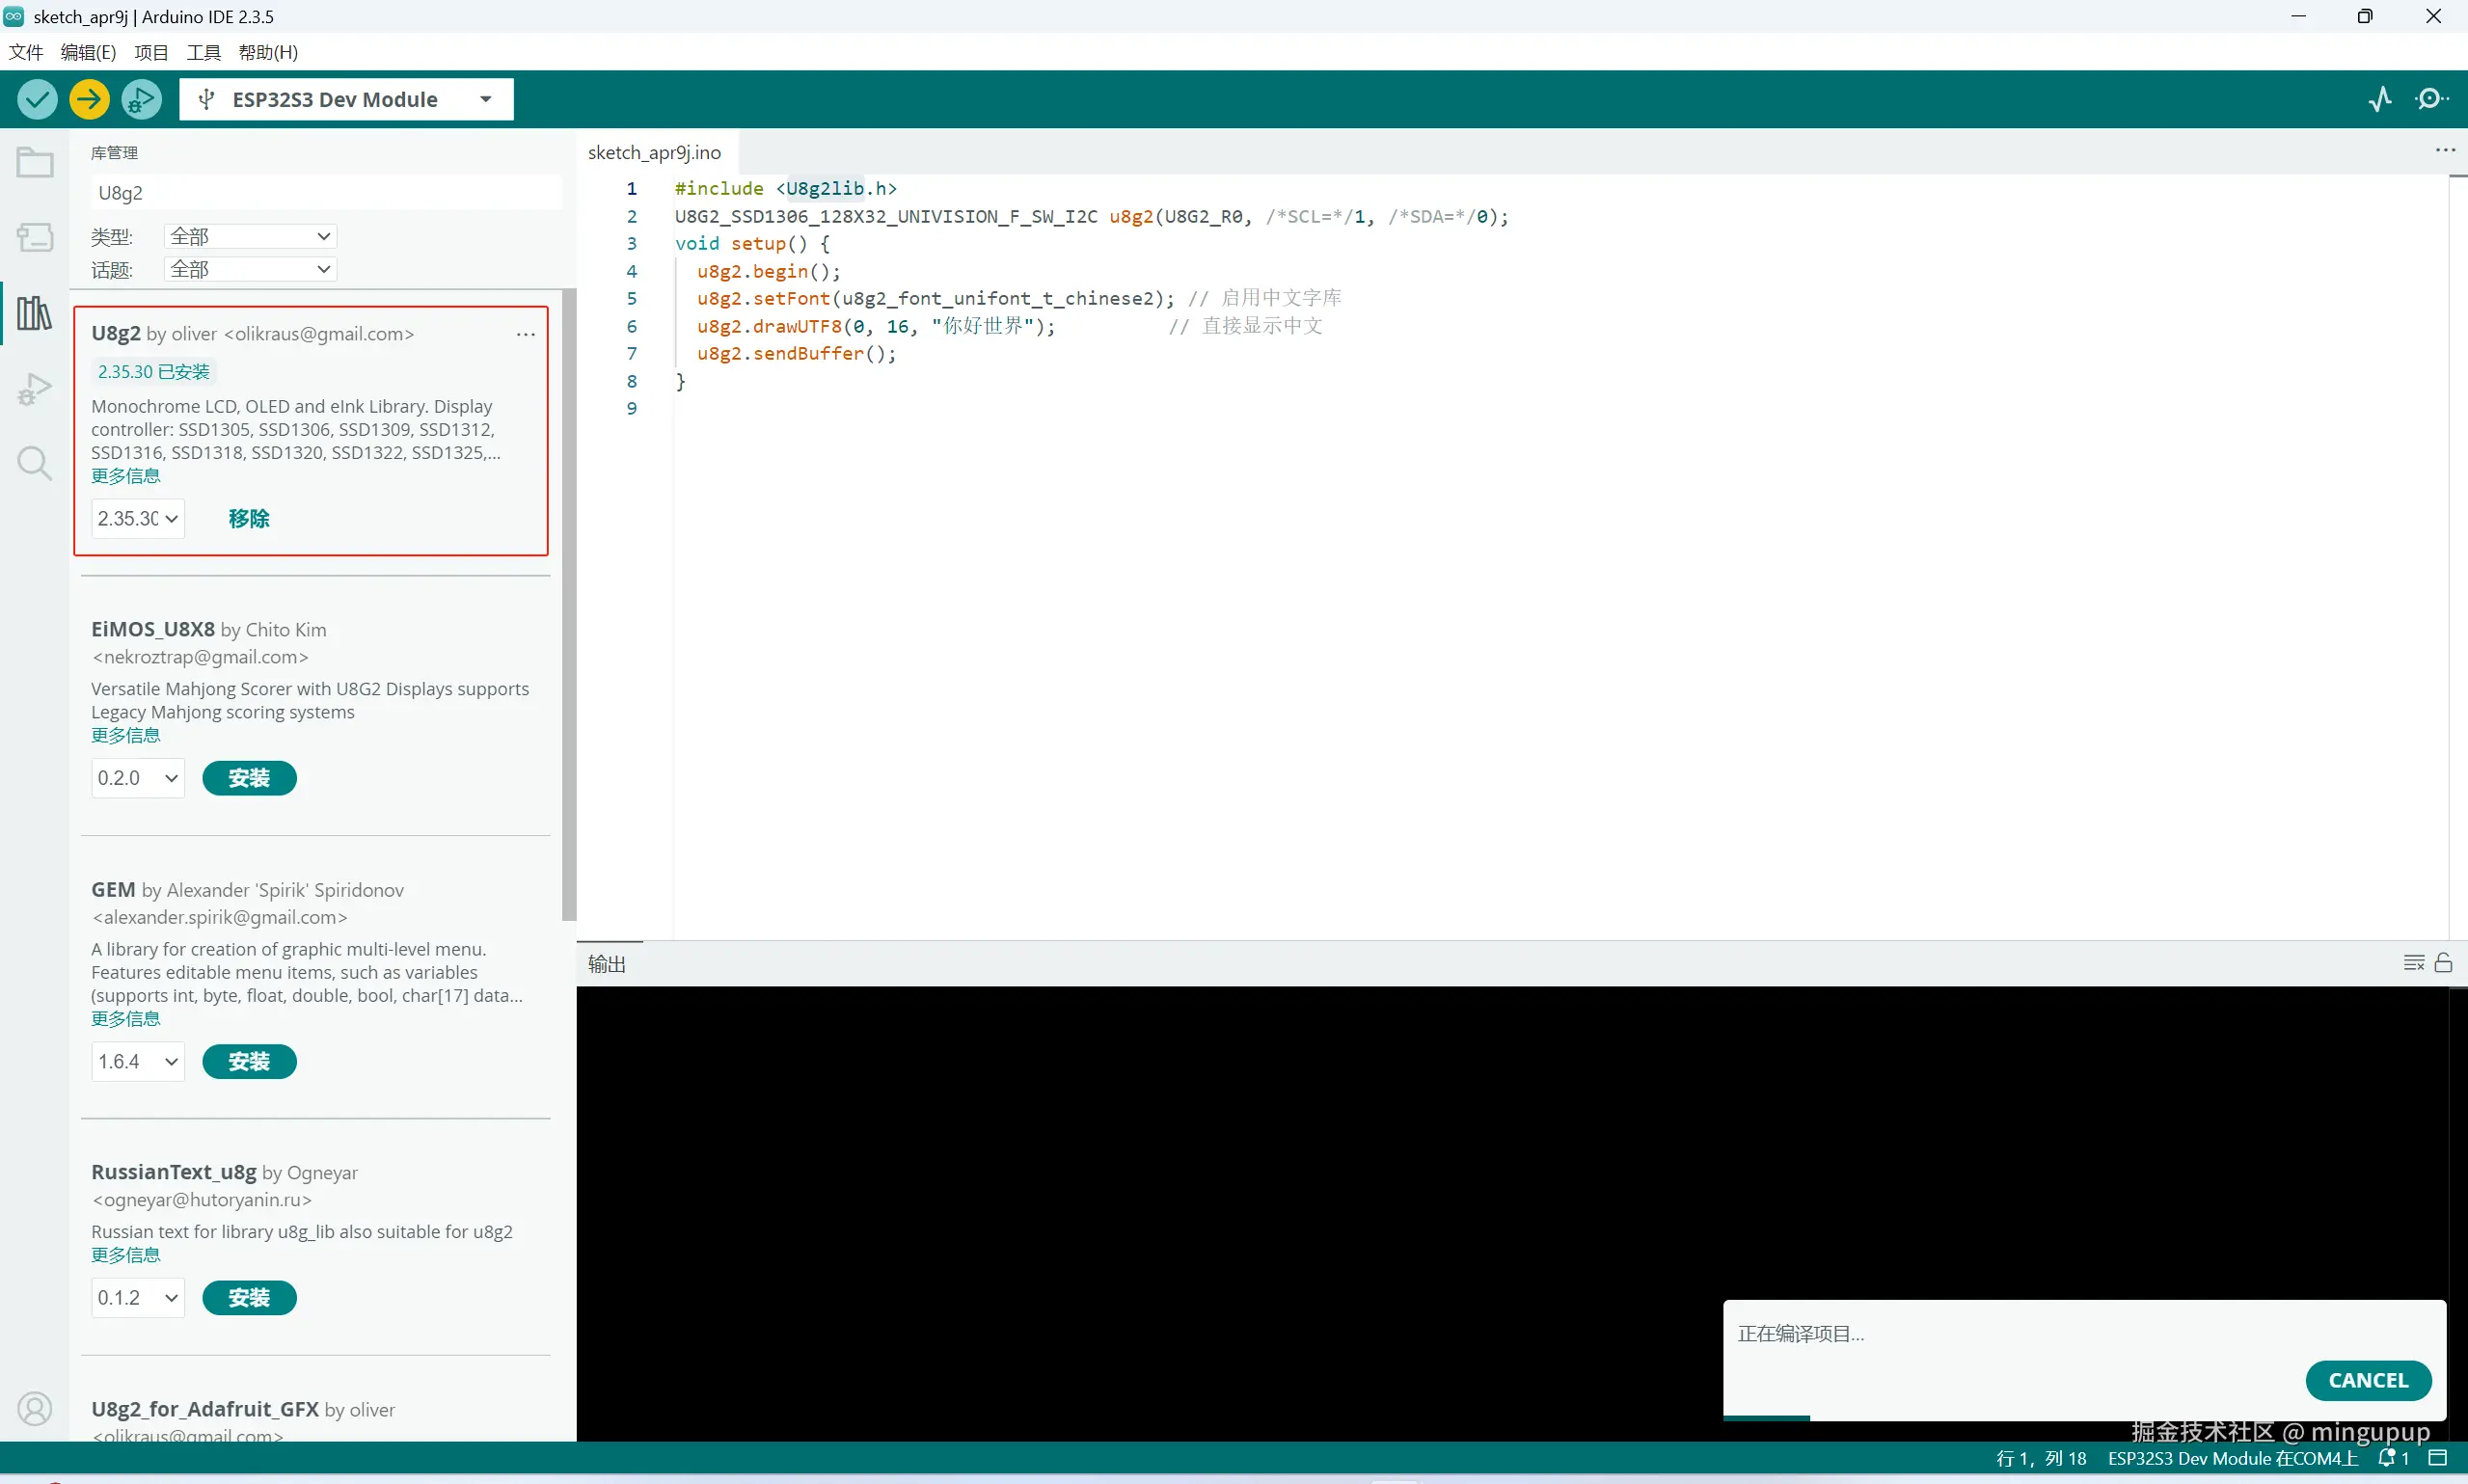
代码:
arduino
#include <U8g2lib.h>
U8G2_SSD1306_128X32_UNIVISION_F_SW_I2C u8g2(U8G2_R0, /*SCL=*/0, /*SDA=*/1, /*RESET=*/U8X8_PIN_NONE);
void setup() {
  Serial.begin(115200);
  u8g2.begin();
  u8g2.enableUTF8Print();
  // 使用更紧凑的字体
  u8g2.setFont(u8g2_font_unifont_t_chinese2);
  // 获取字体实际高度并计算安全 Y 坐标
  uint8_t fontHeight = u8g2.getMaxCharHeight();
  uint8_t yPos = 32 - fontHeight; // 确保底部不超出屏幕
  Serial.print("Font Height: ");
  Serial.println(fontHeight);
  Serial.print("Y Position: ");
  Serial.println(yPos);
  u8g2.clearBuffer();
  u8g2.setCursor(0, yPos);
  u8g2.print("你好世界");
  u8g2.sendBuffer();

  delay(100);
}
void loop() {}
效果:
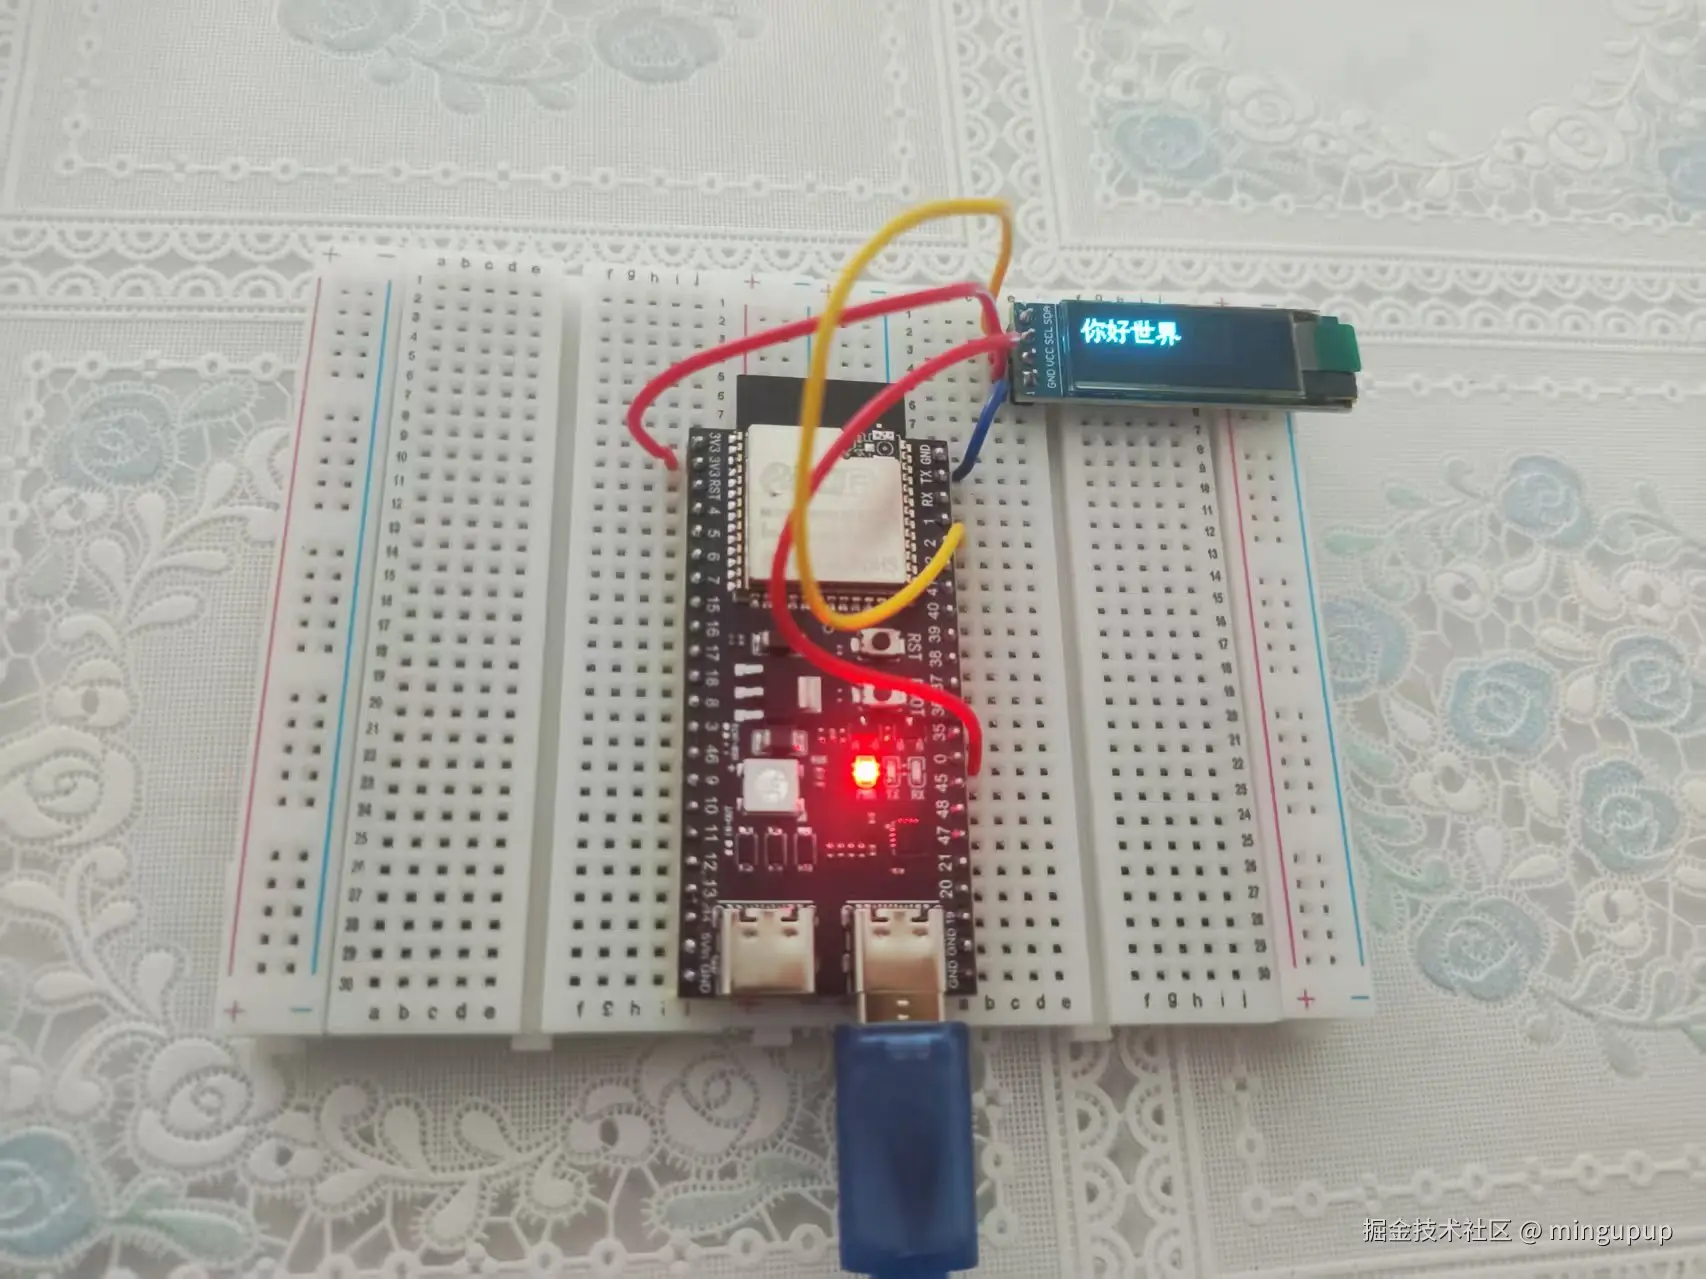
水平滚动显示中文
代码如下:
arduino
#include <U8g2lib.h>
U8G2_SSD1306_128X32_UNIVISION_F_SW_I2C u8g2(U8G2_R0, /*SCL=*/0, /*SDA=*/1, /*RESET=*/U8X8_PIN_NONE);
// 要显示的中文长文本
const char *longText = "这是一个很长很长的中文文本,它将会在屏幕上水平滚动显示。";
// 滚动相关的变量
int16_t textWidth;        // 文本的实际宽度
int16_t scrollPosition = 0; // 当前滚动位置
unsigned long lastScrollTime = 0; // 上次滚动的时间
const unsigned long scrollInterval = 5; // 滚动间隔时间(毫秒)
uint8_t fontHeight;          //字体高度
uint8_t yPos;              //Y坐标
void setup() {
  Serial.begin(115200);
  u8g2.begin();
  u8g2.enableUTF8Print();
  // 使用更紧凑的字体,适合中文显示
  u8g2.setFont(u8g2_font_unifont_t_chinese2);
  // 获取字体实际高度并计算安全 Y 坐标
  fontHeight = u8g2.getMaxCharHeight();
  yPos = 32 - fontHeight; // 确保底部不超出屏幕
  Serial.print("Font Height: ");
  Serial.println(fontHeight);
  Serial.print("Y Position: ");
  Serial.println(yPos);
  // 计算文本的实际宽度
  textWidth = u8g2.getUTF8Width(longText);
  Serial.print("Text Width: ");
  Serial.println(textWidth);
}
void loop() {
  // 获取当前时间
  unsigned long currentTime = millis();
  // 检查是否需要滚动
  if (currentTime - lastScrollTime >= scrollInterval) {
    lastScrollTime = currentTime;
    // 更新滚动位置
    scrollPosition+=5;
    // 如果滚动到文本末尾,则重置滚动位置
    if (scrollPosition > textWidth) {
      scrollPosition = 0;
    }
    // 重绘屏幕
    drawScrollingText();
  }
}
// 绘制滚动文本的函数
void drawScrollingText() {
  u8g2.clearBuffer();
  // 计算绘制文本的起始 X 坐标(负数表示文本部分在屏幕外)
  int16_t xPos = 0 - scrollPosition;
  // 绘制文本
  u8g2.setCursor(xPos, yPos);
  u8g2.print(longText);
  u8g2.sendBuffer();
}
感觉效果不是很好。
中文分段显示
代码如下:
ini
#include <U8g2lib.h>
// 定义屏幕对象(根据实际使用的屏幕和接口调整构造函数参数)
U8G2_SSD1306_128X32_UNIVISION_F_SW_I2C u8g2(U8G2_R0, /*SCL=*/0, /*SDA=*/1, /*RESET=*/U8X8_PIN_NONE);
// 要显示的中文长文本
const char *longText = "这是一个很长很长的中文文本,它将会在屏幕上分段显示。";
// 显示相关的全局变量
uint8_t fontHeight; // 字体高度
uint8_t yPos; // 文本在 Y 轴上的显示位置
const uint16_t screenWidth = 128; // OLED 屏幕宽度
// 控制段显示的时间(毫秒)
const unsigned long segmentDisplayTime = 2000; // 每段显示 2 秒
unsigned long lastSegmentChange = 0; // 上一次切换段的时间
// 记录当前段在文本中的起始字节索引
int currentSegmentStart = 0;
// 用于测量 UTF-8 字符占用的字节数
int utf8CharBytes(char c) {
if ((c & 0x80) == 0) return 1; // ASCII
else if ((c & 0xE0) == 0xC0) return 2; // 2 字节
else if ((c & 0xF0) == 0xE0) return 3; // 3 字节
else if ((c & 0xF8) == 0xF0) return 4; // 4 字节
return 1; // 默认返回 1
}
// 根据当前起始位置和屏幕宽度,计算下一段的起始位置
int getNextSegmentStart(const char* text, int startIndex, int maxWidth) {
int bytePos = startIndex;
int segmentWidth = 0;
int lastValidPos = bytePos;
// 累计添加字符直到超出屏幕宽度
while (text[bytePos] != '\0') {
int charBytes = utf8CharBytes(text[bytePos]);
char buffer[10] = {0}; // 临时存放单个字符,最多支持 4 字节编码
for (int i = 0; i < charBytes; i++) {
buffer[i] = text[bytePos + i];
}
int charWidth = u8g2.getUTF8Width(buffer);
// 如果再加当前字符会超过最大宽度,则退出循环
if (segmentWidth + charWidth > maxWidth) {
break;
}
segmentWidth += charWidth;
lastValidPos = bytePos + charBytes;
bytePos += charBytes;
}
// 如果到达文本末尾,则下次从0开始
if (text[bytePos] == '\0') {
return 0;
}
return lastValidPos;
}
// 将当前段字符提取并显示到屏幕
void drawSegment(const char* text, int startIndex) {
u8g2.clearBuffer();
char segment[256] = {0}; // 存放本段字符串,注意长度根据文本长度自行调整
int bytePos = startIndex;
int segmentWidth = 0;
int segIndex = 0;
// 逐字符读取,直到累计宽度超过屏幕宽度或遇到字符串终结符
while (text[bytePos] != '\0') {
int charBytes = utf8CharBytes(text[bytePos]);
char temp[10] = {0};
for (int i = 0; i < charBytes; i++) {
temp[i] = text[bytePos + i];
}
int charWidth = u8g2.getUTF8Width(temp);
// 达到最大宽度就停止
if (segmentWidth + charWidth > screenWidth) {
break;
}
// 将当前字符复制到 segment 中
for (int i = 0; i < charBytes; i++) {
segment[segIndex++] = text[bytePos + i];
}
segmentWidth += charWidth;
bytePos += charBytes;
}
segment[segIndex] = '\0'; // 末尾加上结束符
// 将段文本显示在屏幕上,Y 坐标保持之前计算的值
u8g2.setCursor(0, yPos);
u8g2.print(segment);
u8g2.sendBuffer();
}
void setup() {
Serial.begin(115200);
u8g2.begin();
u8g2.enableUTF8Print();
// 设置支持中文的字体
u8g2.setFont(u8g2_font_wqy12_t_gb2312);
// 获取字体高度,计算 Y 坐标(确保文字不会超出屏幕)
fontHeight = u8g2.getMaxCharHeight();
//yPos = 32 - fontHeight; // OLED 分辨率 128x32
yPos = (32 + fontHeight) / 2;
Serial.print("Font Height: ");
Serial.println(fontHeight);
// 如果需要第一次直接显示部分文本,可在 setup 中调用 drawSegment()
drawSegment(longText, currentSegmentStart);
}
void loop() {
unsigned long currentTime = millis();
// 判断是否到达切换段的时间
if (currentTime - lastSegmentChange >= segmentDisplayTime) {
lastSegmentChange = currentTime;
// 根据当前段计算下段起始位置
currentSegmentStart = getNextSegmentStart(longText, currentSegmentStart, screenWidth);
}
drawSegment(longText, currentSegmentStart);
}