文章目录
学习视频地址
项目地址
数据集的下载
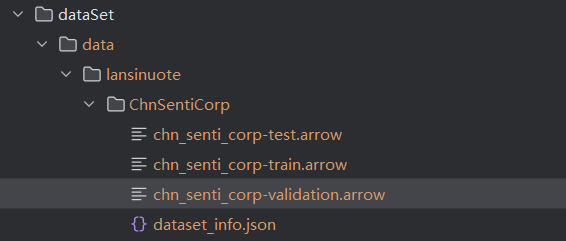
下载数据集,然后进行文件调整,调整结果如下图所示
# 将数据集下载到本地
from datasets import load_dataset
# 在代码开头添加(抑制所有警告)
import os
os.environ["HF_HUB_DISABLE_SYMLINKS_WARNING"] = "1"

# 指定数据集名称和本地缓存路径
dataset_name = "lansinuote/ChnSentiCorp"
cache_dir = "data/lansinuote/ChnSentiCorp"

# 下载并加载数据集
# 下载并加载数据集(添加信任远程代码参数)
dataset = load_dataset(
    dataset_name,
    cache_dir=cache_dir,
    trust_remote_code=True  # 关键修复参数
)

print(f"数据集已下载到:{cache_dir}")
print("\n第一条数据样例:")
print(dataset["train"][0])
测试:加载数据,并在终端输出
from datasets import Dataset
# 取出测试集
test_set = Dataset.from_file("./data/lansinuote/ChnSentiCorp/chn_senti_corp-test.arrow")
print(test_set)
# 查看数据
for data in test_set:
    print(data)

# 取出训练集
train_set = Dataset.from_file(".//data/lansinuote/ChnSentiCorp/chn_senti_corp-train.arrow")
print(train_set)
# 查看数据
for data in train_set:
    print(data)
# 取出验证集
validation_set = Dataset.from_file("./data/lansinuote/ChnSentiCorp/chn_senti_corp-validation.arrow")
print(validation_set)
# 查看数据
for data in validation_set:
    print(data)
模型微调的基本概念与流程
微调指在预训练模型的基础上,通过进一步的训练来适应特定的下游任务 。BERT模型通过预训练来学习语言的通用模式,然后通过微调来适应特定任务,如情感分析、命名实体识别等。微调过程中,通常冻结BERT的预训练层,只训练与下游任务相关的层。
加载数据集
情感分析任务的数据通常包括文本及其对应的情感标签。使用HuggingFace的datasets库可以轻松地加载和处理数据集。
from datasets import load_dataset
#加载数据集
dataset =load_dataset('csv',data_files="data/chnsenticorp.csv")
#查看数据集信息
print(dataset)
数据集格式
Hugging Face 的 datasets 库支持多种数据集格式,如 CSV、JSON、TFRecord 等。在本案例中,使用CSV格式,CSV文件应包含两列:一列是文本数据,另一列是情感标签。
数据集信息
加载数据集后,可以查看数据集的基本信息,如数据集大小、字段名称等。
制作Dataset
加载数据集后,需要对其进行处理以适应模型的输入格式。这包括数据清洗、格式转换等操作。
from torch.utils.data import Dataset, DataLoader
from datasets import Dataset as HFDataset  # 重命名以避免冲突

class MyDataset(Dataset):
    def __init__(self, split):
        # 根据 split 确定 .arrow 文件路径
        if split == "train":
            data_path = "./data/train/chn_senti_corp-train.arrow"
        elif split == "test":
            data_path = "./data/test/chn_senti_corp-test.arrow"
        elif split == "validation":
            data_path = "./data/validation/chn_senti_corp-validation.arrow"
        else:
            raise ValueError("无效的数据集类型,必须是 train/test/validation")

        # 加载 Hugging Face Dataset
        self.hf_dataset = HFDataset.from_file(data_path)

    def __len__(self):
        return len(self.hf_dataset)

    def __getitem__(self, idx):
        text = self.hf_dataset[idx]["text"]
        label = self.hf_dataset[idx]["label"]
        return text, label


if __name__ == "__main__":
    # 创建 PyTorch Dataset
    dataset = MyDataset("train")

    # 使用 DataLoader 进行迭代
    dataloader = DataLoader(dataset, batch_size=1, shuffle=True)

    for data in dataloader:
        print(data)
数据集字段
在制作Dataset时,需定义数据集的字段。在本案例中,定义了两个字段:text(文本)和labe1(情感标签)。每个字段都需要与模型的输入和输出匹配。
数据集信息
制作Dataset后,可以通过dataset.info等方法查看其大小、字段名称等信息,以确保数据集的正确性和完整性。
vocab字典操作
词汇表
BERT模型使用词汇表(vocab)将文本转换为模型可以理解的输入格式。词汇表包含所有模型已知的单词及其对应的索引。确保数据集中的所有文本都能找到对应的词汇索引是至关重要的。
from transformers import BertTokenizer
model_name="./model/google-bert/bert-base-chinese/models--google-bert--bert-base-chinese/snapshots/c30a6ed22ab4564dc1e3b2ecbf6e766b0611a33f"
# 加载字典和分词工具
# token=BertTokenizer.from_pretrained("bert-base-chinese") # 在线方式
token=BertTokenizer.from_pretrained(model_name) # 使用本地方式(推荐)
'''
sents=["酒店太旧,大堂感觉像三星级水平,在郑州这样的酒店水平,绝对算不上四星水平,早餐走了两圈也没有可以吃的,太差",
       "已经贴完了,又给小区的妈妈买了一套,值得推荐",
       "屏幕大,本子薄。自带数字小键盘,比较少见,声音很好,usb接口也很多,性价比高",
       "酒店环境很好,就是有一点偏僻,交通不是很好,不太好打车,酒店应该想办法解决一下"]
'''
# 批量编码句子
'''
out=token.batch_encode_plus(
    batch_text_or_text_pairs=[sents[0],sents[1]],
    add_special_tokens=True,
    truncation=True, # 句子过长截断
    padding="max_length", # 一律补零到max_length长度
    max_length=30,
    return_tensors=None, # 默认返回list
    return_attention_mask=True, # 返回 attention_mask
    return_token_type_ids=False,
    return_special_tokens_mask=True, #特殊符号标识
    return_length=True, # 返回length,标识长度
    )
print(out)
'''
# 获取字典
# vocab=token.get_vocab()
# print(vocab)
# print("阳" in vocab)
# 添加新词
token.add_tokens(new_tokens=["阳光","大志"])
# 重新获取字典
vocab=token.get_vocab()
print("大志" in vocab)
# 添加新的特殊符号 本质键值对
# token.add_special_tokens({"eos_token":"[EOS]"})
# 编码新句子
res=token.encode(
    text="阳光照在大地上[EOS]",
    text_pair=None,
    truncation=True,
    padding="longest",
    longest=10,
    add_special_tokens=True,
    return_tensors=None
    )
print(res)
# 解码为源字符串
print(token.decode(res))
文本转换
使用tokenizer将文本分割成词汇表中的单词,并转换为相应的索引l。此步骤需要确保文本长度、特殊字符处理等都与BERT模型的预训练设置相一致。
下游任务模型设计
在微调BERT模型之前,需要设计一个适应情感分析任务的下游模型结构。通常包括一个或多个全连接层,用于将BERT输出的特征向量转换为分类结果。
# 加载预训练模型
from transformers import BertModel
import torch

# 定义训练设备
DEVICE=torch.device('cuda' if torch.cuda.is_available() else 'cpu')
model_dir="./model/google-bert/bert-base-chinese/models--google-bert--bert-base-chinese/snapshots/c30a6ed22ab4564dc1e3b2ecbf6e766b0611a33f"
pretrained=BertModel.from_pretrained(model_dir).to(DEVICE)
# 定义下游任务模型(将主干网络所提取的特征进行分类)
class Model(torch.nn.Module):
    def __init__(self):
        super().__init__()
        # 上一步 最后输出全连接模型 Linear(in_features=768, out_features=768, bias=True)
        self.fc = torch.nn.Linear(768, 2)
    # 训练推理
    def forward(self,input_ids,attention_mask,token_type_ids):
        # 上游任务不参与训练 不参与反向传播,只参与前向训练
       with torch.no_grad():
           out=pretrained(input_ids=input_ids,attention_mask=attention_mask,token_type_ids=token_type_ids)
       # 下游任务参与训练
       output=self.fc(out.last_hidden_state[:0])
       output=output.softmax(dim=1)
       return output;
模型训练与保存
数据加载
使用DataLoader实现批量数据加载。DataLoader自动处理数据的批处理和随机打乱,确保训l练的高效性和数据的多样性。
优化器
Adamw是一种适用于BERT模型的优化器,结合了Adam和权重衰减的特点,能够有效地防止过拟合。
训练循环
训练循环包含前向传播(forward pass)、损失计算(loss calculation)、反向传播(backward pass)、参数更新(parameter update)等步骤。每个epoch 都会对整个数据集进行一次遍历,更新模型参数。通常训练过程中会跟踪损失值的变化,以判断模型的收敛情况。
import torch
from torch.optim import AdamW

from MyData import MyDataset
from torch.utils.data import DataLoader
from Net import Model
from transformers import BertTokenizer

# 定义训练设备
DEVICE = torch.device('cuda' if torch.cuda.is_available() else 'cpu')
EPOCHS = 100
BATCH_SIZE = 32
# 加载分词器
model_name = "./model/google-bert/bert-base-chinese/models--google-bert--bert-base-chinese/snapshots/c30a6ed22ab4564dc1e3b2ecbf6e766b0611a33f"
token = BertTokenizer.from_pretrained(model_name)


# 自定义数据编码处理函数
def collate_fn(data):
    sente = [i[0] for i in data]
    label = [i[1] for i in data]
    # 编码处理
    data = token.batch_encode_plus(
        batch_text_or_text_pairs=sente,
        truncation=True,
        padding='max_length',
        max_length=300,
        return_tensors='pt',
        return_length=True
    )
    input_ids = data['input_ids']
    attention_mask = data['attention_mask']
    token_type_ids = data['token_type_ids']
    labels = torch.LongTensor(label)

    return input_ids, attention_mask, token_type_ids, labels


# 创建数据集
train_dataset = MyDataset("train")
# 创建数据加载器
train_loader = DataLoader(
    dataset=train_dataset,
    batch_size=BATCH_SIZE,
    shuffle=True,
    drop_last=True,
    collate_fn=collate_fn  # 只传递函数名
)

if __name__ == '__main__':
    # start train
    print(DEVICE)
    model = Model().to(DEVICE)
    # 优化器
    optimizer = AdamW(model.parameters(), lr=5e-4)
    # loss function
    loss_func=torch.nn.CrossEntropyLoss()
    # train model
    model.train()
    for epoch in range(EPOCHS):
        for i,(input_ids, attention_mask, token_type_ids, labels) in enumerate(train_loader):
            # 将数据放到DEVICE上
            input_ids, attention_mask, token_type_ids, labels=input_ids.to(DEVICE), attention_mask.to(DEVICE), token_type_ids.to(DEVICE), labels.to(DEVICE)
            # 执行前向计算
            out=model(input_ids, attention_mask, token_type_ids)
            # print("Output shape:", out.shape)
            # 计算损失
            loss = loss_func(out, labels)
            # 优化模型 清空权重 反向传播 更新梯度
            optimizer.zero_grad()
            loss.backward()
            optimizer.step()

            # 每5个查看一下
            if i%20==0:
                out=out.argmax(dim=1)
                #  准确率
                acc=(out==labels).sum()/len(labels)
                print(epoch,i,loss.item(),acc)
        # 保存模型参数
        torch.save(model.state_dict(),f"./params/{epoch}bert.pt")
        print(epoch)
最终效果评估与测试
在模型训练完成后,需要评估其在测试集上的性能。通常使用准确率、精确率、召回率和F1分数等指标来衡量模型的效果。
准确率是衡量分类模型整体性能的基本指标,计算公式为正确分类的样本数量除以总样本数量。
精确率、召回率是分类模型的另两个重要指标,分别反映模型在正例预测上的精确性和召回能力。
F1分数是精确率和召回率的调和平均数,通常用于不均衡数据集的评估。
import torch
from Net import Model
from transformers import BertTokenizer
from MyData import MyDataset
from torch.utils.data import DataLoader

DEVICE = torch.device("cuda:0" if torch.cuda.is_available() else "cpu")
# 加载分词器
model_name = "./model/google-bert/bert-base-chinese/models--google-bert--bert-base-chinese/snapshots/c30a6ed22ab4564dc1e3b2ecbf6e766b0611a33f"
token = BertTokenizer.from_pretrained(model_name)

# 自定义数据编码处理函数
def collate_fn(data):
    sente = [i[0] for i in data]
    label = [i[1] for i in data]
    # 编码处理
    data = token.batch_encode_plus(
        batch_text_or_text_pairs=sente,
        truncation=True,
        padding='max_length',
        max_length=300,
        return_tensors='pt',
        return_length=True
    )
    input_ids = data['input_ids']
    attention_mask = data['attention_mask']
    token_type_ids = data['token_type_ids']
    labels = torch.LongTensor(label)

    return input_ids, attention_mask, token_type_ids, labels

# 创建数据集
train_dataset = MyDataset("train")
# 创建数据加载器
train_loader = DataLoader(
    dataset=train_dataset,
    batch_size=32,
    shuffle=True,
    drop_last=True,
    collate_fn=collate_fn  # 只传递函数名
)

if __name__ == "__main__":
    acc=0
    total=0
    model=Model().to(DEVICE)
    model.load_state_dict(torch.load("./params/1bert.pt"))
    model.eval() # 开启模型测试模式
    for i, (input_ids, attention_mask, token_type_ids, labels) in enumerate(train_loader):
        # 将数据放到DEVICE上
        input_ids, attention_mask, token_type_ids, labels = input_ids.to(DEVICE), attention_mask.to(
            DEVICE), token_type_ids.to(DEVICE), labels.to(DEVICE)
        # 执行前向计算
        out = model(input_ids, attention_mask, token_type_ids)

        out=out.argmax(dim=1)
        acc+=(out==labels).sum().item()
        total+=len(labels)
    print(acc/total)
模型加载和测试
import torch
from transformers import BertTokenizer

from emotionAnalysis.Net import Model

DEVICE = torch.device('cuda' if torch.cuda.is_available() else 'cpu')
print(DEVICE)

values=["负向评价","正向评价"]
model=Model().to(DEVICE)

# 加载分词器
model_name = "./model/google-bert/bert-base-chinese/models--google-bert--bert-base-chinese/snapshots/c30a6ed22ab4564dc1e3b2ecbf6e766b0611a33f"
token = BertTokenizer.from_pretrained(model_name)

# 自定义数据编码处理函数
def collate_fn(data):
    sente = [data]
    # 编码处理
    data = token.batch_encode_plus(
        batch_text_or_text_pairs=sente,
        truncation=True,
        padding='max_length',
        max_length=300,
        return_tensors='pt',
        return_length=True
    )
    input_ids = data['input_ids']
    attention_mask = data['attention_mask']
    token_type_ids = data['token_type_ids']

    return input_ids, attention_mask, token_type_ids

def test():
    model.load_state_dict(torch.load("./params/1bert.pt"))
    model.eval()
    while True:
        data=input("请输入测试数据(输入'q'退出):")
        if data=="q":
            print("测试结束")
            break
        input_ids, attention_mask, token_type_ids=collate_fn(data)
        input_ids, attention_mask, token_type_ids=input_ids.to(DEVICE), attention_mask.to(DEVICE), token_type_ids.to(DEVICE)

        with torch.no_grad():
            out=model(input_ids=input_ids, attention_mask=attention_mask, token_type_ids=token_type_ids)
            out=out.argmax(dim=1)
            print("模型判定:",values[out],"\n")

if __name__=="__main__":
    test()
cuda
请输入测试数据(输入'q'退出):酒店服务不错,环境也还比较好!特别是好像是48楼那个旋转餐厅满有特色,至少我觉得住这个酒店还满满意!
模型判定: 正向评价

请输入测试数据(输入'q'退出):东西很差
模型判定: 负向评价

请输入测试数据(输入'q'退出):东西很好,我要再买一个
模型判定: 正向评价

请输入测试数据(输入'q'退出):我真的会谢谢你
模型判定: 正向评价

请输入测试数据(输入'q'退出):真的很栓Q
模型判定: 负向评价