使用 Yjs 实现简单协同文档编辑器
1. 引言
在当今数字化协作的时代,实时协同编辑已经成为许多团队工作流程中不可或缺的一部分。无论是文档编辑、代码协作还是设计工具,实时协同功能都能显著提高团队效率。本文将介绍如何使用 Yjs 这一强大的框架来实现一个简单而功能完备的协同文档编辑器。
2. Yjs 简介
Yjs 是一个用于构建协同应用的高性能 CRDT(冲突解决数据类型)实现库。它提供了一套强大的 API,使开发者能够轻松地在应用中添加实时协作功能,而无需担心数据一致性和冲突解决等复杂问题。
2.1 CRDT 原理简述
CRDT(Conflict-free Replicated Data Type,无冲突复制数据类型)是一种特殊的数据结构,它允许多个用户同时修改共享数据,而不需要复杂的锁机制或中央协调。CRDT 的核心思想是:
- 所有操作都是可交换的(操作顺序不影响最终结果)
- 所有操作都是幂等的(重复应用同一操作不会改变结果)
- 所有操作最终会收敛到相同的状态
Yjs 实现了一种称为 YATA 的 CRDT 算法,它专为文本编辑优化,能够高效处理插入、删除等操作,并确保所有客户端最终达到一致的状态。
3. 项目架构
我们的协同文档编辑器基于以下技术栈构建:
- 前端框架:React
- 协同编辑:Yjs
- 网络传输:y-websocket
- 构建工具:Vite
项目结构如下:
bash
├── index.html
├── package.json
├── src/
│ ├── App.jsx # 应用主组件
│ ├── App.css # 应用样式
│ ├── main.jsx # 应用入口
│ ├── index.css # 全局样式
│ └── components/ # 组件目录
│ ├── CollaborativeEditor.jsx # 协同编辑器组件
│ ├── CollaborativeEditor.css # 编辑器样式
│ ├── UserInfo.jsx # 用户信息组件
│ └── UserInfo.css # 用户信息样式
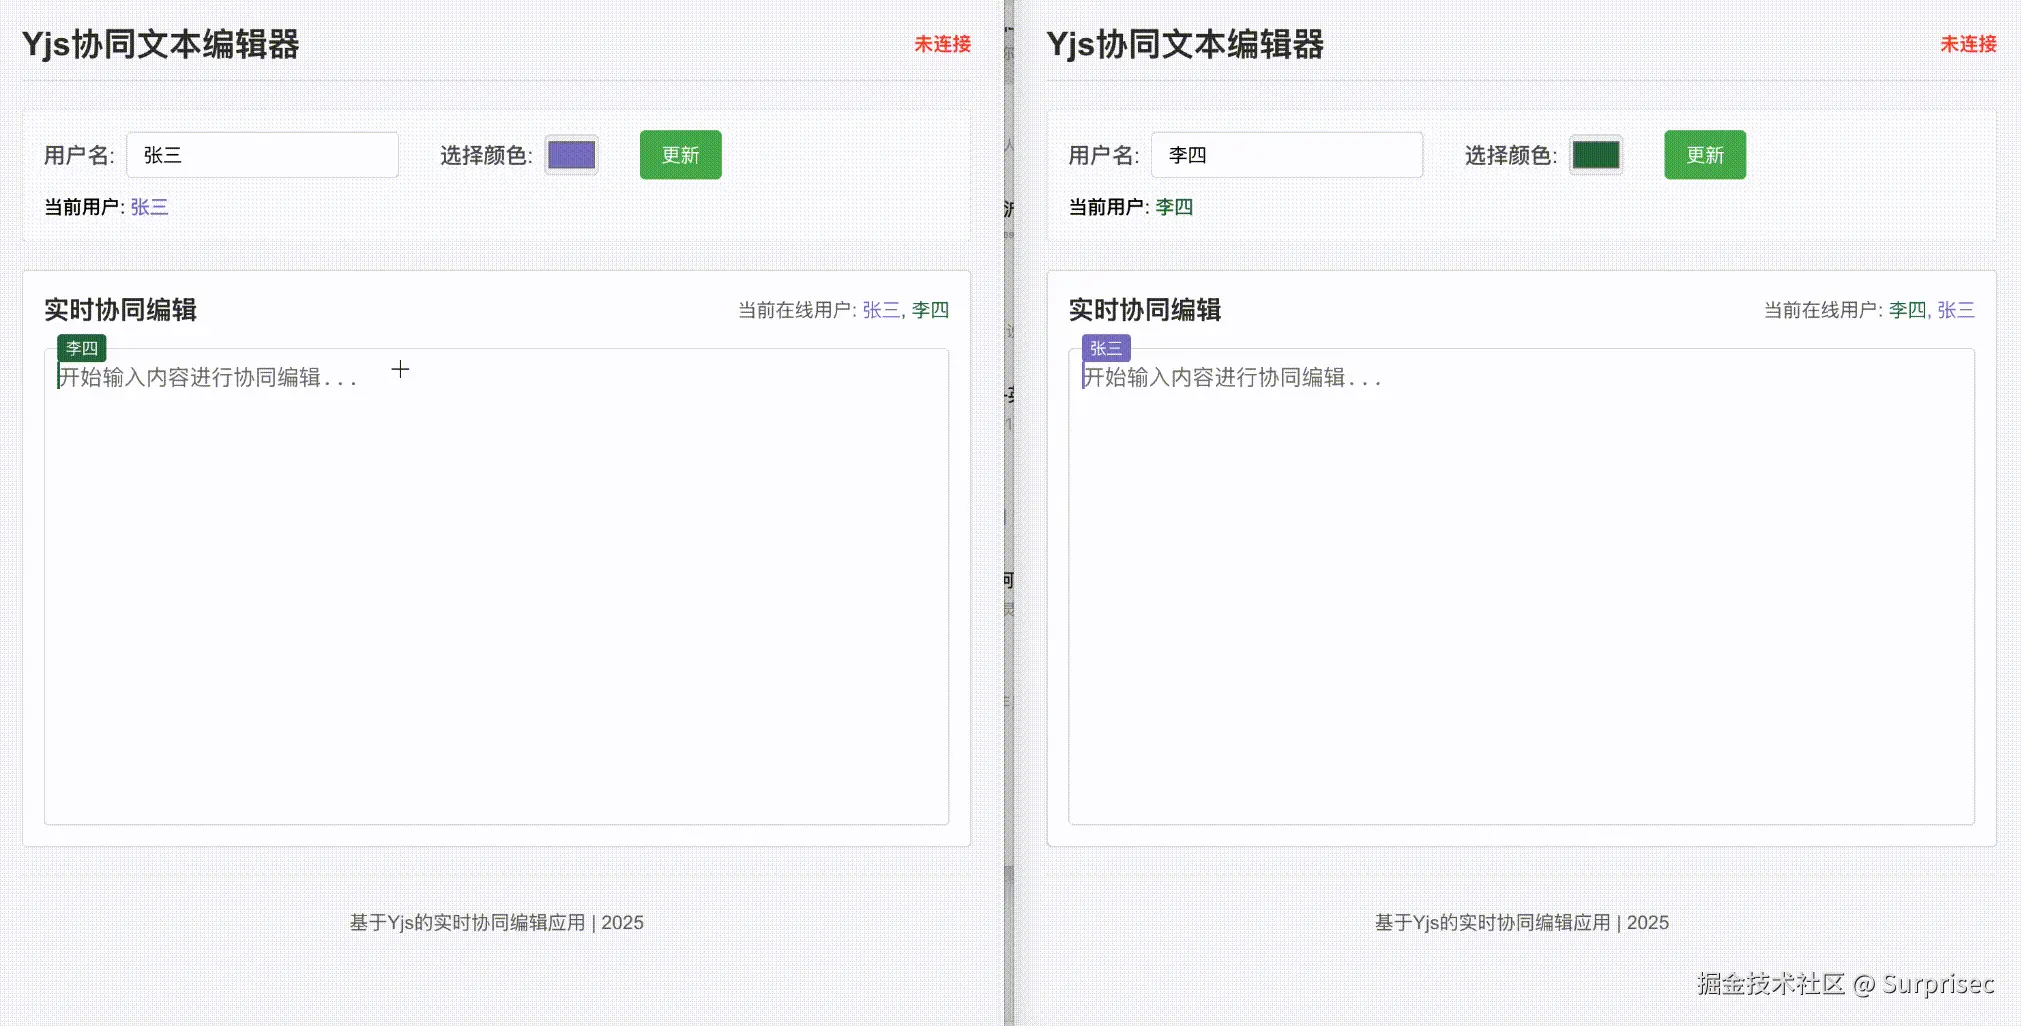
└── vite.config.js # Vite配置实现效果如下:
4. 核心功能实现
4.1 初始化 Yjs 文档和 WebSocket 连接
安装相关依赖
js
npm install y-websocket yjs首先,我们需要在应用中初始化 Yjs 文档和 WebSocket 连接,连接之前需要先安装启动官方的y-websocket-server,官方地址
js
npm install @y/websocket-server
HOST=localhost PORT=1234 npx y-websocket
这里就算没有启动成功,同一浏览器也是可以进行协同编辑的,因为 Yjs 会优先通过浏览器的同 host 共享状态的方式进行通信,然后才是网络通信。
jsx
import React, { useEffect, useState } from "react";
import * as Y from "yjs";
import { WebsocketProvider } from "y-websocket";
import CollaborativeEditor from "./components/CollaborativeEditor";
import UserInfo from "./components/UserInfo";
import "./App.css";

function App() {
  const [doc, setDoc] = useState(null);
  const [provider, setProvider] = useState(null);
  const [username, setUsername] = useState("");
  const [isConnected, setIsConnected] = useState(false);
  const [userColor, setUserColor] = useState(
    "#" + Math.floor(Math.random() * 16777215).toString(16)
  );

  // 初始化Yjs文档和WebSocket连接
  useEffect(() => {
    // 创建新的Yjs文档
    const yDoc = new Y.Doc();

    // 连接到WebSocket服务器
    // 使用y-websocket提供的内存模式,不需要后端服务器
    const wsProvider = new WebsocketProvider(
      "ws://localhost:1234", // 使用Yjs官方提供的公共演示服务器
      "frontend-yjs-demo-room",
      yDoc
    );

    // 设置连接状态监听
    wsProvider.on("status", (event) => {
      setIsConnected(event.status === "connected");
    });

    // 保存文档和提供者的引用
    setDoc(yDoc);
    setProvider(wsProvider);

    // 组件卸载时断开连接
    return () => {
      wsProvider.disconnect();
      yDoc.destroy();
    };
  }, []);

  // 处理用户名变更
  const handleUsernameChange = (newUsername) => {
    setUsername(newUsername);
    if (provider && newUsername) {
      // 设置用户信息到awareness
      provider.awareness.setLocalStateField("user", {
        name: newUsername,
        color: userColor,
      });
    }
  };

  return (
    <div className="app-container">
      <header className="app-header">
        <h1>Yjs协同文本编辑器</h1>
        <div className="connection-status">
          {isConnected ? (
            <span className="connected">已连接</span>
          ) : (
            <span className="disconnected">未连接</span>
          )}
        </div>
      </header>

      <UserInfo
        username={username}
        onUsernameChange={handleUsernameChange}
        userColor={userColor}
        onColorChange={setUserColor}
      />

      <main className="editor-container">
        {doc && provider && username ? (
          <CollaborativeEditor
            doc={doc}
            provider={provider}
            username={username}
            userColor={userColor}
          />
        ) : (
          <div className="editor-placeholder">
            <p>请输入您的用户名以开始协同编辑</p>
          </div>
        )}
      </main>

      <footer className="app-footer">
        <p>基于Yjs的实时协同编辑应用 | {new Date().getFullYear()}</p>
      </footer>
    </div>
  );
}

export default App;
这段代码完成了以下工作:
- 创建一个新的 Yjs 文档实例
- 使用 WebsocketProvider 连接到协作服务器
- 监听连接状态变化
- 在组件卸载时清理资源
4.2 用户信息管理
为了在协同编辑中识别不同用户,我们实现了一个用户信息组件(UserInfo.jsx),允许用户设置自己的名称和颜色:
jsx
function UserInfo({ username, onUsernameChange, userColor, onColorChange }) {
  const [inputValue, setInputValue] = useState(username);

  // 处理用户名提交
  const handleSubmit = (e) => {
    e.preventDefault();
    if (inputValue.trim()) {
      onUsernameChange(inputValue.trim());
    }
  };

  // 处理颜色变更
  const handleColorChange = (e) => {
    onColorChange(e.target.value);
  };

  return (
    <div className="user-info-container">
      <form onSubmit={handleSubmit} className="user-form">
        <div className="form-group">
          <label htmlFor="username">用户名:</label>
          <input
            type="text"
            id="username"
            value={inputValue}
            onChange={(e) => setInputValue(e.target.value)}
            placeholder="请输入您的用户名"
            required
          />
        </div>
        <div className="form-group">
          <label htmlFor="userColor">选择颜色:</label>
          <input
            type="color"
            id="userColor"
            value={userColor}
            onChange={handleColorChange}
          />
        </div>
        <button type="submit" className="submit-button">
          {username ? "更新" : "开始编辑"}
        </button>
      </form>
      {username && (
        <div className="current-user-info">
          <span>当前用户: </span>
          <span style={{ color: userColor }}>{username}</span>
        </div>
      )}
    </div>
  );
}
当用户提交信息后,我们将用户信息设置到 Yjs 的 awareness 机制中:
jsx
// 处理用户名变更
const handleUsernameChange = (newUsername) => {
  setUsername(newUsername);
  if (provider && newUsername) {
    // 设置用户信息到awareness
    provider.awareness.setLocalStateField("user", {
      name: newUsername,
      color: userColor,
    });
  }
};
4.3 协同编辑器实现
这里其实可以使用官方提供的y-quill编辑器,我这里做一些简单实现。
协同编辑器的核心实现位于CollaborativeEditor.jsx组件中。这个组件负责:
- 初始化和同步共享文本
- 处理文本变更
- 同步和显示用户光标位置
4.3.1 初始化共享文本
jsx
// 初始化编辑器
useEffect(() => {
  if (!doc || !provider) return;

  // 获取共享文本
  const yText = doc.getText("shared-text");

  // 设置初始文本
  setText(yText.toString());

  // 监听文本变化
  const textObserver = (event) => {
    setText(yText.toString());
  };

  yText.observe(textObserver);

  // 监听其他用户的光标位置
  const awarenessObserver = (changes) => {
    const states = provider.awareness.getStates();
    const newCursors = {};

    states.forEach((state, clientId) => {
      if (state.user && state.cursor && clientId !== doc.clientID) {
        newCursors[clientId] = {
          name: state.user.name,
          color: state.user.color,
          position: state.cursor.position,
        };
      }
    });

    setCursors(newCursors);
  };

  provider.awareness.on("change", awarenessObserver);

  return () => {
    yText.unobserve(textObserver);
    provider.awareness.off("change", awarenessObserver);
  };
}, [doc, provider]);
4.3.2 处理文本变更
jsx
// 处理文本输入
const handleTextChange = (e) => {
  const newText = e.target.value;
  const yText = doc.getText("shared-text");

  // 获取光标位置
  const cursorPosition = e.target.selectionStart;

  // 计算差异并应用更改
  doc.transact(() => {
    // 清除现有文本并设置新文本
    yText.delete(0, yText.length);
    yText.insert(0, newText);
  });

  // 更新光标位置到awareness
  provider.awareness.setLocalStateField("cursor", {
    position: cursorPosition,
  });
};
4.3.3 光标位置同步
jsx
// 处理光标移动
const handleSelectionChange = (e) => {
  if (!provider) return;

  const cursorPosition = e.target.selectionStart;

  // 更新光标位置到awareness
  provider.awareness.setLocalStateField("cursor", {
    position: cursorPosition,
  });
};
4.3.4 显示远程用户光标
jsx
{
  /* 显示其他用户的光标 */
}
{
  Object.values(cursors).map((cursor, index) => {
    // 计算光标位置
          const textBeforeCursor = text.substring(0, cursor.position);
          const lines = textBeforeCursor.split('\n');
          const lineNumber = lines.length - 1;
          const charPosition = lines[lineNumber].length;

          // 计算光标的像素位置(使用更精确的计算方法)
          // 获取文本区域的样式信息
          const textarea = editorRef.current;
          const computedStyle = textarea ? window.getComputedStyle(textarea) : null;

          // 使用计算样式获取实际行高和字符宽度
          const lineHeight = computedStyle ? parseInt(computedStyle.lineHeight, 10) || 20 : 20;
          const fontSizeInPx = computedStyle ? parseInt(computedStyle.fontSize, 10) || 16 : 16;
          // 使用字体大小的1倍作为平均字符宽度的估计值
          const charWidth = fontSizeInPx * 1;

          // 计算实际位置,考虑内边距
          const paddingTop = computedStyle ? parseInt(computedStyle.paddingTop, 10) || 0 : 0;
          const paddingLeft = computedStyle ? parseInt(computedStyle.paddingLeft, 10) || 0 : 0;

          const top = lineNumber * lineHeight + paddingTop;
          const left = charPosition * charWidth + paddingLeft;

    return (
      <div
        key={index}
        className="remote-cursor"
        style={{
          top: `${top}px`,
          left: `${left}px`,
          backgroundColor: cursor.color,
        }}
      >
        <div className="cursor-label" style={{ backgroundColor: cursor.color }}>
          {cursor.name}
        </div>
      </div>
    );
  });
}
4.3.5 组件完整代码
jsx
import React, { useEffect, useRef, useState } from 'react';
import * as Y from 'yjs';
import './CollaborativeEditor.css';

function CollaborativeEditor({ doc, provider, username, userColor }) {
  const editorRef = useRef(null);
  const [text, setText] = useState('');
  const [cursors, setCursors] = useState({});
  const [isTyping, setIsTyping] = useState(false);
  const selectionRef = useRef(null);

  // 初始化编辑器
  useEffect(() => {
    if (!doc || !provider) return;

    // 获取共享文本
    const yText = doc.getText('shared-text');

    // 设置初始文本
    setText(yText.toString());

    // 监听文本变化
    const textObserver = (event) => {
      setText(yText.toString());
    };

    yText.observe(textObserver);

    // 监听其他用户的光标位置
    const awarenessObserver = (changes) => {
      const states = provider.awareness.getStates();
      const newCursors = {};

      states.forEach((state, clientId) => {
        if (state.user && state.cursor && clientId !== doc.clientID) {
          newCursors[clientId] = {
            name: state.user.name,
            color: state.user.color,
            position: state.cursor.position
          };
        }
      });

      setCursors(newCursors);
    };

    provider.awareness.on('change', awarenessObserver);

    return () => {
      yText.unobserve(textObserver);
      provider.awareness.off('change', awarenessObserver);
    };
  }, [doc, provider]);

  // 处理文本输入
  const handleTextChange = (e) => {
    const newText = e.target.value;
    const yText = doc.getText('shared-text');

    // 获取光标位置
    const cursorPosition = e.target.selectionStart;

    // 计算差异并应用更改
    doc.transact(() => {
      // 清除现有文本并设置新文本
      yText.delete(0, yText.length);
      yText.insert(0, newText);
    });

    // 更新光标位置到awareness
    provider.awareness.setLocalStateField('cursor', {
      position: cursorPosition
    });
  };

  // 处理光标移动
  const handleSelectionChange = (e) => {
    if (!provider) return;

    const cursorPosition = e.target.selectionStart;

    // 更新光标位置到awareness
    provider.awareness.setLocalStateField('cursor', {
      position: cursorPosition
    });
  };

  // 处理焦点事件
  const handleFocus = () => {
    setIsTyping(true);
  };

  const handleBlur = () => {
    setIsTyping(false);
  };

  return (
    <div className="collaborative-editor">
      <div className="editor-header">
        <h3>实时协同编辑</h3>
        <div className="active-users">
          <span>当前在线用户: </span>
          <span style={{ color: userColor }}>{username}</span>
          {Object.values(cursors).map((cursor, index) => (
            <span key={index} style={{ color: cursor.color }}>
              , {cursor.name}
            </span>
          ))}
        </div>
      </div>

      <div className="editor-content">
        <textarea
          ref={editorRef}
          value={text}
          onChange={handleTextChange}
          onSelect={handleSelectionChange}
          onFocus={handleFocus}
          onBlur={handleBlur}
          placeholder="开始输入内容进行协同编辑..."
        />

        {/* 显示其他用户的光标 */}
        {Object.values(cursors).map((cursor, index) => {
           // 计算光标位置
          const textBeforeCursor = text.substring(0, cursor.position);
          const lines = textBeforeCursor.split('\n');
          const lineNumber = lines.length - 1;
          const charPosition = lines[lineNumber].length;

          // 计算光标的像素位置(使用更精确的计算方法)
          // 获取文本区域的样式信息
          const textarea = editorRef.current;
          const computedStyle = textarea ? window.getComputedStyle(textarea) : null;
          console.log('>>>>>computedStyle', computedStyle)

          // 使用计算样式获取实际行高和字符宽度
          const lineHeight = computedStyle ? parseInt(computedStyle.lineHeight, 10) || 20 : 20;
          const fontSizeInPx = computedStyle ? parseInt(computedStyle.fontSize, 10) || 16 : 16;
          // 使用字体大小的1倍作为平均字符宽度的估计值
          const charWidth = fontSizeInPx * 1;
          console.log('>>>>>charWidth',fontSizeInPx, charWidth)

          // 计算实际位置,考虑内边距
          const paddingTop = computedStyle ? parseInt(computedStyle.paddingTop, 10) || 0 : 0;
          const paddingLeft = computedStyle ? parseInt(computedStyle.paddingLeft, 10) || 0 : 0;

          const top = lineNumber * lineHeight + paddingTop;
          const left = charPosition * charWidth + paddingLeft;

          return (
            <div
              key={index}
              className="remote-cursor"
              style={{
                top: `${top}px`,
                left: `${left}px`,
                backgroundColor: cursor.color
              }}
            >
              <div
                className="cursor-label"
                style={{ backgroundColor: cursor.color }}
              >
                {cursor.name}
              </div>
            </div>
          );
        })}
      </div>
    </div>
  );
}

export default CollaborativeEditor;到这里一个简单的yjs协同编辑就实现完成了,当然官方也支持多种流行文本和富文本编辑器ProseMirror、TipTap、Monaco、Quill、CodeMirror、Remirror 官方地址