前言
实际生活中物体表面的明暗 效果是会受到光照 的影响,比如晚上不开灯,你就看不到物体,灯光比较暗,物体也比较暗。在threejs中,咱们用网格模型Mesh模拟生活中物体,所以threejs中模拟光照Light对物体表面的影响,就是模拟光照Light对网格模型Mesh表面的影响。
效果图:文章后面会附带代码 想看实例{Three.js四大光源特性及实现详解} 直接到实例目录 
受光照影响材质
threejs提供的网格材质,有的受光照影响,有的不受光照影响。
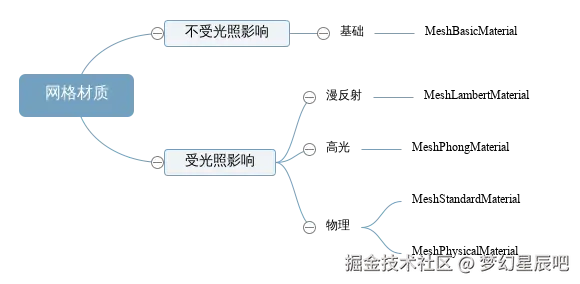
基础网格材质 MeshBasicMaterial (opens new window)不会受到光照影响。
ts
//MeshBasicMaterial不受光照影响
const material = new THREE.MeshBasicMaterial();
漫反射网格材质 MeshLambertMaterial (opens new window)会受到光照影响,该材质也可以称为Lambert网格材质,音译为兰伯特网格材质。
一个立方体长方体使用MeshLambertMaterial材质,不同面和光线夹角不同,立方体不同面就会呈现出来不同的明暗效果。
ts
//MeshLambertMaterial受光照影响
const material = new THREE.MeshLambertMaterial();
光源简介
Three.js提供了多种模拟生活中光源的API,文档搜索关键词light就可以看到。
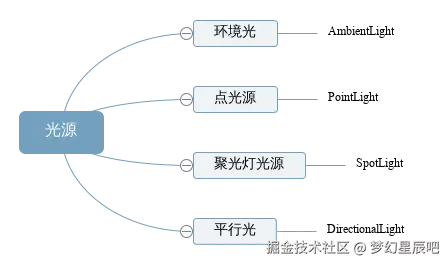
点光源

点光源PointLight (opens new window)可以类比为一个发光点,就像生活中一个灯泡以灯泡为中心向四周发射光线。
ts
//点光源:两个参数分别表示光源颜色和光照强度
// 参数1:0xffffff是纯白光,表示光源颜色
// 参数2:1.0,表示光照强度,可以根据需要调整
const pointLight = new THREE.PointLight(0xffffff, 1.0);除了通过THREE.PointLight的参数2设置光照强度,你可以可以直接访问光照强度属性.intensity设置。
ts
pointLight.intensity = 1.0;//光照强度光源衰减
实际生活中点光源,比如比如一个灯泡,随机距离的改变,光线会衰减,越来越弱,光源衰减属性.decay默认值是2.0,如果你不希望衰减可以设置为0.0。
ts
pointLight.decay = 0.0;//设置光源不随距离衰减【扩展提醒】:如果使用默认衰减2.0,不同版本可能有差异,对于部分threejs新版本,有时候你可能看不到光源效果,这时候可以把光照强度加强试试看,如果你的版本不影响,就不用加强光照强度(根据版本情况灵活对应)。
ts
// 你可以对比不同光照强度明暗差异(传播同样距离)
pointLight.intensity = 10000.0;//光照强度
pointLight.intensity = 50000.0;//光照强度
光源位置
你把点光源想象为一个电灯泡,你在3D空间中,放的位置不同,模型的渲染效果就不一样。
注意光源位置尺寸大小:如果你希望光源照在模型的外表面,那你就需要把光源放在模型的外面。
ts
//点光源位置
pointLight.position.set(400, 0, 0);//点光源放在x轴上
光源添加到场景
光源和网格模型Mesh对应一样是三维场景的一部分,自然需要添加到三维场景中才能起作用。
ts
scene.add(pointLight); //点光源添加到场景中设置好上面所有代码,你现在可以执行代码,用浏览器查看渲染效果。
改变光源位置,观察网格模型表面的明暗变化。
ts
pointLight.position.set(400, 200, 300); Three.js四大光源特性及实现详解
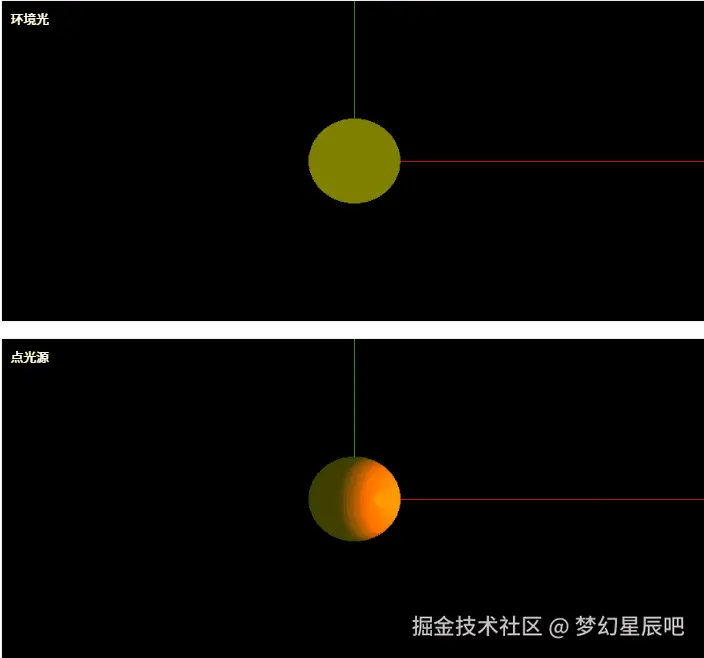
一、案例效果概述
light 目录中的 index.html 实现了一个多光源对比演示系统,通过四个独立场景展示不同光源特性:
- 环境光 - 均匀的基础照明
- 点光源 - 动态移动点状光源
- 聚光灯 - 可调光锥的投射效果
- 平行光 - 方向性照明模拟
二、核心实现解析
1. 场景初始化函数
createBaseScene 方法构建基础场景:
javascript
const createBaseScene = () => {
    // 场景基础配置
    const scene = new THREE.Scene();
    const camera = new THREE.PerspectiveCamera(75,
        window.innerWidth / (window.innerHeight/2), 0.1, 1000);
    camera.position.z = 5;

    // 创建黄色Phong材质球体
    const material = new THREE.MeshPhongMaterial({
        color: 0xFFFF00,
        shininess: 100
    });
    const sphere = new THREE.Mesh(geometry, material);

    // 添加坐标系辅助器
    scene.add(new THREE.AxesHelper(150));
    return { scene, camera, sphere };
};
关键配置:
- 使用 Phong材质 实现高光反射
- 坐标系辅助器帮助观察光源方向
- 摄像机初始Z轴偏移5个单位
2. 点光源动态效果
PointLight 实现方案:
javascript
const light = new THREE.PointLight(0xff4000, 2, 10);
light.position.set(2, 2, 2);

// 动态位置更新
function animate() {
    light.position.x = Math.sin(Date.now()*0.001) * 3;
    light.position.y = Math.cos(Date.now()*0.001) * 3;
}
特性参数:
- decay: 2 光线衰减率
- distance: 10 有效照射距离
- 正弦函数驱动光源圆周运动
3. 聚光灯参数配置
SpotLight 关键设置:
javascript
const light = new THREE.SpotLight(0x00ff00, 2);
light.angle = Math.PI/4;    // 45度照射角度
light.penumbra = 0.5;       // 半影区柔和度
light.position.set(0, 3, 2); // 初始高位布局
4. 响应式处理机制
窗口尺寸变化时的自适应处理:
javascript
window.addEventListener('resize', () => {
    container.querySelectorAll('.scene-container').forEach(container => {
        const renderer = container.querySelector('canvas').renderer;
        renderer.setSize(container.offsetWidth, 400);
    });
});
三、开发实践建议
- 材质选择 - 使用 MeshStandardMaterial 可获得更真实金属质感
- 性能优化 - 多个WebGL上下文可合并为单一场景分区渲染
- 交互扩展 - 添加GUI控件实时调整光源参数
- 后期处理 - 结合EffectComposer添加辉光效果
源码:
HTML
<!DOCTYPE html>
<html>
<head>
    <title>Three.js光源案例</title>
    <style>
        .scene-container {
            width: 100%;
            height: 400px;
            margin: 20px 0;
            border: 1px solid #eee;
            position: relative;
        }
        .scene-title {
            position: absolute;
            top: 10px;
            left: 10px;
            color: white;
            z-index: 1;
        }
    </style>
</head>
<body>
    <h1>Three.js光源演示</h1>

    <!-- 环境光案例 -->
    <div class="scene-container" id="ambient-light">
        <div class="scene-title">环境光</div>
    </div>

    <!-- 点光源案例 -->
    <div class="scene-container" id="point-light">
        <div class="scene-title">点光源</div>
    </div>

    <!-- 聚光灯案例 -->
    <div class="scene-container" id="spot-light">
        <div class="scene-title">聚光灯</div>
    </div>

    <!-- 平行光案例 -->
    <div class="scene-container" id="directional-light">
        <div class="scene-title">平行光</div>
    </div>

    <script src="https://cdnjs.cloudflare.com/ajax/libs/three.js/r128/three.min.js"></script>
    <script>
        // 初始化通用元素
        // 该函数用于创建一个基础的Three.js场景,包含场景、相机和一个球体网格
        const createBaseScene = () => {

            // 创建一个新的Three.js场景
            const scene = new THREE.Scene();
            // 创建一个透视相机,设置视野角度、宽高比、近裁剪面和远裁剪面
            const camera = new THREE.PerspectiveCamera(75,
                window.innerWidth / (window.innerHeight/2), 0.1, 1000);
            // 设置相机的Z轴位置
            camera.position.z = 5;
            // camera.position.x = 2;
            // camera.position.set(5, 5, 3);

            // AxesHelper:辅助观察的坐标系
            const axesHelper = new THREE.AxesHelper(150);
            scene.add(axesHelper);

            // 创建一个球体几何体,半径为1,横向和纵向分段数为32
            const geometry = new THREE.SphereGeometry(1, 32, 32);
            // 创建一个Phong材质,设置颜色为黄色,光泽度为100
            const material = new THREE.MeshPhongMaterial({
                color: 0xFFFF00,
                shininess: 100
            });
            // 创建一个网格对象,将几何体和材质组合在一起
            const sphere = new THREE.Mesh(geometry, material);
            // 将球体网格添加到场景中
            scene.add(sphere);

            // 返回包含场景、相机和球体的对象
            return { scene, camera, sphere };
        };

        // 环境光案例
        (function() {
            // 调用createBaseScene函数获取基础场景元素
            const { scene, camera, sphere } = createBaseScene();
            // 向场景中添加环境光,颜色为0x404040,强度为2
            scene.add(new THREE.AmbientLight(0x404040, 2));

            // 创建一个WebGL渲染器
            const renderer = new THREE.WebGLRenderer();
            // 设置渲染器的大小为环境光容器的宽度和固定高度400
            renderer.setSize(
                document.getElementById('ambient-light').offsetWidth,
                400
            );
            // 将渲染器的DOM元素添加到环境光容器中
            document.getElementById('ambient-light').appendChild(renderer.domElement);

            // 定义动画函数,用于循环渲染场景
            function animate() {
                // 请求下一帧动画
                requestAnimationFrame(animate);
                // 球体绕X轴旋转0.01弧度
                sphere.rotation.x += 0.01;
                // 球体绕Y轴旋转0.01弧度
                sphere.rotation.y += 0.01;
                // 使用渲染器渲染场景和相机视图
                renderer.render(scene, camera);
            }
            // 启动动画循环
            animate();
        })();

        // 点光源案例
        (function() {
            // 调用createBaseScene函数获取基础场景元素
            const { scene, camera, sphere } = createBaseScene();
            // 创建一个点光源,颜色为0xff4000,强度为2,距离为10
            const light = new THREE.PointLight(0xff4000, 2, 10);
            // 设置点光源的初始位置
            light.position.set(2, 2, 2);
            // 将点光源添加到场景中
            scene.add(light);
            // 向场景中添加环境光,颜色为0x404040
            scene.add(new THREE.AmbientLight(0x404040));

            // 创建一个WebGL渲染器
            const renderer = new THREE.WebGLRenderer();
            // 设置渲染器的大小为点光源容器的宽度和固定高度400
            renderer.setSize(
                document.getElementById('point-light').offsetWidth,
                400
            );
            // 将渲染器的DOM元素添加到点光源容器中
            document.getElementById('point-light').appendChild(renderer.domElement);

            // 定义动画函数,用于循环渲染场景
            function animate() {
                // 请求下一帧动画
                requestAnimationFrame(animate);
                // 点光源的X轴位置根据时间正弦变化
                light.position.x = Math.sin(Date.now()*0.001) * 3;
                // 点光源的Y轴位置根据时间余弦变化
                light.position.y = Math.cos(Date.now()*0.001) * 3;
                // 使用渲染器渲染场景和相机视图
                renderer.render(scene, camera);
            }
            // 启动动画循环
            animate();
        })();

        // 聚光灯案例
        (function() {
            // 调用createBaseScene函数获取基础场景元素
            const { scene, camera, sphere } = createBaseScene();
            // 创建一个聚光灯,颜色为0x00ff00,强度为2
            const light = new THREE.SpotLight(0x00ff00, 2);
            // 设置聚光灯的初始位置
            light.position.set(0, 3, 2);
            // 设置聚光灯的照射角度为π/4
            light.angle = Math.PI/4;
            // 设置聚光灯的半影范围为0.5
            light.penumbra = 0.5;
            // 将聚光灯添加到场景中
            scene.add(light);

            // 创建一个WebGL渲染器
            const renderer = new THREE.WebGLRenderer();
            // 设置渲染器的大小为聚光灯容器的宽度和固定高度400
            renderer.setSize(
                document.getElementById('spot-light').offsetWidth,
                400
            );
            // 将渲染器的DOM元素添加到聚光灯容器中
            document.getElementById('spot-light').appendChild(renderer.domElement);

            // 定义动画函数,用于循环渲染场景
            function animate() {
                // 请求下一帧动画
                requestAnimationFrame(animate);
                // 聚光灯的X轴位置根据时间正弦变化
                // light.position.x = Math.sin(Date.now()*0.001) * 3;


                // 聚光灯的X轴位置根据时间正弦变化
                light.position.x = Math.sin(Date.now()*0.001) * 3;
                // 聚光灯的Y轴位置根据时间余弦变化
                light.position.y = Math.cos(Date.now()*0.001) * 3;

                // 使用渲染器渲染场景和相机视图
                renderer.render(scene, camera);
            }
            // 启动动画循环
            animate();
        })();

        // 平行光案例
        (function() {
            // 调用createBaseScene函数获取基础场景元素
            const { scene, camera, sphere } = createBaseScene();
            // 创建一个平行光,颜色为白色,强度为1
            const light = new THREE.DirectionalLight(0xffffff, 1);
            // 设置平行光的初始位置
            light.position.set(1, 1, 1);
            // 将平行光添加到场景中
            scene.add(light);

            // 创建一个WebGL渲染器
            const renderer = new THREE.WebGLRenderer();
            // 设置渲染器的大小为平行光容器的宽度和固定高度400
            renderer.setSize(
                document.getElementById('directional-light').offsetWidth,
                400
            );
            // 将渲染器的DOM元素添加到平行光容器中
            document.getElementById('directional-light').appendChild(renderer.domElement);

            // 定义动画函数,用于循环渲染场景
            function animate() {
                // 请求下一帧动画
                requestAnimationFrame(animate);
                // 球体绕X轴旋转0.01弧度
                sphere.rotation.x += 0.01;
                // 使用渲染器渲染场景和相机视图
                renderer.render(scene, camera);
            }
            // 启动动画循环
            animate();
        })();

        // 窗口大小调整处理
        window.addEventListener('resize', () => {
            // 遍历所有场景容器
            document.querySelectorAll('.scene-container').forEach(container => {
                // 获取容器内的渲染器(此处代码有误,应为container.querySelector('canvas').parentNode.renderer 或正确获取渲染器的方式)
                const renderer = container.querySelector('canvas').renderer;
                // 获取容器的宽度
                const width = container.offsetWidth;
                // 设置固定高度为400
                const height = 400;
                // 调整渲染器的大小
                renderer.setSize(width, height);
            });
        });
    </script>
</body>
</html>