
✨✨ 欢迎大家来到景天科技苑✨✨
🎈🎈 养成好习惯,先赞后看哦~🎈🎈
🏆 作者简介:景天科技苑
🏆《头衔》:大厂架构师,华为云开发者社区专家博主,阿里云开发者社区专家博主,CSDN全栈领域优质创作者,掘金优秀博主,51CTO博客专家等。
🏆《博客》:Rust开发,Python全栈,Golang开发,云原生开发,PyQt5和Tkinter桌面开发,小程序开发,人工智能,js逆向,App逆向,网络系统安全,数据分析,Django,fastapi,flask等框架,云原生K8S,linux,shell脚本等实操经验,网站搭建,数据库等分享。
所属的专栏: Rust语言通关之路
景天的主页: 景天科技苑

文章目录
- Rust结构体
-
- [1. 结构体基础](#1. 结构体基础)
-
- [1.1 什么是结构体](#1.1 什么是结构体)
- [1.2 定义和实例化结构体](#1.2 定义和实例化结构体)
- [1.3 访问结构体字段](#1.3 访问结构体字段)
- [1.4 可变结构体](#1.4 可变结构体)
- [1.5 字段初始化简写](#1.5 字段初始化简写)
- [1.6 结构体更新语法](#1.6 结构体更新语法)
- [2. 结构体高级特性](#2. 结构体高级特性)
-
- [2.1 元组结构体](#2.1 元组结构体)
- [2.2 类单元结构体](#2.2 类单元结构体)
- [2.3 结构体所有权](#2.3 结构体所有权)
- [2.4 打印结构体](#2.4 打印结构体)
- [2.5 结构体方法语法](#2.5 结构体方法语法)
- [2.6 多个impl块](#2.6 多个impl块)
- [2.7 关联函数](#2.7 关联函数)
- [2.8 关联变量](#2.8 关联变量)
- [3. 实际应用案例](#3. 实际应用案例)
-
- [3.1 图形计算](#3.1 图形计算)
- [3.2 学生管理系统](#3.2 学生管理系统)
- [3.3 银行账户系统](#3.3 银行账户系统)
- [4. 最佳实践和常见模式](#4. 最佳实践和常见模式)
-
- [4.1 构建者模式](#4.1 构建者模式)
- [4.2 使用Newtype模式](#4.2 使用Newtype模式)
- [4.3 结构体解构](#4.3 结构体解构)
- [5. 性能考虑](#5. 性能考虑)
-
- [5.1 结构体布局](#5.1 结构体布局)
- [5.2 零成本抽象](#5.2 零成本抽象)
- [5.3 内联优化](#5.3 内联优化)
- [6. 总结](#6. 总结)
Rust结构体
1. 结构体基础
1.1 什么是结构体
结构体(struct)是Rust中一种自定义数据类型,它允许你将多个相关的值组合在一起,形成一个有意义的组。结构体是创建更复杂数据类型的基础,也是面向对象编程中"对象"概念的基石。
与元组类似,结构体的每个部分可以是不同类型。但与元组不同,结构体需要为每个部分命名,这使得数据访问更加清晰明确。
1.2 定义和实例化结构体
定义结构体使用struct关键字,后跟结构体名称和大括号内的字段定义:
结构体与元组类似。就像元组,结构体的每一部分可以是不同类型。
不同于元组,结构体需要命名各部分数据以便能清楚的表明其值的意义。
由于有了这些名字使得结构体比元组更灵活:不需要依赖顺序来指定或访问实例中的值。
定义结构体,需要使用 struct 关键字并为整个结构体提供一个名字。结构体的名字需要描述它所组合的数据的意义。
接着,在大括号中,定义每一部分数据的名字,它们被称作 字段(field)或属性,并定义字段类型。
结构体名首字母一般大写
rust
struct User {
    username: String,
    email: String,
    sign_in_count: u64,
    active: bool,
}
实例化结构体:
一旦定义了结构体后,为了使用它,通过为每个字段指定具体值来创建这个结构体的 实例。
创建一个实例需要以结构体的名字开头,接着在大括号中使用 key: value 对的形式提供字段,其中 key 是字段的名字,value 是需要储存在字段中的数据值。
实例中具体说明字段的顺序不需要和它们在结构体中声明的顺序一致。换句话说,结构体的定义就像一个类
型的通用模板,而实例则会在这个模板中放入特定数据来创建这个类型的值。
rust
let user1 = User {
    email: String::from("someone@example.com"),
    username: String::from("someusername123"),
    active: true,
    sign_in_count: 1,
};
1.3 访问结构体字段
使用点号.访问结构体字段:
为了从结构体中获取某个特定的值,可以使用点号(.)来获取结构体中的属性。如果我们只想要用户的邮箱地址,可以用 user1.email 。
要更改结构体中的值,如果结构体的实例是可变的,我们可以使用点号并为对应的字段赋值。
故要修改结构体的值,必须在创建结构体实例的时候,将实例设为mut 可变结构体,才能修改。
注意整个实例必须是可变的;Rust 并不允许只将特定字段标记为可变。另外需要注意同其他任何表达式一样,我们可以
在函数体的最后一个表达式构造一个结构体,从函数隐式的返回一个结构体的新实例。
rust
println!("User email: {}", user1.email);1.4 可变结构体
如果要修改结构体字段,整个结构体实例必须是可变的:
rust
let mut user1 = User {
    // ...
};

user1.email = String::from("newemail@example.com");
Rust不允许只将某些字段标记为可变 - 要么整个实例可变,要么都不可变。
1.5 字段初始化简写
当变量名与字段名相同时,可以使用字段初始化简写语法:
rust
fn build_user(email: String, username: String) -> User {
    User {
        email,    // 等同于 email: email
        username, // 等同于 username: username
        active: true,
        sign_in_count: 1,
    }
}
1.6 结构体更新语法
可以从老的对象创建新的对象常常是很有帮助的,即复用大部分老对象的值并只改变一部分值。
可以使用其他实例创建新实例:
rust
 //创建结构体实例
    let mut user1 = User{
        username: String::from("jingtian"),
        email: String::from("jingtian@example.com"),
        count: String::from("1000010"),
        nonce: 100000,
        active: true,
    };

    let user3 = User{
        username: String::from("zhangsan"),
        email: String::from("zhangsan@example.com"),
        count: String::from("1000013"),
        nonce: 50,
        active: user1.active, //这里直接引用user1的字段来创建
    };
    //获取结构体的值
    println!("zhangsan username={},email={},count={},nonce={},active={}",user3.username,user3.email,user3.count,user3.nonce,user3.active);
能拿到值
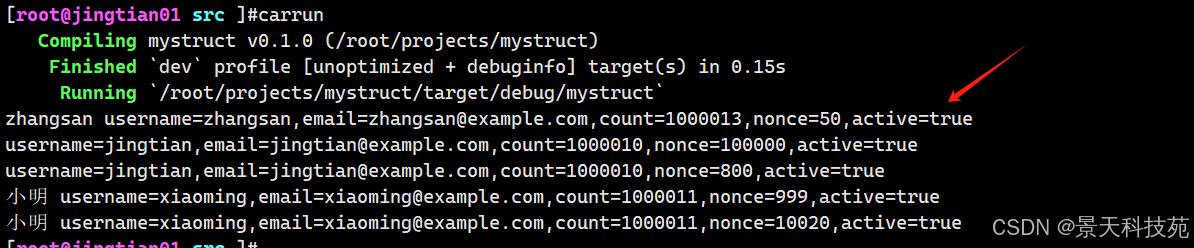
如果是多个字段引用旧对象,还可以更简化
使用结构体更新语法,我们可以通过更少的代码来达到相同的效果。 ... 语法指定了剩余未显式设置值的字段应有与给定实例对应字段相同的值。
rust
let user3 = User{
    username: String::from("zhangsan"),
    email: String::from("zhangsan@example.com"),
    ..user1 //.. 语法指定了剩余未显式设置值的字段应有与给定实例对应字段相同的值
};

//获取结构体的值
println!("zhangsan username={},email={},count={},nonce={},active={}",user3.username,user3.email,user3.count,user3.nonce,user3.active);
使用结构体更新语法为一个 User 实例设置新的 email 和 username 值,不过其余值来自 user1 变量中实例的字段

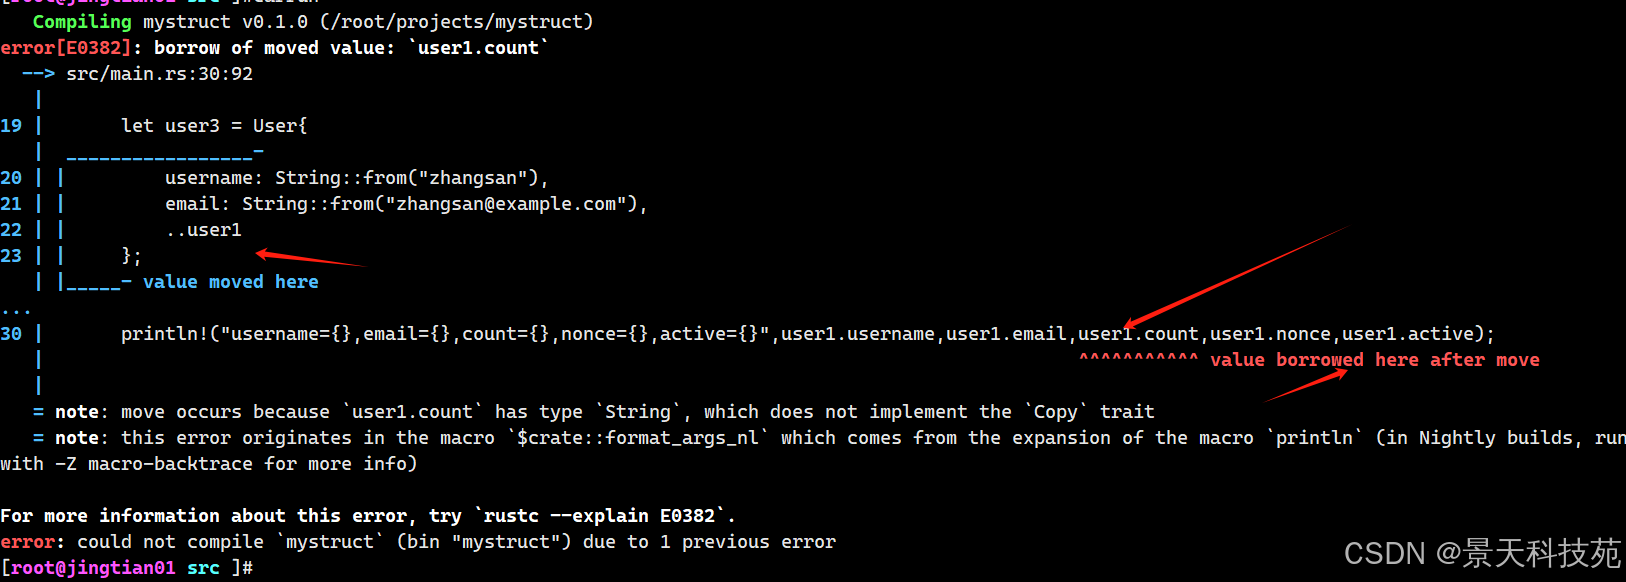
注意:使用结构体语法更新,user1字段后面不能加逗号,the base struct must always be the last field
并且user1对象在使用语法更新后,属于被借用了,后面不能使用该对象了
否则会报错
2. 结构体高级特性
2.1 元组结构体
元组结构体(tuple struct)有名字但没有字段名,只有字段类型:
使用没有命名字段的元组结构体来创建不同的类型
也可以定义与元组类似的结构体,称为 元组结构体(tuple structs),有着结构体名称提供的含义,但没有具体的字段名,只有字段的类型。
元组结构体在你希望命名整个元组并使其与其他(同样的)元组为不同类型时很有用,这时像常规结构体那样为每个字段命名就显得冗余和形式化了。
定义元组结构体以 struct 关键字和结构体名开头并后跟元组中的类型。
例如,这里是两个分别叫做 Color 和 Point 元组结构体的定义和用例:
rust
//元组结构体
struct Color(i32, i32, i32);
struct Point(i32, i32, i32);
let black = Color(255, 110, 220);
let origin = Point(112, 213, 290);
println!("black0={}",black.0);  //通过下标来获取元组的值
println!("black1={}",black.1);
println!("black2={}",black.2);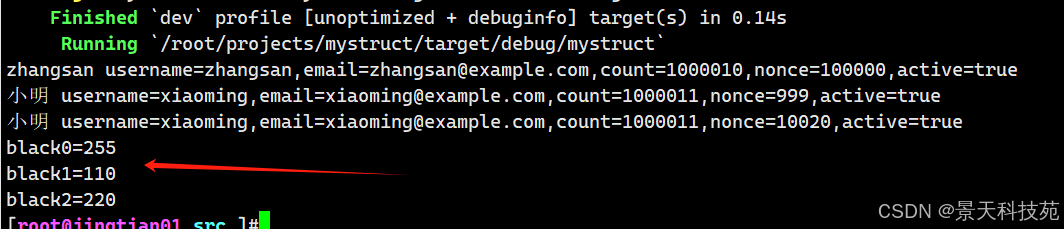
元组结构体适用于需要给元组命名并使其不同于其他同类型元组的场景。
2.2 类单元结构体
没有任何字段的结构体称为类单元结构体(unit-like struct):
rust
struct AlwaysEqual;

let subject = AlwaysEqual;
这种结构体常用于需要在某个类型上实现trait但不需要存储数据的情况。
2.3 结构体所有权
前面的User结构体使用了String而不是&str字符串切片,这意味着结构体拥有其数据的所有权。如果要使用引用,需要使用生命周期:
rust
struct User {
    username: &str,  // 错误:需要生命周期说明符
    email: &str,
    sign_in_count: u64,
    active: bool,
}
正确的带生命周期的定义:
rust
struct User<'a> {
    username: &'a str,
    email: &'a str,
    sign_in_count: u64,
    active: bool,
}
2.4 打印结构体
上面我们打印结构体,都是打印结构体中的某些字段,非常不方便。
有没有更快捷打印出结构体的方法呢?
可以采用自动推导的方法
只需要在定义结构体的时候,上方加上 #derive(Debug)
要实现Debug trait来打印结构体:
rust
#[derive(Debug)]
struct Rectangle {
    width: u32,
    height: u32,
}

let rect = Rectangle { width: 30, height: 50 };
println!("rect is {:?}", rect);  // 单行打印
println!("rect is {:#?}", rect); // 美化多行打印
2.5 结构体方法语法
方法 与函数类似:它们使用 fn 关键字和名称声明,可以拥有参数和返回值,同时包含一段该方法在某处被调用时会执行的代码。
不过方法与函数是不同的,因为它们在结构体的上下文中被定义(或者是枚举或 trait 对象的上下文),并且它们第一个参数总是 &self ,它代表调用该方法的结构体实例。
定义结构体的方法,使用impl关键字, impl 是 implementation 的缩写,后面跟实现哪个结构体,就是哪个结构体的方法
fn定义的函数放到impl 大括号中,函数的第一个参数必须是 &self 。
rust
impl Rectangle {
    fn area(&self) -> u32 {
        self.width * self.height
    }

    fn can_hold(&self, other: &Rectangle) -> bool {
        self.width > other.width && self.height > other.height
    }

    // 关联函数(静态方法)
    fn square(size: u32) -> Rectangle {
        Rectangle { width: size, height: size }
    }
}
使用方法:
rust
let rect1 = Rectangle { width: 30, height: 50 };
println!("Area: {}", rect1.area());

let rect2 = Rectangle { width: 10, height: 40 };
println!("Can rect1 hold rect2? {}", rect1.can_hold(&rect2));

let square = Rectangle::square(10);  // 调用关联函数
2.6 多个impl块
可以为同一个结构体定义多个impl块:
rust
impl Rectangle {
    fn area(&self) -> u32 {
        self.width * self.height
    }
}

impl Rectangle {
    fn perimeter(&self) -> u32 {
        2 * (self.width + self.height)
    }
}
2.7 关联函数
impl 块的另一个有用的功能是:允许在 impl 块中定义 不 以 self 作为参数的函数。
这被称为 关联函数(associatedfunctions),因为它们与结构体相关联。
即便如此它们仍是函数而不是方法,因为它们并不作用于一个结构体的实例。
我们已经使用过 String::from 关联函数了。
关联函数经常被用作返回一个结构体新实例的构造函数。
使用结构体名和 ::函数名() 语法来调用这个关联函数:比如 let sq = Rectangle::square(3); 。
这个方法位于结构体的命名空间中: :: 语法用于关联函数和模块创建的命名空间
rust
//创建结构体
struct Dog {
name: String,
age: u8,
}
impl Dog {
//创建方法
fn bark(&self) {
println!("Woof! My name is {} and I am {} years old.", self.name, self.age);
}
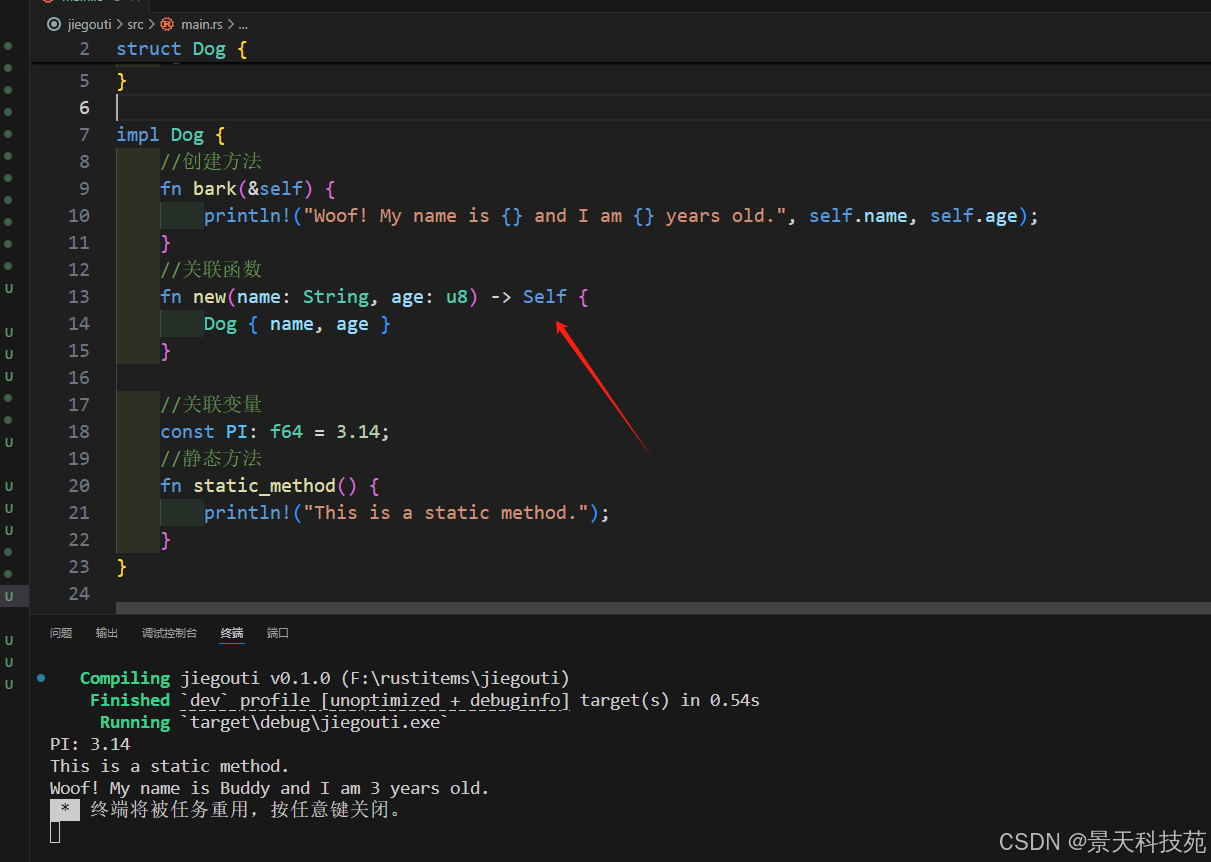
//关联函数,返回结构体Dog,也可以用Self 替代
fn new(name: String, age: u8) -> Dog {
Dog { name, age }
}
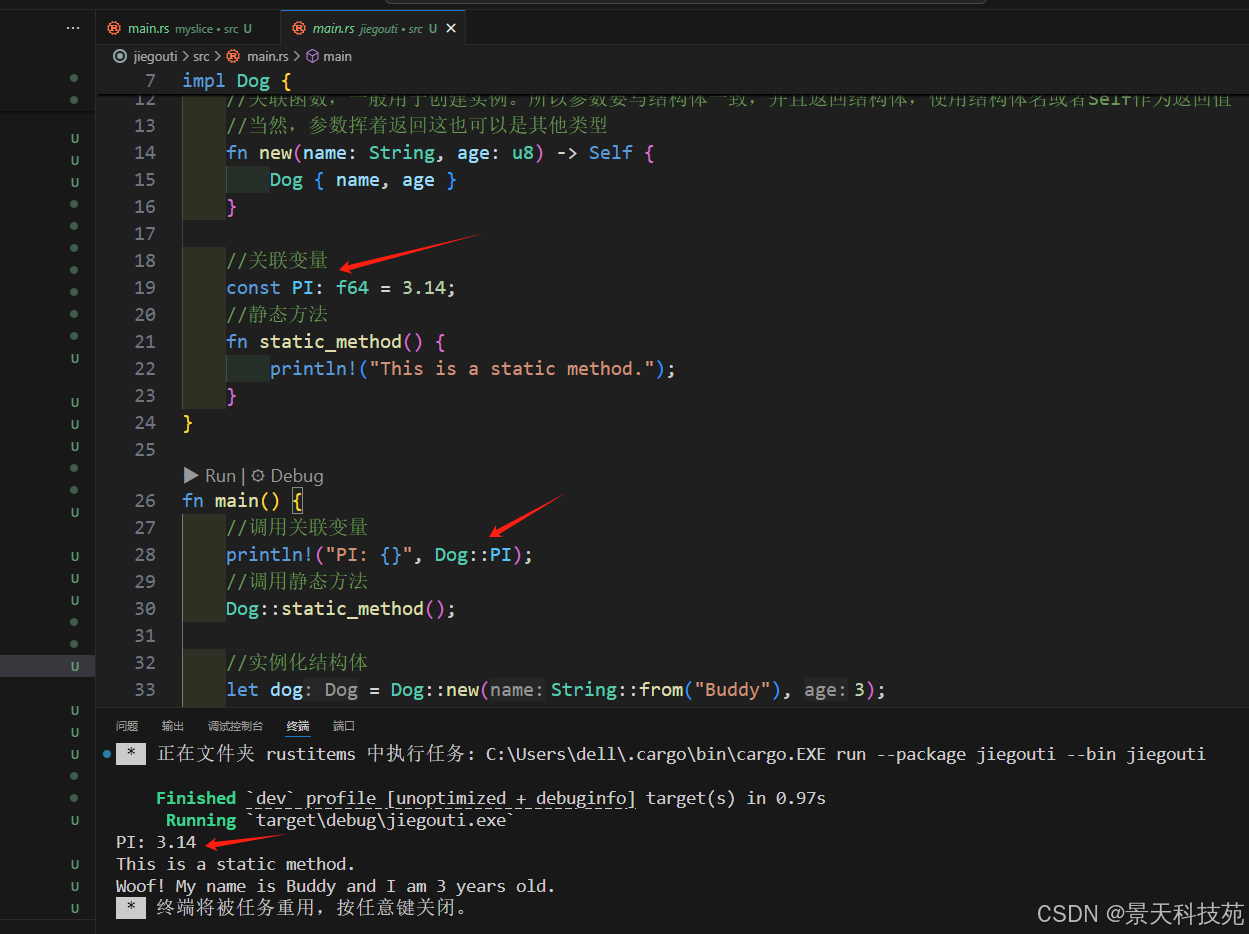
//关联变量
const PI: f64 = 3.14;
//静态方法
fn static_method() {
println!("This is a static method.");
}
}
fn main() {
//调用关联变量
println!("PI: {}", Dog::PI);
//调用静态方法
Dog::static_method();
//实例化结构体 可以通过调用关联函数来实例化,调用关联函数,结构体名::函数名()
let dog = Dog::new(String::from("Buddy"), 3);
//调用方法
dog.bark();
}
2.8 关联变量
这里的关联边变量指的是,和结构体类型相关的变量,也可以在特质或者枚举中
rust
impl Dog {
  const PI: f64 = 3.14

}
调用时使用 Dog::PI
3. 实际应用案例
3.1 图形计算
rust
#[derive(Debug)]
struct Point {
    x: f64,
    y: f64,
}

impl Point {
    fn new(x: f64, y: f64) -> Point {
        Point { x, y }
    }

    fn distance(&self, other: &Point) -> f64 {
        ((self.x - other.x).powi(2) + (self.y - other.y).powi(2)).sqrt()
    }
}

#[derive(Debug)]
struct Triangle {
    a: Point,
    b: Point,
    c: Point,
}

impl Triangle {
    fn perimeter(&self) -> f64 {
        self.a.distance(&self.b) +
        self.b.distance(&self.c) +
        self.c.distance(&self.a)
    }

    fn area(&self) -> f64 {
        let ab = self.a.distance(&self.b);
        let bc = self.b.distance(&self.c);
        let ca = self.c.distance(&self.a);
        let s = self.perimeter() / 2.0;
        (s * (s - ab) * (s - bc) * (s - ca)).sqrt()
    }
}

fn main() {
    let a = Point::new(0.0, 0.0);
    let b = Point::new(3.0, 0.0);
    let c = Point::new(0.0, 4.0);

    let triangle = Triangle { a, b, c };

    println!("Triangle perimeter: {}", triangle.perimeter());
    println!("Triangle area: {}", triangle.area());
}
3.2 学生管理系统
rust
#[derive(Debug)]
struct Student {
    id: u32,
    name: String,
    age: u8,
    courses: Vec<Course>,
}

#[derive(Debug)]
struct Course {
    name: String,
    credit: u8,
    score: Option<u8>, // 使用Option表示可能没有成绩
}

impl Student {
    fn new(id: u32, name: String, age: u8) -> Student {
        Student {
            id,
            name,
            age,
            courses: Vec::new(),
        }
    }

    fn add_course(&mut self, name: String, credit: u8) {
        self.courses.push(Course {
            name,
            credit,
            score: None,
        });
    }

    fn update_score(&mut self, course_name: &str, score: u8) -> Result<(), String> {
        for course in &mut self.courses {
            if course.name == course_name {
                course.score = Some(score);
                return Ok(());
            }
        }
        Err(format!("Course {} not found", course_name))
    }

    fn calculate_gpa(&self) -> Option<f64> {
        if self.courses.is_empty() {
            return None;
        }

        let (total_score, total_credit) = self.courses
            .iter()
            .filter_map(|c| c.score.map(|s| (s as f64 * c.credit as f64, c.credit as f64)))
            .fold((0.0, 0.0), |(sum_score, sum_credit), (score, credit)| {
                (sum_score + score, sum_credit + credit)
            });

        Some(total_score / total_credit)
    }
}

fn main() {
    let mut student = Student::new(1, String::from("Alice"), 20);

    student.add_course(String::from("Math"), 4);
    student.add_course(String::from("Physics"), 3);
    student.add_course(String::from("Chemistry"), 3);

    student.update_score("Math", 90).unwrap();
    student.update_score("Physics", 85).unwrap();
    student.update_score("Chemistry", 78).unwrap();

    println!("Student: {:?}", student);
    println!("GPA: {:.2}", student.calculate_gpa().unwrap());
}
3.3 银行账户系统
rust
use std::fmt;

#[derive(Debug)]
struct BankAccount {
    account_number: String,
    holder_name: String,
    balance: f64,
    transactions: Vec<Transaction>,
}

#[derive(Debug)]
enum TransactionType {
    Deposit,
    Withdrawal,
    Transfer,
}

#[derive(Debug)]
struct Transaction {
    transaction_type: TransactionType,
    amount: f64,
    description: String,
    timestamp: String, // 简化处理,实际应用中应使用专门的日期时间类型
}

impl BankAccount {
    fn new(account_number: String, holder_name: String) -> BankAccount {
        BankAccount {
            account_number,
            holder_name,
            balance: 0.0,
            transactions: Vec::new(),
        }
    }

    fn deposit(&mut self, amount: f64, description: String) -> Result<(), String> {
        if amount <= 0.0 {
            return Err("Deposit amount must be positive".to_string());
        }

        self.balance += amount;
        self.add_transaction(TransactionType::Deposit, amount, description);
        Ok(())
    }

    fn withdraw(&mut self, amount: f64, description: String) -> Result<(), String> {
        if amount <= 0.0 {
            return Err("Withdrawal amount must be positive".to_string());
        }

        if self.balance < amount {
            return Err("Insufficient funds".to_string());
        }

        self.balance -= amount;
        self.add_transaction(TransactionType::Withdrawal, amount, description);
        Ok(())
    }

    fn transfer(&mut self, to_account: &mut BankAccount, amount: f64, description: String) -> Result<(), String> {
        if amount <= 0.0 {
            return Err("Transfer amount must be positive".to_string());
        }

        if self.balance < amount {
            return Err("Insufficient funds for transfer".to_string());
        }

        self.balance -= amount;
        to_account.balance += amount;

        let desc_self = format!("Transfer to {}: {}", to_account.account_number, description);
        let desc_to = format!("Transfer from {}: {}", self.account_number, description);

        self.add_transaction(TransactionType::Transfer, amount, desc_self);
        to_account.add_transaction(TransactionType::Transfer, amount, desc_to);

        Ok(())
    }

    fn add_transaction(&mut self, transaction_type: TransactionType, amount: f64, description: String) {
        // 简化时间戳处理
        let timestamp = "2023-01-01 12:00:00".to_string();

        self.transactions.push(Transaction {
            transaction_type,
            amount,
            description,
            timestamp,
        });
    }

    fn print_statement(&self) {
        println!("Account Statement for {}", self.account_number);
        println!("Holder: {}", self.holder_name);
        println!("Current Balance: {:.2}", self.balance);
        println!("\nTransactions:");
        println!("{:<20} {:<10} {:<15} {}", "Date", "Type", "Amount", "Description");

        for txn in &self.transactions {
            println!("{:<20} {:<10} {:<15.2} {}",
                txn.timestamp,
                match txn.transaction_type {
                    TransactionType::Deposit => "DEPOSIT",
                    TransactionType::Withdrawal => "WITHDRAW",
                    TransactionType::Transfer => "TRANSFER",
                },
                txn.amount,
                txn.description);
        }
    }
}

impl fmt::Display for BankAccount {
    fn fmt(&self, f: &mut fmt::Formatter) -> fmt::Result {
        write!(f, "Account {} ({}): Balance {:.2}",
            self.account_number, self.holder_name, self.balance)
    }
}

fn main() {
    let mut account1 = BankAccount::new("123456".to_string(), "Alice".to_string());
    let mut account2 = BankAccount::new("654321".to_string(), "Bob".to_string());

    account1.deposit(1000.0, "Initial deposit".to_string()).unwrap();
    account1.withdraw(200.0, "Cash withdrawal".to_string()).unwrap();
    account1.transfer(&mut account2, 300.0, "Rent payment".to_string()).unwrap();

    println!("{}", account1);
    println!("{}", account2);

    account1.print_statement();
}
4. 最佳实践和常见模式
4.1 构建者模式
Rust没有默认参数和重载,构建者模式是创建复杂结构体的常用方式:
rust
struct Computer {
    cpu: String,
    memory: u32,
    storage: u32,
    gpu: Option<String>,
    has_wifi: bool,
    has_bluetooth: bool,
}

struct ComputerBuilder {
    cpu: String,
    memory: u32,
    storage: u32,
    gpu: Option<String>,
    has_wifi: bool,
    has_bluetooth: bool,
}

impl ComputerBuilder {
    fn new(cpu: String, memory: u32, storage: u32) -> ComputerBuilder {
        ComputerBuilder {
            cpu,
            memory,
            storage,
            gpu: None,
            has_wifi: false,
            has_bluetooth: false,
        }
    }

    fn gpu(mut self, gpu: String) -> ComputerBuilder {
        self.gpu = Some(gpu);
        self
    }

    fn wifi(mut self, has_wifi: bool) -> ComputerBuilder {
        self.has_wifi = has_wifi;
        self
    }

    fn bluetooth(mut self, has_bluetooth: bool) -> ComputerBuilder {
        self.has_bluetooth = has_bluetooth;
        self
    }

    fn build(self) -> Computer {
        Computer {
            cpu: self.cpu,
            memory: self.memory,
            storage: self.storage,
            gpu: self.gpu,
            has_wifi: self.has_wifi,
            has_bluetooth: self.has_bluetooth,
        }
    }
}

impl Computer {
    fn print_specs(&self) {
        println!("CPU: {}", self.cpu);
        println!("Memory: {} GB", self.memory);
        println!("Storage: {} GB", self.storage);

        if let Some(gpu) = &self.gpu {
            println!("GPU: {}", gpu);
        } else {
            println!("GPU: Integrated");
        }

        println!("Wi-Fi: {}", if self.has_wifi { "Yes" } else { "No" });
        println!("Bluetooth: {}", if self.has_bluetooth { "Yes" } else { "No" });
    }
}

fn main() {
    let gaming_pc = ComputerBuilder::new("Intel i7".to_string(), 16, 1000)
        .gpu("NVIDIA RTX 3080".to_string())
        .wifi(true)
        .bluetooth(true)
        .build();

    gaming_pc.print_specs();

    let office_pc = ComputerBuilder::new("Intel i5".to_string(), 8, 500)
        .wifi(true)
        .build();

    office_pc.print_specs();
}
4.2 使用Newtype模式
Newtype模式是在现有类型上创建新类型的一种方式,用于增加类型安全和表达意图:
rust
struct Email(String);

impl Email {
    fn new(email: &str) -> Result<Email, String> {
        if email.contains('@') {
            Ok(Email(email.to_string()))
        } else {
            Err("Invalid email format".to_string())
        }
    }
}

struct User {
    name: String,
    email: Email,
}

fn send_email(email: &Email, message: &str) {
    println!("Sending '{}' to {}", message, email.0);
}

fn main() {
    let email = Email::new("user@example.com").unwrap();
    let user = User {
        name: "Alice".to_string(),
        email,
    };

    send_email(&user.email, "Hello from Rust!");

    // 下面的代码会编译错误,因为类型不匹配
    // let invalid_email = "not-an-email".to_string();
    // send_email(&invalid_email, "This won't work");
}
4.3 结构体解构
可以使用模式匹配来解构结构体:
rust
struct Point3D {
    x: i32,
    y: i32,
    z: i32,
}

fn print_coordinates(&Point3D { x, y, z }: &Point3D) {
    println!("x: {}, y: {}, z: {}", x, y, z);
}

fn main() {
    let point = Point3D { x: 1, y: 2, z: 3 };
    print_coordinates(&point);

    // 也可以在let语句中解构
    let Point3D { x, y, z } = point;
    println!("x is {}", x);

    // 可以忽略某些字段
    let Point3D { x, .. } = Point3D { x: 4, y: 5, z: 6 };
    println!("only x: {}", x);
}
5. 性能考虑
5.1 结构体布局
Rust默认会对结构体字段进行重排以优化内存使用:
rust
struct Unoptimized {
    a: u8,   // 1字节
    b: u32,  // 4字节
    c: u16,  // 2字节
}

struct Optimized {
    b: u32,  // 4字节
    c: u16,  // 2字节
    a: u8,   // 1字节
}

fn main() {
    println!("Unoptimized size: {}", std::mem::size_of::<Unoptimized>()); // 可能输出12
    println!("Optimized size: {}", std::mem::size_of::<Optimized>());     // 可能输出8
}可以使用#[repr(C)]属性禁用这种优化,保持C兼容的布局:
rust
#[repr(C)]
struct CLike {
    a: u8,
    b: u32,
    c: u16,
}
5.2 零成本抽象
Rust的结构体和方法是零成本抽象,编译后的代码与直接操作数据一样高效:
rust
#[derive(Debug)]
struct Vector3D {
    x: f64,
    y: f64,
    z: f64,
}

impl Vector3D {
    fn dot(&self, other: &Vector3D) -> f64 {
        self.x * other.x + self.y * other.y + self.z * other.z
    }

    fn cross(&self, other: &Vector3D) -> Vector3D {
        Vector3D {
            x: self.y * other.z - self.z * other.y,
            y: self.z * other.x - self.x * other.z,
            z: self.x * other.y - self.y * other.x,
        }
    }
}

fn main() {
    let v1 = Vector3D { x: 1.0, y: 2.0, z: 3.0 };
    let v2 = Vector3D { x: 4.0, y: 5.0, z: 6.0 };

    println!("Dot product: {}", v1.dot(&v2));
    println!("Cross product: {:?}", v1.cross(&v2));
}
5.3 内联优化
小结构体通常会被编译器内联,消除方法调用的开销:
rust
#[derive(Clone, Copy)]
struct Point2D {
    x: f32,
    y: f32,
}

impl Point2D {
    #[inline]
    fn distance_squared(&self, other: Point2D) -> f32 {
        let dx = self.x - other.x;
        let dy = self.y - other.y;
        dx * dx + dy * dy
    }

    fn distance(&self, other: Point2D) -> f32 {
        self.distance_squared(other).sqrt()
    }
}
6. 总结
Rust的结构体是构建复杂数据类型的基础,提供了强大的数据组织和抽象能力。通过本文,我们学习了:
- 结构体的基本定义和实例化
- 方法语法和关联函数
- 高级特性如元组结构体和类单元结构体
- 实际应用案例:图形计算、学生管理、银行账户
- 设计模式如构建者模式和Newtype模式
- 性能考虑和优化技巧
结构体与Rust的其他特性如trait、泛型、生命周期等结合,可以构建出既安全又高效的复杂系统。掌握结构体的使用是成为Rust熟练开发者的重要一步。