今天我们了解下材质和光照的效果。
材质
材质的核心:
-
漫反射(Diffuse):物体表面主要反射颜色
-
高光(Specular):镜面反射的亮斑效果
-
环境光(Ambient):物体在场景中接收的环境基础光照
-
自发光(Emission):物体自身发光效果
-
光泽度(Shininess):控制高光区域的集中程度
漫反射材质(Diffuse Material)
作用 :控制模型表面对光线的散射效果,决定物体的基本颜色。
关键类 :osg::Material(材质属性)、osg::StateSet(状态集,用于绑定材质)。
高光材质(Specular Material)
作用 :模拟物体表面的镜面反射效果(如金属、光滑表面的反光点)。
关键参数:
- 高光颜色(Specular Color):反射光的颜色。
- 高光指数(Shininess):控制高光区域的大小和锐利程度(数值越大,高光点越小越亮)。
环境光(Ambient Material)
作用:模拟光线多次反射后的基础照明
关键参数:
- RGBA四通道控制
- 通常设置为低饱和度颜色
自发光(Emission Material)
作用:物体表面自辐射
cpp
material->setEmission(osg::Material::FRONT, osg::Vec4(0.8, 0.3, 0.1, 1.0));光泽度(Shininess Material)
作用:模拟金属特性
视觉规律:
- 每增加32,高光面积缩小50%
- 金属材质建议值:≥64
cpp
// 动态调整观察效果
osg::Uniform* shininessUniform = new osg::Uniform("shininess", 64.0f);
geode->getStateSet()->addUniform(shininessUniform);
光源
点光源(Point Light)
特点 :光线从单一位置向四周均匀发散(类似灯泡)。
关键类 :osg::Light(光源对象)、osg::LightSource(光源节点,用于添加到场景)。
平行光(Directional Light)
特点:光线以平行方向照射(类似太阳光),无衰减,方向由位置向量决定。
实战开始
light.cpp:
cpp
#include <osgViewer/Viewer>
#include <osgDB/ReadFile>
#include <osg/Node>
#include <osg/Geode>
#include <osg/ShapeDrawable>
#include <osg/Material>
#include <osg/StateSet>
#include <osg/Light>
#include <osg/LightSource>
#include <osg/MatrixTransform>
#include <osgGA/StateSetManipulator>

osg::ref_ptr<osg::Material> createMaterial(
    const osg::Vec4& diffuseColor,    // 漫反射颜色
    const osg::Vec4& specularColor,   // 高光颜色
    float shininess                   // 高光指数
) {
    osg::ref_ptr<osg::Material> material = new osg::Material;

    // 设置漫反射颜色(对应 RGBA,通常 alpha=1.0)
    material->setDiffuse(osg::Material::FRONT, diffuseColor);

    // 设置高光颜色和指数
    material->setSpecular(osg::Material::FRONT, specularColor);
    material->setShininess(osg::Material::FRONT, shininess); // 范围:0-128(默认 0,无高光)
    // 设置环境光,通常与漫反射颜色相同
    material->setAmbient(osg::Material::FRONT, diffuseColor);
    return material;
}

osg::ref_ptr<osg::Material> createEmissionMaterial(
    const osg::Vec4& diffuseColor,    // 漫反射颜色
    const osg::Vec4& specularColor,   // 高光颜色
    float shininess                   // 高光指数
) {
    osg::ref_ptr<osg::Material> material = new osg::Material;

    // 设置漫反射颜色(对应 RGBA,通常 alpha=1.0)
    material->setDiffuse(osg::Material::FRONT, diffuseColor);

    // 设置高光颜色和指数
    material->setSpecular(osg::Material::FRONT, specularColor);
    material->setShininess(osg::Material::FRONT, shininess); // 范围:0-128(默认 0,无高光)
    // 设置环境光,通常与漫反射颜色相同
    material->setAmbient(osg::Material::FRONT, diffuseColor);
    // 自发光
    material->setEmission(osg::Material::FRONT, osg::Vec4(1.0, 1.0, 1.0, 1.0));
    return material;
}

// 金属
osg::ref_ptr<osg::Material> createMetalMaterial(
    const osg::Vec4& diffuseColor,    // 漫反射颜色
    const osg::Vec4& specularColor,   // 高光颜色
    float shininess                   // 高光指数
) {
    osg::ref_ptr<osg::Material> material = new osg::Material;
    // 设置环境光颜色,通常较暗
    // material->setAmbient(osg::Material::FRONT, osg::Vec4(0.1, 0.1, 0.1, 1.0));

    // 设置漫反射颜色,金属的漫反射相对较弱
    material->setDiffuse(osg::Material::FRONT, diffuseColor);

    // 设置高光颜色,金属具有高反射性,高光明显
    material->setSpecular(osg::Material::FRONT, specularColor);

    // 设置高光指数,较高的值会使高光更集中、更亮
    material->setShininess(osg::Material::FRONT, shininess);

    // 设置自发光颜色,一般较弱
    // material->setEmission(osg::Material::FRONT, osg::Vec4(0.0, 0.0, 0.0, 1.0));
    return material;
}

// 创建点光源(ID:GL_LIGHT0,0-7 共 8 个可用光源)
osg::ref_ptr<osg::Light> createPointLight(
    const osg::Vec4& color,       // 光源颜色
    const osg::Vec3& position      // 光源位置(世界坐标系)
) {
    osg::ref_ptr<osg::Light> light = new osg::Light;
    light->setLightNum(0);         // 设置光源 ID
    light->setDiffuse(color);      // 漫反射光颜色
    light->setPosition(osg::Vec4(position, 1.0)); // 点光源位置(w=1,表示位置坐标)
    // 设置环境光,通常为较暗的颜色
    light->setAmbient(osg::Vec4(0.2f, 0.2f, 0.2f, 1.0f));
    return light;
}

// 创建平行光
osg::ref_ptr<osg::Light> createDirectionalLight(
    const osg::Vec4& color,       // 光源颜色
    const osg::Vec3& direction    // 光照方向(世界坐标系,如指向负 Z 轴:(0,0,-1))
) {
    osg::ref_ptr<osg::Light> light = new osg::Light;
    light->setLightNum(1);         // 另一个光源 ID
    light->setDiffuse(color);
    light->setPosition(osg::Vec4(direction, 0.0)); // 平行光位置(w=0,表示方向向量)
    return light;
}

int main() {
    // 创建带材质的模型(红色箱体)
    osg::ref_ptr<osg::Geode> geode = new osg::Geode;
    geode->addDrawable(new osg::ShapeDrawable(new osg::Box(osg::Vec3(0,0,0), 1.0)));
    geode->getOrCreateStateSet()->setAttribute(createMaterial(
        osg::Vec4(1,0,0,1), osg::Vec4(1,1,1,1), 50.0f
    ));

    // 创建光源节点
    osg::ref_ptr<osg::Group> root = new osg::Group;
    root->addChild(geode);


    // 添加点光源(左上前方)
    osg::ref_ptr<osg::LightSource> lightSource = new osg::LightSource;
    osg::ref_ptr<osg::Light> pointLight = createPointLight(osg::Vec4(1,1,1,1), osg::Vec3(2,2,2));
    lightSource->setLight(pointLight);
    root->addChild(lightSource);

    // 创建代表光源位置的球体
    osg::ref_ptr<osg::ShapeDrawable> sphereDrawable = new osg::ShapeDrawable(new osg::Sphere(osg::Vec3(2,2,2), 0.1));
    osg::ref_ptr<osg::Material> whiteMaterial = createEmissionMaterial(osg::Vec4(1, 1, 1, 1), osg::Vec4(1, 1, 1, 1), 50.0f);
    sphereDrawable->getOrCreateStateSet()->setAttributeAndModes(whiteMaterial, osg::StateAttribute::ON);
    osg::ref_ptr<osg::Geode> sphereGeode = new osg::Geode;
    sphereGeode->addDrawable(sphereDrawable);
    root->addChild(sphereGeode);

    // 创建代表金属的球体
    osg::ref_ptr<osg::ShapeDrawable> sphereMetalDrawable = new osg::ShapeDrawable(new osg::Sphere(osg::Vec3(2,2,6), 1));
    osg::ref_ptr<osg::Material> metalMaterial = createMetalMaterial(osg::Vec4(0.4, 0.4, 0.4, 1), osg::Vec4(1, 1, 1, 1), 100.0f);
    sphereMetalDrawable->getOrCreateStateSet()->setAttributeAndModes(metalMaterial, osg::StateAttribute::ON);
    osg::ref_ptr<osg::Geode> sphereMetalGeode = new osg::Geode;
    sphereMetalGeode->addDrawable(sphereMetalDrawable);
    root->addChild(sphereMetalGeode);

    // 添加平行光(从上方照射)
    osg::ref_ptr<osg::LightSource> lightSourceDirectional = new osg::LightSource;
    osg::ref_ptr<osg::Light> directionalLight = createDirectionalLight(osg::Vec4(0.5,0.5,1,1), osg::Vec3(0,-1,0));
    lightSourceDirectional->setLight(directionalLight);
    root->addChild(lightSourceDirectional);

    // 启用光照和光源
    root->getOrCreateStateSet()->setMode(GL_LIGHTING, osg::StateAttribute::ON);
    root->getOrCreateStateSet()->setMode(GL_LIGHT0, osg::StateAttribute::ON);
    root->getOrCreateStateSet()->setMode(GL_LIGHT1, osg::StateAttribute::ON);

    // 渲染场景
    osgViewer::Viewer viewer;
    viewer.setSceneData(root);

    // 调试光源
    viewer.addEventHandler(new osgGA::StateSetManipulator(
        viewer.getCamera()->getOrCreateStateSet()
    ));


    return viewer.run();
}
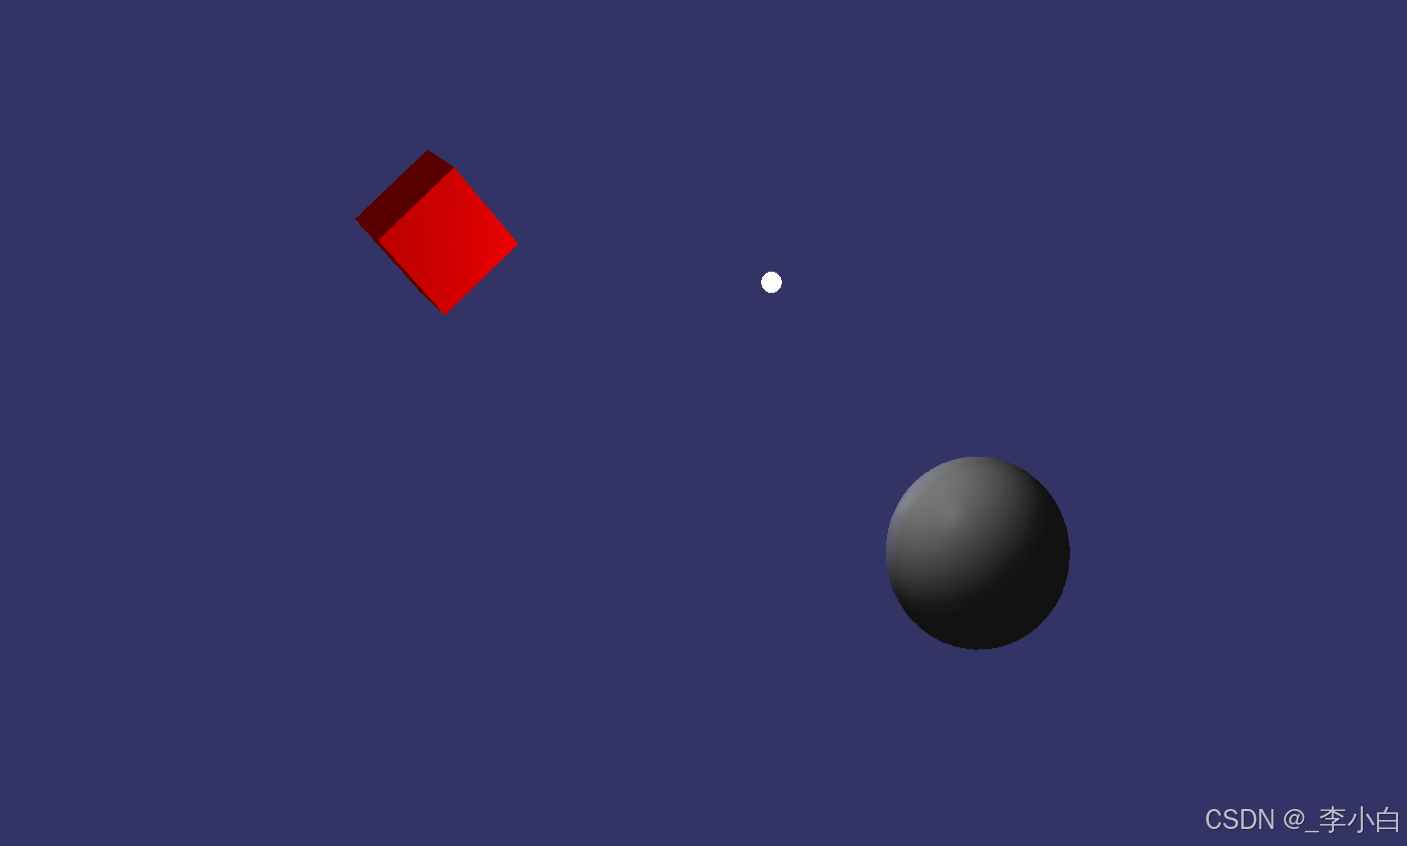
运行效果

效果还是可以的, 就是金属球看起来黑乎乎的,后续再说怎么优化。下课。_
