文章目录
任务介绍
本次任务为毒蘑菇的二元分类,任务本身并不复杂,适合初学者,主要亮点在于对字符数据的处理,还有尝试了加深神经网络深度的效果,之后读者也可自行改变观察效果,比赛路径将于附录中给出。
数据概览
本次任务的数据集比较简单
- train.csv 训练文件
- test.csv 测试文件
- sample_submission.csv 提交示例文件
具体内容就是关于毒蘑菇的各种特征,可在附录中获取数据集。
数据处理
数据读取与拼接
这段代码提取了数据文件,并且对两个不同来源的数据集进行了拼接,当我们的数据集较小时,就可采用这种方法,获取其他的数据集并将两个数据集合并起来。
python
import pandas as pd
from sklearn.preprocessing import LabelEncoder, StandardScaler
python
file = pd.read_csv("/kaggle/input/playground-series-s4e8/train.csv", index_col="id")
file2 = pd.read_csv("/kaggle/input/mushroom-classification-edible-or-poisonous/mushroom.csv")
python
file_all = pd.concat([file, file2])字符数据转化
这段代码主要就是提取出字符数据,因为字符是无法直接被计算机处理,所以我们提取出来后,再将字符数据映射为数字数据。
python
char_features = ['cap-shape', 'cap-surface', 'cap-color', 'does-bruise-or-bleed', 'gill-attachment', 'gill-spacing', 'gill-color', 'stem-root', 'stem-surface', 'stem-color', 'veil-type', 'veil-color', 'has-ring', 'ring-type', 'spore-print-color', 'habitat', 'season']
python
for i in char_features:
    file_all[i] = LabelEncoder().fit_transform(file_all[i])
python
file_all = file_all.fillna(0)
python
train_col = ['cap-diameter', 'stem-height', 'stem-width', 'cap-shape', 'cap-surface', 'cap-color', 'does-bruise-or-bleed', 'gill-attachment', 'gill-spacing', 'gill-color', 'stem-root', 'stem-surface', 'stem-color', 'veil-type', 'veil-color', 'has-ring', 'ring-type', 'spore-print-color', 'habitat', 'season']
python
X = file_all[train_col]
y = file_all['class']
标签数据映射
除了用上述方法进行字符转化外,还可以使用map函数,以下是具体操作。
python
y.unique()
python
# 构建映射字典
applying = {'e': 0, 'p': 1}
python
y = y.map(applying)数据集划分
这段代码使用sklearn库将数据集划分为训练集和测试集。
python
from sklearn.model_selection import train_test_split
python
x_train, x_test, y_train, y_test = train_test_split(X, y, test_size=0.1)
python
x_train.shape, y_train.shape数据标准化
这段代码将我们的数据进行归一化,减小数字大小方便计算,但是仍然保持他们之间的线性关系,不会对结果产生影响。
python
scaler = StandardScaler()
python
x_train = scaler.fit_transform(x_train)
x_test = scaler.fit_transform(x_test)
模型构建与训练
这段代码使用torch库构建了深度学习模型,主要运用了线性层,还进行了正则化操作,防止模型过拟合。
模型构建
python
import torch
import torch.nn as nn
python
class Model(nn.Module):
    def __init__(self):
        super().__init__()
        self.linear = nn.Linear(20, 256)
        self.relu = nn.ReLU()
        self.dropout = nn.Dropout(p=0.2)
        self.linear1 = nn.Linear(256, 128)
        self.linear2 = nn.Linear(128, 64)
        self.linear3 = nn.Linear(64, 48)
        self.linear4 = nn.Linear(48, 32)
        self.linear5 = nn.Linear(32, 2)

    def forward(self, x):
        out = self.linear(x)
        out = self.relu(out)
        out = self.linear1(out)
        out = self.relu(out)
        out = self.dropout(out)
        out = self.linear2(out)
        out = self.relu(out)
        out = self.linear3(out)
        out = self.dropout(out)
        out = self.relu(out)
        out = self.linear4(out)
        out = self.relu(out)
        out = self.linear5(out)

        return out
对模型类进行实例化。
python
model = Model()数据批处理
由于数据一条一条的处理起来很慢,因此我们可以将数据打包,一次给模型输入多条数据,能有效节省时间。
python
import torch.nn.functional as F
python
class Dataset(torch.utils.data.Dataset):
    def __init__(self, x, y):
        self.x = x
        self.y = y

    def __len__(self):
        return len(self.x)

    def __getitem__(self, i):
        x = torch.Tensor(self.x[i])
        y = torch.tensor(self.y.iloc[i])

        return x, y
python
train_data = Dataset(x_train, y_train)
test_data = Dataset(x_test, y_test)
python
loader = torch.utils.data.DataLoader(train_data, batch_size=64, drop_last=True, shuffle=True)
python
test_loader = torch.utils.data.DataLoader(test_data, batch_size=256, drop_last=True, shuffle=True)模型训练
这段代码就是模型的训练过程,包括创建优化器,定义损失函数等,还在训练过程中测试准确率与损失函数值,动态的观察训练过程。
python
from tqdm import tqdm
import matplotlib.pyplot as plt
python
criterion = nn.CrossEntropyLoss()
optimizer = torch.optim.SGD(model.parameters(), lr=0.1, weight_decay=1e-5)
python
from sklearn.metrics import matthews_corrcoef
python
flag = 0
for i in range(10):
    for x, label in tqdm(loader):
        out = model(x)
        loss = criterion(out, label)
        loss.backward()
        optimizer.step()
        optimizer.zero_grad()
        flag+=1
        if flag%500 == 0:
            test = next(iter(test_loader))
            t_out = model(test[0]).argmax(dim=1)
            print("loss=", loss.item())
            acc = (t_out == test[1]).sum().item()/len(test[1])
            mcc = matthews_corrcoef(t_out, test[1])
            print("acc=", acc)
            print("mcc=", mcc)
文件提交
这段代码主要就是使用训练好的模型在测试集上预测,并且将其整合成提交文件。
python
test_file = pd.read_csv("/kaggle/input/playground-series-s4e8/test.csv")
python
for i in char_features:
    test_file[i] = LabelEncoder().fit_transform(test_file[i])
python
test_file.fillna(0)
python
test_x = torch.Tensor(test_file[train_col].values)
test_x = torch.Tensor(scaler.fit_transform(test_x))
python
out = model(test_x)
out = pd.Series(out.argmax(dim=1))
python
map2 = {0: 'e', 1: 'p'}
python
result = out.map(map2)
python
answer = pd.DataFrame({'id': test_file['id'], "class": result})
python
answer.to_csv('submission.csv', index=False)结果
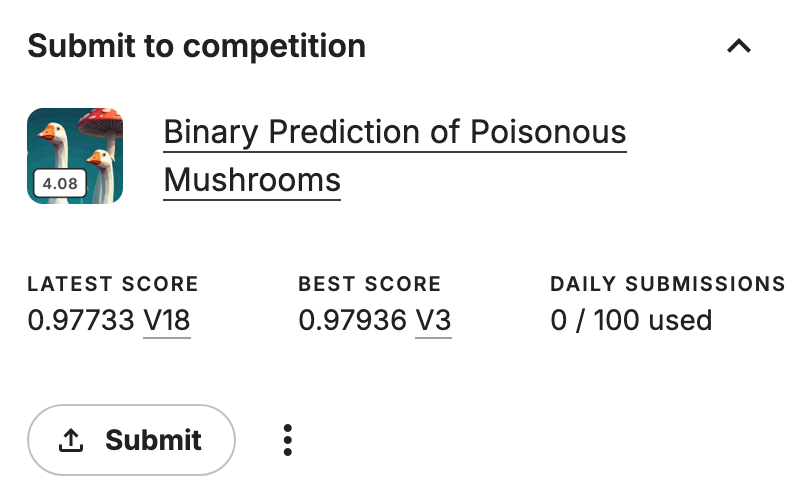
将文件提交后,得到了0.97的成绩,已经非常接近1了,证明模型的效果非常不错。
附录
比赛链接:https://www.kaggle.com/competitions/playground-series-s4e8
额外数据集地址:https://www.kaggle.com/datasets/vishalpnaik/mushroom-classification-edible-or-poisonous