🔥 本文详细讲解如何从零搭建一个完整的DeepSeek AI对话系统,包括Spring Boot后端和React前端,适合AI开发入门者快速上手。即使你是编程萌新,也能轻松搭建自己的AI助手!
📚博主匠心之作,强推专栏:

文章目录
-
- 项目介绍
- 系统架构
- 后端项目搭建
-
- [1. 创建Spring Boot项目](#1. 创建Spring Boot项目)
- [2. 创建DeepSeek客户端](#2. 创建DeepSeek客户端)
- [3. 创建模型类](#3. 创建模型类)
- [4. 创建Controller层](#4. 创建Controller层)
- 前端项目搭建
-
- [1. 创建React项目](#1. 创建React项目)
- [2. 配置项目](#2. 配置项目)
- [3. 创建API服务](#3. 创建API服务)
- [4. 创建聊天组件](#4. 创建聊天组件)
- [5. 支持Markdown渲染](#5. 支持Markdown渲染)
- 运行项目
- 项目运行效果
-
- [1. 初始界面展示](#1. 初始界面展示)
- [2. 请求发送与等待响应](#2. 请求发送与等待响应)
- [3. AI响应后界面效果](#3. AI响应后界面效果)
- [4. 长文本Markdown渲染展示](#4. 长文本Markdown渲染展示)
- [5. 一键复制功能展示](#5. 一键复制功能展示)
- 项目优化
- 踩坑与解决方案
- 项目拓展方向
- 源码下载
- 写在最后
项目介绍
在AI大模型时代,拥有一个自己的AI助手已不再是高不可攀的梦想。本文将带你从零开始,搭建一个完整的DeepSeek AI对话系统,包括Spring Boot后端和React前端,让你无需深厚的技术背景,也能轻松构建专属AI应用。
这个项目的核心功能是:
- 🚀 通过Spring Boot构建稳定的后端服务
- 🔌 对接DeepSeek AI API实现智能对话
- 💻 使用React打造美观的前端界面
- 🎨 支持Markdown格式的AI回复展示
源码已附文章末尾,有需要的朋友自行获取
系统架构
整个系统采用前后端分离架构,主要包含两个部分:
-
后端服务 (DeepSeekExtProject):
- 基于Spring Boot框架
- 提供RESTful API接口
- 封装DeepSeek API调用逻辑
- 处理请求/响应数据转换
-
前端应用 (DeepSeekExtWeb):
- 基于React + TypeScript
- 美观的聊天界面
- 实时消息交互
- Markdown格式渲染支持
后端项目搭建
1. 创建Spring Boot项目
首先,我们需要创建一个Spring Boot项目。可以通过Spring Initializr网站或IDE插件完成:
java
// 项目关键依赖
<dependencies>
    <dependency>
        <groupId>org.springframework.boot</groupId>
        <artifactId>spring-boot-starter-web</artifactId>
    </dependency>
    <dependency>
        <groupId>com.squareup.okhttp3</groupId>
        <artifactId>okhttp</artifactId>
        <version>4.9.3</version>
    </dependency>
    <dependency>
        <groupId>com.alibaba</groupId>
        <artifactId>fastjson</artifactId>
        <version>2.0.23</version>
    </dependency>
</dependencies>
2. 创建DeepSeek客户端
接下来,创建一个客户端类来调用DeepSeek API:
java
public class DeepSeekClient {
    private static final String API_URL = "https://api.deepseek.com/v1/chat/completions";
    public static String API_KEY = "你的DeepSeek API Key";  // 替换为你的API密钥

    private static final String MODEL_CHAT = "deepseek-chat";
    private final OkHttpClient client = new OkHttpClient();

    public String getResponse(String apiKey, String prompt) throws IOException {
        // 构建请求体
        DeepSeekRequestModel requestBody = DeepSeekRequestModel.builder()
                .model(MODEL_CHAT)
                .messages(Arrays.asList(
                        DeepSeekRequestModel.Message.builder()
                                .role("user")
                                .content(prompt)
                                .build()
                ))
                .build();

        String jsonBody = JSON.toJSONString(requestBody);
        Request request = new Request.Builder()
                .url(API_URL)
                .post(RequestBody.create(jsonBody, MediaType.get("application/json")))
                .addHeader("Authorization", "Bearer " + apiKey)
                .build();

        try (Response response = client.newCall(request).execute()) {
            if (response.isSuccessful() && response.body() != null) {
                return response.body().string();
            }
            throw new IOException("Unexpected code " + response);
        }
    }
}
3. 创建模型类
我们需要几个模型类来处理请求和响应:
java
// 请求模型
@Data
@Builder
public class DeepSeekRequestModel {
    private String model;
    private List<Message> messages;

    @Data
    @Builder
    public static class Message {
        private String role;
        private String content;
    }
}

// 响应模型
@Data
public class DeepSeeekResponse {
    private String id;
    private String object;
    private long created;
    private String model;
    private List<Choice> choices;

    @Data
    public static class Choice {
        private Message message;
        private String finish_reason;
        private int index;
    }

    @Data
    public static class Message {
        private String role;
        private String content;
    }
}
4. 创建Controller层
最后,创建一个控制器来处理HTTP请求:
java
@Controller
@RequestMapping("/deepseek")
@ResponseBody
public class DeepSeekController {

    @RequestMapping(value = "/ask", method = RequestMethod.POST)
    public R<String> ask(@RequestBody AskParam askParam) {
        try {
            String responsestr = new DeepSeekClient().getResponse(DeepSeekClient.API_KEY, askParam.getAskInfo());
            DeepSeeekResponse response = JSONObject.parseObject(responsestr, DeepSeeekResponse.class);
            for (DeepSeeekResponse.Choice choice : response.getChoices()) {
                if ("stop".equals(choice.getFinish_reason())) {
                    // 成功
                    String content = choice.getMessage().getContent();
                    return R.ok(content);
                }
            }
            return R.error("请求失败");
        } catch (IOException e) {
            return R.error("异常:" + e.getMessage());
        }
    }
}
前端项目搭建
1. 创建React项目
首先,创建一个新的React项目:
bash
# 创建新项目
mkdir DeepSeekExtWeb
cd DeepSeekExtWeb

# 初始化package.json
npm init -y

# 安装核心依赖
npm install react react-dom react-scripts typescript @types/react @types/react-dom axios antd @ant-design/icons styled-components react-markdown remark-gfm rehype-highlight rehype-raw
2. 配置项目
创建必要的配置文件:
javascript
// package.json 配置启动脚本
"scripts": {
  "start": "set PORT=8889 && react-scripts start",
  "build": "react-scripts build"
}

// tsconfig.json
{
  "compilerOptions": {
    "target": "es5",
    "lib": ["dom", "dom.iterable", "esnext"],
    "allowJs": true,
    "skipLibCheck": true,
    "esModuleInterop": true,
    "allowSyntheticDefaultImports": true,
    "strict": true,
    "forceConsistentCasingInFileNames": true,
    "noFallthroughCasesInSwitch": true,
    "module": "esnext",
    "moduleResolution": "node",
    "resolveJsonModule": true,
    "isolatedModules": true,
    "noEmit": true,
    "jsx": "react-jsx"
  },
  "include": ["src"]
}
3. 创建API服务
创建一个service文件处理API调用:
typescript
// src/services/deepSeekService.ts
import axios from 'axios';

const API_BASE_URL = 'http://localhost:8888';

export interface ApiResponse<T> {
  code: number;
  msg: string;
  data: T;
}

export const deepSeekService = {
  askQuestion: async (question: string): Promise<string> => {
    try {
      const response = await axios.post<ApiResponse<string>>(`${API_BASE_URL}/deepseek/ask`, {
        askInfo: question
      });

      if (response.data.code === 0) {
        return response.data.data;
      } else {
        throw new Error(response.data.msg || '请求失败');
      }
    } catch (error) {
      console.error('API请求错误:', error);
      throw error;
    }
  }
};
4. 创建聊天组件
构建核心的聊天界面组件:
tsx
// src/components/ChatPage.tsx (部分核心代码)
const ChatPage: React.FC = () => {
  const [inputValue, setInputValue] = useState('');
  const [messages, setMessages] = useState<MessageType[]>([
    {
      id: '1',
      content: '欢迎使用DeepSeek聊天助手,请输入您的问题!',
      sender: 'bot',
      timestamp: new Date().toISOString(),
    },
  ]);
  const [loading, setLoading] = useState(false);

  const handleSendMessage = async () => {
    if (!inputValue.trim()) {
      return;
    }

    const userMessage = {
      id: Date.now().toString(),
      content: inputValue,
      sender: 'user',
      timestamp: new Date().toISOString(),
    };

    setMessages((prev) => [...prev, userMessage]);
    setInputValue('');
    setLoading(true);

    try {
      const response = await deepSeekService.askQuestion(inputValue);

      const botMessage = {
        id: (Date.now() + 1).toString(),
        content: response,
        sender: 'bot',
        timestamp: new Date().toISOString(),
      };

      setTimeout(() => {
        setMessages((prev) => [...prev, botMessage]);
        setLoading(false);
      }, 500);
    } catch (error) {
      console.error('发送消息失败:', error);
      setLoading(false);
    }
  };

  return (
    <ChatContainer>
      <MessagesContainer>
        {messages.map((msg) => (
          <ChatMessage key={msg.id} message={msg} />
        ))}

        {loading && (
          <TypingIndicator>
            DeepSeek正在思考...
          </TypingIndicator>
        )}
      </MessagesContainer>

      <InputContainer>
        <TextArea
          value={inputValue}
          onChange={(e) => setInputValue(e.target.value)}
          placeholder="输入您的问题..."
          disabled={loading}
        />
        <Button
          type="primary"
          onClick={handleSendMessage}
          loading={loading}
        >
          发送
        </Button>
      </InputContainer>
    </ChatContainer>
  );
};
5. 支持Markdown渲染
为了优雅地显示AI回复,我们添加了Markdown渲染支持:
tsx
// src/components/ChatMessage.tsx (部分代码)
import ReactMarkdown from 'react-markdown';
import remarkGfm from 'remark-gfm';
import rehypeHighlight from 'rehype-highlight';

const ChatMessage: React.FC<ChatMessageProps> = ({ message }) => {
  const isUser = message.sender === 'user';

  const handleCopy = () => {
    navigator.clipboard.writeText(message.content);
    message.antd.message.success('已复制到剪贴板');
  };

  return (
    <MessageContainer isUser={isUser}>
      <MessageContent isUser={isUser}>
        {!isUser && (
          <CopyButton onClick={handleCopy}>
            <CopyOutlined />
          </CopyButton>
        )}
        <MessageBubble isUser={isUser}>
          {isUser ? (
            message.content
          ) : (
            <MarkdownContent isUser={isUser}>
              <ReactMarkdown
                remarkPlugins={[remarkGfm]}
                rehypePlugins={[rehypeHighlight]}
              >
                {message.content}
              </ReactMarkdown>
            </MarkdownContent>
          )}
        </MessageBubble>
      </MessageContent>
    </MessageContainer>
  );
};
运行项目
完成以上代码开发后,你可以按以下步骤运行项目:
-
启动后端服务:
bashcd DeepSeekExtProject mvn spring-boot:run后端服务将在8888端口启动。
-
启动前端应用:
bashcd DeepSeekExtWeb npm start前端应用将在8889端口启动。
-
开始对话:
- 在浏览器访问 http://localhost:8889
- 在输入框中输入问题并发送
- 等待DeepSeek AI的回复(支持Markdown格式展示)
项目运行效果
完成所有代码后,成功运行项目,下面是实际效果展示:
1. 初始界面展示
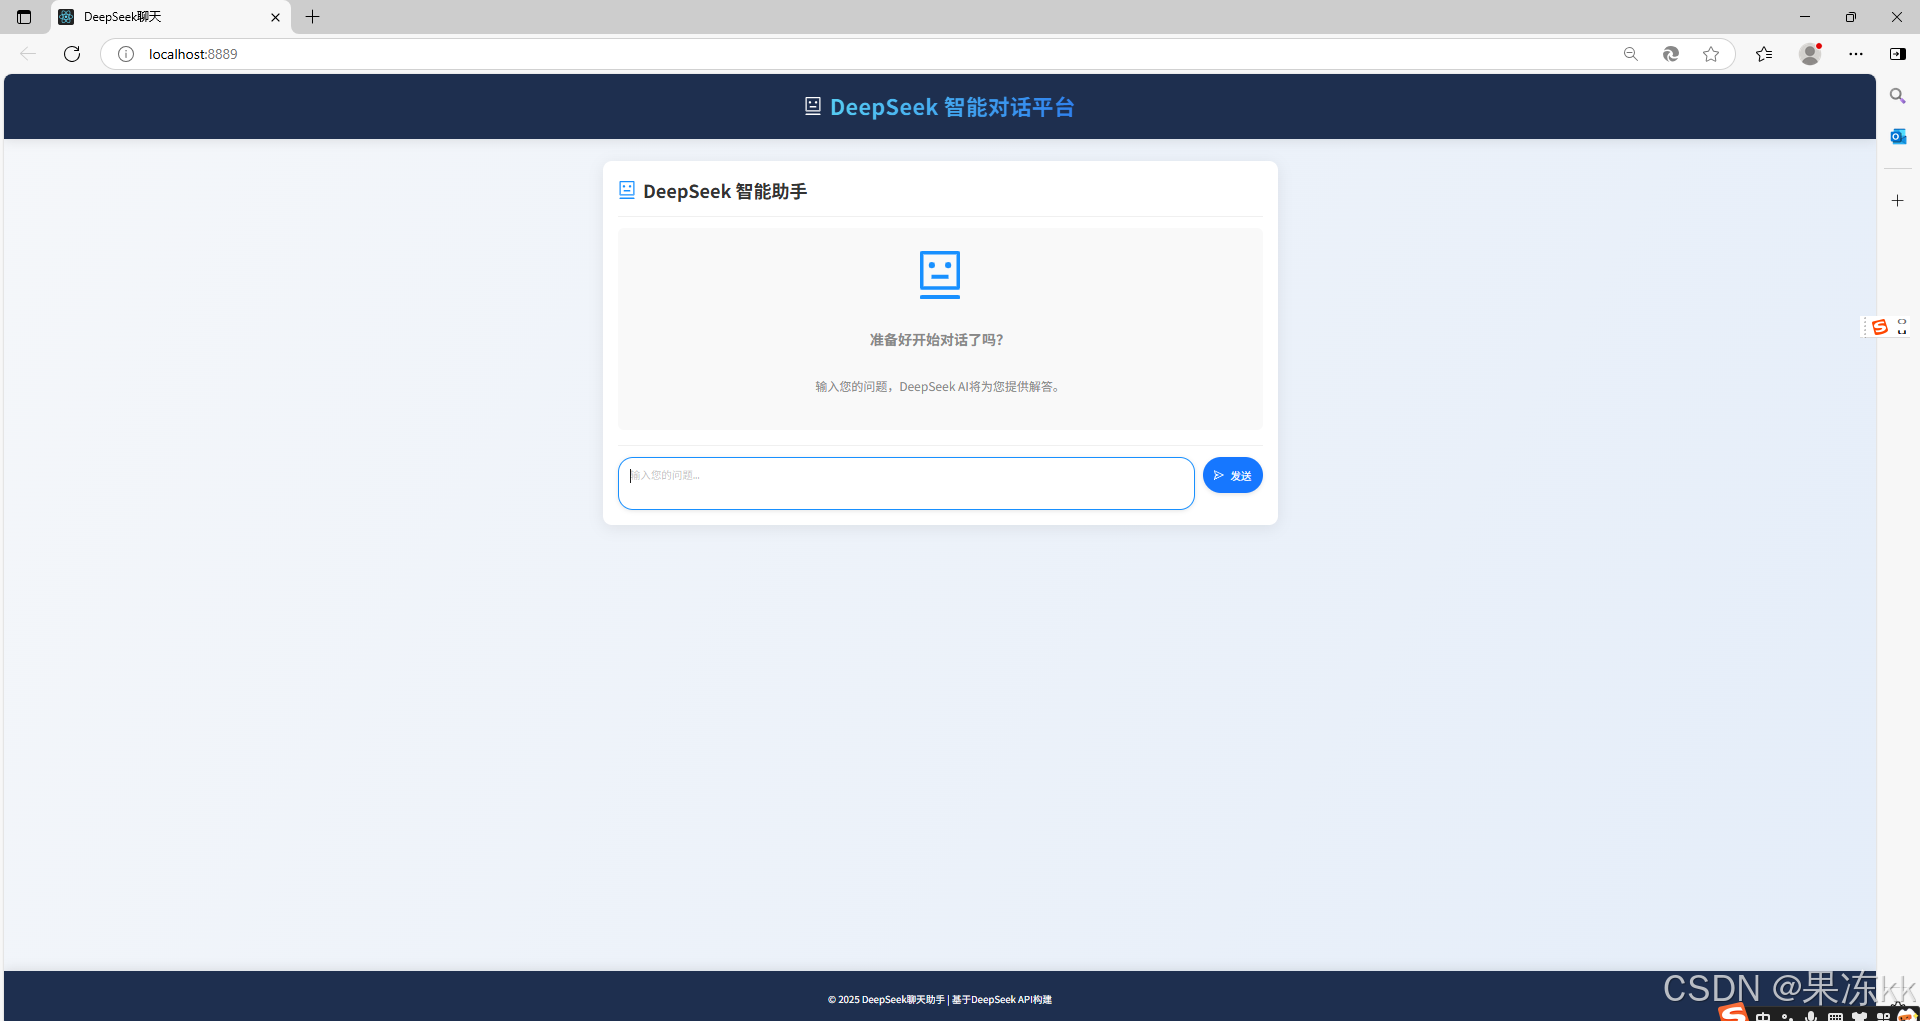
图1:项目启动后的初始聊天界面,等待用户输入问题
2. 请求发送与等待响应
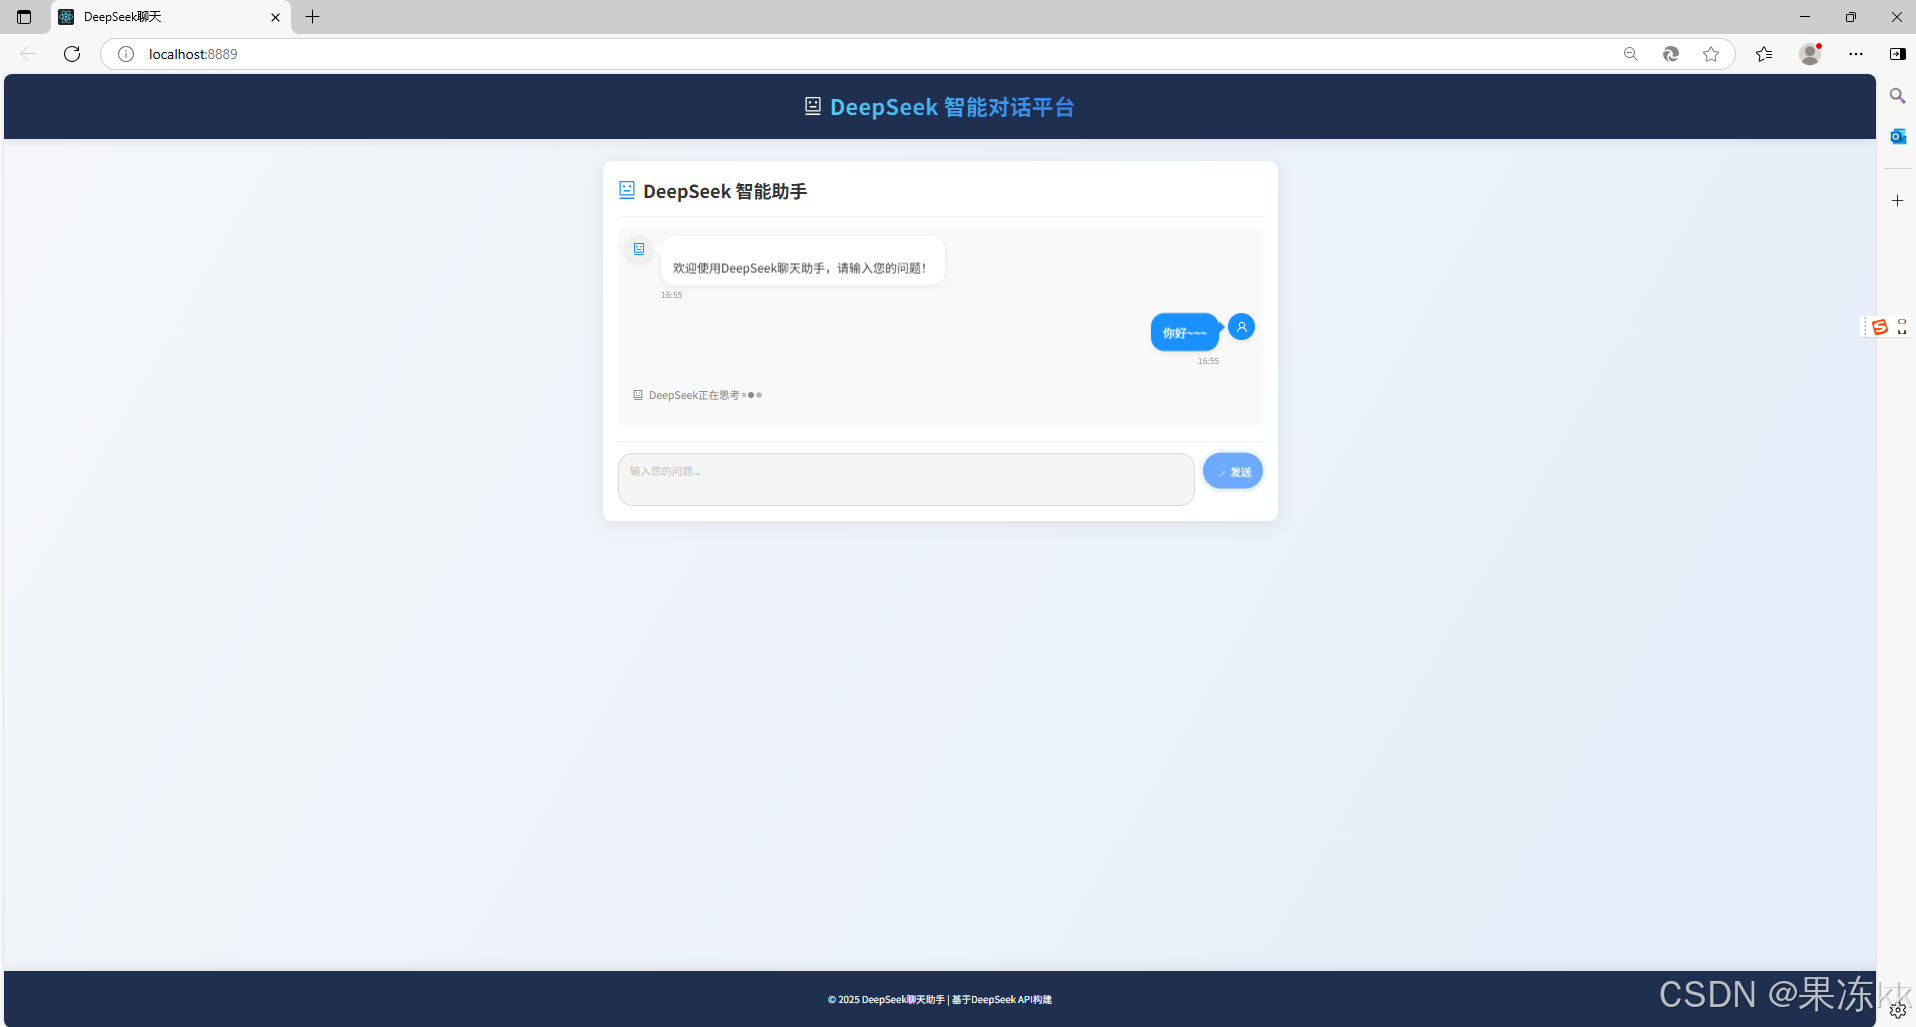
图2:用户发送问题后,显示加载动画提示AI正在思考
3. AI响应后界面效果
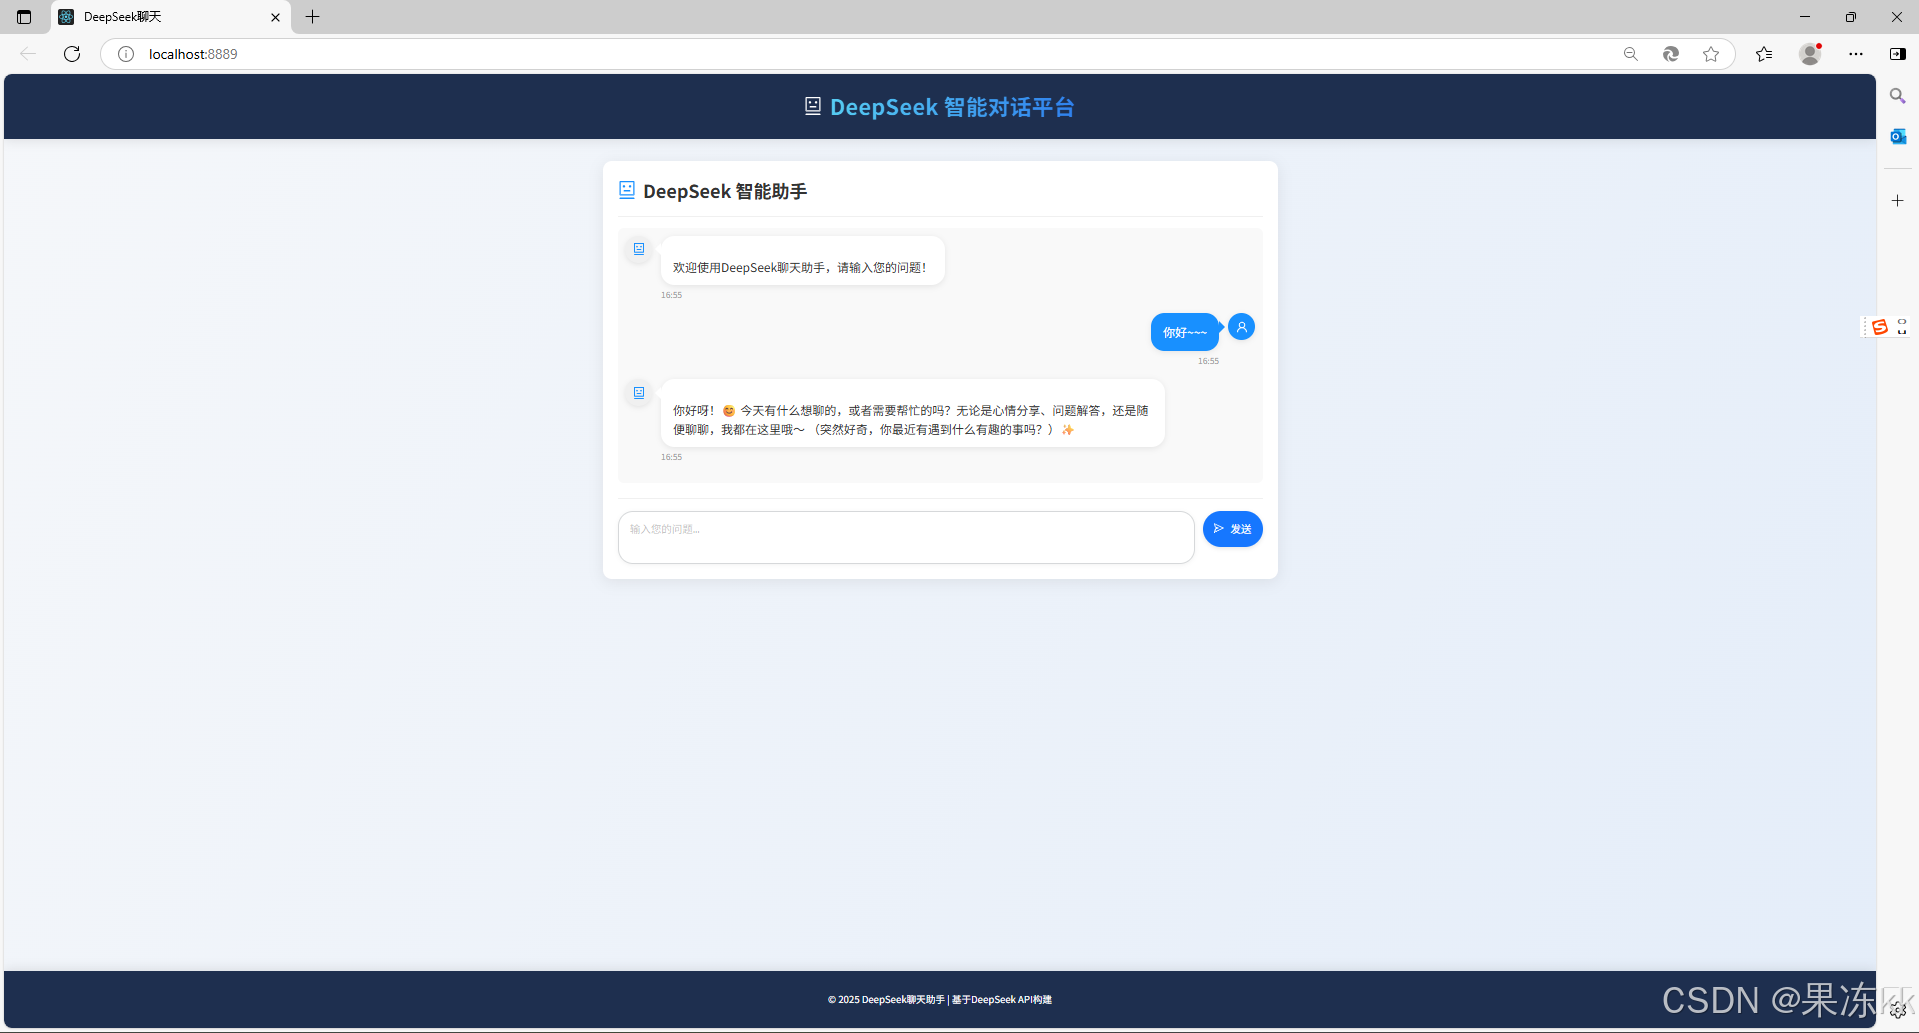
图3:DeepSeek AI回答完成后的界面效果
4. 长文本Markdown渲染展示
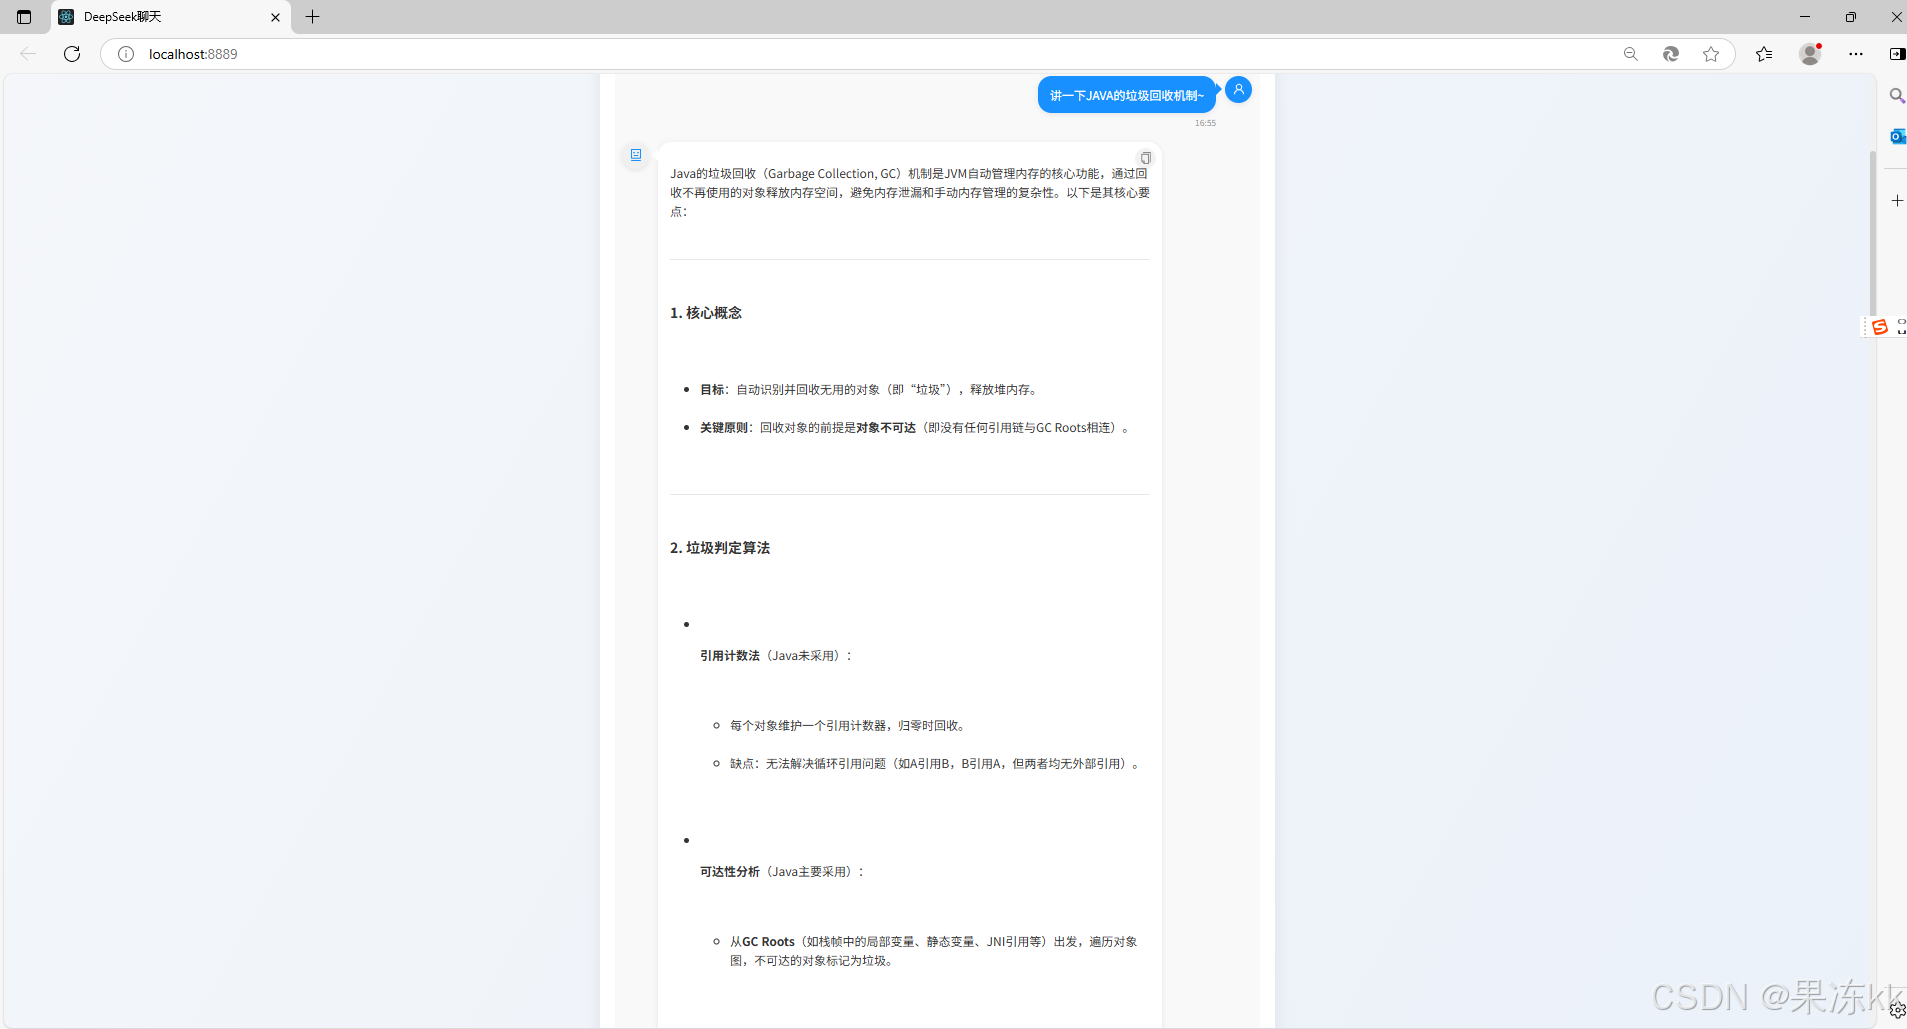
图4:查询"Java垃圾回收"等专业问题后,长文本响应的Markdown渲染效果
5. 一键复制功能展示
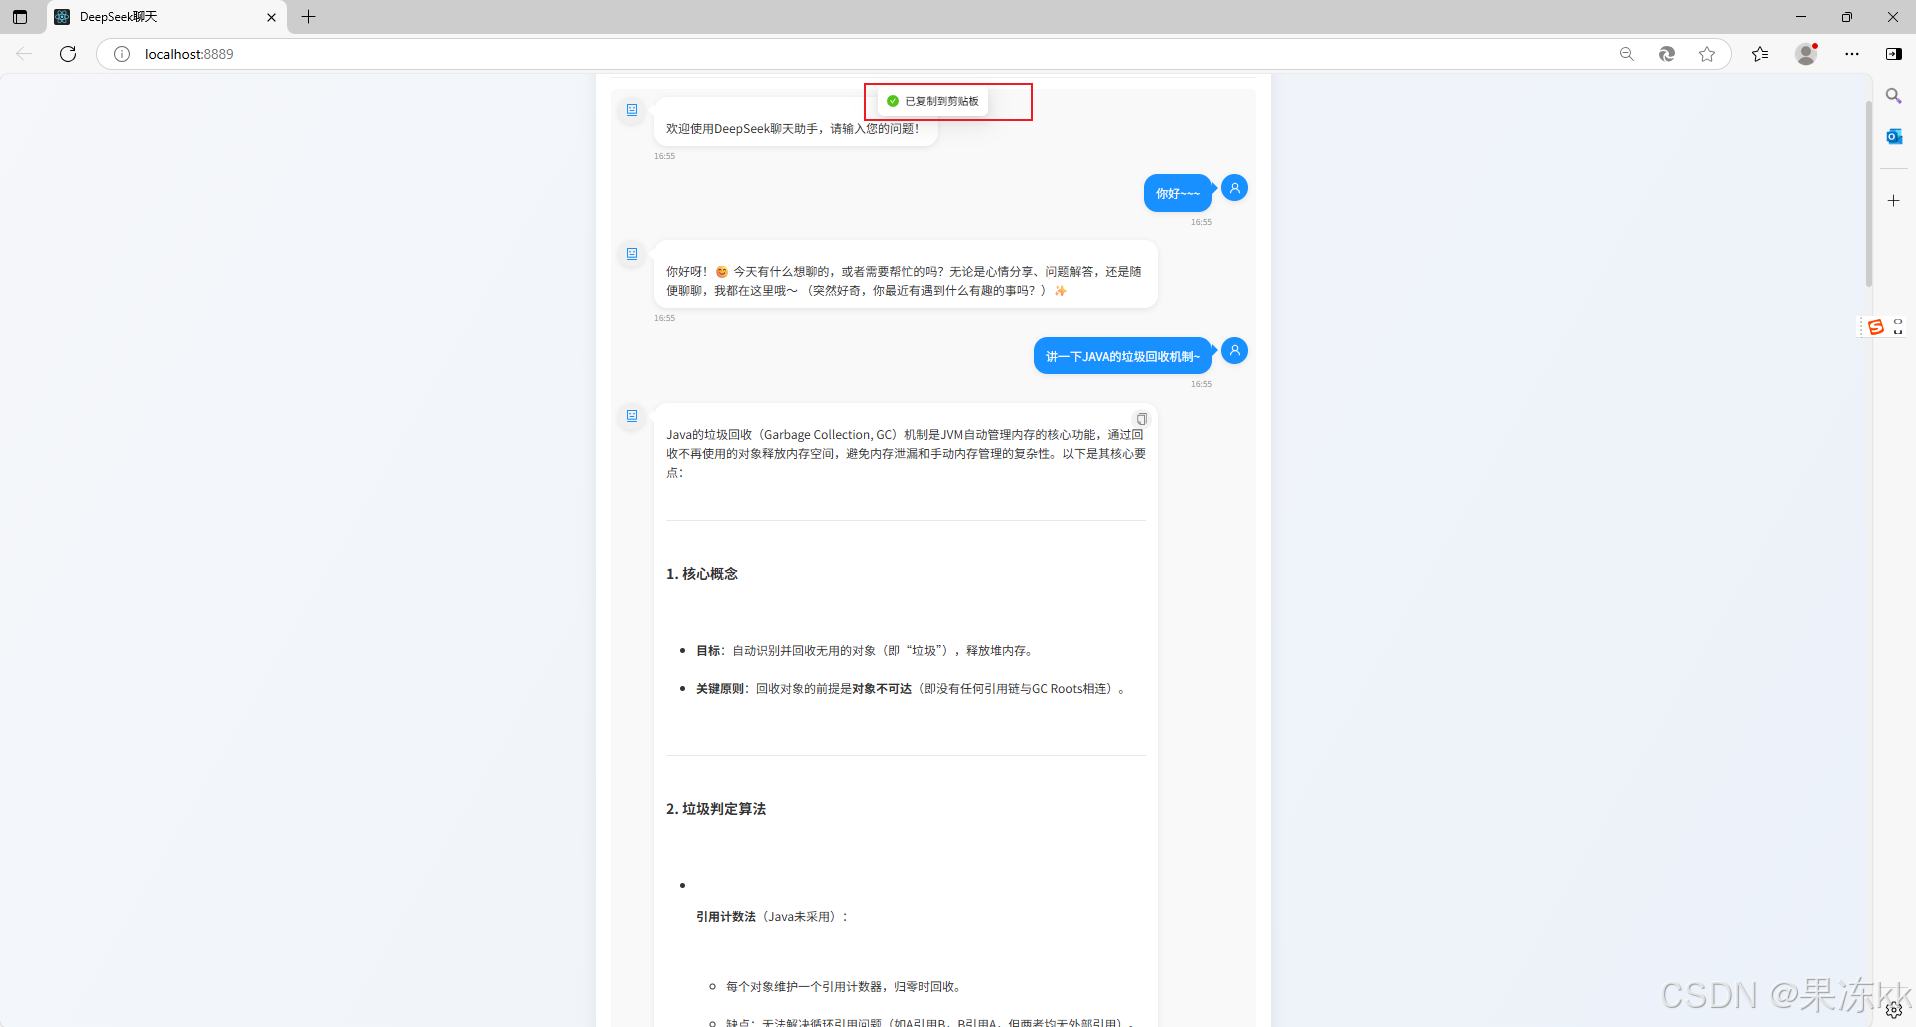
图5:用户可以通过点击复制按钮,一键复制AI回复内容,方便在其他地方使用
从上面的截图中可以看到,我们的聊天界面具有以下特点:
- 美观的UI设计:采用简洁现代的卡片式设计,聊天气泡明确区分用户和AI
- 加载状态提示:用户等待AI思考时有动态加载提示,增强交互体验
- Markdown完美渲染:支持代码块、标题、列表、表格等Markdown元素的精确渲染
- 左对齐文本展示:所有AI回复内容均左对齐,提高可读性,方便用户阅读长文本
这种设计不仅美观,还极大提高了用户体验,特别是对于长篇技术解答,格式化展示让内容更易理解。
项目优化
我们对项目进行了多项优化,提升用户体验:
-
UI美化:
- 精心设计的聊天气泡
- 加载状态动画
- 响应式布局适配多种设备
-
功能增强:
- 支持Markdown格式渲染
- 代码高亮显示
- 一键复制AI回复内容:每条AI回复右上角配有复制按钮,方便用户快速复制所需内容
-
性能优化:
- 消息自动滚动到底部
- 防抖处理避免重复请求
- 错误处理与提示
踩坑与解决方案
在开发过程中,我们遇到的主要问题及解决方案:
-
跨域问题:
- 解决方案:在Spring Boot后端添加CORS配置
-
Markdown渲染:
- 问题:AI返回的Markdown内容无法正常显示
- 解决方案:引入react-markdown等库进行处理
-
响应内容居中问题:
- 问题:Markdown内容默认居中显示
- 解决方案:添加text-align:left样式强制左对齐
项目拓展方向
这个基础项目可以进一步拓展为:
- 添加会话历史:保存对话历史,实现多轮对话
- 用户管理:添加登录注册功能
- 多模型支持:集成更多AI模型,如GPT系列
- 自定义参数:允许用户调整温度、最大长度等参数
- 语音交互:添加语音输入和输出功能
源码下载
为方便读者快速上手,我已将完整项目源码打包上传,包含以下内容:
-
DeepSeekExtProject(Java后端项目)
- 完整的Spring Boot项目结构
- DeepSeek API调用封装
- 请求/响应处理逻辑
-
DeepSeekExtWeb(React前端项目)
- 完整的React+TypeScript项目结构
- 聊天界面组件
- Markdown渲染功能
- 一键复制实现
源码下载地址:DeepSeek AI对话系统完整源码
使用说明:
- 下载并解压源码包
- 按照上述运行步骤分别启动前后端项目
- 修改后端DeepSeekClient.java中的API_KEY为您自己的密钥
注意:使用前请确保已安装Java 8+、Maven、Node.js 14+环境。
写在最后
🎉 通过本文的指导,即使是编程萌新也能轻松搭建一个完整的DeepSeek AI对话系统。希望这个项目能帮助你开启AI开发之旅!
📚 推荐几篇很有趣的文章:
📚博主匠心之作,强推专栏:
如果觉得有帮助的话,别忘了点个赞 👍 收藏 ⭐ 关注 🔖 哦!
🎯 我是果冻~,一个热爱技术、乐于分享的开发者
📚 更多精彩内容,请关注我的博客
🌟 我们下期再见!