【Linux学习笔记】系统文件IO之重定向原理分析

🔥个人主页 :大白的编程日记
🔥专栏:Linux学习笔记

文章目录
- 【Linux学习笔记】系统文件IO之重定向原理分析
-
- 前言
- [一. 系统文件I/0](#一. 系统文件I/0)
-
- [1.1 一种传递标志位的方法](#1.1 一种传递标志位的方法)
- [1.2 hello.c写文件:](#1.2 hello.c写文件:)
- [1.3 hello.c读文件](#1.3 hello.c读文件)
- [1.4 接口介绍](#1.4 接口介绍)
- [1.5 open函数返回值](#1.5 open函数返回值)
- [1.6 文件描述符fd](#1.6 文件描述符fd)
-
- [1.6.1 0&1&2](#1.6.1 0&1&2)
- [1.6.2 文件描述符的分配规则](#1.6.2 文件描述符的分配规则)
- [1.6.3 重定向](#1.6.3 重定向)
- [1.6.4 使用dup2系统调用](#1.6.4 使用dup2系统调用)
- [1.6.5 在minishell中添加重定向功能](#1.6.5 在minishell中添加重定向功能)
- 后言
前言
哈喽,各位小伙伴大家好!上期我们讲了进程替换和自定义shell 今天我们讲的是系统文件IO之重定向原理分析。话不多说,我们进入正题!向大厂冲锋!

一. 系统文件I/0
打开文件的方式不仅仅是fopen,ifstream等流式,语言层的方案,其实系统才是打开文件最底层的方案。不过,在学习系统文件IO之前,先要了解下如何给函数传递标志位,该方法在系统文件IO接口中会使用到:
1.1 一种传递标志位的方法
cpp
#include <stdio.h>
 #define ONE
#define TWO
0001 //0000 0001
 0002 //0000 0010
 #define THREE  0004 //0000 0100
 void func(int flags) {
	 if (flags & ONE) printf("flags has ONE! ");
	 if (flags & TWO) printf("flags has TWO! ");
	 if (flags & THREE) printf("flags has THREE! ");
	 printf("\n");
 }
 int main() {
	 func(ONE);
	 func(THREE);
	 func(ONE | TWO);
	 func(ONE | THREE | TWO);
	 return 0;
 }
操作文件,除了上小节的C接口(当然,C++也有接口,其他语言也有),我们还可以采用系统接口来]进行文件访问,先来直接以系统代码的形式,实现和上面一模一样的代码:
1.2 hello.c写文件:
cpp
#include <stdio.h>
#include <sys/types.h>
#include <sys/stat.h>
#include <fcntl.h>
#include <unistd.h>
#include <string.h>
int main()
{
	umask(0);
	int fd = open("myfile", O_WRONLY | O_CREAT, 0644);
	if (fd < 0) {
		perror("open");
		return 1;
	}
	int count = 5;
	const char* msg = "hello bit!\n";
	int len = strlen(msg);
	while (count--) {
	}
	write(fd, msg, len);
	//fd: 后⾯讲,msg:缓冲区⾸地址,len :本次读取,期望写⼊多少个字节的数据。
	//返回值:实际写了多少字节数据
	close(fd);
	return 0;
}
1.3 hello.c读文件
cpp
 #include <stdio.h>
 #include <sys/types.h>
 #include <sys/stat.h>
 #include <fcntl.h>
 #include <unistd.h>
 #include <string.h>
 int main()
 {
    int fd = open("myfile", O_RDONLY);
    if(fd < 0){
        perror("open");
        return 1;
    }
    const char *msg = "hello bit!\n";
    char buf[1024];
    while(1){
        ssize_t s = read(fd, buf, strlen(msg));//类⽐write
        if(s > 0){
            printf("%s", buf);
        }else{
            break;
        }
    }
    close(fd);
    return 0;
 }
1.4 接口介绍
open man open
cpp
 #include <sys/types.h>
 #include <sys/stat.h>
 #include <fcntl.h>
 int open(const char *pathname, int flags);
 int open(const char *pathname, int flags, mode_t mode);
 pathname:
要打开或创建的⽬标⽂件flags:
打开⽂件时,可以传⼊多个参数选项,⽤下⾯的⼀个或者多个常量进⾏"或"运算,构成flags
。
参数
:
O_RDONLY: 只读打开
O_WRONLY: 只写打开
O_RDWR  : 读,写打开
这三个常量,必须指定⼀个且只能指定⼀个
O_CREAT : 若⽂件不存在,则创建它。需要使⽤mode选项,来指明新⽂件的访问权限
O_APPEND: 追加写
返回值:
成功:新打开的⽂件描述符
失败:-1mode_t理解:直接man手册,比什么都清楚。
open函数具体使用哪个,和具体应用场景相关,如目标文件不存在,需要open创建,则第三个参数表示创建文件的默认权限,否则,使用两个参数的open。
write read closelseek,类比c文件相关接口。
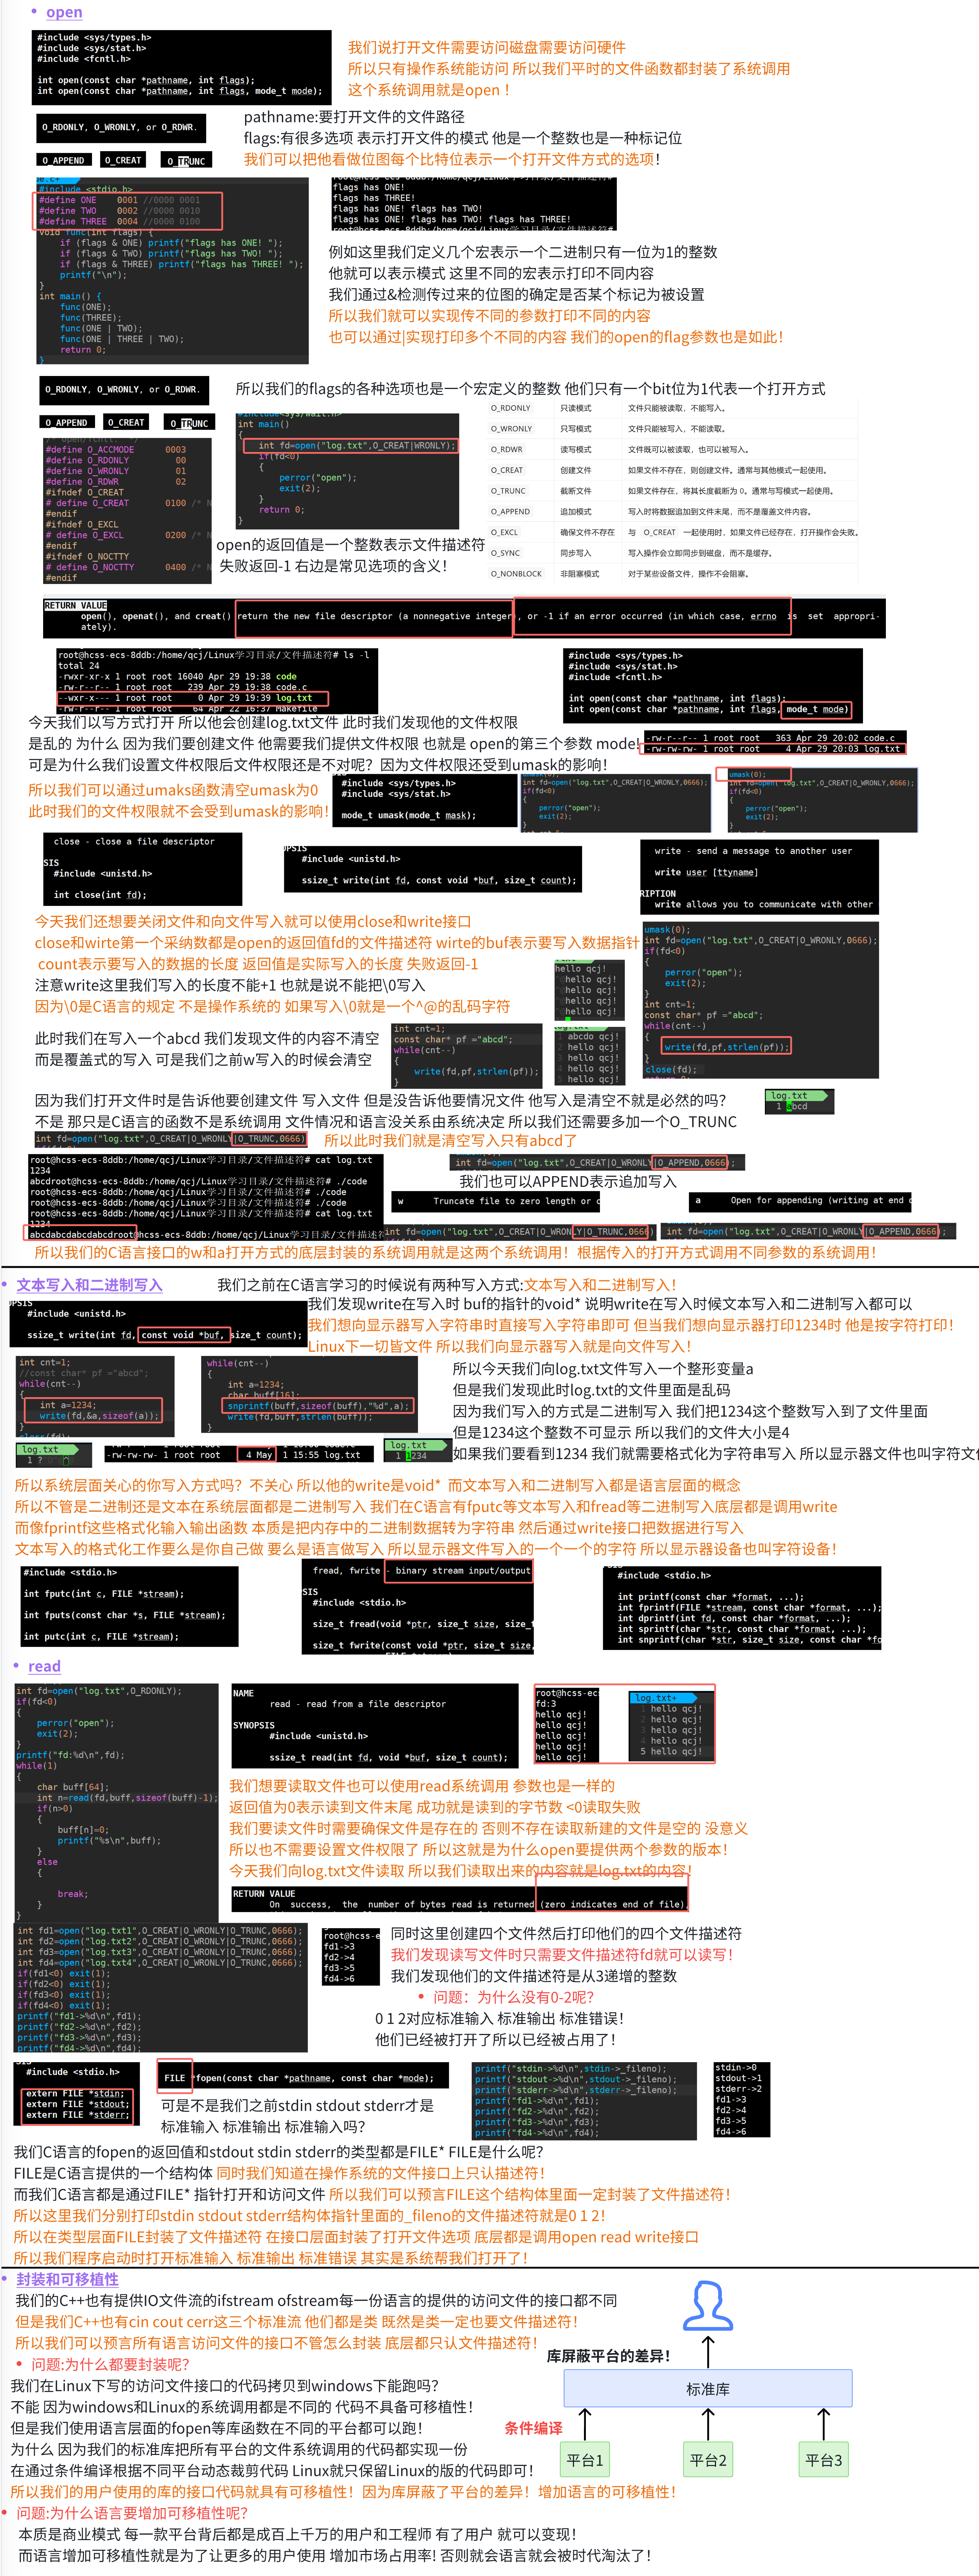
1.5 open函数返回值
在认识返回值之前,先来认识一下两个概念:系统调用和库函数
- 上面的 fopen fclose fread fwrite 都是C标准库当中的函数,我们称之为库函数(libc)。
- 而 open close read write lseek 都属于系统提供的接口,称之为系统调用接口
- 回忆一下我们讲操作系统概念时,画的一张图
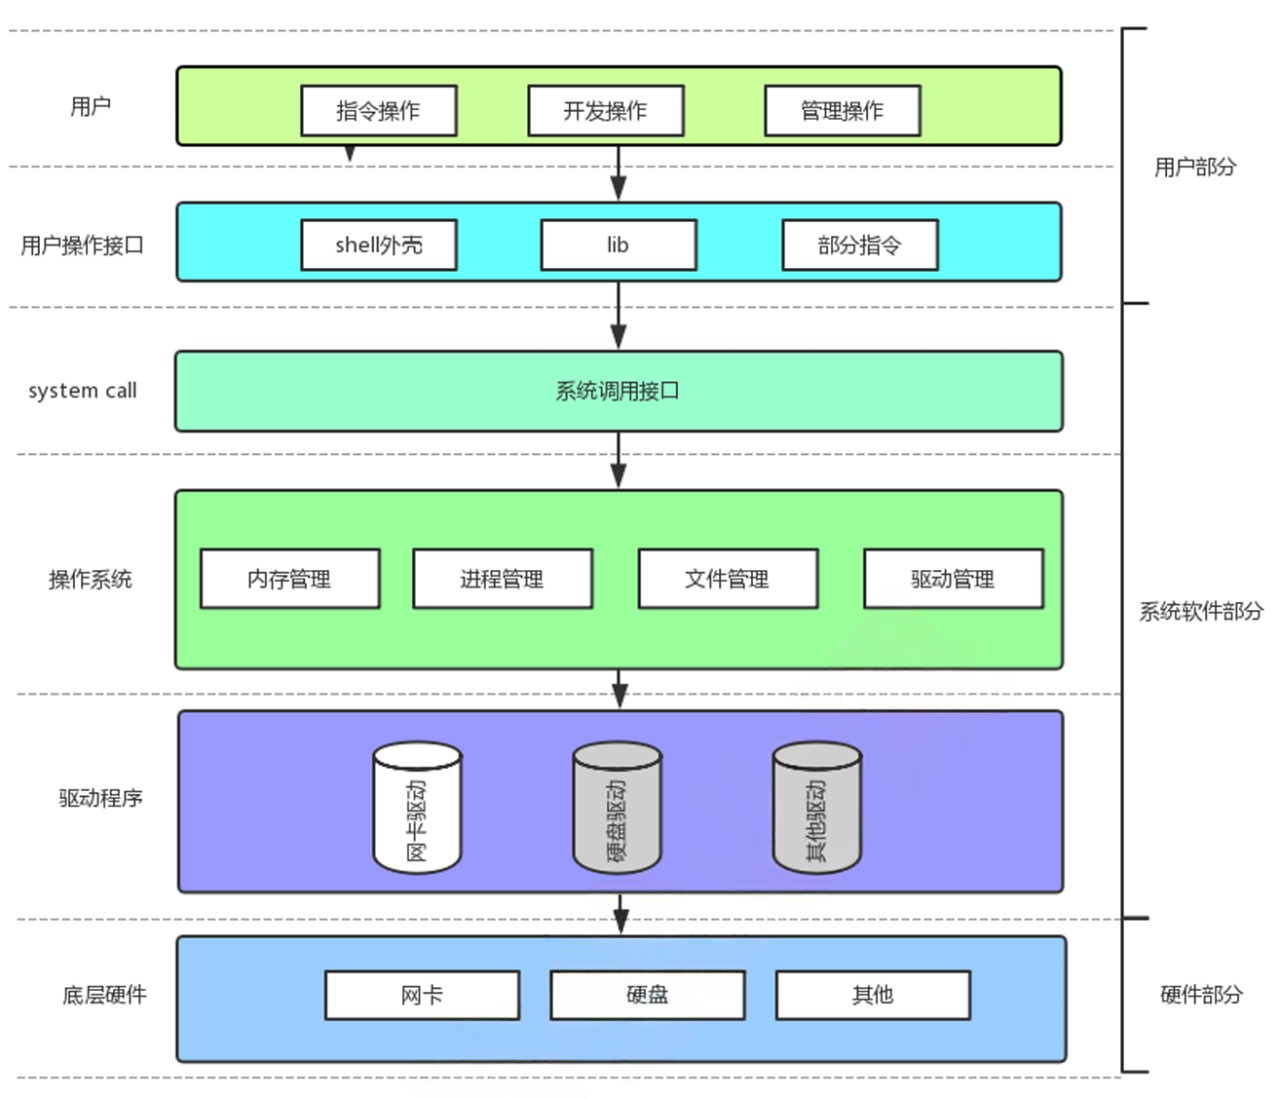
系统调用接口和库函数的关系,一目了然。
所以,可以认为,f#系列的函数,都是对系统调用的封装,方便二次开发。
1.6 文件描述符fd
- 通过对open函数的学习,我们知道了文件描述符就是一个小整数
1.6.1 0&1&2
- Linux进程默认情况下会有3个缺省打开的文件描述符,分别是标准输入0,标准输出1,标准错误2.
- 0,1,2对应的物理设备一般是:键盘,显示器,显示器
所以输入输出还可以采用如下方式:
cpp
#include <stdio.h>
#include <sys/types.h>
#include <sys/stat.h>
#include <fcntl.h>
#include <string.h>
int main()
{
char buf[1024];
ssize_t s = read(0, buf, sizeof(buf));
if(s > 0){
buf[s] = 0;
write(1, buf, strlen(buf));
write(2, buf, strlen(buf));
}
return 0;
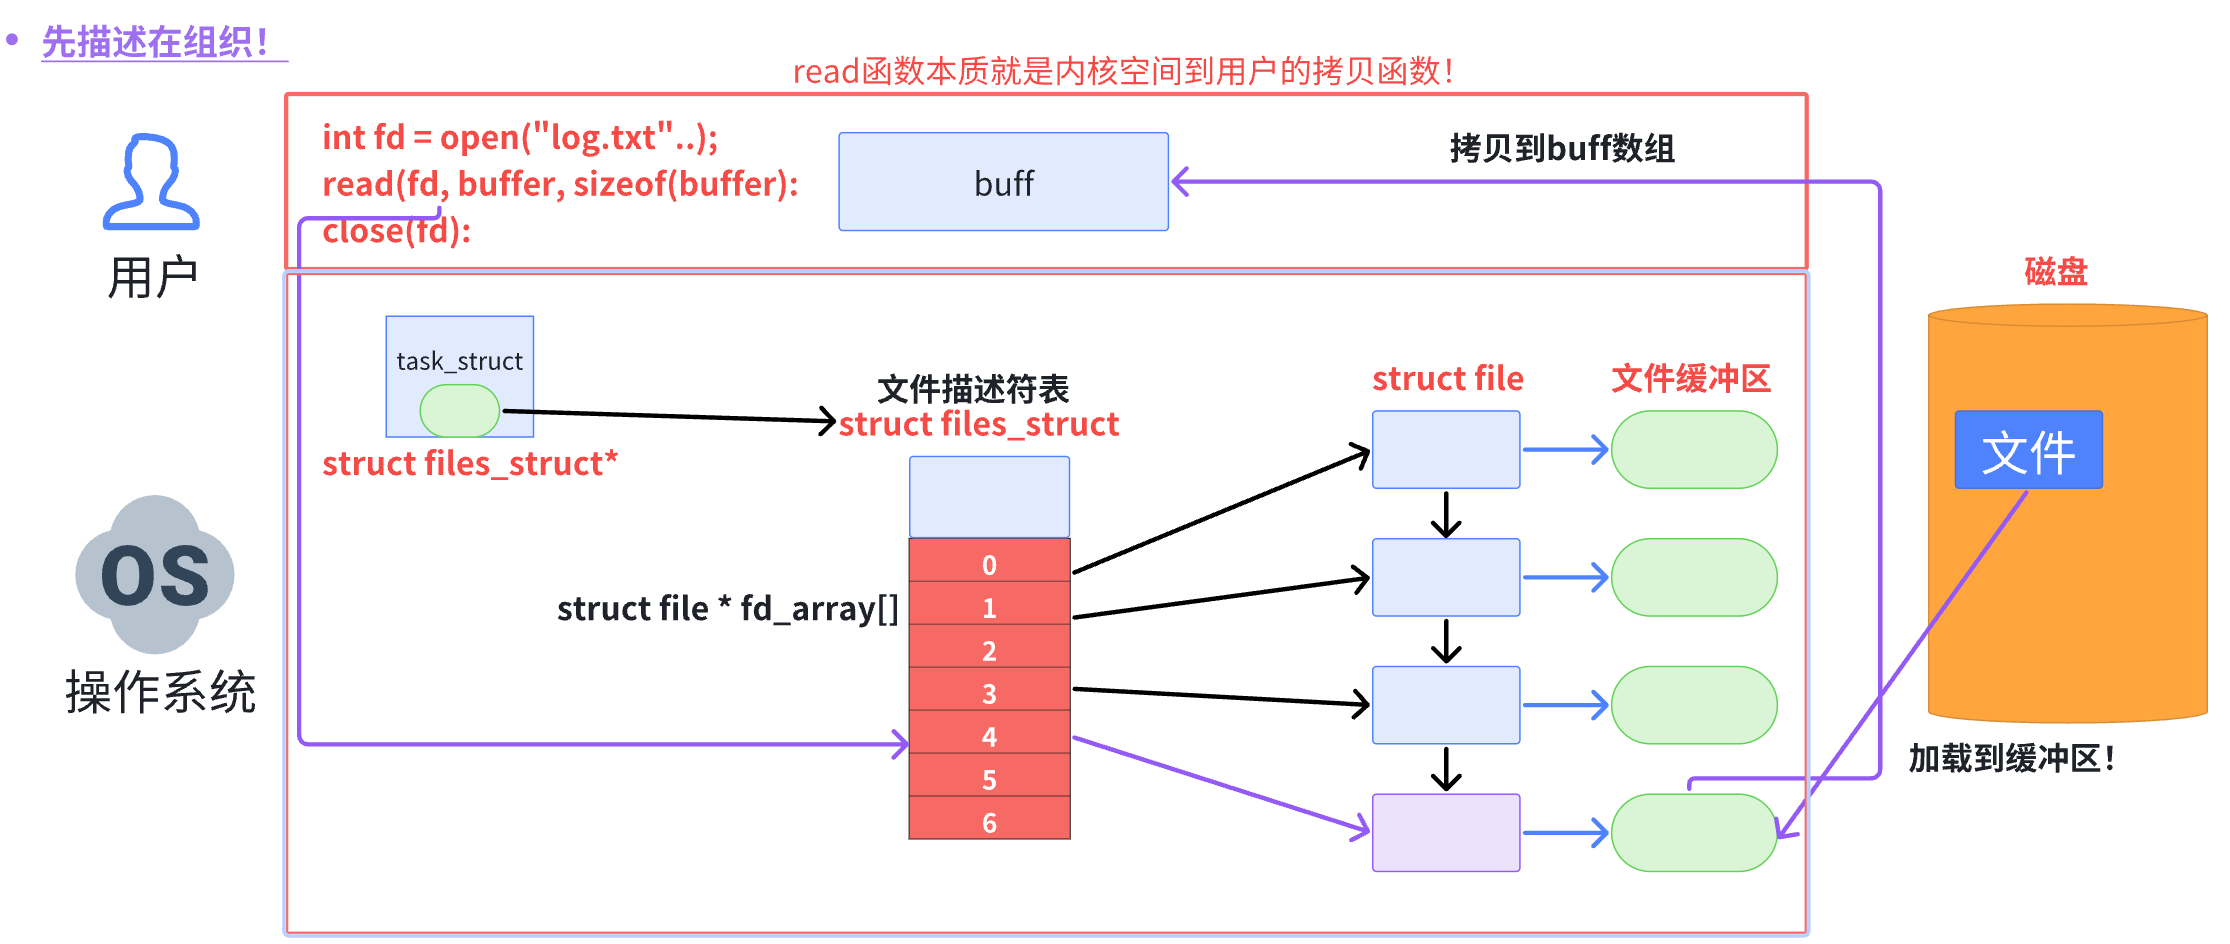
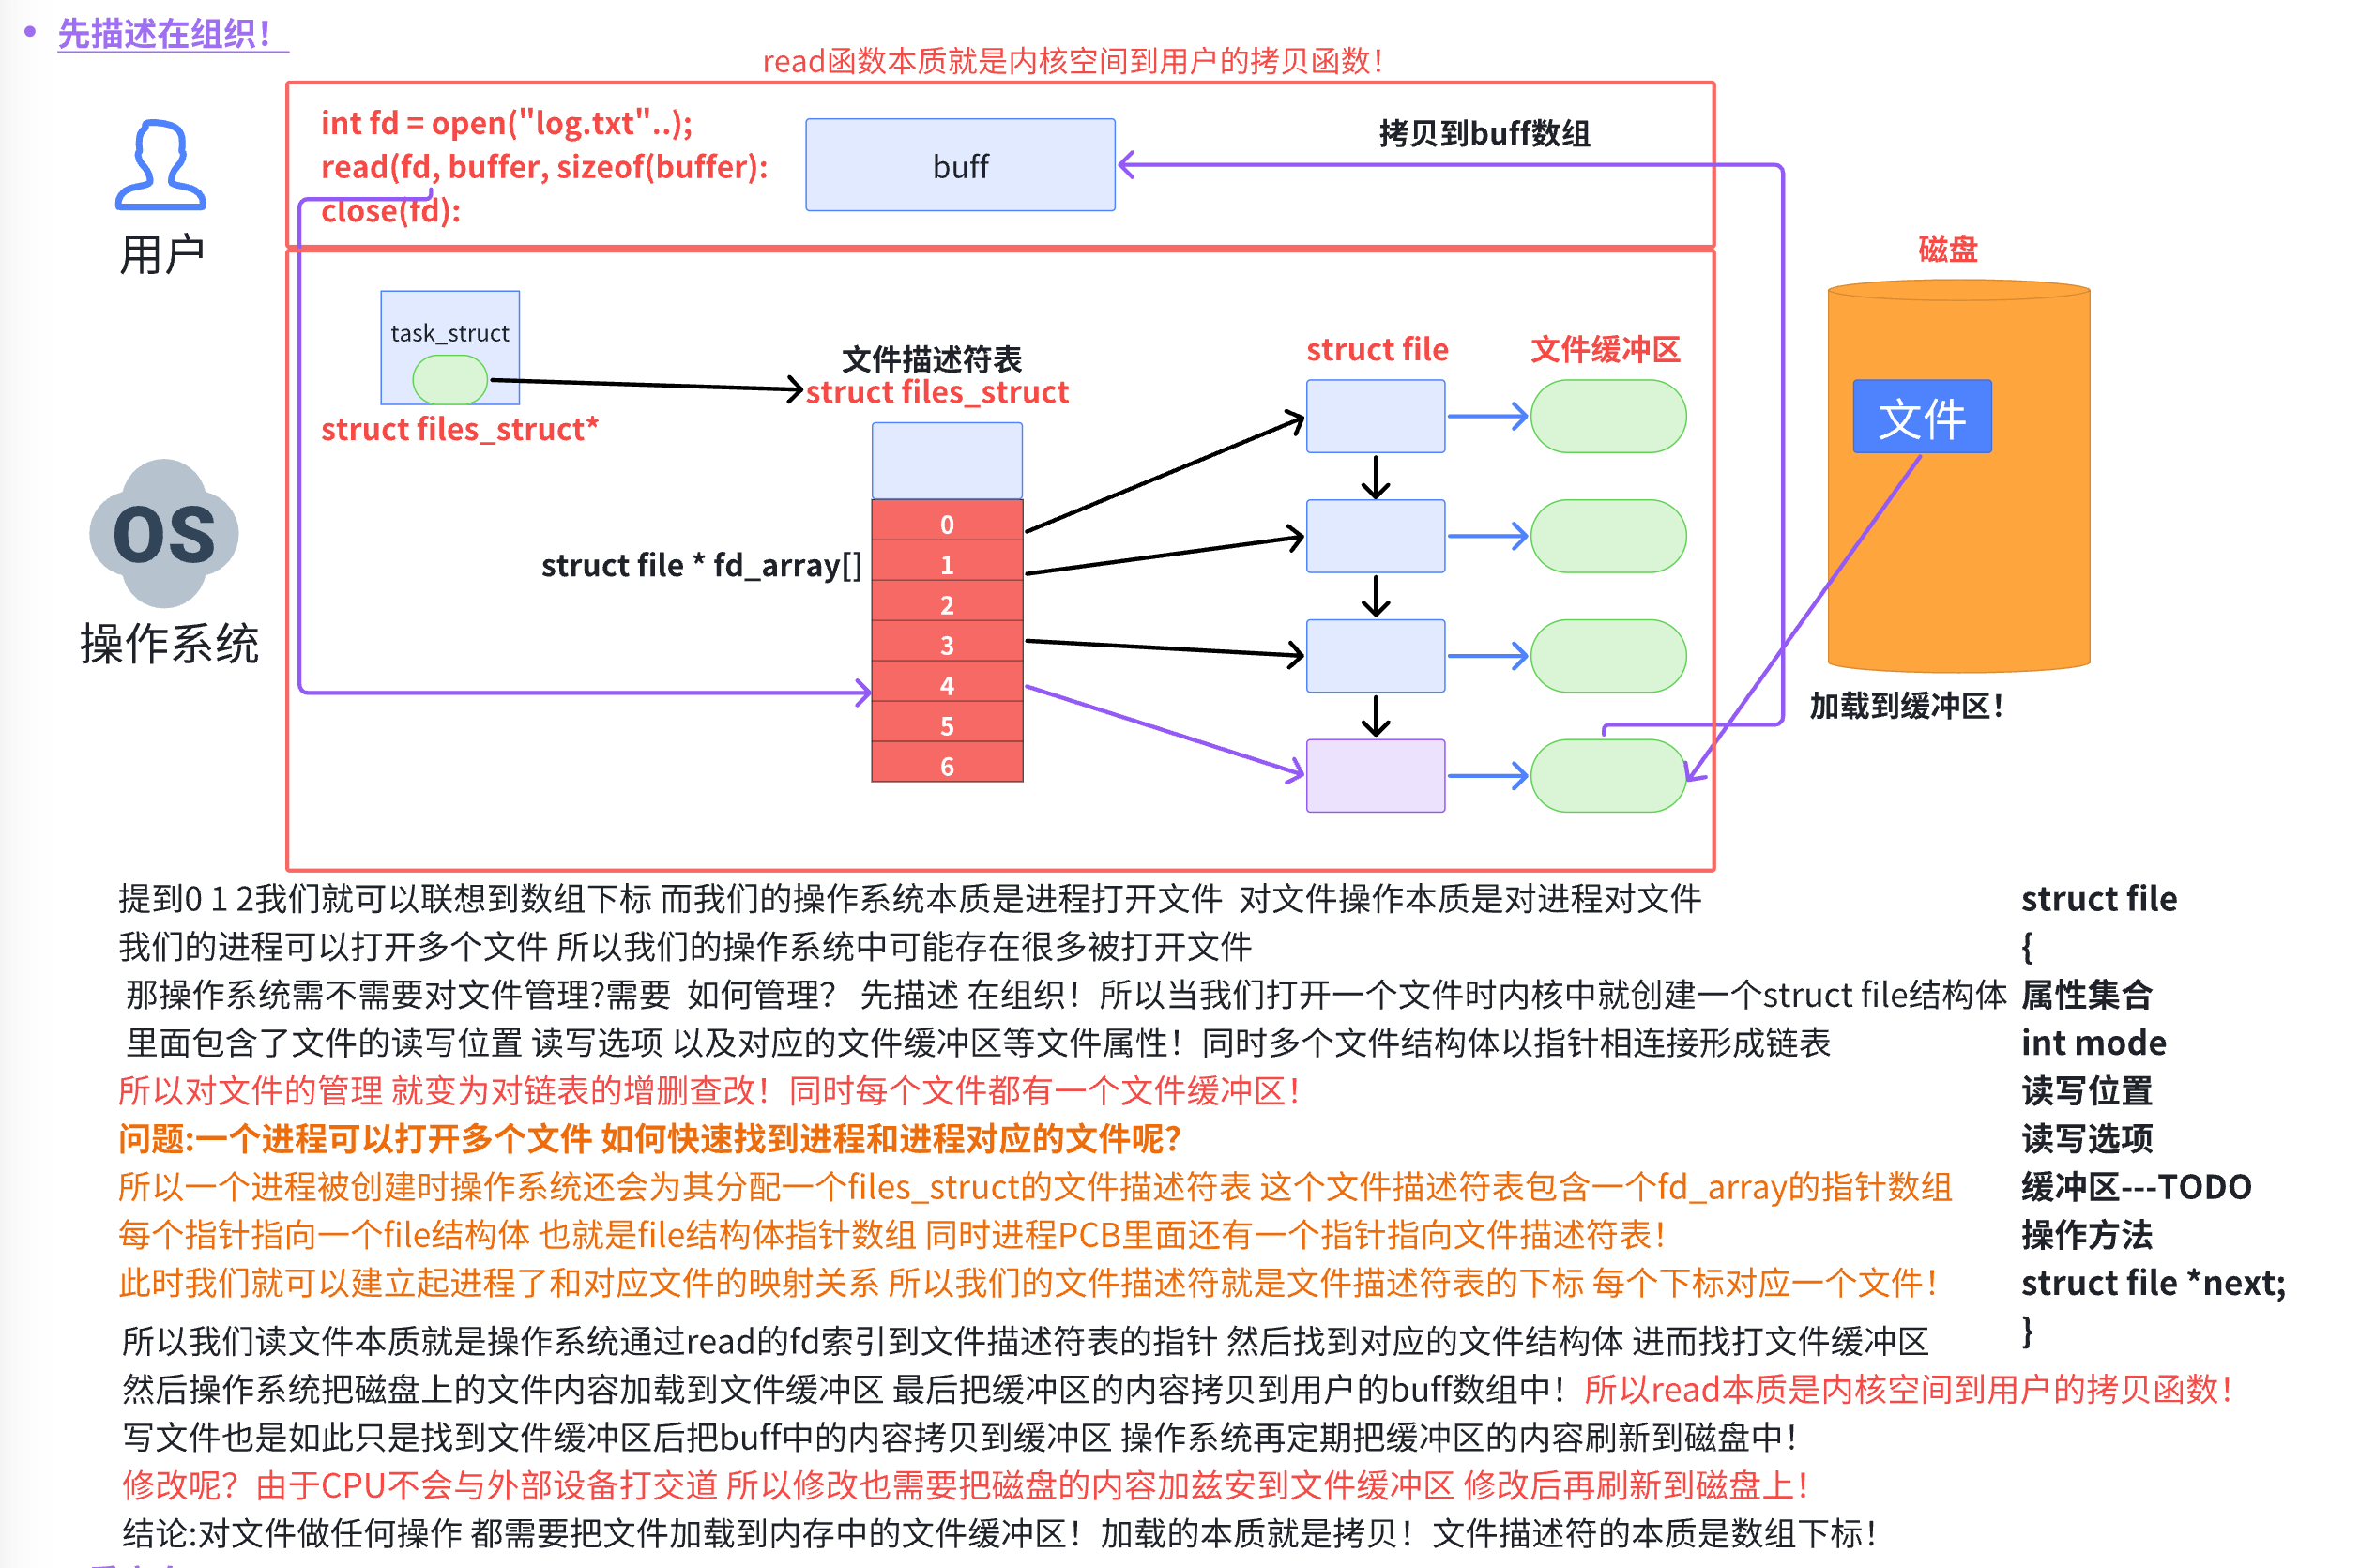
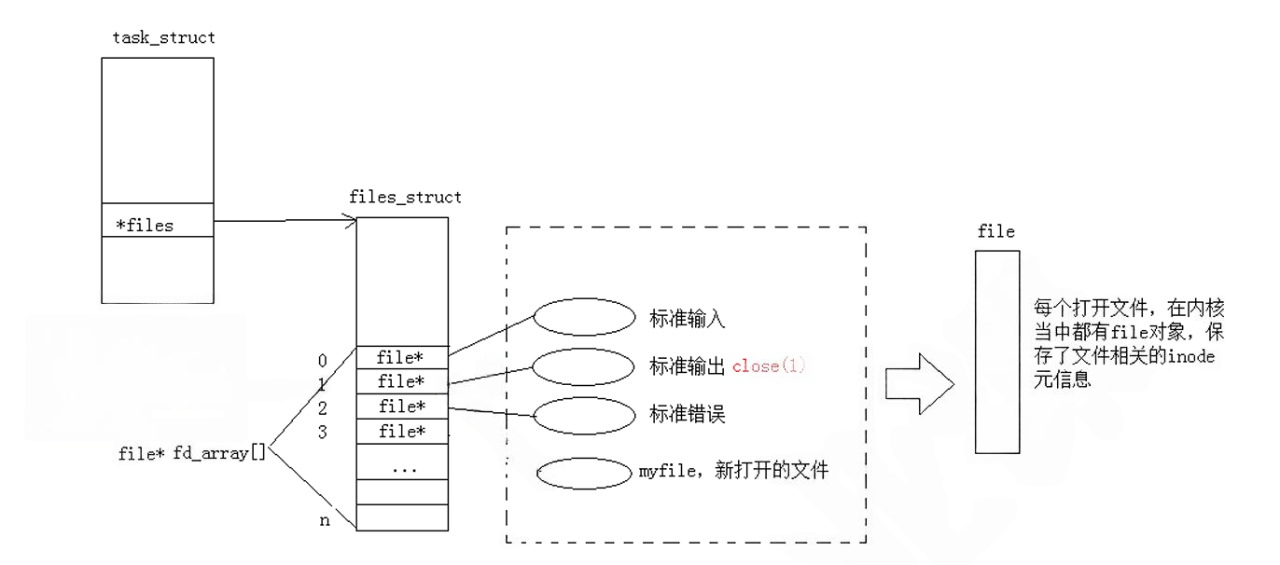
}而现在知道,文件描述符就是从0开始的小整数。当我们打开文件时,操作系统在内存中要创建相应的数据结构来描述目标文件。于是就有了file结构体。表示一个已经打开的文件对象。而进程执行open系统调用,所以必须让进程和文件关联起来。每个进程都有一个指针*files,指向一张表files_struct,该表最重要的部分就是包含一个指针数组,每个元素都是一个指向打开文件的指针!所以,本质上,文件
描述符就是该数组的下标。所以,只要拿着文件描述符,就可以找到对应的文件。
1.6.2 文件描述符的分配规则
直接看代码:
cpp
#include <stdio.h>
#include <sys/types.h>
#include <sys/stat.h>
#include <fcntl.h>
 int main()
 {
	 int fd = open("myfile", O_RDONLY);
	 if(fd < 0){
	 perror("open");
	 return 1;
	 }
	 printf("fd: %d\n", fd);
	 }
	 close(fd);
	 return 0;
}
输出发现是fd:3
关闭0或者2,在看
cpp
#include <stdio.h>
#include <sys/types.h>
#include <sys/stat.h>
#include <fcntl.h>
int main()
{
close(0);
//close(2);
int fd = open("myfile", O_RDONLY);
if(fd < 0){
perror("open");
return 1;
}
printf("fd: %d\n", fd);
close(fd);
return 0;
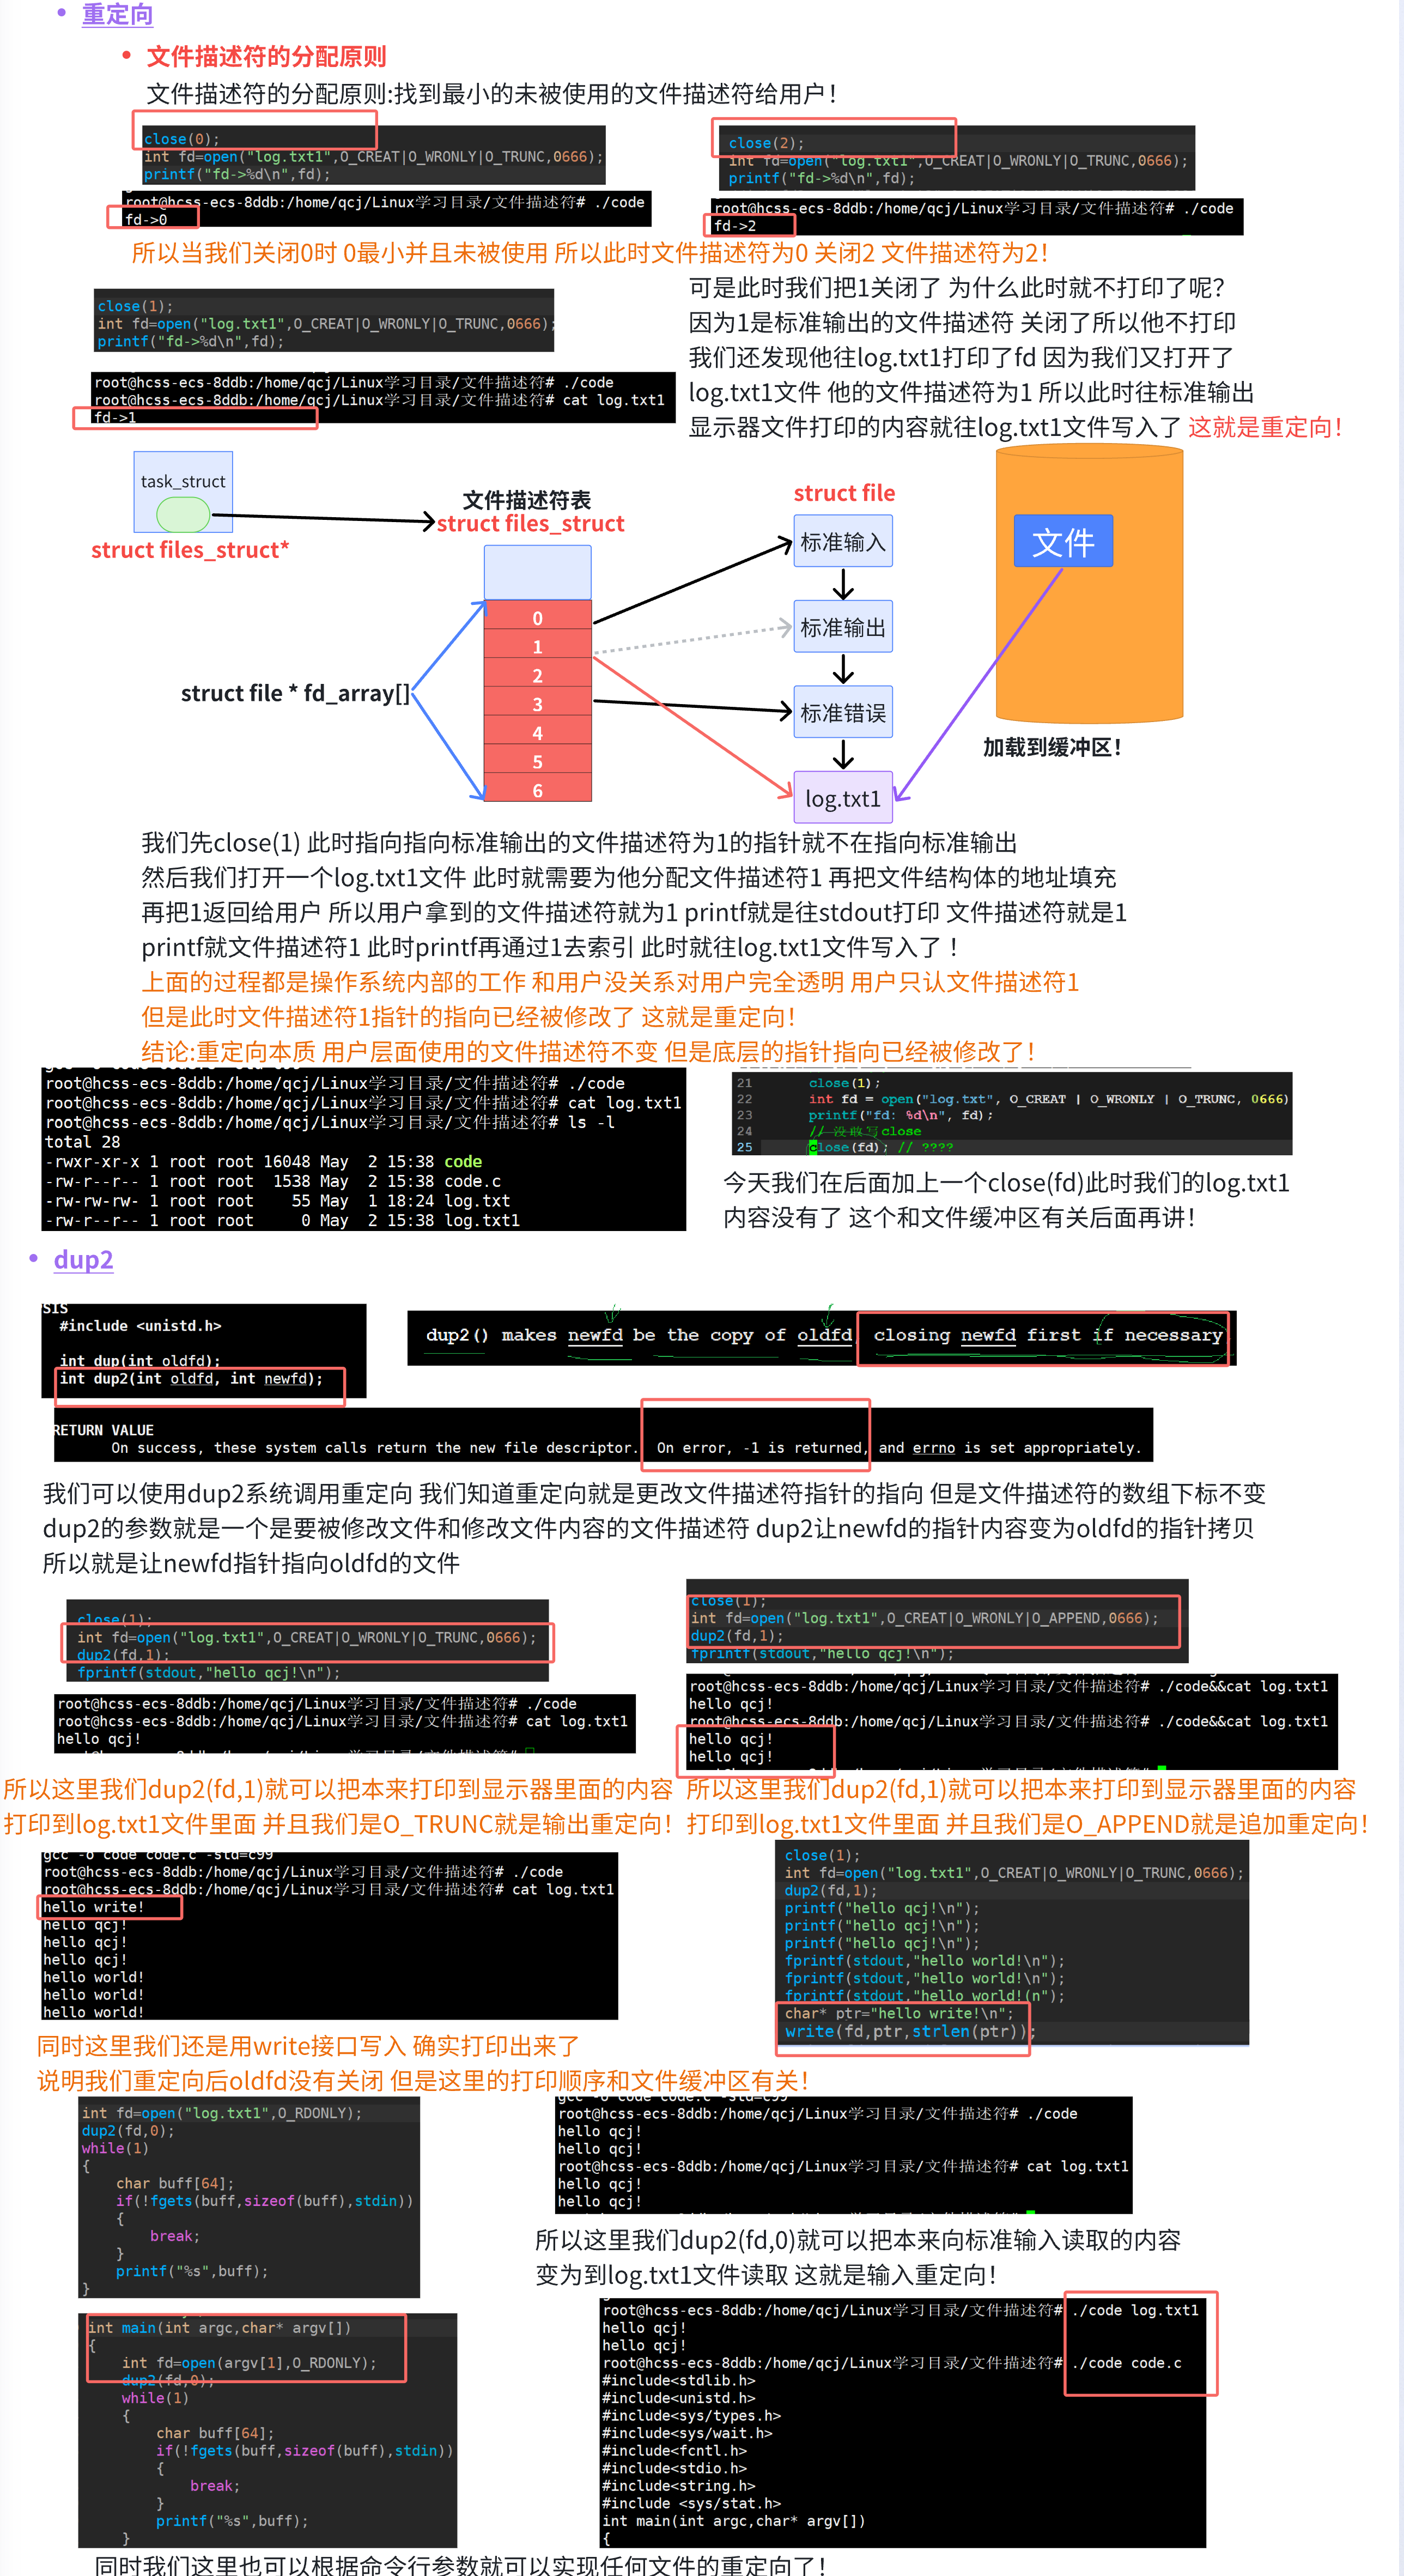
}发现是结果是:fd:0或者fd2,可见,文件描述符的分配规则:在files_struct数组当中,找到当前没有被使用的最小的一个下标,作为新的文件描述符。
1.6.3 重定向
那如果关闭1呢?看代码:
cpp
#include <stdio.h>
 #include <sys/types.h>
 #include <sys/stat.h>
 #include <fcntl.h>
 #include <stdlib.h>
 int main()
 {
	 close(1);
	 int fd = open("myfile", O_WRONLY|O_CREAT, 00644);
	 if(fd < 0){
	 perror("open");
	 return 1;
	 }
	 printf("fd: %d\n", fd);
	 fflush(stdout);
	 close(fd);
	 exit(0);
 }
此时,我们发现,本来应该输出到显示器上的内容,输出到了文件myfile当中,其中,fd=1。这种现象叫做输出重定向。常见的重定向有:>,>>,<
那重定向的本质是什么呢?
1.6.4 使用dup2系统调用
函数原型如下:
cpp
#include <unistd.h>
 int dup2(int oldfd, int newfd);
cpp
#include <stdio.h>
#include <unistd.h>
#include <fcntl.h>

int main() {
    int fd = open("./log", O_CREAT | O_RDWR);
    if (fd < 0) {
        perror("open");
        return 1;
    }

    close(1);
    dup2(fd, 1);
    for (;;) {
        char buf[1024] = {0};
        ssize_t read_size = read(0, buf, sizeof(buf) - 1);
        if (read_size < 0) {
            perror("read");
            break;
        }
        printf("%s", buf);
        fflush(stdout);
    }
    return 0;
}
printf是C库当中的IO函数,一般往stdout中输出,但是stdout底层访问文件的时候,找的还是fd:1,但此时,fd:1下标所表示内容,已经变成了myfifile的地址,不再是显示器文件的地址,所以,输出的任何消息都会往文件中写入,进而完成输出重定向。那追加和输入重定向如何完成呢?
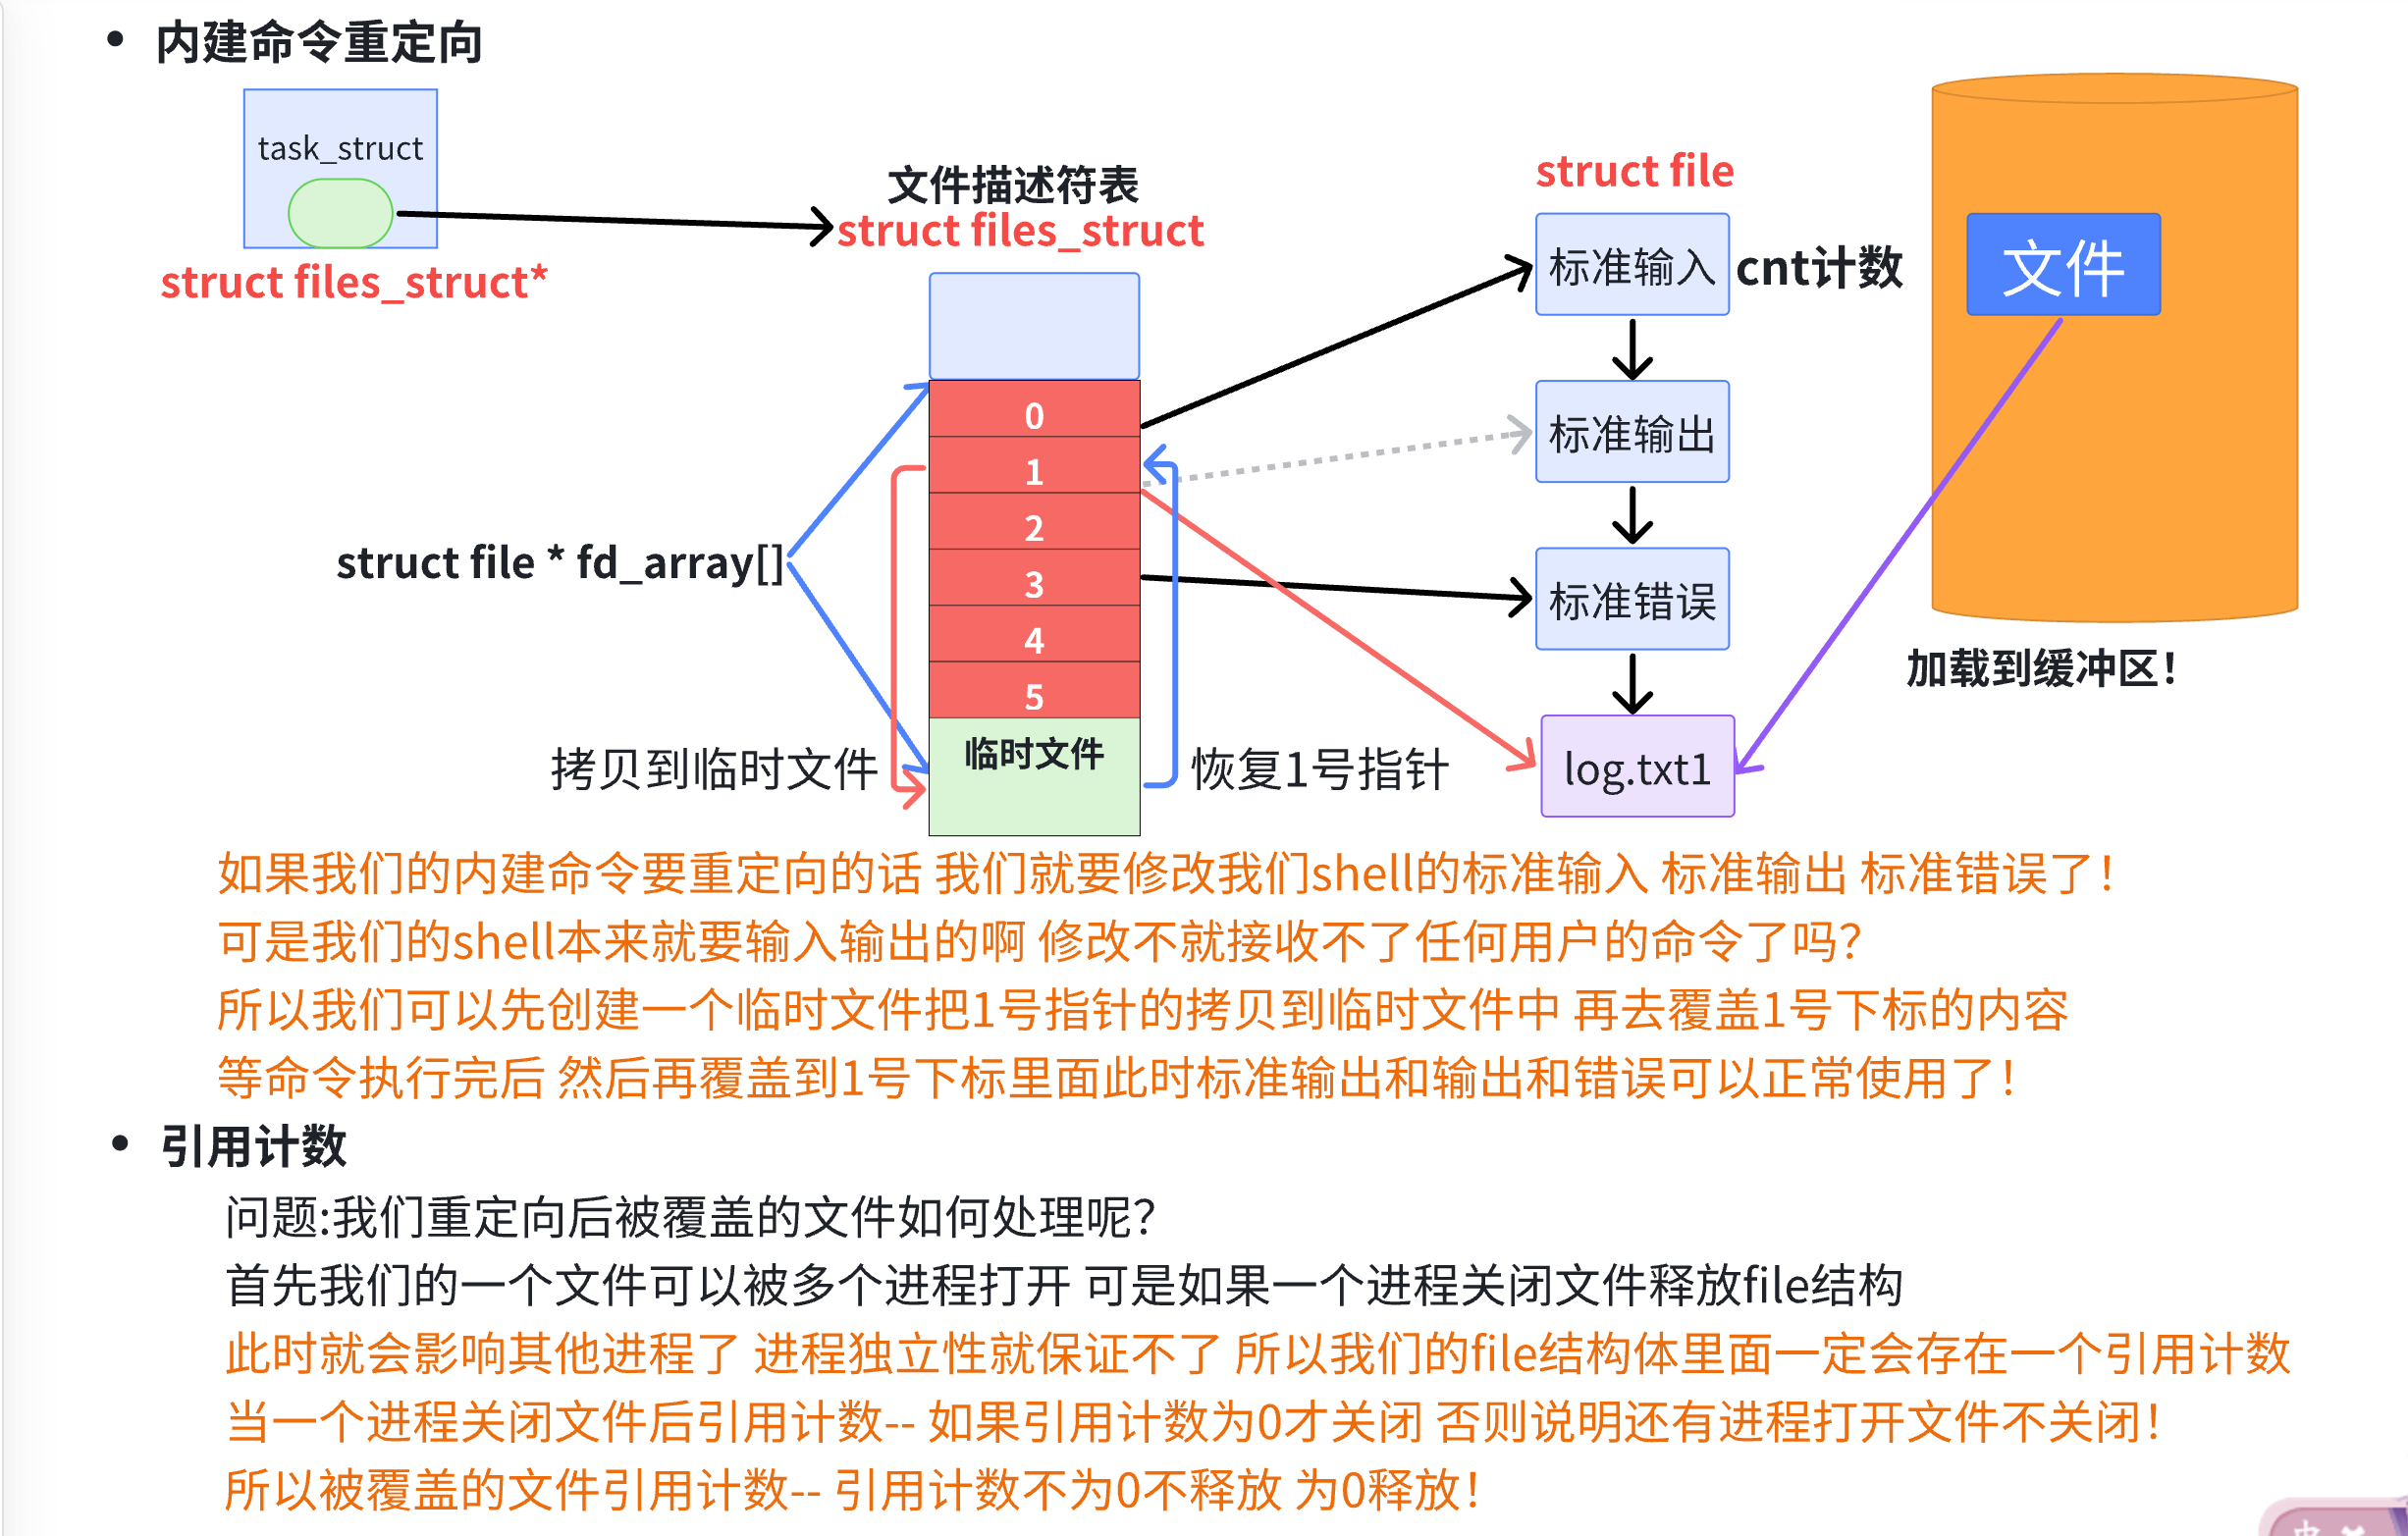
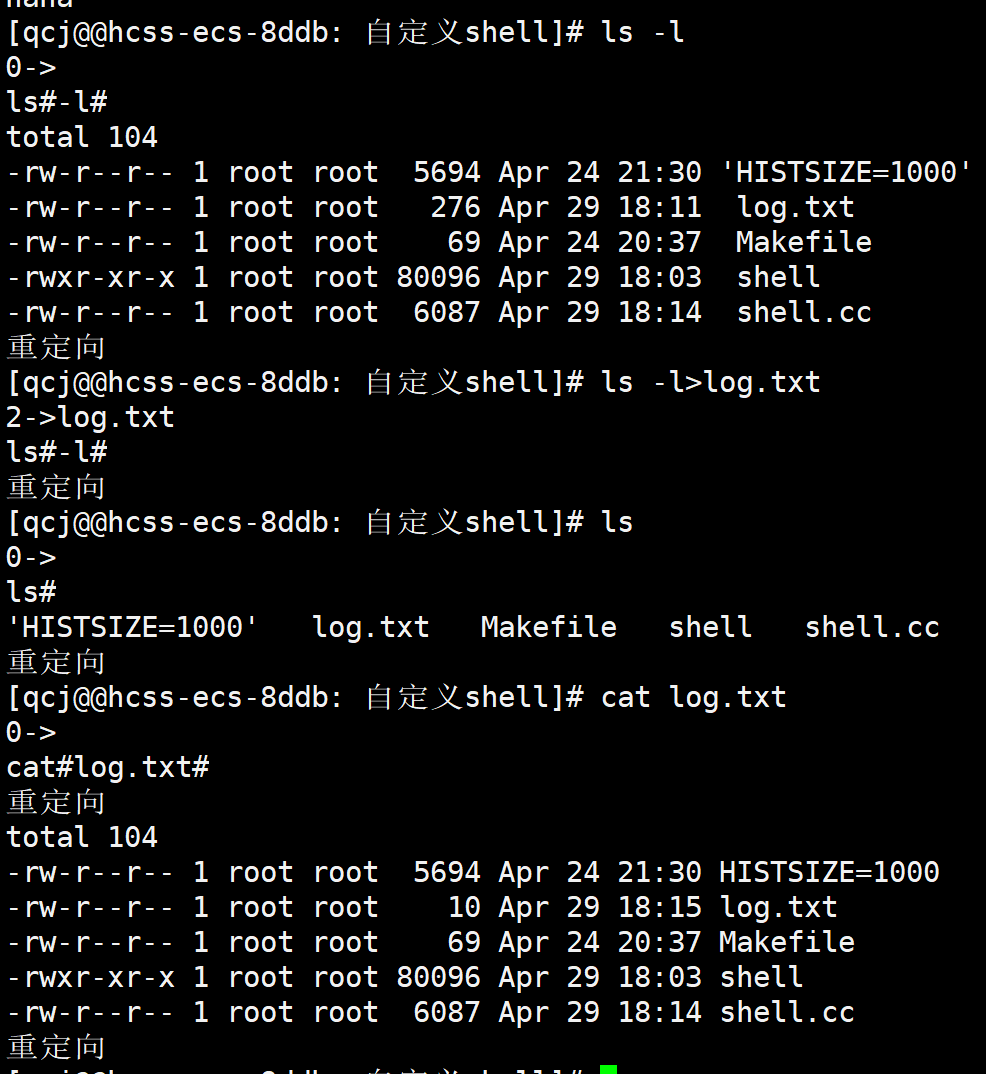
1.6.5 在minishell中添加重定向功能
先定义一个整数记录重定向方式 一个字符串记录重定向文件
TrimSpace跳过重定向字符后的空格 指向文件名开始位置
每次调用RedirCheck先清空文件和让文件描述符为0
然后从后向前查找
> >> <每次让命令行参数表清空重定及其之后的内容 设置为\0即可 命令正常执行
然后根据找到的符号 调用跳过空格函数 在让文件名指向end之后的内容
设置重定向方式即可
Execute根据redir 调用open打开文件 然后dup2重定向即可
之后再让子进程正常执行即可
- 问题:进程替换会不会影响重定向结果?
不会 因为进程替换只是替换程序的代码和数据
而文件结构体和文件描述符等内核数据结构不受到影响。
cpp
#define NONE_REDIR 0
#define INPUT_REDIR 1
#define OUTPUT_REDIR 2
#define APPEND_REDIR 3
int redir = NONE_REDIR;
std::string filename;
void RedirCheck(char cmd[])
{
	redir = NONE_REDIR;
	filename.clear();
	int end = strlen(cmd)-1;
	while (end > 0)
	{
		if (cmd[end] == '>')
		{
			if (cmd[end - 1] == '>')
			{
				cmd[end - 1] = 0;
				redir = APPEND_REDIR;
			}
			else
			{
				cmd[end] = 0;
				redir =OUTPUT_REDIR;
			}
			TrimSpace(cmd, ++end);
			filename = cmd + end;
			break;
		}
		else if (cmd[end] == '<')
		{
			cmd[end] = 0;
			redir = INPUT_REDIR;
			TrimSpace(cmd, ++end);
			filename = cmd + end;
			break;
		}
		else
		{
			end--;
		}
	}
}
int Execute()
{
	pid_t id = fork();
	if (id == 0)
	{
		int fd = -1;
		// 子进程检测重定向情况
		if (redir == INPUT_REDIR)
		{
			fd = open(filename.c_str(), O_RDONLY);
			if (fd < 0) exit(1);
			dup2(fd, 0);
			close(fd);
		}
		else if (redir == OUTPUT_REDIR)
		{
			fd = open(filename.c_str(), O_CREAT | O_WRONLY | O_TRUNC, 0666);
			if (fd < 0) exit(2);
			dup2(fd, 1);
			close(fd);
		}
		else if (redir == APPEND_REDIR)
		{
			fd = open(filename.c_str(), O_CREAT | O_WRONLY | O_APPEND, 0666);
			if (fd < 0) exit(2);
			dup2(fd, 1);
			close(fd);
		}
		execvp(g_argv[0], g_argv);
		exit(1);
	}
	int status = 0;
	pid_t rid=waitpid(id, &status, 0);
	if (rid > 0)
	{
		lastcode = WEXITSTATUS(status);
	}
	return 0;
}
int main()
{
	//初始化环境变量表
	InitEnv()**加粗样式**;
	while (1)
	{
		//打印命令行提示符
		PrintCommandPrompt();
		//获取命令行输入
		char commandline[COMMAND_SIZE];
		if (!GetCommandLine(commandline, sizeof(commandline)))
		{
			continue;
		}
		RedirCheck(commandline);
		cout << redir << "->" << filename << endl;
		//填充命令行参数表
		if (!CommandParse(commandline))
		{
			continue;
		}
		//处理内建命令
		if (CheckAndExecBuiltion())
		{
			continue;
		}
		//执行命令
		Execute();
	}
	return  0;
}
后言
这就是系统文件IO之重定向原理分析。大家自己好好消化!今天就分享到这! 感谢各位的耐心垂阅!咱们下期见!拜拜~
