1、总体概览
读光系列文字检测及识别模型是通义实验室于开源的小模型,总结下来就是模型小、速度快、效果好,适合用于简单的OCR应用,复杂任务还有待考究。
读光系列细分为两个类型:文字检测、文字识别,都是针对"行"维度处理,即文字行检测、文字行识别,同时下放不同的垂直领域:
如文字行检测模型:++DBNet行检测模型、有线(无线)表格结构识别、Resnet行检测模型++等;
如文字行识别模型:++手写体、车牌文本、通用、印刷体、自然场景领域++等;
具体模型可在modelscope上下载:modelscope读光系列模型 ,内容如下:

本文主要介绍文字检测+识别模型端到端OCR应用的方法,首先介绍行检测用法,然后介绍行识别用法,最后介绍整体的端到端用法。
2、文本行检测模型
python
from modelscope.pipelines import pipeline
from modelscope.utils.constant import Tasks
import cv2

ocr_detection = pipeline(Tasks.ocr_detection, model='damo/cv_resnet18_ocr-detection-line-level_damo')

# read file
img_path = 'ocr_detection.jpg'
img = cv2.imread(img_path)
result = ocr_detection(img)
print(result)

# or read url
img_url = 'https://modelscope.oss-cn-beijing.aliyuncs.com/test/images/ocr_detection.jpg'
result_url = ocr_detection(img_url)
print(result_url)
上述为行检测模型基本实现过程,在实际使用中可以根据模型效果来选择检测模型,并替换 ocr_detection 变量对应的模型id ,即可替换模型,或者将权重下载,并直接调用本地模型,避免每次都要联网检查下载。
模型用法主要有两种,见上述代码中 read file 或 read url ,本质是读取文件的来源不同,对于第一种方法,需使用opencv读取图片像素点,然后再使用模型处理;对于第二种方法,可直接读取oss存储的图片,可通过url读取并处理。检测模型最终会返回每一个检测行对应的坐标:包括检测框的左上、左下、右上、右下4个坐标。
3、文本行识别模型
python
from modelscope.pipelines import pipeline
from modelscope.utils.constant import Tasks
import cv2

ocr_recognition = pipeline(Tasks.ocr_recognition, model='damo/cv_convnextTiny_ocr-recognition-general_damo')
# ocr_recognition = pipeline(Tasks.ocr_recognition, model='damo/cv_convnextTiny_ocr-recognition-scene_damo')
# ocr_recognition = pipeline(Tasks.ocr_recognition, model='damo/cv_convnextTiny_ocr-recognition-document_damo')
# ocr_recognition = pipeline(Tasks.ocr_recognition, model='damo/cv_convnextTiny_ocr-recognition-handwritten_damo')

# read file
img_path = 'ocr_recognition.jpg'
img = cv2.imread(img_path)
result = ocr_recognition(img)
print(result)

# or read url
img_url = 'http://duguang-labelling.oss-cn-shanghai.aliyuncs.com/mass_img_tmp_20220922/ocr_recognition.jpg'
result_url = ocr_recognition(img_url)
print(result_url)上述是文本行识别模型,单独使用行识别模型时可以使用文本行图片进行测试,如果使用整张图片,会出现识别混乱的问题。同样可以替换不同垂直场景的行识别模型,且读取方式与行检测模型相同,最终模型会返回包含识别结果的dict字典。
4、检测识别端到端应用
python
from modelscope.pipelines import pipeline
from modelscope.utils.constant import Tasks
import numpy as np
import cv2
import math

# 在图像中裁剪出特定区域
def crop_image(img, position):
    def distance(x1,y1,x2,y2):
        return math.sqrt(pow(x1 - x2, 2) + pow(y1 - y2, 2))
    position = position.tolist()
    for i in range(4):
        for j in range(i+1, 4):
            if(position[i][0] > position[j][0]):
                tmp = position[j]
                position[j] = position[i]
                position[i] = tmp
    if position[0][1] > position[1][1]:
        tmp = position[0]
        position[0] = position[1]
        position[1] = tmp

    if position[2][1] > position[3][1]:
        tmp = position[2]
        position[2] = position[3]
        position[3] = tmp

    x1, y1 = position[0][0], position[0][1]
    x2, y2 = position[2][0], position[2][1]
    x3, y3 = position[3][0], position[3][1]
    x4, y4 = position[1][0], position[1][1]

    corners = np.zeros((4,2), np.float32)
    corners[0] = [x1, y1]
    corners[1] = [x2, y2]
    corners[2] = [x4, y4]
    corners[3] = [x3, y3]

    img_width = distance((x1+x4)/2, (y1+y4)/2, (x2+x3)/2, (y2+y3)/2)
    img_height = distance((x1+x2)/2, (y1+y2)/2, (x4+x3)/2, (y4+y3)/2)

    corners_trans = np.zeros((4,2), np.float32)
    corners_trans[0] = [0, 0]
    corners_trans[1] = [img_width - 1, 0]
    corners_trans[2] = [0, img_height - 1]
    corners_trans[3] = [img_width - 1, img_height - 1]

    transform = cv2.getPerspectiveTransform(corners, corners_trans)
    dst = cv2.warpPerspective(img, transform, (int(img_width), int(img_height)))
    return dst

# 对四个角点坐标进行排序
def order_point(coor):
    arr = np.array(coor).reshape([4, 2])
    sum_ = np.sum(arr, 0)
    centroid = sum_ / arr.shape[0]
    theta = np.arctan2(arr[:, 1] - centroid[1], arr[:, 0] - centroid[0])
    sort_points = arr[np.argsort(theta)]
    sort_points = sort_points.reshape([4, -1])
    if sort_points[0][0] > centroid[0]:
        sort_points = np.concatenate([sort_points[3:], sort_points[:3]])
    sort_points = sort_points.reshape([4, 2]).astype('float32')
    return sort_points

ocr_detection = pipeline(Tasks.ocr_detection, model='damo/cv_resnet18_ocr-detection-line-level_damo')
ocr_recognition = pipeline(Tasks.ocr_recognition, model='damo/cv_convnextTiny_ocr-recognition-general_damo')
img_path = 'ocr_detection.jpg'
image_full = cv2.imread(img_path)
det_result = ocr_detection(image_full)
det_result = det_result['polygons']
for i in range(det_result.shape[0]):
    pts = order_point(det_result[i])
    image_crop = crop_image(image_full, pts)
    result = ocr_recognition(image_crop)
    print("box: %s" % ','.join([str(e) for e in list(pts.reshape(-1))]))
    print("text: %s" % result['text'])
绝大多数场景下我们会使用端到端的方法,即识别一张完整图片的所有文字内容,代码如上,下面进行介绍:
端到端的处理逻辑:图片一定要放在本地,因为要读取图片像素,然后使用检测模型返回图片中的所有检测行(检测框坐标) ,包括各行的坐标,然后遍历检测行 ,对坐标进行排序(order_point函数 ),避免4个坐标错误,最后根据坐标由图片像素中拿到检测行对应的图片像素(crop_image函数),并使用识别模型识别出文字。
准备好模型、测试图片就可以快速测试整体效果
5、扩展
上述端到端过程可用于解决大部分OCR应用,但对于细节识别不准确的情况,经深入测试发现,大部分情况是检测模型 不准确,主要是检测框范围小 ,对于数字,可能会丢失关键信息 ,如果你不想微调模型,可参考本文的扩展方法,即适当调整检测框大小(需根据实际情况调整)来解决该问题。
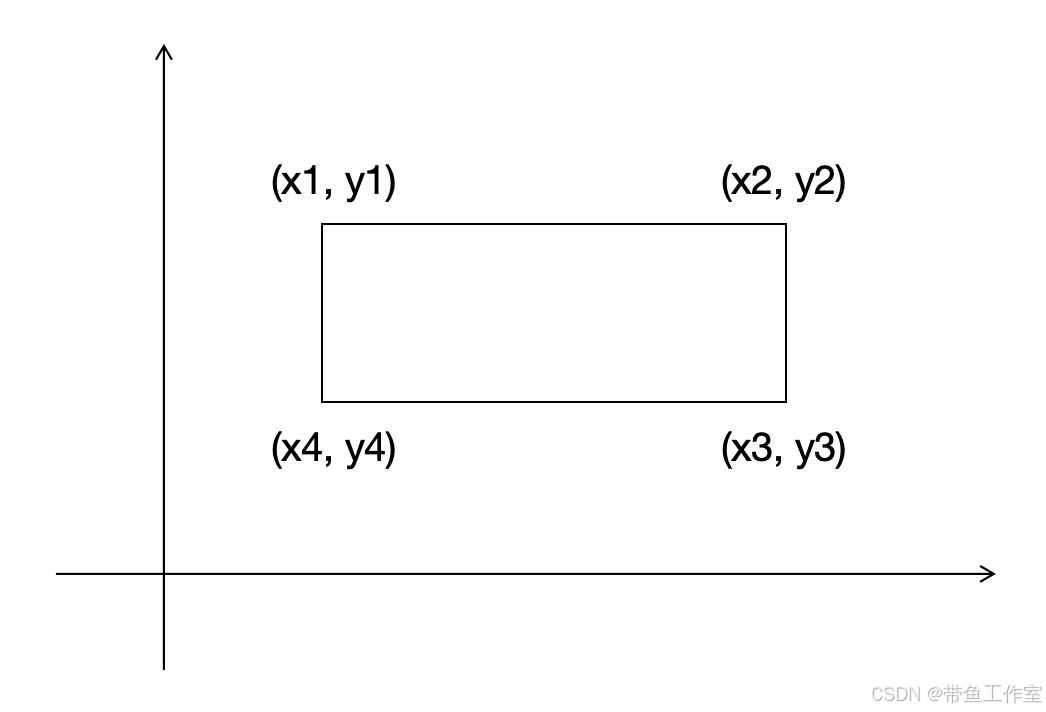
检测框共4个坐标,如端到端代码中crop_image函数的(x1, y1)、(x2, y2)、(x3, y3)、(x4, y4)
因此可在检测框遍历过程中在crop_image函数中调整,4个坐标分别对应一个检测框的左上、右上、右下、左下4个位置,可见下图:
至此,你可以在 crop_image 函数的坐标赋值位置进行修改,如下代码位置修改即可,根据实际需求调整检测框大小。
python
x1, y1 = position[0][0], position[0][1]
x2, y2 = position[2][0], position[2][1]
x3, y3 = position[3][0], position[3][1]
x4, y4 = position[1][0], position[1][1]同时还可以使用cv2的图像保存方法处理端到端代码中变量image_crop(行图片像素),来确认检测框修改的是否正确,可准确调整修改方式,确保最终效果。