一.背景
Keepalived 和 LVS(Linux Virtual Server)是两个常用于构建高可用、高性能服务器集群的开源工具,通常结合使用以实现 负载均衡 和 故障转移。以下是它们的核心介绍及协同工作原理:
1. Keepalived 的作用
高可用性(HA):基于 VRRP 协议(Virtual Router Redundancy Protocol)实现主备节点冗余。通过虚拟 IP(VIP)对外提供服务,主节点故障时,备用节点自动接管 VIP。
健康检查:监控后端服务器(Real Server)的健康状态,自动剔除不可用节点。
集成 LVS 配置:直接管理 LVS 的负载均衡规则,动态调整流量分发策略。
2. LVS 的作用
负载均衡:作为内核级(Layer 4)负载均衡器,支持多种调度算法(如轮询、加权轮询、最小连接等),将客户端请求分发到后端服务器集群。
高性能:基于 Linux 内核实现,处理能力远超应用层负载均衡器(如 Nginx、HAProxy)。
工作模式:
NAT 模式:修改请求/响应的 IP 地址,适合小规模集群。
DR 模式(Direct Routing):直接路由模式,响应数据不经过 LVS,性能最优。
TUN 模式:通过 IP 隧道转发请求,支持跨机房部署。
3. Keepalived + LVS 协同工作流程
虚拟 IP(VIP)管理
Keepalived 通过 VRRP 协议在主备节点间同步状态,确保 VIP 始终由存活节点对外提供服务。
负载均衡配置
Keepalived 根据配置生成 LVS 规则,定义后端服务器池(Real Server)及调度算法。
健康检查
Keepalived 定期检查后端服务器健康状态(如 HTTP/HTTPS/TCP 端口检测),自动从 LVS 池中移除故障节点,恢复后重新加入。
故障转移
若主 LVS 节点宕机,备用节点通过 VRRP 抢占 VIP,并接管 LVS 负载均衡任务,实现无缝切换。
4. 典型应用场景
Web 服务器集群:为高并发网站提供负载均衡和故障转移。
数据库高可用:结合 LVS 的 DR 模式实现数据库读负载均衡。
微服务架构:为后端服务(如 API、缓存)提供可靠入口。
金融/电商系统:对可用性要求极高的业务场景。
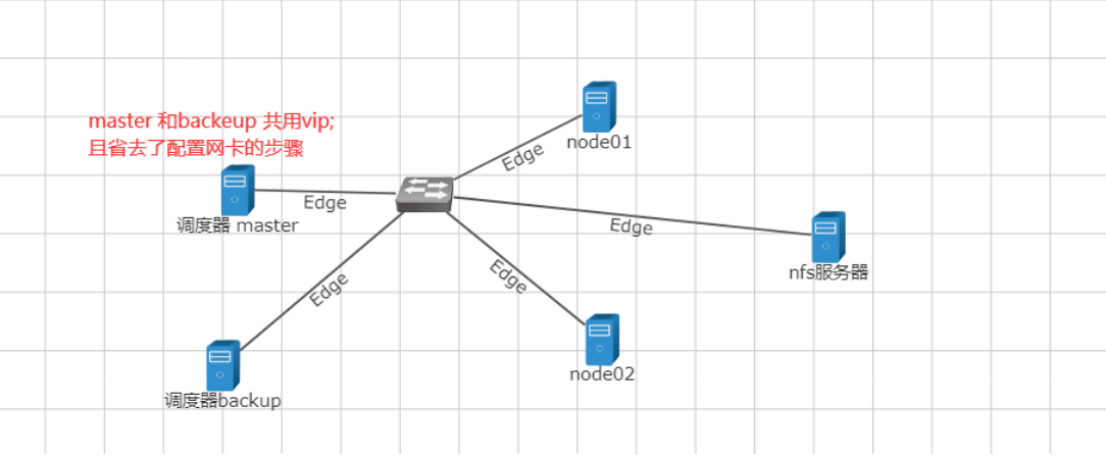
- 集群拓扑
Keepalived 主节点
IP:10.1.1.65
角色:MASTER
虚拟 IP(VIP):10.1.1.10
Keepalived 备节点
IP:10.1.1.66
角色:BACKUP
虚拟 IP(VIP):10.1.1.10
后端服务器(Real Server)
节点1:10.1.1.65(与主节点复用)
节点2:10.1.1.66(与备节点复用)
二.步骤
注绿色是关键配置,红色框是区别地方

实验步骤
所有服务器停止防火墙和selinux
1.在主和备上配置:
安装keepalived ipvsadm
modprobe  ip_vs
yum -y install keepalived ipvsadm
bash
modprobe ip_vs
yum -y install keepalived ipvsadm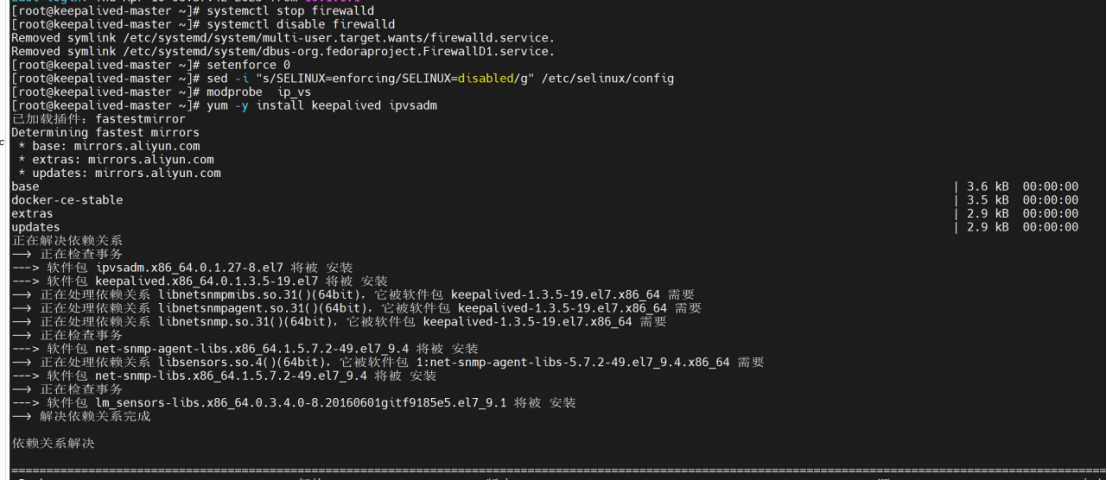
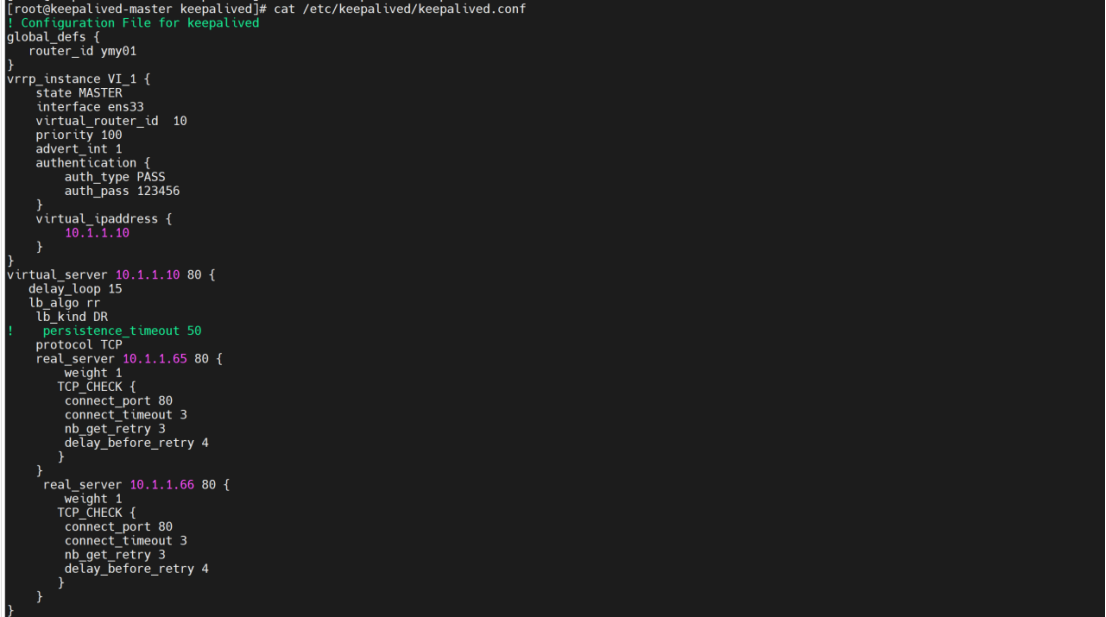
2.主配置:

root@keepalived-master keepalived# cat /etc/keepalived/keepalived.conf
! Configuration File for keepalived
global_defs {
router_id ymy01
}
vrrp_instance VI_1 {
state MASTER
interface ens33
virtual_router_id 10
priority 100
advert_int 1
authentication {
auth_type PASS
auth_pass 123456
}
virtual_ipaddress {
10.1.1.10
}
}
virtual_server 10.1.1.10 80 {
delay_loop 15
lb_algo rr
lb_kind DR
! persistence_timeout 50
protocol TCP
real_server 10.1.1.65 80 {
weight 1
TCP_CHECK {
connect_port 80
connect_timeout 3
nb_get_retry 3
delay_before_retry 4
}
}
real_server 10.1.1.66 80 {
weight 1
TCP_CHECK {
connect_port 80
connect_timeout 3
nb_get_retry 3
delay_before_retry 4
}
}
}
bash
# cat /etc/keepalived/keepalived.conf
! Configuration File for keepalived
global_defs {
   router_id ymy01
}
vrrp_instance VI_1 {
    state MASTER
    interface ens33
    virtual_router_id  10
    priority 100
    advert_int 1
    authentication {
        auth_type PASS
        auth_pass 123456
    }
    virtual_ipaddress {
        10.1.1.10
    }
}
virtual_server 10.1.1.10 80 {
   delay_loop 15
   lb_algo rr
    lb_kind DR
!    persistence_timeout 50
    protocol TCP
    real_server 10.1.1.65 80 {
        weight 1
       TCP_CHECK {
        connect_port 80
        connect_timeout 3
        nb_get_retry 3
        delay_before_retry 4
       }
    }
     real_server 10.1.1.66 80 {
        weight 1
       TCP_CHECK {
        connect_port 80
        connect_timeout 3
        nb_get_retry 3
        delay_before_retry 4
       }
    }
}
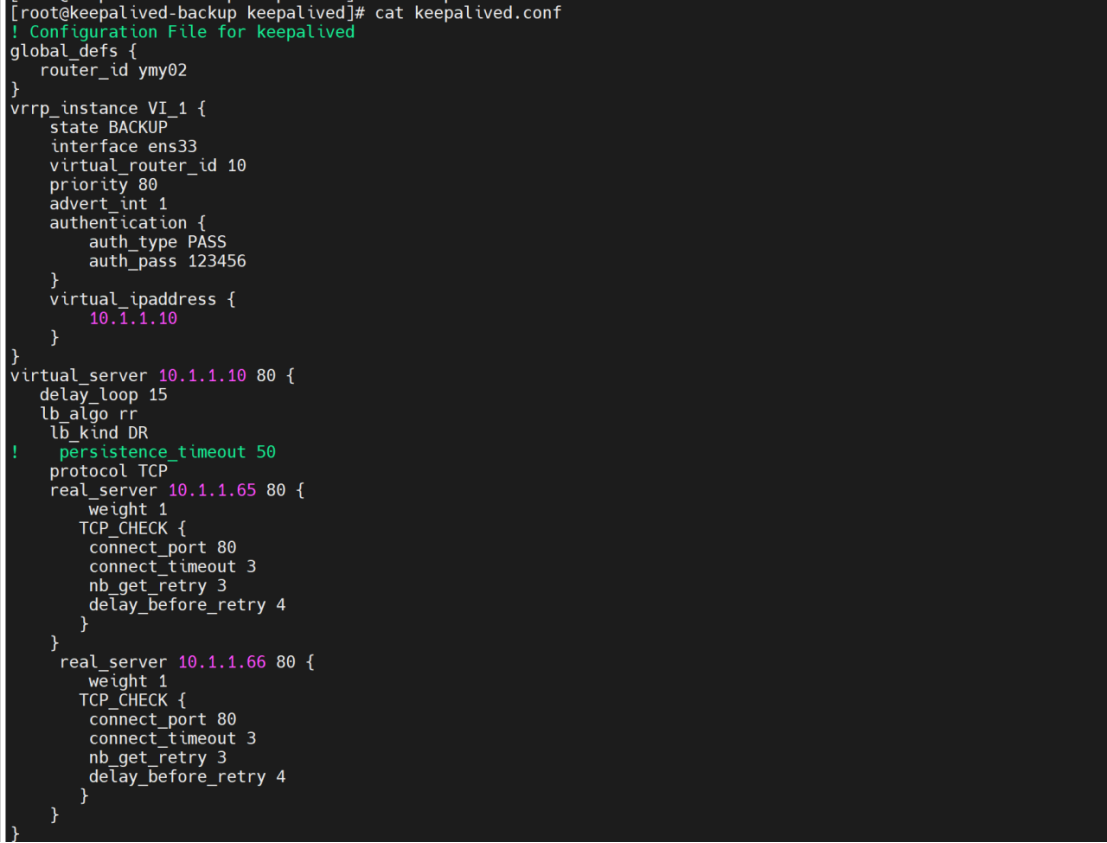
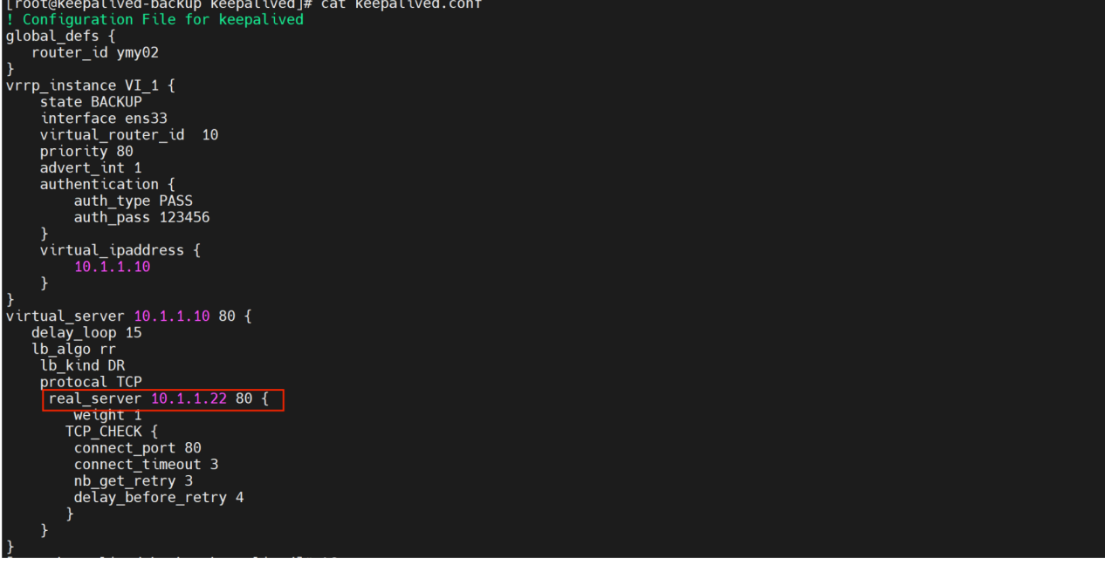
3.备主机配置:
root@keepalived-backup keepalived# cat keepalived.conf
! Configuration File for keepalived
global_defs {
router_idymy02
}
vrrp_instance VI_1 {
state BACKUP
interface ens33
virtual_router_id 10
priority 80
advert_int 1
authentication {
auth_type PASS
auth_pass 123456
}
virtual_ipaddress {
10.1.1.10
}
}
virtual_server 10.1.1.10 80 {
delay_loop 15
lb_algo rr
lb_kind DR
! persistence_timeout 50
protocol TCP
real_server 10.1.1.65 80 {
weight 1
TCP_CHECK {
connect_port 80
connect_timeout 3
nb_get_retry 3
delay_before_retry 4
}
}
real_server 10.1.1.66 80 {
weight 1
TCP_CHECK {
connect_port 80
connect_timeout 3
nb_get_retry 3
delay_before_retry 4
}
}
}
bash
# cat keepalived.conf
! Configuration File for keepalived
global_defs {
   router_id ymy02
}
vrrp_instance VI_1 {
    state BACKUP
    interface ens33
    virtual_router_id  10
    priority 80
    advert_int 1
    authentication {
        auth_type PASS
        auth_pass 123456
    }
    virtual_ipaddress {
        10.1.1.10
    }
}
virtual_server 10.1.1.10 80 {
   delay_loop 15
   lb_algo rr
    lb_kind DR
!    persistence_timeout 50
    protocol TCP
    real_server 10.1.1.65 80 {
        weight 1
       TCP_CHECK {
        connect_port 80
        connect_timeout 3
        nb_get_retry 3
        delay_before_retry 4
       }
    }
     real_server 10.1.1.66 80 {
        weight 1
       TCP_CHECK {
        connect_port 80
        connect_timeout 3
        nb_get_retry 3
        delay_before_retry 4
       }
    }
}
4.配置节点服务器:除了ip,其他配置相同(需关闭防火墙和SELIUX,下载httpd)
修改一下主备用机文件中测试机IP

bash
cd /etc/sysconfig/network-scripts/
cp ifcfg-lo ifcfg-lo:0
vi ifcfg-lo:0

bash
ifup lo:0
vi /etc/rc.local 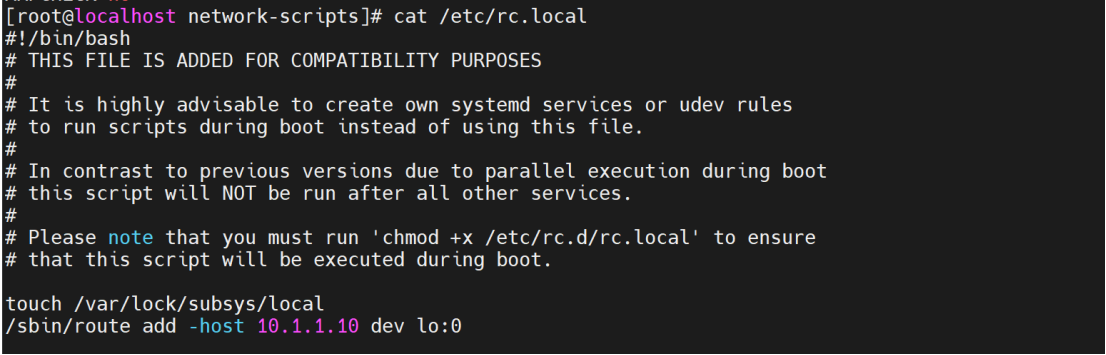
bash
route add -host 10.1.1.10 dev lo:0
vi /etc/sysctl.conf    添加如下内容:
net.ipv4.conf.all.arp_ignore = 1
net.ipv4.conf.all.arp_announce = 2
net.ipv4.conf.default.arp_ignore = 1
net.ipv4.conf.default.arp_announce = 2
net.ipv4.conf.lo.arp_ignore = 1
net.ipv4.conf.lo.arp_announce = 2
sysctl -p

bash
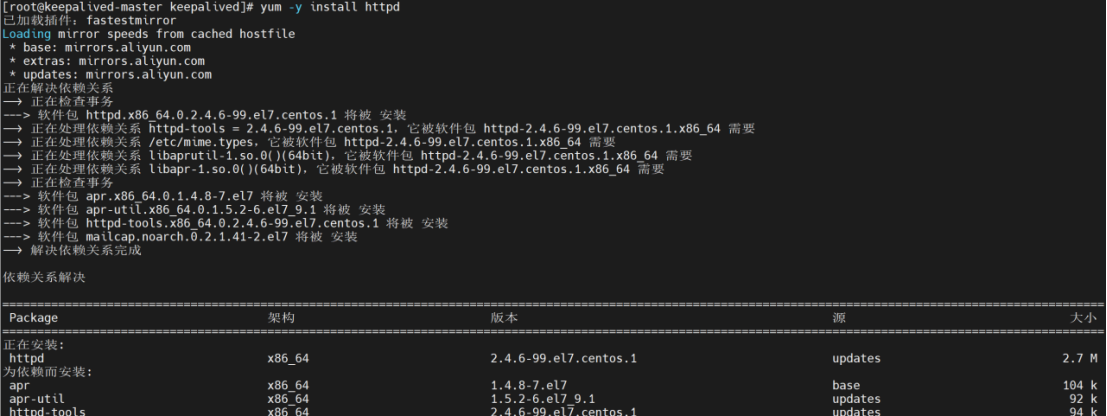
yum -y install httpd
Systemctl start httpd,关闭主备机httpd服务
三.验证主备切换
Master停掉keepalived,漂流ip到Backup
Windows ping漂流ip,主备切换时超时后又恢复正常

都访问http服务,主备切换时在外部浏览器访问web,浏览内容不同


四.注意事项
1.防火墙与 SELinux
实验环境中关闭防火墙和 SELinux 以简化配置,但生产环境需开放 VRRP 协议(112 端口)及业务端口(如 80)。
命令:
systemctl stop firewalld
setenforce 0
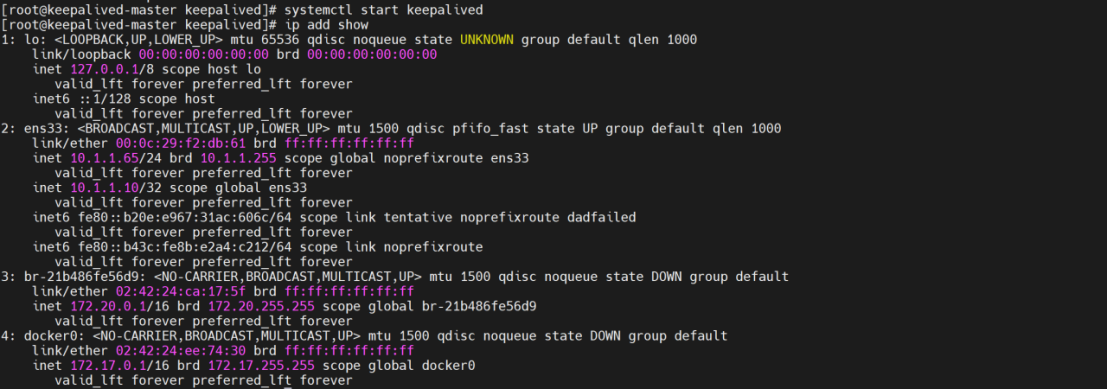
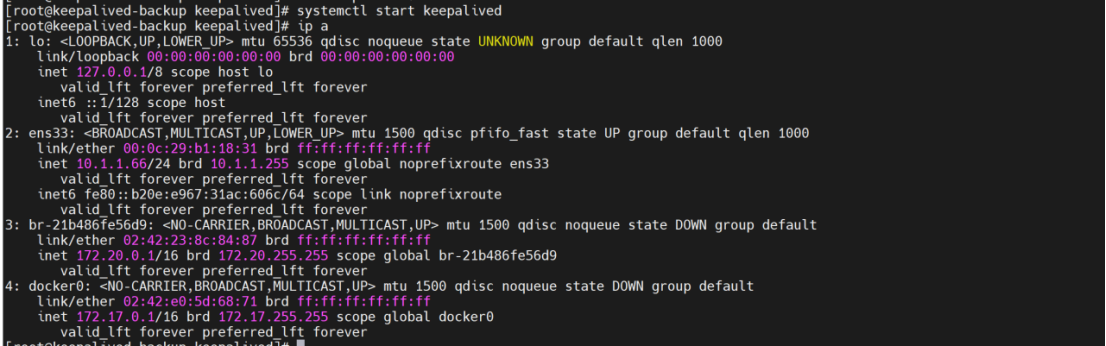
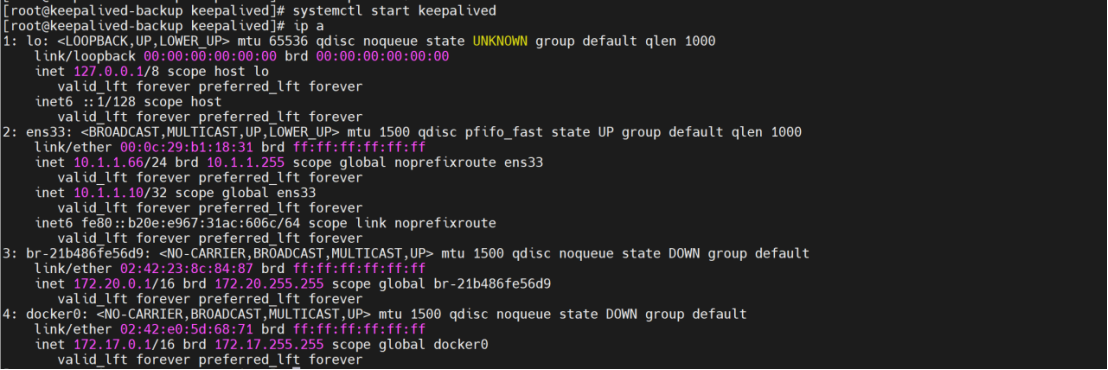
2.虚拟 IP(VIP)验证
使用 ip addr show 检查 VIP 是否绑定到主节点网卡(如 ens33)。
主节点宕机后,备节点应自动接管 VIP,通过 ping 10.1.1.10 验证切换是否成功。
3.日志与排错
查看 Keepalived 日志:journalctl -u keepalived -f。
使用 ipvsadm -Ln 检查 LVS 规则和当前连接状态。
4.持久化配置
后端服务器的 ARP 抑制配置需写入 /etc/sysctl.conf 并执行 sysctl -p 生效。
VIP 绑定(如 ifcfg-lo:0)和路由配置需添加到 /etc/rc.local,防止重启后失效。
常见问题处理
VIP 不切换:检查主备节点防火墙、VRRP 组 ID 和优先级配置。
负载不均衡:确认 lb_algo 调度算法(如 rr 轮询)和后端服务器权重(weight)。
服务不可达:验证后端服务器 HTTP 服务是否启动,以及 LVS 规则是否包含正确端口。
通过遵循以上注意事项,可确保 Keepalived + LVS 配置的稳定性和实验结果的准确性。