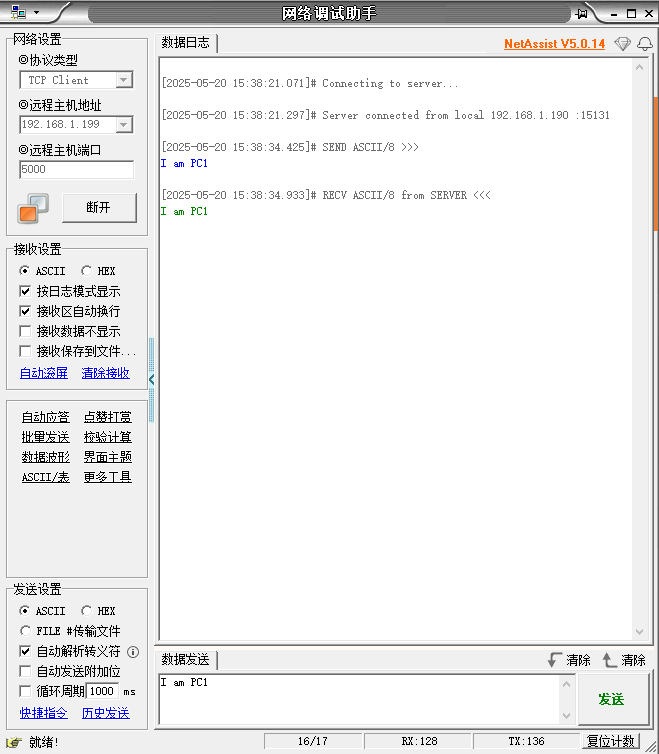
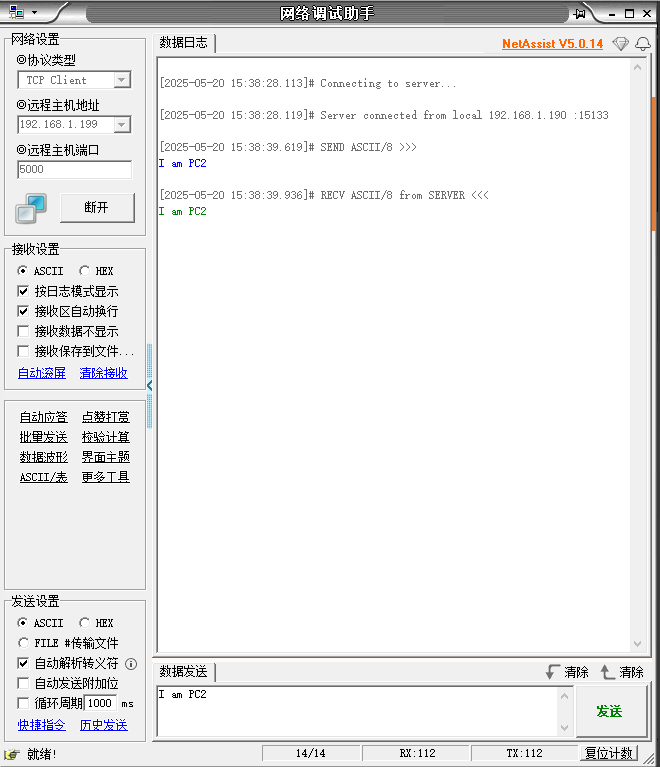
W5500是一款具有8个Socket的网络芯片,支持TCP Server模式,最多可同时连接8个客户端。本文介绍了基于STM32F10x和W5500的TCP Server实现,包括SPI初始化、W5500复位、网络参数配置、Socket状态管理等功能,适用于需要多客户端连接的嵌入式网络应用场景。
w5500具有8个Socket,TCPserver模式下最多支持8个客户端同时访问。
文件下载地址:https://gitee.com/wiznet-hk/STM32F10x_W5500_Examples
源文件下载地址:https://gitee.com/wiznet-hk
1、wiz_platform.c有改动
#include "wiz_platform.h"
#include <stdio.h>
#include <stdint.h>
#include "wizchip_conf.h"
#include "wiz_interface.h"
#include "stm32f10x.h"
#include "delay.h"

//函数功能:SPI1初始化
void wiz_spi_init(void)
{
	GPIO_InitTypeDef 	GPIO_InitStructure;
	SPI_InitTypeDef   SPI_InitStructure;

  RCC_APB2PeriphClockCmd(RCC_APB2Periph_GPIOA, ENABLE); //使能GPIOA的外设时钟
  RCC_APB2PeriphClockCmd(RCC_APB2Periph_SPI1, ENABLE);  //使能SPI1的外设时钟

  GPIO_InitStructure.GPIO_Pin = GPIO_Pin_5;         //选择PIN5,是SPI1的SCL
  GPIO_InitStructure.GPIO_Mode = GPIO_Mode_AF_PP;	  //选择引脚为复用推挽输出
  GPIO_InitStructure.GPIO_Speed = GPIO_Speed_50MHz; //设置引脚的最高工作速率为50MHz
  GPIO_Init(GPIOA, &GPIO_InitStructure);  //根据GPIO_InitStructure结构指针所指向的参数配置PA5引脚

  GPIO_InitStructure.GPIO_Pin = GPIO_Pin_6;         //选择PIN6,是SPI1的MISO
	GPIO_InitStructure.GPIO_Mode = GPIO_Mode_IN_FLOATING;	  //选择引脚为输入悬浮
  GPIO_InitStructure.GPIO_Speed = GPIO_Speed_50MHz; //设置引脚的最高工作速率为50MHz
  GPIO_Init(GPIOA, &GPIO_InitStructure);  //根据GPIO_InitStructure结构指针所指向的参数配置PA6引脚

  GPIO_InitStructure.GPIO_Pin = GPIO_Pin_7;         //选择PIN7,是SPI1的MOSI
	GPIO_InitStructure.GPIO_Mode = GPIO_Mode_AF_PP;	  //选择引脚为复用推挽输出
  GPIO_InitStructure.GPIO_Speed = GPIO_Speed_50MHz; //设置引脚的最高工作速率为50MHz
  GPIO_Init(GPIOA, &GPIO_InitStructure);  //根据GPIO_InitStructure结构指针所指向的参数配置PA7引脚

  GPIO_InitStructure.GPIO_Pin = GPIO_Pin_4;         //选择PIN3,是W5500的片选脚CS
  GPIO_InitStructure.GPIO_Mode = GPIO_Mode_Out_PP;  //选择引脚为推挽输出
	GPIO_InitStructure.GPIO_Speed = GPIO_Speed_50MHz; //设置引脚的最高工作速率为50MHz
  GPIO_Init(GPIOA, &GPIO_InitStructure);  //根据GPIO_InitStructure结构指针所指向的参数配置PA3引脚

//设置SPI1的工作模式
  SPI_InitStructure.SPI_Direction = SPI_Direction_2Lines_FullDuplex;
	//SPI设置为双线双向全双工
  SPI_InitStructure.SPI_Mode = SPI_Mode_Master;     //设置为主SPI
  SPI_InitStructure.SPI_DataSize = SPI_DataSize_8b; //设置SPI发送接收为8位帧结构
  SPI_InitStructure.SPI_CPOL = SPI_CPOL_Low;        //设置SCK空闲时钟为低电平
  SPI_InitStructure.SPI_CPHA = SPI_CPHA_1Edge;      //数据捕获于第1个时钟沿
	//SCK空闲时钟为低电平,数据捕获于第1个时钟沿,这样就设置了SPI从机在下降沿采集数据了
	//SPI从机在下降沿采集数据,这要求CPU必须在SCK上升沿输出位值,在SCK为高电平时达到稳定,为数据采集做好准备
  SPI_InitStructure.SPI_NSS = SPI_NSS_Soft;  //设置NSS输出由SSI位控制
  SPI_InitStructure.SPI_BaudRatePrescaler = SPI_BaudRatePrescaler_2;
	//设置波特率预分频值为2
  SPI_InitStructure.SPI_FirstBit = SPI_FirstBit_MSB;  //设置数据传输先从MSB位开始
  SPI_InitStructure.SPI_CRCPolynomial = 7;            //使用CRC7校验
  SPI_Init(SPI1, &SPI_InitStructure);

  SPI_Cmd(SPI1, ENABLE); //使能SPI外设
}

//函数功能:初始化W5500的RST引脚和INT引脚
void wiz_rst_int_init(void)
{
	GPIO_InitTypeDef  GPIO_InitStructure;

	RCC_APB2PeriphClockCmd ( RCC_APB2Periph_GPIOC, ENABLE ); //使能GPIOC外设的高速时钟
	/* W5500_RST引脚初始化配置(PC5) */
	GPIO_InitStructure.GPIO_Pin  = GPIO_Pin_5;	//选择PC5为W5500的RST引脚
	GPIO_InitStructure.GPIO_Speed=GPIO_Speed_10MHz;
	GPIO_InitStructure.GPIO_Mode = GPIO_Mode_Out_PP;
	GPIO_Init(GPIOC, &GPIO_InitStructure);
	GPIO_ResetBits(GPIOC, GPIO_Pin_5);

	RCC_APB2PeriphClockCmd ( RCC_APB2Periph_GPIOC, ENABLE ); //使能GPIOC外设的高速时钟

	/* W5500_INT引脚初始化配置(PC4) */
	GPIO_InitStructure.GPIO_Pin = GPIO_Pin_4;	//选择PC4为W5500的INT引脚
	GPIO_InitStructure.GPIO_Speed=GPIO_Speed_50MHz;
	GPIO_InitStructure.GPIO_Mode = GPIO_Mode_IPU;
	GPIO_Init(GPIOC, &GPIO_InitStructure);
}

//函数功能:使能SPI片选
void wizchip_select(void)
{
	GPIO_ResetBits(GPIOA,GPIO_Pin_4);
	//输出低电平表示选择W5500
}

//函数功能:不使能SPI片选
void wizchip_deselect(void)
{
	GPIO_SetBits(GPIOA,GPIO_Pin_4);
	//输出高电平表示不选择W5500
}

//函数功能:通过SPI,将dat的值发送给W5500
void wizchip_write_byte(uint8_t dat)
{
	while (SPI_I2S_GetFlagStatus(SPI1, SPI_I2S_FLAG_TXE) == RESET)
	{//检查SPI1的发送完成标志是否建立
	}

	SPI_I2S_SendData(SPI1, dat);//通过SPI,将dat发送给W5500
	while (SPI_I2S_GetFlagStatus(SPI1, SPI_I2S_FLAG_RXNE) == RESET)
	{//检查SPI1的接收完成标志是否建立
	}
	SPI_I2S_ReceiveData(SPI1);//读SPI接收数据寄存器
}

//函数功能:通过SPI读取1个字节,并返回
uint8_t wizchip_read_byte(void)
{
	while (SPI_I2S_GetFlagStatus(SPI1, SPI_I2S_FLAG_TXE) == RESET)
	{//检查SPI1的发送完成标志是否建立
	}

	SPI_I2S_SendData(SPI1,0xffff);//发送16个移位时钟,为接收数据作准备
	while (SPI_I2S_GetFlagStatus(SPI1, SPI_I2S_FLAG_RXNE) == RESET)
	{//检查SPI1的接收完成标志是否建立
	}
	return SPI_I2S_ReceiveData(SPI1);//读SPI接收数据寄存器
}

//函数功能:通过SPI,将buf[]中的前len个字节发送给W5500
void wizchip_write_buff(uint8_t *buf, uint16_t len)
{
	uint16_t idx = 0;

	for (idx = 0; idx < len; idx++)
	{
		wizchip_write_byte(buf[idx]);
		//通过SPI,将buf[idx]的值发送给W5500
	}
}

//函数功能:通过SPI读取len个字节,保存到buf[]中
void wizchip_read_buff(uint8_t *buf, uint16_t len)
{
	uint16_t idx = 0;

	for (idx = 0; idx < len; idx++)
	{
		buf[idx] = wizchip_read_byte();
		//通过SPI读取1个字节,保存到buf[idx]中
	}
}

//函数功能:W5500使用RST引脚复位
void wizchip_reset(void)
{
	GPIO_SetBits(GPIOC, GPIO_Pin_5);//复位引脚拉高
	delay_ms(10);
	GPIO_ResetBits(GPIOC, GPIO_Pin_5);//复位引脚拉低
	delay_ms(10);
	GPIO_SetBits(GPIOC, GPIO_Pin_5);//复位引脚拉高
	delay_ms(10);
}

//函数功能:注册SPI片选函数,单字节读写函数和多字节读写函数
//1.注册SPI片选信号函数
//2.注册SPI读写单一字节函数
//3.注册SPI读写多字节函数
void wizchip_spi_cb_reg(void)
{
	reg_wizchip_cs_cbfunc(wizchip_select, wizchip_deselect);//注册SPI片选信号函数
	reg_wizchip_spi_cbfunc(wizchip_read_byte, wizchip_write_byte);//注册SPI读写单一字节函数
	reg_wizchip_spiburst_cbfunc(wizchip_read_buff, wizchip_write_buff);//注册SPI读写多字节函数
}

//函数功能:配置TIM2每毫秒中断一次
void wiz_timer_init(void)
{
	TIM_TimeBaseInitTypeDef TIM_TimeBaseStructure;
	NVIC_InitTypeDef NVIC_InitStructure;

	RCC_APB1PeriphClockCmd(RCC_APB1Periph_TIM2, ENABLE);
	TIM_TimeBaseStructure.TIM_Period = 1000 - 1;
	TIM_TimeBaseStructure.TIM_Prescaler = 72 - 1;
	TIM_TimeBaseStructure.TIM_ClockDivision = TIM_CKD_DIV1;
	TIM_TimeBaseStructure.TIM_CounterMode = TIM_CounterMode_Up;
	TIM_TimeBaseInit(TIM2, &TIM_TimeBaseStructure);

	TIM_ClearFlag(TIM2, TIM_FLAG_Update);
	TIM_ITConfig(TIM2, TIM_IT_Update, ENABLE);

	NVIC_InitStructure.NVIC_IRQChannel = TIM2_IRQn;
	NVIC_InitStructure.NVIC_IRQChannelPreemptionPriority = 0;
	NVIC_InitStructure.NVIC_IRQChannelSubPriority = 3;
	NVIC_InitStructure.NVIC_IRQChannelCmd = ENABLE;
	NVIC_Init(&NVIC_InitStructure);

	TIM_Cmd(TIM2, ENABLE);
}

//函数功能:使能TIM2中断
void wiz_tim_irq_enable(void)
{
	TIM_ITConfig(TIM2, TIM_IT_Update, ENABLE);
}

//函数功能:不使能TIM2中断
void wiz_tim_irq_disable(void)
{
	TIM_ITConfig(TIM2, TIM_IT_Update, DISABLE);
}

//函数功能:TIM2每毫秒中断一次
void TIM2_IRQHandler(void)
{
	static uint32_t wiz_timer_1ms_count = 0;
	if (TIM_GetITStatus(TIM2, TIM_IT_Update) == SET)
	{
		wiz_timer_1ms_count++;
		if (wiz_timer_1ms_count >= 1000)
		{
			wiz_timer_1ms_count = 0;
		}
		TIM_ClearITPendingBit(TIM2, TIM_IT_Update);
	}
}
2、wiz_platform.h
#ifndef __WIZ_PLATFORM_H__
#define __WIZ_PLATFORM_H__

#include <stdint.h>


/**
 * @brief   wiz spi init
 * @param   none
 * @return  none
 */
void wiz_spi_init(void);

/**
 * @brief   wiz rst and int pin init
 * @param   none
 * @return  none
 */
void wiz_rst_int_init(void);

/**
 * @brief   hardware reset wizchip
 * @param   none
 * @return  none
 */
void wizchip_reset(void);

/**
 * @brief   Register the WIZCHIP SPI callback function
 * @param   none
 * @return  none
 */
void wizchip_spi_cb_reg(void);

/**
 * @brief   wiz timer init
 * @param   none
 * @return  none
 */
void wiz_timer_init(void);

/**
 * @brief   Turn on wiz timer interrupt
 * @param   none
 * @return  none
 */
void wiz_tim_irq_enable(void);

/**
 * @brief   Turn off wiz timer interrupt
 * @param   none
 * @return  none
 */
void wiz_tim_irq_disable(void);
#endif
3、wiz_interface.c有改动
#include "wiz_interface.h"
#include "wiz_platform.h"
#include "wizchip_conf.h"
#include <stdio.h>
#include <stdlib.h>
#include <string.h>
#include "delay.h"

void wizchip_initialize(void);
void Server_network_init(uint8_t *ethernet_buff, wiz_NetInfo *conf_info);

void wizchip_version_check(void);
void print_network_information(void);
void wiz_phy_link_check(void);
void wiz_print_phy_info(void);

#define W5500_VERSION 0x04
//函数功能:读取芯片版本号码,并检查是否正确
void wizchip_version_check(void)
{
	uint8_t error_count = 0;

	while (1)
	{
		delay_ms(1000);
		if (getVERSIONR() != W5500_VERSION)
		{//读取芯片版本号码
			error_count++;
			if (error_count > 5)
			{
				printf("error, %s version is 0x%02x, but read %s version value = 0x%02x\r\n", _WIZCHIP_ID_, W5500_VERSION, _WIZCHIP_ID_, getVERSIONR());
				while (1)
					;
			}
		}
		else
		{
			break;
		}
	}
}

/**
 * @brief Print PHY information
 */
//函数功能:
//1.读PHY配置寄存器的bit1和bit2
//2.串口输出当前网速为100M/10M
//3.串口输出当前以太网采用全双工通讯/半双工通讯
void wiz_print_phy_info(void)
{
	uint8_t get_phy_conf;

	get_phy_conf = getPHYCFGR();//读PHY配置寄存器
	printf("The current Mbtis speed : %dMbps\r\n", get_phy_conf & 0x02 ? 100 : 10);
	//PHY配置寄存器,bit1=1表示网速为100M,bit1=0表示网速为10M
	printf("The current Duplex Mode : %s\r\n", get_phy_conf & 0x04 ? "Full-Duplex" : "Half-Duplex");
	//PHY配置寄存器,bit2=1表示以太网采用全双工通讯,bit2=0表示以太网采用半双工通讯
}

//函数功能:
//读PHY配置寄存器的bit[2:0]
//bit0=1表示W5500连接到局域网
//bit1=1表示当前网速为100M,否则为10M
//bit2=1表示当前以太网采用全双工通讯,否则为半双工通讯
void wiz_phy_link_check(void)
{
	uint8_t phy_link_status;

	do
		{
			delay_ms(1000);
			ctlwizchip(CW_GET_PHYLINK, (void *)&phy_link_status);
			//读PH配置寄存器的bit0,保存到phy_link_status中,为1表示连接到局域网
			if (phy_link_status == PHY_LINK_ON)
			{//W5500连接到局域网
				printf("PHY link\r\n");
				wiz_print_phy_info();
        //1.读PHY配置寄存器的bit1和bit2
        //2.串口输出当前网速为100M/10M
        //3.串口输出当前以太网采用全双工通讯/半双工通讯
			}
			else
			{
				printf("PHY no link\r\n");
			}
		} while (phy_link_status == PHY_LINK_OFF);
}

//1.注册SPI片选函数,单字节读写函数和多字节读写函数
//2.W5500使用RST引脚复位
//3.读取芯片版本号码,并检查是否正确
//4.读PHY配置寄存器的bit[2:0],bit0=1表示W5500连接到局域网
//bit1=1表示当前网速为100M,否则为10M
//bit2=1表示当前以太网采用全双工通讯,否则为半双工通讯
void wizchip_initialize(void)
{
	wizchip_spi_cb_reg();
	//注册SPI片选函数,单字节读写函数和多字节读写函数

	wizchip_reset();//W5500使用RST引脚复位
	wizchip_version_check();
	//读取芯片版本号码,并检查是否正确
	//Read version register

	wiz_phy_link_check();
  //读PHY配置寄存器的bit[2:0]
  //bit0=1表示W5500连接到局域网
  //bit1=1表示当前网速为100M,否则为10M
  //bit2=1表示当前以太网采用全双工通讯,否则为半双工通讯
}

//函数功能:读本地网络参数:MAC地址,GW网关,SN子网掩码,本地IP地址,DNS服务器IP地址,DHCP,然后从串口输出
void print_network_information(void)
{
	wiz_NetInfo net_info;

	wizchip_getnetinfo(&net_info);
	// Get chip configuration information
	//读本地网络参数:MAC地址,GW网关,SN子网掩码,本地IP地址,DNS服务器IP地址,DHCP
	if (net_info.dhcp == NETINFO_DHCP)
	{
		printf("====================================================================================================\r\n");
		printf(" %s network configuration : DHCP\r\n\r\n", _WIZCHIP_ID_);
	}
	else
	{
		printf("====================================================================================================\r\n");
		printf(" %s network configuration : static\r\n\r\n", _WIZCHIP_ID_);
	}
	printf(" MAC         : %02X:%02X:%02X:%02X:%02X:%02X\r\n", net_info.mac[0], net_info.mac[1], net_info.mac[2], net_info.mac[3], net_info.mac[4], net_info.mac[5]);
	printf(" IP          : %d.%d.%d.%d\r\n", net_info.ip[0], net_info.ip[1], net_info.ip[2], net_info.ip[3]);
	printf(" Subnet Mask : %d.%d.%d.%d\r\n", net_info.sn[0], net_info.sn[1], net_info.sn[2], net_info.sn[3]);
	printf(" Gateway     : %d.%d.%d.%d\r\n", net_info.gw[0], net_info.gw[1], net_info.gw[2], net_info.gw[3]);
	printf(" DNS         : %d.%d.%d.%d\r\n", net_info.dns[0], net_info.dns[1], net_info.dns[2], net_info.dns[3]);
	printf("====================================================================================================\r\n\r\n");
}


//函数功能:TCP Server设置本地网络信息
//1.使用"默认网络参数"设置本地网络参数:MAC地址,GW网关,SN子网掩码,本地IP地址,DNS服务器IP地址,DHCP
//2.读本地网络参数:MAC地址,GW网关,SN子网掩码,本地IP地址,DNS服务器IP地址,DHCP,然后从串口输出
void Server_network_init(uint8_t *ethernet_buff, wiz_NetInfo *conf_info)
{
	wizchip_setnetinfo(conf_info);
	//设置本地网络参数:MAC地址,GW网关,SN子网掩码,本地IP地址,DNS服务器IP地址,DHCP模式
	print_network_information();
	//读本地网络参数:MAC地址,GW网关,SN子网掩码,本地IP地址,DNS服务器IP地址,DHCP模式,然后从串口输出
}
4、wiz_interface.h
#ifndef __WIZ_INTERFACE_H__
#define __WIZ_INTERFACE_H__

#include "wizchip_conf.h"

extern void wizchip_initialize(void);
extern void Server_network_init(uint8_t *ethernet_buff, wiz_NetInfo *conf_info);
#endif
5、W5500_Variable.c有改动
#include "W5500_Variable.h"
#include "socket.h"	// Just include one header for WIZCHIP
#include "stdio.h"  //getchar(),putchar(),scanf(),printf(),puts(),gets(),sprintf()
#include "string.h" //使能strcpy(),strlen(),memset()

//W5500的网络参数
//本地物理地址:00 08 DC 11 11 11
//本地IP地址:192.168.1.199
//本地子网掩码:	255.255.255.0
//本地网关:192.168.1.1
//DNS服务器IP地址:8.8.8.8
//程序固化IP地址
/* network information */
wiz_NetInfo default_net_info = {
    {0x00, 0x08, 0xdc,0x11, 0x11, 0x11},
    {192, 168, 1, 199},
    {255,255,255,0},
    {192, 168, 1, 1},
    {8,8,8,8},
    NETINFO_STATIC}; //静态IP,程序固化IP地址
wiz_NetInfo net_info;

uint8_t ethernet_buf[ETHERNET_BUF_MAX_SIZE] = {0};

uint8_t destip[8][4];//存放8个端口的远程IP地址
uint16_t destport[8];//存放8个远程端口值
6、W5500_Variable.h有改动
#ifndef _W5500_Variable_H
#define _W5500_Variable_H

#include "stm32f10x.h"//使能uint8_t,uint16_t,uint32_t,uint64_t,int8_t,int16_t,int32_t,int64_t
#include "wizchip_conf.h"

extern wiz_NetInfo default_net_info;
extern wiz_NetInfo net_info;

#define ETHERNET_BUF_MAX_SIZE (1024 * 2)
extern uint8_t ethernet_buf[ETHERNET_BUF_MAX_SIZE];

extern uint8_t destip[8][4];
extern uint16_t destport[8];
#endif
7、TestTcpServer.c
#include "TestTcpServer.h"
#include "stdio.h"  //getchar(),putchar(),scanf(),printf(),puts(),gets(),sprintf()
#include "w5500.h"
#include "W5500_Variable.h"
#include "socket.h"

//w5500具有8个Socket,TCPserver模式下最多支持8个客户端同时访问

int32_t loop_TestTcpServer(uint8_t sn, uint8_t* buf, uint16_t port);

/**
 * @brief   tcp server loopback test
 * @param   sn:    socket number
 * @param   buf:   Data sending and receiving cache
 * @param   port:  Listen port
 * @return  value for SOCK_ERRORs,return 1:no error
*/
//sn为SOCKET端口
//buf为接收数据缓冲区
//port为本地端口
int32_t loop_TestTcpServer(uint8_t sn, uint8_t* buf, uint16_t port)
{
	int32_t ret;
	uint16_t size = 0, sentsize=0;

	switch(getSn_SR(sn))//获取W5500端口sn的状态寄存器
	{
		case SOCK_ESTABLISHED ://W5500端口sn已经连接成功
			if(getSn_IR(sn) & Sn_IR_CON)
			{//读端口sn的Sn_IR中断标志寄存器的bit0
#ifdef _LOOP_TestTcpServer_DEBUG_
				getSn_DIPR(sn, destip[sn]);
				destport[sn] = getSn_DPORT(sn);
				printf("Socket%d:Connected - %d.%d.%d.%d : %d\r\n",sn, destip[sn][0], destip[sn][1], destip[sn][2], destip[sn][3], destport[sn]);
#endif
				setSn_IR(sn,Sn_IR_CON);//回写端口sn的Sn_IR中断标志寄存器的bit0,清除中断标志
			}
			if((size = getSn_RX_RSR(sn)) > 0)//读端口sn的Sn_RX_RSR寄存器,获取该端口的接收缓冲区的数据长度
			{
				if(size > ETHERNET_BUF_MAX_SIZE) size = ETHERNET_BUF_MAX_SIZE;
				ret = recv(sn, buf, size);//读"W5500端口sn"的数据,长度为size个字节,保存到buf
				buf[ret]='\0';//添加字符串结束符
				printf("Socket%d recv: %s\n",sn,buf); //print the receive data.
				if(ret <= 0) return ret;      // check SOCKERR_BUSY & SOCKERR_XXX. For showing the occurrence of SOCKERR_BUSY.
				size = (uint16_t) ret;

				sentsize = 0;
				while(size != sentsize)
				{
					ret = send(sn, buf+sentsize, size-sentsize);
					//将(buf+sentsize)为首地址的存储单元的前len个字节通过"W5500端口sn"发送出去
					if(ret < 0)
					{
						close(sn);//关闭端口sn的连接, socket close
						return ret;
					}
					sentsize += ret; // Don't care SOCKERR_BUSY, because it is zero.
				}
			}
			break;
		case SOCK_CLOSE_WAIT ://W5500端口sn处于等待关闭状态
#ifdef _LOOP_TestTcpServer_DEBUG_
		  printf("Socket%d:CloseWait\r\n",sn);
#endif
		if((ret = disconnect(sn)) != SOCK_OK) return ret;
#ifdef _LOOP_TestTcpServer_DEBUG_
		printf("Socket%d:Socket Closed\r\n", sn);
#endif
		break;
		case SOCK_INIT ://W5500端口sn已经初始化
#ifdef _LOOP_TestTcpServer_DEBUG_
		printf("Socket%d:Listen port [%d]\r\n", sn, port);
#endif
		if( (ret = listen(sn)) != SOCK_OK)//监听SOCKET端口sn
			return ret;
		break;
		case SOCK_CLOSED://W5500端口sn处于关闭状态
#ifdef _LOOP_TestTcpServer_DEBUG_
		printf("Socket%d:TCP server start\r\n",sn);
#endif
		if((ret = socket(sn, Sn_MR_TCP, port, 0x00)) != sn) return ret;
#ifdef _LOOP_TestTcpServer_DEBUG_
		printf("Socket%d:Socket opened\r\n",sn);
#endif
		break;
		default:
			break;
	}

	return 1;
}
8、TestTcpServer.h
#ifndef _TestTcpServer_H
#define _TestTcpServer_H

#include "stm32f10x.h"//使能uint8_t,uint16_t,uint32_t,uint64_t,int8_t,int16_t,int32_t,int64_t

#define TCPServerSOCEKET0        0     //W5500使用端口0作为TCP Server
#define TCPServerSOCEKET1        1     //W5500使用端口1作为TCP Server
#define TCPServerSOCEKET2        2     //W5500使用端口2作为TCP Server
#define TCPServerSOCEKET3        3     //W5500使用端口3作为TCP Server
#define TCPServerSOCEKET4        4     //W5500使用端口4作为TCP Server
#define TCPServerSOCEKET5        5     //W5500使用端口5作为TCP Server
#define TCPServerSOCEKET6        6     //W5500使用端口6作为TCP Server
#define TCPServerSOCEKET7        7     //W5500使用端口7作为TCP Server

#define	_LOOP_TestTcpServer_DEBUG_  //允许串口跟踪

extern int32_t loop_TestTcpServer(uint8_t sn, uint8_t* buf, uint16_t port);

#endif
9、main.c
#include "stm32f10x.h"//使能uint8_t,uint16_t,uint32_t,uint64_t,int8_t,int16_t,int32_t,int64_t
#include "stdio.h"  //getchar(),putchar(),scanf(),printf(),puts(),gets(),sprintf()
#include "string.h" //使能strcpy(),strlen(),memset()
#include "delay.h"
#include "USART4.h"
#include "LED.h"

//文件下载地址:https://gitee.com/wiznet-hk/STM32F10x_W5500_Examples
//源文件下载地址:https://gitee.com/wiznet-hk
#include "wiz_platform.h"
#include "wizchip_conf.h"
#include "wiz_interface.h"
#include "W5500_Variable.h"
#include "TestTcpServer.h"

const char CPU_Reset_REG[]="\r\nCPU reset!\r\n";
int main(void)
{

//	SCB->VTOR = 0x8000000;//中断向量表重定义

//	SystemInit();
	delay_init();//延时函数初始化
	NVIC_PriorityGroupConfig(NVIC_PriorityGroup_4);//设置系统中断优先级分组4
	USART4_Serial_Interface_Enable(115200);
	printf("%s",CPU_Reset_REG);//调试串口输出"\r\nCPU reset!\r\n"
	LED_Init();
	LED0_ON();

	wiz_timer_init();  //配置TIM2每毫秒中断一次
	wiz_spi_init();    //SPI1初始化
	wiz_rst_int_init();//初始化W5500的RST引脚和INT引脚
	printf("%s network install example\r\n",_WIZCHIP_ID_);

	wizchip_initialize();
  //1.注册SPI片选函数,单字节读写函数和多字节读写函数
  //2.W5500使用RST引脚复位
  //3.读取芯片版本号码,并检查是否正确
  //4.读PHY配置寄存器的bit[2:0],bit0=1表示W5500连接到局域网
  //bit1=1表示当前网速为100M,否则为10M
  //bit2=1表示当前以太网采用全双工通讯,否则为半双工通讯

	Server_network_init(ethernet_buf, &default_net_info);
//TCP Server设置本地网络信息
//1.使用"默认网络参数"设置本地网络参数:MAC地址,GW网关,SN子网掩码,本地IP地址,DNS服务器IP地址,DHCP模式
//2.读本地网络参数:MAC地址,GW网关,SN子网掩码,本地IP地址,DNS服务器IP地址,DHCP模式,然后从串口输出

	setSn_KPALVTR(TCPServerSOCEKET0, 6); // 30s keepalive
	//Socket在线时间寄存器,在线验证心跳包传输时间,他只在TCP模式下生效,在其他模式下将会被忽略,单位时间为5秒。
	//因此心跳包传输时间为6*5=30秒
	setSn_KPALVTR(TCPServerSOCEKET1, 6); // 30s keepalive
	setSn_KPALVTR(TCPServerSOCEKET2, 6); // 30s keepalive
	setSn_KPALVTR(TCPServerSOCEKET3, 6); // 30s keepalive
	setSn_KPALVTR(TCPServerSOCEKET4, 6); // 30s keepalive
	setSn_KPALVTR(TCPServerSOCEKET5, 6); // 30s keepalive
	setSn_KPALVTR(TCPServerSOCEKET6, 6); // 30s keepalive
	setSn_KPALVTR(TCPServerSOCEKET7, 6); // 30s keepalive
	while(1)
	{
		loop_TestTcpServer(TCPServerSOCEKET0,ethernet_buf,5000);
		loop_TestTcpServer(TCPServerSOCEKET1,ethernet_buf,5000);
		loop_TestTcpServer(TCPServerSOCEKET2,ethernet_buf,5000);
		loop_TestTcpServer(TCPServerSOCEKET3,ethernet_buf,5000);
		loop_TestTcpServer(TCPServerSOCEKET4,ethernet_buf,5000);
		loop_TestTcpServer(TCPServerSOCEKET5,ethernet_buf,5000);
		loop_TestTcpServer(TCPServerSOCEKET6,ethernet_buf,5000);
		loop_TestTcpServer(TCPServerSOCEKET7,ethernet_buf,5000);
		LED0=!LED0;
		delay_ms(1000);
	}
}
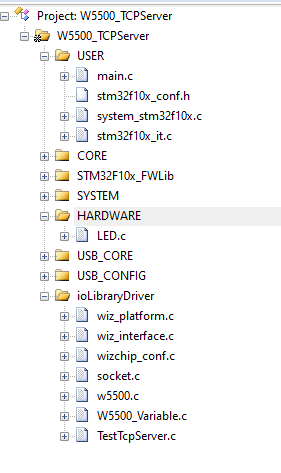
10、工程样板
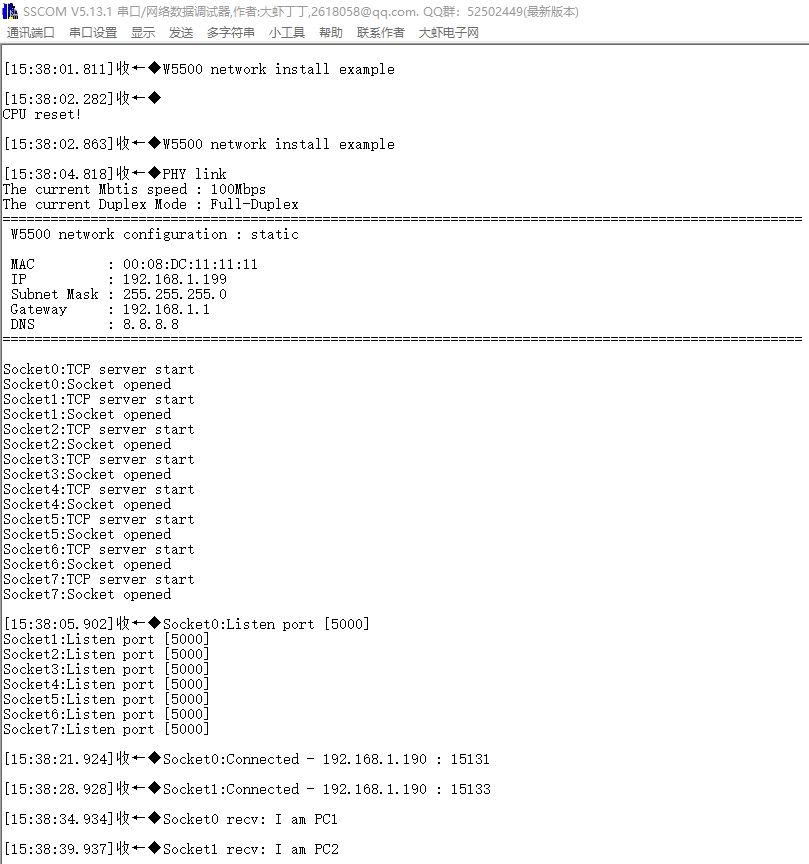
11、串口仿真结果
12、TCP Client客户机