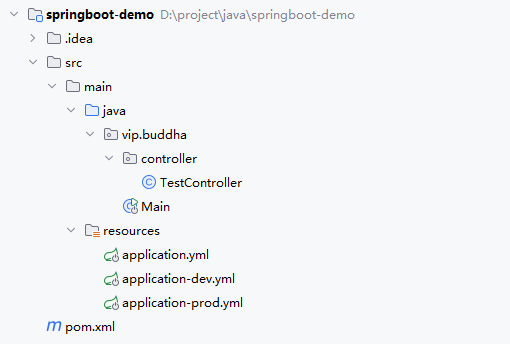
resources下application.yml、application-dev.yml、application-prod.yml多个配置文件。
yaml
spring:
  profiles:
    active: dev
yaml
spring:
  profiles:
    active: prod
一般都是通过修改spring.profiles.active值来修改加载不同环境的配置信息,可以把切换的dev/prod放到pom.xml文件来实现,避免手动修改。
1. 示例代码结构
2. pom文件
xml
<?xml version="1.0" encoding="UTF-8"?>
<project xmlns="http://maven.apache.org/POM/4.0.0"
         xmlns:xsi="http://www.w3.org/2001/XMLSchema-instance"
         xsi:schemaLocation="http://maven.apache.org/POM/4.0.0 http://maven.apache.org/xsd/maven-4.0.0.xsd">
    <modelVersion>4.0.0</modelVersion>

    <parent>
        <groupId>org.springframework.boot</groupId>
        <artifactId>spring-boot-starter-parent</artifactId>
        <version>2.7.0</version>
    </parent>

    <groupId>vip.buddha</groupId>
    <artifactId>springboot-demo</artifactId>
    <version>1.0-SNAPSHOT</version>

    <properties>
        <maven.compiler.source>8</maven.compiler.source>
        <maven.compiler.target>8</maven.compiler.target>
    </properties>

    <dependencies>
        <dependency>
            <groupId>org.springframework.boot</groupId>
            <artifactId>spring-boot-starter-web</artifactId>
        </dependency>
    </dependencies>

    <profiles>
        <!-- 开发环境 -->
        <profile>
            <id>dev</id>
            <activation>
                <activeByDefault>true</activeByDefault>
            </activation>
            <properties>
                <package.environment>dev</package.environment>
            </properties>
        </profile>

        <!-- 生产环境 -->
        <profile>
            <id>prod</id>
            <activation>
                <activeByDefault>false</activeByDefault>
            </activation>
            <properties>
                <package.environment>prod</package.environment>
            </properties>
        </profile>
    </profiles>
    <build>
        <resources>
            <resource>
                <directory>src/main/resources</directory>
                <filtering>true</filtering>
                <!-- 添加以下配置,明确包含YAML文件 -->
                <includes>
                    <include>**/*.yml</include>
                </includes>
            </resource>
        </resources>

        <plugins>
            <plugin>
                <artifactId>maven-resources-plugin</artifactId>
                <configuration>
                    <delimiters>
                        <delimiter>${}</delimiter> <!-- 使用 ${} 作为占位符 -->
                    </delimiters>
                    <useDefaultDelimiters>false</useDefaultDelimiters> <!-- 禁用默认的 @..@ -->
                </configuration>
            </plugin>
        </plugins>
    </build>

</project>
3. application文件
yaml
spring:
  profiles:
    active: ${package.environment}
4. application-dev文件
yaml
spring:
  datasource:
    url: jdbc:mysql://localhost:3306/dev_db
    username: dev_user
    password: dev_password
5. application-prod文件
yaml
spring:
  datasource:
    url: jdbc:mysql://localhost:3306/prod_db
    username: prod_user
    password: prod_password
6. TestController文件
java
package vip.buddha.controller;

import org.springframework.beans.factory.annotation.Value;
import org.springframework.web.bind.annotation.RequestMapping;
import org.springframework.web.bind.annotation.RestController;

@RestController
public class TestController {
    @Value("${spring.datasource.url}")
    private String url;

    @Value("${spring.datasource.username}")
    private String username;

    @Value("${spring.datasource.password}")
    private String password;

    @RequestMapping("/test")
    public void test() {
        System.out.println("url:" + url);
        System.out.println("username:" + username);
        System.out.println("password:" + password);
    }
}
7. Main文件
java
package vip.buddha;

import org.springframework.boot.SpringApplication;
import org.springframework.boot.autoconfigure.SpringBootApplication;

@SpringBootApplication
public class Main {
    public static void main(String[] args) {
        SpringApplication.run(Main.class, args);
    }
}
8. 效果演示
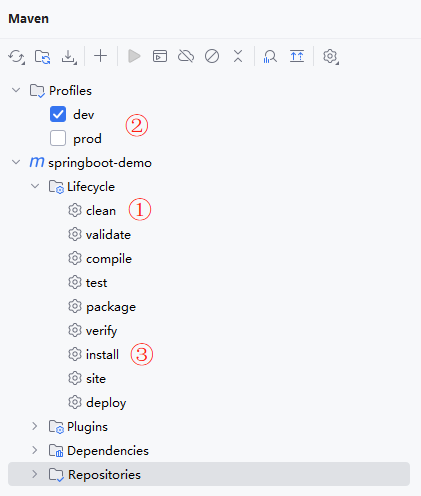
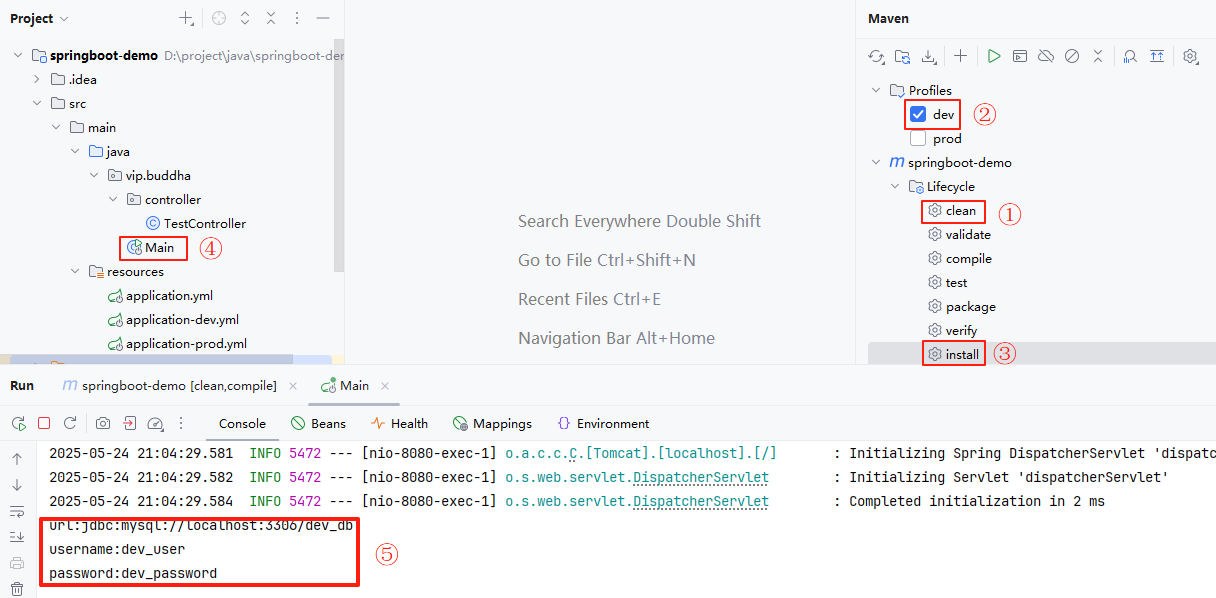
maven面板中,先clean,后选择Profiles为dev还是prod,再install后启动Main主程序。浏览器访问http://localhost:8080/test,接口控制台就展示出预期结果来。