import numpy as np
import cv2
import matplotlib.pyplot as plt
from mpl_toolkits.mplot3d import Axes3D
def calculate_camera_intrinsics(image_width=640, image_height=480, fov=55, is_horizontal=True):
"""
计算相机内参矩阵
参数:
image_width: 图像宽度(像素)
image_height: 图像高度(像素)
fov: 视野角(度)
is_horizontal: 是否为水平视野角
返回:
K: 相机内参矩阵
focal_length: 焦距(像素)
"""
# 将FOV从度转换为弧度
fov_rad = np.radians(fov)
# 计算焦距
if is_horizontal:
focal_length = (image_width / 2) / np.tan(fov_rad / 2)
else:
focal_length = (image_height / 2) / np.tan(fov_rad / 2)
# 主点(通常位于图像中心)
cx = image_width / 2
cy = image_height / 2
# 构建相机内参矩阵
K = np.array([[focal_length, 0, cx], [0, focal_length, cy], [0, 0, 1]], dtype=np.float32)
return K, focal_length
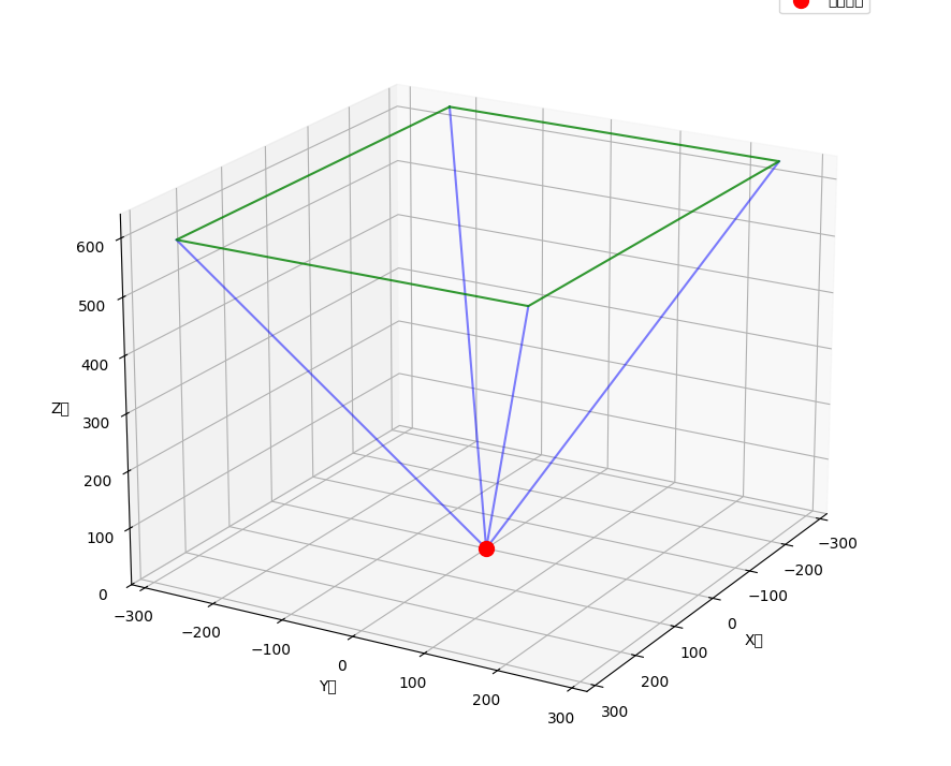
def visualize_camera_model(K, image_size, title="相机模型可视化"):
"""可视化相机模型和视野"""
fig = plt.figure(figsize=(10, 8))
ax = fig.add_subplot(111, projection='3d')
# 相机位置
camera_pos = np.array([0, 0, 0])
# 图像平面尺寸
width, height = image_size
# 焦距
fx = K[0, 0]
fy = K[1, 1]
cx = K[0, 2]
cy = K[1, 2]
# 假设图像平面在z=f处
z = fx
# 计算图像平面四个角点的3D坐标
top_left = np.array([(0 - cx) * z / fx, (0 - cy) * z / fy, z])
top_right = np.array([(width - cx) * z / fx, (0 - cy) * z / fy, z])
bottom_left = np.array([(0 - cx) * z / fx, (height - cy) * z / fy, z])
bottom_right = np.array([(width - cx) * z / fx, (height - cy) * z / fy, z])
# 绘制相机位置
ax.scatter(camera_pos[0], camera_pos[1], camera_pos[2], c='r', marker='o', s=100, label='相机位置')
# 绘制从相机到图像平面四角的视线
for corner in [top_left, top_right, bottom_left, bottom_right]:
ax.plot([camera_pos[0], corner[0]], [camera_pos[1], corner[1]], [camera_pos[2], corner[2]], 'b-', alpha=0.5)
# 绘制图像平面
x = np.array([top_left[0], top_right[0], bottom_right[0], bottom_left[0], top_left[0]])
y = np.array([top_left[1], top_right[1], bottom_right[1], bottom_left[1], top_left[1]])
z = np.array([top_left[2], top_right[2], bottom_right[2], bottom_left[2], top_left[2]])
ax.plot(x, y, z, 'g-', alpha=0.8)
# 设置坐标轴范围
max_range = max(width, height, fx) * 0.5
ax.set_xlim([-max_range, max_range])
ax.set_ylim([-max_range, max_range])
ax.set_zlim([0, max_range * 2])
# 设置坐标轴标签
ax.set_xlabel('X轴')
ax.set_ylabel('Y轴')
ax.set_zlabel('Z轴')
# 设置视角
ax.view_init(elev=20, azim=30)
# 添加标题和图例
ax.set_title(title)
ax.legend()
plt.tight_layout()
plt.show()
def visualize_camera_model_opencv(K, image_size, title="相机模型可视化"):
"""使用OpenCV可视化相机模型和视野"""
# 创建空白图像
width, height = image_size
canvas = np.ones((height, width, 3), dtype=np.uint8) * 255
# 焦距和主点
fx = K[0, 0]
fy = K[1, 1]
cx = K[0, 2]
cy = K[1, 2]
# 相机位置(图像中心)
camera_center = (int(cx), int(cy))
# 计算视野边界点
fov_scale = min(width, height) * 0.4 # 视野显示比例
# 计算四个方向的视野边界点
points = [(int(cx), int(cy - fov_scale)), # 上
(int(cx + fov_scale), int(cy)), # 右
(int(cx), int(cy + fov_scale)), # 下
(int(cx - fov_scale), int(cy)), # 左
]
# 绘制视野范围(矩形)
cv2.rectangle(canvas, (points[3][0], points[0][1]), (points[1][0], points[2][1]), (0, 255, 0), 2)
# 绘制主点
cv2.circle(canvas, camera_center, 5, (0, 0, 255), -1)
cv2.putText(canvas, "主点", (camera_center[0] + 10, camera_center[1] - 10), cv2.FONT_HERSHEY_SIMPLEX, 0.5, (0, 0, 255), 1)
# 绘制坐标轴
axis_length = 100
cv2.arrowedLine(canvas, camera_center, (camera_center[0] + axis_length, camera_center[1]), (255, 0, 0), 2) # X轴(蓝色)
cv2.arrowedLine(canvas, camera_center, (camera_center[0], camera_center[1] + axis_length), (0, 0, 255), 2) # Y轴(红色)
# 添加焦距信息
cv2.putText(canvas, f"fx: {fx:.2f}", (20, 30), cv2.FONT_HERSHEY_SIMPLEX, 0.7, (0, 0, 0), 2)
cv2.putText(canvas, f"fy: {fy:.2f}", (20, 60), cv2.FONT_HERSHEY_SIMPLEX, 0.7, (0, 0, 0), 2)
# 添加标题
cv2.putText(canvas, title, (20, height - 20), cv2.FONT_HERSHEY_SIMPLEX, 0.7, (0, 0, 0), 2)
# 显示图像
cv2.imshow(title, canvas)
cv2.waitKey(0)
cv2.destroyAllWindows()
def main():
# 图像尺寸
image_width = 640
image_height = 480
# FOV(度)
fov = 55
# 计算相机内参(假设为水平FOV)
K, focal_length = calculate_camera_intrinsics(image_width=image_width, image_height=image_height, fov=fov, is_horizontal=True)
# 打印结果
print(f"图像尺寸: {image_width}x{image_height} 像素")
print(f"视野角(FOV): {fov} 度")
print(f"焦距: {focal_length:.2f} 像素")
print("\n相机内参矩阵:")
print(K)
# 可视化相机模型
visualize_camera_model(K, (image_width, image_height))
# visualize_camera_model_opencv(K, (image_width, image_height), title="相机模型可视化")
# 如果是垂直FOV,也可以计算
K_vertical, _ = calculate_camera_intrinsics(image_width=image_width, image_height=image_height, fov=fov, is_horizontal=False)
print("\n如果这是垂直FOV,相机内参矩阵为:")
print(K_vertical)
if __name__ == "__main__":
main()