我们在进行Java项目开发时候,经常会用到Redis缓存例如数据库里的一些信息、手机验证码之类的,正常写法就会像去连mysql一样,这种硬编码的方式肯定是非常不合适的。
  @Autowire
  private UserMapper userMapper;
  @Autowire
  private StringCommand stringCommand;
  //查询用户
  public User getUserById(Long userId) {
   String cacheKey = "userId_" + userId;
   User user=stringCommand.get(cacheKey);
   if(user != null) {
    return user;
   }
   user = userMapper.getUserById(userId);
   if(user != null) {
    stringCommand.set(cacheKey,user);
    return user;
   }
   //修改用户
   public void updateUser(User user){
    userMapper.updateUser(user);
    String cacheKey = "userId_" + userId.getId();
    stringCommand.set(cacheKey , user);
   }
   //删除用户
   public void deleteUserById(Long userId){
     userMapper.deleteUserById(userId);
     String cacheKey = "userId_" + userId.getId();
     stringCommand.del(cacheKey);
   }
  }
有没有啥更抽象、更优雅的方式来实现呢?
有!那就是使用Spring Cache,它是一个对缓存的抽象,即使使用的缓存不是Redis也可以。
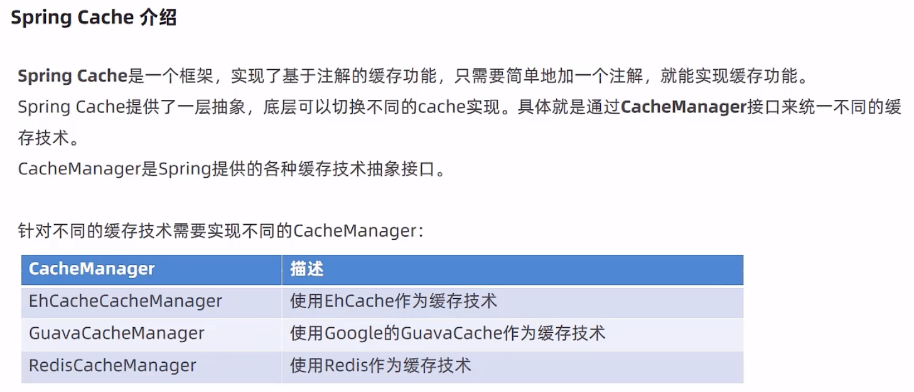
我们看到这里最重要的是这个CacheManager,是他给我们提供了一个抽象,让我们不用关心底层缓存技术(如 Redis、Ehcache、Caffeine)
那如何使用呢?
当然是通过Spring中最常见的方式------注释了 !!!这也是CacheManager提供给我们的功能
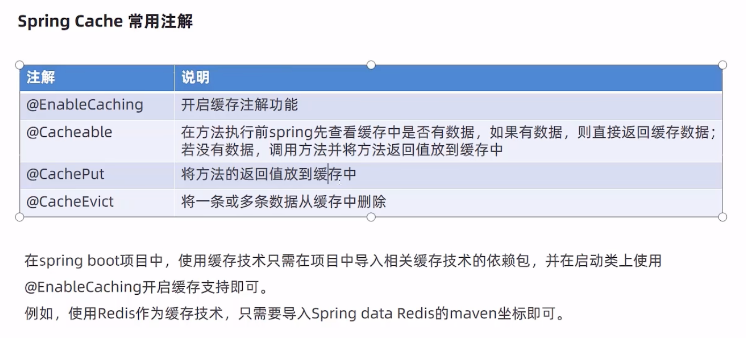
在pom文件下引入对应包(spring-boot-starter-data-redis、spring-boot-starter-cache)后,在启动类上加@EnableCaching注释,就可以使用Spring Cache的功能了。
这里再解释一下注释里的value和key分别是啥:
-
首先value指定的是缓存的名称,对应底层 Redis 的 key 前缀或 hash 名,也就是你缓存数据时存在哪个"区域"。比如下面这个示例,缓存内容都是存入名为 userCache 的缓存区。
-
key则是指定缓存项在缓存区中的唯一标识。如果不指定,Spring 会默认根据方法所有参数自动生成一个 key。
// 先查缓存,有则返回缓存内容;如果没有,执行方法,并把返回值放进缓存。
@Cacheable(value = "userCache", key = "#id")
public User getUserById(Long id) {
// 方法体只会在缓存未命中时执行
return userService.getUserFromDB(id);
}// 还有一种写法,假设查询对应id用户为空时,这样可以让查询结果不缓存
// unless表示条件成立时,不缓存,也就是说:如果方法返回结果是 null,则不缓存
@Cacheable(value = "userCache", key = "#id", unless = "#result == null")
public User getUserById(Long id) {
// 方法体只会在缓存未命中时执行
return userService.getUserFromDB(id);
}// 不查缓存,始终执行方法,然后将方法返回值更新到缓存中。
@CachePut(value = "userCache", key = "#user.id")
public User updateUser(User user) {
// 更新数据库
return userRepository.save(user);
}// 删除缓存中的数据,可以指定 key,也可以一次清空整个缓存。
@CacheEvict(value = "userCache", key = "#id")
// @CacheEvict(value = "userCache", allEntries = true) 这个是全部清空
public void deleteUser(Long id) {
// 删除数据库中的数据
userRepository.deleteById(id);
}
还需要强调的一点,可能你会知道RedisTemplate,在我另一篇文章也讲了,这是一种给你手动操作Redis数据的方式,你可以调用.opsForXXX()来获取数据,是一种更加灵活、精细操作Redis的方式,例如在实现分布式锁等场景可以采用。但我们本文介绍的CacheManager是通过注释的方式自动操作缓存的,是一种方法级的自动缓存,简洁优雅,推荐用于 Controller/Service 层。
来个更加易懂的方式来解释,RedisTemplate像是你手动操作数据库的 JDBC 接口,而CacheManager则像是用 ORM 框架(比如 MyBatis)配置好后,通过注解自动执行数据库操作。
@Configuration
@EnableCaching // 开启Spring Cache注解支持,这样的话就可以直接使用@@Cacheable、@CachePut、@CacheEvict等注释来用了,当然如果你已经在主程序上标了,这里就不用写了,@EnableCaching全局写一次就行
public class RedisConfig {

    @Bean
    public RedisCacheManager redisCacheManager(RedisConnectionFactory factory, CacheTtlProperties ttlProps) {

        // 创建默认缓存配置:设置序列化方式、key前缀、是否缓存null值、默认过期时间等
        RedisCacheConfiguration defaultConfig = RedisCacheConfiguration.defaultCacheConfig()
            .serializeKeysWith(RedisSerializationContext.SerializationPair.fromSerializer(new StringRedisSerializer())) // key 使用字符串序列化
            .serializeValuesWith(RedisSerializationContext.SerializationPair.fromSerializer(new GenericJackson2JsonRedisSerializer())); // value 使用 JSON 序列化

        // 创建一个 map 存放不同缓存区域(cacheName)对应的 TTL(过期时间)配置
        Map<String, RedisCacheConfiguration> cacheConfigurations = new HashMap<>();

        // 从application.yml配置中读取每个缓存区域自定义的 TTL,并生成对应的配置项
        for (Map.Entry<String, Long> entry : ttlProps.getTtl().entrySet()) {
            cacheConfigurations.put(entry.getKey(),
                defaultConfig.entryTtl(Duration.ofMillis(entry.getValue()))); // 将该 cacheName 设置为自定义 TTL
        }

        // 构建 RedisCacheManager:指定默认配置及每个缓存区域的个性化配置
        return RedisCacheManager.builder(factory)
            .cacheDefaults(defaultConfig) // 设置默认缓存行为
            .withInitialCacheConfigurations(cacheConfigurations) // 设置个性化缓存行为
            .build(); // 构建缓存管理器
    }
}
然后记得在application.yml配置对应参数,例如过期时间等:
spring:
  redis:
    host: localhost # Redis 服务地址
    port: 6379       # Redis 端口号

  cache:
    type: redis      # 使用 Redis 作为缓存实现
    redis:
      time-to-live: 1800000 # 全局默认缓存过期时间(单位:毫秒,1800000ms = 30分钟)
      cache-null-values: false # 是否缓存 null,false 表示不缓存 null 值,假设想在每个地方自行判断要不要缓存null可以不写这行
      use-key-prefix: true     # 是否启用 key 前缀
      key-prefix: cache::      # 缓存 key 的统一前缀,也就是key都变成了cache::xxx
// 上面配置的是全局缓存过期时间,你如果还想单独指定redis缓存空间例如userCache、orderCache的过期时间可以写在下面,其余的空间仍然是30分钟
custom:
  cache:
    ttl:
      userCache: 600000     # userCache 缓存区域的 TTL(单位:毫秒,600000ms = 10分钟)
      orderCache: 3600000   # orderCache 缓存区域的 TTL(单位:毫秒,3600000ms = 1小时)