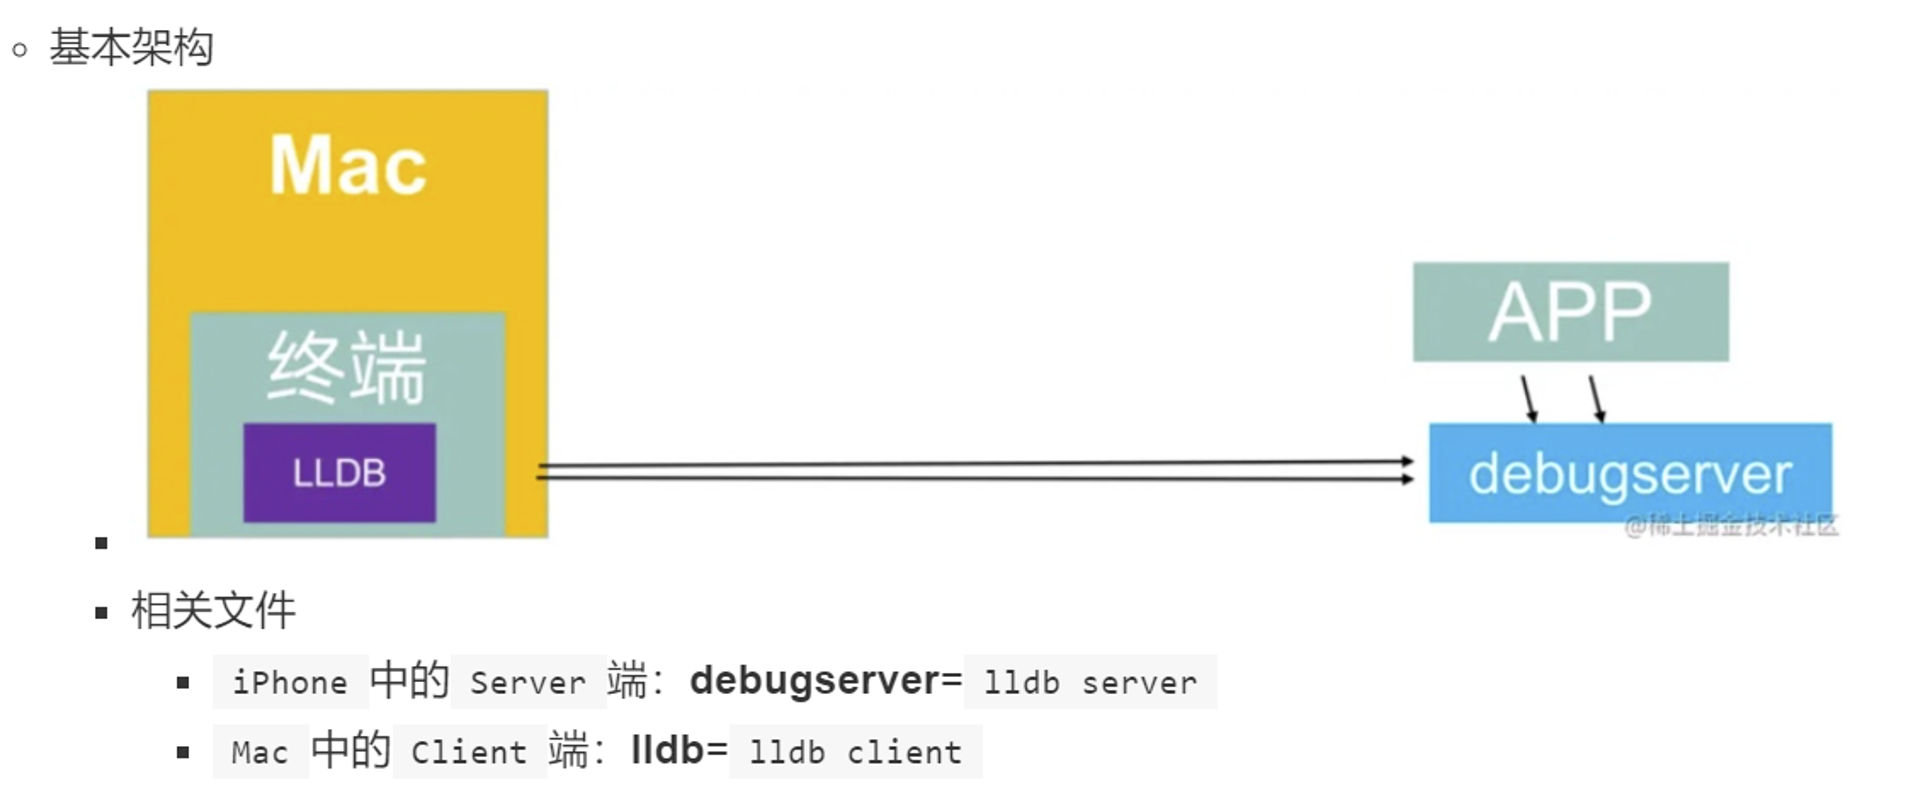
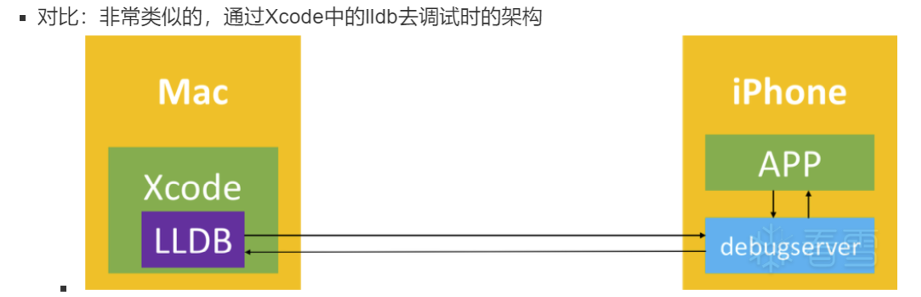
LLDB基本架构
参考:
https://crifan.github.io/ios_re_dynamic_debug/website/debug_code/lldb_debugserver.html
https://book.crifan.org/books/ios_re_debug_debugserver_lldb/website/
LLDB安装和配置
1. 让iPhone中出现/Developer/usr/bin/debugserver
最初的iPhone中没有 /Developer/usr/bin/debugserver:

需要让iPhone中出现/Developer/usr/bin/debugserver
1.1 启动xcode并创建项目
用数据线把iPhone连到MacBook ,MacBook 上打开xcode,创建项目并连接设备,自动配置好后xcode就会把debugserver发送到iPhone上
1.2 报错:MacBook xcode连接iPhone时报错xxx is not available
Window → Devices and Simulators 报错如下:
bash
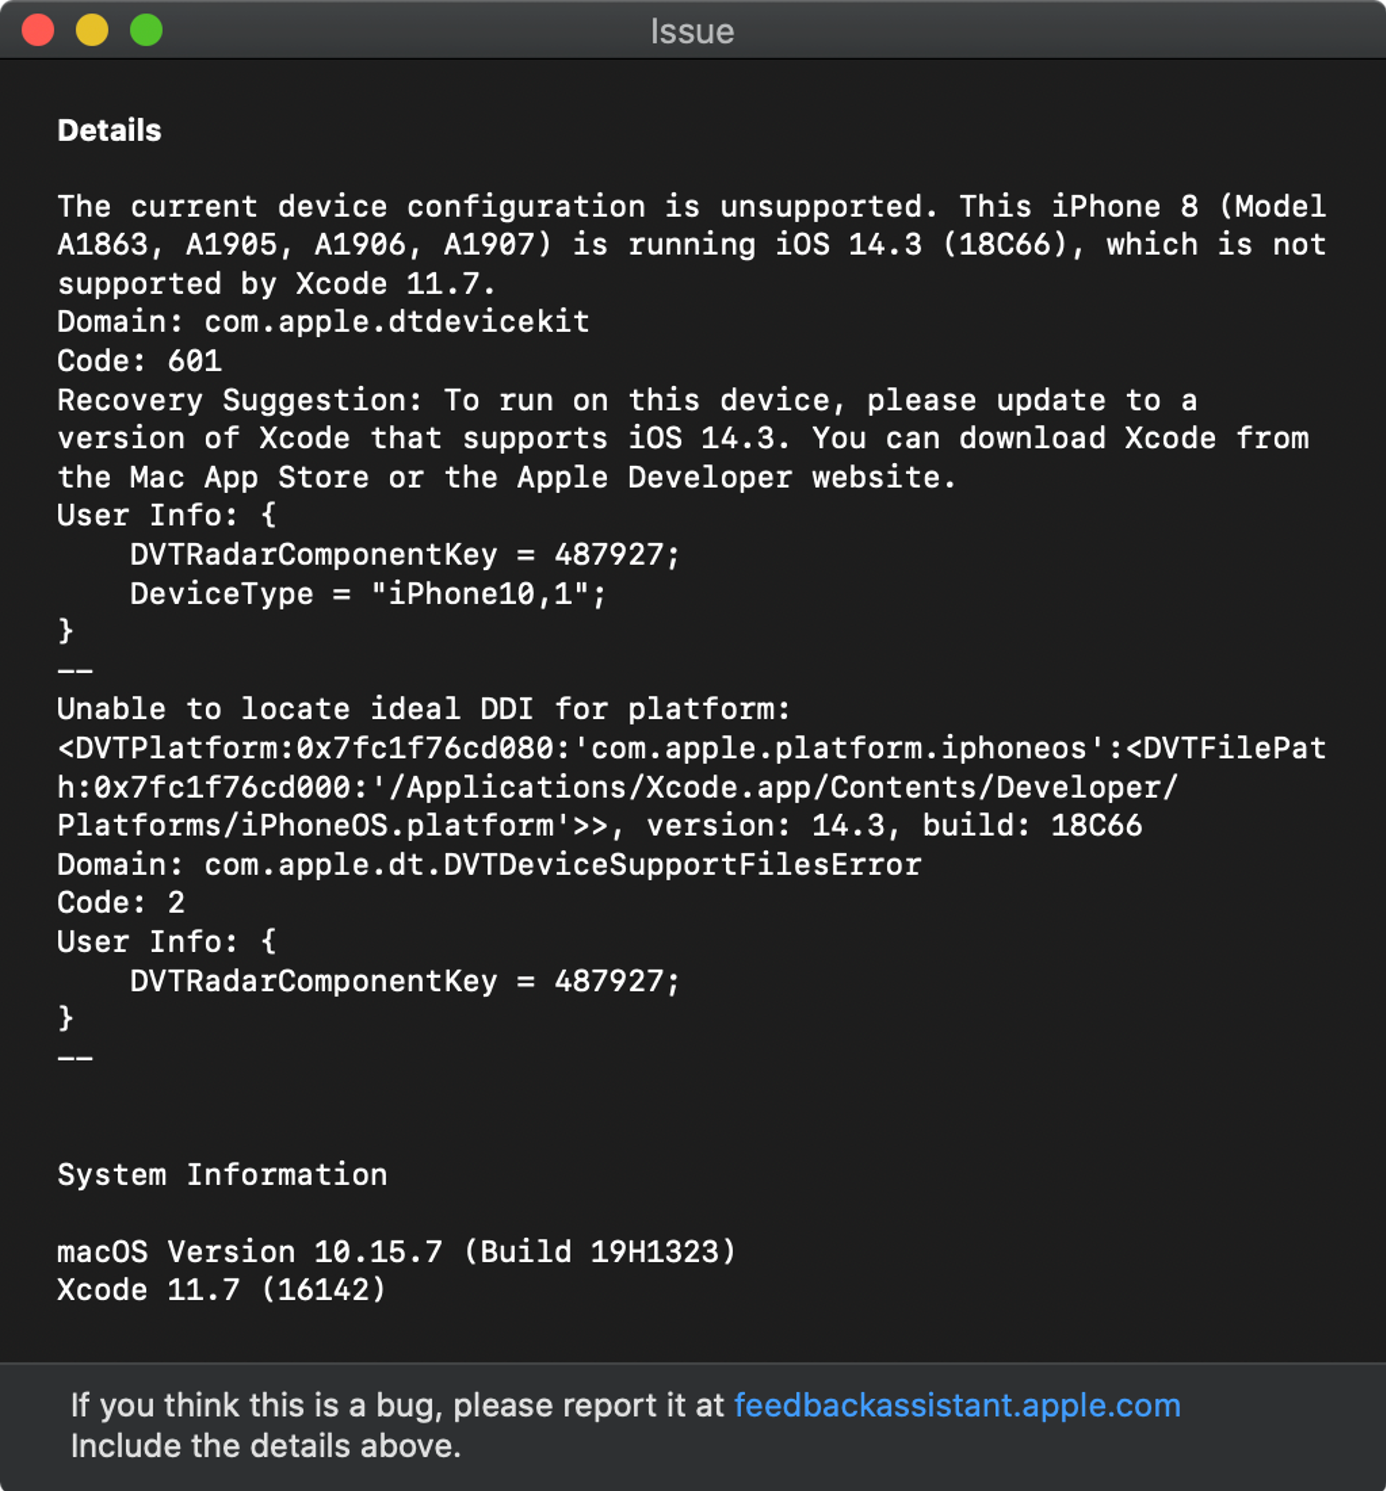
The current device configuration is unsupported. This iPhone 8 (Model A1863, A1905, A1906, A1907) is running iOS 14.3 (18C66), which is not supported by Xcode 11.7.
Domain: com.apple.dtdevicekit
Code: 601
Recovery Suggestion: To run on this device, please update to a version of Xcode that supports iOS 14.3. You can download Xcode from the Mac App Store or the Apple Developer website.
User Info: {
    DVTRadarComponentKey = 487927;
    DeviceType = "iPhone10,1";
}
解决方法:
参考:https://developer.apple.com/forums/thread/659166
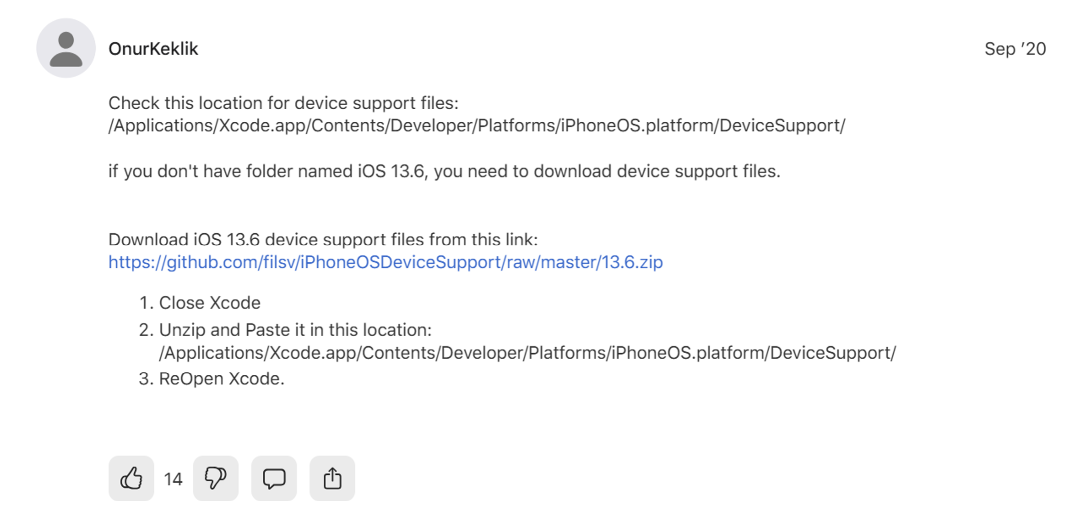
从这里下载14.3的支持文件
https://github.com/JinjunHan/iOSDeviceSupport/tree/master/iOSDeviceSupport
复制粘贴到
/Applications/Xcode.app/Contents/Developer/Platforms/iPhoneOS.platform/DeviceSupport/
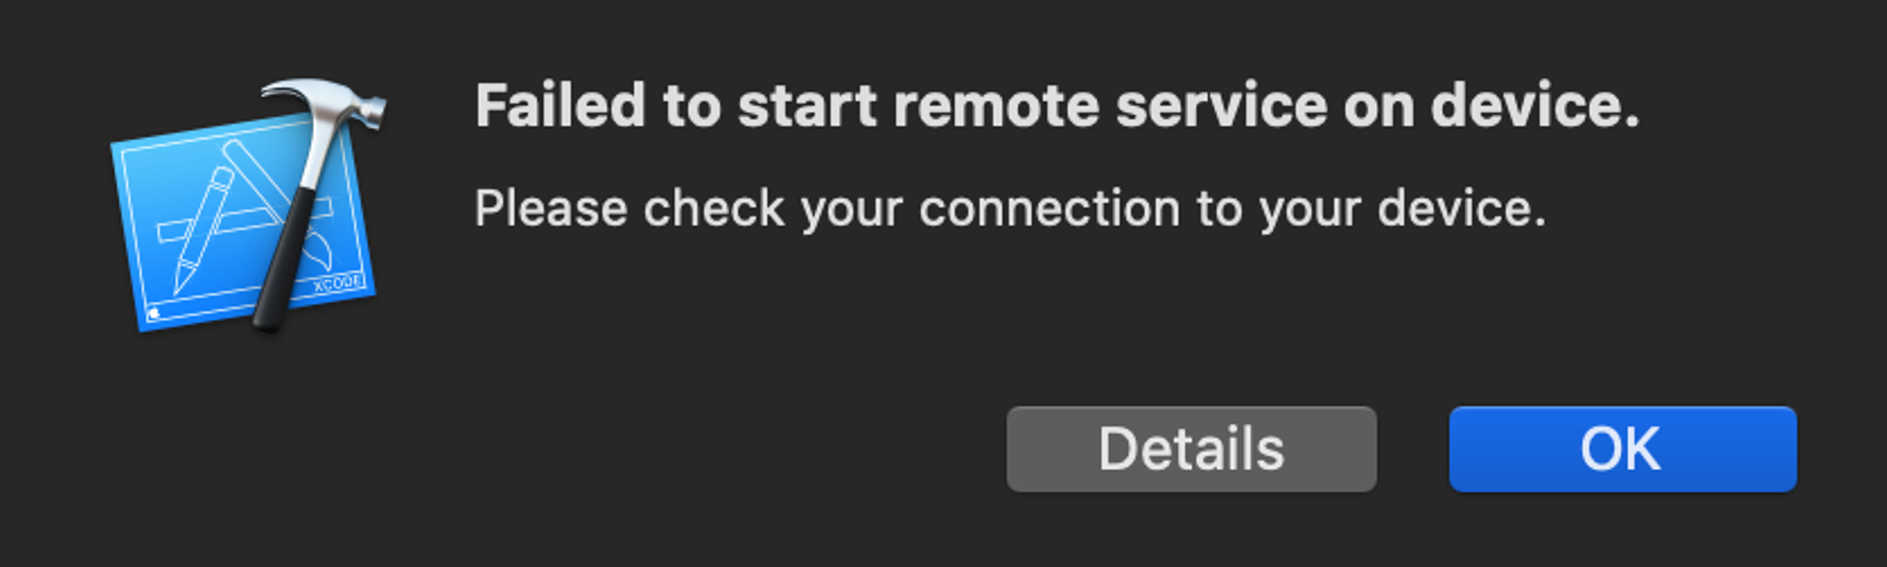
但是出现新的报错:
bash
Details
Failed to start remote service on device.
Domain: com.apple.dtdevicekit
Code: 811
Recovery Suggestion: Please check your connection to your device.
User Info: {
DVTRadarComponentKey = 261622;
}
--
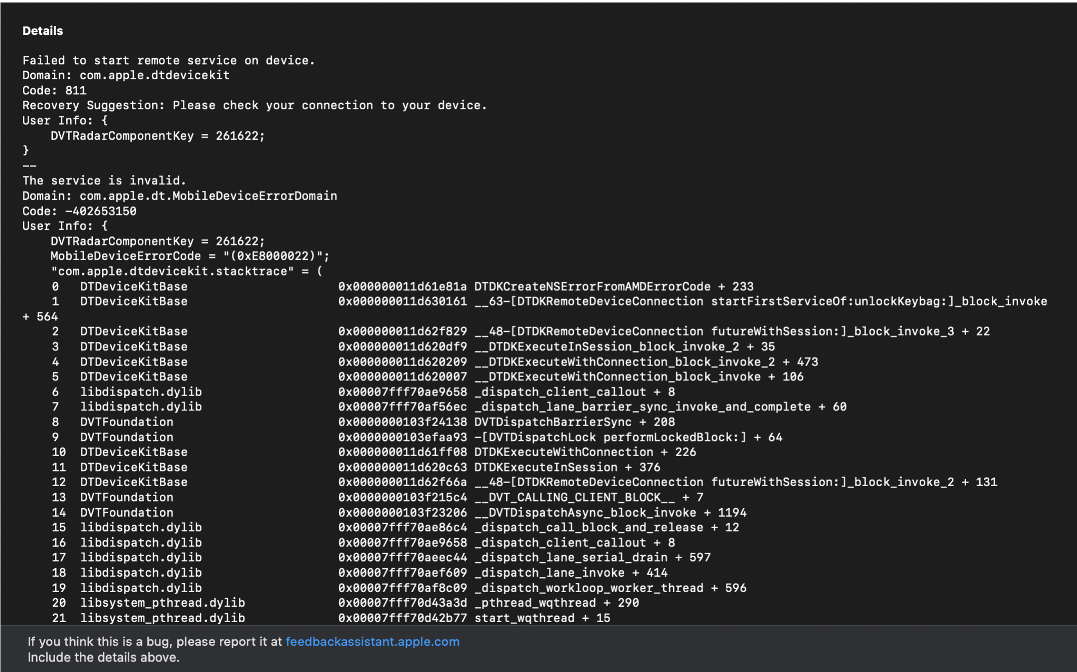
The service is invalid.
Domain: com.apple.dt.MobileDeviceErrorDomain
Code: -402653150
User Info: {
DVTRadarComponentKey = 261622;
MobileDeviceErrorCode = "(0xE8000022)";
"com.apple.dtdevicekit.stacktrace" = (
0 DTDeviceKitBase 0x000000011d61e81a DTDKCreateNSErrorFromAMDErrorCode + 233
1 DTDeviceKitBase 0x000000011d630161 __63-[DTDKRemoteDeviceConnection startFirstServiceOf:unlockKeybag:]_block_invoke + 564
2 DTDeviceKitBase 0x000000011d62f829 __48-[DTDKRemoteDeviceConnection futureWithSession:]_block_invoke_3 + 22
3 DTDeviceKitBase 0x000000011d620df9 __DTDKExecuteInSession_block_invoke_2 + 35
4 DTDeviceKitBase 0x000000011d620209 __DTDKExecuteWithConnection_block_invoke_2 + 473
5 DTDeviceKitBase 0x000000011d620007 __DTDKExecuteWithConnection_block_invoke + 106
6 libdispatch.dylib 0x00007fff70ae9658 _dispatch_client_callout + 8
7 libdispatch.dylib 0x00007fff70af56ec _dispatch_lane_barrier_sync_invoke_and_complete + 60
8 DVTFoundation 0x0000000103f24138 DVTDispatchBarrierSync + 208
9 DVTFoundation 0x0000000103efaa93 -[DVTDispatchLock performLockedBlock:] + 64
10 DTDeviceKitBase 0x000000011d61ff08 DTDKExecuteWithConnection + 226
11 DTDeviceKitBase 0x000000011d620c63 DTDKExecuteInSession + 376
12 DTDeviceKitBase 0x000000011d62f66a __48-[DTDKRemoteDeviceConnection futureWithSession:]_block_invoke_2 + 131
13 DVTFoundation 0x0000000103f215c4 __DVT_CALLING_CLIENT_BLOCK__ + 7
14 DVTFoundation 0x0000000103f23206 __DVTDispatchAsync_block_invoke + 1194
15 libdispatch.dylib 0x00007fff70ae86c4 _dispatch_call_block_and_release + 12
16 libdispatch.dylib 0x00007fff70ae9658 _dispatch_client_callout + 8
17 libdispatch.dylib 0x00007fff70aeec44 _dispatch_lane_serial_drain + 597
18 libdispatch.dylib 0x00007fff70aef609 _dispatch_lane_invoke + 414
19 libdispatch.dylib 0x00007fff70af8c09 _dispatch_workloop_worker_thread + 596
20 libsystem_pthread.dylib 0x00007fff70d43a3d _pthread_wqthread + 290
21 libsystem_pthread.dylib 0x00007fff70d42b77 start_wqthread + 15
);
}
--
System Information
macOS Version 10.15.7 (Build 19H1323)
Xcode 11.7 (16142)但是手机上出现构建好的App
解决方法见下文
1.3 报错:运行编写的App时报错Failed to start remote service on device.
bash
Details

Failed to start remote service on device.
Domain: com.apple.dtdevicekit
Code: 811
Recovery Suggestion: Please check your connection to your device.
User Info: {
    DVTRadarComponentKey = 261622;
}
--
The service is invalid.
Domain: com.apple.dt.MobileDeviceErrorDomain
Code: -402653150
User Info: {
    DVTRadarComponentKey = 261622;
    MobileDeviceErrorCode = "(0xE8000022)";
    "com.apple.dtdevicekit.stacktrace" = (
    0   DTDeviceKitBase                     0x000000011d61e81a DTDKCreateNSErrorFromAMDErrorCode + 233
    1   DTDeviceKitBase                     0x000000011d630161 __63-[DTDKRemoteDeviceConnection startFirstServiceOf:unlockKeybag:]_block_invoke + 564
    2   DTDeviceKitBase                     0x000000011d62f829 __48-[DTDKRemoteDeviceConnection futureWithSession:]_block_invoke_3 + 22
    3   DTDeviceKitBase                     0x000000011d620df9 __DTDKExecuteInSession_block_invoke_2 + 35
    4   DTDeviceKitBase                     0x000000011d620209 __DTDKExecuteWithConnection_block_invoke_2 + 473
    5   DTDeviceKitBase                     0x000000011d620007 __DTDKExecuteWithConnection_block_invoke + 106
    6   libdispatch.dylib                   0x00007fff70ae9658 _dispatch_client_callout + 8
    7   libdispatch.dylib                   0x00007fff70af56ec _dispatch_lane_barrier_sync_invoke_and_complete + 60
    8   DVTFoundation                       0x0000000103f24138 DVTDispatchBarrierSync + 208
    9   DVTFoundation                       0x0000000103efaa93 -[DVTDispatchLock performLockedBlock:] + 64
    10  DTDeviceKitBase                     0x000000011d61ff08 DTDKExecuteWithConnection + 226
    11  DTDeviceKitBase                     0x000000011d620c63 DTDKExecuteInSession + 376
    12  DTDeviceKitBase                     0x000000011d62f66a __48-[DTDKRemoteDeviceConnection futureWithSession:]_block_invoke_2 + 131
    13  DVTFoundation                       0x0000000103f215c4 __DVT_CALLING_CLIENT_BLOCK__ + 7
    14  DVTFoundation                       0x0000000103f23206 __DVTDispatchAsync_block_invoke + 1194
    15  libdispatch.dylib                   0x00007fff70ae86c4 _dispatch_call_block_and_release + 12
    16  libdispatch.dylib                   0x00007fff70ae9658 _dispatch_client_callout + 8
    17  libdispatch.dylib                   0x00007fff70aeec44 _dispatch_lane_serial_drain + 597
    18  libdispatch.dylib                   0x00007fff70aef609 _dispatch_lane_invoke + 414
    19  libdispatch.dylib                   0x00007fff70af8c09 _dispatch_workloop_worker_thread + 596
    20  libsystem_pthread.dylib             0x00007fff70d43a3d _pthread_wqthread + 290
    21  libsystem_pthread.dylib             0x00007fff70d42b77 start_wqthread + 15
);
}
--
System Information

macOS Version 10.15.7 (Build 19H1323)
Xcode 11.7 (16142)
不好使的解决办法:
https://cloud.tencent.com/developer/ask/sof/107747170
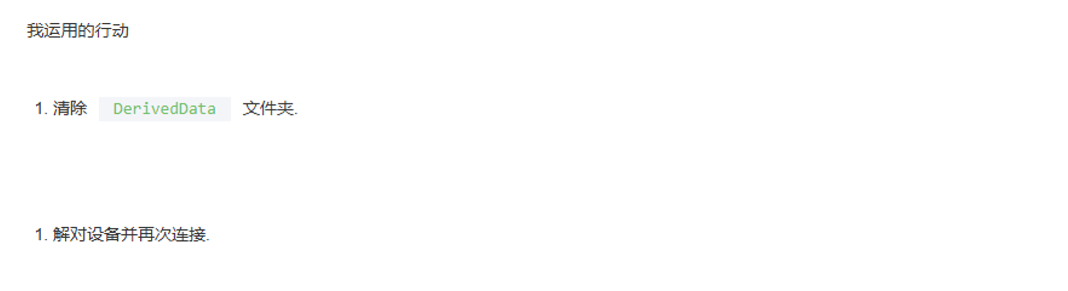
cd ~/Library/Developer/Xcode/DerivedData
rm -rf *
解决方法:
安装Xcode 12.3
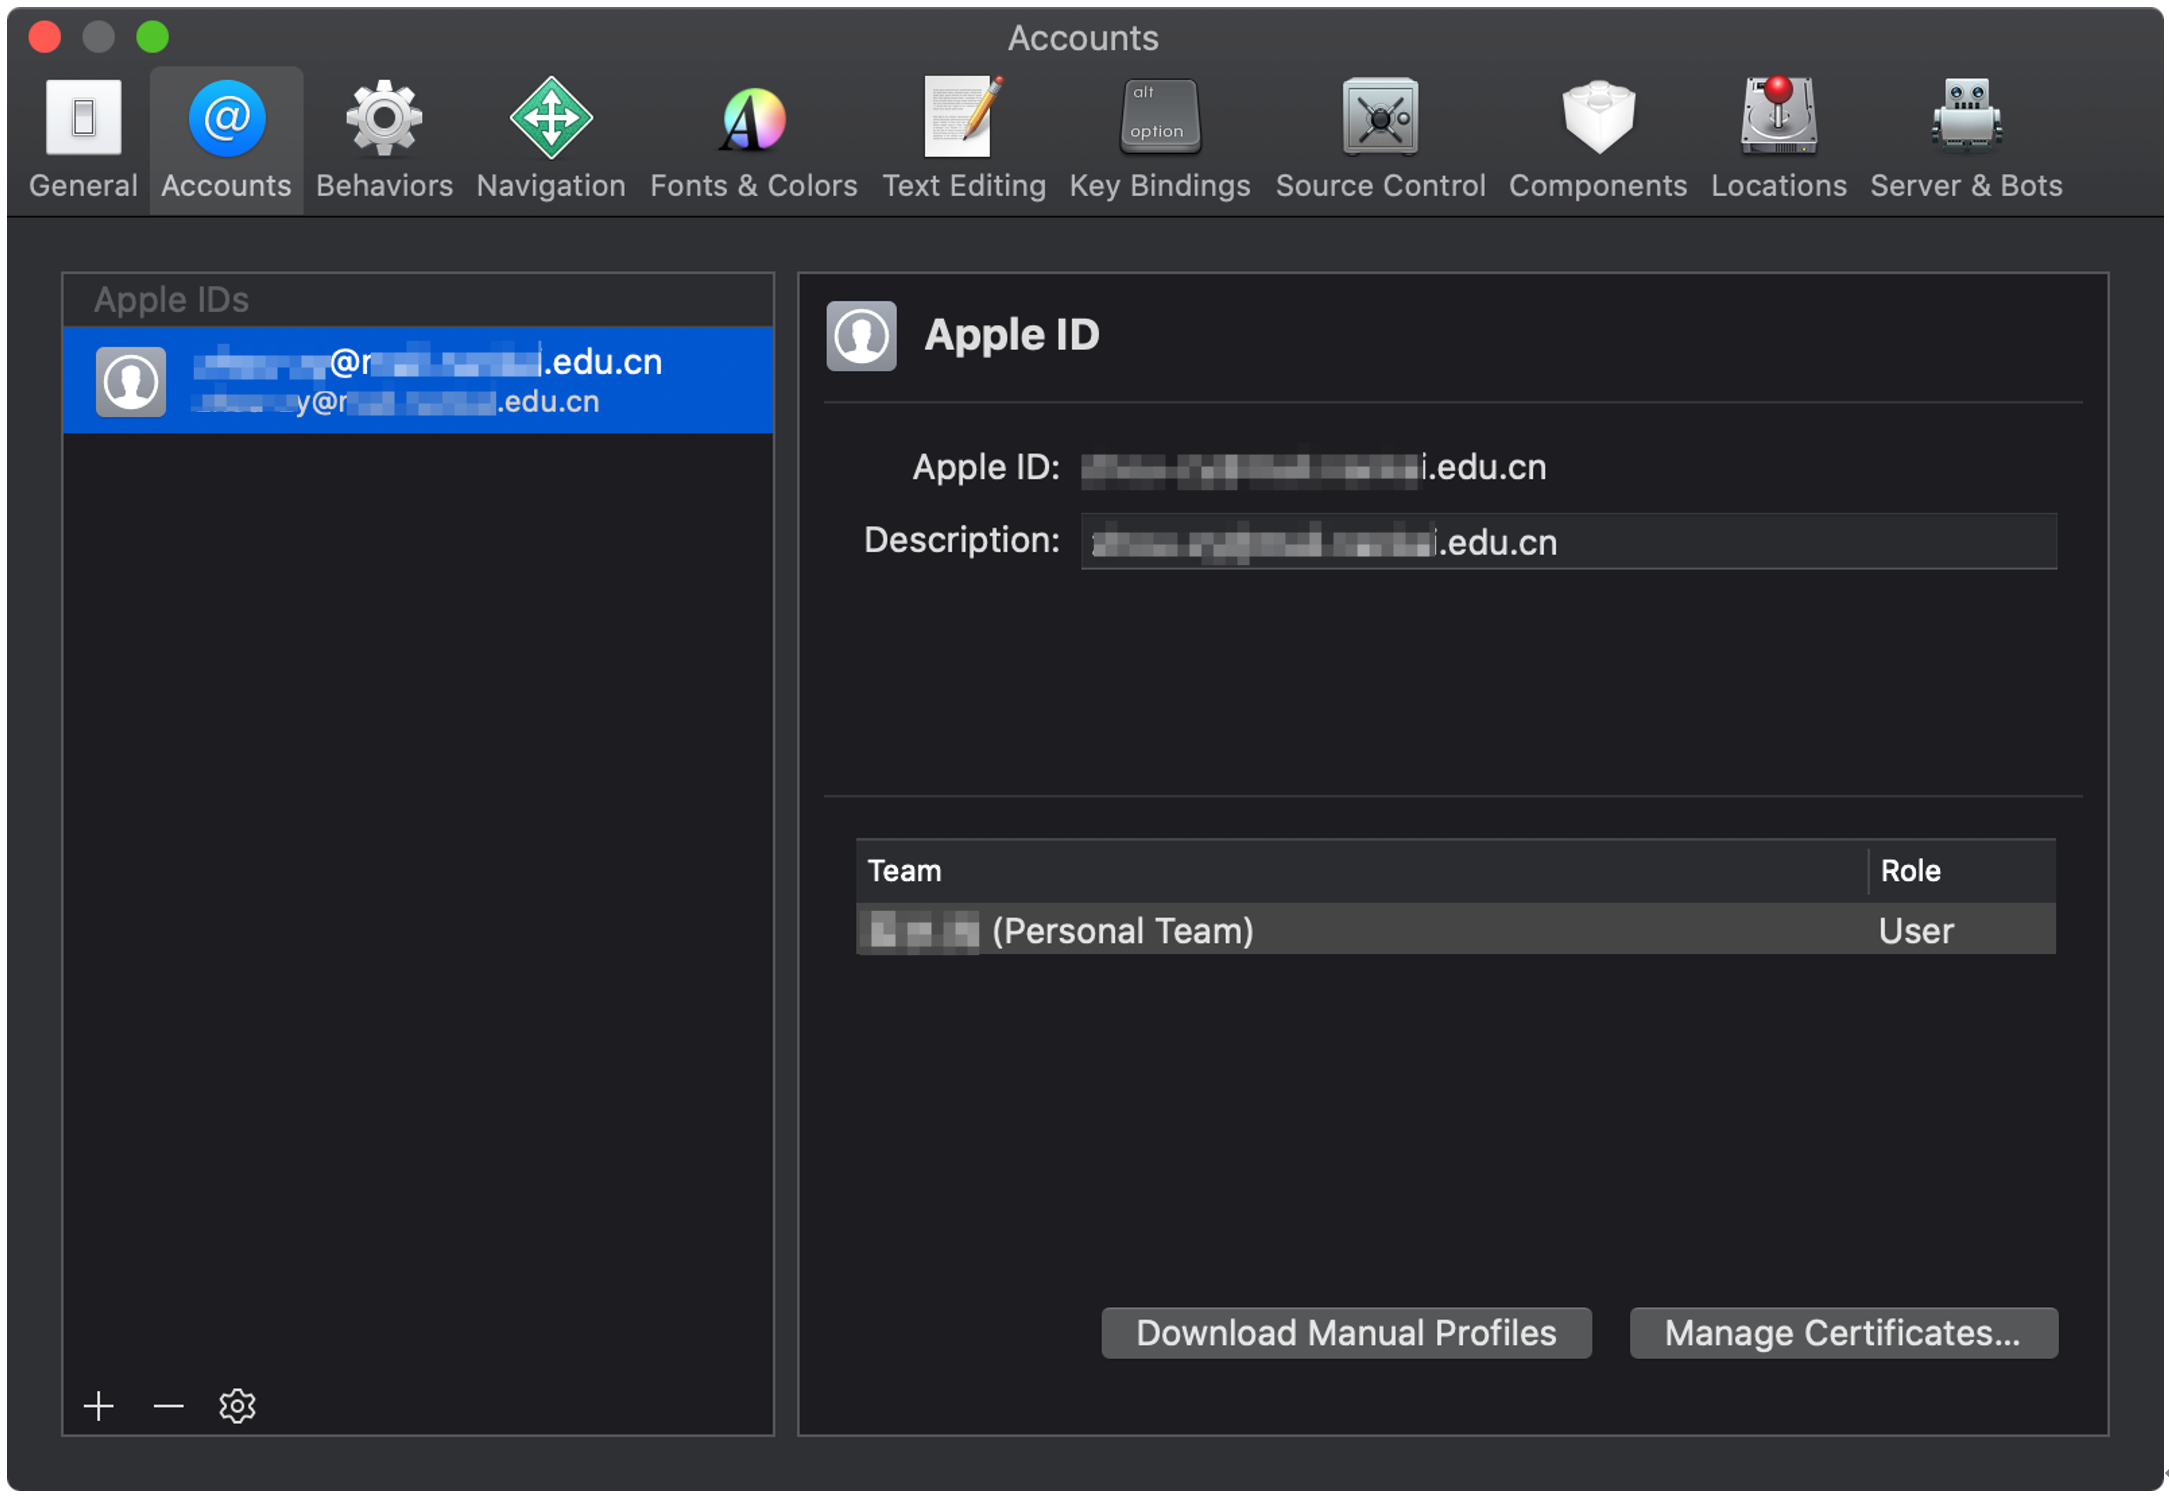
1.4 报错: Signing for xxx requires a development team
Signing for "lldbTest" requires a development team.Select a development team in the Signing & Capabilities editor.
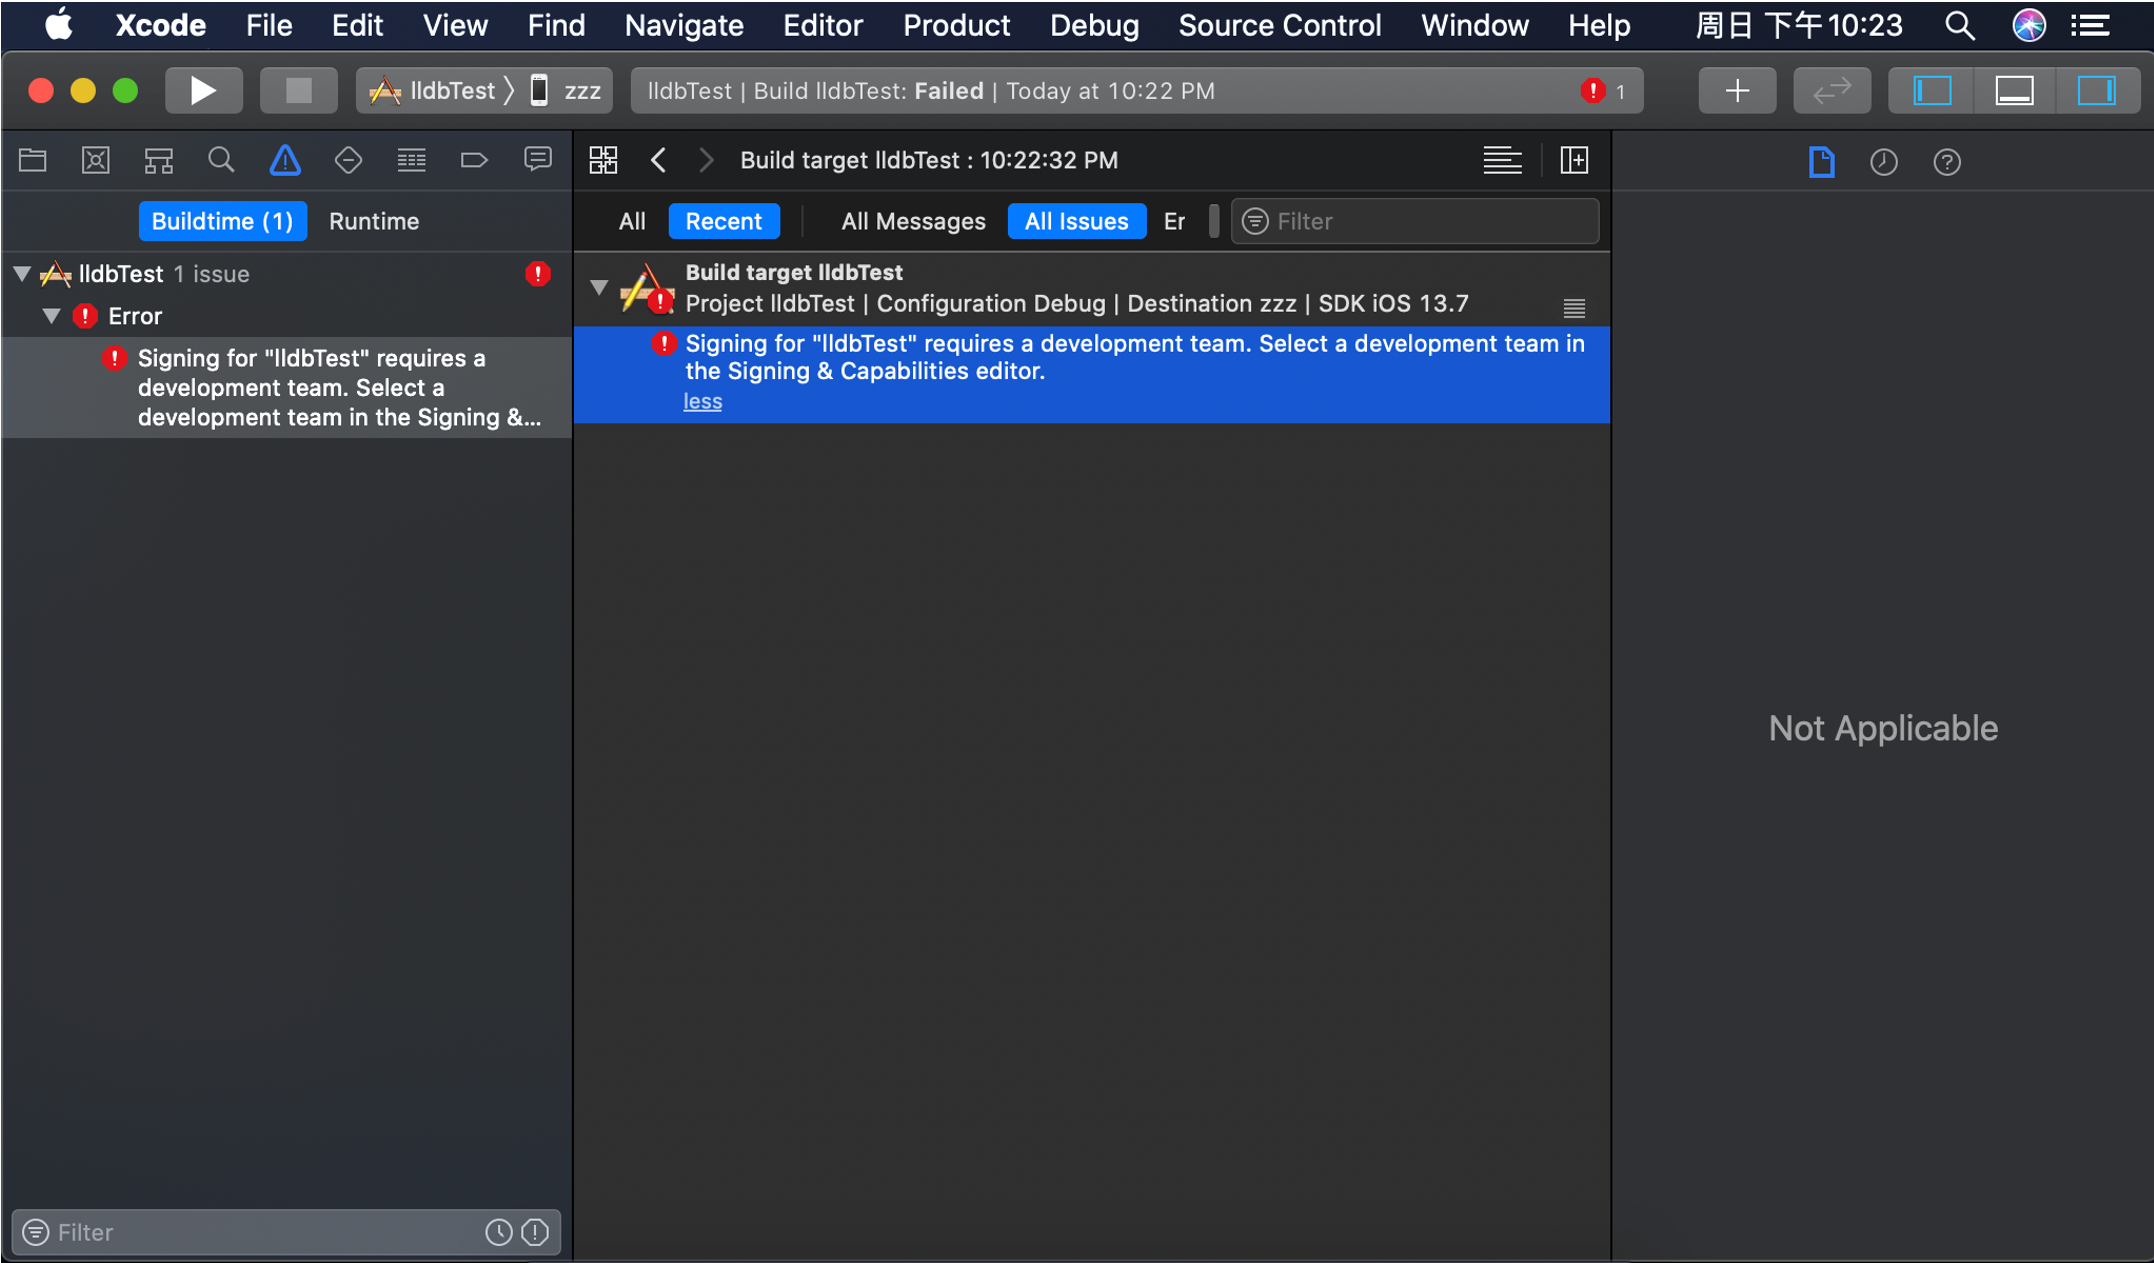
解决方法:
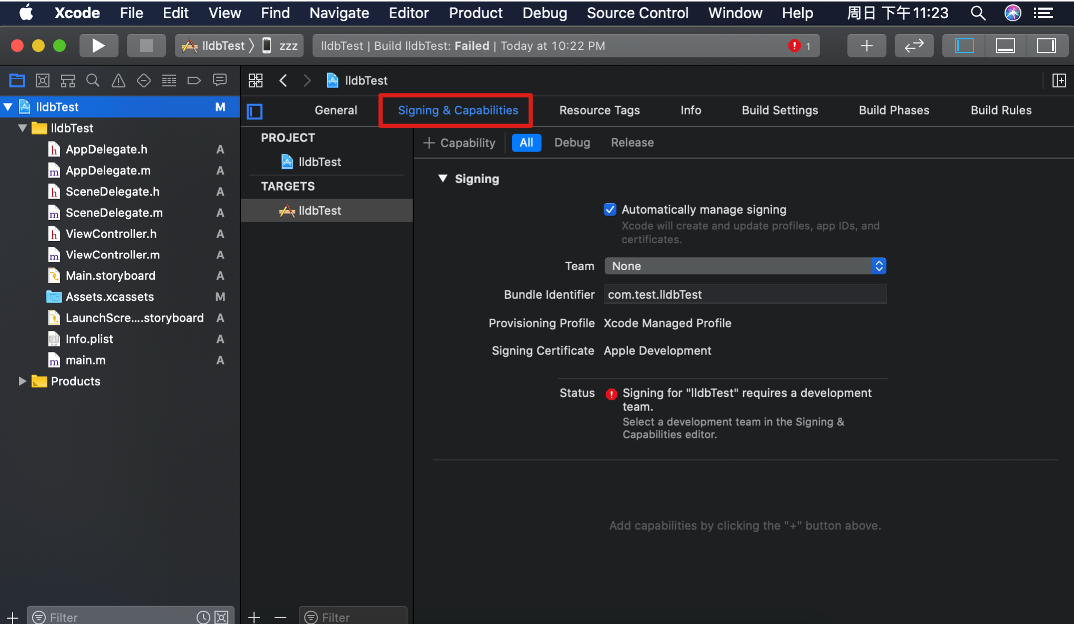
添加team
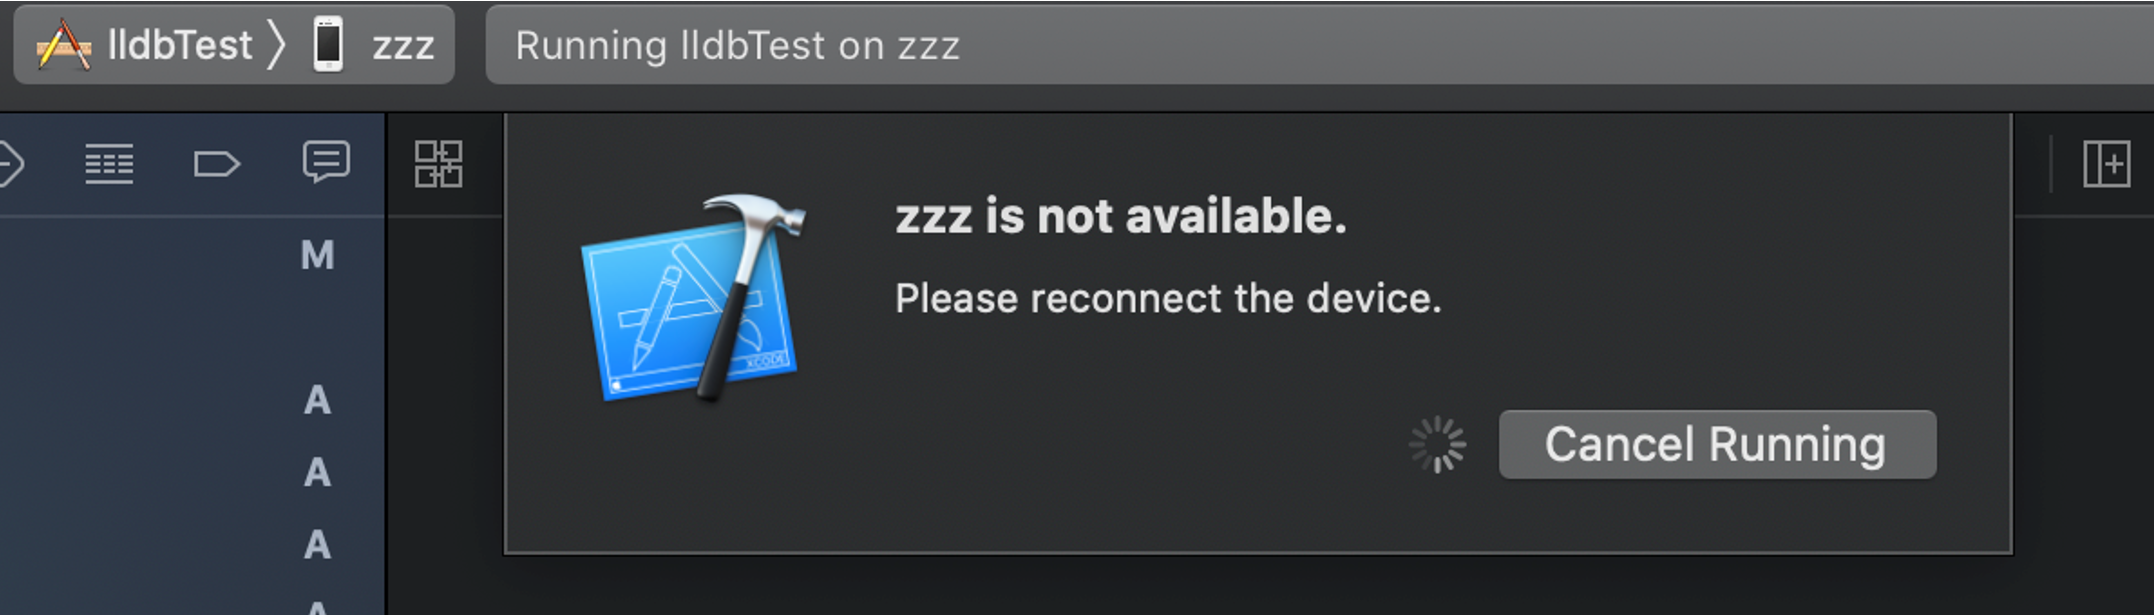
1.5 报错: iPhone is not available. Please reconnect the device
iPhone is not available. Please reconnect the device
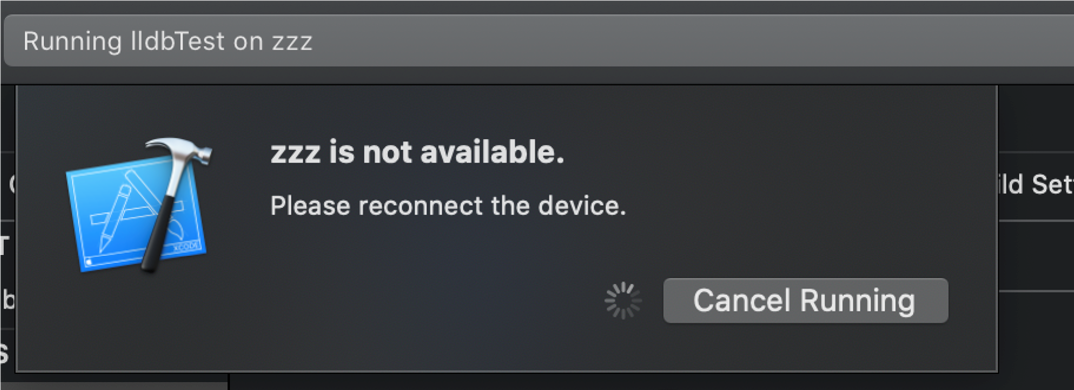
解决方法:
参考:https://blog.csdn.net/zjpjay/article/details/108770188
Window → Devices And Simulators 能看到报错信息
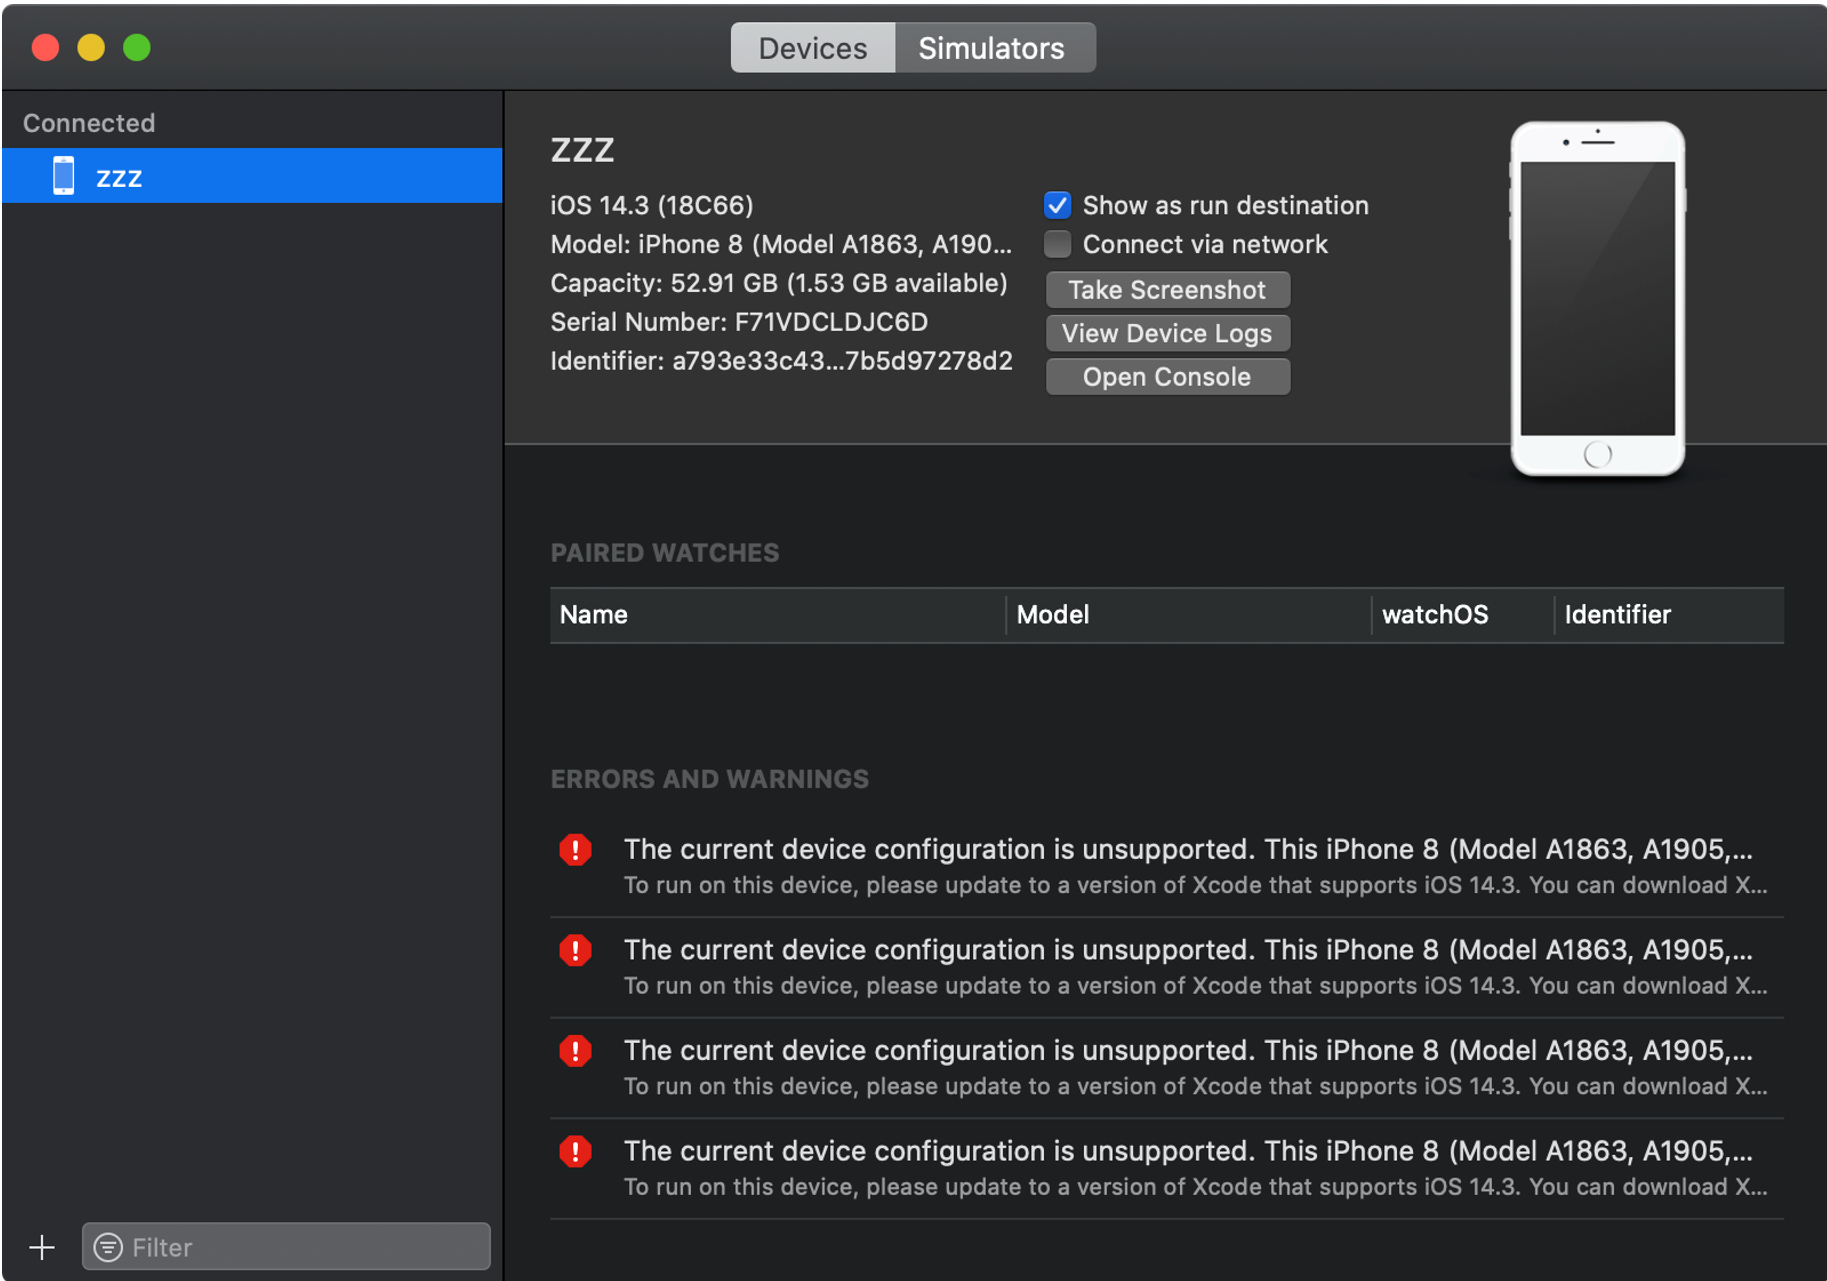
我是iOS 14.3,因此可以下载xcode 12.3
下载地址
https://developer.apple.com/download/all/
使用xcode 12.3之后出现新的报错
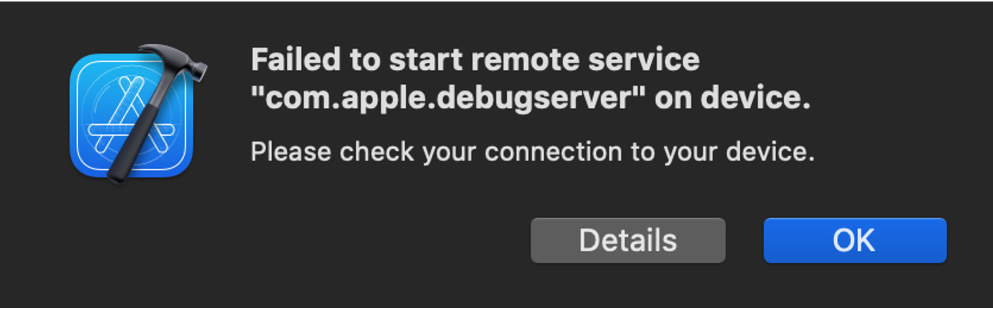
1.6 报错: iPhone is not available. Please reconnect the device
Failed to start remote service "com.apple.debugserver" on device.
Please check your connection to your deviice.
解决方法:
我没管这个报错,好像没什么影响,这一步骤只要保证iPhone中出现/Developer/usr/bin/debugserver即可
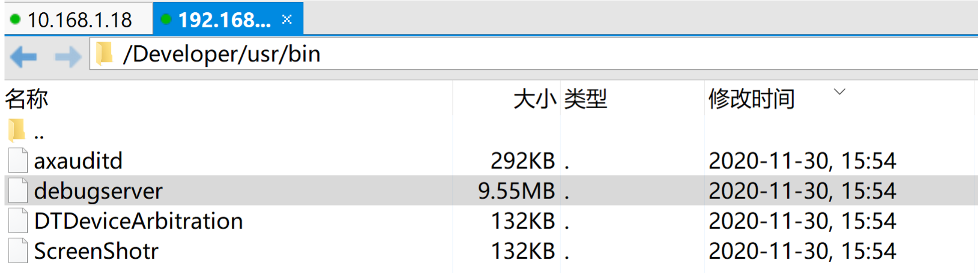
1.7 iPhone中出现debugserver
/Developer/usr/bin/debugserver
2. 确保iPhone中debugserver有正确的权限entitlement
2.1 从iPhone中导出debugserver到MacBook

2.2 MacBook上给debugserver加权限
参考:https://www.cnblogs.com/ludashi/p/5730338.html
找到iPhone中的debugserver,在macos上进行如下操作:
2.2.1 根据机型对debugserver进行瘦身
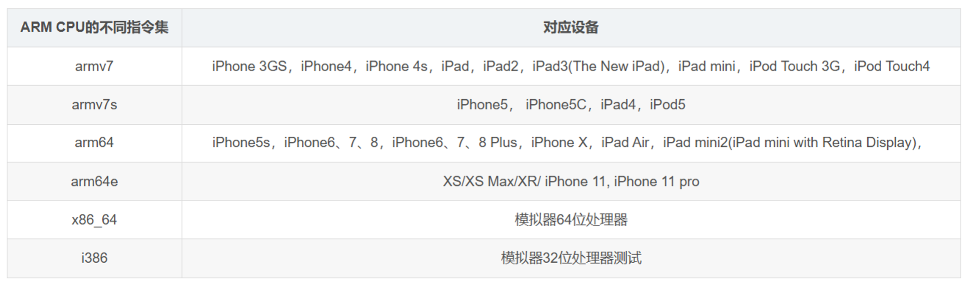
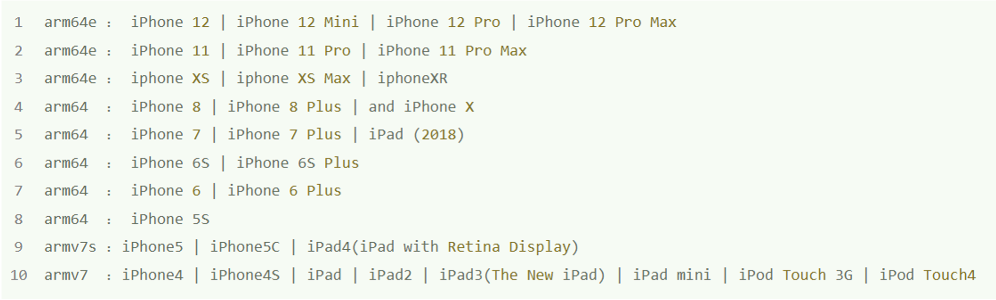
lipo -thin arm64 debugserver -output debugserver-thin后方填写你的测试机相应的ARM指令集架构即可
指令集架构参考:https://blog.csdn.net/zgpeace/article/details/104290302
2.2.2 安装ldid
brew install ldid2.2.3 导出debugserver现有的权限
参考:https://www.jianshu.com/p/fa2f080fb4bb
ldid -e debugserver > debugserver-origin.entitlements我导出的:
bash
<?xml version="1.0" encoding="UTF-8"?>
<!DOCTYPE plist PUBLIC "-//Apple//DTD PLIST 1.0//EN" "http://www.apple.com/DTDs/PropertyList-1.0.dtd">
<plist version="1.0">
<dict>
    <key>com.apple.springboard.debugapplications</key>
    <true/>
    <key>com.apple.backboardd.launchapplications</key>
    <true/>
    <key>com.apple.backboardd.debugapplications</key>
    <true/>
    <key>com.apple.frontboard.launchapplications</key>
    <true/>
    <key>com.apple.frontboard.debugapplications</key>
    <true/>
    <key>seatbelt-profiles</key>
    <array>
        <string>debugserver</string>
    </array>
    <key>com.apple.private.logging.diagnostic</key>
    <true/>
    <key>com.apple.security.network.server</key>
    <true/>
    <key>com.apple.security.network.client</key>
    <true/>
    <key>com.apple.private.memorystatus</key>
    <true/>
    <key>com.apple.private.cs.debugger</key>
    <true/>
</dict>
</plist>
ldid对于FAT格式会输出多份entitlement权限信息,需要去除其中重复的一份xml
例如我这里从iPhone8中导出的debugserver就是包含arm64和arm64e的FAT格式的debugserver,因此entitlement权限信息就有多份,需要去掉一份
2.2.4 修改entitlement权限
然后对entitlement权限进行如下修改
- 已加上权限:get-task-allow、task_for_pid-allow、run-unsigned-code
目的:允许debugserver调试其他app - 已去掉权限:com.apple.security.network.server、com.apple.security.network.client
目的:防止后续lldb调试报错Failed to get connection from a remote gdb process - 已去掉权限:seatbelt-profiles
目的:方式后续debugserver加上-l的日志文件时报错:Failed to open log file for writing errno = 1 Operation not permitted
最终修改为如下,保存为debugserver.entitlements:
bash
<?xml version="1.0" encoding="UTF-8"?>
<!DOCTYPE plist PUBLIC "-//Apple//DTD PLIST 1.0//EN" "http://www.apple.com/DTDs/PropertyList-1.0.dtd">
<plist version="1.0">
<dict>
    <key>com.apple.springboard.debugapplications</key>
    <true/>
    <key>com.apple.backboardd.launchapplications</key>
    <true/>
    <key>com.apple.backboardd.debugapplications</key>
    <true/>
    <key>com.apple.frontboard.launchapplications</key>
    <true/>
    <key>com.apple.frontboard.debugapplications</key>
    <true/>
    <key>com.apple.private.logging.diagnostic</key>
    <true/>
    <key>com.apple.private.memorystatus</key>
    <true/>
    <key>com.apple.private.cs.debugger</key>
    <true/>
    <key>get-task-allow</key>
    <true/>
    <key>task_for_pid-allow</key>
    <true/>
    <key>run-unsigned-code</key>
    <true/>
</dict>
</plist>
2.2.5 对debugserver进行重新签名
如果iOS < 15.0,可以用ldid
ldid -Sdebugserver.entitlements debugserver
注意S是大写,并且与debugserver紧挨着
如果iOS ≥ 15.0 或者 iOS < 15.0,可以用codesign
codesign -f -s - --entitlements debugserver.entitlements debugserver
(未尝试)
2.3 将debugserver拷贝到iPhone并赋执行权限
将已经签好权限的debugserver拷贝到iPhone的/usr/bin目录下
iPhone中的,原始版本的debugserver位置是:/Developer/usr/bin/debugserver
但该位置只读,无法修改
所以才需要拷贝到/usr/bin,因为/usr/bin是用于存放可执行文件工具的路径之一
理论上也可以拷贝到/bin/sbin /usr/sbin等,保证此路径出现在echo $PATH中即可
参考:

chmod +x debugserver

赋完权限后,你就可以使用debugserver命令来开启debugserver了
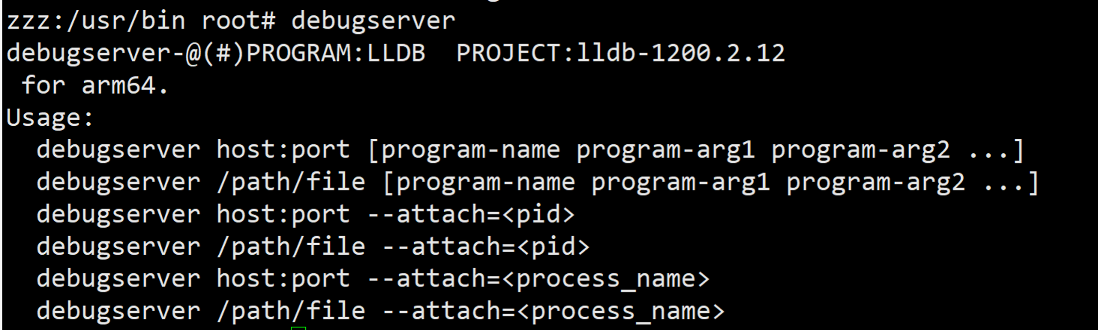
3. iPhone中运行debugserver
整体参考:
3.1 attach模式
先手动启动app,再用debugserver去attach
3.1.1 找到App进程名
一般也就是App的可执行Mach-O文件名
PC端
frida-ps -H 192.168.31.32:6666 -a
bash
6461 顺丰速运 com.sf-express.waybillcn手机端查看进程名
ps -ef | grep "6461"
bash
501 6461 1 0 12:02AM ?? 0:25.81 /var/containers/Bundle/Application/81449B8F-7C5D-4A06-8970-A3EEDF922AC2/SFMainland_Store_Pro.app/SFMainland_Store_Pro后续用debugserver attach到App时:
可以使用Mach-O文件名
debugserver 0.0.0.0:12345 -a "SFMainland_Store_Pro"

可以使用完整Mach-O文件名
debugserver 0.0.0.0:12345 -a "/var/containers/Bundle/Application/81449B8F-7C5D-4A06-8970-A3EEDF922AC2/SFMainland_Store_Pro.app/SFMainland_Store_Pro"

可以使用进程号
debugserver 0.0.0.0:12345 -a 6461

其中12345是端口号,可以设置为任意值,只要不和其他端口号冲突即可;后续Macbook中lldb连接时,要用到此端口号
3.1.2 使用iproxy进行端口映射
参考:
https://blog.csdn.net/u010775335/article/details/127691013
需要将iPhone通过数据线连接至MacBook
MacBook安装usbmuxd
参考:https://cloud.tencent.com/developer/article/1173911
brew install usbmuxd
MacBook使用iproxy 将iPhone的端口映射到PC端口
iproxy 12345 12345
第一个参数是你要映射到的电脑端口
第二个是iPhone的端口
然后保持此窗口不动

3.1.3 用debugserver attach到App
启动顺丰速运app
iPhone SSH端
debugserver 0.0.0.0:12345 -a "SFMainland_Store_Pro"

3.2 spawn模式(未尝试)
debugserver -x auto 0.0.0.0:12345 "/var/containers/Bundle/Application/FD516591-AAA8-47B4-AD8B-5DA9EC88856B/UCWEB.app/UCWEB"
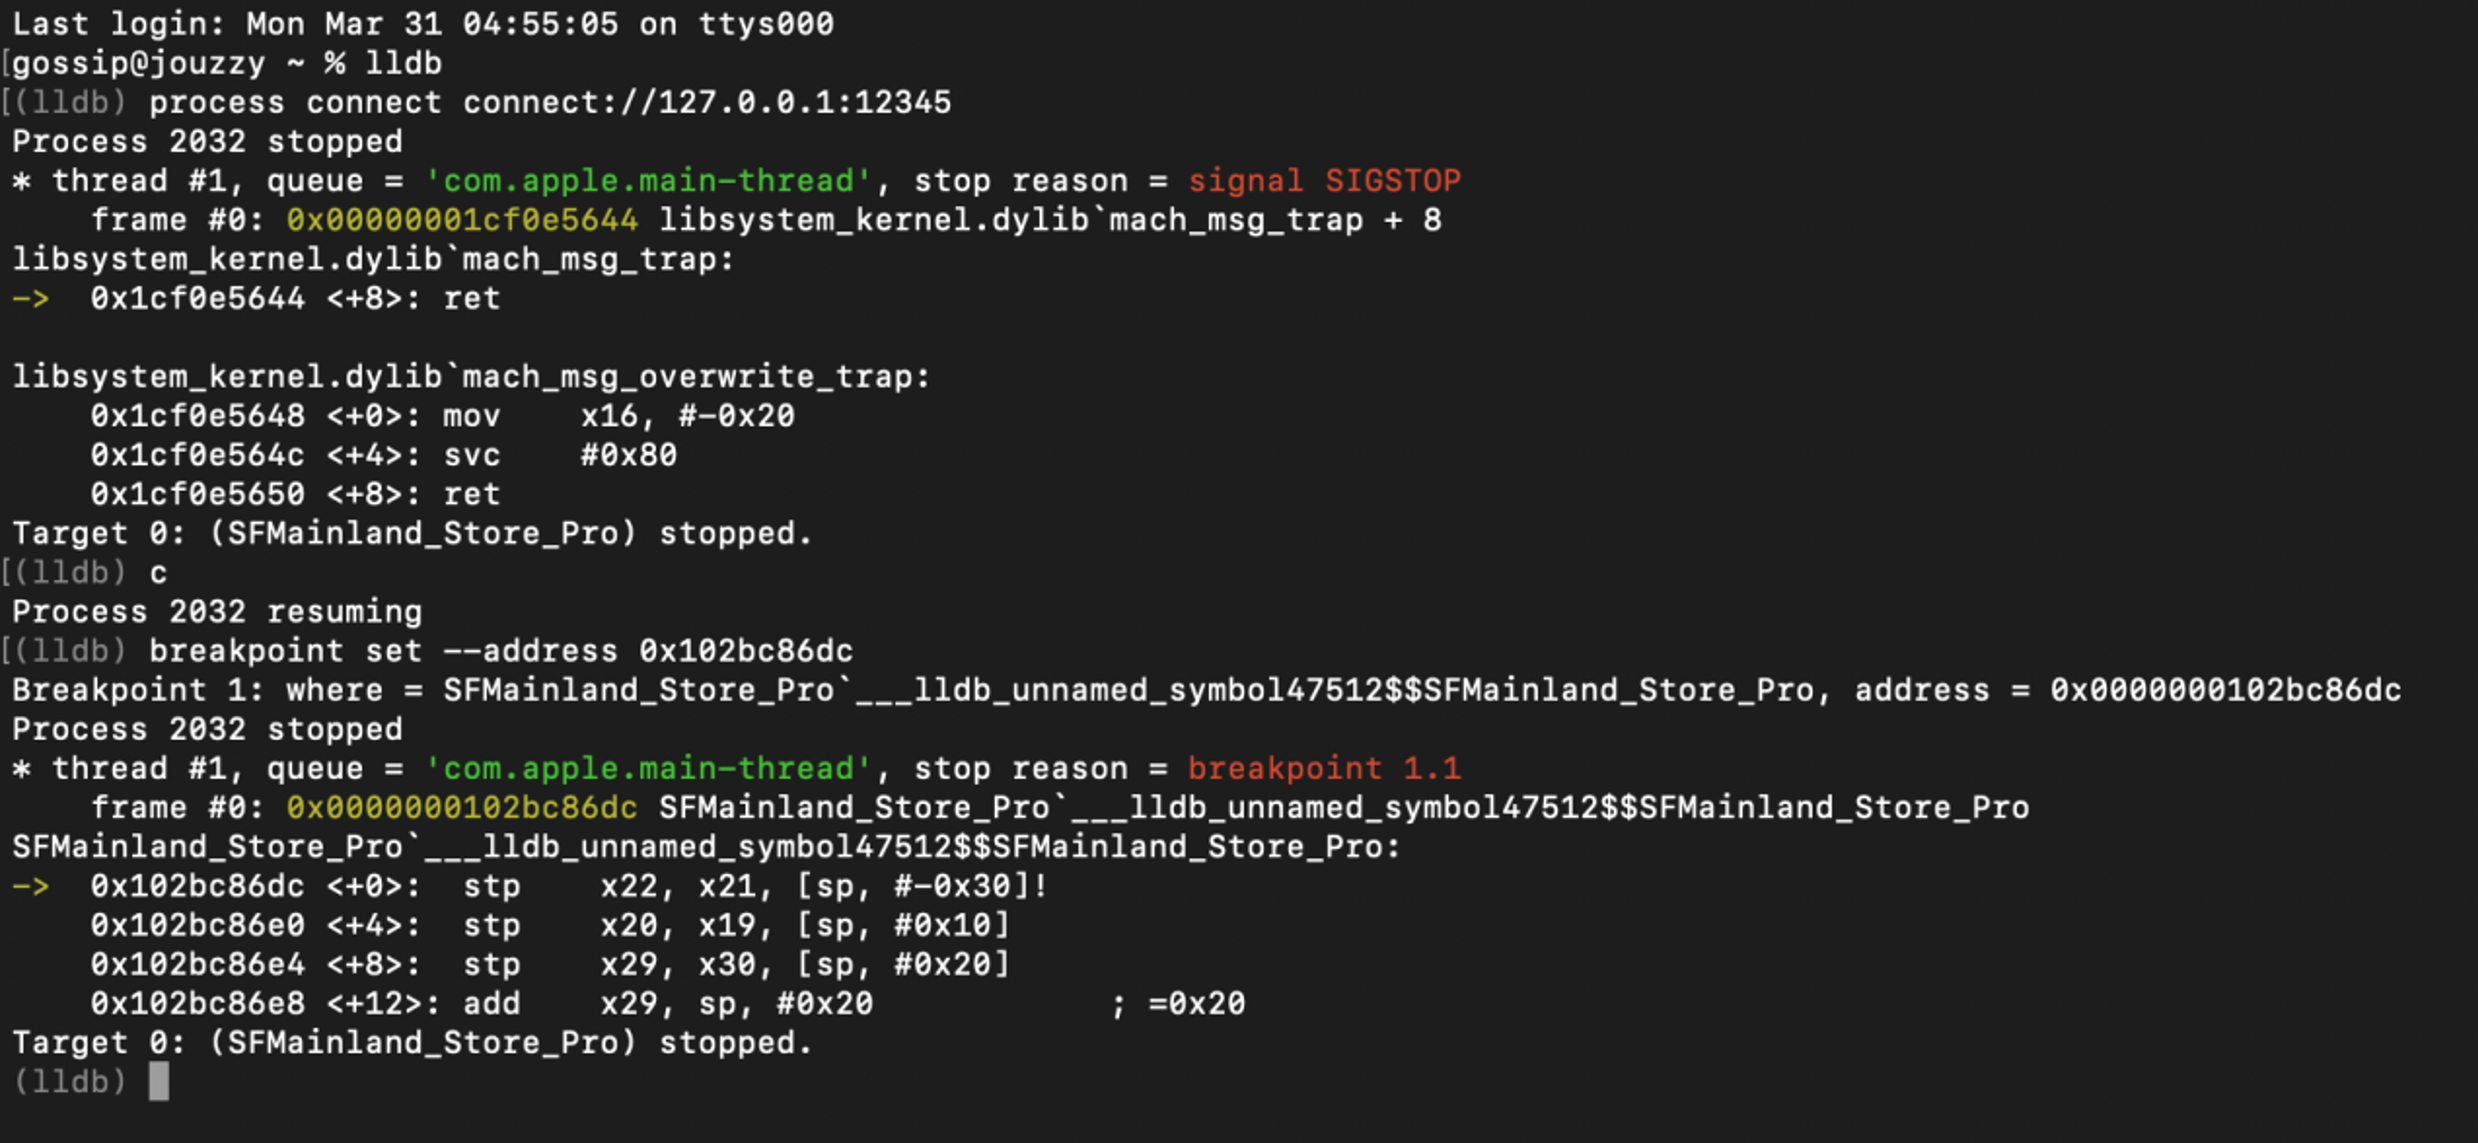
4. Mac中启动lldb来调试app
MacBook另起终端:
lldb
process connect connect://127.0.0.1:12345
等待若干分钟:

bash
xxx@xxx lldb % lldb
(lldb) process connect connect://127.0.0.1:12345
Process 10038 stopped
* thread #1, queue = 'com.apple.main-thread', stop reason = signal SIGSTOP
    frame #0: 0x0000000102ee6bc0 SFMainland_Store_Pro
->  0x102ee6bc0: adrp   x1, 3044
    0x102ee6bc4: ldr    x1, [x1, #0x1f0]
    0x102ee6bc8: adrp   x16, 1705
    0x102ee6bcc: ldr    x16, [x16, #0xf78]
Target 0: (SFMainland_Store_Pro) stopped.
(lldb)
此时iPhone SSH 变成

MacBook
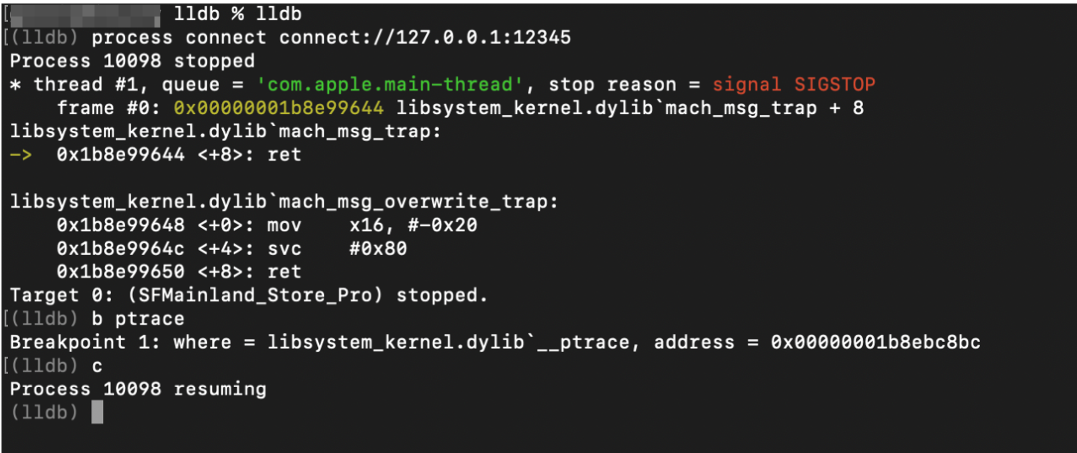
(lldb) b ptrace
(lldb) c

完整的双侧截图如下:

LLDB指令教程
参考:https://www.jianshu.com/p/fa2f080fb4bb
breakpoint set -n "-RNCWeakScriptMessageDelegate userContentController:didReceiveScriptMessage:"
breakpoint set -n "-\* userContentController:didReceiveScriptMessage:"
breakpoint list
禁用所有断点
breakpoint disable
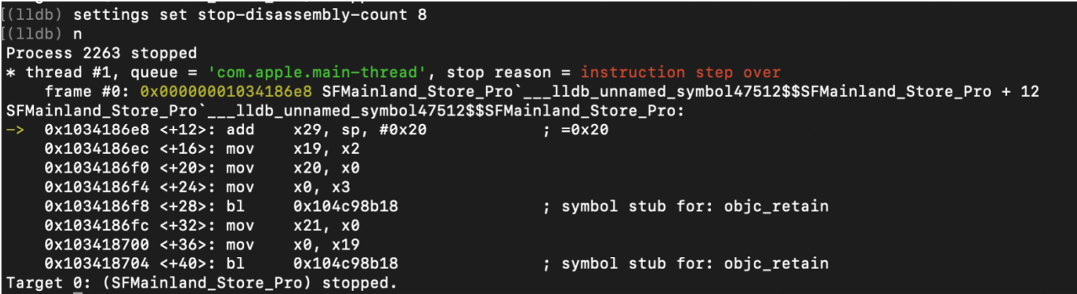
临时修改显示汇编行数
disassemble --count 16

永久修改显示汇编行数
settings set stop-disassembly-count 16
用Frida拿到地址,再用LLDB调试
frida-trace -m "-[* userContentController:didReceiveScriptMessage:]" -H 192.168.71.114:6666 顺丰速运确认有-[RNCWeakScriptMessageDelegate userContentController:didReceiveScriptMessage:]
lldb检查符号是否存在
(lldb) image lookup -s "-RNCWeakScriptMessageDelegate userContentController:didReceiveScriptMessage:"

没有输出,说明LLDB找不到这个方法
(lldb) image lookup -rn "RNCWeakScriptMessageDelegate.*didReceiveScriptMessage"
问DeepSeek
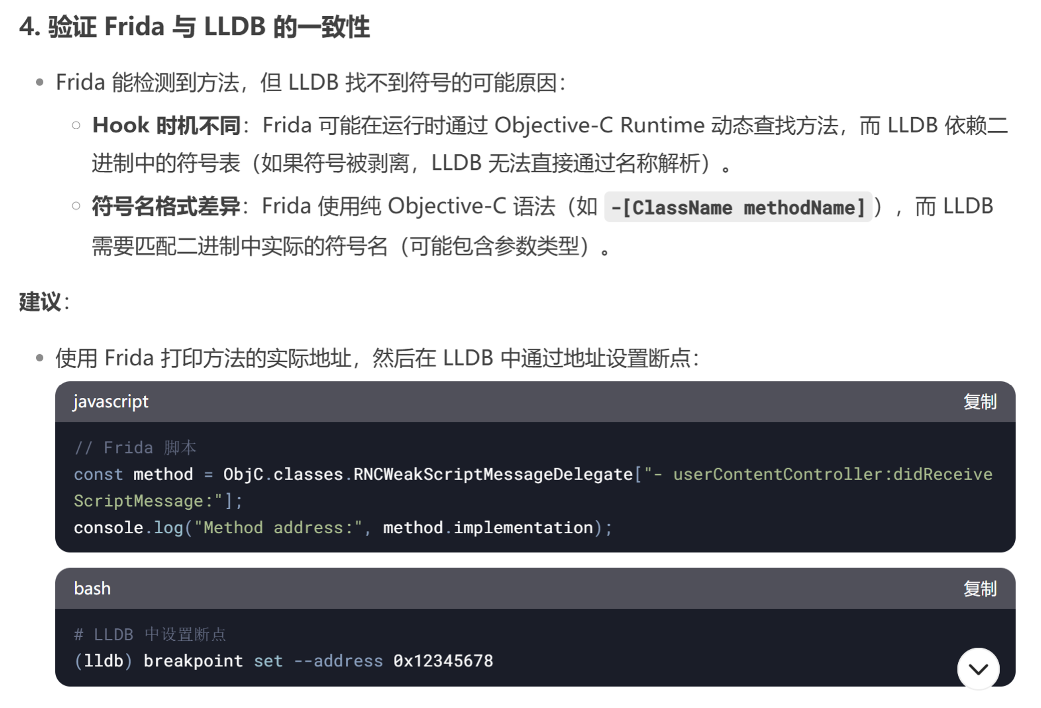
// Frida 脚本
const method = ObjC.classes.RNCWeakScriptMessageDelegate["- userContentController:didReceiveScriptMessage:"];
console.log("Method address:", method.implementation);
frida -H 192.168.71.128:6666 -F -l addr-frida-script.js
bash
[*] Starting Hooking
Method address: 0x102bc86dc
(lldb) breakpoint set --address 0x102bc86dc
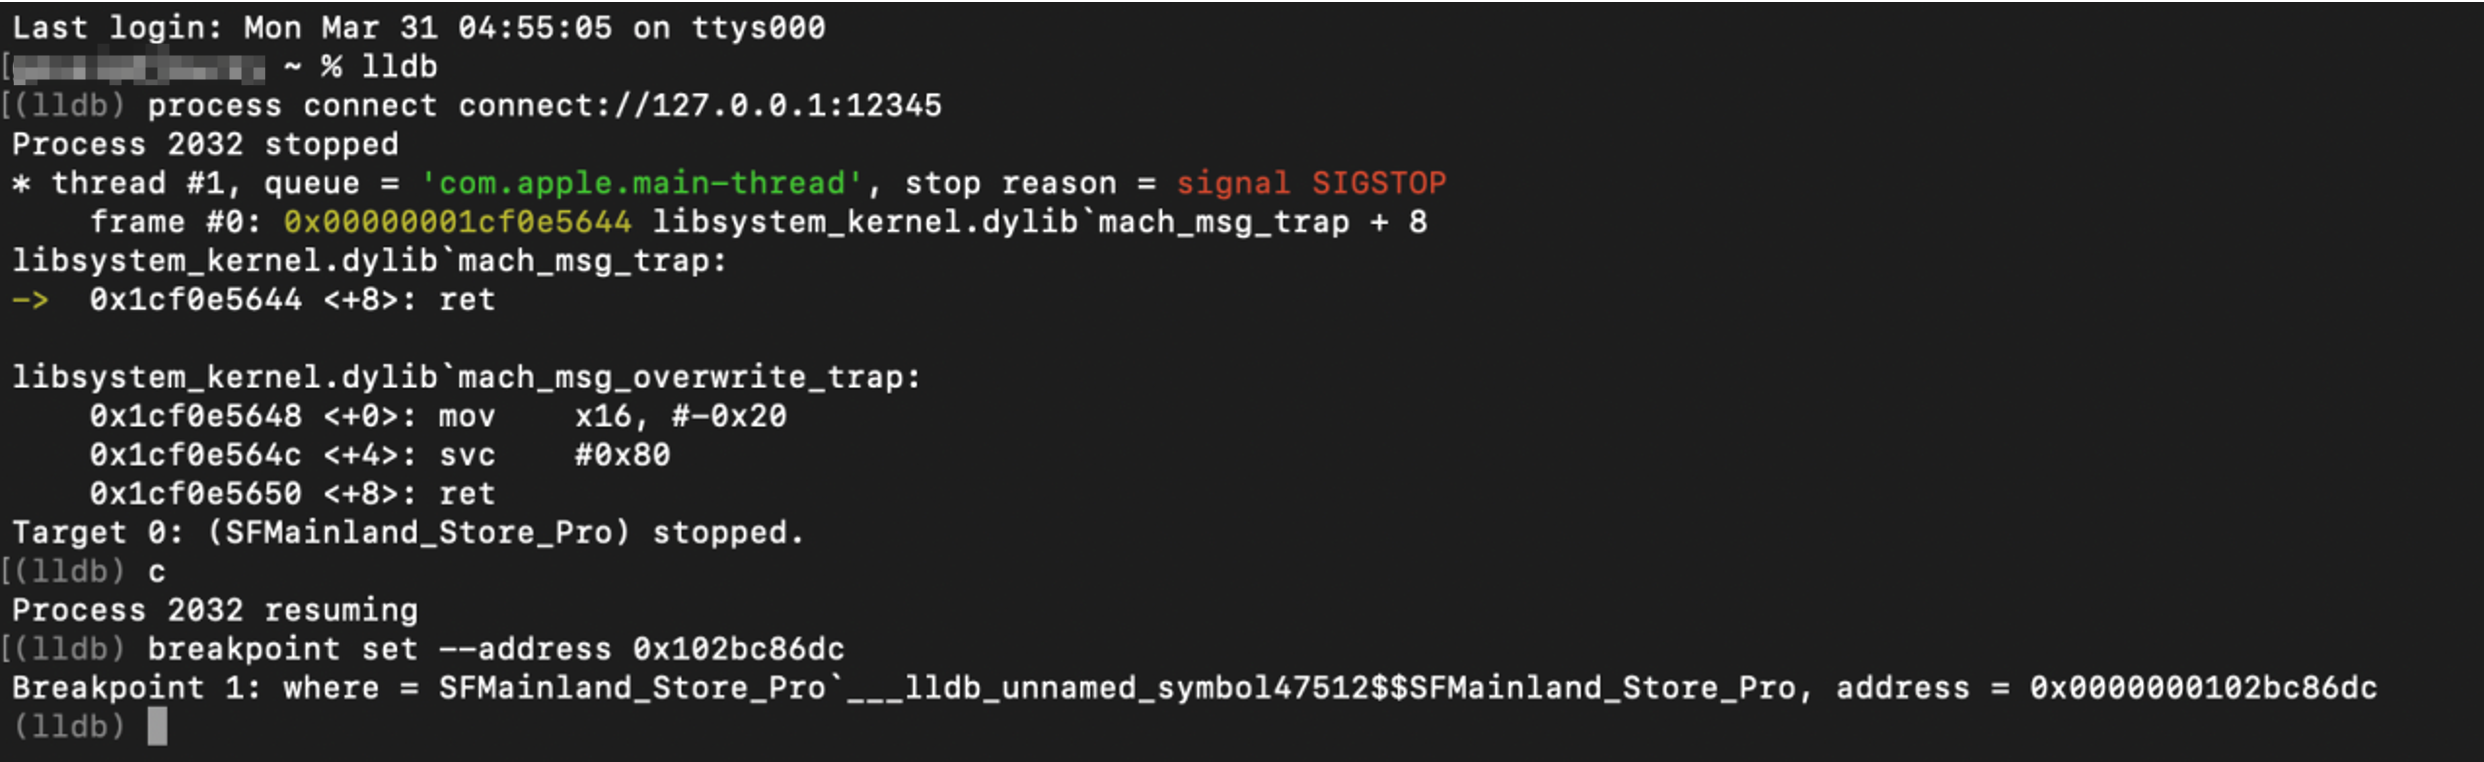
打开webview时真的命中了