云计算 Linux Rocky day03
目录
- [云计算 Linux Rocky day03](#云计算 Linux Rocky day03)
1.which找到命令所对应的程序
命令行基础
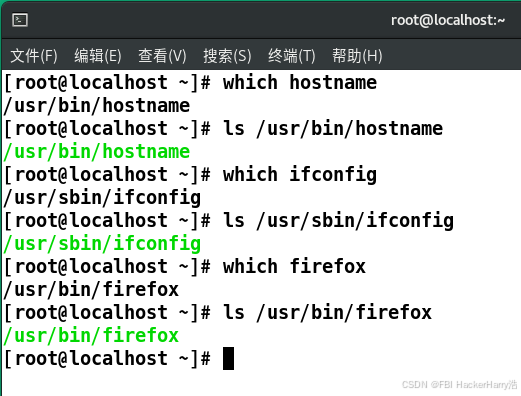
在Linux中执行大多数命令时,都要找到命令所对应的程序
root@localhost /# which hostname #查询命令对应的程序
root@localhost /# ls /usr/bin/hostname
root@localhost /# which ifconfig #查询命令对应的程序
root@localhost /# firefox
root@localhost /# which firefox #查询命令对应的程序
2.绿色:可执行的程序
3.默认解释器:/bin/bash
人----》解释器(shell)----》内核----》硬件
shell:壳
4.完整的命令格式:
命令 选项 参数1 参数2 参数3 ...
c
ls -l #长格式显示 #显示详细属性5.Tab键自动补全
可补齐命令、选项、参数、文件路径、软件名、服务名
root@localhost /# if(tab) (tab) #列出以if开头的命令
root@localhost /# ifco(tab)
root@localhost /# cat /etc/re(tab) (tab)
root@localhost /# cat /etc/red(tab)
root@localhost /# ls /etc/sysconfig/network-scripts/
root@localhost /# ls /et(tab)/sysco(tab)/netw(tab)- (tab)
6.快捷键
Ctrl + c:结束正在运行的命令
Esc + .或Alt + .:粘贴上一个命令的参数
root@localhost \~# ls /etc/shells
root@localhost \~# ls -l Alt + .
root@localhost \~# cat Alt + .
root@localhost \~# cat -n Alt + .
Ctrl + l:清空整个屏幕
Ctrl + u:从光标处清空至行首
Ctrl + k:从光标处清空至行尾
Home键:从光标处快速到行首
end键:从光标处快速到行尾
Ctrl + w:往回删除一个单词(以空格界定)
7.天青色:快捷方式
8.mount挂载
安装软件
光盘镜像文件,获取软件包
显示光盘镜像文件内容
Linux的光驱设备:一切皆文件
光盘内容获得众多的软件包
光盘镜像文件----》虚拟机的光驱设备----》访问点(目录)
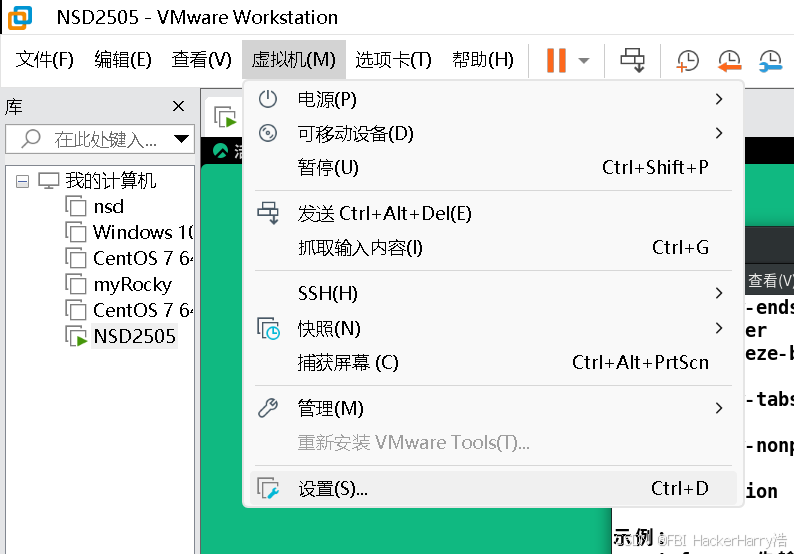
1.将光盘镜像文件放入虚拟机的光驱设备
点击虚拟机->设置
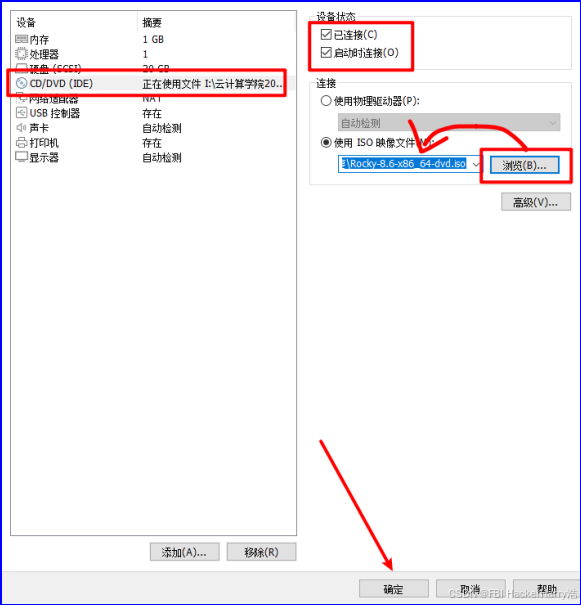
2.虚拟机光驱设备
c
[root@qq ~]# ls   /dev/sr0
[root@qq ~]# ls   /dev/cdrom
[root@qq ~]# ls  -l   /dev/cdrom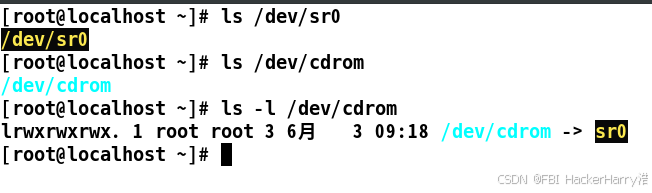
mount挂载操作:让目录成为设备的访问点
c
[root@localhost /]#  mkdir   /dvd
[root@localhost /]#  ls    /
[root@localhost /]#  ls    /dvd         #显示内容为空
c
[root@localhost /]#  mount   /dev/cdrom    /dvd
mount: /dvd: WARNING: device write-protected, mounted read-only.
[root@localhost /]# ls /dvd 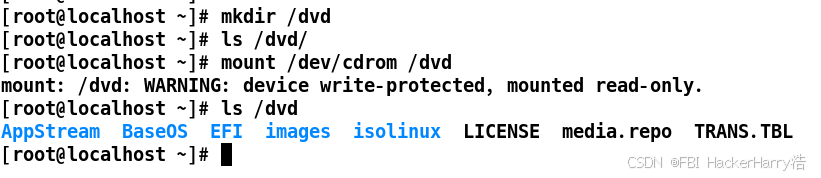
注意事项:
1.卸载:当前所在的路径是挂载点目录
root@localhost mydvd# umount /mydvd
umount: /mydvd:目标忙。
(有些情况下通过 lsof(8) 或 fuser(1) 可以
找到有关使用该设备的进程的有用信息)
2.允许:一个设备,挂载到不同的挂载点目录
c
[root@qq /]# mkdir   /mydvd
[root@qq /]# mount  /dev/cdrom   /mydvd
mount: /mydvd: WARNING: device write-protected, mounted read-only.
[root@qq /]# ls  /mydvd/
[root@qq /]# ls  /mydvd/A(Tab)/P(Tab)/n   #查看软件包
3.不允许:一个挂载点目录,挂载多个设备
4.建议挂载点目录,最好自行创建。如果不自行创建,可以挂载到/mnt下面
9.家目录
~ 表示家目录
家目录:储存用户个性化设置的目录
/root:管理员的家目录
/home:存放所有普通用户家目录
c
[root@localhost /]#  cd  ~root    #去往root用户的家目录
[root@localhost /]#  pwd
[root@localhost /]#  useradd  dc   #创建用户dc
[root@localhost /]#  cd  ~dc       #去往dc用户的家目录
[root@localhost /]#  pwd
[root@localhost /]#  useradd  tom   #创建用户tom
[root@localhost /]#  cd  ~tom       #去往tom用户的家目录
[root@localhost /]#  pwd
10.ls常用的选项
-l:以长格式显示,显示详细信息
-h:提供易读的容量单位(K、M等)
-d:显示目录本身(而不是内容)的属性
c
[root@localhost /]# ls  -ld   /home
[root@localhost /]# ls  -ld   /root
[root@localhost /]# ls  -ld    /
[root@localhost /]# ls  -l     /etc/passwd
[root@localhost /]# ls  -lh   /etc/passwd
-A:显示所有内容,包含隐藏数据
-R:递归显示目录内容
c
[root@localhost /]# ls  -A     /root
[root@localhost /]# touch    /opt/.nsd.txt
[root@localhost /]# ls    /opt/
[root@localhost /]# ls   -A    /opt
[root@localhost /]# ls  -R   /boot
c
[root@localhost /]# tree  /boot
[root@localhost /]# tree  /opt
通配符使用,针对不确定的文档名称,以特殊字符表示
*:任意多个任意字符
c++
[root@localhost /]# ls    /root/a*
[root@localhost /]# ls    /boot/vm*
[root@localhost /]# ls    /etc/*tab
[root@localhost /]# ls    /etc/*.conf
[root@localhost /]# ls    /etc/re*.conf
[root@localhost /]# ls    /dev/tty*
[root@localhost /]# ls   -d   /etc/r*
[root@localhost /]# ls   -d   /etc/*as*
?:单个字符(必须要有一个)
c
[root@localhost /]# ls   /etc/??tab
[root@localhost /]# ls   /dev/tty?
[root@localhost /]# ls /dev/tty??a-z:连续范围中的一个,若无则忽略
{a,min,xy}:多组不同的字符串,全匹配
c
[root@localhost /]#  ls    /dev/tty[3-9]
[root@localhost /]#  ls    /dev/tty[1-7]
[root@localhost /]#  ls    /dev/tty{1,17,20}
[root@localhost /]#  ls    /dev/tty{10,18,22,33}
[root@localhost /]#  ls    /dev/tty{26,19,21,30,40}
[root@localhost /]#  ls    /etc/{rw,fs}tab
11.定义别名:简化复杂的命令
查看已设置的别名
alias
定义新的别名
alias 别名名称= '实际执行的命令行'
取消已设置的别名
unalias 别名名称
c
[root@localhost /]#  hostname
[root@localhost /]#  alias   hn='hostname'   #临时定义别名
[root@localhost /]#  hn
[root@localhost /]#  alias           #查看系统中有哪些别名
[root@localhost /]#  unalias    hn    #删除hn别名
[root@localhost /]#  hn
bash: hn: 未找到命令...

[root@localhost /]#  alias     myls='ls   -l'
[root@localhost /]#  myls   /etc/passwd
永久定义别名:配置文件 在用户家目录下 .bashrc
c
[root@qq ~]# vim    /root/.bashrc
......
alias   hn='hostname'       #新增一行配置
......
新开一个全新的命令行终端进行验证
root@qq \~# hn
12.mkdir创建目录
格式:mkdir /路径/目录名...
-p:连同父目录一并创建
c
[root@localhost /]# mkdir -p /opt/aa/bb/cc/dd13.rm删除
常用命令选项
-r、-f:递归删除(含目录)、强制删除
c
[root@localhost /]#  ls     /opt
[root@localhost /]#  rm     -rf     /opt/1.txt
[root@localhost /]#  ls    /opt

[root@localhost /]#  rm     -rf     /opt/aa
[root@localhost /]#  ls     /opt
14.mv移动
移动(剪切)
mv --- Move移动:源数据会消失
格式:mv 原文件... 目标路径
c++
[root@qq ~]# rm  -rf   /opt/*
[root@qq ~]# touch   /opt/1.txt
[root@qq ~]# mkdir   /opt/nsd01
[root@qq ~]# ls  /opt/
[root@qq ~]# mv  /opt/1.txt   /opt/nsd01
[root@qq ~]# ls  /opt
[root@qq ~]# ls  /opt/nsd01
[root@qq ~]#
重命名:路径不变的移动
c
[root@localhost /]#  ls   /opt/
[root@localhost /]#  mv   /opt/nsd01    /opt/abc
[root@localhost /]#  ls   /opt/
[root@localhost /]#  mv    /opt/abc       /opt/student
[root@localhost /]#  ls    /opt/
15.cp复制/拷贝
格式:cp 原文件... 目标路径
常用命令选项
-r:递归,复制目录时必须有此选项
c
[root@localhost /]#  cp      /etc/passwd       /opt
[root@localhost /]#  ls     /opt
[root@localhost /]#  cp    -r     /boot       /opt
[root@localhost /]#  ls     /opt
[root@localhost /]#  cp    -r     /home      /opt
[root@localhost /]#  ls     /opt
进行强制覆盖
c
]#  \cp  -r  /boot  /opt   #本次操作临时取消别名
]#  \cp  -r  /boot  /opt   #本次操作临时取消别名
复制可以重新命名,目标路径下数据的名称
css
[root@localhost /]#  cp    -r    /home   /opt/myhome
[root@localhost /]#  ls    /opt
[root@localhost /]#  cp    /etc/shells      /opt/r.txt
[root@localhost /]#  ls    /opt
[root@localhost /]#  cp    -r     /root     /opt/myroot
[root@localhost /]#  ls    /opt
[root@localhost /]#  cp   -r     /root      /opt/myroot
[root@localhost /]#  ls      /opt/myroot
复制可以支持两个以上的参数,永远把最后一个参数作为目标,其他的所有的参数都作为源数据
css
]# mkdir    /nsd05
]# ls   /nsd05

]# cp    -r    /home    /boot   /etc/passwd    /etc/shells      /nsd05
]# ls    /nsd05
复制与一个点进行连用,将数据复制到当前路径下
css
[root@localhost /]#  cd    /etc/sysconfig/network-scripts/
[root@localhost network-scripts]#  pwd
[root@localhost network-scripts]#  cp   /etc/passwd      .
[root@localhost network-scripts]#  ls

[root@localhost network-scripts]#  cd    /mnt
[root@localhost mnt]#  pwd
[root@localhost mnt]#  cp   /etc/shells     .
16.grep过滤文件内容
常用命令选项
-v,取反匹配(不包含)
-i,忽略大小写
css
[root@localhost /]#  grep   root     /etc/passwd
[root@localhost /]#  grep  -v   root    /etc/passwd
css
[root@localhost /]#  grep  ROOT    /etc/passwd
[root@localhost /]#  grep  -i  ROOT  /etc/passwd
高级使用
^word 以字符串word开头
word$ 以字符串word结尾
css
[root@localhost /]#  grep   ^root   /etc/passwd
[root@localhost /]#  grep   ^bin     /etc/passwd
css
[root@localhost /]#  grep   root$    /etc/passwd
[root@localhost /]#  grep   bash$    /etc/passwd
高级使用
^$ 表示空行
css
]#  cat    /etc/default/useradd
]#  grep  ^$   /etc/default/useradd   #过滤空行
]#  grep -v  ^$   /etc/default/useradd  #过滤不要空行的内容
css
]#  cat    /etc/login.defs
]#  grep  ^$   /etc/login.defs   #过滤空行
]#  grep -v  ^$   /etc/login.defs    #过滤不要空行的内容
17.删除交换文件,swap文件效果
css
[root@localhost ~]# vim /opt/1.txt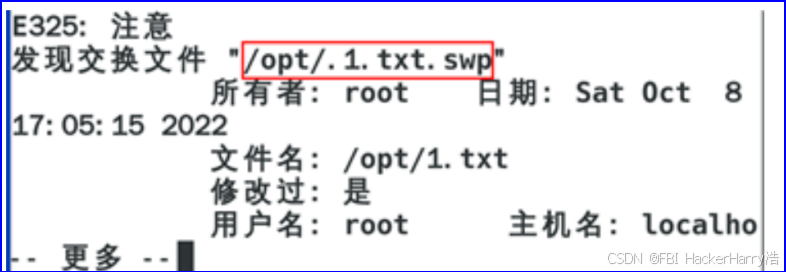
css
[root@localhost ~]# rm -rf /opt/.1.txt.swp