💡WPF 项目实战:构建一个可增删、排序的光源类型管理界面(含源码)
在实际的图像处理项目中,我们经常需要对"光源类型"进行筛选或管理。今天我们来一步步构建一个实用的 WPF 界面,实现以下功能:
- ✅ 添加新的光源类型
- ❌ 删除已有光源类型
- 🔼🔽 调整光源类型显示顺序
- 🧠 使用标准的 MVVM 模式 + Prism 命令绑定
🏗️ 第一步:定义模型类
我们为每个光源项定义一个类 LightSourceFilterItem,它包含两个属性:光源名称、是否勾选。
csharp
public class LightSourceFilterItem : BindableBase
{
    public string Name { get; }

    private bool _isChecked;
    public bool IsChecked
    {
        get => _isChecked;
        set => SetProperty(ref _isChecked, value);
    }

    public LightSourceFilterItem(string name)
    {
        Name = name;
        IsChecked = true;
    }
}
🧠 第二步:ViewModel 实现逻辑
ViewModel 是整个逻辑核心,包括添加、删除、排序命令。
csharp
public class LightTypeViewModel : BindableBase
{
    public ObservableCollection<LightSourceFilterItem> LightSourceItems { get; } = new();

    private string _newLightSourceName;
    public string NewLightSourceName
    {
        get => _newLightSourceName;
        set => SetProperty(ref _newLightSourceName, value);
    }

    public DelegateCommand AddLightSourceCommand { get; }
    public DelegateCommand<LightSourceFilterItem> RemoveLightSourceCommand { get; }
    public DelegateCommand<LightSourceFilterItem> MoveUpCommand { get; }
    public DelegateCommand<LightSourceFilterItem> MoveDownCommand { get; }

    public LightTypeViewModel()
    {
        AddLightSourceCommand = new DelegateCommand(AddLightSource);
        RemoveLightSourceCommand = new DelegateCommand<LightSourceFilterItem>(RemoveLightSource);
        MoveUpCommand = new DelegateCommand<LightSourceFilterItem>(MoveUp);
        MoveDownCommand = new DelegateCommand<LightSourceFilterItem>(MoveDown);
    }

    private void AddLightSource()
    {
        if (string.IsNullOrWhiteSpace(NewLightSourceName)) return;
        if (LightSourceItems.Any(x => x.Name == NewLightSourceName)) return;

        LightSourceItems.Add(new LightSourceFilterItem(NewLightSourceName));
        NewLightSourceName = string.Empty;
    }

    private void RemoveLightSource(LightSourceFilterItem item)
    {
        if (item != null)
            LightSourceItems.Remove(item);
    }

    private void MoveUp(LightSourceFilterItem item)
    {
        var index = LightSourceItems.IndexOf(item);
        if (index > 0)
            LightSourceItems.Move(index, index - 1);
    }

    private void MoveDown(LightSourceFilterItem item)
    {
        var index = LightSourceItems.IndexOf(item);
        if (index < LightSourceItems.Count - 1)
            LightSourceItems.Move(index, index + 1);
    }
}
💡 温馨提示
使用 ObservableCollection.Move() 可以高效地重排项,UI 会自动更新。
如果你未来打算支持拖动排序,也可以换成 ListBox + drag-and-drop 实现。
🎨 第三步:编写 XAML 界面
xml
<UserControl x:Class="MainPro.Views.LightTypeView"
xmlns="http://schemas.microsoft.com/winfx/2006/xaml/presentation"
xmlns:x="http://schemas.microsoft.com/winfx/2006/xaml"
xmlns:prism="http://prismlibrary.com/"
prism:ViewModelLocator.AutoWireViewModel="True"
Background="AliceBlue">
<StackPanel Margin="20">
<!-- 添加区域 -->
<StackPanel Orientation="Horizontal" Margin="0,0,0,10">
<TextBox Width="150"
Text="{Binding NewLightSourceName, UpdateSourceTrigger=PropertyChanged}" />
<Button Content="添加光源类型" Command="{Binding AddLightSourceCommand}" Margin="10,0,0,0" />
</StackPanel>
<!-- 光源列表 -->
<ItemsControl ItemsSource="{Binding LightSourceItems}">
<ItemsControl.ItemTemplate>
<DataTemplate>
<StackPanel Orientation="Horizontal" Margin="5">
<CheckBox Content="{Binding Name}"
IsChecked="{Binding IsChecked, Mode=TwoWay}" />
<Button Content="☝" Margin="10,0,0,0"
Command="{Binding DataContext.MoveUpCommand, RelativeSource={RelativeSource AncestorType=UserControl}}"
CommandParameter="{Binding}" />
<Button Content="👇" Margin="5,0,0,0"
Command="{Binding DataContext.MoveDownCommand, RelativeSource={RelativeSource AncestorType=UserControl}}"
CommandParameter="{Binding}" />
<Button Content="❌" Foreground="Red" Margin="5,0,0,0"
Command="{Binding DataContext.RemoveLightSourceCommand, RelativeSource={RelativeSource AncestorType=UserControl}}"
CommandParameter="{Binding}" />
</StackPanel>
</DataTemplate>
</ItemsControl.ItemTemplate>
</ItemsControl>
</StackPanel>
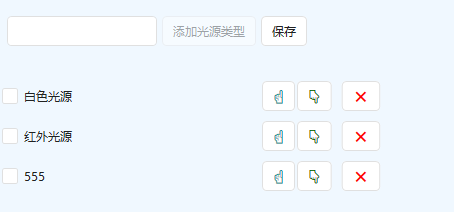
</UserControl>🔍 第四步:效果展示
✅ 添加新项后立即出现在下方
❌ 删除指定项
🔼🔽 可调整顺序,数据集合自动更新 UI
📝 总结
这个小型项目展示了:
- 如何结合
ObservableCollection和ItemsControl构建交互式列表 - 如何用 Prism 的
DelegateCommand<T>实现项级操作 - 使用 MVVM 保持代码整洁、解耦、易维护
这种思路不仅适用于光源类型管理,也适合于任何需要用户自定义数据项列表的场景。
📎 如需源码或进一步扩展功能(如拖拽排序、持久化到配置文件等),欢迎留言!如果这篇文章对你有帮助,欢迎收藏+转发 ❤️