任务来源:https://aicarrier.feishu.cn/wiki/D7kZw9Nx4iMyDnkpL0Gc5giNn5g
闯关任务:端侧小模型论文分类微调练习打榜赛 赛中提交结果超过基线,并提交复现文档。
本文档说明:
1.任务完成证明贴图
2.原理说明
3.实现过程代码(会针对完全小白用户做一些批注,需要注意文件存放路径)
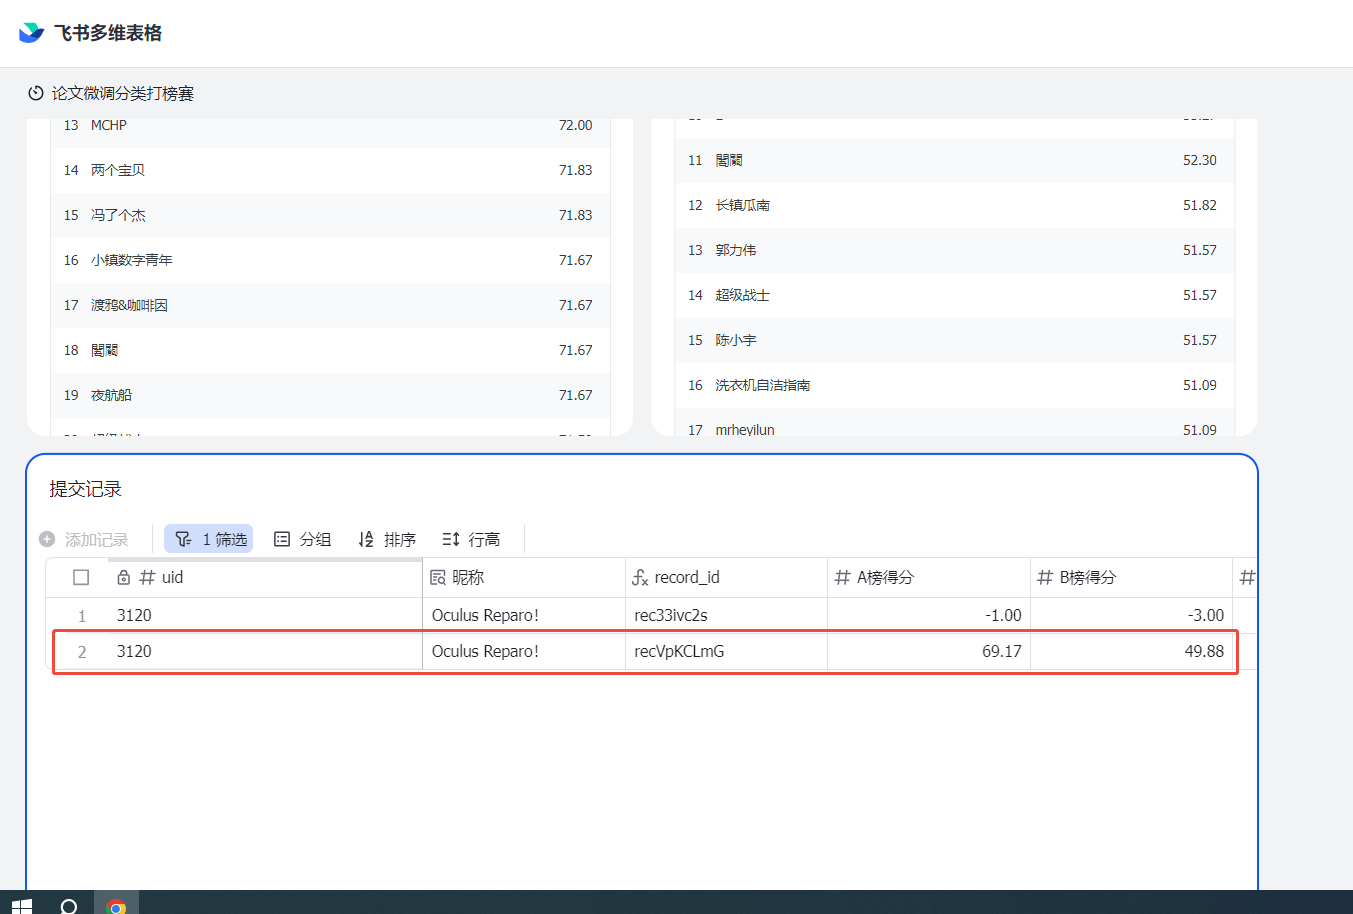
一、任务完成证明
二、原理说明
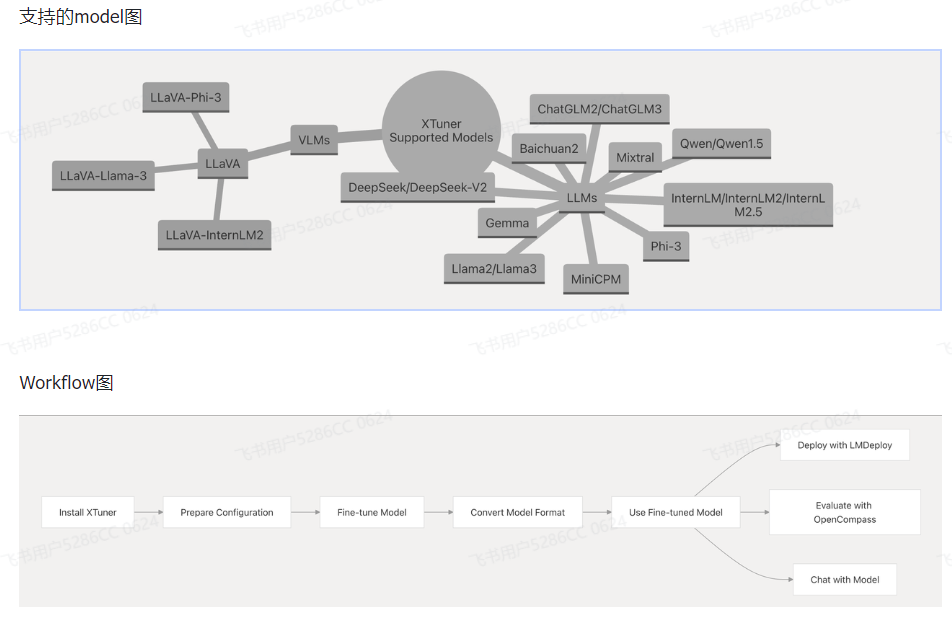
XTuner 是一款高效、灵活、全能的轻量化大模型微调工具库。
核心特点
-
高效性能:支持低至 8GB 显存的 7B 模型微调,亦支持多节点 70B+ 模型训练;内置高性能算子自动调度,兼容 DeepSpeed 优化。
-
极致灵活:兼容多种大语言模型(如 InternLM、LLaMA、ChatGLM)与多模态模型,支持 QLoRA、LoRA、全量参数等多种微调方法与数据格式。
-
一体化方案:涵盖增量预训练、指令微调、Agent 微调,内置多种对话模板,支持与 LMDeploy、OpenCompass 无缝集成。
解决痛点
-
降低大模型微调对算力资源的要求
-
提升多模型、多算法环境下的兼容性与效率
github仓库:https://github.com/InternLM/xtuner
动态知识库:https://deepwiki.com/InternLM/xtuner
贴心为完全小白补充一个如何从github拉代码的命令
bash
git clone https://github.com/InternLM/xtuner.git三、实现过程代码
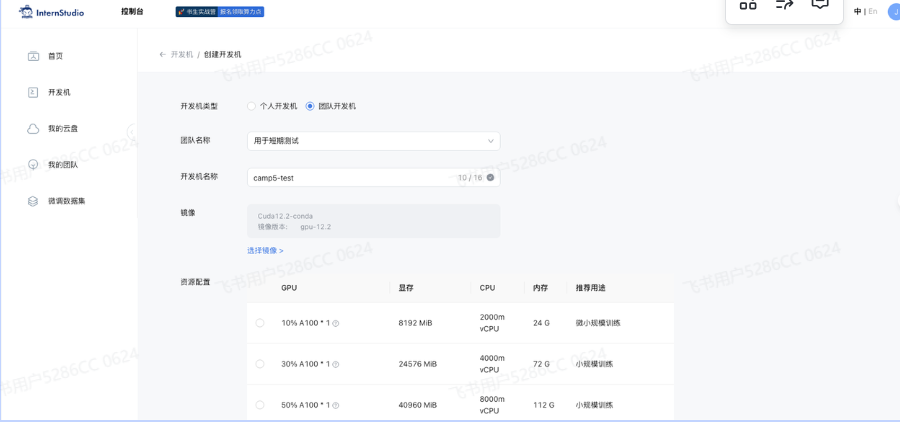
1.在创建开发机界面选择镜像为 Cuda12.2-conda,并选择 GPU 为50% A100(肯定越大越好哈哈)
 2.创建虚拟环境
bash
conda create -n xtuner_513 python=3.10 -y
conda activate xtuner_513
pip install torch==2.4.0+cu121 torchvision torchaudio --extra-index-url https://download.pytorch.org/whl/cu121
pip install xtuner timm flash_attn datasets==2.21.0 deepspeed==0.16.1
conda install mpi4py -y
#为了兼容模型,降级transformers版本
pip uninstall transformers -y
pip install transformers==4.48.0 --no-cache-dir -i https://pypi.tuna.tsinghua.edu.cn/simple3.输入xtuner list-cfg检验环境安装
bash
xtuner list-cfg4.数据获取
关于数据详情参考InternLM论文分类微调实践(swift 版)数据部分
原本的数据是swift版本,因此需要代码转化。(从https://aicarrier.feishu.cn/wiki/D7kZw9Nx4iMyDnkpL0Gc5giNn5g链接里面进去通过sftdata.jsonl关键字搜索下载https://aicarrier.feishu.cn/wiki/D7kZw9Nx4iMyDnkpL0Gc5giNn5g链接里面进去通过)
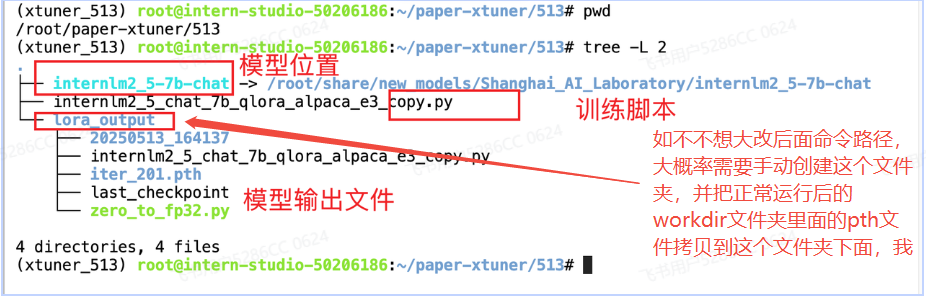
5.训练(上海人工智能实验室InternStudio工作机已经在路径下放好模型文件)
ln -s /root/share/new_models/Shanghai_AI_Laboratory/internlm2_5-7b-chat ./
6.注意事项(针对完全小白重点说明!!!)
7.微调脚本
python
# Copyright (c) OpenMMLab. All rights reserved.
import torch
from datasets import load_dataset
from mmengine.dataset import DefaultSampler
from mmengine.hooks import (
    CheckpointHook,
    DistSamplerSeedHook,
    IterTimerHook,
    LoggerHook,
    ParamSchedulerHook,
)
from mmengine.optim import AmpOptimWrapper, CosineAnnealingLR, LinearLR
from peft import LoraConfig
from torch.optim import AdamW
from transformers import AutoModelForCausalLM, AutoTokenizer, BitsAndBytesConfig

from xtuner.dataset import process_hf_dataset
from xtuner.dataset.collate_fns import default_collate_fn
from xtuner.dataset.map_fns import alpaca_map_fn, template_map_fn_factory
from xtuner.engine.hooks import (
    DatasetInfoHook,
    EvaluateChatHook,
    VarlenAttnArgsToMessageHubHook,
)
from xtuner.engine.runner import TrainLoop
from xtuner.model import SupervisedFinetune
from xtuner.parallel.sequence import SequenceParallelSampler
from xtuner.utils import PROMPT_TEMPLATE, SYSTEM_TEMPLATE

#######################################################################
#                          PART 1  Settings                           #
#######################################################################
# Model
pretrained_model_name_or_path = "./internlm2_5-7b-chat"
use_varlen_attn = False

# Data
alpaca_en_path = "/root/xtuner/datasets/train/sftdata.jsonl"#换成自己的数据路径
prompt_template = PROMPT_TEMPLATE.internlm2_chat
max_length = 2048
pack_to_max_length = True

# parallel
sequence_parallel_size = 1

# Scheduler & Optimizer
batch_size = 1  # per_device
accumulative_counts = 1
accumulative_counts *= sequence_parallel_size
dataloader_num_workers = 0
max_epochs = 3
optim_type = AdamW
lr = 2e-4
betas = (0.9, 0.999)
weight_decay = 0
max_norm = 1  # grad clip
warmup_ratio = 0.03

# Save
save_steps = 500
save_total_limit = 2  # Maximum checkpoints to keep (-1 means unlimited)

# Evaluate the generation performance during the training
evaluation_freq = 500
SYSTEM = SYSTEM_TEMPLATE.alpaca
evaluation_inputs = ["请给我介绍五个上海的景点", "Please tell me five scenic spots in Shanghai"]

#######################################################################
#                      PART 2  Model & Tokenizer                      #
#######################################################################
tokenizer = dict(
    type=AutoTokenizer.from_pretrained,
    pretrained_model_name_or_path=pretrained_model_name_or_path,
    trust_remote_code=True,
    padding_side="right",
)

model = dict(
    type=SupervisedFinetune,
    use_varlen_attn=use_varlen_attn,
    llm=dict(
        type=AutoModelForCausalLM.from_pretrained,
        pretrained_model_name_or_path=pretrained_model_name_or_path,
        trust_remote_code=True,
        torch_dtype=torch.float16,
        quantization_config=dict(
            type=BitsAndBytesConfig,
            load_in_4bit=True,
            load_in_8bit=False,
            llm_int8_threshold=6.0,
            llm_int8_has_fp16_weight=False,
            bnb_4bit_compute_dtype=torch.float16,
            bnb_4bit_use_double_quant=True,
            bnb_4bit_quant_type="nf4",
        ),
    ),
    lora=dict(
        type=LoraConfig,
        r=64,
        lora_alpha=16,
        lora_dropout=0.1,
        bias="none",
        task_type="CAUSAL_LM",
    ),
)

#######################################################################
#                      PART 3  Dataset & Dataloader                   #
#######################################################################
alpaca_en = dict(
    type=process_hf_dataset,
    dataset=dict(type=load_dataset, path='json', data_files=alpaca_en_path),
    tokenizer=tokenizer,
    max_length=max_length,
    dataset_map_fn=alpaca_map_fn,
    template_map_fn=dict(type=template_map_fn_factory, template=prompt_template),
    remove_unused_columns=True,
    shuffle_before_pack=True,
    pack_to_max_length=pack_to_max_length,
    use_varlen_attn=use_varlen_attn,
)

sampler = SequenceParallelSampler if sequence_parallel_size > 1 else DefaultSampler
train_dataloader = dict(
    batch_size=batch_size,
    num_workers=dataloader_num_workers,
    dataset=alpaca_en,
    sampler=dict(type=sampler, shuffle=True),
    collate_fn=dict(type=default_collate_fn, use_varlen_attn=use_varlen_attn),
)

#######################################################################
#                    PART 4  Scheduler & Optimizer                    #
#######################################################################
# optimizer
optim_wrapper = dict(
    type=AmpOptimWrapper,
    optimizer=dict(type=optim_type, lr=lr, betas=betas, weight_decay=weight_decay),
    clip_grad=dict(max_norm=max_norm, error_if_nonfinite=False),
    accumulative_counts=accumulative_counts,
    loss_scale="dynamic",
    dtype="float16",
)

# learning policy
# More information: https://github.com/open-mmlab/mmengine/blob/main/docs/en/tutorials/param_scheduler.md  # noqa: E501
param_scheduler = [
    dict(
        type=LinearLR,
        start_factor=1e-5,
        by_epoch=True,
        begin=0,
        end=warmup_ratio * max_epochs,
        convert_to_iter_based=True,
    ),
    dict(
        type=CosineAnnealingLR,
        eta_min=0.0,
        by_epoch=True,
        begin=warmup_ratio * max_epochs,
        end=max_epochs,
        convert_to_iter_based=True,
    ),
]

# train, val, test setting
train_cfg = dict(type=TrainLoop, max_epochs=max_epochs)

#######################################################################
#                           PART 5  Runtime                           #
#######################################################################
# Log the dialogue periodically during the training process, optional
custom_hooks = [
    dict(type=DatasetInfoHook, tokenizer=tokenizer),
    dict(
        type=EvaluateChatHook,
        tokenizer=tokenizer,
        every_n_iters=evaluation_freq,
        evaluation_inputs=evaluation_inputs,
        system=SYSTEM,
        prompt_template=prompt_template,
    ),
]

if use_varlen_attn:
    custom_hooks += [dict(type=VarlenAttnArgsToMessageHubHook)]

# configure default hooks
default_hooks = dict(
    # record the time of every iteration.
    timer=dict(type=IterTimerHook),
    # print log every 10 iterations.
    logger=dict(type=LoggerHook, log_metric_by_epoch=False, interval=10),
    # enable the parameter scheduler.
    param_scheduler=dict(type=ParamSchedulerHook),
    # save checkpoint per `save_steps`.
    checkpoint=dict(
        type=CheckpointHook,
        by_epoch=False,
        interval=save_steps,
        max_keep_ckpts=save_total_limit,
    ),
    # set sampler seed in distributed evrionment.
    sampler_seed=dict(type=DistSamplerSeedHook),
)

# configure environment
env_cfg = dict(
    # whether to enable cudnn benchmark
    cudnn_benchmark=False,
    # set multi process parameters
    mp_cfg=dict(mp_start_method="fork", opencv_num_threads=0),
    # set distributed parameters
    dist_cfg=dict(backend="nccl"),
)

# set visualizer
visualizer = None

# set log level
log_level = "INFO"

# load from which checkpoint
load_from = None

# whether to resume training from the loaded checkpoint
resume = False

# Defaults to use random seed and disable `deterministic`
randomness = dict(seed=None, deterministic=False)

# set log processor
log_processor = dict(by_epoch=False)
pretrained_model_name_or_path alpaca_en_path 只需要注意34和38行模型、数据位置就好了。
8.启动脚本
bash
cd /root/paper-xtuner/513
conda activate xtuner_513
xtuner train internlm2_5_chat_7b_qlora_alpaca_e3_copy.py --deepspeed deepspeed_zero1
9.合并
在完成XTuner的微调后,需要进行两个步骤:首先将PTH格式的模型转换为HuggingFace格式,然后将adapter与基础模型合并。
bash
xtuner convert pth_to_hf internlm2_5_chat_7b_qlora_alpaca_e3_copy.py ./lora_output/iter_180.pth ./lora_output/hf唯一需要注意的就是pth文件名称和自己生成的保持一致,我的是iter_180.pth,参考任务里面的事iter_180.pth
9.1 将PTH格式转换为HuggingFace格式
bash
xtuner convert pth_to_hf internlm2_5_chat_7b_qlora_alpaca_e3_copy.py ./lora_output/iter_180.pth ./lora_output/hf9.2. 合并adapter和基础模型
bash
xtuner convert merge \
    ./internlm2_5-7b-chat \
    ./lora_output/hf \
    ./lora_output/merged \
--max-shard-size 2GB完成这两个步骤后,合并好的模型将保存在./lora_output/merged目录下,你可以直接使用这个模型进行推理了。
10.推理
python
from transformers import AutoModelForCausalLM, AutoTokenizer
import time

# 加载模型和分词器
# model_path = "./lora_output/merged"
model_path = "./internlm2_5-7b-chat"
print(f"加载模型:{model_path}")

start_time = time.time()

tokenizer = AutoTokenizer.from_pretrained(model_path, trust_remote_code=True)
model = AutoModelForCausalLM.from_pretrained(
    model_path, trust_remote_code=True, torch_dtype="auto", device_map="auto"
)

def classify_paper(title, authors, abstract, additional_info=""):
    # 构建输入,包含多选选项
    prompt = f"Based on the title '{title}', authors '{authors}', and abstract '{abstract}', please determine the scientific category of this paper. {additional_info}\n\nA. astro-ph\nB. cond-mat.mes-hall\nC. cond-mat.mtrl-sci\nD. cs.CL\nE. cs.CV\nF. cs.LG\nG. gr-qc\nH. hep-ph\nI. hep-th\nJ. quant-ph"

    # 设置系统信息
    messages = [
        {"role": "system", "content": "你是个优秀的论文分类师"},
        {"role": "user", "content": prompt},
    ]

    # 应用聊天模板
    input_text = tokenizer.apply_chat_template(messages, tokenize=False)

    # 生成回答
    inputs = tokenizer(input_text, return_tensors="pt").to(model.device)
    outputs = model.generate(
        **inputs,
        max_new_tokens=10,  # 减少生成长度,只需要简短答案
        temperature=0.1,  # 降低温度提高确定性
        top_p=0.95,
        repetition_penalty=1.0,
    )

    # 解码输出
    response = tokenizer.decode(
        outputs[0][inputs.input_ids.shape[1] :], skip_special_tokens=True
    ).strip()

    # 如果回答中包含选项标识符,只返回该标识符
    for option in ["A", "B", "C", "D", "E", "F", "G", "H", "I", "J"]:
        if option in response:
            return option

    # 如果回答不包含选项,返回完整回答
    return response

# 示例使用
if __name__ == "__main__":
    title = "Outilex, plate-forme logicielle de traitement de textes 'ecrits"
    authors = "Olivier Blanc (IGM-LabInfo), Matthieu Constant (IGM-LabInfo), Eric Laporte (IGM-LabInfo)"
    abstract = "The Outilex software platform, which will be made available to research, development and industry, comprises software components implementing all the fundamental operations of written text processing: processing without lexicons, exploitation of lexicons and grammars, language resource management. All data are structured in XML formats, and also in more compact formats, either readable or binary, whenever necessary; the required format converters are included in the platform; the grammar formats allow for combining statistical approaches with resource-based approaches. Manually constructed lexicons for French and English, originating from the LADL, and of substantial coverage, will be distributed with the platform under LGPL-LR license."

    result = classify_paper(title, authors, abstract)
    print(result)

    # 计算并打印总耗时
    end_time = time.time()
    total_time = end_time - start_time
    print(f"程序总耗时:{total_time:.2f}秒")
11.部署
bash
pip install lmdeploy
python -m lmdeploy.pytorch.chat ./lora_output/merged \
--max_new_tokens 256 \
--temperture 0.8 \
--top_p 0.95 \
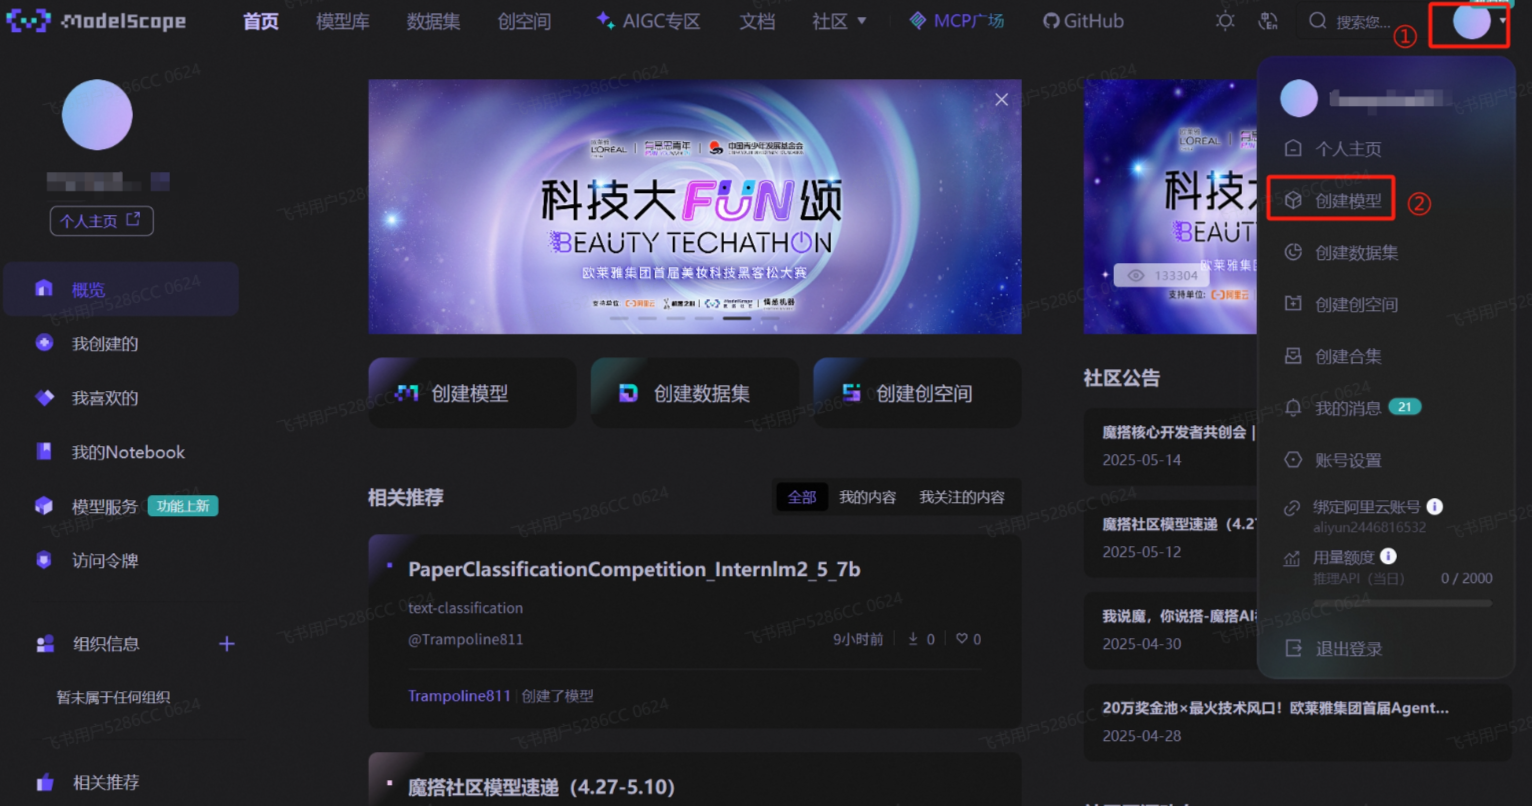
--seed 012.提交模型完成评测(这里使用swift 指令方法,其实我更喜欢ModeScope 官方 Python SDK方法,但是传了N次始终不成功,总是到最后剩下几个条目传不上去)
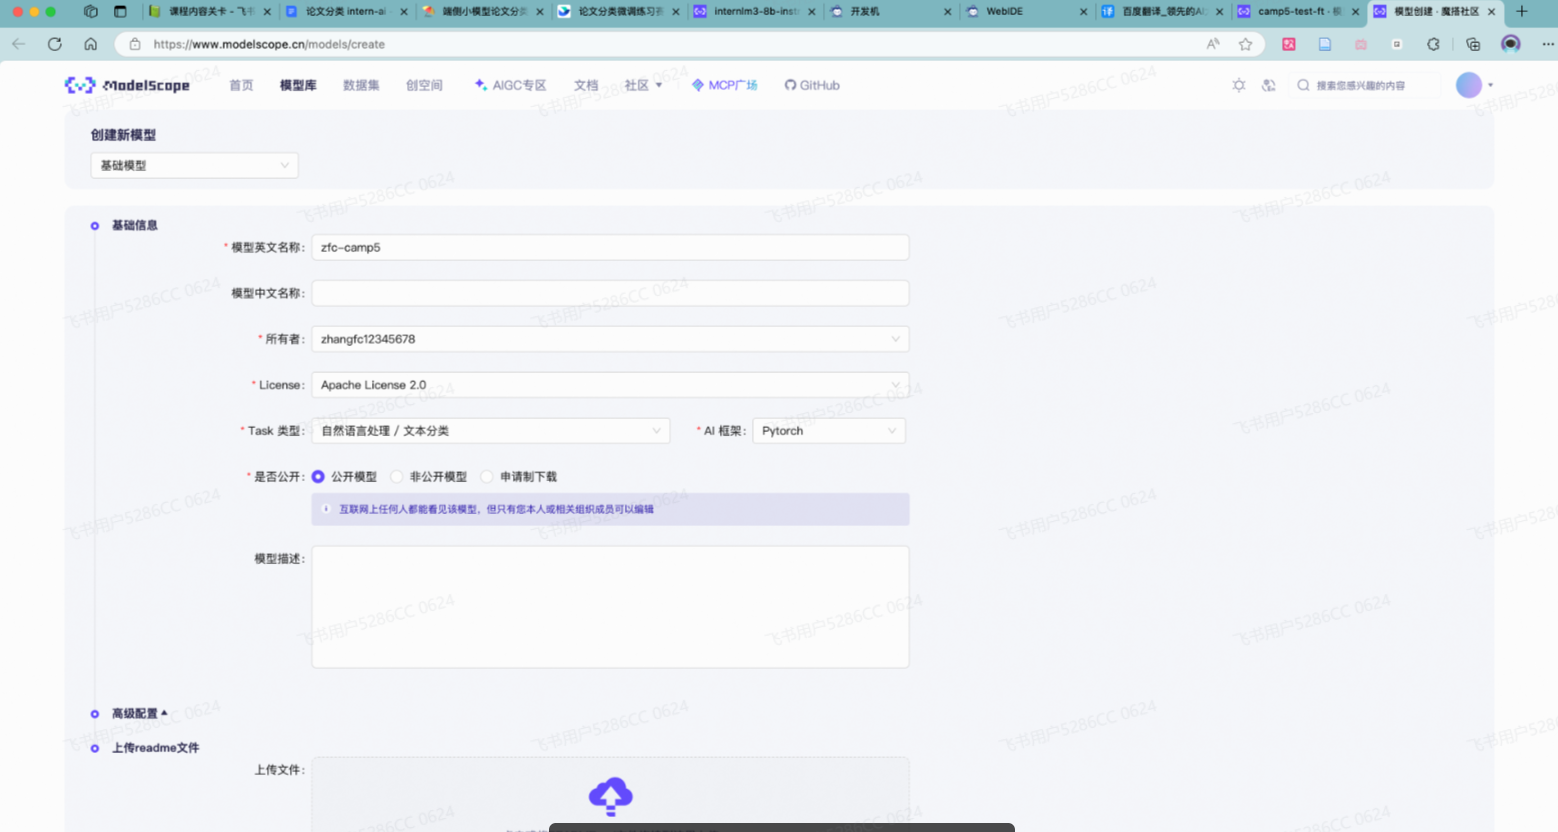
首先需要在 ModelScope 创建模型,为你的模型取一个响亮优雅又好听的名字,然后按右下图中的信息创建(下面截图有点问题,根本不需要创建②,如果你创建了使用ModeScope 官方 Python SDK方法会提示你重复了,如果没有反而可以直接创建)
接下来需要两个步骤:
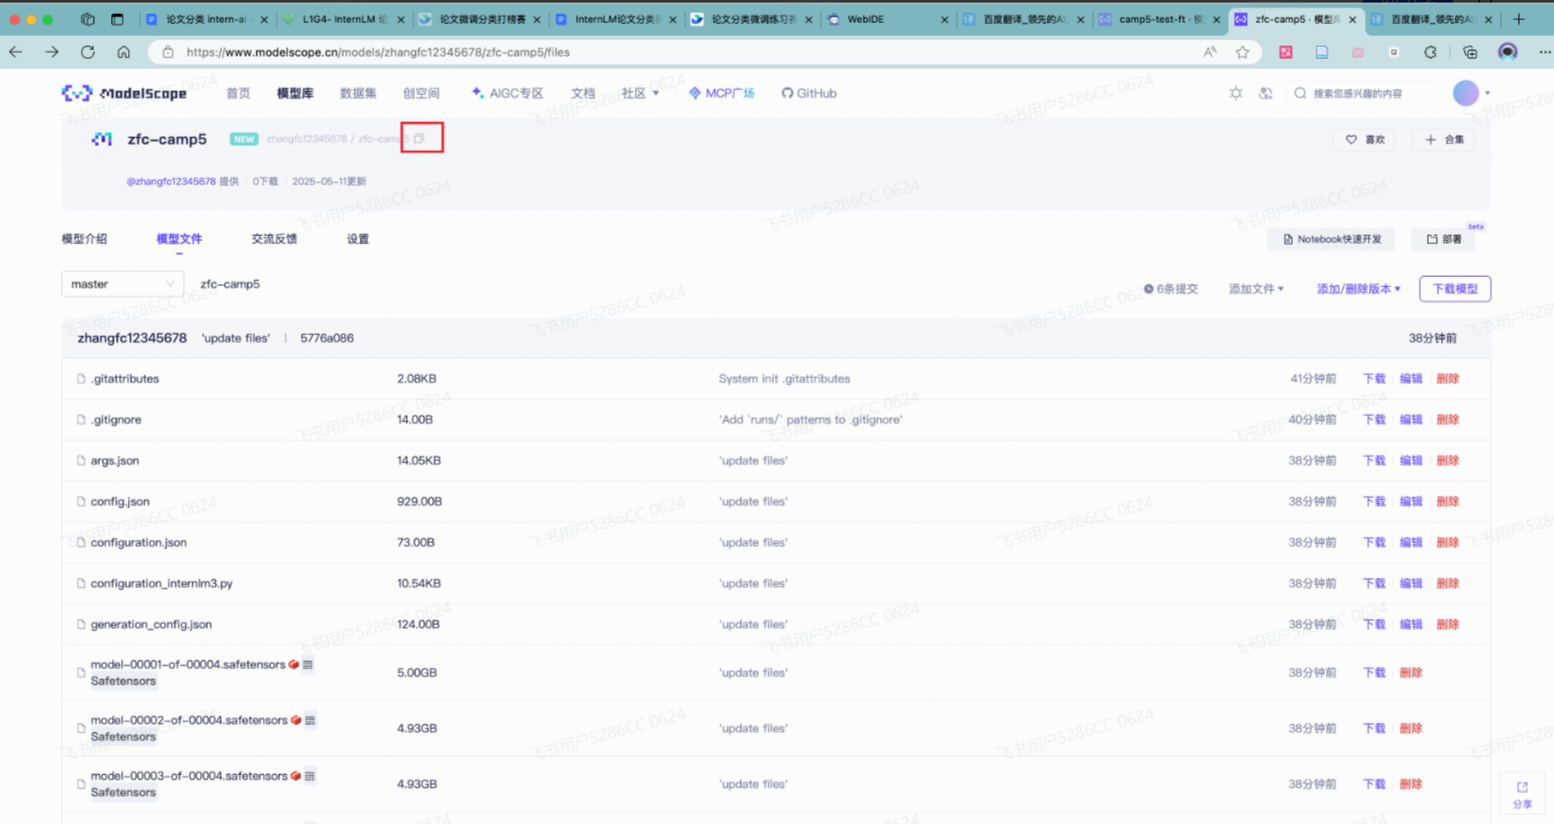
到刚创建好的模型仓库中,拿到**hub_model_id** ,实际上就是 {账号名称/模型库名称} ,如"Shanghai_AI_Laboratory/internlm3-8b-instruct "
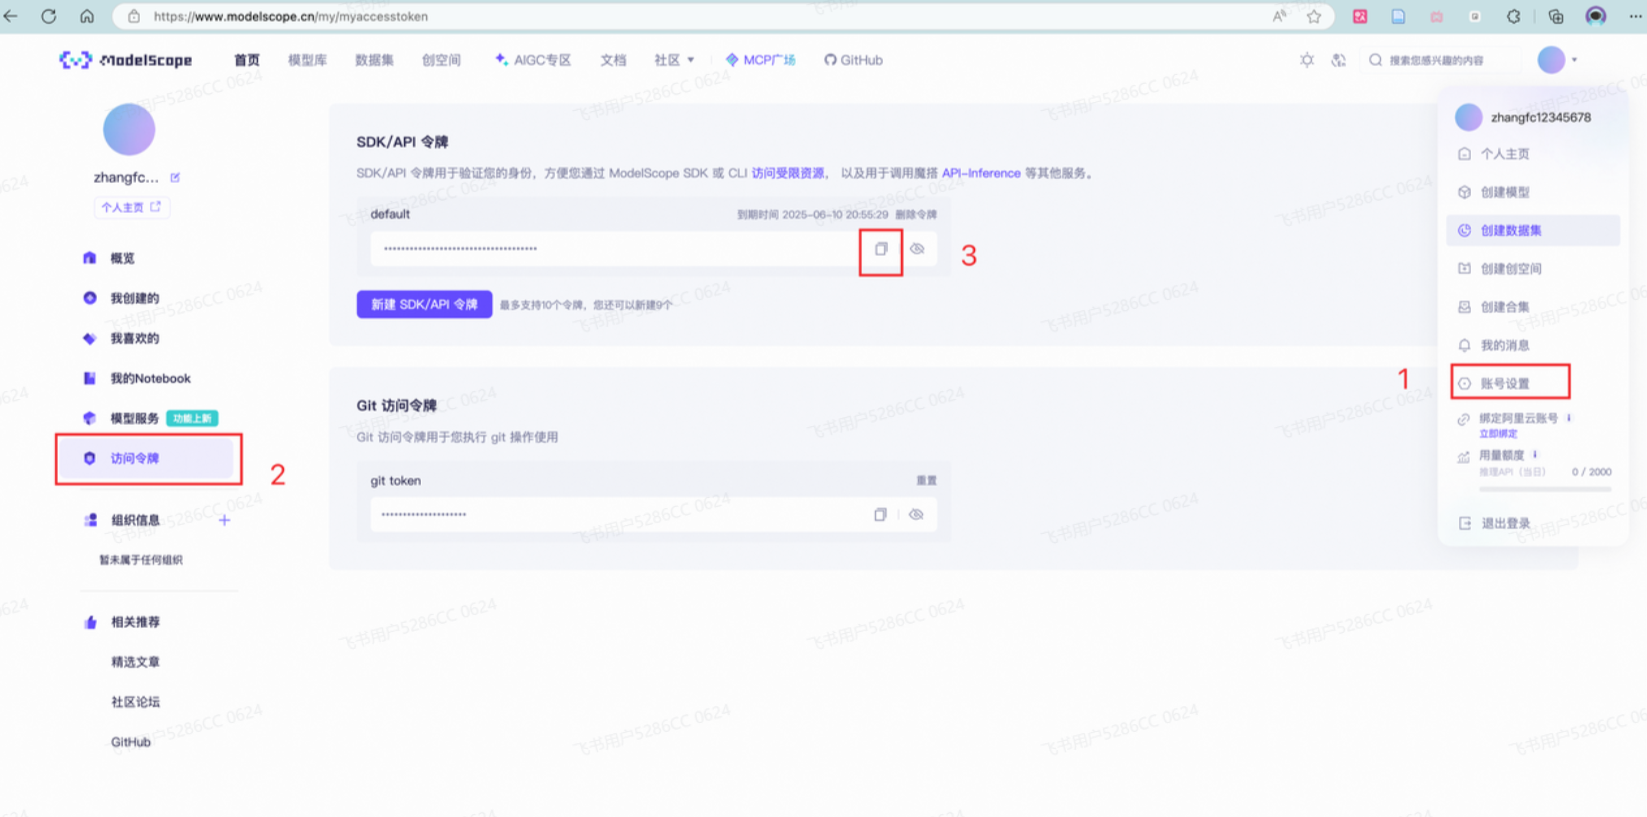
账号设置-访问令牌 中拿到**hub_token**,需妥善保存,不要暴露给他人
12.1下载github
bash
apt-get install git-lfs
git lfs install
12.2提交
bash
swift export \
    --model /root/paper/config/swift_output/InternLM3-8B-Lora-SFT/v3-20250510-231854/checkpoint-21-merged\
    --push_to_hub true \
    --hub_model_id 'zhangfc12345678/zfc-camp5' #替换成自己的 \
    --hub_token '03fb4fxx' \ #替换成自己的
    --use_hf false
13.填链接提交模型
记住你的**"** Modelscope账号名称/模型库名称 " ,如"Shanghai_AI_Laboratory/internlm3-8b-instruct ", 然后填写信息提交单等待成绩榜单更新吧!!!如果完成了测评,会在成绩榜单最下面的提交记录中,查找自己的uid进行查询。
信息 提交单:https://aicarrier.feishu.cn/share/base/form/shrcn0JkjbZKMeMPw04uHCWc5Pg