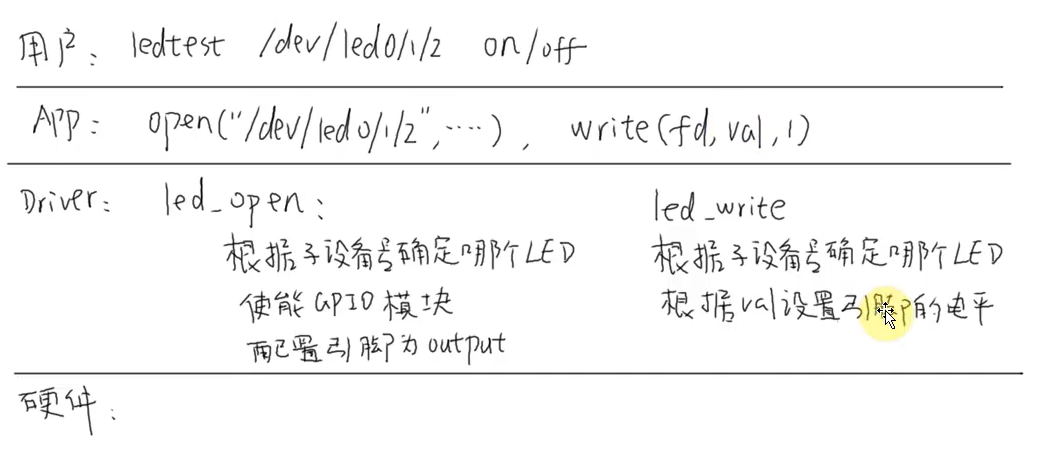
GPIO(通用的输入输出口)引脚操作方法
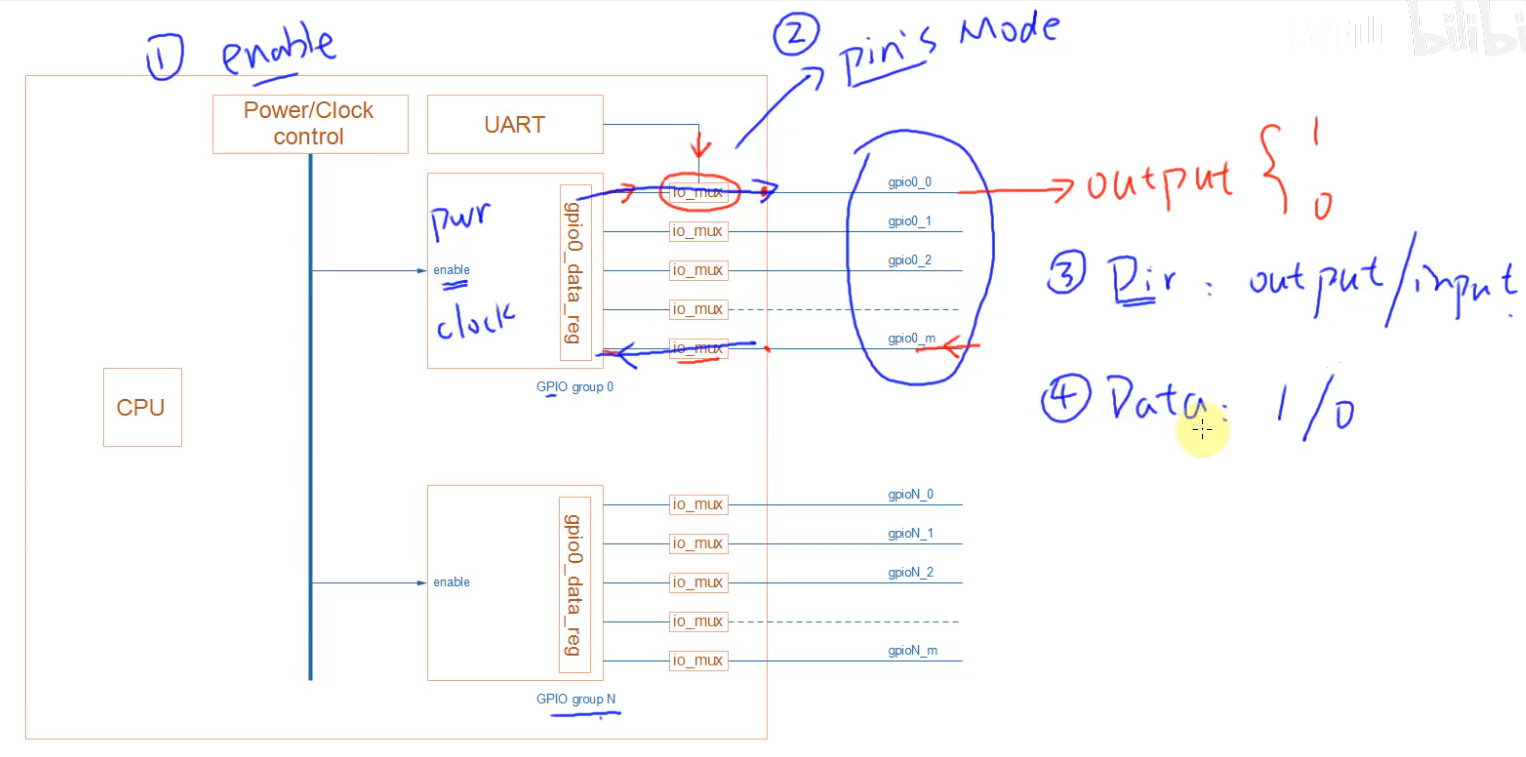
主要的步骤分为4步:1、使能某个GPIO模块 2、设置引脚模式是GPIO 3、设置引脚位输入还是输出 4、设置引脚数据。寄存器操作原则:不要影响其他位。
有些芯片有set_reg、clr_reg两种寄存器(set-and-clear protocol, 设置和清除协议),如果我想设置GPIO0_0引脚的第一个功能为输出高电平,我可以直接使用set_reg = 1,如果想要第三个也有其功能,就使用set_reg = 1 | (1 << 2)。清除也是同理,设置清除寄存器。但是一般的芯片是读出原来的值,然后修改写回去。
设置引脚功能
寄存器详情信息在***03、核心板资料\03、核心板资料\01、金手指规格\03、核心板板载芯片资料/***Rockchip RK3568 TRM Part1 V1.1-20210301.pdf
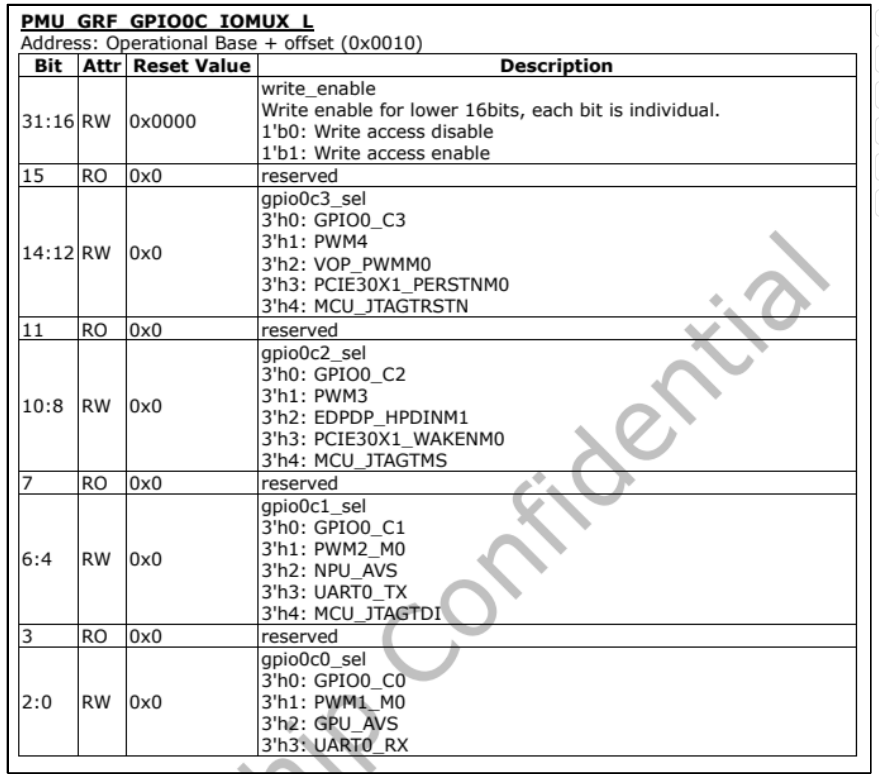
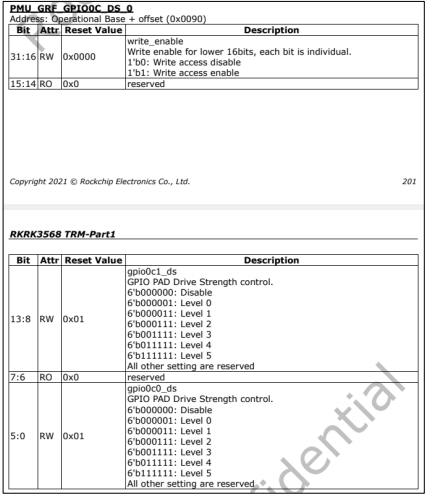
以正点原子GPIO0_C0这个引脚为例。每个引脚都有一个IOMUX寄存器,使用GPIO0_C0这个引脚,设置bit2:0 为000,并且需要将bit16:18设置为111才能对bit2:0进行写操作。
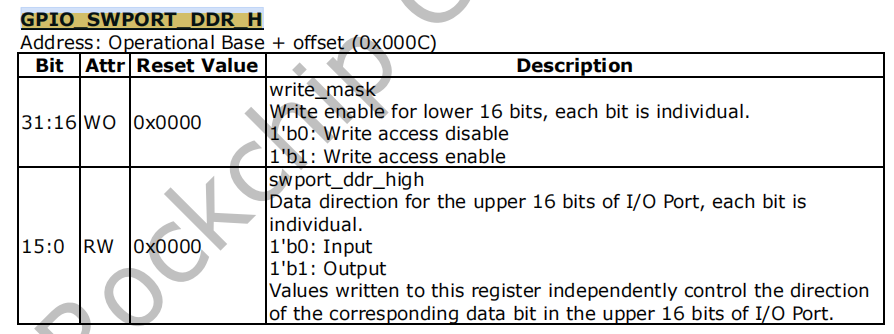
设置完该寄存器要设置方向寄存器
在这个板子中,含有两个方向寄存器,GPIO_SWPORT_DDR_L的低16位控制的是A0-B7的输入和输出,GPIO_SWPORT_DDR_H低16位控制的是C0-D7的输入输出。
 我们要控制C0其为输出的话,就需要将GPIO_SWPORT_DDR_H第一个位置(bit0 = 1)设置为1,为了写入该bit,要将bit16也置为1,即(0 << 1) | (16 << 1)
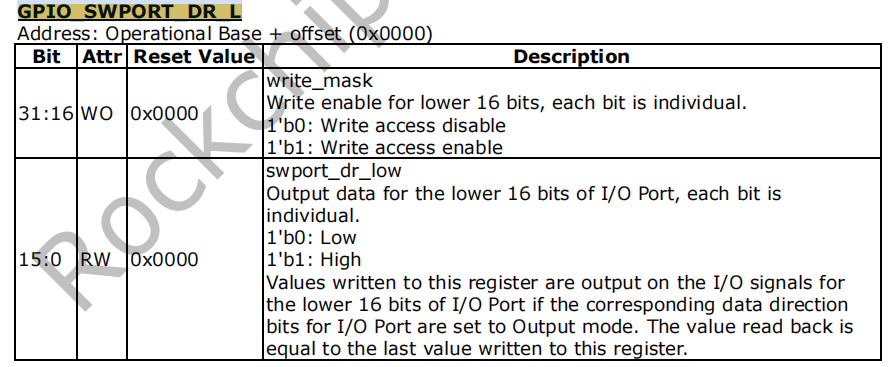
 设置完输入输出之后就可以控制引脚输出为高低电平了,同上述GPIO_SWPORT_DDR_寄存器一样,该寄存器也分为GPIO_SWPORT_DR_H和GPIO_SWPORT_DR_L,同理L控制A0-B7个引脚,H控制C0-D7个引脚。要设置C0输出为高电平,就需要将GPIO_SWPORT_DR_H第一个位置(bit0 = 1)设置为1,为了写入该bit,要将bit16也置为1,即(0 << 1) | (16 << 1)
如果之前设置GPIO为输入,要读取其引脚的信息,可以使用 GPIO_EXT_PORT寄存器。

RK系列的好像还需要设置引脚驱动能力,用到的是PMU_GRF_GPIO0C_DS_0这个寄存器,bit5:0 用于设置 GPIO0_C0 的驱动能力,一共有 6 级。
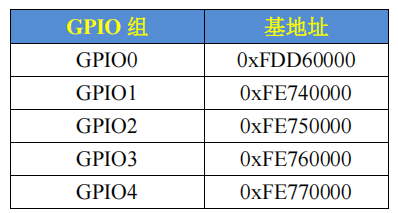
RK3568 GPIO基地址,每个寄存器的地址=基地址+偏移地址。
编写LED驱动程序
驱动程序不能直接使用物理地址,所以要使用ioremap函数进行映射成虚拟地址。之后直接使用虚拟地址来访问寄存器。
这里有个注意事项:要使用volatile(异变)来限定指针,原因是编辑器会去优化某些代码,但是对于硬件操作,这些是不能够去优化的。
这里贴出最简单的led_drv操作代码
cpp
static int major;
static struct class *led_class;

static volatile unsigned int *PMU_GRF_GPIO0C_IOMUX_L; /* IO复用 */
static volatile unsigned int *PMU_GRF_GPIO0C_DS_0;    /* 驱动level */
static volatile unsigned int *GPIO_SWPORT_DDR_H;      /* 输入 or 输出 */
static volatile unsigned int *GPIO_SWPORT_DR_H;       /* 输出高低电平 */

static led_write (struct file *file , const char __user *buf , size_t size , loff_t *offset)
{
    int val;
    int ret;
    /* copy_from_user */
    ret = copy_from_user(&val , buf , 1);
    /* to set gpio register: output 1/0 */
    if(val)
    {
        /* set gpio to let led on  高电平点亮LED*/
        ret = readl(GPIO_SWPORT_DR_H);
        ret &= ~(0x0 << 0);
        ret |= ((0x1 << 16) | (0x1 << 0));
        write(val , GPIO_SWPORT_DR_H);
    }
    else
    {
        /* set gpio to let led off */
        ret = readl(GPIO_SWPORT_DR_H);
        ret &= ~(0x0 << 0);
        ret |= ((0x1 << 16) | (0x0 << 0));
        write(val , GPIO_SWPORT_DR_H);
    }
    return 1;
}

static int led_open (struct inode *node , struct file *file);
{
    u32 val;
    printk("%s %s %d\n" , __FILE__ , __FUNCTION__ , __LINE__);
    /*enable gpio
     *configure pin as gpio  mode
     *configure gpio as output  dir
     */
    val = readl(PMU_GRF_GPIO0C_IOMUX_L);
    val &= ~(0x7 << 0); /* 0b0000 0111 , 取反就是1b 1111 1000 , bit2:0清零操作*/;
    val |= ((0x7 << 16) | (0x7 << 0));
    /* 高16位控制低16位的读写,-->bit18:16 为1 ,bit2:0可写 */
    writel(val , PMU_GRF_GPIO0C_IOMUX_L);

    /* gpio level */
    val = readl(PMU_GRF_GPIO0C_DS_0);
    val &= ~(0x3F << 0); /* 0b0011 1111 */
    val |= ((0x3F << 16) | (0x3F << 0));
    writel(val , PMU_GRF_GPIO0C_DS_0);

    /* output or input  output:1*/
    val = readl(GPIO_SWPORT_DDR_H);
    val &= ~(0x7 << 0); /* 0b0000 0111 */
    val |= ((0x7 << 16) | (0x7 << 0));
    writel(val , GPIO_SWPORT_DDR_H);

    return 0;
}

static int __init led_init(void)
{
    /* ioremap */
    PMU_GRF_GPIO0C_IOMUX_L = ioremap(0xFDC20010 , 4);

    PMU_GRF_GPIO0C_DS_0 = ioremap(0xFDC20090 , 4);

    GPIO_SWPORT_DDR_H = ioremap(0xFDD6000C , 4);

    GPIO_SWPORT_DR_H = ioremap(0xFDD60004 , 4);

    major = register(0 , "led_drv" , &fops);
    led_class = class_create(THIS_MODULE , "led_class");
    drivce_create(led_class , NULL , MKDEV(major , 0) , NULL , "led_drv"); /* /dev/led_drv             */
}

static void __exit led_exit(void)
{
    iounmap(PMU_GRF_GPIO0C_IOMUX_L);

    iounmap(PMU_GRF_GPIO0C_DS_0 );

    iounmap(GPIO_SWPORT_DDR_H );

    iounmap(GPIO_SWPORT_DR_H );

    device_destroy(led_class , MKDEV(major , 0));

    class_destroy(led_class);

    unregister_chrdev(major , "led_drv");
}

module_init(led_init);
module_exit(led_exit);
MODULE_LICENSE("GPL");
这里在操作寄存器的时候,韦东山老师的视频是*PMU_GRF_GPIO0C_IOMUX_L_PI &=~(0x7 << 0); *PMU_GRF_GPIO0C_IOMUX_L_PI |= ((0x7 << 16) | (0x0 << 0));这样的操作,但是原子的是
cpp
韦东山老师:
*PMU_GRF_GPIO0C_IOMUX_L_PI &=~(0x7 << 0);
*PMU_GRF_GPIO0C_IOMUX_L_PI |= ((0x7 << 16) | (0x0 << 0));
原子:
val = readl(PMU_GRF_GPIO0C_IOMUX_L_PI);
val &= ~(0X7 << 0); /* bit2:0,清零 */
val |= ((0X7 << 16) | (0X0 << 0));
writel(val, PMU_GRF_GPIO0C_IOMUX_L_PI);
led测试代码
cpp
#include <stdio.h>
#include <sys/types.h>
#include <sys/stat.h>
#include <fcntl.h>
#include <unistd.h>
#include <string.h>

/*use : ./ledtest /dev/led_drv on*/

int main(int argc , char *argv[])
{
    int fd;
    char status;
    if(argc != 3)
    {
        printf("Usage: %s <dev> <off | on>\n" , argv[0]);
        printf("eg. %s /dev/led_drv on\n" , argv[0]);
        return -1;
    }
    fd = open(argv[1] , O_RDWR);
    if(fd < 0)
    {
        printf("can not opne %s\n" , argv[1]);
        return -1;
    }
    if(strcmp(argv[2] , "on") == 0)
    {
        status = 1;
        write(fd , &status , 1);
    }else if(strcmp(argv[2] , "off") == 0)
    {
        status = 0;
        write(fd , &status , 1);
    }
    close(fd);

    return 0;
}
如果原始板子将LED设置成心跳灯,就看不清楚其作用,我们需要将心跳灯关闭
cpp
echo none > /sys/class/leds/heartbeat/trigger大框架(支持多个单板)
 实现原理
实现原理

使用面向对象的思想,将对LED灯的操作封装到一个结构体中(类似C++的类),不同单板只需各自写 board_xxx.c,实现自己的 init 和 ctl,然后替换或注册不同实现,在主驱动中只需根据配置或平台选择合适的 get_board_led_opr() 绑定对象,无需改动主驱动代码。
cpp
#ifndef __LED_OPR_H
#define __LED_OPR_H

struct fed_operations
{
    /* init */
    int (*init) (int which);
    /* ctl */
    int (*ctl) (int which , char status);
};

struct fed_operations *get_board_led_opr(void);

#endif
然后只需要在单板的代码中实现上述两个函数即可
cpp
#include <linux/gfp.h>
#include "led_opr.h"

static int board_demo_led_init(int which)
{
    printk("%s %s line :%d , led%d\n" , __FILE__ , __FUNCTION__ , __LINE__ , which);
    return 0;
}

static int board_demo_led_ctl(int which , char status)
{
    printk("%s %s line :%d , led%d , %s\n" , __FILE__ , __FUNCTION__ , __LINE__ , which , status ? "on" : "off");
    return 0;
}

static struct fed_operations board_demo_led_opr = {
    .init = board_demo_led_init,
    .ctl  = board_demo_led_ctl,
};

struct fed_operations *get_board_led_opr(void)
{
    return &board_demo_led_opr;
}
LED驱动代码(不具备硬件实现)
cpp
#include <linux/module.h>     // 最基本模块宏
#include <linux/kernel.h>     // printk
#include <linux/init.h>       // __init/__exit
#include <linux/fs.h>         // register_chrdev 等
#include <linux/uaccess.h>    // copy_to_user, copy_from_user
#include <linux/types.h>      // dev_t, bool 等类型
#include <linux/device.h>
#include "led_opr.h"

static int major = 0;

static struct class *myled_class;

struct fed_operations *p_led_opr;

/* funciton */

static ssize_t led_drv_read (struct file *file, char __user *buf , size_t size, loff_t * offset)
{
    //printk("%s %s %d\n" , __FILE__ , __FUNCTION__ , __LINE__);
    printk("read from drivers:%s %s\n" , __FILE__ , __FUNCTION__ );
    return 0;
}
/* write(fd , &val , 1) */
static ssize_t led_drv_write (struct file *file, const char __user *buf , size_t size, loff_t * offset)
{
    unsigned char status;
    unsigned int ret;

    struct inode * inode = file_inode(file);
    int minor = iminor(inode);
    // printk("%s %s %d\n" , __FILE__ , __FUNCTION__ , __LINE__);
    ret = copy_from_user(&status, buf, 1);

    /* minior and status  */
    p_led_opr->ctl(minor , status);
    return 1;
}

static int led_drv_open (struct inode *node, struct file *file)
{
    int minor = iminor(node);
    printk("%s %s %d\n" , __FILE__ , __FUNCTION__ , __LINE__);
    /* init LED */
    p_led_opr->init(minor);
    return 0;
}

static int led_drv_close (struct inode *node, struct file *file)
{
    // printk("%s %s %d\n" , __FILE__ , __FUNCTION__ , __LINE__);
    return 0;
}

/*  create struct file_operations */
static struct file_operations myled_drv =
{
    .owner          = THIS_MODULE,
    .open           = led_drv_open,
    .read           = led_drv_read,
    .write          = led_drv_write,
    .release        = led_drv_close,
};

/* register_chrdev */
static int __init led_init(void)
{
    major = register_chrdev(0 , "led_drv", &myled_drv);

    /* do not need mknod */
    myled_class = class_create(THIS_MODULE, "led_class");
    if (IS_ERR(myled_class)) {
		printk("failed to allocate class\n");
		unregister_chrdev(major, "led_class");
		return PTR_ERR(myled_class);
	}
    /* struct device *device_create(struct class *class, struct device *parent,
			     dev_t devt, void *drvdata, const char *fmt, ...) */

    device_create(myled_class , NULL , MKDEV(major, 0) , NULL , "myled"); /* create node /dev/myled */

    p_led_opr = get_board_led_opr();
    return 0;
}

/* entry function */
static void __exit  led_exit(void)
{
    /* distroy
    void device_destroy(struct class *class, dev_t devt)*/
    device_destroy(myled_class , MKDEV(major, 0));

    class_destroy(myled_class);

    unregister_chrdev(major, "led_drv");

    return;
}

module_init(led_init);
module_exit(led_exit);
MODULE_LICENSE("GPL");