目录
[1.wait 和 notify](#1.wait 和 notify)
[2.wait 和 sleep 的对比(面试题)](#2.wait 和 sleep 的对比(面试题))
[4.双重检查锁(DCL)(double cheak Lock)必须会写](#4.双重检查锁(DCL)(double cheak Lock)必须会写)
[3.1我们自己要实现一个定时器, 需要使用那些工作](#3.1我们自己要实现一个定时器, 需要使用那些工作)
[5.添加一些校验, 防止非法输入](#5.添加一些校验, 防止非法输入)
8.基于线程抢占式执行,由于CPU调度的问题产生的一系列现象
一、解决线程安全问题
1.wait 和 notify

++join 与 wait 的不同++

java
package demo3;

/**
 * 演示wait() 和 notify() 方法的使用
 * 创建两个线程,一个线程用来调用wait(),另一个用来调用notify()
 */
public class Text3 {
    public static void main(String[] args) {
        // 定义一个锁对象
        Object locker = new Object();

        // 创建调用wait() 的线程
        Thread t1 = new Thread(() -> {
            while (true) {
                synchronized (locker) {
                    // 执行线程的逻辑
                    // 如果没有满足线程所需要的数据,那么就等待
                    System.out.println("调用wait()之前...");
                    try {
                        locker.wait();
                    } catch (InterruptedException e) {
                        e.printStackTrace();
                    }
                }
                System.out.println("wait()唤醒之后...");
                System.out.println("=====================");
            }
        });

        Thread t2 = new Thread(() -> {
            while (true) {
                System.out.println("notifyAll()之前...");
                // 对等待的对象进行唤醒
                synchronized (locker) {
                    locker.notifyAll();
                }
                System.out.println("notiftyAll()之后...");
                try {
                    Thread.sleep(1000);
                } catch (InterruptedException e) {
                    e.printStackTrace();
                }
            }
        });

        // 启动线程
        t1.start();
        t2.start();


    }
}
/*
调用wait()之前...
notifyAll()之前...
notiftyAll()之后...
wait()唤醒之后...
=====================
调用wait()之前...
notifyAll()之前...
wait()唤醒之后...
=====================
调用wait()之前...
notiftyAll()之后...
notifyAll()之前...
wait()唤醒之后...
*/
wait与notify 必须配置synchronized一起使用,并且使用同一个锁对象

2.wait 和 sleep 的对比(面试题)

二、多线程案列
1.单例模式
1.1概念
在程序中一个类只需要有一个对象实例

JVM中类对象是全局唯一的,只有一个对象
类对象:.class文件被加载到JVM以后,会创建一个描述类结构的对象,称之为类对象,全局唯一
static关键字修饰的属性,在该类所有实例对象中共享
1.2实现过程
要实现单例类,只需要定义一个static修饰的变量,就可以保证这个变量全局唯一

1.饿汉模式
java
package demo3;

/**
 * 单例
 */

public class SingletonHungry {
    // 定义一个类的全局变量,用static修饰,保证全局唯一
    private static SingletonHungry instance = new SingletonHungry();

    // 构造方法私有化
    private SingletonHungry () {}

    // 提供一个公开方法放回instance对象
    public static SingletonHungry getInstance() {
        // 返回全局唯一的对象
        return instance;
    }
}


package demo3;

public class Text {
    public static void main(String[] args) {
//        // 获取第一个实例
//        SingletonHungry s1 = new SingletonHungry();
//        System.out.println(s1.getInstance());
//        // 获取第一个实例
//        SingletonHungry s2 = new SingletonHungry();
//        System.out.println(s2.getInstance());
//        // 获取第一个实例
//        SingletonHungry s3 = new SingletonHungry();
//        System.out.println(s3.getInstance());

        // 获取第一个实例
        SingletonHungry s1 = SingletonHungry.getInstance();
        System.out.println(s1.getInstance());
        // 获取二个实例
        SingletonHungry s2 = SingletonHungry.getInstance();
        System.out.println(s2.getInstance());
        // 获取第三个实例
        SingletonHungry s3 = SingletonHungry.getInstance();
        System.out.println(s3.getInstance());

    }
}


/*
demo3.Singleton@2f4d3709
demo3.Singleton@2f4d3709
demo3.Singleton@2f4d3709
*/
把这种类加载的时候就完成对象初始化的创建方式称为 "饿汉模式"

2.懒汉模式
java
package demo3;

public class SingletonLazy {
    // 定义一个全局变量
    private static SingletonLazy instance = null;

    // 构造方法私有化
    private SingletonLazy () {}

    /**
     * 对外提供一个获取对象的方法
     * @return
     */
    public static SingletonLazy getInstance() {
        if (instance == null) {
            // 创建对象
            instance = new SingletonLazy();
        }
        return instance;
    }
}

public class Text {
    public static void main(String[] args) {
        // 获取第一个实例
        SingletonLazy s1 = SingletonLazy.getInstance();
        System.out.println(s1.getInstance());
        // 获取二个实例
        SingletonLazy s2 = SingletonLazy.getInstance();
        System.out.println(s2.getInstance());
        // 获取第三个实例
        SingletonLazy s3 = SingletonLazy.getInstance();
        System.out.println(s3.getInstance());
    }
}
/*
demo3.SingletonLazy@2f4d3709
demo3.SingletonLazy@2f4d3709
demo3.SingletonLazy@2f4d3709
*/
3.测试在多线程环境中的运行结果
java
public class Text2 {
    public static void main(String[] args) {
        // 创建10个线程
        for (int i = 0; i < 10; i++) {
            Thread thread = new Thread(() -> {
                // 获取单例对象
                SingletonLazy instance = SingletonLazy.getInstance();
                // 打印对象结果
                System.out.println(instance);
            });
            // 启动线程
            thread.start();
        }
    }
}
/*
demo3.SingletonLazy@4c343a75
demo3.SingletonLazy@4c343a75
demo3.SingletonLazy@68052623
demo3.SingletonLazy@4c343a75
demo3.SingletonLazy@4c343a75
demo3.SingletonLazy@4c343a75
demo3.SingletonLazy@4c343a75
demo3.SingletonLazy@4c343a75
demo3.SingletonLazy@4c343a75
demo3.SingletonLazy@2cbd4b9c
*/
// 出现线程安全问题
java
public class SingletonLazy {
    // 定义一个全局变量
    private static SingletonLazy instance = null;

    // 构造方法私有化
    private SingletonLazy () {}

    /**
     * 对外提供一个获取对象的方法
     * @return
     */
    public static SingletonLazy getInstance() {
        // 锁加在外面
        synchronized (SingletonLazy.class) {
            if (instance == null) {
                // 创建对象
                instance = new SingletonLazy();
            }
        }
        return instance;
    }
}
写法存在的问题

4.双重检查锁(DCL)(double cheak Lock) 必须会写
java
public class SingletonLazy {
    // 定义一个全局变量
    private volatile static SingletonLazy instance = null;

    // 构造方法私有化
    private SingletonLazy () {}

    /**
     * 对外提供一个获取对象的方法
     * @return
     */
    public static SingletonLazy getInstance() {
        // 第一次判断是是否需要加锁
        if (instance == null) {
            // 锁加在外面
            synchronized (SingletonLazy.class) {
                if (instance == null) {
                    // 创建对象
                    instance = new SingletonLazy();
                }
            }
        }
        return instance;
    }
}

sleep()后再次进入cpu都会重新在主内存中加载变量
new 一个对象的步骤
1.在内存中申请一片空间
2.初始化对象的属性(赋初值)
3.把对象在内存中的首地址赋给对象的引用
1,3是强相关的关系 , 2并不强相关 就有可能发生重排序
为对象加volatile禁止指令重排序
工作中用饿汉式,面试中写DCL
2.阻塞队列
阻塞队列是⼀种特殊的队列. 也遵守 "先进先出" 的原则.
阻塞队列能是⼀种线程安全的数据结构, 并且具有以下特性:
• 当队列满的时候, 继续⼊队列就会阻塞, 直到有其他线程从队列中取⾛元素.
• 当队列空的时候, 继续出队列也会阻塞, 直到有其他线程往队列中插⼊元素.
阻塞队列的⼀个典型应⽤场景就是 "⽣产者消费者模型". 这是⼀种⾮常典型的开发模型.
生产者消费模型: 生产者是生产资源的, 消费者是消费资源的
java
import java.util.concurrent.BlockingQueue;
import java.util.concurrent.LinkedBlockingQueue;

public class Text02 {
    public static void main(String[] args) throws InterruptedException {
        // 创建一个阻塞队列
        BlockingQueue<Integer> queue = new LinkedBlockingQueue<>(3);
        // 向阻塞队列中添加元素
        queue.put(1);
        queue.put(2);
        queue.put(3);
        System.out.println("添加了三个元素...");
        queue.put(4);
        System.out.println("添加了四个元素..."); // 这句话打印不出来
    }
}
// 添加了三个元素...
java
import java.util.concurrent.BlockingQueue;
import java.util.concurrent.LinkedBlockingQueue;

public class Text02 {
    public static void main(String[] args) throws InterruptedException {
        // 创建一个阻塞队列
        BlockingQueue<Integer> queue = new LinkedBlockingQueue<>(3);
        // 向阻塞队列中添加元素
        queue.put(1);
        queue.put(2);
        queue.put(3);
        System.out.println("添加了三个元素...");
//        queue.put(4);
//        System.out.println("添加了四个元素..."); // 这句话打印不出来

        System.out.println(queue.take());
        System.out.println(queue.take());
        System.out.println(queue.take());
        System.out.println("已经取出来三个元素...");
        System.out.println(queue.take());
        System.out.println("已经取出来四个元素..."); // 这句话打印不出来
    }
}
/*
添加了三个元素...
1
2
3
已经取出来三个元素...
*/
2.1方法

2.2阻塞队列的应用场景
1.解耦

 生产消息的应用程序把消息写入消息队列(生产者)
使用消息的应用程序从消息队列中取出消息(消费者)
2.削峰填谷(流量)
平时业务程序很难应对流量暴增的情况,正常的流量可以满足,大流量的时,程序会申请很多线程,各种资源,最终服务器资源耗尽,被打爆
 针对流量暴增的时候使用消息队列来进行缓冲
3.异步操作
 同步: 发出请求后, 死等, 等到有响应返回在进行下一步操作
异步: 发出请求后, 就去干别的事, 当响应之后主动通知请求方
2.3实现一个阻塞队列
java
public class MyBlockingQueue {
    // 定义一个数组来存放数据 具体的容量由构造方法来决定
    private Integer[] elementData = null;
    // 定义头尾下标
    private volatile int head = 0;
    private volatile int tail = 0;
    // 定义数组中元素个数
    private volatile int size = 0;


    // 构造方法
    public MyBlockingQueue (int capacity) {
        if (capacity <= 0) {
            throw new RuntimeException("队列容量必须大于零...");
        }
        elementData = new Integer[capacity];
    }


    // 插入数据的方法
    public void put (Integer value) throws InterruptedException {
        synchronized (this) {

            // 判断队列是否已满
            while (size >= elementData.length) {
                // 阻塞队列在队列满的时候就应该阻塞等待
                // 等待
                this.wait();
            }

            // 插入数据的过程
            // 在队尾插入元素
            elementData[tail] = value;
            // 移动队尾下标
            tail++;
            // 处理队尾下标
            if (tail >= elementData.length) tail = 0;
            // 修改size值
            size++;
            // 唤醒阻塞线程
            this.notifyAll();
        }
    }


    // 获取数据的方法
    public synchronized Integer take () throws InterruptedException {
        // 判断数组是否为空
        while (size == 0) {
            this.wait();
        }

        // 出队的过程
        // 获取要出对的元素
        Integer value = elementData[head];
        // 移动对头下标
        head++;
        // 处理对头下标
        if (head >= elementData.length) head = 0;
        // 处理数组中的元素个数
        size--;
        // 唤醒阻塞等待的队列
        this.notifyAll();
        // 返回元素
        return value;
    }
}


public class Text01 {
    public static void main(String[] args) throws InterruptedException {
        // 创建阻塞队列
        MyBlockingQueue queue = new MyBlockingQueue(3);
        // 入队元素
        queue.put(1);
        queue.put(2);
        queue.put(3);
        System.out.println("已经入队了三个元素...");
//        queue.put(4);
//        System.out.println("已经入队了四个元素...");
        System.out.println(queue.take());
        System.out.println(queue.take());
        System.out.println(queue.take());
        System.out.println("已经取出了三个元素...");
        System.out.println(queue.take());
        System.out.println("已经取出四了个元素...");
    }
}
唤醒后会唤醒全部的线程, 可能会覆盖之前的元素
2.4阻塞队列实现生产者消费者模型
生产消息的应用程序把消息写入消息队列(生产者) 写入元素
使用消息的应用程序从消息队列中取出消息(消费者) 取出元素

java
package demo3;

import java.util.concurrent.TimeUnit;

public class Text02 {
    public static void main(String[] args) {
        // 定义一个阻塞队列
        MyBlockingQueue queue = new MyBlockingQueue(100);

        // 创建生产者线程
        Thread producer = new Thread(() -> {
            int num = 0;
            // 使用循环不停的向队列中添加元素, 直到队列容量占满
            while (true) {
                try {
                    // 添加元素
                    queue.put(num);
                    System.out.println("生产了元素: " + num);
                    num++;
                    // 休眠
                    TimeUnit.MICROSECONDS.sleep(1);
                } catch (InterruptedException e) {
                    e.printStackTrace();
                }
            }
        });
        // 启动
        producer.start();

        // 定义一个消费者线程
        Thread consumer = new Thread(() -> {
            while (true) {
                try {
                    Integer value = queue.take();
                    System.out.println("消费了元素: " + value);
                    TimeUnit.SECONDS.sleep(1);
                } catch (InterruptedException e) {
                    e.printStackTrace();
                }
            }
        });
        // 启动消费者线程
        consumer.start();
    }
}
3.定时器
1.闹钟
2.计时器
3.定时关机
java
package demo3;

import java.util.Timer;
import java.util.TimerTask;

public class Text03 {
    public static void main(String[] args) {
        // 使用JDK中提供的类, 创建一个定时器
        Timer timer = new Timer();

        // 向定时器中添加任务
        timer.schedule(new TimerTask() {
            @Override
            public void run() {
                System.out.println("该起床了...");
            }
        }, 1000);

        timer.schedule(new TimerTask() {
            @Override
            public void run() {
                System.out.println("任务2...");
            }
        }, 3000);

        timer.schedule(new TimerTask() {
            @Override
            public void run() {
                System.out.println("任务3...");
            }
        }, 5000);
    }
}
3.1我们自己要实现一个定时器, 需要使用那些工作

1.用一个类来描述任务和执行任务的时间
具体任务的逻辑用Runnable表示, 执行时间的可以用一个long型delay去表示

2.组织任务和时间的对象
可以用一个阻塞队列

3.提供一个方法,提交任务

4.要有一个线程执行任务

5.添加一些校验, 防止非法输入

6.解决long型会溢出的问题
 compateTo方法中涉及到高类型向低类型转换可以用比较的方式返回 -1 0 1
7.解决忙等问题


8.基于线程抢占式执行,由于CPU调度的问题产生的一系列现象
cpu调度的过程中可能会产生执行顺序的问题,或当一个线程执行到一半的时间被调度走的现象

造成这个现象的原因是take()时没有保证原子性


 在处理任务无法及时处理的问题时, 扩大了加锁的范围, 却又引入了更大的问题. 一般我们两害相全取其轻
为了解决无法及时执行任务的问题, 可以创建一个后台扫描线程, 只做唤醒操作, 定时一秒或者10毫秒, 唤醒一次
 不会影响前台线程, 随进程的结束而结束 这种处理方法, 首先保证了正常业务的运行, 又兼顾了小概率事件
9.完整代码
先实现, 再优化
java
package demo3;

import java.util.concurrent.BlockingQueue;
import java.util.concurrent.PriorityBlockingQueue;
import java.util.concurrent.TimeUnit;

/**
 * 自定义定时器
 */

public class MyTimer {
    // 用一个阻塞队列来组织任务
    private BlockingQueue<MyTask> queue = new PriorityBlockingQueue<>();
    private Object locker = new Object();

    public MyTimer() {
        // 创建扫描线程
        Thread thread = new Thread(() -> {
            // 不断地扫描线程队列中的任务
            while (true) {
                // 将锁放到take之前
//                synchronized (locker) {
                    try {
                        // 1. 从队列中取出任务
                        MyTask task = this.queue.take();
                        // 2. 判断到没到执行时间
                        long currentTime = System.currentTimeMillis();
                        if (currentTime >= task.getTime()) {
                            // 时间到了, 执行任务
                            task.getRunnable().run();
                        } else {
                            // 当前时间与任务执行的时间差
                            long waitTime = task.getTime() - currentTime;
                            // 没有到时间, 重新放回队列
                            queue.put(task);
                        // 等待时间
                            synchronized (locker) {
                                locker.wait(waitTime);
                            }
                        }
                    } catch (InterruptedException e) {
                        e.printStackTrace();
                    }
//                }
            }
        });
        // 启动线程, 真正的去系统中申请资源
        thread.start();

        // 创建一个后台线程
        Thread daemonThread = new Thread(() -> {
            while (true) {
                // 定时唤醒
                synchronized (locker) {
                    locker.notifyAll();
                }
                // 休眠一会
                try {
                    TimeUnit.MICROSECONDS.sleep(100);
                } catch (InterruptedException e) {
                    e.printStackTrace();
                }
            }
        });
        // 设置为后台线程
        daemonThread.setDaemon(true);
        // 启动线程
        daemonThread.start();
    }

    /**
     * 添加任务的方法
     *
     * @param runnable 任务
     * @param delay    延时
     * @throws InterruptedException
     */
    public void schedule(Runnable runnable, long delay) throws InterruptedException {
        // 根据传入的参数, 构造一个MyTask
        MyTask task = new MyTask(runnable, delay);
        // 把任务放入阻塞队列
        queue.put(task);
        // 等待唤醒的时间
        synchronized (locker) {
            locker.notifyAll();
        }
    }
}

// 用一个类来描述任务及任务执行的时间
class MyTask implements Comparable<MyTask> {
    // 任务
    private Runnable runnable;
    // 任务执行的时间
    private long time;

    public MyTask(Runnable runnable, long time) {
        // 校验任务不能为空
        if (runnable == null) {
            throw new IllegalArgumentException("任务不能为空...");
        }
        // 校验时间不能为负数
        if (time < 0) {
            throw new RuntimeException("时间不能为负数...");
        }
        this.runnable = runnable;
        this.time = time + System.currentTimeMillis();
    }

    public Runnable getRunnable() {
        return runnable;
    }

    public long getTime() {
        return time;
    }

    @Override
    public int compareTo(MyTask o) {
        // 返回小根堆
//        return (int) (this.time- o.getTime());
        if (this.getTime() > o.getTime()) return 1;
        else if (this.getTime() < o.getTime()) return -1;
        else return 0;
    }
}


package demo3;

public class Text01 {
    public static void main(String[] args) throws InterruptedException {
        MyTimer timer = new MyTimer();
        timer.schedule(() -> {
            System.out.println("马上执行任务一...");
        },0);
        timer.schedule(() -> {
            System.out.println("马上执行任务二...");
        },0);
        timer.schedule(() -> {
            System.out.println("马上执行任务三...");
        },0);
        timer.schedule(() -> {
            System.out.println("该起床了...");
        },1000);
        timer.schedule(() -> {
            System.out.println("洗漱...");
        },2000);
        timer.schedule(() -> {
            System.out.println("吃饭...");
        },3000);
    }
}
4.线程池
4.1线程池是什么
一次创建很多个线程,用的时候从池子里拿出一个来用,用完之后还回池子
4.2为什么要用线程池
避免了频繁创建销毁线程的开销
提升程序性能
DataSource数据源, 一开始初始化了很多个数据库连接, 当需要用连接的时候从池子中获取一个连接, 用完了还给池子,并不真正的销毁
线程池中的县城不停的扫描保存任务的集合, 当有任务的时候执行任务, 没有任务的时候阻塞等待, 但不是正真的销毁线程
4.3为什么用线程池可以提升效率
内核态 操作系统层面
用户态 JVM层面(应用程序层)

少创建 少销毁

4.4怎么用
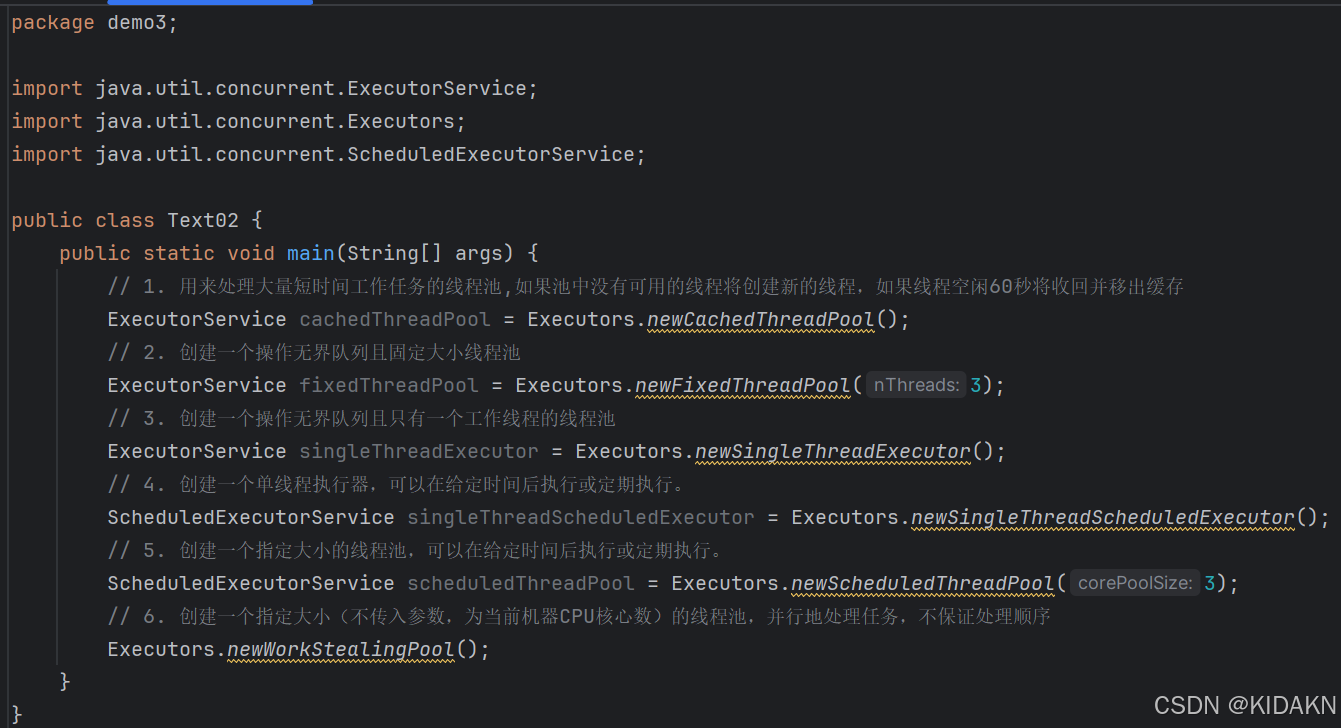
任务队列的容量没有限制 称之为无界队列
java
package demo3;

import java.util.concurrent.ExecutorService;
import java.util.concurrent.Executors;
import java.util.concurrent.TimeUnit;

public class Text03 {
    public static void main(String[] args) throws InterruptedException {
        // 创建一个线程池, 容量为3
        ExecutorService threadPool = Executors.newFixedThreadPool(3);
        // 向线程池中添加任务
        for (int i = 0; i < 10; i++) {
            int taskId = i + 1;
            threadPool.submit(() -> {
                // 通过submnit方法向线程池中添加任务
                System.out.println("执行任务: " + taskId + ", " + Thread.currentThread().getName());
            });
            if (taskId % 2 == 0) {
                // 休眠
                TimeUnit.SECONDS.sleep(1);
            }
        }
    }
}
工厂方法模式: 根据不同的业务需求定义不同的方法来获取对象
java
package demo3;

public class Text04 {
    public static void main(String[] args) {
        Student s1 = Student.crateStudentByAgeAndName(18, "张三");
        Student s2 = Student.crateStudentByClassIdAndName(1, "李四");
    }
}

/**
 * 定义一个Student类
 */
class Student {
    private int id;
    private int age;
    private int classId;
    private String name;
    private String sno;

    public Student() {
    }

//    // 通过age和name初始化一个对象
//    public Student (int age, String name) {
//        this.age = age;
//        this.name = name;
//    }
//
//    // 通过classId和name初始化一个对象
//    public Student (int classId, String name) {
//        this.classId = classId;
//        this.name = name;
//    }

    // 通过age和name初始化一个对象
    public static Student crateStudentByAgeAndName (int age, String name) {
        Student student = new Student();
        student.setAge(age);
        student.setName(name);
        return student;
    }

    // 通过classId和name初始化一个对象
    public static Student crateStudentByClassIdAndName (int classId, String name) {
        Student student = new Student();
        student.setClassId(classId);
        student.setName(name);
        return student;
    }

    public int getId() {
        return id;
    }

    public void setId(int id) {
        this.id = id;
    }

    public int getAge() {
        return age;
    }

    public void setAge(int age) {
        this.age = age;
    }

    public int getClassId() {
        return classId;
    }

    public void setClassId(int classId) {
        this.classId = classId;
    }

    public String getName() {
        return name;
    }

    public void setName(String name) {
        this.name = name;
    }

    public String getSno() {
        return sno;
    }

    public void setSno(String sno) {
        this.sno = sno;
    }
}
4.5实现一个线程池
线程池的作用: 用少量的线程执行大量的任务
1.用Runnable描述任务
2.组织管理任务可以使用一个队列, 可以用阻塞队列去实现
使用阻塞队列的好处 : 当队列中没有任务的时候就等待, 节省系统资源
3.提供一个队列中添加任务的方法
4.创建多个线程, 扫描队列中的任务, 有任务的时候取出来执行即可
java
package demo3;

import java.util.concurrent.BlockingQueue;
import java.util.concurrent.LinkedBlockingQueue;

public class MyThreadPool {
    // 定义一个阻塞队列来组织任务
    BlockingQueue<Runnable> queue = new LinkedBlockingQueue<>();
    public MyThreadPool (int threadNum) {
        if (threadNum == 0) {
            throw new IllegalArgumentException("线程数量必须大于零...");
        }
        for (int i = 0; i < threadNum; i++) {
            Thread thread = new Thread(() -> {
                // 不停的去扫描队列
                while (true) {
                    // 从队列中提取出任务
                    try {
                        Runnable runnable = queue.take();
                        // 执行任务
                        runnable.run();
                    } catch (InterruptedException e) {
                        e.printStackTrace();
                    }
                }
            });
            // 启动线程
            thread.start();
        }
    }
    /**
     * 提交任务到线程池
     * @param runnable 具体的任务
     * @throws InterruptedException
     */
    public void submit (Runnable runnable) throws InterruptedException {
        if (runnable == null) {
            throw new IllegalArgumentException("任务不能为空...");
        }
        // 把任务加入到队列
        queue.put(runnable);
    }

}

package demo3;

import java.util.concurrent.TimeUnit;

public class Text01 {
    public static void main(String[] args) throws InterruptedException {
        // 初始化自定义的线程池,
        MyThreadPool threadPool = new MyThreadPool(3);
        // 通过循环向线程池中添加任务
        for (int i = 0; i < 10; i++) {
            int taskId = i + 1;
            threadPool.submit(() -> {
                System.out.println("执行任务 : " + taskId + ", " +  Thread.currentThread().getName());
            });

            if (taskId % 2 == 0) {
                TimeUnit.SECONDS.sleep(1);
            }
        }
    }
}
4.6创建系统自带的线程池

java
package demo3;

import java.util.concurrent.LinkedBlockingQueue;
import java.util.concurrent.ThreadPoolExecutor;
import java.util.concurrent.TimeUnit;

public class Text02 {
    public static void main(String[] args) throws InterruptedException {
        ThreadPoolExecutor threadPool = new ThreadPoolExecutor(3,
                5, 1, TimeUnit.SECONDS,
                new LinkedBlockingQueue<>(10));
        // 通过循环向线程池中添加任务
        for (int i = 0; i < 10; i++) {
            int taskId = i + 1;
            threadPool.submit(() -> {
                System.out.println("执行任务 : " + taskId + ", " +  Thread.currentThread().getName());
            });

            if (taskId % 2 == 0) {
                TimeUnit.SECONDS.sleep(1);
            }
        }
    }
}
4.7线程池的工作原理
例子1: 
例子2:

4.8线程池流程图


4.9拒绝策略


1.直接拒绝
java
package demo3;

import java.util.concurrent.LinkedBlockingQueue;
import java.util.concurrent.ThreadPoolExecutor;
import java.util.concurrent.TimeUnit;

public class Text03 {
    public static void main(String[] args) throws InterruptedException {
        ThreadPoolExecutor threadPool = new ThreadPoolExecutor(3,
                5, 1, TimeUnit.SECONDS,
                new LinkedBlockingQueue<>(5),
                new ThreadPoolExecutor.AbortPolicy());
        // 通过循环向线程池中添加任务
        for (int i = 0; i < 100; i++) {
            int taskId = i + 1;
            threadPool.submit(() -> {
                System.out.println("执行任务 : " + taskId + ", " +  Thread.currentThread().getName());
            });
        }
    }
}
/*
Exception in thread "main" java.util.concurrent.RejectedExecutionException: Task java.util.concurrent.FutureTask@4edde6e5[Not completed, task = java.util.concurrent.Executors$RunnableAdapter@30dae81[Wrapped task = demo3.Text03$$Lambda/0x0000018a81003200@1b2c6ec2]] rejected from java.util.concurrent.ThreadPoolExecutor@34c45dca[Running, pool size = 5, active threads = 5, queued tasks = 5, completed tasks = 0]
	at java.base/java.util.concurrent.ThreadPoolExecutor$AbortPolicy.rejectedExecution(ThreadPoolExecutor.java:2081)
	at java.base/java.util.concurrent.ThreadPoolExecutor.reject(ThreadPoolExecutor.java:841)
	at java.base/java.util.concurrent.ThreadPoolExecutor.execute(ThreadPoolExecutor.java:1376)
	at java.base/java.util.concurrent.AbstractExecutorService.submit(AbstractExecutorService.java:123)
	at demo3.Text03.main(Text03.java:16)
执行任务 : 1, pool-1-thread-1
执行任务 : 10, pool-1-thread-5
执行任务 : 9, pool-1-thread-4
执行任务 : 4, pool-1-thread-5
执行任务 : 3, pool-1-thread-3
执行任务 : 8, pool-1-thread-3
执行任务 : 2, pool-1-thread-2
执行任务 : 5, pool-1-thread-1
执行任务 : 6, pool-1-thread-4
执行任务 : 7, pool-1-thread-5
*/
2.放弃目前最早的任务
java
package demo3;

import java.util.concurrent.LinkedBlockingQueue;
import java.util.concurrent.ThreadPoolExecutor;
import java.util.concurrent.TimeUnit;

public class Text04 {
    public static void main(String[] args) throws InterruptedException {
        ThreadPoolExecutor threadPool = new ThreadPoolExecutor(3,
                5, 1, TimeUnit.SECONDS,
                new LinkedBlockingQueue<>(5),
                new ThreadPoolExecutor.DiscardOldestPolicy());
        // 通过循环向线程池中添加任务
        for (int i = 0; i < 100; i++) {
            int taskId = i + 1;
            threadPool.submit(() -> {
                System.out.println("执行任务 : " + taskId + ", " +  Thread.currentThread().getName());
            });
        }
    }
}
/*
执行任务 : 9, pool-1-thread-4
执行任务 : 10, pool-1-thread-5
执行任务 : 2, pool-1-thread-2
执行任务 : 3, pool-1-thread-3
执行任务 : 1, pool-1-thread-1
执行任务 : 99, pool-1-thread-3
执行任务 : 96, pool-1-thread-4
执行任务 : 98, pool-1-thread-2
执行任务 : 97, pool-1-thread-5
执行任务 : 100, pool-1-thread-1
*/
3.返回新提交的任务
java
package demo3;

import java.util.concurrent.LinkedBlockingQueue;
import java.util.concurrent.ThreadPoolExecutor;
import java.util.concurrent.TimeUnit;

public class Text06 {
    public static void main(String[] args) throws InterruptedException {
        ThreadPoolExecutor threadPool = new ThreadPoolExecutor(3,
                5, 1, TimeUnit.SECONDS,
                new LinkedBlockingQueue<>(5),
                new ThreadPoolExecutor.DiscardPolicy());
        // 通过循环向线程池中添加任务
        for (int i = 0; i < 100; i++) {
            int taskId = i + 1;
            threadPool.submit(() -> {
                System.out.println("执行任务 : " + taskId + ", " +  Thread.currentThread().getName());
            });
        }
    }
}
/*
执行任务 : 9, pool-1-thread-4
执行任务 : 2, pool-1-thread-2
执行任务 : 1, pool-1-thread-1
执行任务 : 10, pool-1-thread-5
执行任务 : 3, pool-1-thread-3
执行任务 : 4, pool-1-thread-1
执行任务 : 5, pool-1-thread-4
执行任务 : 6, pool-1-thread-2
执行任务 : 7, pool-1-thread-5
执行任务 : 8, pool-1-thread-3

*/
4.返回给调用者
java
package demo3;

import java.util.concurrent.LinkedBlockingQueue;
import java.util.concurrent.ThreadPoolExecutor;
import java.util.concurrent.TimeUnit;

public class Text05 {
    public static void main(String[] args) throws InterruptedException {
        ThreadPoolExecutor threadPool = new ThreadPoolExecutor(3,
                5, 1, TimeUnit.SECONDS,
                new LinkedBlockingQueue<>(5),
                new ThreadPoolExecutor.CallerRunsPolicy());
        // 通过循环向线程池中添加任务
        for (int i = 0; i < 100; i++) {
            int taskId = i + 1;
            threadPool.submit(() -> {
                System.out.println("执行任务 : " + taskId + ", " +  Thread.currentThread().getName());
            });
        }
    }
}
/*
执行任务 : 11, main
执行任务 : 10, pool-1-thread-5
执行任务 : 1, pool-1-thread-1
执行任务 : 3, pool-1-thread-3
执行任务 : 4, pool-1-thread-1
执行任务 : 9, pool-1-thread-4
执行任务 : 2, pool-1-thread-2
执行任务 : 12, main
执行任务 : 5, pool-1-thread-5
执行任务 : 6, pool-1-thread-3
执行任务 : 14, pool-1-thread-2
执行任务 : 7, pool-1-thread-1
执行任务 : 15, pool-1-thread-3
执行任务 : 8, pool-1-thread-4
执行任务 : 13, pool-1-thread-5
执行任务 : 19, main
执行任务 : 16, pool-1-thread-2
执行任务 : 25, main
执行任务 : 17, pool-1-thread-1
执行任务 : 18, pool-1-thread-3
执行任务 : 20, pool-1-thread-4
执行任务 : 27, main
执行任务 : 21, pool-1-thread-2
执行任务 : 23, pool-1-thread-1
执行任务 : 22, pool-1-thread-5
执行任务 : 24, pool-1-thread-3
执行任务 : 26, pool-1-thread-4
执行任务 : 33, main
执行任务 : 28, pool-1-thread-2
执行任务 : 39, main
执行任务 : 29, pool-1-thread-1
执行任务 : 30, pool-1-thread-5
执行任务 : 31, pool-1-thread-3
执行任务 : 32, pool-1-thread-4
执行任务 : 34, pool-1-thread-2
执行任务 : 41, main
执行任务 : 35, pool-1-thread-1
执行任务 : 47, main
执行任务 : 36, pool-1-thread-5
执行任务 : 37, pool-1-thread-3
执行任务 : 38, pool-1-thread-4
执行任务 : 44, pool-1-thread-3
执行任务 : 40, pool-1-thread-2
执行任务 : 42, pool-1-thread-1
执行任务 : 49, main
执行任务 : 43, pool-1-thread-5
执行任务 : 55, main
执行任务 : 58, main
执行任务 : 50, pool-1-thread-1
执行任务 : 45, pool-1-thread-4
执行任务 : 46, pool-1-thread-3
执行任务 : 48, pool-1-thread-2
执行任务 : 54, pool-1-thread-3
执行任务 : 51, pool-1-thread-5
执行任务 : 57, pool-1-thread-3
执行任务 : 59, main
执行任务 : 52, pool-1-thread-1
执行任务 : 66, main
执行任务 : 53, pool-1-thread-4
执行任务 : 63, pool-1-thread-4
执行任务 : 56, pool-1-thread-2
执行任务 : 60, pool-1-thread-5
执行任务 : 65, pool-1-thread-2
执行任务 : 62, pool-1-thread-1
执行任务 : 61, pool-1-thread-3
执行任务 : 69, main
执行任务 : 64, pool-1-thread-4
执行任务 : 67, pool-1-thread-5
执行任务 : 68, pool-1-thread-2
执行任务 : 75, main
执行任务 : 70, pool-1-thread-1
执行任务 : 71, pool-1-thread-4
执行任务 : 72, pool-1-thread-3
执行任务 : 73, pool-1-thread-5
执行任务 : 74, pool-1-thread-2
执行任务 : 81, main
执行任务 : 76, pool-1-thread-1
执行任务 : 77, pool-1-thread-4
执行任务 : 78, pool-1-thread-3
执行任务 : 80, pool-1-thread-2
执行任务 : 79, pool-1-thread-5
执行任务 : 87, main
执行任务 : 82, pool-1-thread-1
执行任务 : 83, pool-1-thread-4
执行任务 : 84, pool-1-thread-3
执行任务 : 88, pool-1-thread-1
执行任务 : 85, pool-1-thread-2
执行任务 : 92, pool-1-thread-2
执行任务 : 86, pool-1-thread-5
执行任务 : 93, main
执行任务 : 89, pool-1-thread-3
执行任务 : 100, main
执行任务 : 95, pool-1-thread-3
执行任务 : 97, pool-1-thread-3
执行任务 : 90, pool-1-thread-4
执行任务 : 91, pool-1-thread-1
执行任务 : 94, pool-1-thread-2
执行任务 : 96, pool-1-thread-5
执行任务 : 98, pool-1-thread-3
执行任务 : 99, pool-1-thread-4
*/
三、wait和sleep的区别

