1.导入黑马商城
安装Mysql
配置那些文档有:https://b11et3un53m.feishu.cn/wiki/R4Sdwvo8Si4kilkSKfscgQX0niB
不好配docker镜像源的可以dd博主,这里不太好方便贴教程。
配置后端,文件里面记得修改自己的虚拟机地址
配置前端:启动nginx.exe就行 打开cmd窗口 start nginx.exe
此时:http://localhost:18080/ 进去看看
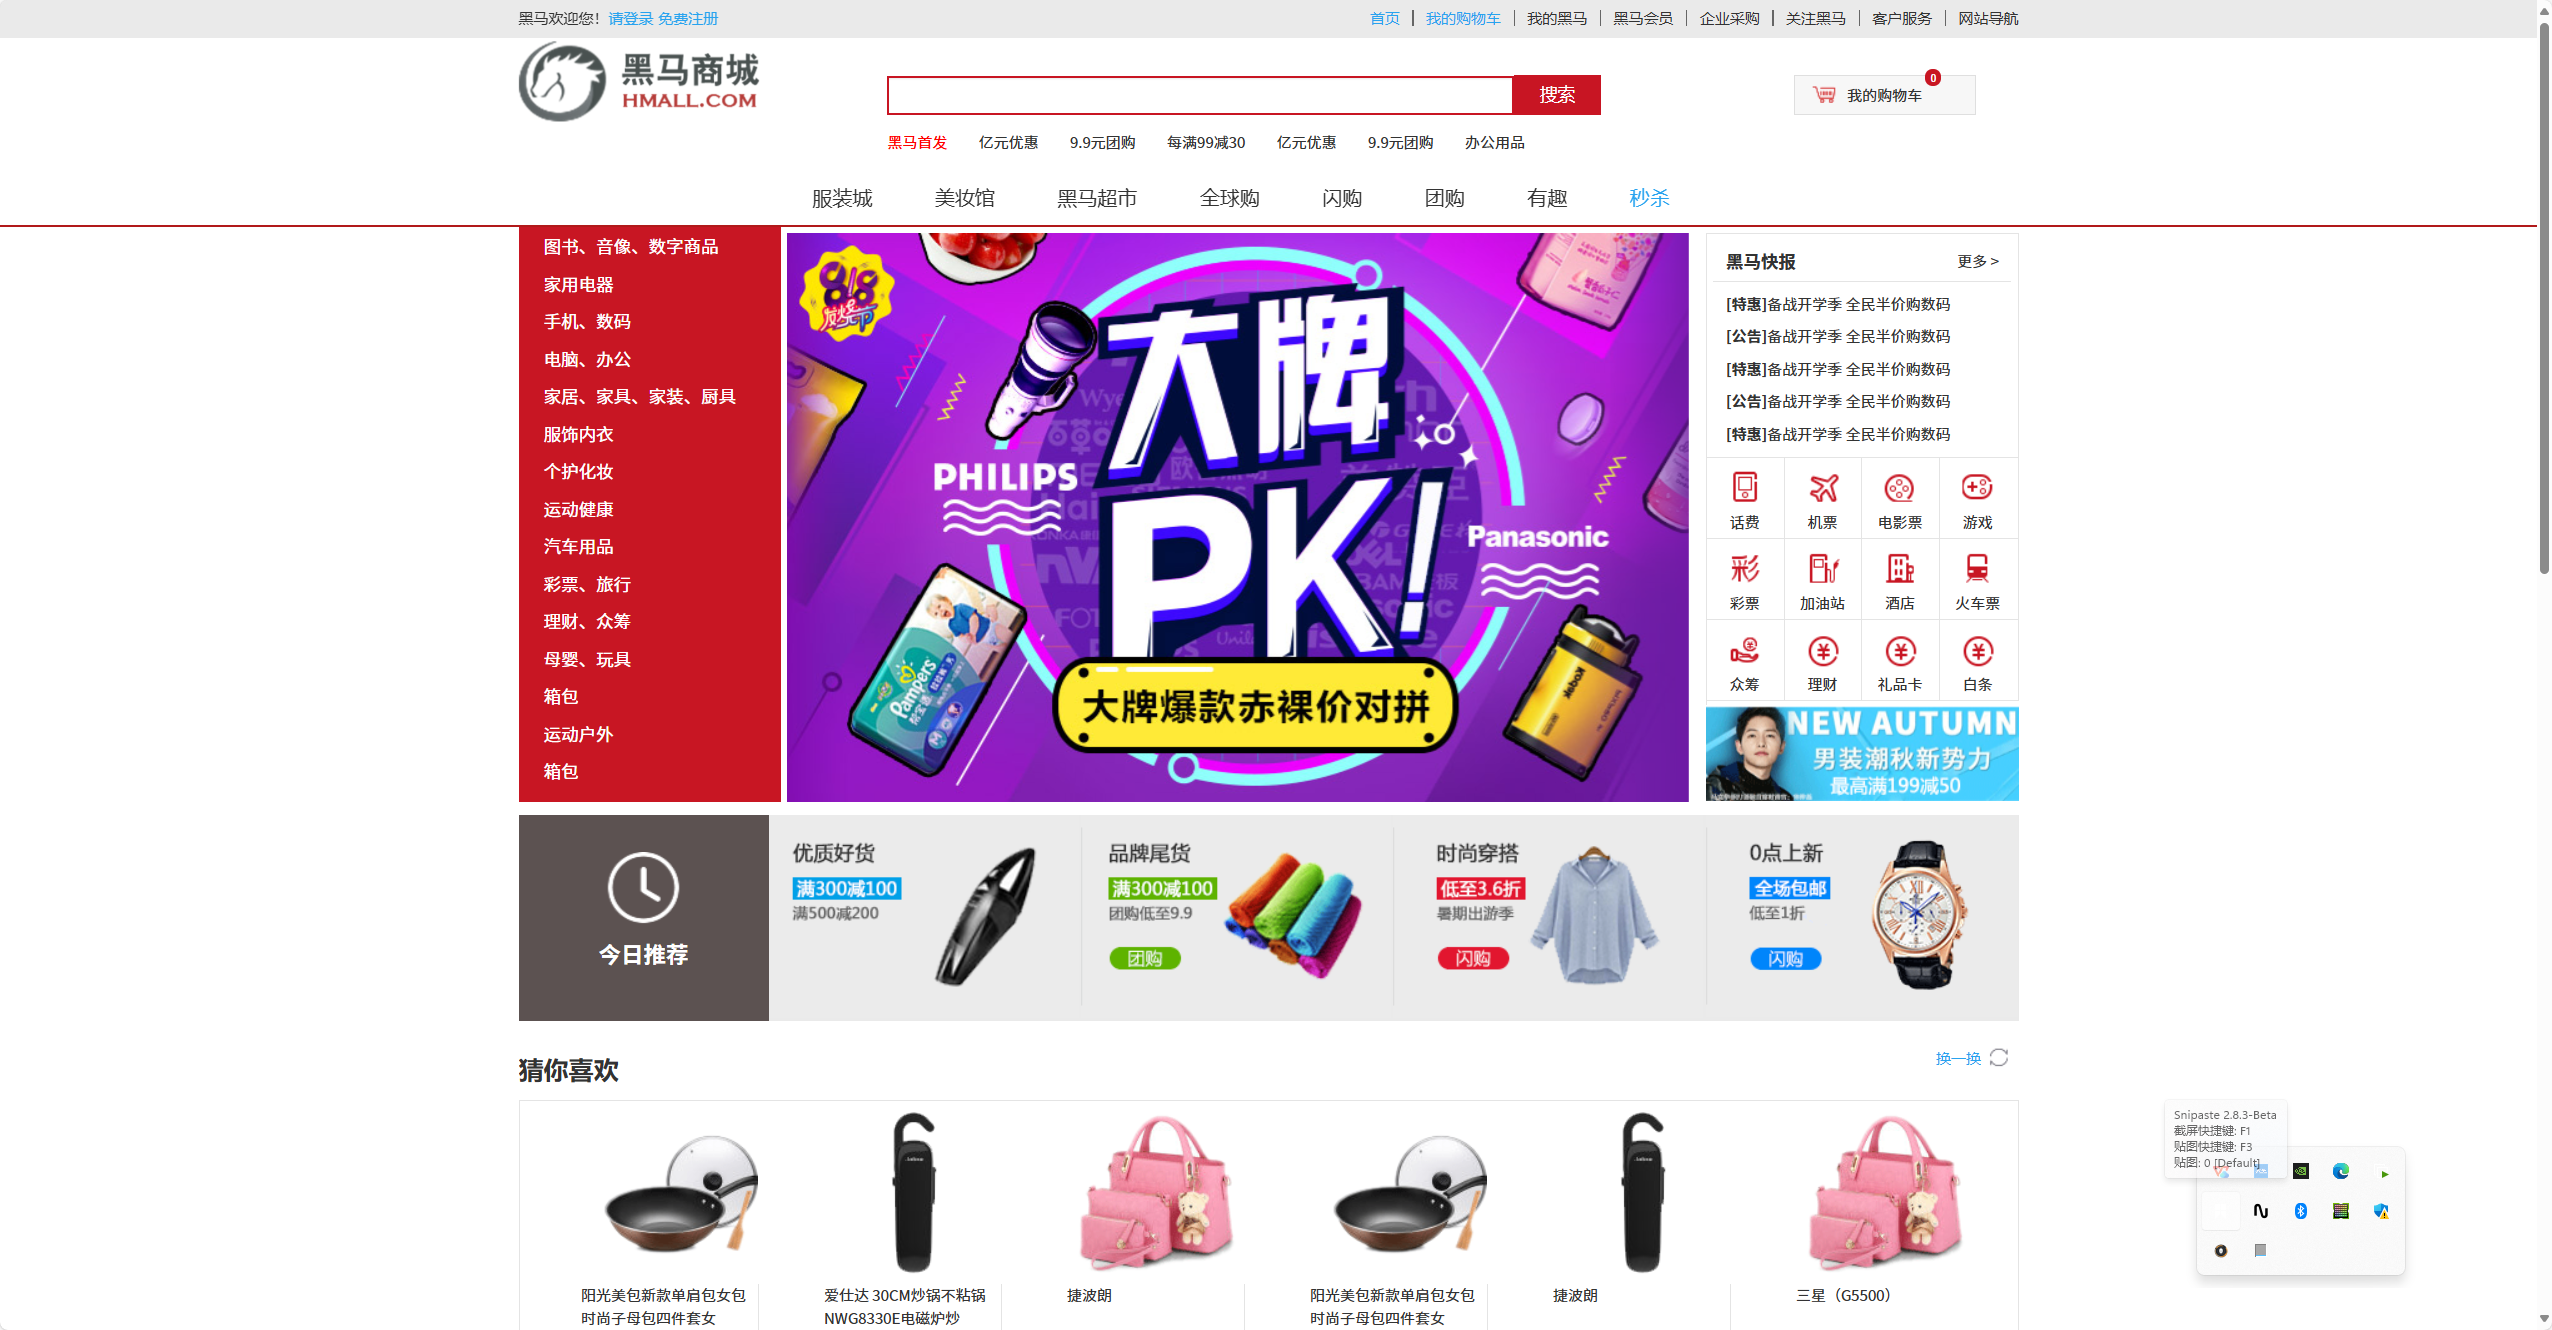
登录,输入账号密码即可,和视频一样 (jkd要11)
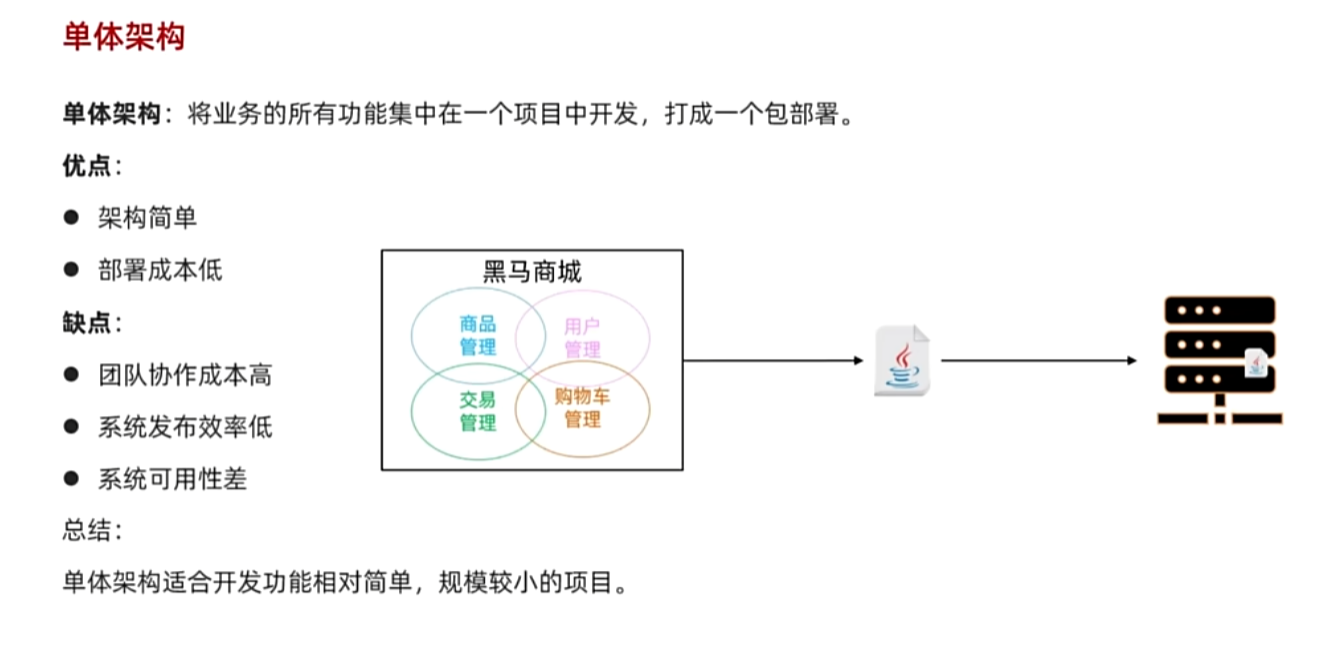
2. 单体架构
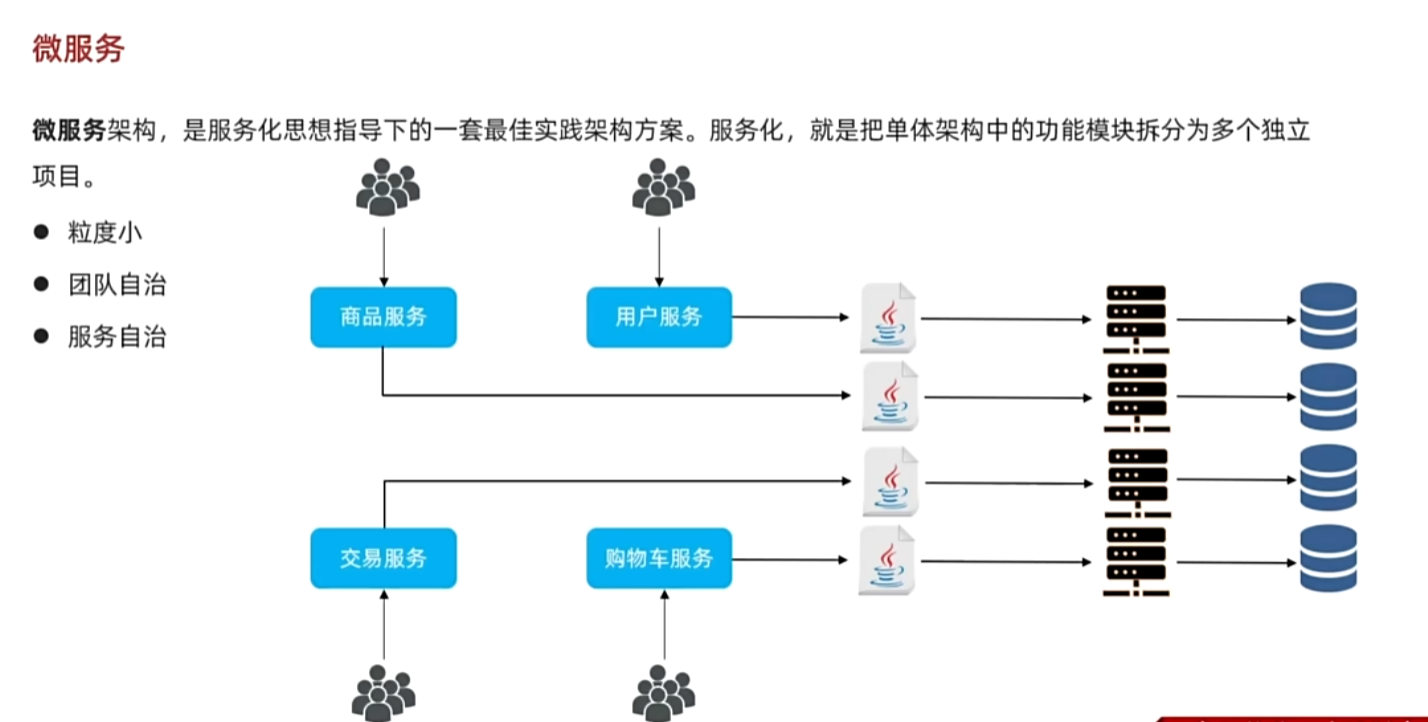
3. 微服务架构
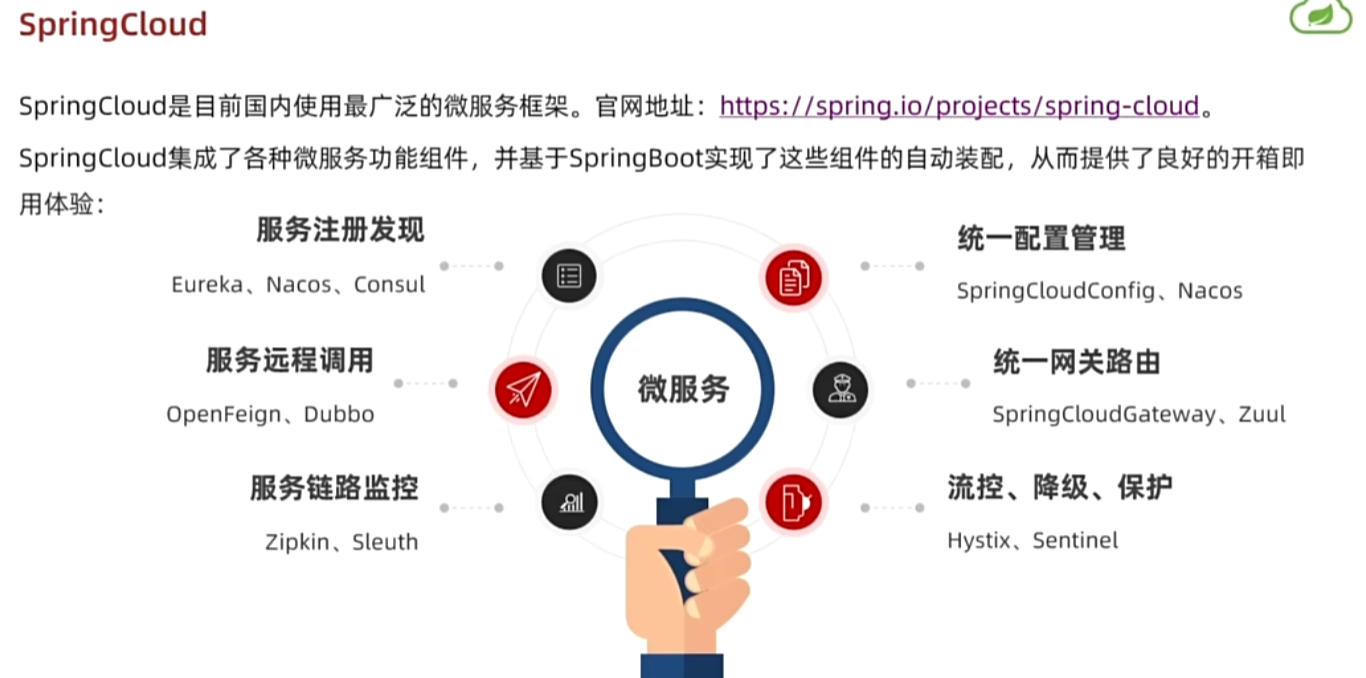
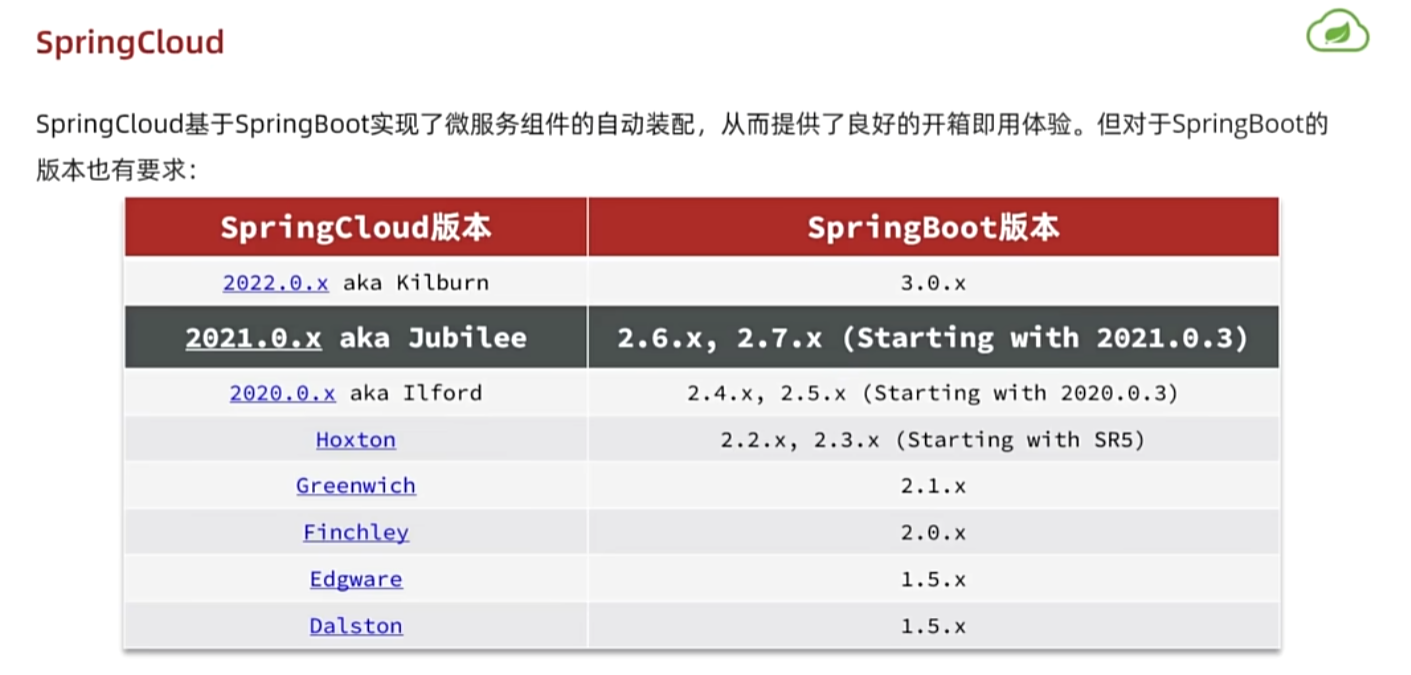
4. SpringCloud
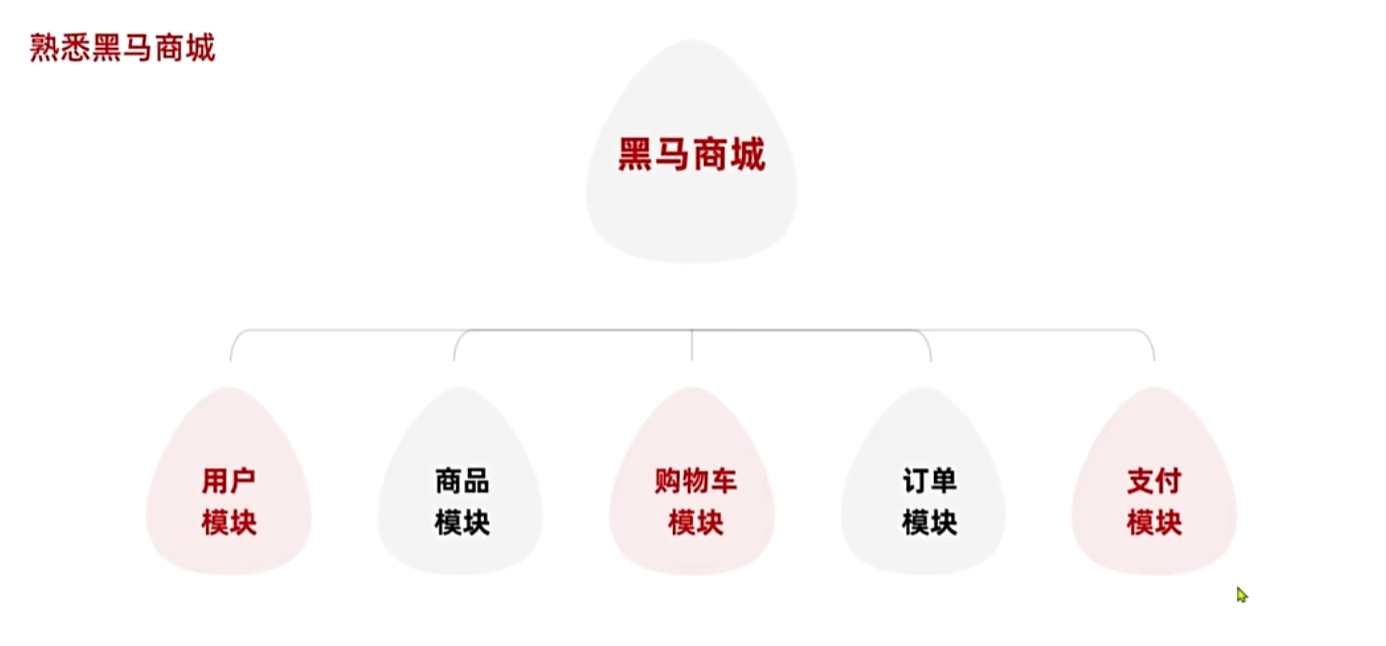
5. 熟悉黑马商城
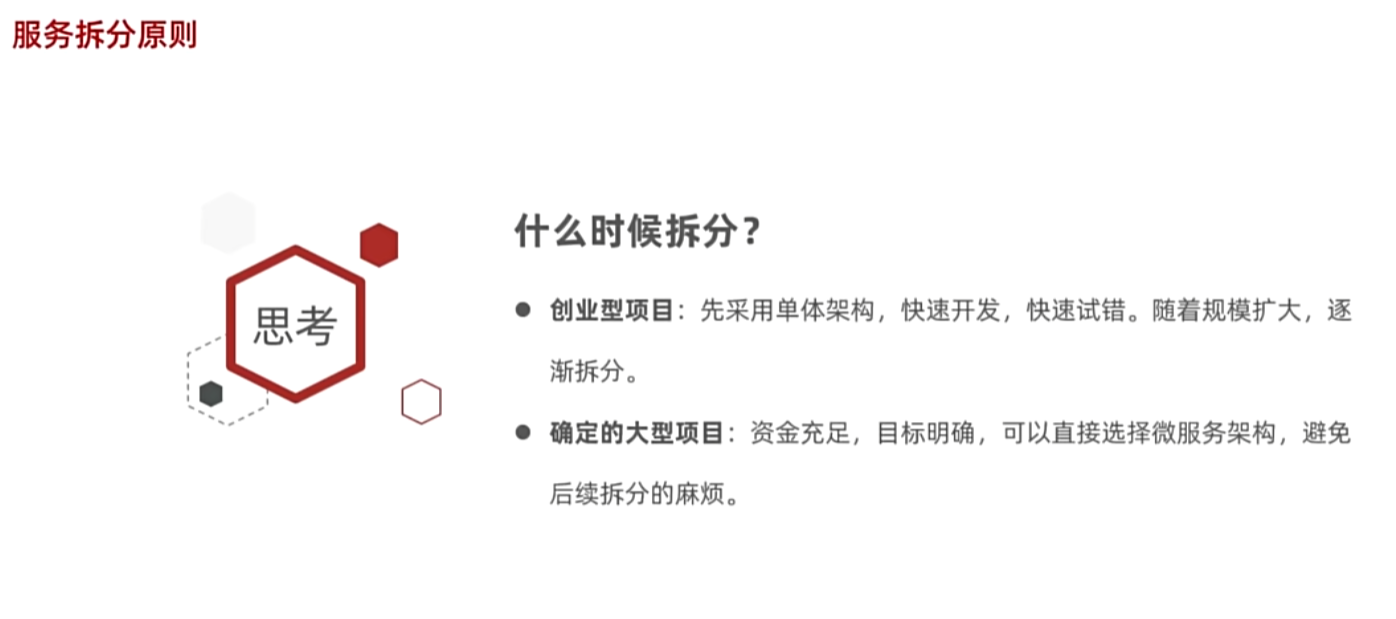
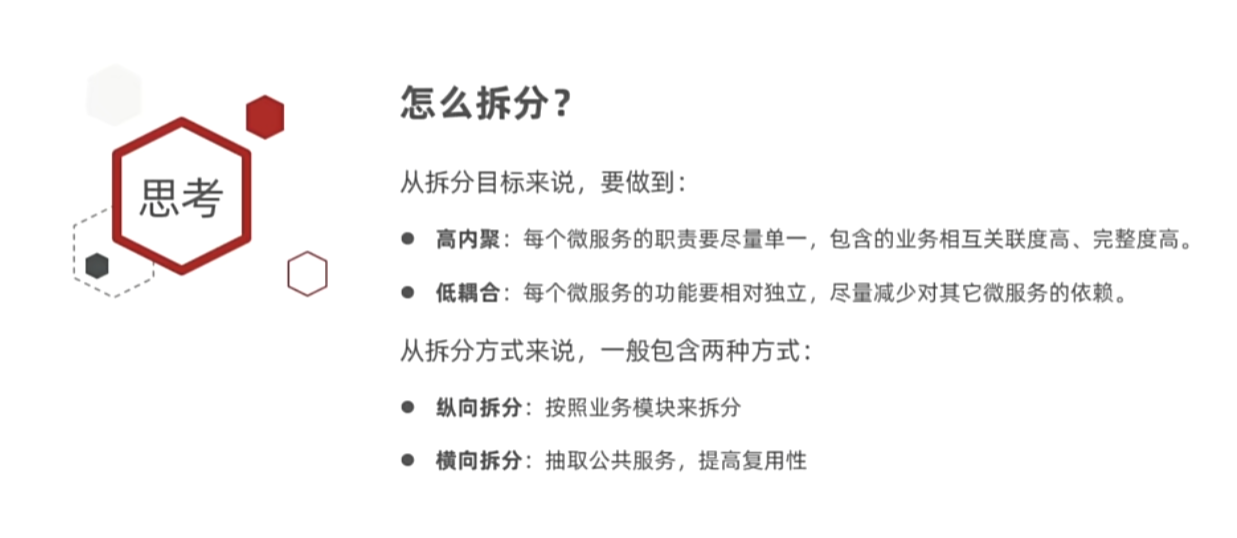
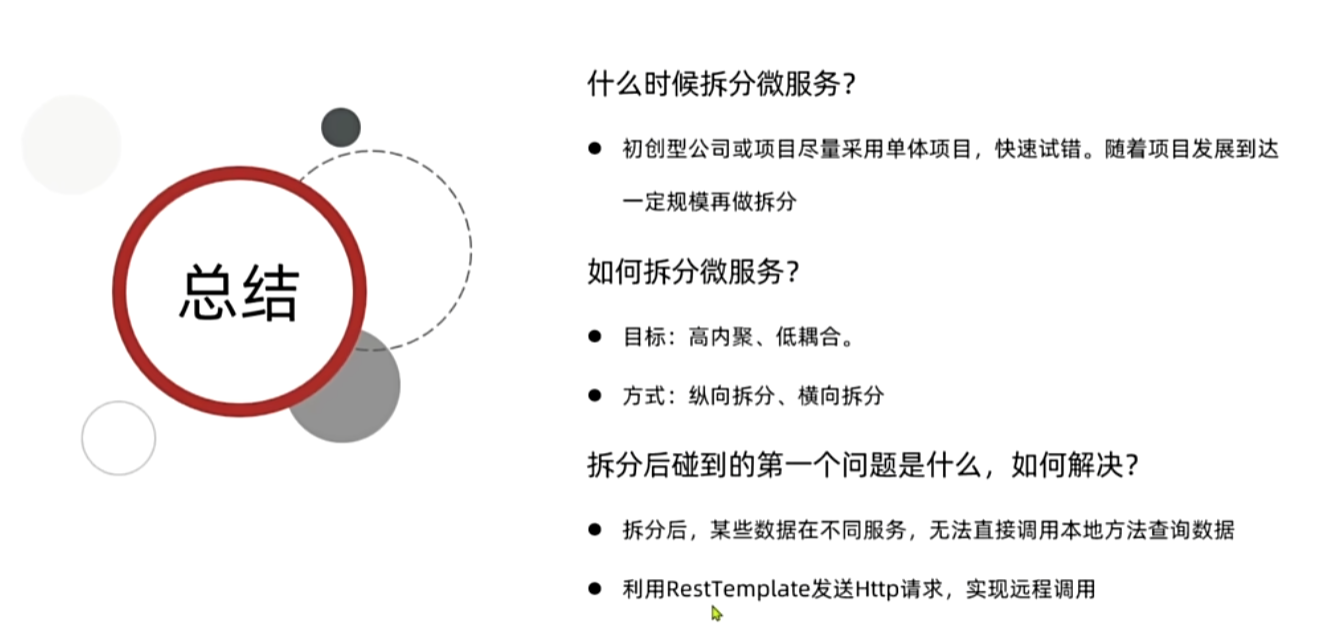
6. 拆分原则
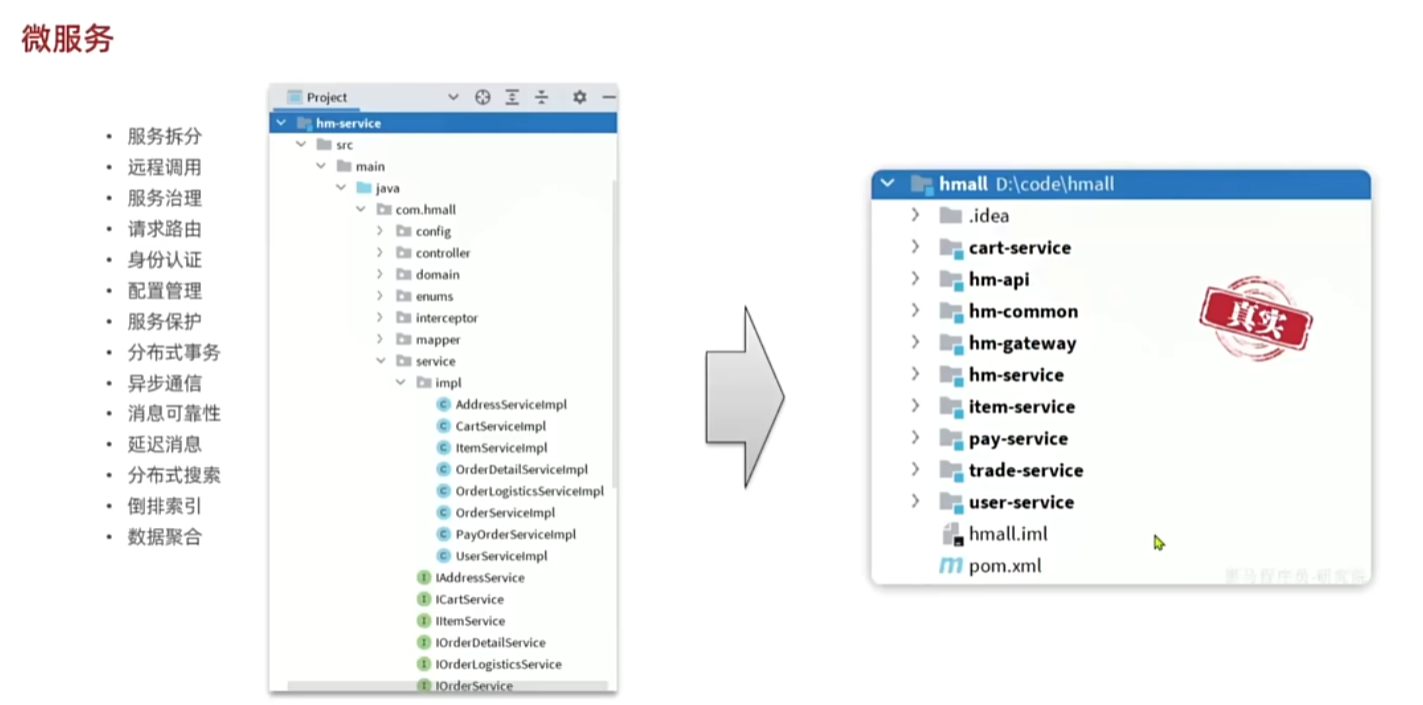
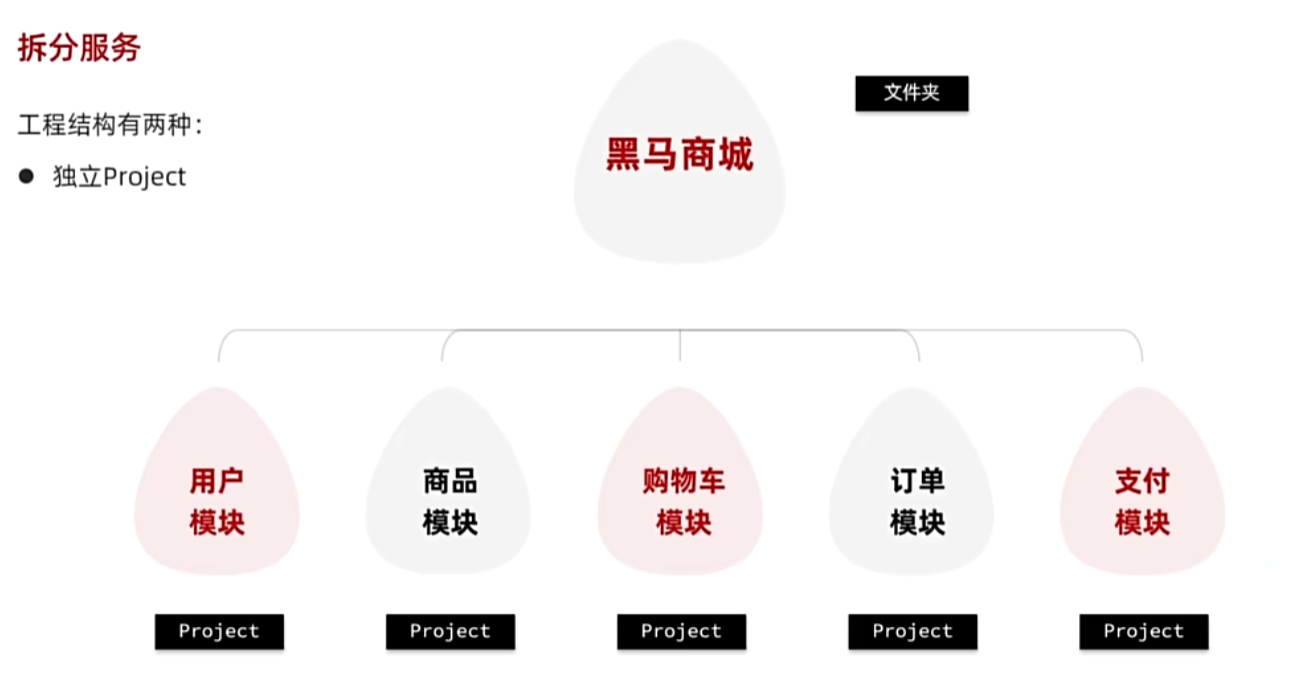
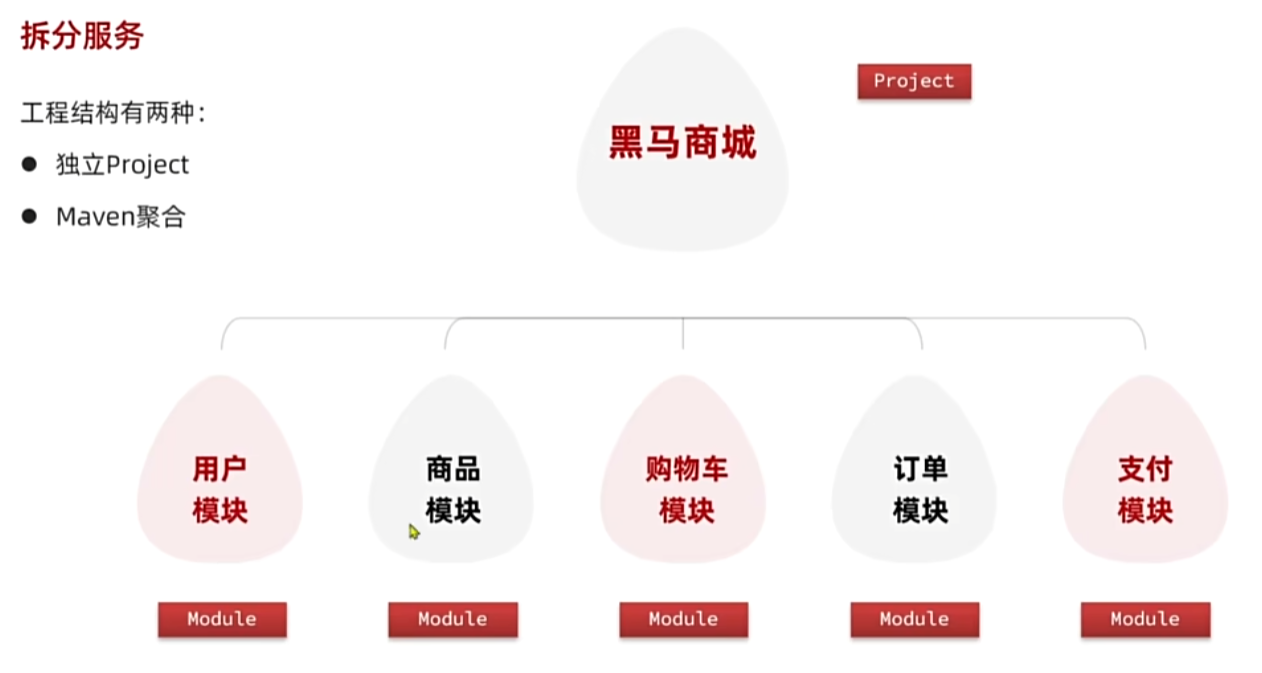
7. 微服务项目结构说明
8. 拆分商品服务
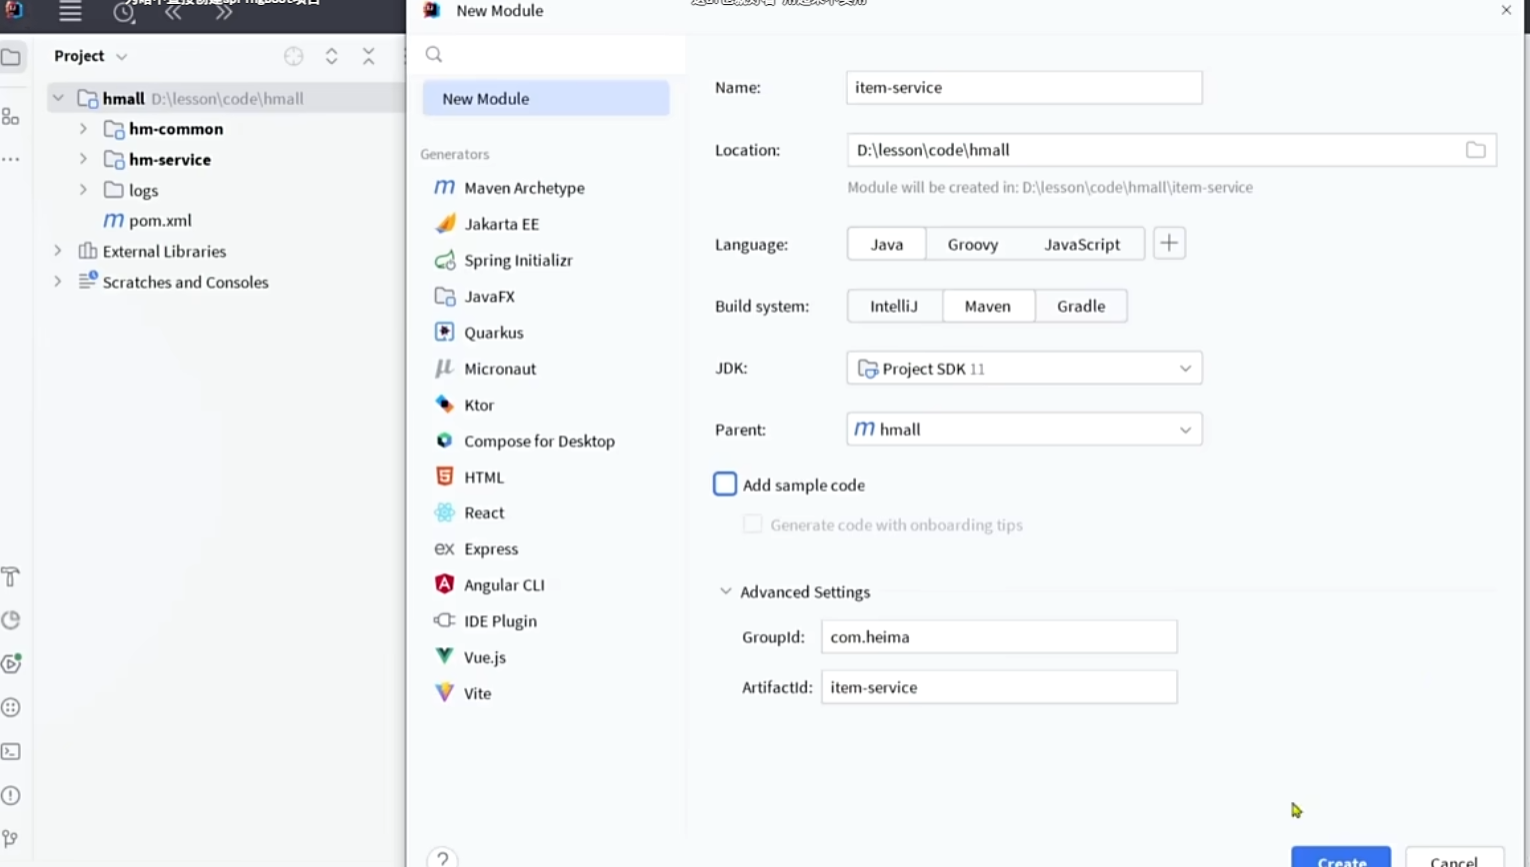
复制依赖
xml
<?xml version="1.0" encoding="UTF-8"?>
<project xmlns="http://maven.apache.org/POM/4.0.0"
         xmlns:xsi="http://www.w3.org/2001/XMLSchema-instance"
         xsi:schemaLocation="http://maven.apache.org/POM/4.0.0 http://maven.apache.org/xsd/maven-4.0.0.xsd">
    <parent>
        <artifactId>hmall</artifactId>
        <groupId>com.heima</groupId>
        <version>1.0.0</version>
    </parent>
    <modelVersion>4.0.0</modelVersion>

    <artifactId>item-service</artifactId>

    <properties>
        <maven.compiler.source>11</maven.compiler.source>
        <maven.compiler.target>11</maven.compiler.target>
    </properties>


    <dependencies>
        <!--common-->
        <dependency>
            <groupId>com.heima</groupId>
            <artifactId>hm-common</artifactId>
            <version>1.0.0</version>
        </dependency>
        <!--web-->
        <dependency>
            <groupId>org.springframework.boot</groupId>
            <artifactId>spring-boot-starter-web</artifactId>
        </dependency>
        <!--数据库-->
        <dependency>
            <groupId>mysql</groupId>
            <artifactId>mysql-connector-java</artifactId>
        </dependency>
        <!--mybatis-->
        <dependency>
            <groupId>com.baomidou</groupId>
            <artifactId>mybatis-plus-boot-starter</artifactId>
        </dependency>
        <!--单元测试-->
        <dependency>
            <groupId>org.springframework.boot</groupId>
            <artifactId>spring-boot-starter-test</artifactId>
        </dependency>
    </dependencies>
    <build>
        <finalName>${project.artifactId}</finalName>
        <plugins>
            <plugin>
                <groupId>org.springframework.boot</groupId>
                <artifactId>spring-boot-maven-plugin</artifactId>
            </plugin>
        </plugins>
    </build>
</project>
复制配置文件,新建数据库
yaml
server:
port: 8081
spring:
application:
name: item-service
profiles:
active: dev
datasource:
url: jdbc:mysql://${hm.db.host}:3306/hm-item?useUnicode=true&characterEncoding=UTF-8&autoReconnect=true&serverTimezone=Asia/Shanghai
driver-class-name: com.mysql.cj.jdbc.Driver
username: root
password: ${hm.db.pw}
mybatis-plus:
configuration:
default-enum-type-handler: com.baomidou.mybatisplus.core.handlers.MybatisEnumTypeHandler
global-config:
db-config:
update-strategy: not_null
id-type: auto
logging:
level:
com.hmall: debug
pattern:
dateformat: HH:mm:ss:SSS
file:
path: "logs/${spring.application.name}"
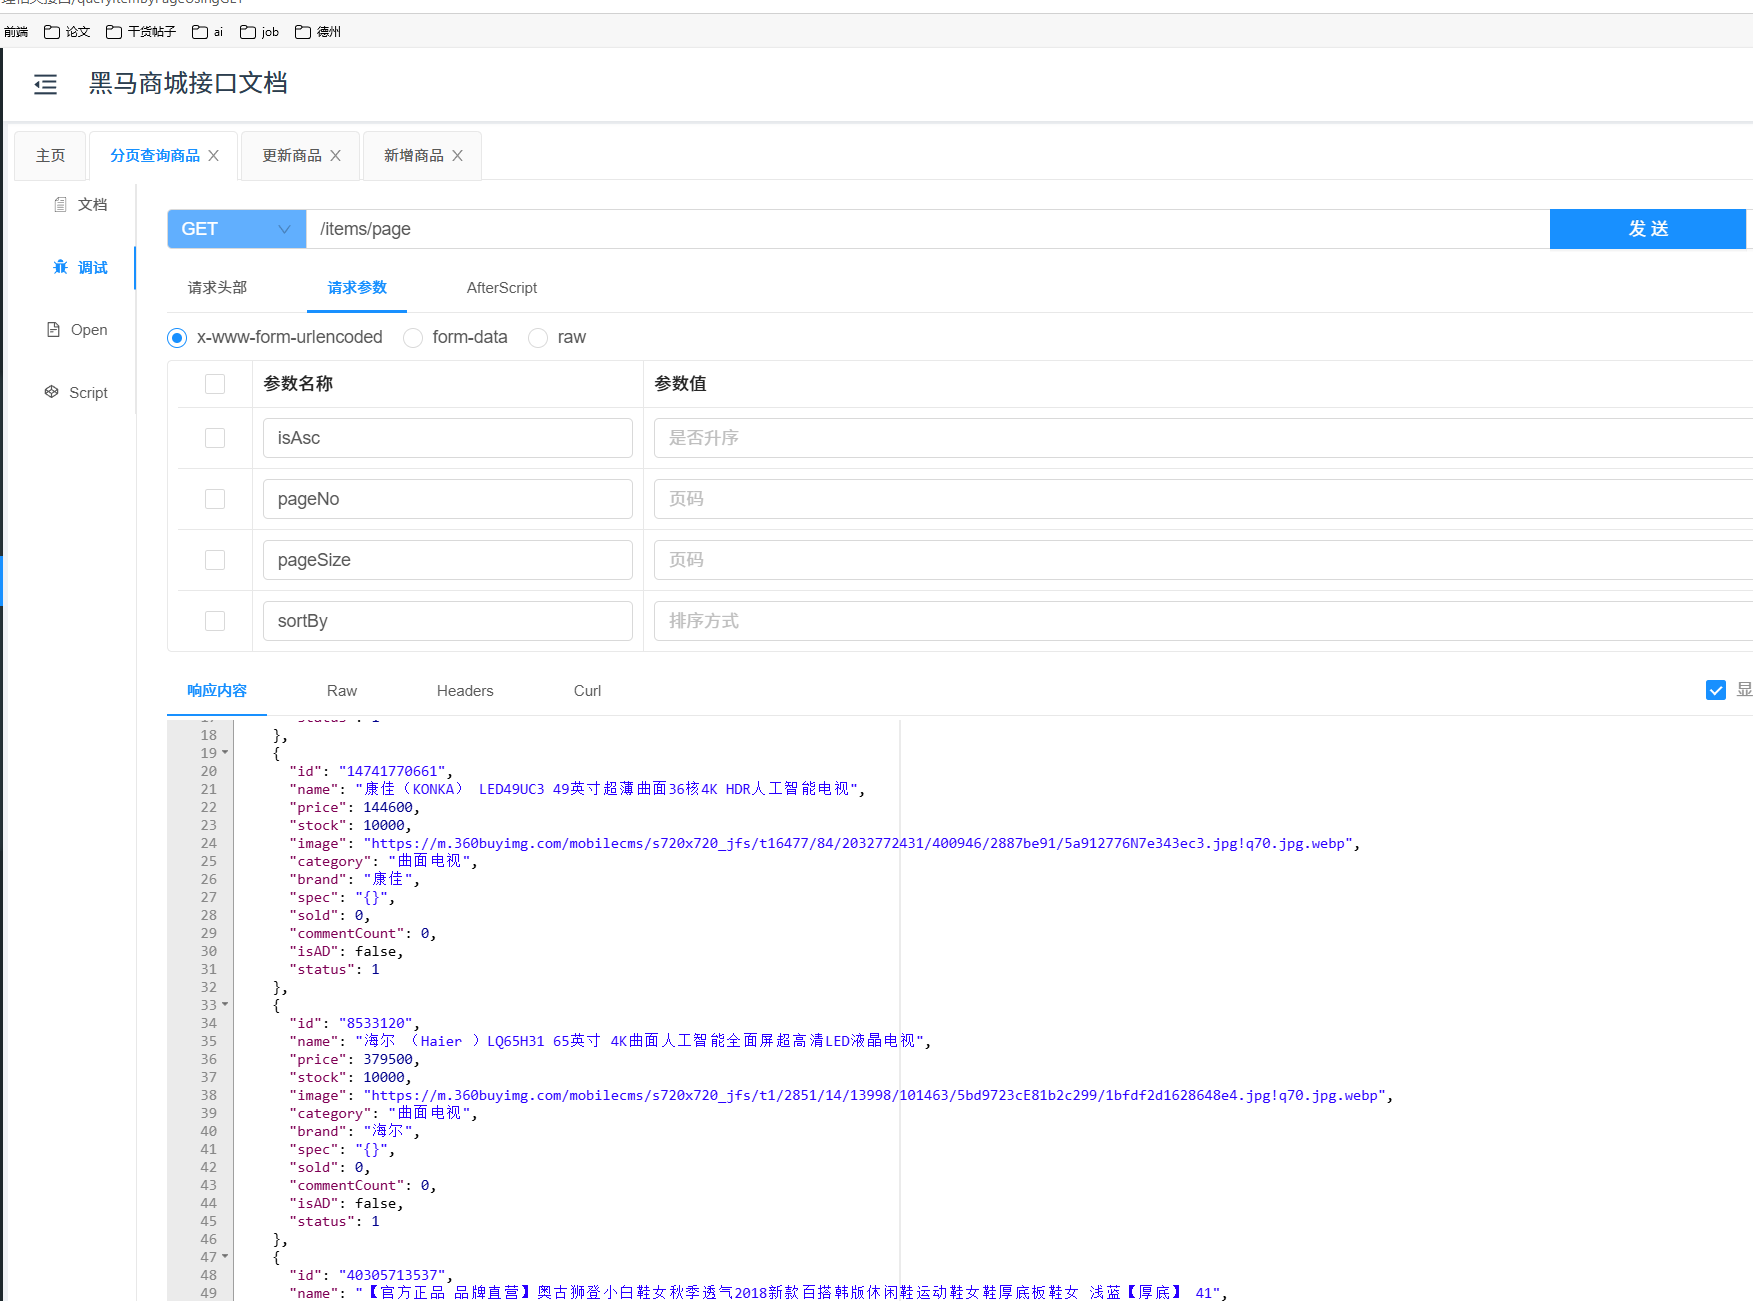
knife4j:
enable: true
openapi:
title: 黑马商品接口文档
description: "黑马商品接口文档"
email: zhanghuyi@itcast.cn
concat: 虎哥
url: https://www.itcast.cn
version: v1.0.0
group:
default:
group-name: default
api-rule: package
api-rule-resources:
- com.hmall.item.controller
# keytool -genkeypair -alias hmall -keyalg RSA -keypass hmall123 -keystore hmall.jks -storepass hmall123复制相关层的代码
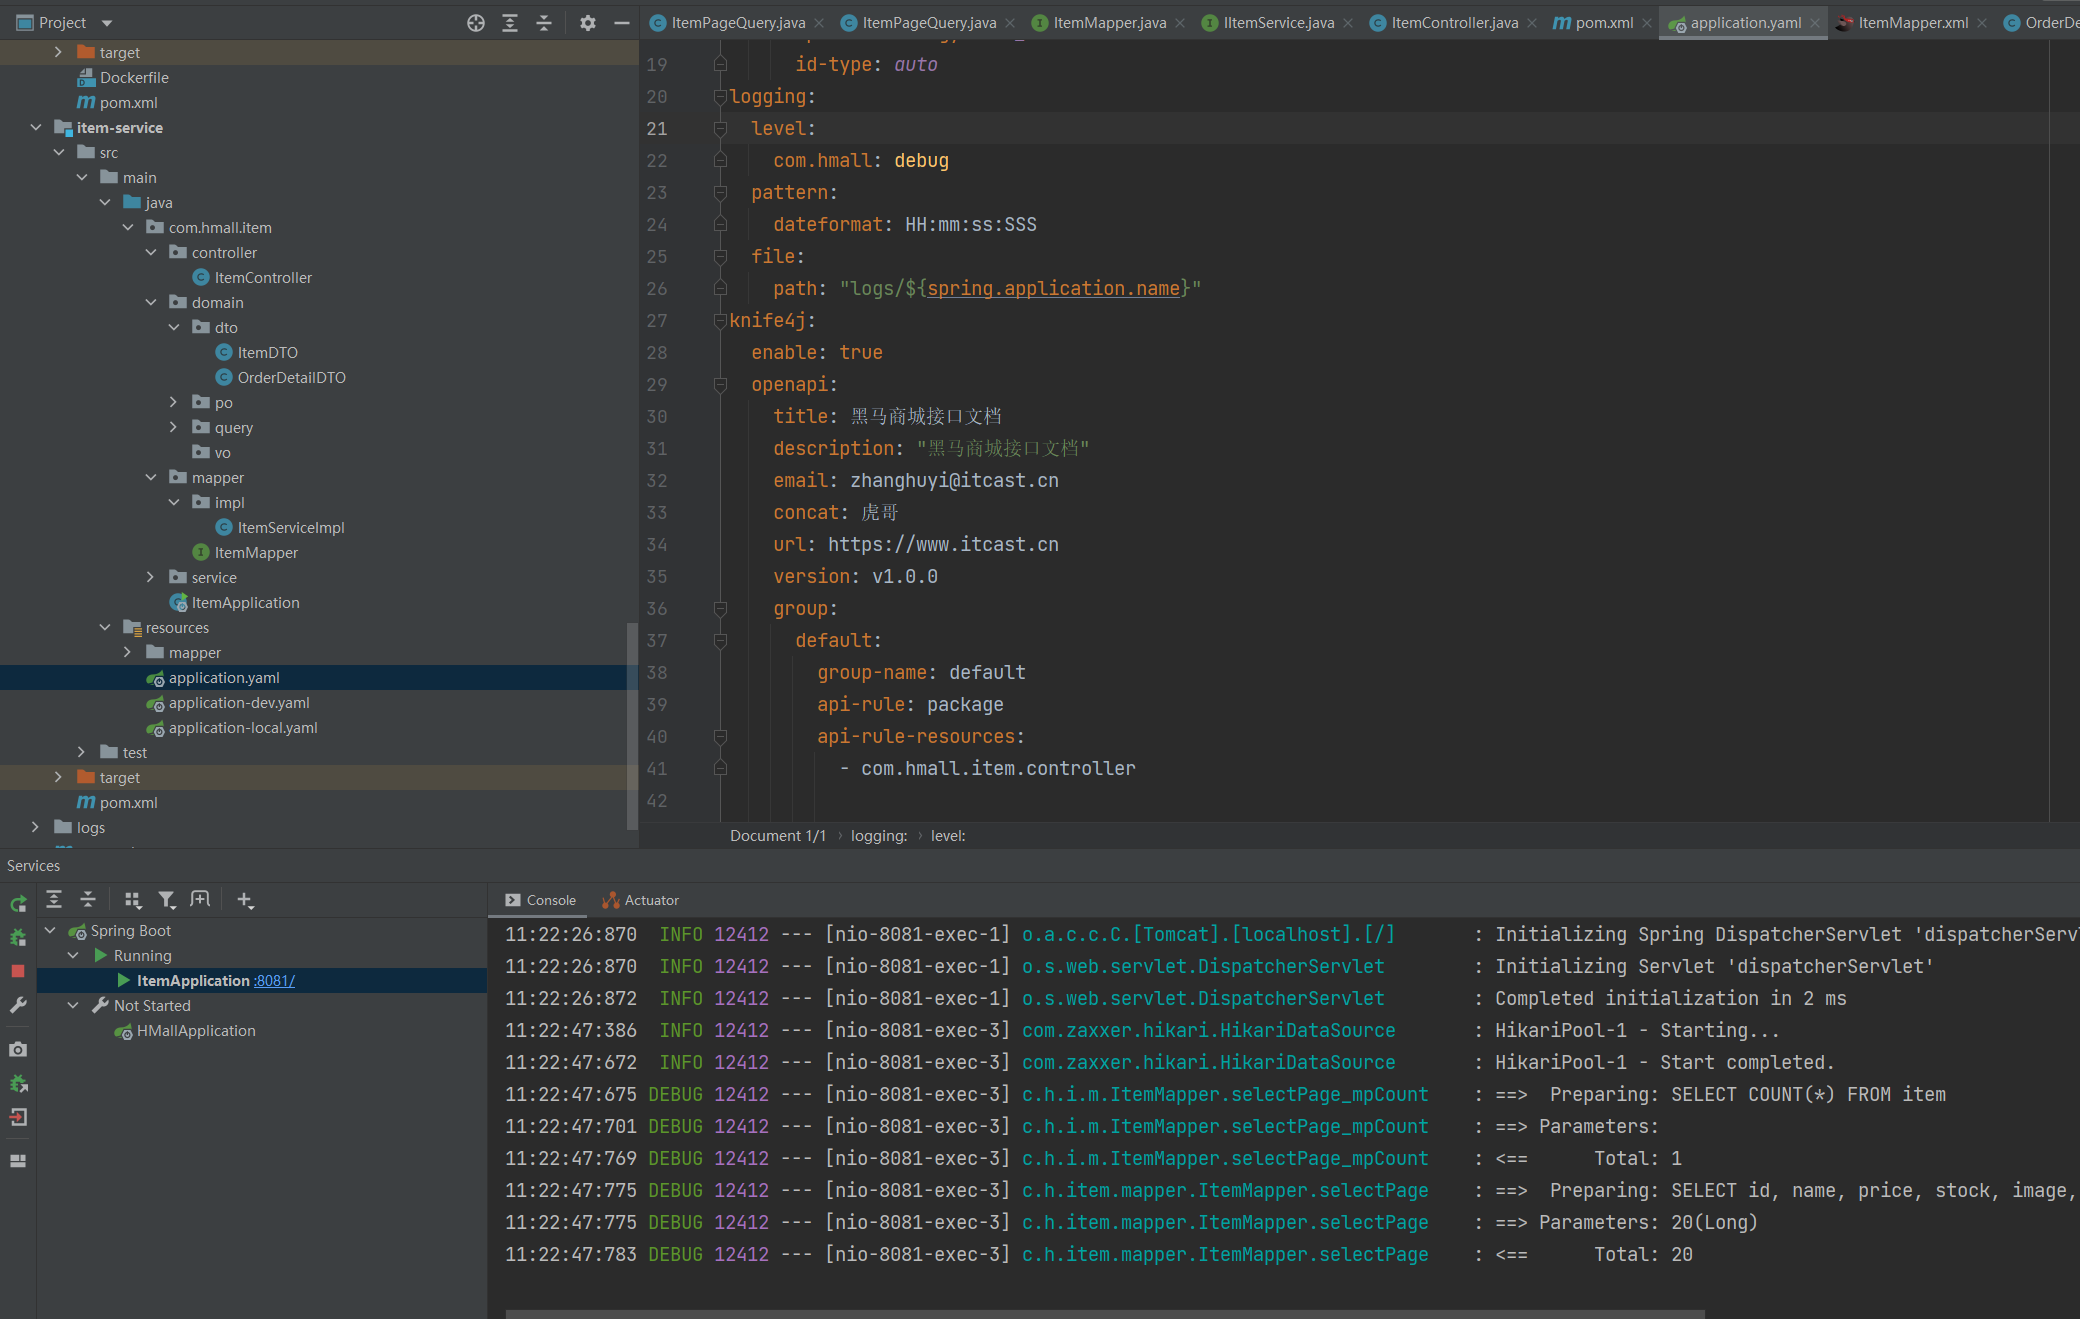
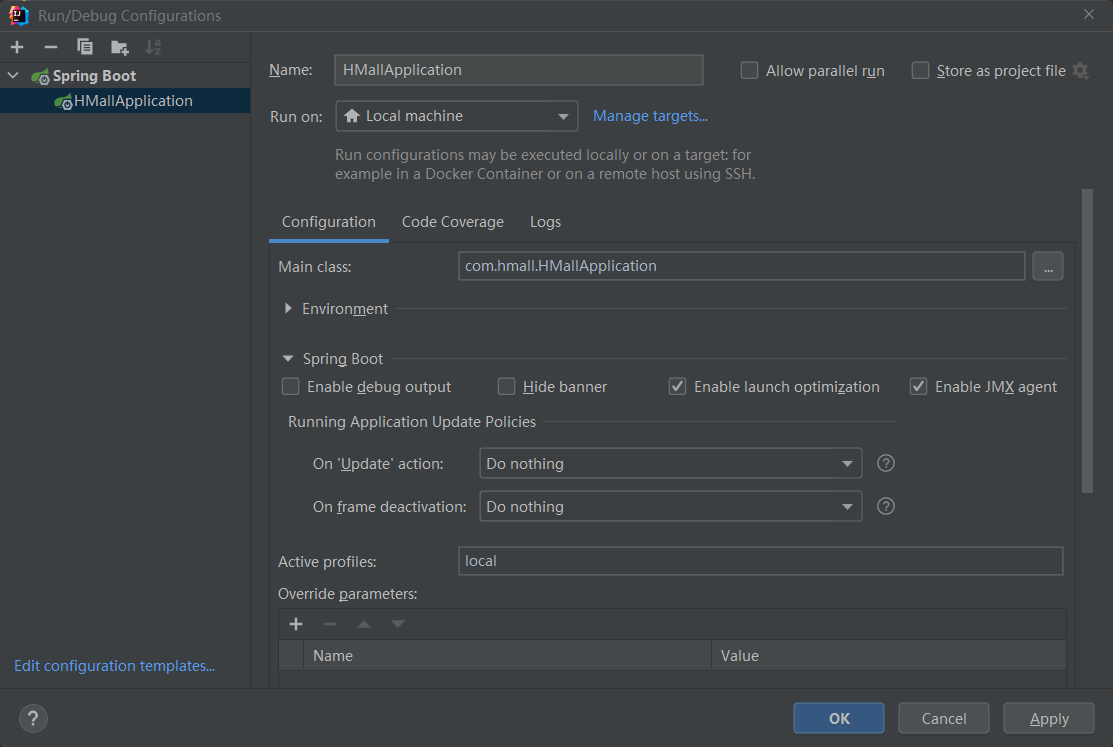
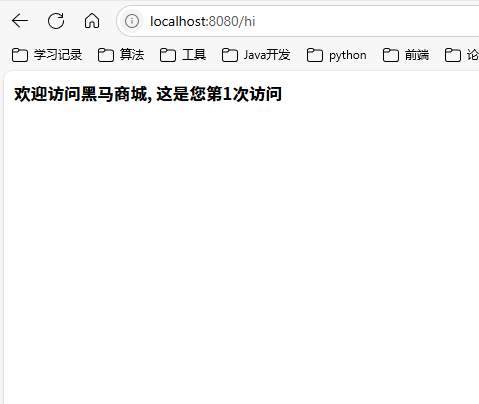
启动测试:
9. 拆分购物车服务
同8.拆分类似,有几处跟着视频注释就行。
xml
<?xml version="1.0" encoding="UTF-8"?>
<project xmlns="http://maven.apache.org/POM/4.0.0"
         xmlns:xsi="http://www.w3.org/2001/XMLSchema-instance"
         xsi:schemaLocation="http://maven.apache.org/POM/4.0.0 http://maven.apache.org/xsd/maven-4.0.0.xsd">
    <parent>
        <artifactId>hmall</artifactId>
        <groupId>com.heima</groupId>
        <version>1.0.0</version>
    </parent>
    <modelVersion>4.0.0</modelVersion>

    <artifactId>cart-service</artifactId>

    <properties>
        <maven.compiler.source>11</maven.compiler.source>
        <maven.compiler.target>11</maven.compiler.target>
    </properties>


    <dependencies>
        <!--common-->
        <dependency>
            <groupId>com.heima</groupId>
            <artifactId>hm-common</artifactId>
            <version>1.0.0</version>
        </dependency>
        <!--web-->
        <dependency>
            <groupId>org.springframework.boot</groupId>
            <artifactId>spring-boot-starter-web</artifactId>
        </dependency>
        <!--数据库-->
        <dependency>
            <groupId>mysql</groupId>
            <artifactId>mysql-connector-java</artifactId>
        </dependency>
        <!--mybatis-->
        <dependency>
            <groupId>com.baomidou</groupId>
            <artifactId>mybatis-plus-boot-starter</artifactId>
        </dependency>
        <!--单元测试-->
        <dependency>
            <groupId>org.springframework.boot</groupId>
            <artifactId>spring-boot-starter-test</artifactId>
        </dependency>
    </dependencies>
    <build>
        <finalName>${project.artifactId}</finalName>
        <plugins>
            <plugin>
                <groupId>org.springframework.boot</groupId>
                <artifactId>spring-boot-maven-plugin</artifactId>
            </plugin>
        </plugins>
    </build>


</project>
yaml
server:
  port: 8082
spring:
  application:
    name: cart-service
  profiles:
    active: dev
  datasource:
    url: jdbc:mysql://${hm.db.host}:3306/hm-cart?useUnicode=true&characterEncoding=UTF-8&autoReconnect=true&serverTimezone=Asia/Shanghai
    driver-class-name: com.mysql.cj.jdbc.Driver
    username: root
    password: ${hm.db.pw}
mybatis-plus:
  configuration:
    default-enum-type-handler: com.baomidou.mybatisplus.core.handlers.MybatisEnumTypeHandler
  global-config:
    db-config:
      update-strategy: not_null
      id-type: auto
logging:
  level:
    com.hmall: debug
  pattern:
    dateformat: HH:mm:ss:SSS
  file:
    path: "logs/${spring.application.name}"
knife4j:
  enable: true
  openapi:
    title: 黑马购物车接口文档
    description: "黑马购物车接口文档"
    email: zhanghuyi@itcast.cn
    concat: 虎哥
    url: https://www.itcast.cn
    version: v1.0.0
    group:
      default:
        group-name: default
        api-rule: package
        api-rule-resources:
          - com.hmall.cart.controller

# keytool -genkeypair -alias hmall -keyalg RSA -keypass hmall123 -keystore hmall.jks -storepass hmall123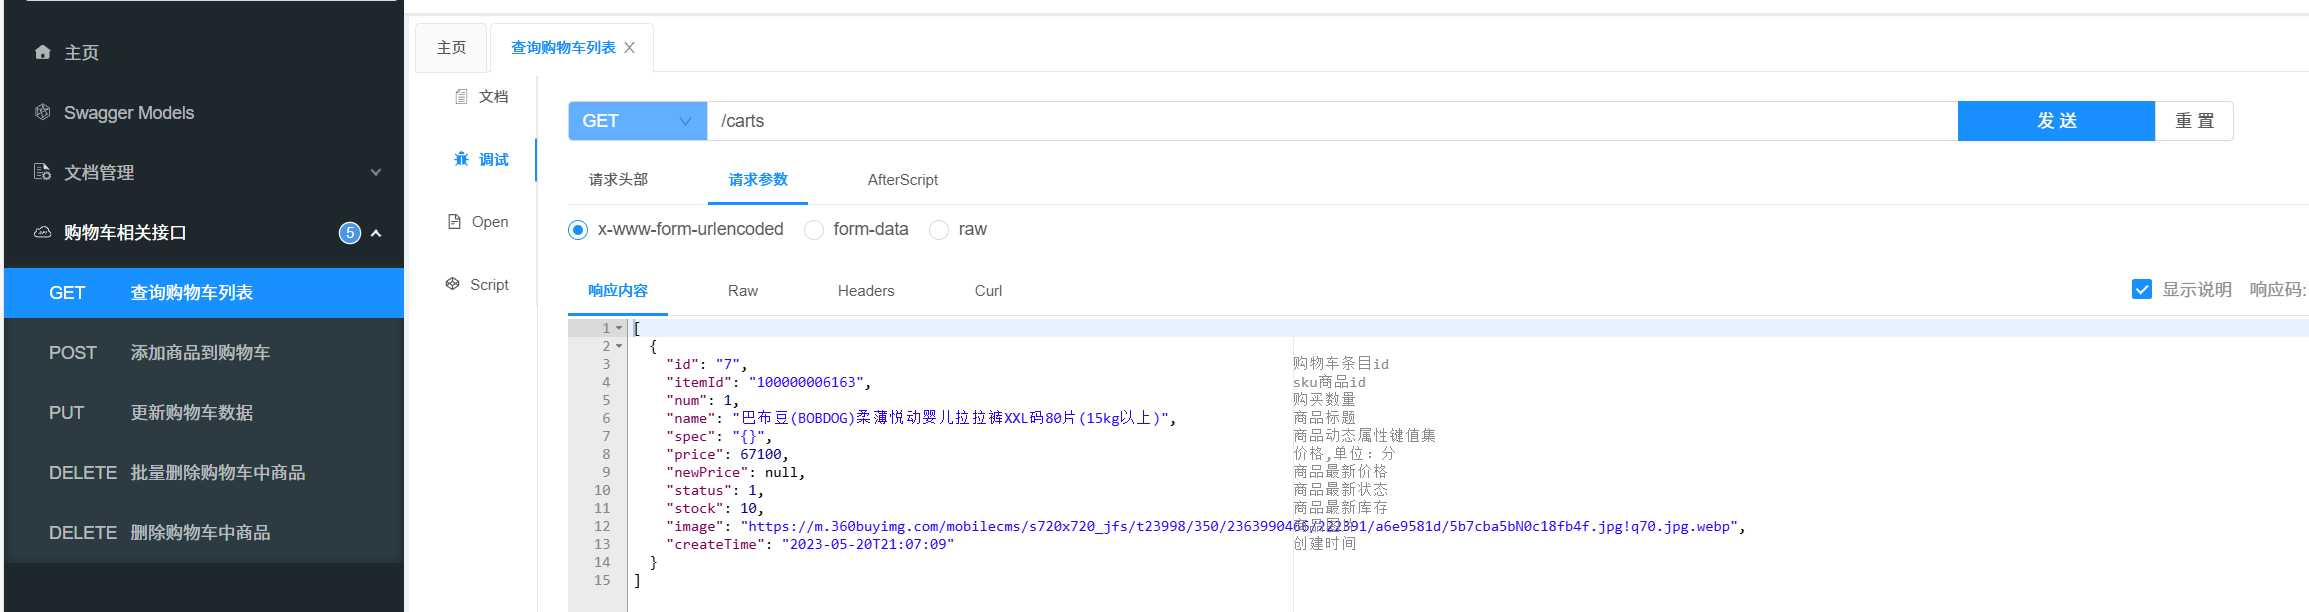
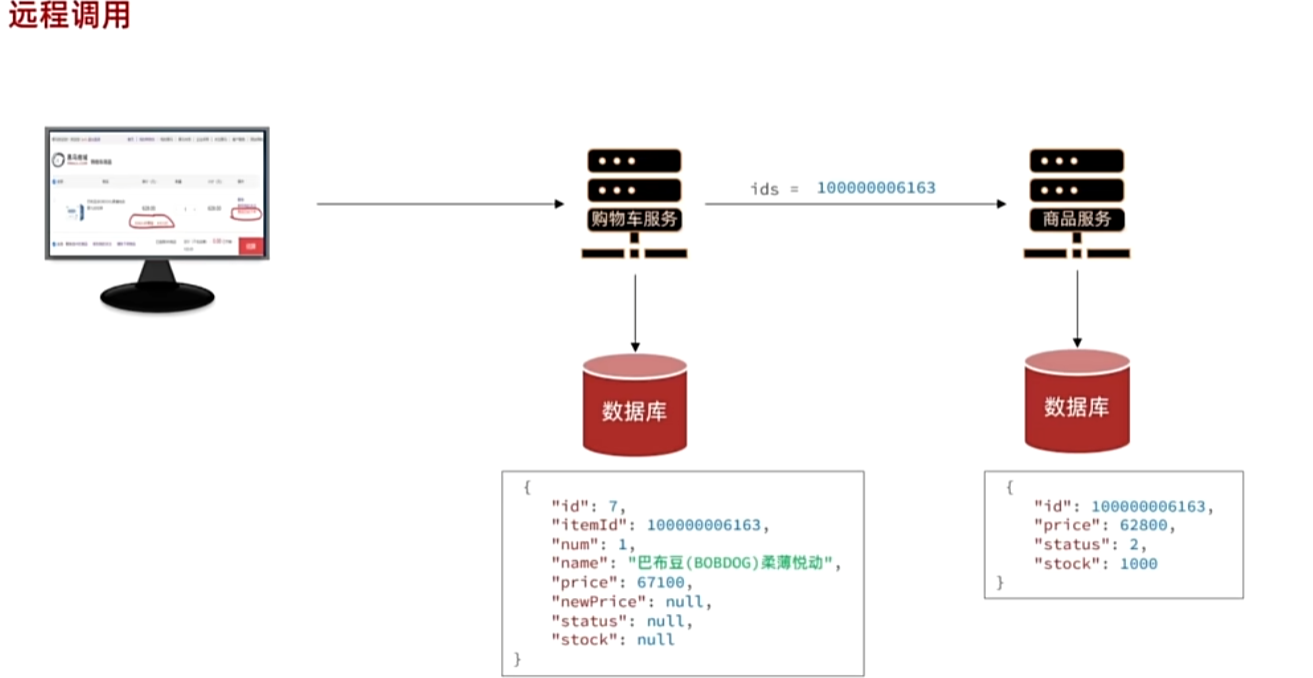
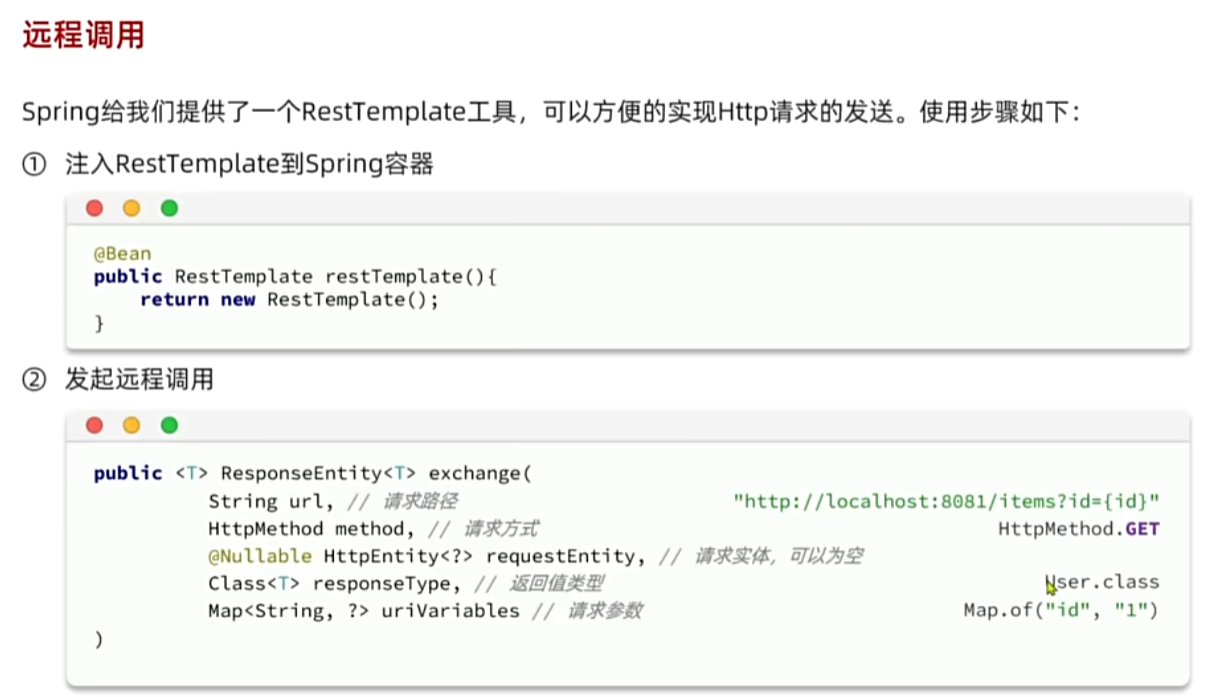
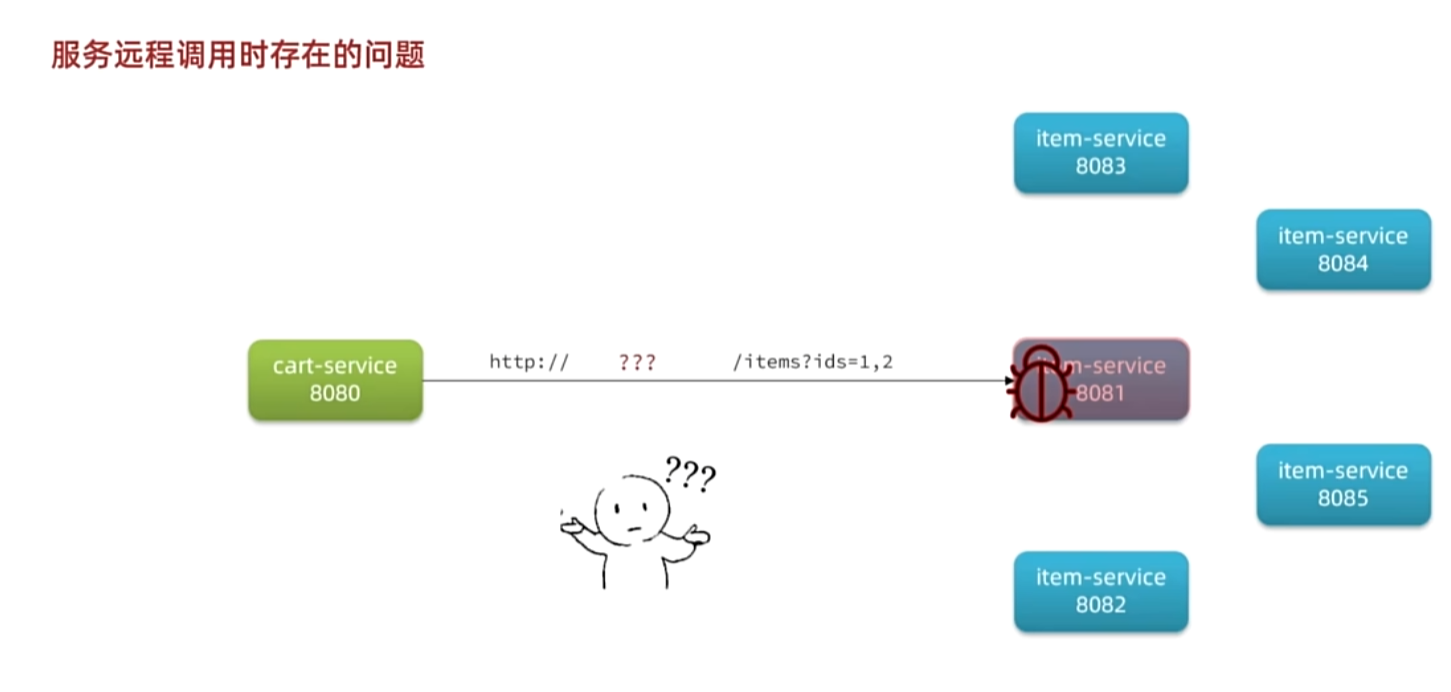
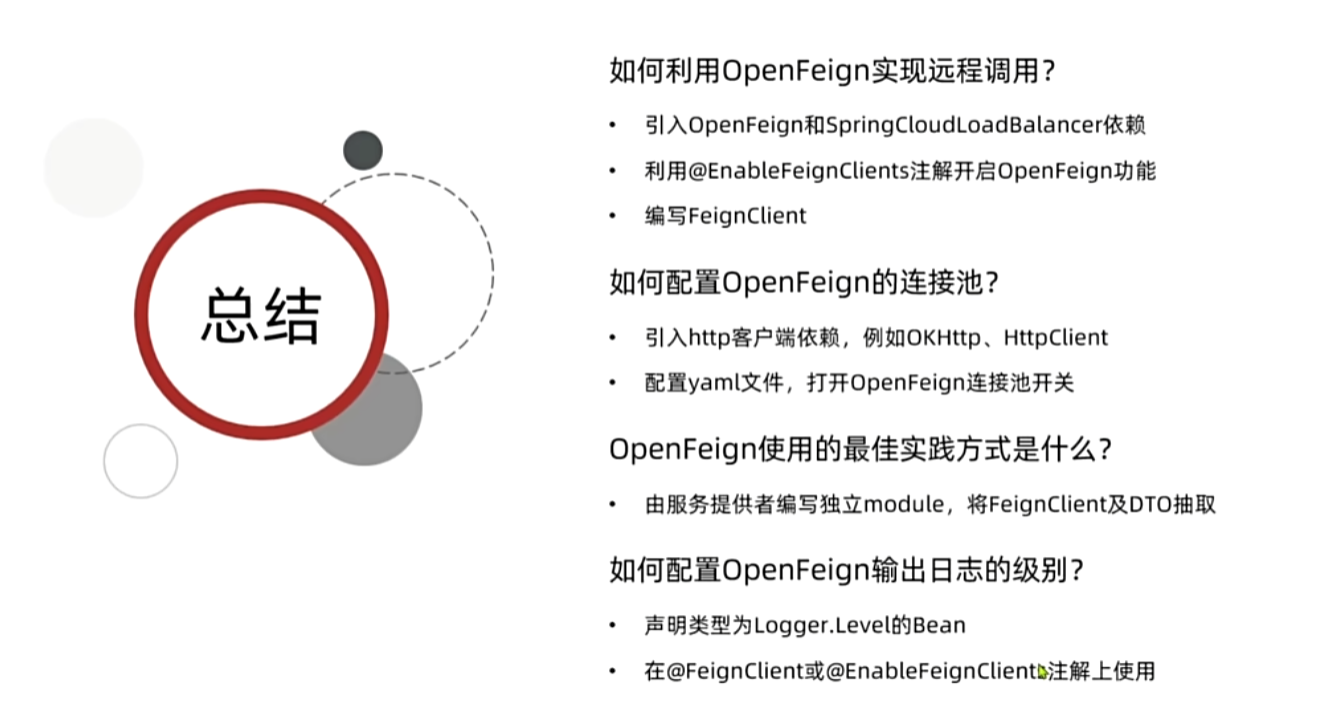
10. 微服务远程调用
java
@MapperScan("com.hmall.cart.mapper")
@SpringBootApplication
public class  CartApplication {
    public static void main(String[] args) {
        SpringApplication.run(CartApplication.class, args);
    }

    @Bean
    public RestTemplate restTemplate(){
        return new RestTemplate();
    }
}
需要配合@RequiredArgsConstructor一起食用
java
private final RestTemplate restTemplate;


// 2.查询商品
//        List<ItemDTO> items = itemService.queryItemByIds(itemIds);
ResponseEntity<List<ItemDTO>> response = restTemplate.exchange(
       "http://localhost:8081/items?ids={ids}",
       HttpMethod.GET,
       null,
       new ParameterizedTypeReference<List<ItemDTO>>() {
       },
       Map.of("ids", CollUtils.join(itemIds, ","))
);
if(!response.getStatusCode().is2xxSuccessful()){
   return;
}
List<ItemDTO> items = response.getBody();
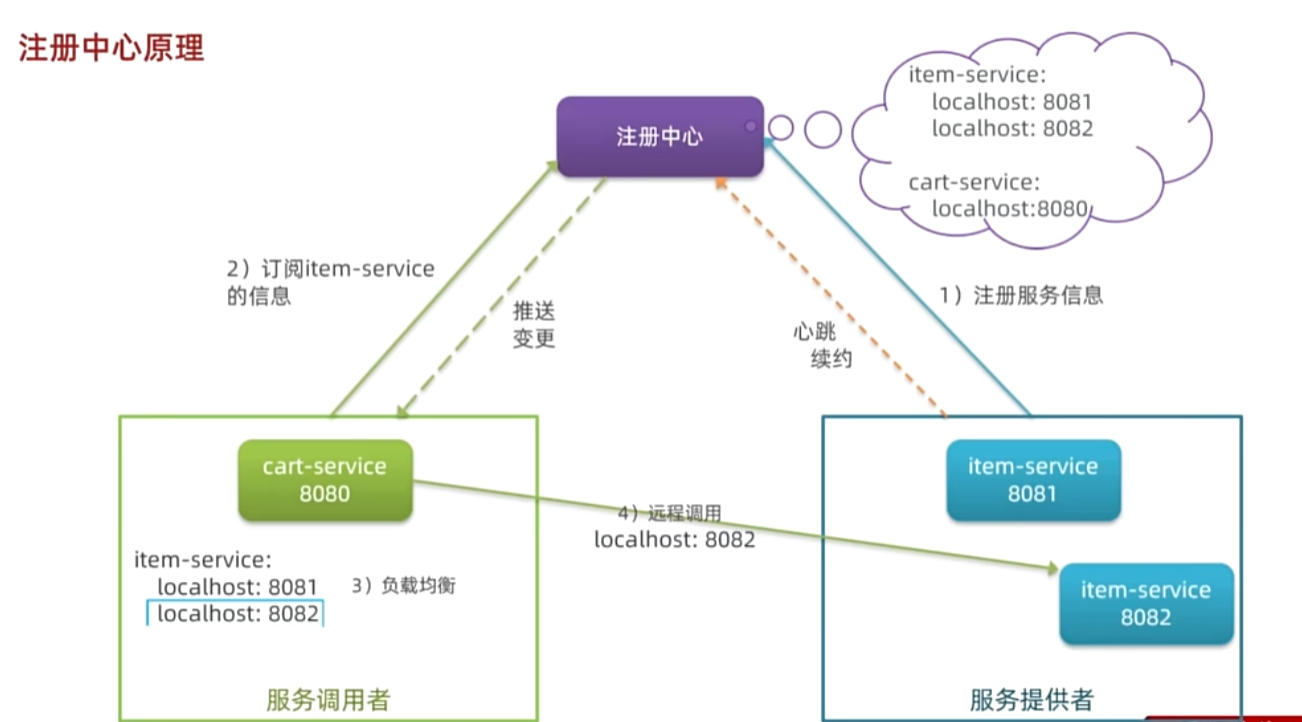
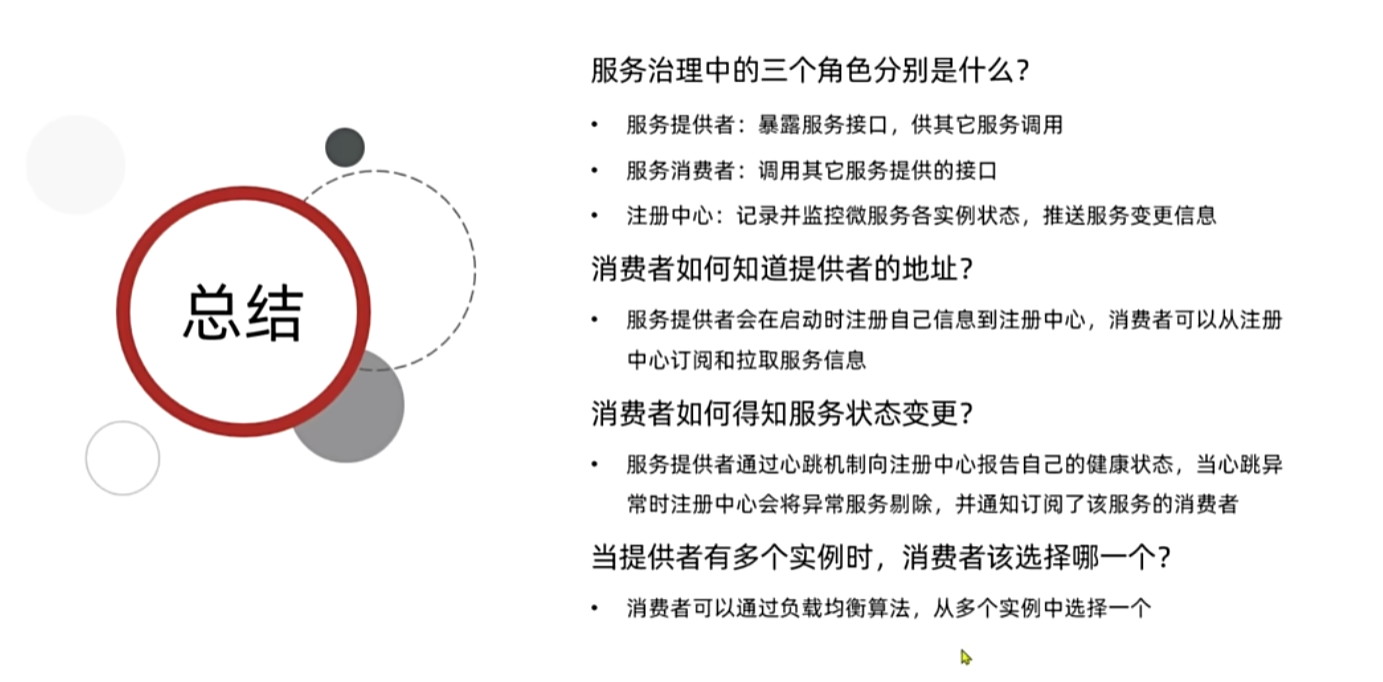
11. 微服务注册中心原理
12. 搭建nacos注册中心
运行执行nacos.sql文件
修改.env文件
yaml
PREFER_HOST_MODE=hostname
MODE=standalone
SPRING_DATASOURCE_PLATFORM=mysql
MYSQL_SERVICE_HOST=192.168.10.100
MYSQL_SERVICE_DB_NAME=nacos
MYSQL_SERVICE_PORT=3306
MYSQL_SERVICE_USER=root
MYSQL_SERVICE_PASSWORD=123
MYSQL_SERVICE_DB_PARAM=characterEncoding=utf8&connectTimeout=1000&socketTimeout=3000&autoReconnect=true&useSSL=false&allowPublicKeyRetrieval=true&serverTimezone=Asia/Shanghai
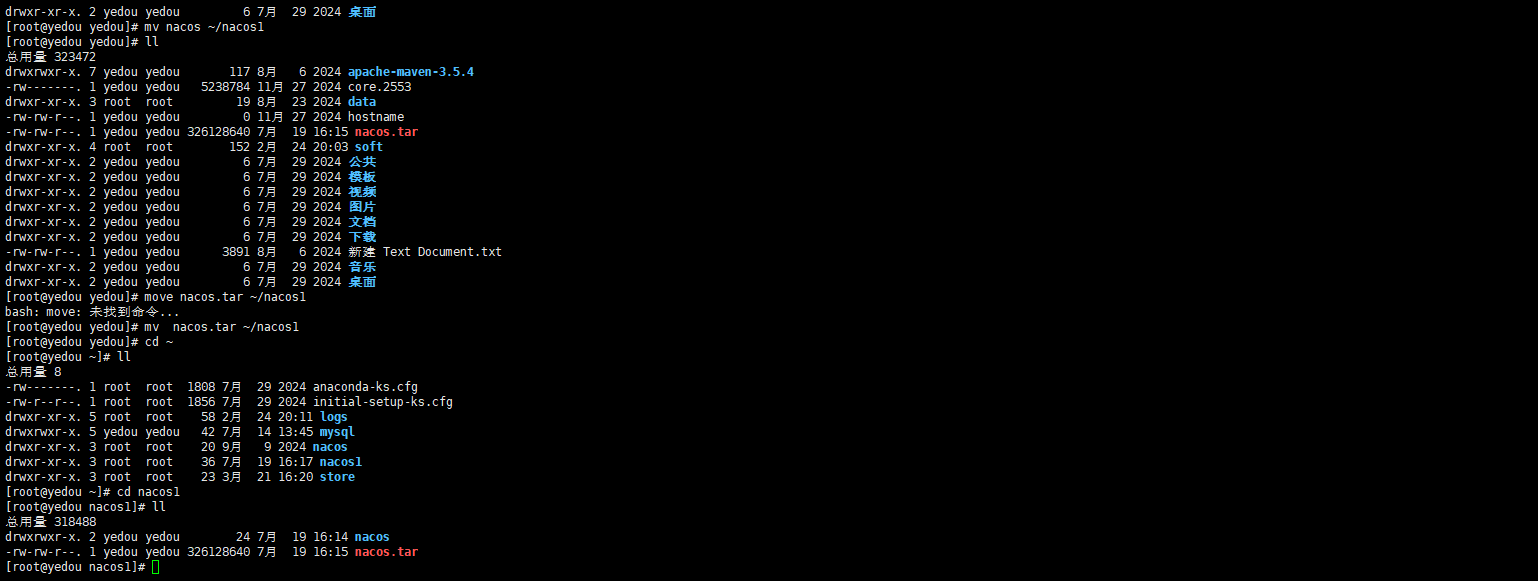
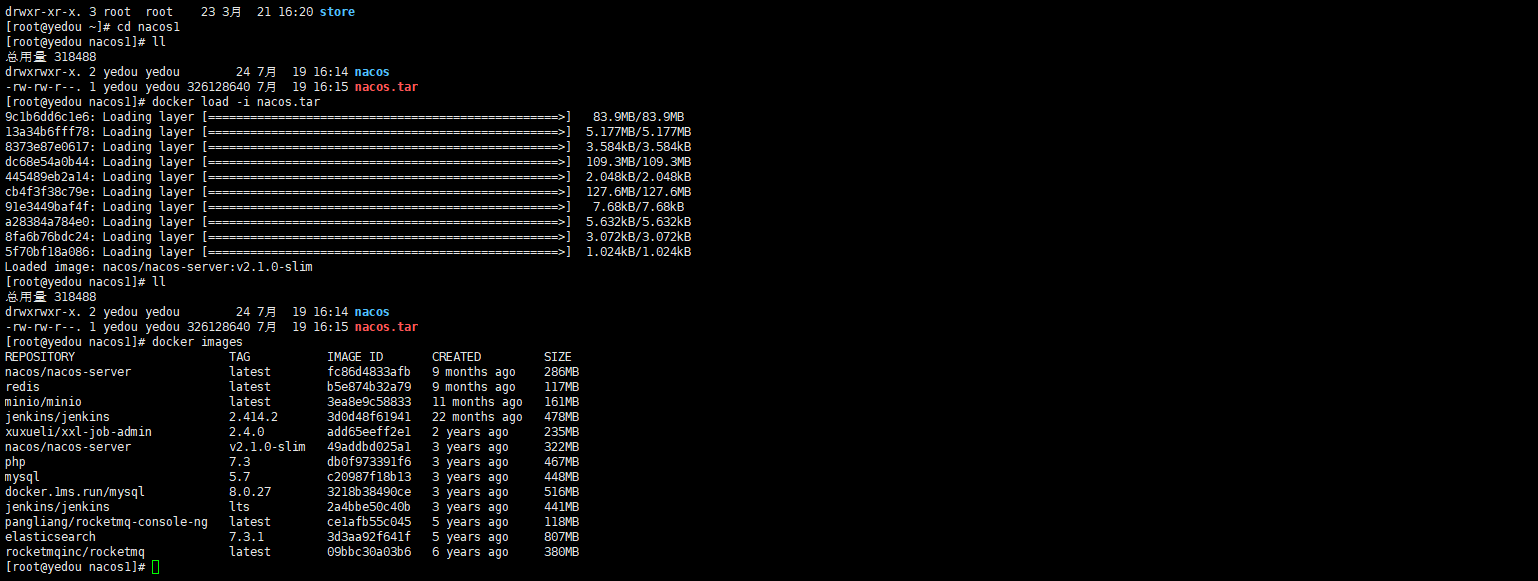
我把两个文件移动到根目录下,因为之前弄过其他nacos,因此创建一个nacos1用于存放
powershell
docker run -d \
--name nacos1 \
--env-file ./nacos/custom.env \
-p 8858:8848 \
-p 9858:9848 \
-p 9859:9849 \
--restart=always \
nacos/nacos-server:v2.1.0-slim
因为博主已经有了一个nacos,所以给命名为nacos1、主机也需要更改,如果你们没配置和视频保持一致就行。

powershell
docker logs -f nacos1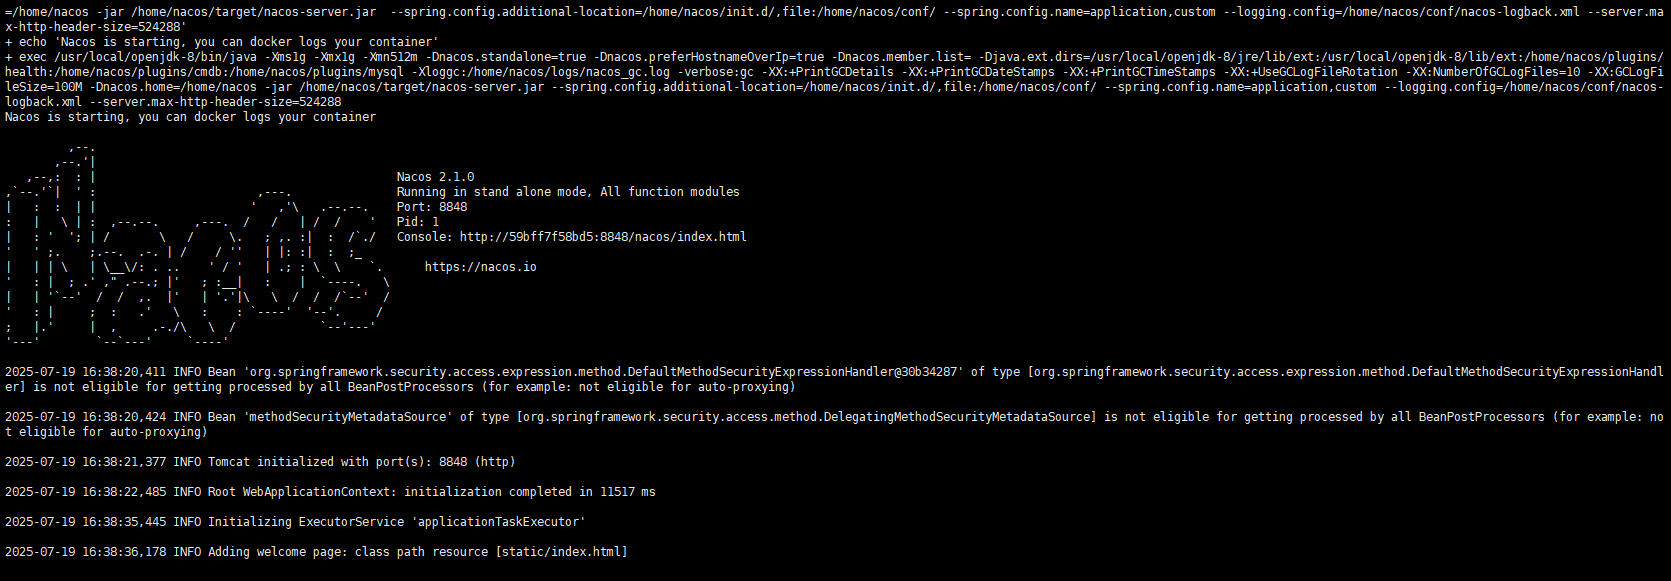

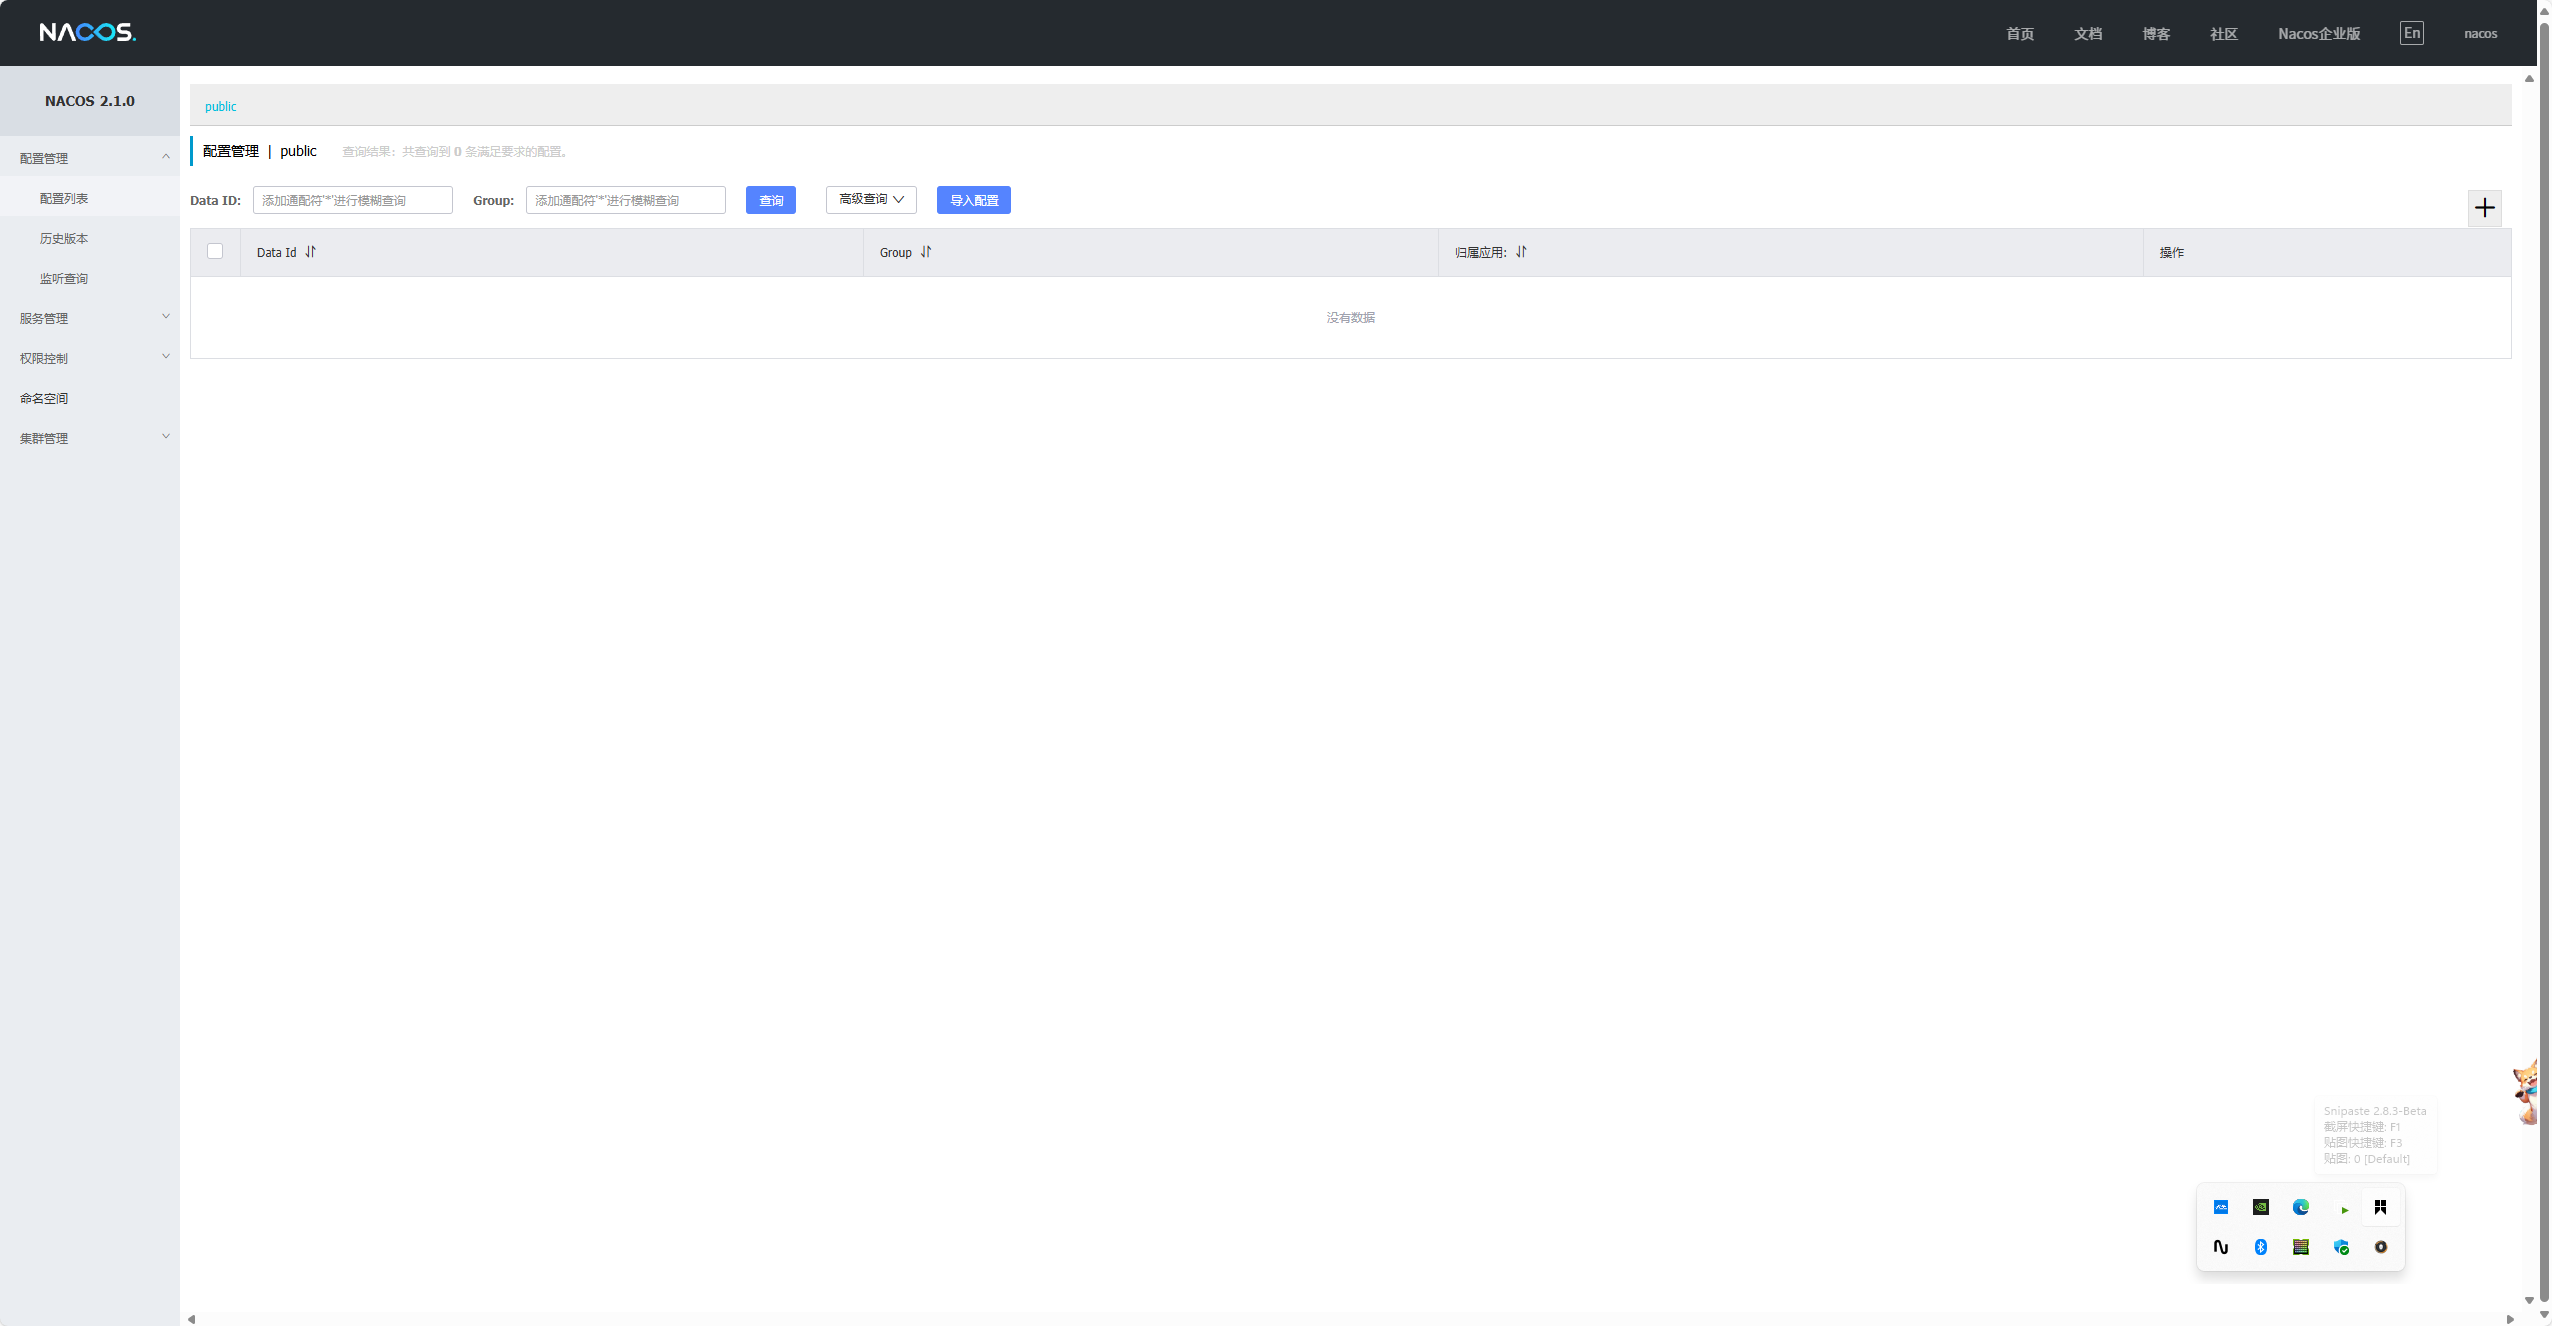
http://192.168.10.100:8858/nacos/#/login
注意了,这里因为我映射的是8858,你们的依旧是8848。因为我的8848主机端口配置了另一个nacos
账号密码都是:nacos
13. 服务注册
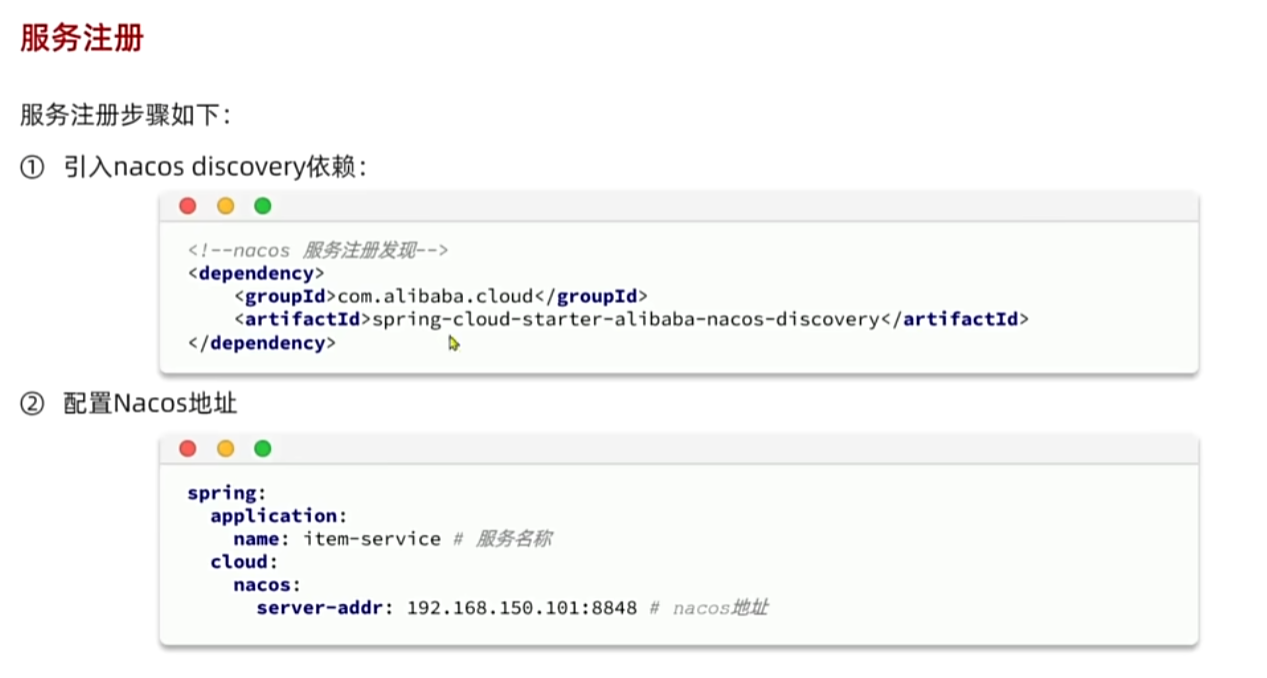
xml
<!--nacos 服务注册发现-->
<dependency>
    <groupId>com.alibaba.cloud</groupId>
    <artifactId>spring-cloud-starter-alibaba-nacos-discovery</artifactId>
</dependency>
yaml
spring:
  application:
    name: item-service
  profiles:
    active: dev
  datasource:
    url: jdbc:mysql://${hm.db.host}:3306/hm-item?useUnicode=true&characterEncoding=UTF-8&autoReconnect=true&serverTimezone=Asia/Shanghai
    driver-class-name: com.mysql.cj.jdbc.Driver
    username: root
    password: ${hm.db.pw}
  cloud:
    nacos:
      discovery:
        server-addr: 192.168.10.100:8858
配置多个实例

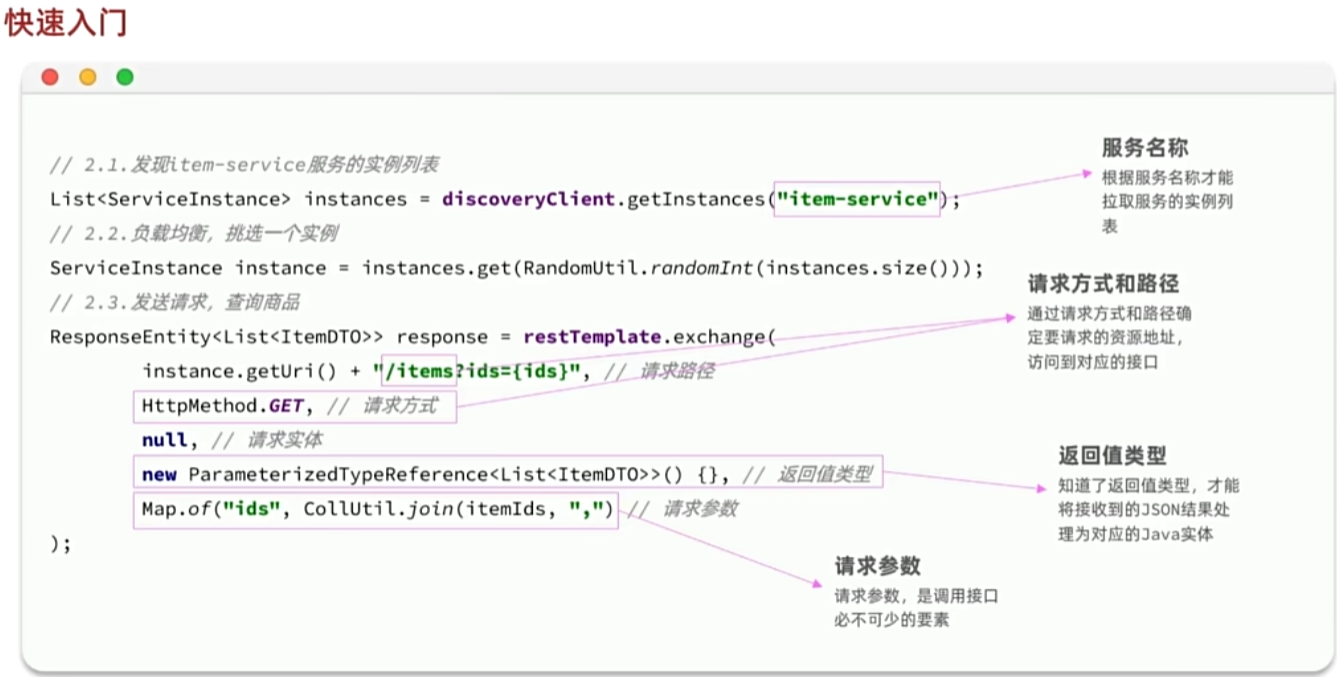
14. 服务发现和负载均衡

java
List<ServiceInstance> instances = discoveryClient.getInstances("item-service");
if(CollUtils.isEmpty(instances)){
return;
}
ServiceInstance serviceInstance = instances.get(RandomUtil.randomInt(instances.size()));
ResponseEntity<List<ItemDTO>> response = restTemplate.exchange(
serviceInstance.getUri() + "/items?ids={ids}",
HttpMethod.GET,
null,
new ParameterizedTypeReference<List<ItemDTO>>() {
},
Map.of("ids", CollUtils.join(itemIds, ","))
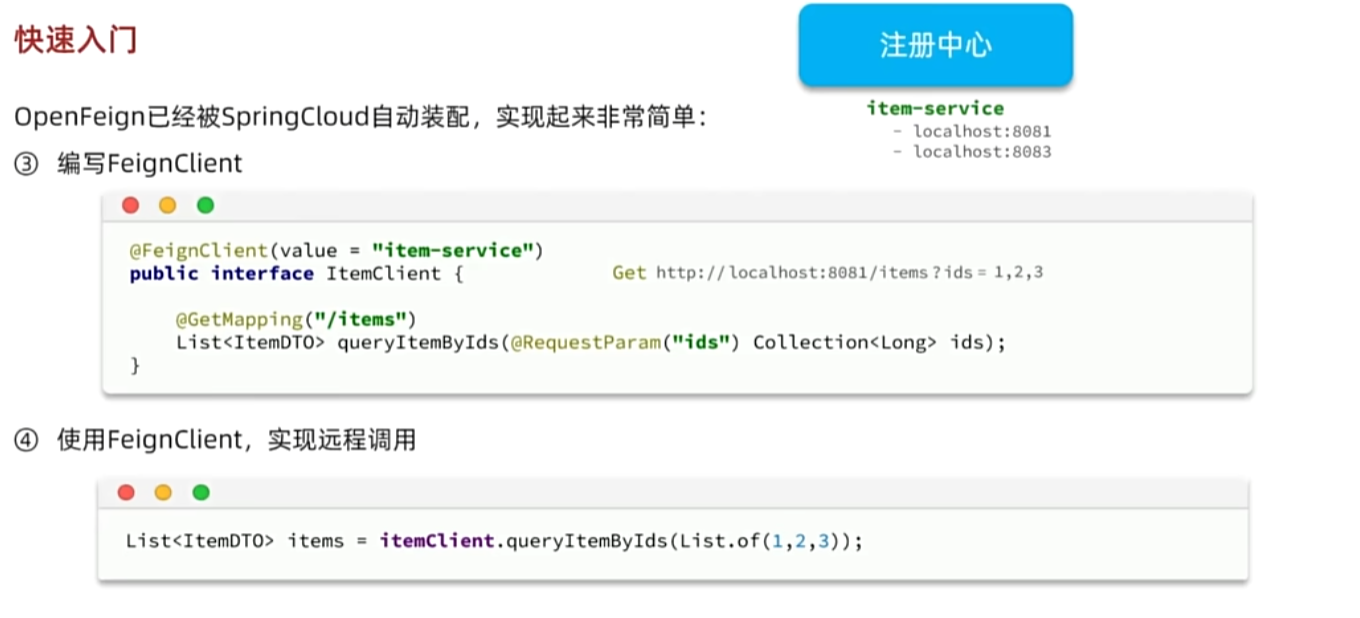
);15. openFeign快速入门
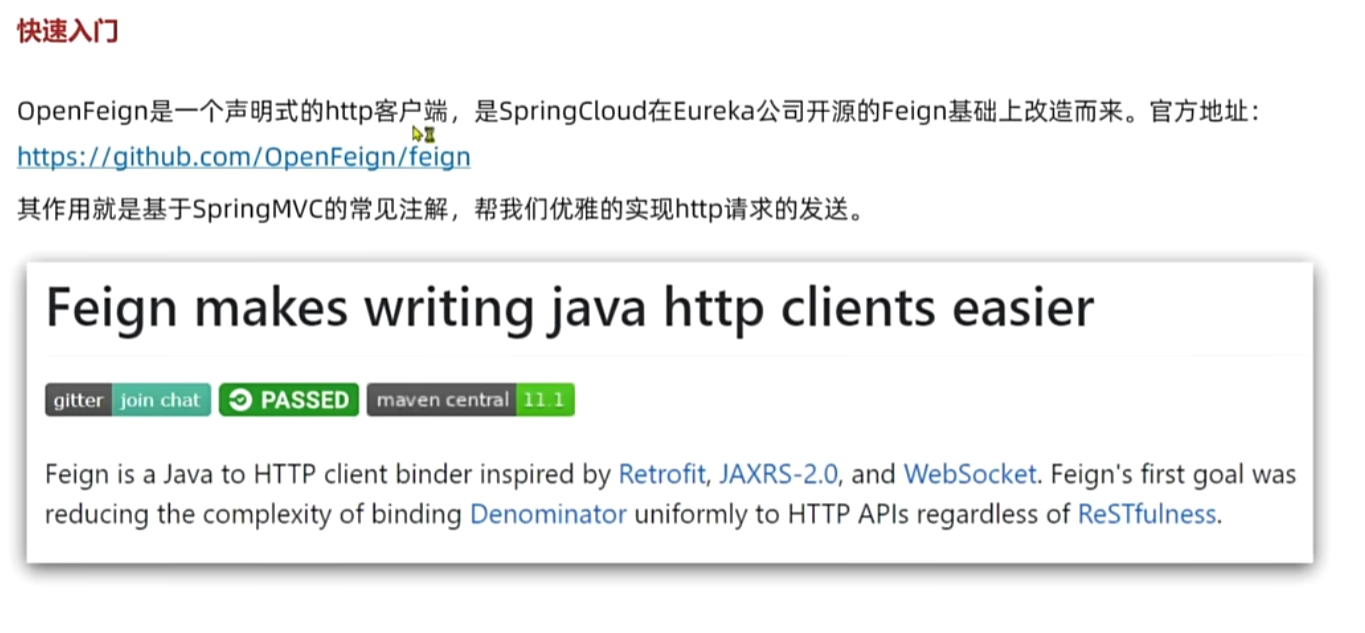
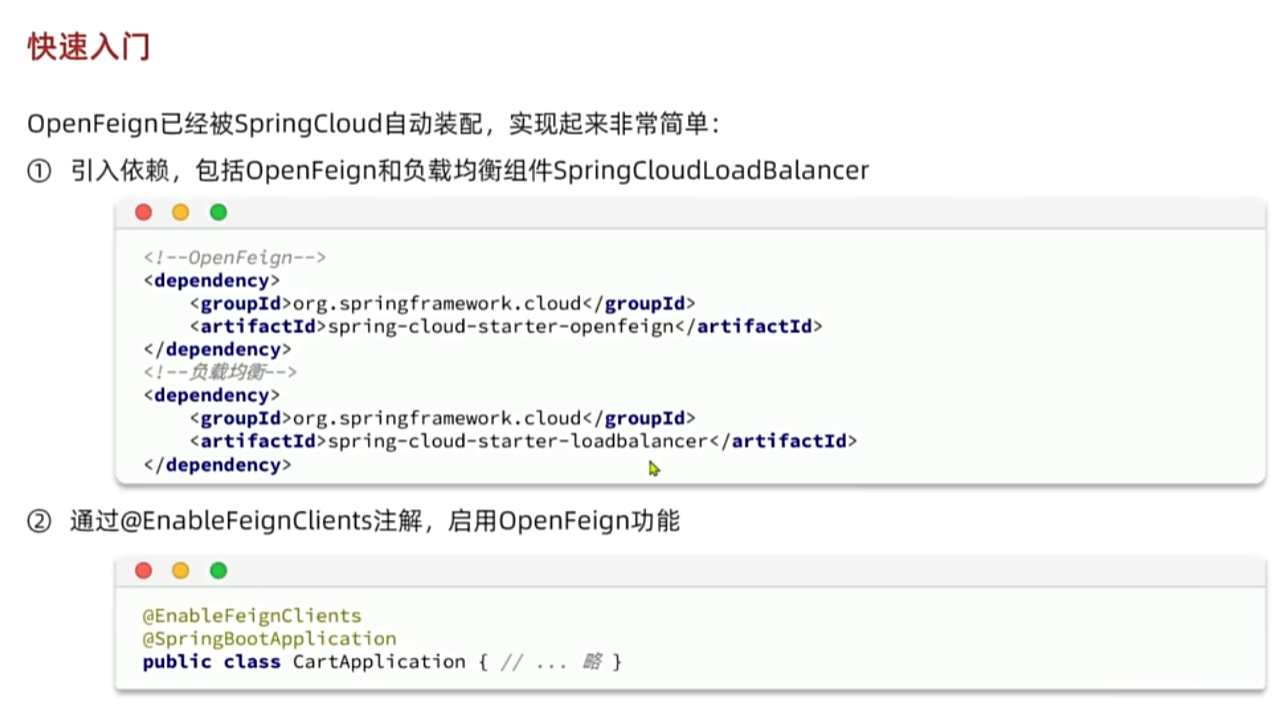
启动类加注解.
xml
  <!--openFeign-->
  <dependency>
      <groupId>org.springframework.cloud</groupId>
      <artifactId>spring-cloud-starter-openfeign</artifactId>
  </dependency>
  <!--负载均衡器-->
  <dependency>
      <groupId>org.springframework.cloud</groupId>
      <artifactId>spring-cloud-starter-loadbalancer</artifactId>
  </dependency>
java
@FeignClient("item-service")
public interface ItemClient {

    @GetMapping("/items")
    List<ItemDTO> queryItemByIds(@RequestParam("ids") Collection<Long> ids);
}
java
    private void handleCartItems(List<CartVO> vos) {
        // 1.获取商品id
        Set<Long> itemIds = vos.stream().map(CartVO::getItemId).collect(Collectors.toSet());
        // 2.查询商品
//        List<ItemDTO> items = itemService.queryItemByIds(itemIds);
//        List<ServiceInstance> instances = discoveryClient.getInstances("item-service");
//        if(CollUtils.isEmpty(instances)){
//            return;
//        }
//        ServiceInstance serviceInstance = instances.get(RandomUtil.randomInt(instances.size()));
//
//
//        ResponseEntity<List<ItemDTO>> response = restTemplate.exchange(
//                serviceInstance.getUri() + "/items?ids={ids}",
//                HttpMethod.GET,
//                null,
//                new ParameterizedTypeReference<List<ItemDTO>>() {
//                },
//                Map.of("ids", CollUtils.join(itemIds, ","))
//        );
//        if(!response.getStatusCode().is2xxSuccessful()){
//            return;
//        }
//        List<ItemDTO> items = response.getBody();
        List<ItemDTO> items = itemClient.queryItemByIds(itemIds);
        if (CollUtils.isEmpty(items)) {
            return;
        }
        // 3.转为 id 到 item的map
        Map<Long, ItemDTO> itemMap = items.stream().collect(Collectors.toMap(ItemDTO::getId, Function.identity()));
        // 4.写入vo
        for (CartVO v : vos) {
            ItemDTO item = itemMap.get(v.getItemId());
            if (item == null) {
                continue;
            }
            v.setNewPrice(item.getPrice());
            v.setStatus(item.getStatus());
            v.setStock(item.getStock());
        }
    }
16. 连接池
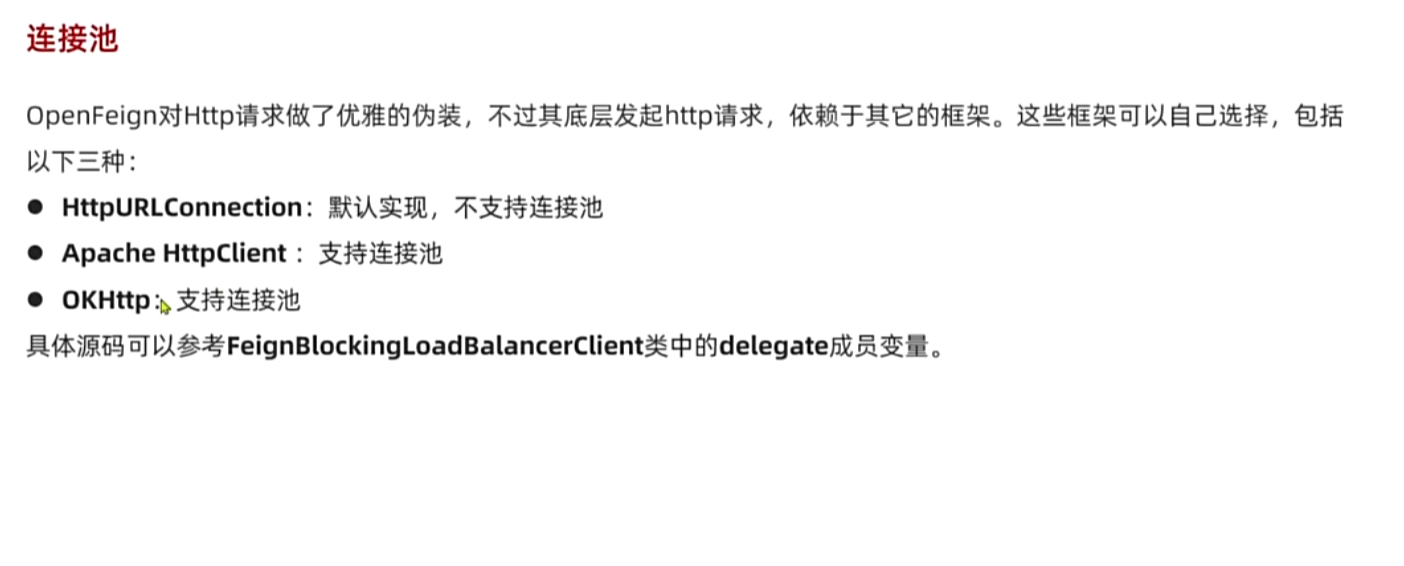
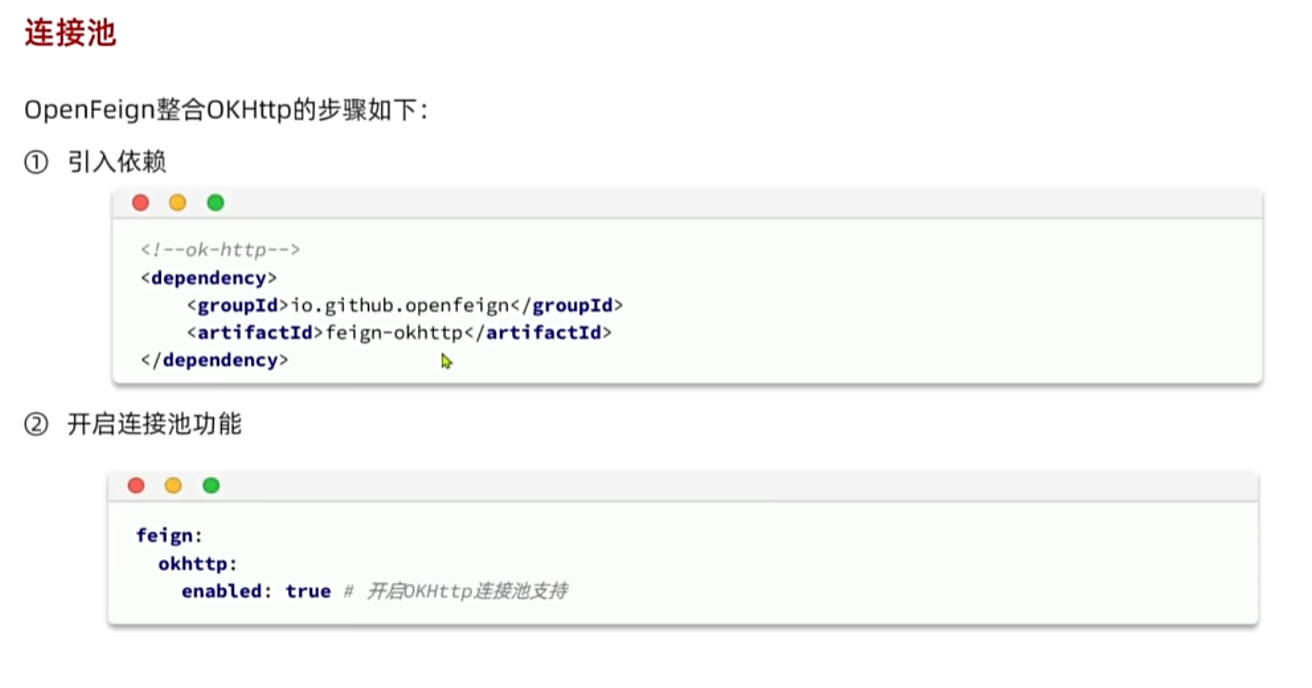
xml
<!--OK http 的依赖 -->
<dependency>
  <groupId>io.github.openfeign</groupId>
  <artifactId>feign-okhttp</artifactId>
</dependency>
yaml
feign:
okhttp:
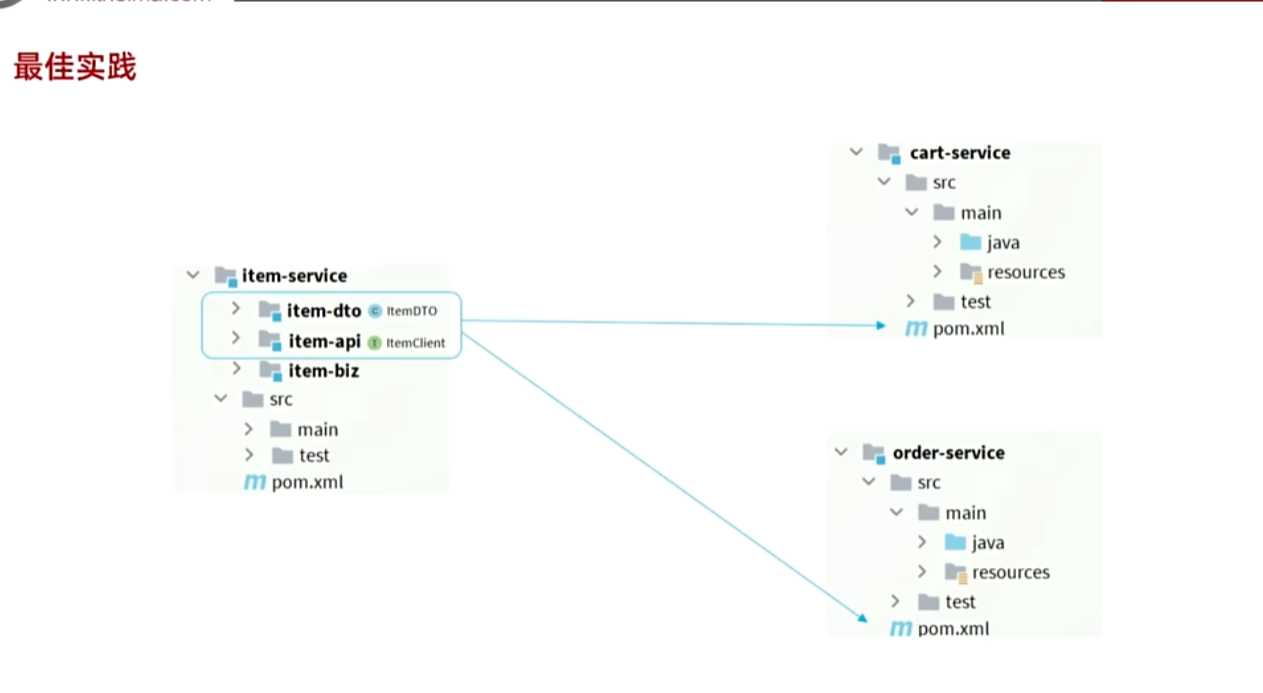
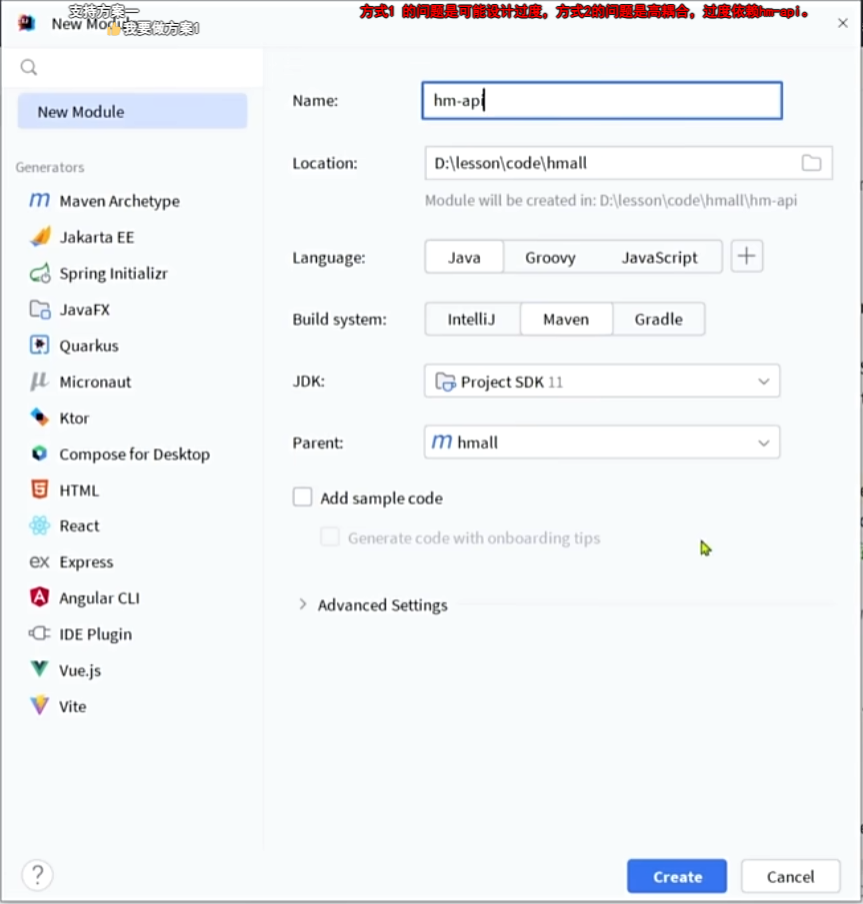
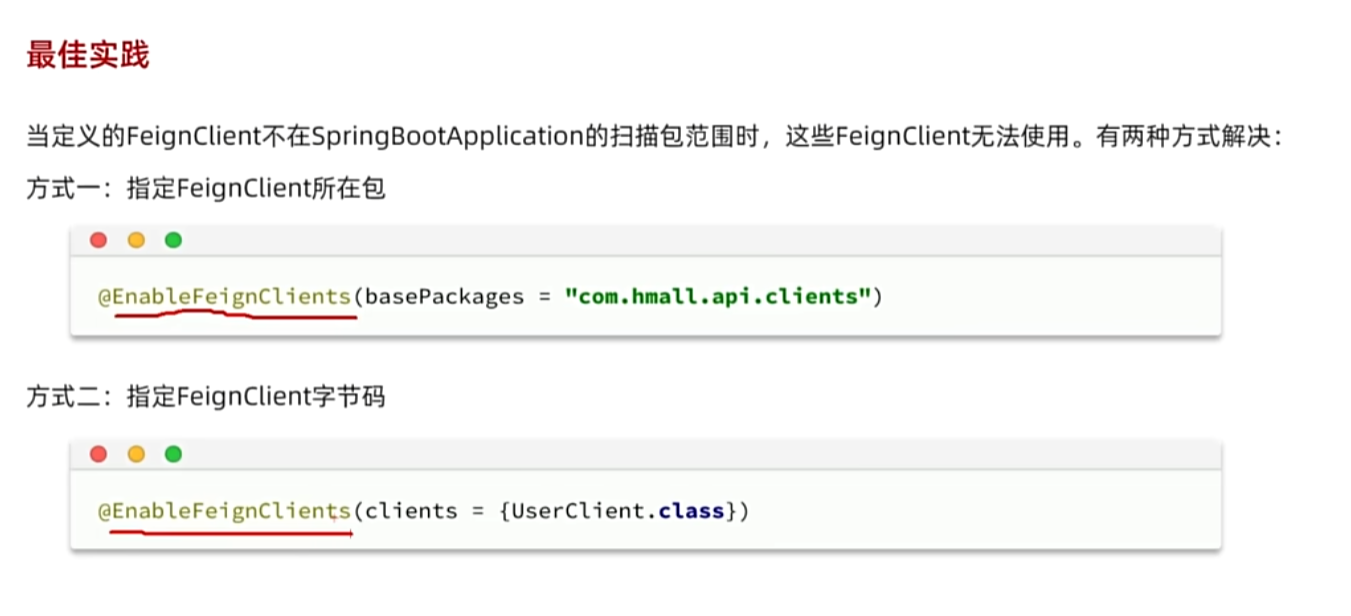
enabled: true # 开启OKHttp功能16. 最佳实践
yaml
```xml
<?xml version="1.0" encoding="UTF-8"?>
<project xmlns="http://maven.apache.org/POM/4.0.0"
         xmlns:xsi="http://www.w3.org/2001/XMLSchema-instance"
         xsi:schemaLocation="http://maven.apache.org/POM/4.0.0 http://maven.apache.org/xsd/maven-4.0.0.xsd">
    <parent>
        <artifactId>hmall</artifactId>
        <groupId>com.heima</groupId>
        <version>1.0.0</version>
    </parent>
    <modelVersion>4.0.0</modelVersion>

    <artifactId>hm-api</artifactId>

    <dependencies>
        <!--openFeign-->
        <dependency>
            <groupId>org.springframework.cloud</groupId>
            <artifactId>spring-cloud-starter-openfeign</artifactId>
        </dependency>
        <!--负载均衡器-->
        <dependency>
            <groupId>org.springframework.cloud</groupId>
            <artifactId>spring-cloud-starter-loadbalancer</artifactId>
        </dependency>
        <dependency>
            <groupId>io.swagger</groupId>
            <artifactId>swagger-annotations</artifactId>
            <version>1.6.6</version>
            <scope>compile</scope>
        </dependency>
    </dependencies>
    <properties>
        <maven.compiler.source>11</maven.compiler.source>
        <maven.compiler.target>11</maven.compiler.target>
    </properties>

</project>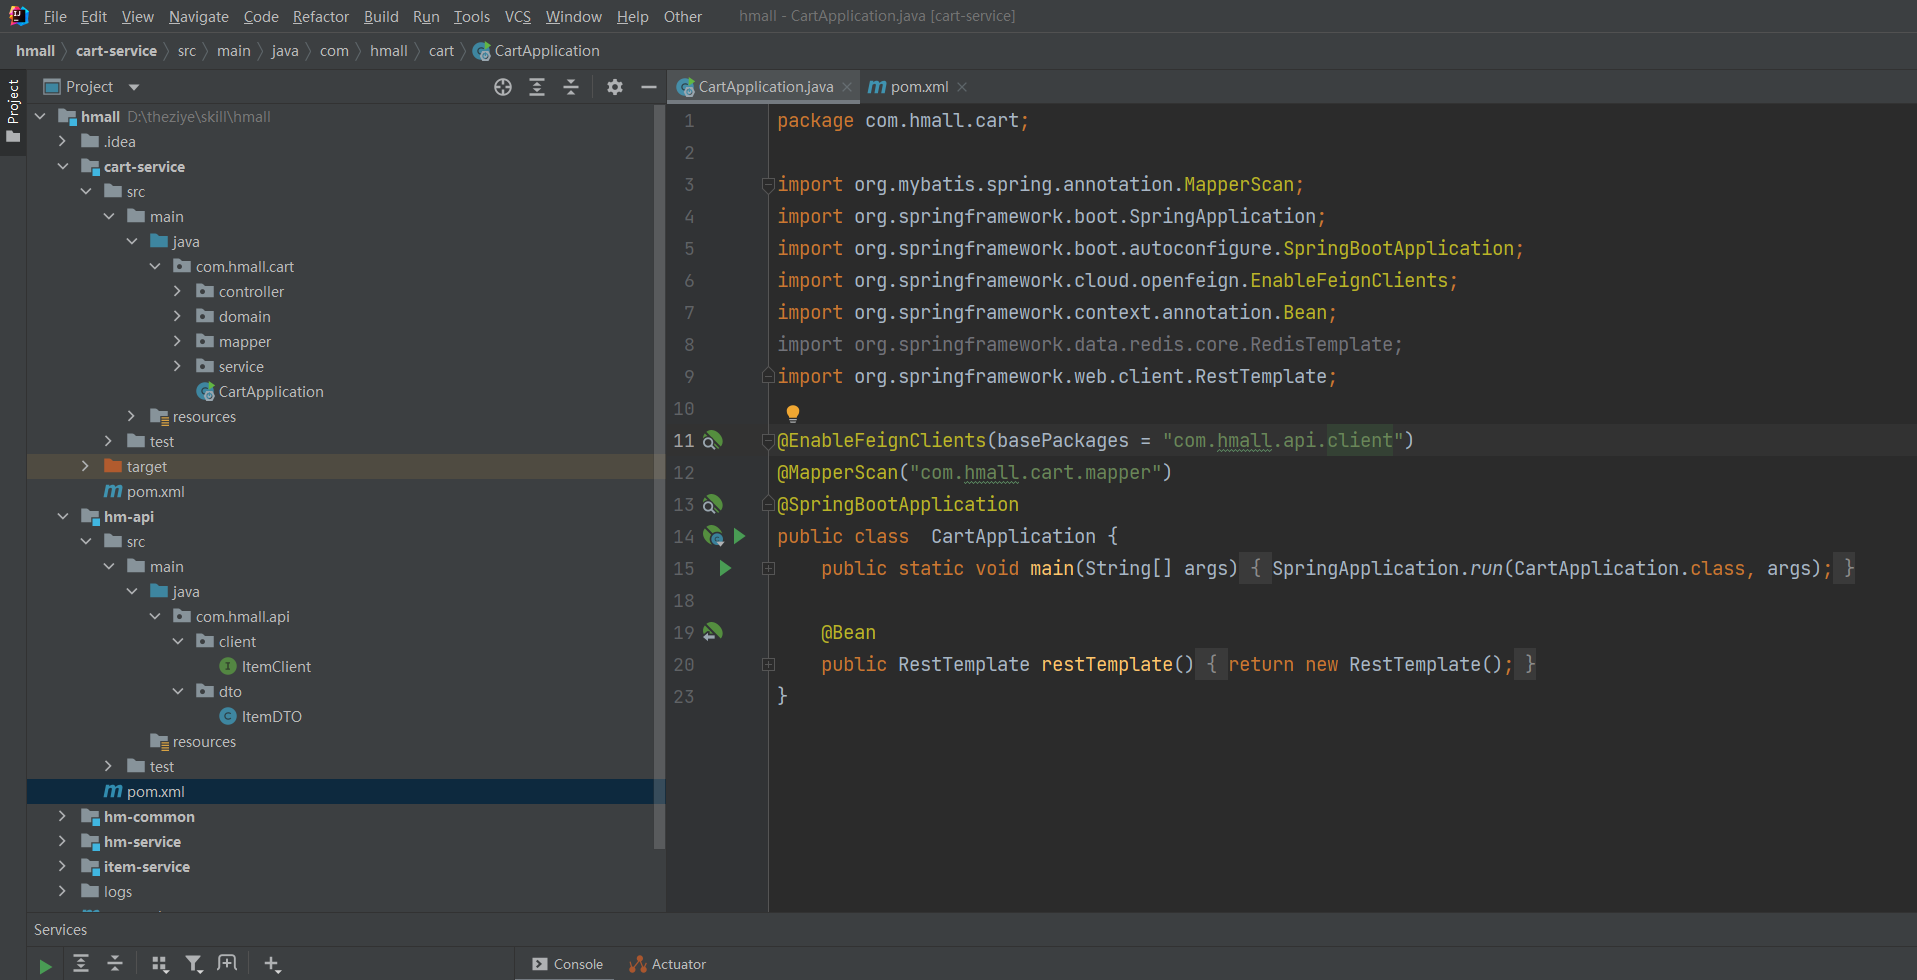
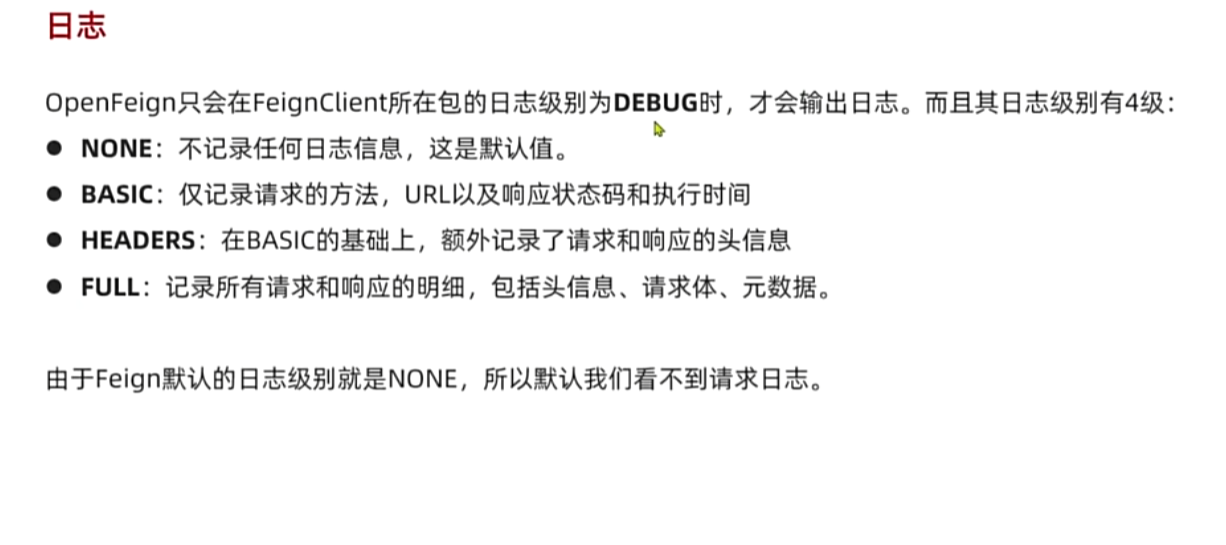
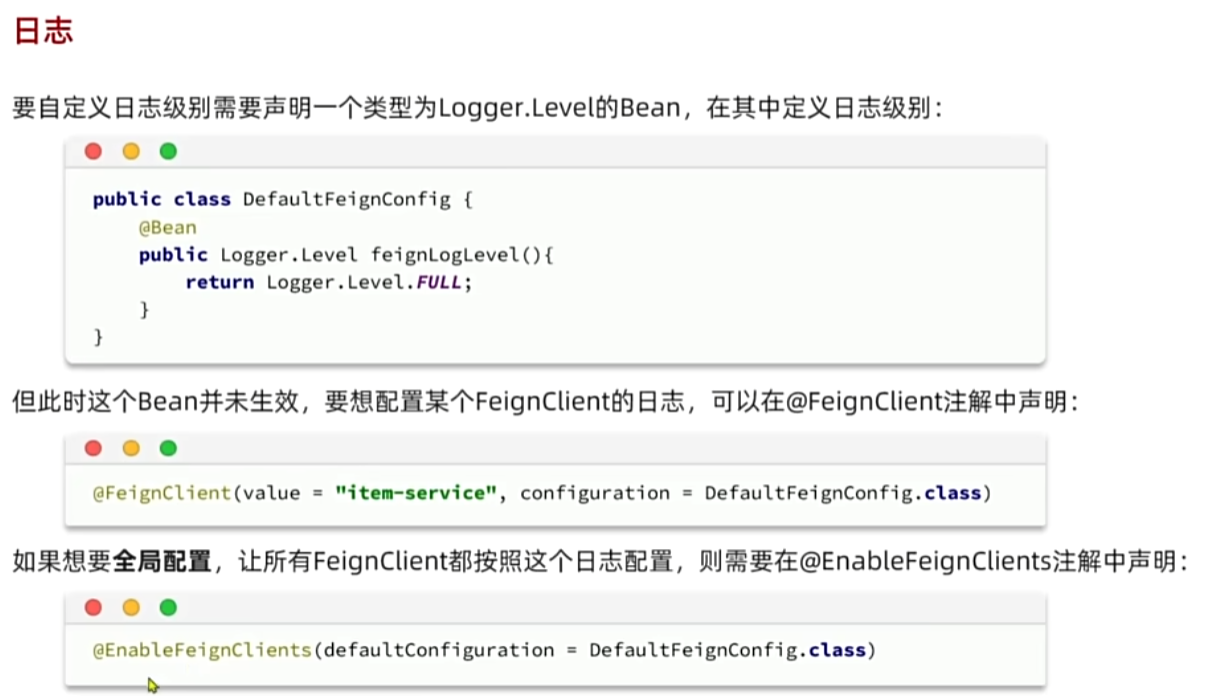
16. 日志输出
到此为止->01结束
后面的作用内容大家可以自己动手实现,博主会在下一个章节单独列出.,...加油