目录
一、解决的问题
- 将行为请求者与行为实现者解耦,当用户发出命令后,无需关注谁来执行命令。
- 将命令的发出者和命令的执行者完全隔离开。
二、设计类图

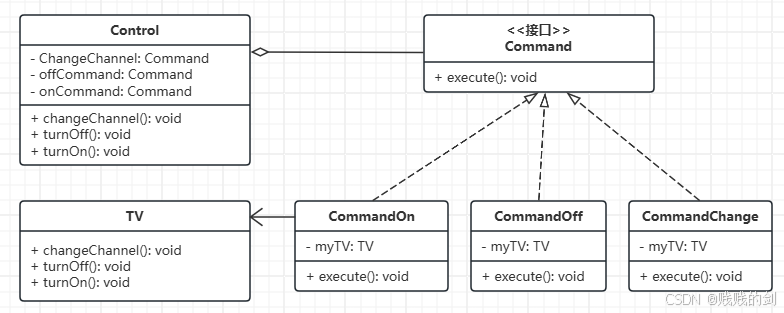
Client:创建具体的命令对象,并且设置命令对象的接收者Invoker:命令传递者,要求命令对象执行请求Command:定义命令的接口ConcreteCommand:命令接口实现对象Receiver:命令接收并执行
三、代码实现
3.1 设计类图
- 以电视机遥控器作为背景进行,类图如下
3.2 代码实现
cpp
#include <iostream>

class TV
{
private:
    int currentChannel = 0;

public:
    void changeChannel(int channel)
    {
        this->currentChannel = channel;
    }

    void turnOff()
    {
        std::cout << "TV is off." << std::endl;
    }

    void turnOn()
    {
        std::cout << "TV is on." << std::endl;
    }
};

class Command
{
public:
    virtual void execute() = 0;
};

class CommandOn : public Command
{
private:
    TV* myTV;
public:
    CommandOn(TV* tv)
    {
        myTV = tv;
    }

    void execute()
    {
        myTV->turnOn();
    }
};

class CommandOff : public Command
{
private:
    TV* myTV;
public:
    CommandOff(TV* tv)
    {
        myTV = tv;
    }

    void execute()
    {
        myTV->turnOff();
    }
};

class CommandChange : public Command
{
private:
    TV* myTV;
    int channel;
public:
    CommandChange(TV* tv, int channel)
    {
        myTV = tv;
        this->channel = channel;
    }

    void execute()
    {
        std::cout << "Switch Channel to " << channel << std::endl;
        myTV->changeChannel(channel);
    }
};

class Control
{
private:
    Command* changChannel;
    Command* offCommand;
    Command* onCommand;

public:
    Control(Command* changChannel, Command* off, Command* on)
    {
        this->changChannel = changChannel;
        this->offCommand = off;
        this->onCommand = on;
    }

    void changeChannel()
    {
        changChannel->execute();
    }

    void turnOff()
    {
        offCommand->execute();
    }

    void turnOn()
    {
        onCommand->execute();
    }
};

int main()
{
    TV* mytv = new TV();
    Command* on = new CommandOn(mytv);
    Command* off = new CommandOff(mytv);
    Command* channel = new CommandChange(mytv, 3);

    Control* control = new Control(channel, off, on);

    control->turnOn();
    control->changeChannel();
    control->turnOff();
    return 0;
}
四、扩展
- 定义一个3对控制器的按钮
- 分别控制客厅灯、厨房灯和车库门的开关操作
- 类图如下

- 运行结果

- 代码部分请参阅 https://gitee.com/piglittle/design_patterns中的
Head_First_Design_Partterns解决方案下的command_pattern项目