1、描述:
前端项目中经常会需要http请求,而且很频繁,一般大型项目会使用axios等现成组件兼容性和实用性会很好,但是相对需要安装等比较笨重,所以自己封装了原生 XMLHttpRequest方法,可移植性强。2、主要功能:
arduino
组件透出get,post,put,delete 四个主要的http请求,以及修改baseURL和修改超时请求时间,下面是功能截图: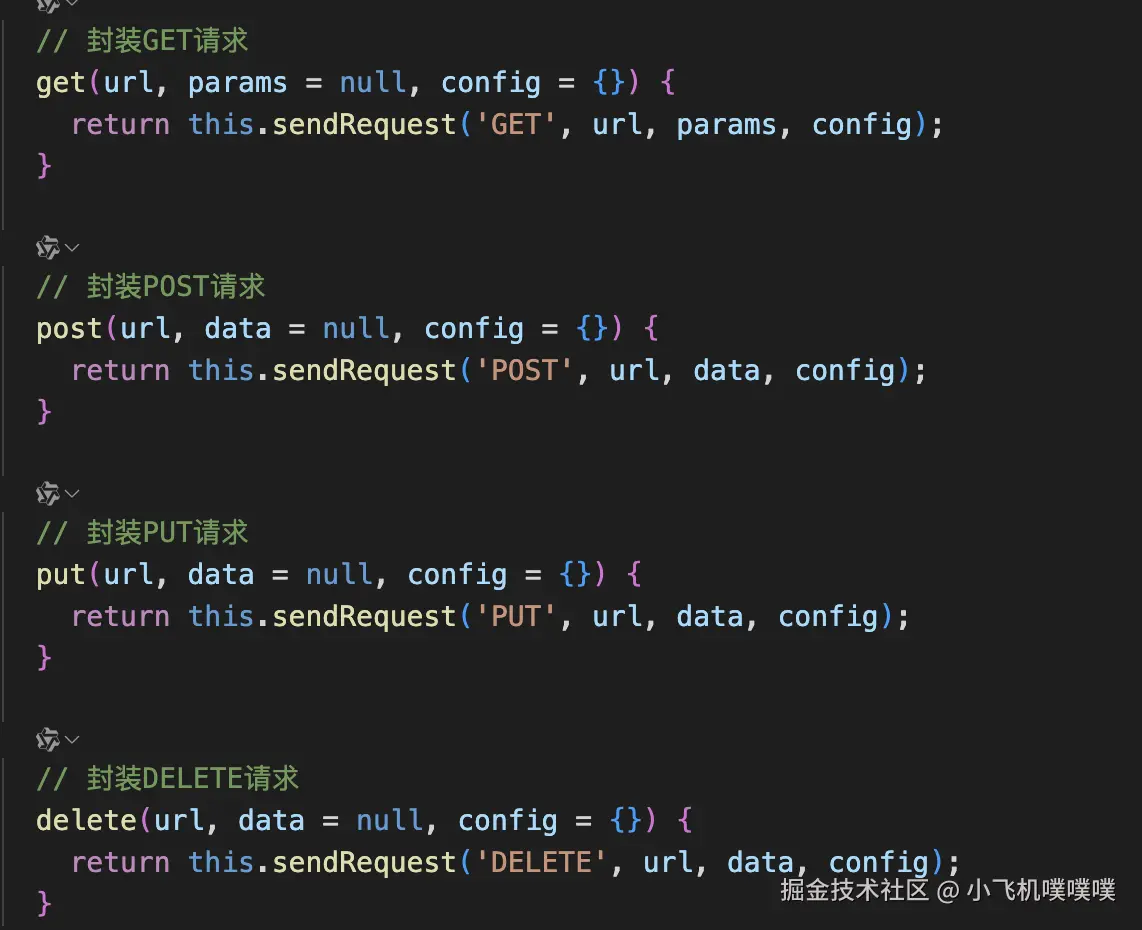
3、完整代码
javascript
class HttpClient {
constructor(baseUrl) {
this.baseUrl = baseUrl;
this.timeout = 30000; // 默认30秒超时
}
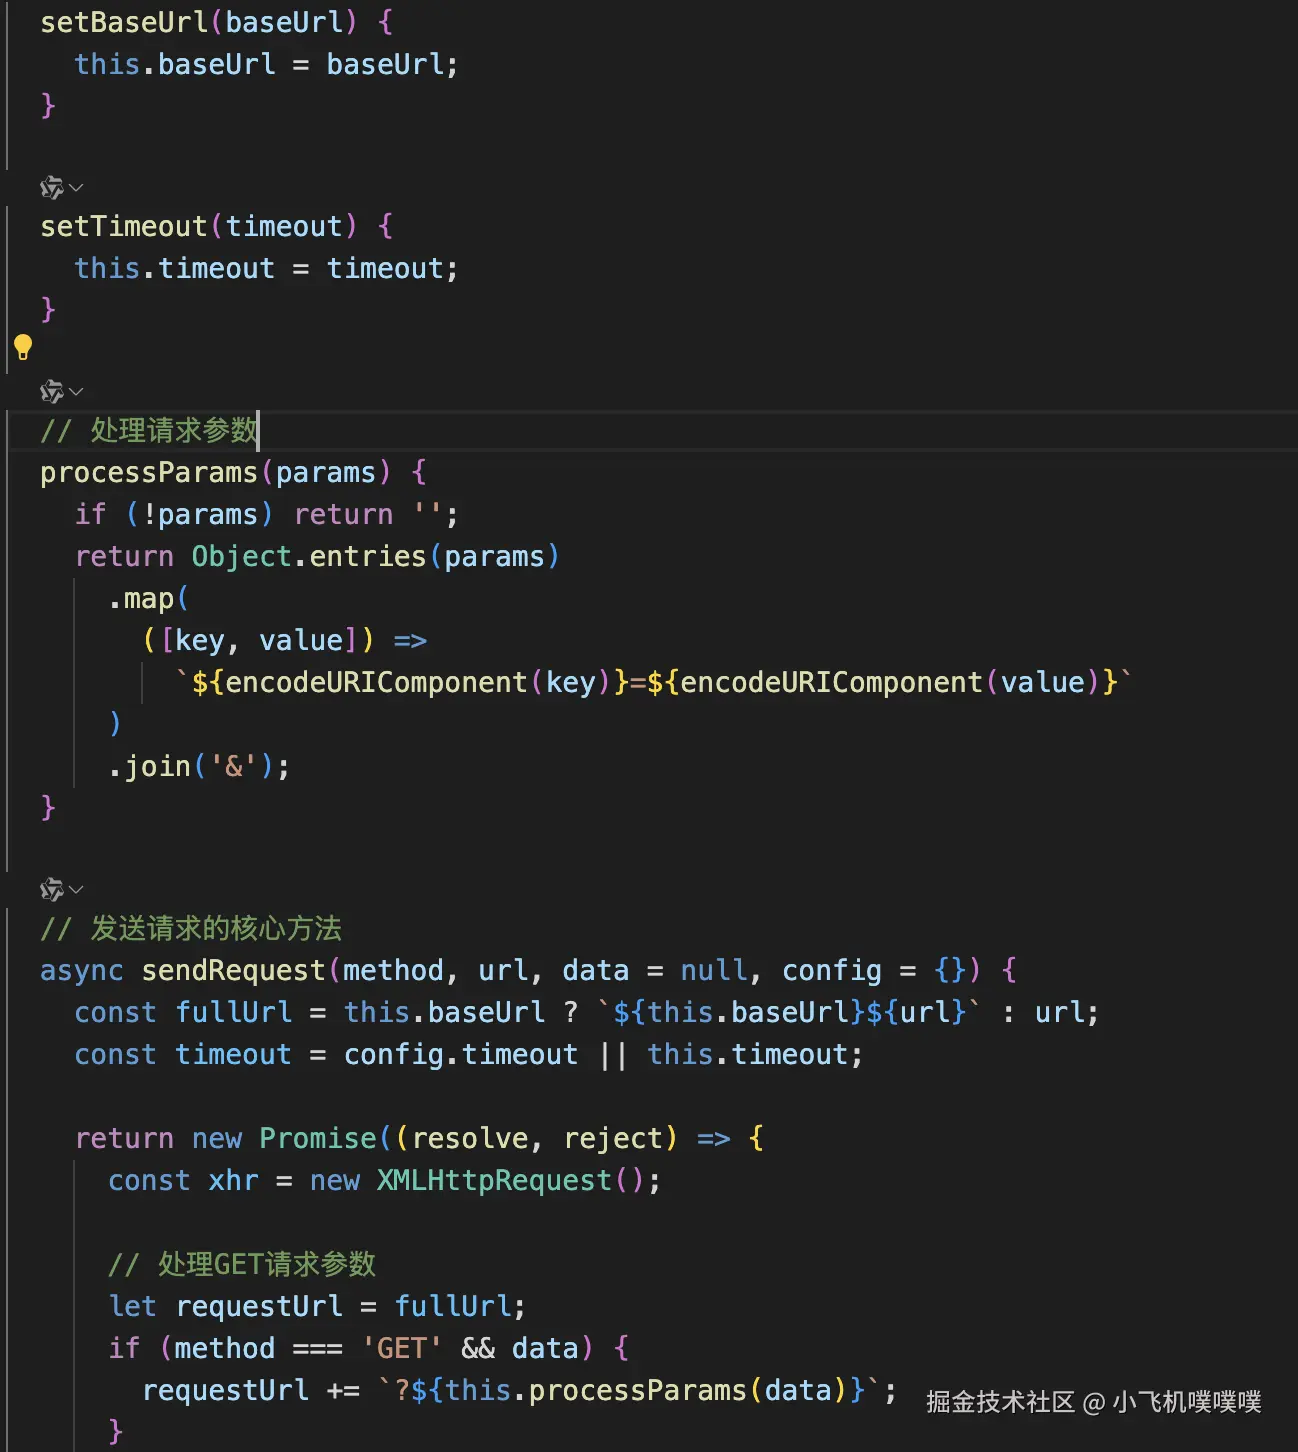
setBaseUrl(baseUrl) {
this.baseUrl = baseUrl;
}
setTimeout(timeout) {
this.timeout = timeout;
}
// 处理请求参数
processParams(params) {
if (!params) return '';
return Object.entries(params)
.map(
([key, value]) =>
`${encodeURIComponent(key)}=${encodeURIComponent(value)}`
)
.join('&');
}
// 发送请求的核心方法
async sendRequest(method, url, data = null, config = {}) {
const fullUrl = this.baseUrl ? `${this.baseUrl}${url}` : url;
const timeout = config.timeout || this.timeout;
return new Promise((resolve, reject) => {
const xhr = new XMLHttpRequest();
// 处理GET请求参数
let requestUrl = fullUrl;
if (method === 'GET' && data) {
requestUrl += `?${this.processParams(data)}`;
}
xhr.open(method, requestUrl, true);
// 设置请求头
const headers = {
'Content-Type': 'application/json',
...config.headers,
};
Object.entries(headers).forEach(([key, value]) => {
xhr.setRequestHeader(key, value);
});
// 设置超时
xhr.timeout = timeout;
xhr.ontimeout = () => {
reject({
code: 'ETIMEDOUT',
message: `请求超时(${timeout}ms)`,
});
};
// 错误处理
xhr.onerror = () => {
reject({
code: 'NETWORK_ERROR',
message: '网络错误',
});
};
// 请求状态变化
xhr.onreadystatechange = () => {
if (xhr.readyState === 4) {
try {
let responseData;
if (xhr.responseText) {
try {
responseData = JSON.parse(xhr.responseText);
} catch (e) {
responseData = xhr.responseText;
}
}
if (xhr.status >= 200 && xhr.status < 300) {
if (responseData.error.error_no !== '0') {
reject({
code: xhr.status,
message: xhr.statusText,
data: responseData,
});
} else {
resolve({
data: responseData,
status: xhr.status,
statusText: xhr.statusText,
});
}
} else {
reject({
code: xhr.status,
message: xhr.statusText,
data: responseData,
});
}
} catch (error) {
reject({
code: 'PARSE_ERROR',
message: '响应解析错误',
error,
});
}
}
};
// 发送请求体
let requestData = null;
if (method !== 'GET' && data) {
if (headers['Content-Type'] === 'application/json') {
requestData = JSON.stringify(data);
} else if (
headers['Content-Type'] === 'application/x-www-form-urlencoded'
) {
requestData = this.processParams(data);
} else {
requestData = data;
}
}
xhr.send(requestData);
});
}
// 封装GET请求
get(url, params = null, config = {}) {
return this.sendRequest('GET', url, params, config);
}
// 封装POST请求
post(url, data = null, config = {}) {
return this.sendRequest('POST', url, data, config);
}
// 封装PUT请求
put(url, data = null, config = {}) {
return this.sendRequest('PUT', url, data, config);
}
// 封装DELETE请求
delete(url, data = null, config = {}) {
return this.sendRequest('DELETE', url, data, config);
}
}
// 创建单例实例
const httpClient = new HttpClient();
export default httpClient;4、使用实例
javascript
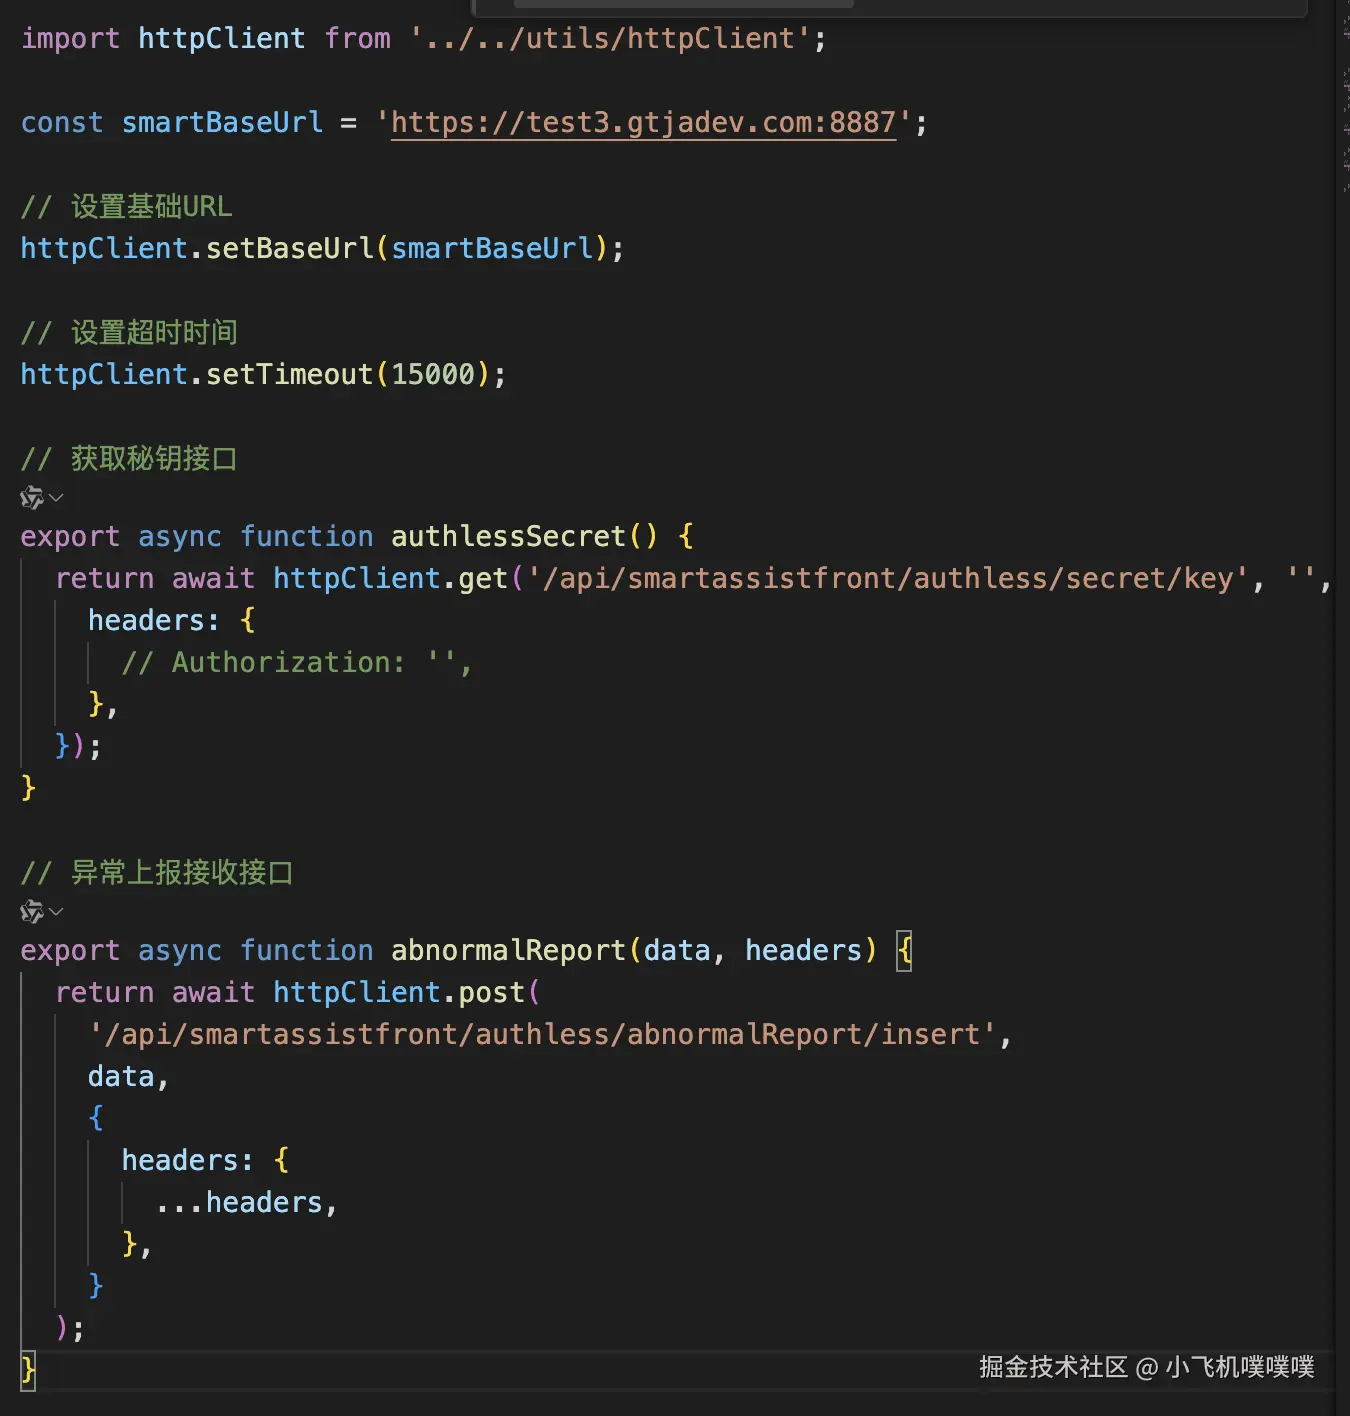
import httpClient from '../../utils/httpClient';
const smartBaseUrl = 'https://test3.gtjadev.com:8887';
// 设置基础URL
httpClient.setBaseUrl(smartBaseUrl);
// 设置超时时间
httpClient.setTimeout(15000);
// 获取秘钥接口
export async function authlessSecret() {
return await httpClient.get('/api/smartassistfront/authless/secret/key', '', {
headers: {
// Authorization: '',
},
});
}
// 异常上报接收接口
export async function abnormalReport(data, headers) {
return await httpClient.post(
'/api/smartassistfront/authless/abnormalReport/insert',
data,
{
headers: {
...headers,
},
}
);
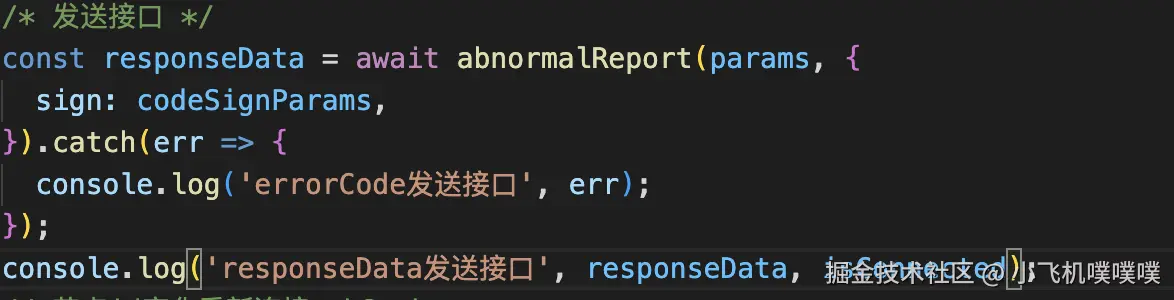
}封装的接口使用:
5、结尾
好了,简单的封装了api的请求实例,以后在不同项目中也能直接复用了,尤其是一些比较小的项目,对包大小有限制的一些项目最为实用。