简介
前面我们已经讲解了CarService FW层相关流程,感兴趣的可以点击文章回顾下CarService启动流程,接下来我们分析下hal层相关流程。官方文档可以参考:source.android.com/docs/automo...
HAL 层车控服务Vehicle服务启动流程
系统启动相关的服务时,一般是从init进程启动开始的,init进程扫描各个服务对应的rc文件,获取rc文件对应的配置服务来启动对应的服务,那么对于hal层的Vehicle服务来说,我们先看下对应的rc文件:
js
// hardware/interfaces/automotive/vehicle/aidl/impl/vhal/vhal-default-service.rc
// 启动一个名字为:vendor.vehicle-hal-default 的服务
// 可执行文件路径为: /vendor/bin/hw/android.hardware.automotive.vehicle@V1-default-service

service vendor.vehicle-hal-default /vendor/bin/hw/android.hardware.automotive.vehicle@V1-default-service
    class early_hal
    user vehicle_network
    group system inet

// class:指定服务所属的类别。
// 会在系统启动的较早阶段被初始化,先于普通 HAL 服务(如hal类)。这类服务通常对系统启动流程至关重要。
// user vehicle_network:指定服务运行的用户身份为vehicle_network。这是一个特殊用户,通常具有访问车辆网络(如 CAN 总线)的权限。
// group system inet:指定服务所属的用户组为system和inet,主要和权限相关。
// system组:允许访问系统级资源和 API。
// inet组:允许进行网络通信(如 socket 操作)。
接下来我们得找到 android.hardware.automotive.vehicle@V1-default-service 这个可执行文件是由谁编译出来的,才能找到VehicleService的主入口
arduino
// 路径: hardware/interfaces/automotive/vehicle/aidl/impl/vhal/Android.bp
// ...
cc_binary {
    name: "android.hardware.automotive.vehicle@V1-default-service",
    vendor: true,
    // ...
    init_rc: ["vhal-default-service.rc"],  // 建立关联的init.rc关系
    relative_install_path: "hw",   // 路径
    srcs: ["src/VehicleService.cpp"], // 源文件
    // ...
}
这样的我们就跟踪到对应源文件了,看下VehicleService.cpp里面的main做了些什么:
js
// hardware/interfaces/automotive/vehicle/aidl/impl/vhal/src/VehicleService.cpp
// 程序主入口
int main(int /* argc */, char* /* argv */[]) {
    // 创建一个最多4个线程的线程池,后续处理应用层binder请求
    ALOGI("Starting thread pool...");
    if (!ABinderProcess_setThreadPoolMaxThreadCount(4)) {
        ALOGE("%s", "failed to set thread pool max thread count");
        return 1;
    }
    // 启动线程池
    ABinderProcess_startThreadPool();

    // 初始化 FakeVehicleHardware 模拟车辆硬件的实现类,
    // 在真实的环境中,需要替换为真实的通信环境 CAN,以太网、LIN等
    std::unique_ptr<FakeVehicleHardware> hardware = std::make_unique<FakeVehicleHardware>();
    // VehicleHal 默认的服务实现端
    // 这里的DefaultVehicleHal类定义了和上层应用交互的一套范式接口,
    // 模拟器或者厂商正常情况下都把它作为和上层通信的桥接接口
    std::shared_ptr<DefaultVehicleHal> vhal =
            ::ndk::SharedRefBase::make<DefaultVehicleHal>(std::move(hardware));

    // 添加服务到ServiceManager中,上层通过这个服务明获取对应的Vehicle服务 的Binder对象
    ALOGI("Registering as service...");
    binder_exception_t err = AServiceManager_addService(
            vhal->asBinder().get(), "android.hardware.automotive.vehicle.IVehicle/default");
    // ...
    return 0;
}
到此,把服务添加到ServiceManager后,就和FW的代码就呼应上了,FW层获取的车控服务的名称就是:android.hardware.automotive.vehicle.IVehicle/default ,拿到服务后,我们接下来就看下设置车控属性的流程,当上层应用调用set车控属性方法时,对应到的服务端就是VehicleService,具体的set方法内容如下:
js
StatusCode DefaultVehicleHal::set(const VehiclePropValue& propValue) {
    // .. 省去一些校验的判断代码
    // 实现一般分为:谷歌模拟器或者根据实车开发了
    // Send the value to the vehicle server, the server will talk to the (real or emulated) car
    return mVehicleClient->setProperty(propValue, /*updateStatus=*/false);
}
流程到这里,相关的服务启动和set就算是完成了,剩下的就是OEM厂商根据自己的硬件功能去定义相关的IVehicleClient实现。
有了上面的思路和流程,接下来我们可以如果我们要根据自己的硬件开发hal层接口,我们应该怎么做,我们这里参考下模拟器是怎么实现了解下流程。同样的道理,模拟器得定义好自己的车控服务,启动rc文件如下:
js
// device/generic/car/emulator/vhal_aidl/vhal-emulator-service.rc
service vendor.vehicle-hal-emulator /vendor/bin/hw/android.hardware.automotive.vehicle@V1-emulator-service
    class early_hal
    user vehicle_network
    group system inet
同样的流程,这个执行文件的源文件定义在:device/generic/car/emulator/vhal_aidl/Android.bp
js
cc_binary {
    name: "android.hardware.automotive.vehicle@V1-emulator-service",
    vendor: true,
    defaults: [
        "FakeVehicleHardwareDefaults",
        "VehicleHalDefaults",
        "android-automotive-large-parcelable-defaults",
    ],
    vintf_fragments: ["vhal-emulator-service.xml"],
    init_rc: ["vhal-emulator-service.rc"],  // 关init.rc文件
    relative_install_path: "hw",
    cflags: ["-DENABLE_VENDOR_CLUSTER_PROPERTY_FOR_TESTING"],
    srcs: ["EmulatedVehicleService.cpp"],  // 源文件
    // ...
}
//device/generic/car/emulator/vhal_aidl/EmulatedVehicleService.cpp 源文件中main函数所作事情为:
js
int main(int /* argc */, char* /* argv */[]) {
    // ...
    // hal层实现代码 这里就是模拟器的hal了
    std::unique_ptr<EmulatedVehicleHardware> hardware = std::make_unique<EmulatedVehicleHardware>();
    // 和上层桥接任然是 DefaultVehicleHal
    std::shared_ptr<DefaultVehicleHal> vhal =
            ::ndk::SharedRefBase::make<DefaultVehicleHal>(std::move(hardware));

    // 又看到了我们熟悉的 addService了吧,还是一样的名字
    ALOGI("Emulator Vehicle Service: Registering as service...");
    binder_exception_t err = AServiceManager_addService(
            vhal->asBinder().get(), "android.hardware.automotive.vehicle.IVehicle/default");
    // ...
    return 0;
}
我们启动一下模拟器可以看到以下日志打印,说明我们的分析是没错的

这里我们可以看到,无论硬件hal层谁来承接是实现,但是对应上层FW来说,中介永远都是DefaultVehicleHal,至于中介最终需要和那个供应商沟通,FW层并不关心!接下来我们看下set流程:
js
// 定位到DefaultVehicleHal类的set函数
// hardware/interfaces/automotive/vehicle/2.0/default/impl/vhal_v2_0/DefaultVehicleHal.cpp
StatusCode DefaultVehicleHal::set(const VehiclePropValue& propValue) {
    //...
    // 获取属性值
    int32_t property = propValue.prop;
    const VehiclePropConfig* config = mPropStore->getConfigOrNull(property);
    if (config == nullptr) {
        ALOGW("no config for prop 0x%x", property);
        return StatusCode::INVALID_ARG;
    }
    // 校验属性area合法性
    const VehicleAreaConfig* areaConfig = getAreaConfig(propValue, config);
    if (!isGlobalProp(property) && areaConfig == nullptr) {
        // Ignore areaId for global property. For non global property, check whether areaId is
        // allowed. areaId must appear in areaConfig.
        ALOGW("invalid area ID: 0x%x for prop 0x%x, not listed in config", propValue.areaId,
              property);
        return StatusCode::INVALID_ARG;
    }
    auto status = checkPropValue(propValue, config);
    if (status != StatusCode::OK) {
        ALOGW("invalid property value: %s", toString(propValue).c_str());
        return status;
    }
    // 校验值的范围
    status = checkValueRange(propValue, areaConfig);
    if (status != StatusCode::OK) {
        ALOGW("property value out of range: %s", toString(propValue).c_str());
        return status;
    }

    auto currentPropValue = mPropStore->readValueOrNull(propValue);
    if (currentPropValue && currentPropValue->status != VehiclePropertyStatus::AVAILABLE) {
        // do not allow Android side to set() a disabled/error property
        return StatusCode::NOT_AVAILABLE;
    }
    // set值出去
    // Send the value to the vehicle server, the server will talk to the (real or emulated) car
    return mVehicleClient->setProperty(propValue, /*updateStatus=*/false);
}
调用IVehicleClient的setProperty()方法,IVehicleClient是一个hal层桥接车辆或者模拟器的中间接口类,Android 14模拟器中使用 gRPC 远程通信框架来做的客户端和模拟器端的通信调用,感兴趣的可以去了解下gRPC。IVehicleClient的子类关系图为:
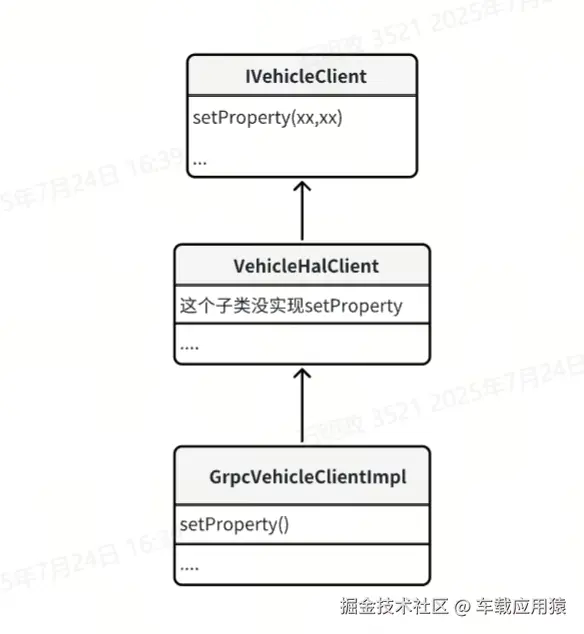
GrpcVehicleClientImpl 实现如下:
js
StatusCode GrpcVehicleClientImpl::setProperty(const VehiclePropValue& value, bool updateStatus) {
    ::grpc::ClientContext context;
    vhal_proto::WrappedVehiclePropValue wrappedProtoValue;
    vhal_proto::VehicleHalCallStatus vhal_status;
    // 把propValue转换成为 proto 格式
    proto_msg_converter::toProto(wrappedProtoValue.mutable_value(), value);
    wrappedProtoValue.set_update_status(updateStatus);
    // 调用服务端 SetProperty 写入数据
    auto grpc_status = mGrpcStub->SetProperty(&context, wrappedProtoValue, &vhal_status);
    if (!grpc_status.ok()) {
        LOG(ERROR) << __func__ << ": GRPC SetProperty Failed: " << grpc_status.error_message();
        return StatusCode::INTERNAL_ERROR;
    }

    return static_cast<StatusCode>(vhal_status.status_code());
}
接下来我们看下服务端 GrpcVehicleServerImpl 实现:
js
::grpc::Status GrpcVehicleServerImpl::SetProperty(
        ::grpc::ServerContext* context, const vhal_proto::WrappedVehiclePropValue* wrappedPropValue,
        vhal_proto::VehicleHalCallStatus* status) {
    VehiclePropValue value;
    proto_msg_converter::fromProto(&value, wrappedPropValue->value());
    LOG(ERROR) << __func__ << "my_log GrpcVehicleServerImpl::SetProperty ";
    // 内部调用 onSetProperty()方法
    auto set_status = static_cast<int32_t>(onSetProperty(value, wrappedPropValue->update_status()));
    if (!vhal_proto::VehicleHalStatusCode_IsValid(set_status)) {
        return ::grpc::Status(::grpc::StatusCode::INTERNAL, "Unknown status code");
    }

    status->set_status_code(static_cast<vhal_proto::VehicleHalStatusCode>(set_status));

    return ::grpc::Status::OK;
}

StatusCode GrpcVehicleServerImpl::onSetProperty(const VehiclePropValue& value, bool updateStatus) {
    LOG(ERROR) << __func__ << "my_log
    GrpcVehicleServerImpl::onSetProperty";
    if (value.prop == AP_POWER_STATE_REPORT &&
        value.value.int32Values[0] == toInt(VehicleApPowerStateReport::SHUTDOWN_POSTPONE)) {
        mGarageModeHandler->HandleHeartbeat();
    }
    return GrpcVehicleServer::onSetProperty(value, updateStatus);
}
这里调用了父类GrpcVehicleServer::onSetProperty()方法,但是GrpcVehicleServer其实并没有实现onSetProperty(),真正得实现在GrpcVehicleServer的父类DefaultVehicleHalServer中。
js
StatusCode DefaultVehicleHalServer::onSetProperty(const VehiclePropValue& value,
                                                  bool updateStatus) {
    LOG(DEBUG) << "my_log onSetProperty(" << value.prop << ")";
    // Some properties need to be treated non-trivially
    switch (value.prop) {
        case AP_POWER_STATE_REPORT:
            switch (value.value.int32Values[0]) {
                case toInt(VehicleApPowerStateReport::DEEP_SLEEP_EXIT):
                case toInt(VehicleApPowerStateReport::SHUTDOWN_CANCELLED):
                case toInt(VehicleApPowerStateReport::WAIT_FOR_VHAL):
                    // CPMS is in WAIT_FOR_VHAL state, simply move to ON
                    // Send back to HAL
                    // ALWAYS update status for generated property value
                    onPropertyValueFromCar(*createApPowerStateReq(VehicleApPowerStateReq::ON, 0),
                                           true /* updateStatus */);
                    break;
                case toInt(VehicleApPowerStateReport::DEEP_SLEEP_ENTRY):
                case toInt(VehicleApPowerStateReport::SHUTDOWN_START):
                    // CPMS is in WAIT_FOR_FINISH state, send the FINISHED command
                    // Send back to HAL
                    // ALWAYS update status for generated property value
                    onPropertyValueFromCar(
                            *createApPowerStateReq(VehicleApPowerStateReq::FINISHED, 0),
                            true /* updateStatus */);
                    break;
                case toInt(VehicleApPowerStateReport::ON):
                case toInt(VehicleApPowerStateReport::SHUTDOWN_POSTPONE):
                case toInt(VehicleApPowerStateReport::SHUTDOWN_PREPARE):
                    // Do nothing
                    break;
                default:
                    // Unknown state
                    break;
            }
            break;
        // ...
        default:
            break;
    }

    // In the real vhal, the value will be sent to Car ECU.
    // We just pretend it is done here and send back to HAL
    auto updatedPropValue = getValuePool()->obtain(value);
    updatedPropValue->timestamp = elapsedRealtimeNano();
    // 把数据写入mServerSidePropStore中,保存起来,到这里对于模拟器来说,整个set流程就算完结了。
    mServerSidePropStore.writeValue(*updatedPropValue, updateStatus);
    onPropertyValueFromCar(*updatedPropValue, updateStatus);
    return StatusCode::OK;
}