文章目录
- [MariaDB 数据库管理](#MariaDB 数据库管理)
MariaDB 数据库管理
章节内容:
- 介绍 MariaDB 数据库
- 部署 MariaDB 数据库
- 实践 MariaDB 中 SQL
- 管理 MariaDB 用户
- 备份和恢复 MariaDB
介绍 MariaDB
数据库介绍
**数据库,是一个存放计算机数据的仓库。**这个仓库是按照一定的数据结构来对数据进行组织和存储的,我们可以通过数据库提供的多种方法来管理其中的数据。
数据结构,是指数据的组织形式或数据之间的联系。
数据库种类
按照早期的数据库理论,比较流行的数据库模型有三种,分别为:
- 层次式数据库,以层次模型建立的数据库,例如文件系统。
- 网状数据库,以网状模型建立的数据库,例如网络通信。
- 关系型数据库,以二维表模型建议的数据库,例如图书馆管理系统。
在当今的互联网企业中,最常用的数据库模式主要有两种:
- 关系型数据库,把复杂的数据结构归结为简单的二维表形式。在关系型数据库中,对数据的操作几乎全部建立在一个或多个关系表格上,通过对这些关联的表格分类、合并、连接或选取等运算来实现数据库的管理。例如:Oracle、MySql和PostgreSQL等。
- 非关系型数据库 ,也被称为 NoSQL 数据库,本意是"Not Only SQL",而非"NO SQL"的意思,因此,NoSQL的产生并不是要彻底否定关系型数据库,而是作为传统数据库的一个有效补充。典型产品有Redis(持久化缓存)、Mongodb、Memcached(纯内存)等。
关系数据库
关系数据库将结构化数据存储在一组相互关联的表中。 这意味着一个表中的信息可以轻松地与另一表中的信息组合在一起,以处理和提供有关该数据的报告。
关系数据库管理系统(RDBMS-relational database management system)是用于管理关系数据库的软件。大多数关系数据库管理系统都允许您使用结构化查询语言(SQL)查找和管理数据库中的数据。
许多组织使用关系数据库存储业务信息,例如:库存,销售和财务。 关系数据库管理系统在许多应用中起着关键作用。 例如,许多需要支持动态生成内容的Web应用程序都是围绕LAMP(LNMP)解决方案构建:
- Linux 操作系统提供了基本的环境。
- Apache HTTPS Server 或Nginx,提供Web服务器。
- MariaDB ,MySQL 或其他关系数据库,例如PostgreSQL,用于存储站点数据。
- 由 Web 服务器运行的编程语言,例如 PHP,Python,Perl,Ruby,Java,服务器端JavaScript或其他,可以更新数据库中的数据并使用它为用户动态构建网页。
由于关系数据库通常与系统管理员管理的应用程序集成在一起,因此即使您不是数据库管理员,也有必要了解这些服务及其数据的安装和管理知识。
MariaDB 介绍
MariaDB数据库管理系统是MySQL数据库的一个分支,主要由开源社区维护,采用GPL授权许可。开发这个MariaDB数据库分支的可能原因之一是:甲骨文公司收购了MySQL后,有将MySQL闭源的潜在风险,因此MySQL开源社区采用分支的方式来避开这个风险。
MariaDB数据库完全兼容MySQL数据库,包括API和命令行,使之能轻松的成为MySQL的代替品。
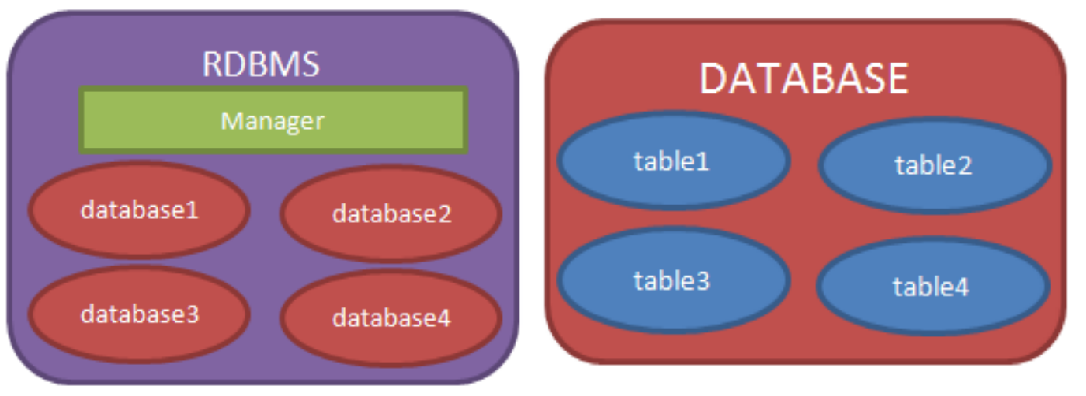
MariaDB数据库管理系统可以包含多个database,每个database包涵多张表。
关系数据库的表采用二维表格来存储数据,类似于Excle工作表。
- 表中的一行即为一个元组 ,或称为一条记录。
- 数据表中的每一列称为一个字段(属性),表是由其包含的各种字段定义,每个字段描述了它所含有的数据意义,为每个字段分配一个数据类型,定义它们的数据长度和其他属性。
- 行和列的交叉位置表示某个属性值。

部署 MariaDB
安装 MariaDB
在Rocky 8中,MariaDB由AppStream存储库提供。
安装
bash
# 安装服务端
[root@server ~ 11:01:56]# yum install -y mariadb-server

# 安装客户端
[root@client ~ 11:05:16]# yum install -y mariadb
启用并启动服务
bash
[root@server ~ 11:02:15]# systemctl enable --now mariadb配置防火墙
bash
[root@server ~ 11:02:36]# firewall-cmd --permanent --add-service=mysql
success
[root@server ~ 11:02:42]# firewall-cmd --reload
success
加固 MariaDB
MariaDB数据库默认具有test 数据库和一些不太安全的配置。运行mysql_secure_installation修改这些配置。
bash
[root@server ~ 11:02:49]# mysql_secure_installation交互式提示您进行更改,包括:
- 为root帐户设置密码。
- 禁止root帐户从本地主机外部访问数据库。
- 删除匿名用户帐户。
- 删除用于演示的test数据库。
连接 MariaDB
MariaDB客户端可以通过两种方式连接到服务器:
-
如果客户端与服务器在同一台计算机上运行,则它可以使用特殊的套接字文件与MariaDB通信。 这种方式更安全,因为MariaDB不需要侦听来自网络客户端的连接。 但是,使用该数据库的服务都需要在MariaDB服务器上运行,会影响性能。
bash[root@server ~ 10:04:57]# mysql -uroot Welcome to the MariaDB monitor. Commands end with ; or \g. Your MariaDB connection id is 2 Server version: 5.5.68-MariaDB MariaDB Server Copyright (c) 2000, 2018, Oracle, MariaDB Corporation Ab and others. Type 'help;' or '\h' for help. Type '\c' to clear the current input statement. MariaDB [(none)]> -
客户端可以使用TCP/IP网络连接到MariaDB服务。 远程服务器与MariaDB服务器运行在不同主机。 此时服务器需要配置侦听端口3306/TCP上的连接。
bash# 数据库服务器本机创建连接用户 [root@server ~ 11:03:37]# mysql -uroot MariaDB [(none)]> grant all privileges on *.* to zzh@'%' identified by 'redhat'; Query OK, 0 rows affected (0.00 sec) MariaDB [(none)]> quit Bye # 客户端测试 [root@client ~ 11:05:40]# mysql -uzzh -predhat -h server
配置 MariaDB
默认情况下,MariaDB 侦听系统中所有网络地址上3306/TCP端口。
MariaDB 配置文件:
- 主配置文件 /etc/my.cnf
- 辅助配置文件 /etc/my.conf.d/*
/etc/my.cnf.d/mariadb-server.cnf 文件是数据库服务主要配置。 在该文件的 mysqld 块中可以定义以下参数:
- bind-address ,该指令指定MariaDB用来侦听客户端连接的网络地址。 只能输入一个选项。 可能的选项包括:
- 单个IPv4地址。
- 单个IPv6地址。
- ::连接到所有可用地址(IPv6和IPv4)。
- 对于所有IPv4地址,保留为空白(或设置为0.0.0.0)。
- 如果只希望本地客户端访问MariaDB,则可以使用127.0.0.1或**::1**作为网络地址。
- skip-networking ,如果在配置文件的mysqld部分中设置skip-networking或skip-networking = 1 ,则将禁用网络连接,并且客户端必须使用套接字文件与MariaDB通信。 如果您设置skip-networking = 0(默认值),MariaDB会侦听网络连接。
- port , 您可以使用此设置指定3306/TCP以外的网络端口。
客户端配置示例:
bash
[root@server ~ 11:03:52]# vim /etc/my.cnf.d/mysql-clients.cnf
ini
[mysql]
    user=zzh
    password=redhat
    host=server
    port=3306
# database=test
MariaDB 中 SQL
描述 SQL
SQL(Structured Query Language),结构化查询语言,是1986年10 月由美国国家标准局颁布的数据库语言。国际标准化组织(ISO)也颁布了SQL国际标准。
结构化查询语言是关系数据库最重要的操作语言,它的影响已经超出数据库领域,得到其他领域的重视和采用,如人工智能领域的数据检索,第四代软件开发工具中嵌入SQL的语言等。
SQL语句可简单分为如下几类:
- 数据查询语言(DQL:Data Query Language):也称为"数据检索语句",用以从表中获得数据,保留字SELECT WHERE,ORDER BY,GROUP BY和HAVING。
- 数据操作语言(DML:Data Manipulation Language):其语句包括动词INSERT,UPDATE和DELETE。
- 数据定义语言(DDL):其语句包括动词CREATE和DROP。例如,在数据库中创建新表(CREATE TABLE)、删除表(DROP TABLE),为表添加索引等。
- 事务处理语言(TPL):它的语句能确保被DML语句影响的表的所有行及时得以更新。TPL语句包括BEGIN TRANSACTION,COMMIT和ROLLBACK。
- 数据控制语言(DCL):它的语句通过GRANT或REVOKE获得许可,确定单个用户和用户组对数据库对象的访问。
连接数据库
mariadb 软件包提供了命令mysql,该命令支持对MariaDB数据库的交互式和非交互式访问。
- 交互式执行时,结果以ASCII表的格式显示。
- 非交互执行时,结果以制表符分隔的格式显示。
示例:
bash
[root@server ~]# mysql -u root -h localhost -p首次安装时,MariaDB默认设置root用户帐户无需密码即可进行访问。
bash
[root@server ~ 11:08:23]# mysql -u root
Welcome to the MariaDB monitor.  Commands end with ; or \g.
Your MariaDB connection id is 8
Server version: 10.3.17-MariaDB MariaDB Server

Copyright (c) 2000, 2018, Oracle, MariaDB Corporation Ab and others.

Type 'help;' or '\h' for help. Type '\c' to clear the current input statement.

MariaDB [(none)]>
执行交互式SQL语句时,MariaDB提示符在方括号中显示您当前选择数据库。
数据库操作
查询数据库列表
bash
MariaDB [(none)]> SHOW DATABASES;
+--------------------+
| Database           |
+--------------------+
| information_schema |
| mysql              |
| performance_schema |
+--------------------+
3 rows in set (0.019 sec)

MariaDB [(none)]>
数据库说明:
- mysql 数据库,是一个系统数据库,保存数据库用户及其访问权限等信息。
- INFORMATION_SCHEMA 数据库,保存关于数据库或者数据表的元数据信息。
- **PERFORMANCE_SCHEMA **数据库,保存数据库服务器性能信息。
使用数据库
您可以使用 USE 语句选择数据库之一,例如:USE mysql;,后续默认操作的表属于mysql数据库。
sql
MariaDB [(none)]> USE mysql;
Reading table information for completion of table and column names
You can turn off this feature to get a quicker startup with -A

Database changed
MariaDB [mysql]>
SQL语句不区分大小写,但数据库名称区分大小写。 通常的做法是数据库名称全为小写字母,SQL语句全为大写字母,以区分SQL语句与语句的目标或参数。
创建数据库
sql
MariaDB [mysql]> CREATE DATABASE laoma;
Query OK, 1 row affected (0.010 sec)

MariaDB [mysql]> USE laoma;
Database changed
删除数据库
DROP DATABASE 语句删除数据库中的所有表并删除数据库。 这将破坏数据库中的所有数据。 只有对该数据库具有DROP 特权的用户才能运行此语句。 这不会更改数据库的用户特权。 如果重新创建具有该名称的数据库,则为旧数据库设置的用户权限仍然有效。
sql
MariaDB [inventory]> DROP DATABASE zzh;
Query OK, 0 rows affected (0.006 sec)
表操作
SQL CRUD操作(create 添加数据 read读取数据 update 修改数据delete删除数据)。
环境准备
bash
# 导入备份
[root@server ~ 11:23:05]# mysql -uroot -predhat -e 'create database inventory;'
[root@server ~ 11:24:29]# mysql -uroot -predhat inventory < inventory.dump
查询表
查询表列表
bash
查询表列表
MariaDB [(none)]> USE inventory;
MariaDB [inventory]> SHOW TABLES;
+---------------------+
| Tables_in_inventory |
+---------------------+
| category            |
| manufacturer        |
| product             |
+---------------------+
3 rows in set (0.001 sec)
查询表结构
bash
MariaDB [inventory]> DESCRIBE product;
+-----------------+--------------+------+-----+---------+----------------+
| Field           | Type         | Null | Key | Default | Extra          |
+-----------------+--------------+------+-----+---------+----------------+
| id              | int(11)      | NO   | PRI | NULL    | auto_increment |
| name            | varchar(100) | NO   |     | NULL    |                |
| price           | double       | NO   |     | NULL    |                |
| stock           | int(11)      | NO   |     | NULL    |                |
| id_category     | int(11)      | NO   |     | NULL    |                |
| id_manufacturer | int(11)      | NO   |     | NULL    |                |
+-----------------+--------------+------+-----+---------+----------------+
6 rows in set (0.008 sec)

MariaDB [inventory]>
输出显示,表格中有六列(属性):
- Field 列,显示该属性名称。
- Type 列,显示该属性的数据必须采用的格式。例如,stock属性必须是最多11位数字的整数。
- Null 列,指示此属性是否可以为null。
- Default 列,指示如果未指定该属性,则是否设置了默认值。
- Key 列 ,显示属性ID是primary key。 主键是表中一行的唯一标识符。 该属性的任何其他行都不能具有相同的值。
- Extra列,提供该列额外信息,对于id字段标记为auto_increment。 这意味着每次将新项目插入表中时,该条目的属性值都会增加。 这样可以更轻松地使数字主键保持唯一。
查询表中数据
查询表中所有记录所有字段
bash
MariaDB [inventory]> SELECT * FROM product;
+----+-------------------+---------+-------+-------------+-----------------+
| id | name              | price   | stock | id_category | id_manufacturer |
+----+-------------------+---------+-------+-------------+-----------------+
|  1 | ThinkServer TS140 |  539.88 |    20 |           2 |               4 |
|  2 | ThinkServer RD630 | 2379.14 |    20 |           2 |               4 |
|  3 | RT-AC68U          |  219.99 |    10 |           1 |               3 |
|  4 | X110 64GB         |   73.84 |   100 |           3 |               1 |
+----+-------------------+---------+-------+-------------+-----------------+
4 rows in set (0.004 sec)

MariaDB [inventory]> SELECT * FROM category;
+----+------------+
| id | name       |
+----+------------+
|  1 | Networking |
|  2 | Servers    |
|  3 | Ssd        |
+----+------------+
3 rows in set (0.001 sec)

MariaDB [inventory]> SELECT * FROM manufacturer;
+----+----------+----------------+-------------------+
| id | name     | seller         | phone_number      |
+----+----------+----------------+-------------------+
|  1 | SanDisk  | John Miller    | +1 (941) 329-8855 |
|  2 | Kingston | Mike Taylor    | +1 (341) 375-9999 |
|  3 | Asus     | Wilson Jackson | +1 (432) 367-8899 |
|  4 | Lenovo   | Allen Scott    | +1 (876) 213-4439 |
+----+----------+----------------+-------------------+
4 rows in set (0.001 sec)

MariaDB [inventory]>
查询表中所有记录特定字段
bash
MariaDB [inventory]> SELECT name,price,stock FROM product;
+-------------------+---------+-------+
| name              | price   | stock |
+-------------------+---------+-------+
| ThinkServer TS140 |  539.88 |    20 |
| ThinkServer RD630 | 2379.14 |    20 |
| RT-AC68U          |  219.99 |    10 |
| X110 64GB         |   73.84 |   100 |
+-------------------+---------+-------+
4 rows in set (0.001 sec)
WHERE子句
bash
MariaDB [inventory]> SELECT * FROM product WHERE price > 100;
+----+-------------------+---------+-------+-------------+-----------------+
| id | name              | price   | stock | id_category | id_manufacturer |
+----+-------------------+---------+-------+-------------+-----------------+
|  1 | ThinkServer TS140 |  539.88 |    20 |           2 |               4 |
|  2 | ThinkServer RD630 | 2379.14 |    20 |           2 |               4 |
|  3 | RT-AC68U          |  219.99 |    10 |           1 |               3 |
+----+-------------------+---------+-------+-------------+-----------------+
3 rows in set (0.020 sec)
条件操作数
| Operator | Description |
|---|---|
| = | Equal |
| <> | Not equal. Note: In some versions of SQL, this operator may be written as != |
| > | Greater than |
| < | Less than |
| >= | Greater than or equal |
| <= | Less than or equal |
| BETWEEN | Between an inclusive range |
| LIKE | Search for a pattern |
| IN | Specify multiple possible values for a column |
bash
# 条件操作符包括:=、<>、>、<、>=、<=
MariaDB [inventory]> SELECT * FROM product WHERE price > 100;

# BETWEEN,匹配2个数字之间(包括数字本身)的记录。
MariaDB [inventory]> SELECT * FROM product WHERE id BETWEEN 1 AND 3;

# IN,匹配列表中记录。
MariaDB [inventory]> SELECT * FROM product WHERE id IN (1,3);
MariaDB [inventory]> SELECT * FROM category WHERE name IN ('Servers','Ssd');

# LIKE,用于匹配字符串。%表示一个或多个字符,_表示一个字符,[charlist]表示字符列中的任何单一字符,[^charlist]或者[!charlist]不在字符列中的任何单一字符。
MariaDB [inventory]> SELECT * FROM product WHERE name like '%Server%';

# 逻辑与AND
MariaDB [inventory]> SELECT * FROM product WHERE name like '%RD%' AND price>1000;

# 逻辑或or
MariaDB [inventory]> SELECT * FROM product WHERE name like '%RD%' OR price>500;

# ORDER BY 关键字用于对结果集进行排序。
MariaDB [inventory]> SELECT * FROM product ORDER BY price;
MariaDB [inventory]> SELECT * FROM product ORDER BY price desc;
多表查询
bash
# 示例1:产品类型是Servers的产品名称和价格
MariaDB [inventory]> SELECT product.name,product.price
FROM product,category
WHERE product.id_category = category.id
AND category.name='Servers';

# 示例2:查询厂商是Lenovo的产品名称和价格
MariaDB [inventory]> SELECT product.name,product.price
FROM product,manufacturer
WHERE product.id_manufacturer = manufacturer.id
AND manufacturer.name='Lenovo';
函数
bash
# 示例1:查询产品价格平均值
MariaDB [inventory]> SELECT avg(price) FROM product;

# 示例2:查询产品价格最大值
MariaDB [inventory]> SELECT max(price) FROM product;

# 示例3:查询产品价格最小值
MariaDB [inventory]> SELECT min(price) FROM product;

# 示例4:查询产品存量
MariaDB [inventory]> SELECT sum(stock) FROM product;

# 示例5:查询产品价格最小值的那个产品信息
MariaDB [inventory]> SELECT min(price) FROM product;
MariaDB [inventory]> SELECT * FROM product WHERE price=73.84;
或者
MariaDB [inventory]> SELECT * FROM product WHERE price=(SELECT min(price) FROM product);

# 示例6:查询Lenovo厂商提供了几种产品
MariaDB [inventory]> SELECT count(product.name)
FROM product,manufacturer
WHERE product.id_manufacturer = manufacturer.id
AND manufacturer.name='Lenovo';

# GROUP BY 语句用于结合聚合函数,根据一个或多个列对结果集进行分组。
MariaDB [inventory]> SELECT id_category,sum(stock) FROM product GROUP BY id_category;
创建表
bash
MariaDB [inventory]> CREATE TABLE staff(
id INT(11) NOT NULL,
name VARCHAR(100) NOT NULL,
age INT(11)  DEFAULT 10,
id_department INT(11)
);
Query OK, 0 rows affected (0.017 sec)
MariaDB [inventory]> SHOW TABLES;
插入记录
bash
MariaDB [inventory]> INSERT INTO staff (id,name,age,id_department)
VALUES (1,'zzh1',28,10);
MariaDB [inventory]> INSERT INTO staff (id,name,age) VALUES (2,'zzh2',20);
MariaDB [inventory]> INSERT INTO staff (id,name) VALUES (3,'zzh3');
更新记录
bash
MariaDB [inventory]> UPDATE staff SET age=30 WHERE id=3;
MariaDB [inventory]> UPDATE staff SET age=30
如果使用不带WHERE子句的UPDATE,则表中的所有记录都会更新。
删除记录
bash
MariaDB [inventory]> DELETE FROM staff WHERE id=3 ;
MariaDB [inventory]> DELETE FROM staff ;
如果使用不带WHERE子句的DELETE子句,则表中的所有记录都会删除。
删除表
bash
MariaDB [inventory]> DROP TABLE staff ;管理 MariaDB 用户
创建用户账户
默认情况下,MariaDB有自己的用户和密码,与本地系统的用户和密码分开。这意味着MariaDB数据库用户与服务器的Linux用户不同, 即使用户帐户具有相同的名称。
为了控制用户对数据库服务器的访问级别,必须在MariaDB中设置数据库用户并授予他们在服务器及其数据上执行操作的权限。
您可以配置MariaDB使用
pam身份验证插件将系统用户帐户和密码集成为MariaDB数据库用户,本课程不介绍该配置。 在大多数情况下,最好分开管理数据库和系统用户账户。
要创建新用户,您需要以下权限级别之一:
- MariaDB的root用户。
- 被授予全局CREATE USER特权的用户。
- 被授予对mysql数据库的INSERT特权的用户。
我们可以使用CREATE USER语句,在mysql数据库的user表中创建一条新记。
用户名格式:user_name@host_name。 这样就可以根据主机源,创建具有相同名称但具有不同特权的多个用户帐户。
bash
MariaDB [(none)]> CREATE USER zzh@'%' IDENTIFIED BY 'redhat';当前,zzh 帐户只能使用密码redhat从**%**连接。
用户的密码,会被加密存在在mysql.user表:
bash
MariaDB [mysql]> SELECT host,user,password FROM user WHERE user = 'zzh';
+-----------+--------+-------------------------------------------+
| host      | user   | password                                  |
+-----------+--------+-------------------------------------------+
| %         | zzh    | *84BB5DF4823DA319BBF86C99624479A198E6EEE9 |
+-----------+--------+-------------------------------------------+
1 row in set (0.000 sec)
用户帐户定义示例
| Account | Description |
|---|---|
| laoma | User laoma can connect from any host. |
| laoma@'%' | User laoma can connect from any host. |
| laoma@'localhost' | User laoma can only connect from localhost. |
| laoma@'192.168.1.5' | User laoma can only connect from the IP address192.168.1.5. |
| laoma@'192.168.1.%' | User laoma can connect from any address that belongs to the network 192.168.1.0/24. |
| laoma@'2001:db8:18:b51:c32:a21' | User laoma can connect from the IP address 2001:db8:18:b51:c32:a21. |
控制用户权限
默认情况下,新帐户被授予最小特权。 在不授予其他特权的情况下,laoma用户只能访问最少的帐户信息,大多数其他操作均被拒绝。
示例:
bash
[root@server ~]# mysql -u zzh -p
Enter password: redhat
Welcome to the MariaDB monitor.  Commands end with ; or \g.
Your MariaDB connection id is 12
Server version: 10.3.17-MariaDB MariaDB Server

Copyright (c) 2000, 2018, Oracle, MariaDB Corporation Ab and others.

Type 'help;' or '\h' for help. Type '\c' to clear the current input statement.

MariaDB [(none)]> SELECT USER();
+------------------+
| USER()           |
+------------------+
| laoma@localhost |
+------------------+
1 row in set (0.003 sec)

MariaDB [(none)]> SHOW DATABASES;
+--------------------+
| Database           |
+--------------------+
| information_schema |
+--------------------+
1 row in set (0.004 sec)

MariaDB [(none)]> USE mysql;
ERROR 1044 (42000): Access denied for user 'laoma'@'localhost' to database 'mysql'
MariaDB [(none)]> CREATE DATABASE inventory;
ERROR 1044 (42000): Access denied for user 'laoma'@'localhost' to database 'inventory'
MariaDB [(none)]>
privileges是用户在MariaDB中拥有的能力,确定用户可以做什么以及用户在MariaDB中可以做什么。特权按范围进行组织:
-
全局特权 ,用于管理MariaDB数据库服务器本身,例如CREATE USER。
-
数据库特权 ,用于在MariaDB服务器上创建数据库和使用数据库,例如CREATE DATABASE。
-
表特权 ,用于在特定数据库中创建表和处理数据,例如CRUD命令。
CRUD 是指在做计算处理时的增加(Create)、查询(Retrieve)(重新得到数据)、更新(Update)和删除(Delete)几个单词的首字母简写。
-
列特权,用于授予类似表的命令用法,但用于特定的列(通常很少见)。
详情参考本节末尾引用的MariaDB文档。
查询用户权限
bash
MariaDB [(none)]> SHOW GRANTS FOR root@localhost;
+----------------------------------------------------------------------------------------------------------------------------------------+
| Grants for root@localhost                                                                                                              |
+----------------------------------------------------------------------------------------------------------------------------------------+
| GRANT ALL PRIVILEGES ON *.* TO 'root'@'localhost' IDENTIFIED BY PASSWORD '*84BB5DF4823DA319BBF86C99624479A198E6EEE9' WITH GRANT OPTION |
| GRANT PROXY ON ''@'%' TO 'root'@'localhost' WITH GRANT OPTION                                                                          |
+----------------------------------------------------------------------------------------------------------------------------------------+
2 rows in set (0.006 sec)
授予用户权限
GRANT 语句可用于向帐户授予特权。 要授予GRANT特权,连接的用户必须具有GRANT OPTION 且必须具有他们所授予的特定特权。
例如,laoma用户无法授予数据库表SELECT特权,除非他们已经具有SELECT特权和GRANT OPTION表特权。
在此示例中,MariaDB根用户向清单数据库中类别表上的laoma用户授予CRUD特权。
bash
[root@server ~]# mysql -u root -p
Enter password: redhat

MariaDB [(none)]> GRANT SELECT, UPDATE, DELETE, INSERT
    -> ON inventory.category
    -> TO laoma@localhost ;
Query OK, 0 rows affected (0.006 sec)

MariaDB [inventory]> exit
Bye
验证权限
bash
[root@server ~]# mysql -u laoma -p
Enter password: redhat

MariaDB [(none)]> USE inventory;
Reading table information for completion of table and column names
You can turn off this feature to get a quicker startup with -A

Database changed
MariaDB [inventory]> SELECT * FROM category;
+----+------------+
| id | name       |
+----+------------+
|  1 | Networking |
|  2 | Servers    |
|  3 | Ssd        |
+----+------------+
3 rows in set (0.004 sec)
授权示例
| Grant | Description |
|---|---|
| GRANT SELECT ON database.table TO username@hostname | Grant SELECT privilege for a specific table in a specific database to a specific user. |
| GRANT SELECT ON database. TO username@hostname* | Grant SELECT privilege for all tables in a specific database to a specific user. |
GRANT SELECT ON *.* TO username@hostname |
Grant SELECT privilege for all tables in all databases to a specific user. |
| GRANT CREATE, ALTER, DROP ON database. to username@hostname* | Grant CREATE, ALTER, and DROP TABLES privileges in a specific database to a specific user. |
GRANT ALL PRIVILEGES ON *.* to username@hostname |
Grant all available privileges for all databases to a specific user, effectively creating a superuser, similar toroot. |
回收用户权限
REVOKE 语句从帐户中删除特权。 连接的用户必须具有GRANT OPTION特权,并且必须具有被撤消的特定特权。
bash
MariaDB [(none)]> REVOKE SELECT, UPDATE, DELETE, INSERT
    -> ON inventory.category FROM zzh@localhost;
Query OK, 0 rows affected (0.011 sec)
删除用户
当不再需要特定的用户帐户时,可以使用DROP USER将其从数据库中删除。
用户名使用**'user'@'host'**格式。
bash
MariaDB [(none)]> DROP USER zzh@localhost;
Query OK, 0 rows affected (0.001 sec)
如果删除了当前连接的帐户,则在关闭连接之前不会删除该帐户,关闭连接之后才会删除该帐户。
更改用户密码
bash
# root用户修改普通用户账户密码
MariaDB [(none)]> USE mysql;
MariaDB [(mysql)]> UPDATE user SET password=PASSWORD('mypass') WHERE user='zzh' and host='localhost';

# 或者
MariaDB [(none)]> SET PASSWORD FOR 'zzh'@'localhost' = PASSWORD('mypass');

# 普通用户修改自己账户密码
MariaDB [(none)]> SET PASSWORD = PASSWORD('mypass');
MariaDB [(none)]> FLUSH PRIVILEGES;
排故数据库访问
下表总结了用户在身份验证和访问方面可能遇到的一些问题,以及可能的原因。
| 问题 | 解决方法 |
|---|---|
| 已授予用户从任何主机进行连接的访问权限,但只能使用数据库服务器本地mysql命令进行连接。 | 如果在配置文件/etc/my.cnf.d/mariadb-server.cnf中设置了skip-networking,请删除该指令并重新启动服务。 |
| 用户可以与localhost上的任何应用程序连接,但不能远程连接。 | 确保/etc/my.cnf.d/mariadb-server.cnf中的bind-address配置正确。 确保用户表中包含用户要尝试与其连接的主机的条目。 |
| 用户可以连接,但看不到除information_schema以外的任何数据库。 | 确保已授予用户访问其数据库的权限。 刚创建的用户具有最小权限,会遇到这个问题。 |
| 用户可以连接,但不能创建任何数据库。 | 考虑向用户授予全局CREATE特权(这也授予DROP特权)。 |
| 用户可以连接,但不能读取或写入任何数据。 | 向用户授予他们打算使用的数据库的CRUD特权。 |
忘记 root 用户密码
-
编辑**/etc/my.cnf.d/mariadb-server.cnf**配置文件,在mysqld下添加
skip-grant-tables=1。 -
重启 mariadb 服务。
-
执行
mysql -u root命令进入mysql命令行,修改root用户密码。bash[root@server ~ 13:57:54]# mysql -u root MariaDB [(none)]> UPDATE mysql.user SET password=PASSWORD('新密码') where USER='root'; MariaDB [(none)]> exit -
把**/etc/my.cnf.d/mariadb-server.cnf配置文件中的
skip-grant-tables=1注释掉,然后重启mariadb**服务。
备份和恢复
备份方式
逻辑备份
逻辑备份,将数据库导出为包含重新创建数据库所需的SQL命令的文本文件。
- 通过查询数据库,检索数据库结构。
- 备份速度较慢,因为服务器必须访问数据库信息并将其转换为逻辑格式。
- 逻辑备份具有高度的可移植性,在某些情况下可以还原到其他数据库提供程序(例如PostgreSQL)。
- 在服务器联机时执行。
- 备份不包括日志或配置文件。
物理备份特征
物理备份,复制原始数据库目录和包含数据库内容的文件。
- 备份可以包括日志和配置文件。
- 仅可移植到具有类似硬件和软件的其他计算机上。
- 比逻辑备份更快。
- 在服务器脱机或数据库中的所有表均已锁定时执行,以防止在备份期间进行更改。
执行备份
执行逻辑备份
您在运行mysqldump 时所连接的MariaDB用户至少需要对转储表具有SELECT 特权,对转储视图至少需要SHOW VIEW ,对于转储触发器至少需要TRIGGER特权。
使用mysqldump命令执行逻辑备份。
语法:
bash
Usage: mysqldump [OPTIONS] database [tables]
OR     mysqldump [OPTIONS] --databases [OPTIONS] DB1 [DB2 DB3...]
OR     mysqldump [OPTIONS] --all-databases [OPTIONS]
For more options, use mysqldump --help
常用选项:
bash
  -A, --all-databases Dump all the databases. This will be same as --databases
                      with all databases selected.
  --ignore-database=name
                      Do not dump the specified database. To specify more than
                      one database to ignore, use the directive multiple times,
                      once for each database. Only takes effect when used
                      together with --all-databases|-A
  -B, --databases     Dump several databases. Note the difference in usage; in
                      this case no tables are given. All name arguments are
                      regarded as database names. 'USE db_name;' will be
                      included in the output.

  -Y, --all-tablespaces
                      Dump all the tablespaces.
  --ignore-table=name Do not dump the specified table. To specify more than one
                      table to ignore, use the directive multiple times, once
                      for each table.  Each table must be specified with both
                      database and table names, e.g.,
                      --ignore-table=database.table.
  -y, --no-tablespaces
                      Do not dump any tablespace information.

  --add-drop-database Add a DROP DATABASE before each create.
  --add-drop-table    Add a DROP TABLE before each create.

-x, --lock-all-tables
                      Locks all tables across all databases. This is achieved
                      by taking a global read lock for the duration of the
                      whole dump. Automatically turns --single-transaction and
                      --lock-tables off.
示例:
bash
[root@server ~]# mysqldump -u root -p inventory > /backup/inventory.dump
[root@server ~]# mysqldump -u root -p --all-databases > /backup/mariadb.dump
导出的文本文件部分内容示例:
bash
DROP TABLE IF EXISTS `category`;
/*!40101 SET @saved_cs_client     = @@character_set_client */;
/*!40101 SET character_set_client = utf8 */;
CREATE TABLE `category` (
  `id` int(11) NOT NULL AUTO_INCREMENT,
  `name` varchar(100) NOT NULL,
  PRIMARY KEY (`id`)
) ENGINE=InnoDB AUTO_INCREMENT=4 DEFAULT CHARSET=latin1;
/*!40101 SET character_set_client = @saved_cs_client */;

--
-- Dumping data for table `category`
--

LOCK TABLES `category` WRITE;
/*!40000 ALTER TABLE `category` DISABLE KEYS */;
INSERT INTO `category` VALUES (1,'Networking'),(2,'Servers'),(3,'Ssd');
/*!40000 ALTER TABLE `category` ENABLE KEYS */;
UNLOCK TABLES;
执行物理备份
mariabackup 工具由AppStream存储库中的mariadb-backup包提供。 mariabackup工具执行MariaDB服务器的完整物理备份。
bash
# 在安装mariadb-server软件包时,也会安装mariadb-backup软件包。
[root@server ~]# yum install mariadb-backup

# 准备备份目录
[root@server ~]# mkdir -p /var/mariadb/backup/

# 执行备份
[root@server ~]# mariabackup --backup --target-dir /var/mariadb/backup/ \
> --user root --password redhat
[00] 2021-03-11 17:34:31 Connecting to MySQL server host: localhost, user: root, password: set, port: not set, socket: not set
[00] 2021-03-11 17:34:31 Using server version 10.3.17-MariaDB
mariabackup based on MariaDB server 10.3.17-MariaDB Linux (x86_64)
[00] 2021-03-11 17:34:31 uses posix_fadvise().
[00] 2021-03-11 17:34:31 cd to /var/lib/mysql/
[00] 2021-03-11 17:34:31 open files limit requested 0, set to 1024
[00] 2021-03-11 17:34:31 mariabackup: using the following InnoDB configuration:
......
[00] 2021-03-11 17:34:34 >> log scanned up to (1699497)
[00] 2021-03-11 17:34:34 Executing UNLOCK TABLES
[00] 2021-03-11 17:34:34 All tables unlocked
[00] 2021-03-11 17:34:34 Copying ib_buffer_pool to /var/mariadb/backup/ib_buffer_pool
[00] 2021-03-11 17:34:34         ...done
[00] 2021-03-11 17:34:34 Backup created in directory '/var/mariadb/backup/'
[00] 2021-03-11 17:34:34 Writing backup-my.cnf
[00] 2021-03-11 17:34:34         ...done
[00] 2021-03-11 17:34:34 Writing xtrabackup_info
[00] 2021-03-11 17:34:34         ...done
[00] 2021-03-11 17:34:34 Redo log (from LSN 1699488 to 1699497) was copied.
[00] 2021-03-11 17:34:34 completed OK!

#确认目录中内容
[root@server ~]# ls /var/mariadb/backup/
aria_log.00000001  ib_buffer_pool  inventory           xtrabackup_checkpoints
aria_log_control   ibdata1         mysql               xtrabackup_info
backup-my.cnf      ib_logfile0     performance_schema
为了避免交互式输入密码,可以将密码配置在配置文件中。
示例:
bash
[root@server ~]# cat /etc/my.cnf.d/mariabackup.cnf
[xtrabackup]
user=root
password=redhat还可以创建一个具有RELOAD , LOCK TABLES 和REPLICATION CLIENT权限的用户代替root用户执行此备份。
执行恢复
还原备份时,它将用备份的内容覆盖数据库服务器的内容。 如果数据库中的数据比备份中的数据新,该部分数据将会丢失。
恢复逻辑备份
bash
[root@server ~]# mysql -u root -p inventory < /backup/mariadb.dump恢复物理备份
mariabackup工具使用以下选项之一,以从物理备份执行还原:
- --copy-back,保留原始备份文件。
- --move-back,将备份文件移动到数据目录,然后删除原始备份文件。
操作过程如下:
bash
# 停止mariadb服务
[root@server ~]# systemctl stop mariadb

# 确保数据库数据目录是空
[root@server ~]# grep '^datadir' /etc/my.cnf.d/mariadb-server.cnf
datadir=/var/lib/mysql
[root@server ~]# rm -rf /var/lib/mysql/*

# 恢复备份
[root@server ~]# mariabackup --copy-back --target-dir=/var/mariadb/backup/
...output omitted...
[00] 2020-06-08 22:26:08 completed OK!

# 清空数据库数据目录
[root@server ~]# chown -R mysql:mysql /var/lib/mysql/

# 启动mariadb服务
[root@server ~]# systemctl start mariadb
WEB 服务器
WEB 服务器简介
WEB也称为WWW(WORLD WIDE WEB),中文名字为万维网、全球信息网等,主要功能是提供网上信息浏览服务。Web服务器可以为Internet上的用户提供WWW、Email和FTP等各种Internet服务。
WEB起源于1989年3月,伯纳斯-李 (Tim Berners-Lee) 为了更有效率地让欧洲核物理实验室的科学家可以分享及更新他们的研究成果, 于是他开发出超文件传输协议(Hyper Text Transport Protocol, HTTP)。为了让 HTTP 这个协议得以顺利的应用,大约在90 年代初期,由伊利诺大学的国家超级计算机应用中心 开发出了HTTPd (HTTP daemon )服务器,也就是后来的Apache。
常见的WEB服务器,除了Apache,还有一些Nginx,Lighttpd,IIS等。
常见web服务器
Apache
Apache HTTP Server,非正式的称呼 Apache,是世界上应用最广泛的WEB服务器。
其优势在于,Apache一个可扩展的Web服务器,支持的模块非常丰富。
Apache的源代码是开放的、支持跨平台应用等。
Apache 是属于重量级产品,在速度和性能上不及其他轻量级WEB服务器,所消耗的内存也比其他WEB服务器要高。
Nginx
Nginx是一款高性能的HTTP和反向代理服务器,能够选择高效的epoll、kqueue、eventport最为网络I/O模型,在高连接并发的情况下,能够支持高达5万个并发连接数的响应,而内存、CPU等系统资源消耗却非常低,运行非常稳定。
Lighttpd
Lighttpd提供一个专门针对高性能网站,安全、快速、兼容性好并且灵活的WEB Server环境,它具有内存开销低、CPU占有率低、效能好,以及模块丰富等特点。支持FastCGI、CGI、Auth、输出压缩、URL重写及Alias等重要功能,属于轻量级WEB服务器。
Tomcat
Tomcat 是一个开放源代码、运行servlet和JSP Web应用软件的基于Java的web应用软件容器。Tomcat server 是根据servlet和jsp规范执行的,因此也可以说Tomcat server实行了Apache-Jakarta规范,且比绝大多数商用应用软件服务器要好。tomcat对静态文件和高并发的处理比较弱。
IIS
Microsoft的Web服务器产品为 Internet Information Server (IIS), IIS 是允许在公共Intranet或Internet上发布信息的Web服务器。IIS是目前最流行的Web服务器产品之一,很多著名的网站都是建立在IIS的平台上。IIS提供了一个图形界面的管理工具,称为 Internet服务管理器,可用于监视配置和控制Internet服务。
IIS是一种Web服务组件,其中包括Web服务器、FTP服务器、NNTP服务器和SMTP服务器,分别用于网页浏览、文件传输、新闻服务和邮件发送等方面,它使得在网络(包括互联网和局域网)上发布信息成了一件很容易的事。它提供ISAPI(IntranetServer API)作为扩展Web服务器功能的编程接口;同时它还提供一个Internet数据库连接器,可以实现对数据库的查询和更新。
Apache
简介
Apache HTTP Server,非正式的称呼 Apache,是世界上应用最广泛的WEB服务器。
其优势在于,Apache一个可扩展的Web服务器,支持的模块非常丰富。
Apache的源代码是开放的、支持跨平台应用等。
Apache是属于重量级产品,在速度和性能上不及其他轻量级WEB服务器,所消耗的内存也比其他WEB服务器要高。
服务器配置
系统:Rocky 8.10(minimal 安装)
硬件:1CPU/2G 内存/20G 硬盘/1个 NAT模式网卡
网络信息:10.1.8.10/24 网关10.1.8.2 DNS 223.5.5.5
**配置主机名 网络信息 /etc/hosts **
安装和配置
bash
# 安装
[root@www ~ 15:45:22]# yum -y install httpd

# 启动服务
[root@www ~ 15:45:43]# systemctl enable httpd --now

# 可选:修改 ServerName
[root@www ~ 15:46:15]# vim /etc/httpd/conf/httpd.conf
ServerName www.laoma.cloud:80

# 配置解析
[root@www ~ 15:46:28]# echo '10.1.8.10 www.laoma.cloud'>> /etc/hosts

# 查看主页目录
[root@www ~ 15:47:30]# grep ^DocumentRoot /etc/httpd/conf/httpd.conf
DocumentRoot "/var/www/html"

# 准备主页
[root@www ~ 15:47:52]# echo Hello World From Apache. > /var/www/html/index.html

# 防火墙放行
[root@www ~ 15:48:24]# firewall-cmd --add-service=http --permanent
[root@www ~]# firewall-cmd --reload

# 测试
[root@client ~]# curl http://www.zzh.cloud
# windows客户端修改C:\Windows\System32\drivers\etc\hosts
# Linux或Unix修改 /etc/hosts
# 添加如下记录
10.1.8.10 www.zzh.cloud
配置文件
主配置文件:/etc/httpd/conf/httpd.conf
部分参数说明:
-
ServerRoot "/etc/httpd",定义配置文件所在位置,后面出现的文件相对路径都是基于该目录。 -
IncludeOptional conf.d/*.conf,定义从配置文件,绝对路径为/etc/httpd/conf.d/*.conf -
DocumentRoot "/var/www/html",定义网站主目录位置。 -
以下命令块定义目录中主页文件名。
ini<IfModule dir_module> DirectoryIndex index.html </IfModule>建议以上代码块定义在目录中,以限定特定目录的主页文件。
Apache 手册
bash
# 安装手册软件包
[root@www ~]# yum install -y httpd-manual

# 重启服务
[root@www ~]# systemctl restart httpd

# 访问测试
[root@client ~]# firefox http://www.laoma.cloud/manual/
启用 Userdir
bash
[root@www ~]# vim /etc/httpd/conf.d/userdir.conf
# 修改17行
UserDir enabled

# 修改24行
UserDir public_html

[root@www ~]# systemctl restart httpd

# SELinux
[root@www ~]# setsebool -P httpd_enable_homedirs on
[root@www ~]# restorecon -R /home

# 准备测试页
[root@www ~]# useradd laoma
[root@www ~]# mkdir /home/zzh/public_html
[root@www ~]# chmod 711 /home/zzh
[root@www ~]# chmod 755 /home/zzh/public_html
[root@www ~]# cat << 'EOF' > /home/zzh/public_html/index.html
<html>
<body>
<div style="width: 100%; font-size: 40px; font-weight: bold; text-align: laomaer;">
UserDir Test Page
</div>
</body>
</html>
EOF

# 测试
[root@client ~]# curl http://www.laoma.cloud/~laoma/
虚拟主机
同一个web服务器提供多个站点。
一个虚拟网站常见参数说明:
DocumentRoot /var/www/laoma/,定义主页目录。ServerName www.laoma.cloud,定义虚拟主机名。ServerAdmin laoma@laoma.cloud,定义网站管理员邮箱。ErrorLog logs/www.laoma.cloud-error_log,定义错误日志位置。CustomLog logs/www.laoma.cloud-access_log combined,定义正常访问日志位置。
基于主机名的虚拟主机
示例:两个虚拟网站www1和www2。
bash
[root@www ~]# vim /etc/httpd/conf.d/vhost-www1.conf
# for www1 virtual domain
<VirtualHost *:80>
   DocumentRoot /var/www/www1/
   ServerName www1.laoma.cloud
   ServerAdmin www1@laoma.cloud
   ErrorLog logs/www1.laoma.cloud-error_log
   CustomLog logs/www1.laoma.cloud-access_log combined

    <Directory "/var/www/www1">
        Options Indexes FollowSymLinks
        AllowOverride None
        Require all granted
    </Directory>

</VirtualHost>


[root@www ~]# vim /etc/httpd/conf.d/vhost-www2.conf
# for www2 virtual domain
<VirtualHost *:80>
   DocumentRoot /var/www/www2/
   ServerName www2.laoma.cloud
   ServerAdmin www2@laoma.cloud
   ErrorLog logs/www2.laoma.cloud-error_log
   CustomLog logs/www2.laoma.cloud-access_log combined

    <Directory "/var/www/www2">
        Options Indexes FollowSymLinks
        AllowOverride None
        Require all granted
    </Directory>

</VirtualHost>


# 准备目录和测试页
[root@www ~]# cd /var/www
[root@www www]# mkdir www1 www2
[root@www www]# echo hello www1 > www1/index.html
[root@www www]# echo hello www2 > www2/index.html

# 重启服务
[root@www ~]# systemctl restart httpd

# 测试
# windows客户端修改C:\Windows\System32\drivers\etc\hosts
# Linux或Unix修改 /etc/hosts
# 添加如下记录
10.1.8.10 www1.laoma.cloud
10.1.8.10 www2.laoma.cloud

[root@client ~]# curl http://www1.laoma.cloud/
[root@client ~]# curl http://www2.laoma.cloud/
基于端口的虚拟主机
配置文件示例:
bash
[root@www ~]# vim /etc/httpd/conf.d/vhost-port.conf
bash
Listen 8081
<VirtualHost *:8081>
    ServerAdmin site1@laoma.cloud
    DocumentRoot "/var/www/site1"
    ServerName www.laoma.cloud
    ErrorLog "/var/log/httpd/site1.laoma.cloud-error_log"
    CustomLog "/var/log/httpd/site1.laoma.cloud-access_log" common

    <Directory "/var/www/site1">
        AllowOverride None
        Require all granted
    </Directory>

</VirtualHost>


Listen 8082
<VirtualHost *:8082>
    ServerAdmin site2@laoma.cloud
    DocumentRoot "/var/www/site2"
    ServerName www.laoma.cloud
    ErrorLog "/var/log/httpd/site2.laoma.cloud-error_log"
    CustomLog "/var/log/httpd/site2.laoma.cloud-access_log" common

    <Directory "/var/www/site2">
        AllowOverride None
        Require all granted
    </Directory>

</VirtualHost>
bash
# 准备目录和测试页
[root@www ~]# cd /var/www
[root@www www]# mkdir site1 site2
[root@www www]# echo hello site1 > site1/index.html
[root@www www]# echo hello site2 > site2/index.html

# 重启服务
[root@www ~]# systemctl restart httpd

# 测试
[root@client ~]# curl http://www.laoma.cloud:8081/
hello site1
[root@client ~]# curl http://www.laoma.cloud:8082/
hello site2
配置 SSL/TLS
补充TLS知识
生成自签名SSL证书
bash
#--1--生成私钥
[root@www ~]# openssl genrsa -out www.key 2048

#--2--生成请求文件csr,该文件需要签名
[root@www ~]# openssl req -new -key www.key -out www.csr
You are about to be asked to enter information that will be incorporated
into your certificate request.
What you are about to enter is what is called a Distinguished Name or a DN.
There are quite a few fields but you can leave some blank
For some fields there will be a default value,
If you enter '.', the field will be left blank.
-----
Country Name (2 letter code) [XX]:CN
State or Province Name (full name) []:JS
Locality Name (eg, city) [Default City]:NJ
Organization Name (eg, company) [Default Company Ltd]:LM
Organizational Unit Name (eg, section) []:DEVOPS
Common Name (eg, your name or your server's hostname) []:www.laoma.cloud
Email Address []:laoma@laoma.cloud

Please enter the following 'extra' attributes
to be sent with your certificate request
A challenge password []:回车
An optional company name []:回车

# 以下非交互方式生成
[root@www ~]# openssl req -new -key www.key -out www.csr -subj "/C=CN/ST=JS/L=NJ/O=LM/OU=DEVOPS/CN=www.laoma.cloud/emailAddress=laoma@laoma.cloud"
#CN的值必须是网站域名

#--3--使用自己的私钥对请求文件签名,以生成证书
[root@www ~]# openssl x509 -req -days 3650 -in www.csr -signkey www.key -out www.crt
安装和配置
bash
[root@www ~]# yum -y install mod_ssl
[root@www ~]# vim /etc/httpd/conf.d/vhost-ssl.conf
<VirtualHost _default_:443>
    DocumentRoot "/var/www/html"
    ServerName www.laoma.cloud:443
    #使用私钥签名的证书
    SSLCertificateFile /etc/ssl/certs/www.laoma.cloud/www.crt
    #私钥
    SSLCertificateKeyFile /etc/ssl/certs/www.laoma.cloud/www.key
</VirtualHost>

[root@www ~]# mkdir /etc/ssl/certs/www.laoma.cloud
[root@www ~]# mv www.* /etc/ssl/certs/www.laoma.cloud

[root@www ~]# systemctl restart httpd

# 设置防火墙
[root@www ~]# firewall-cmd --add-service=https --permanent
success
[root@www ~]# firewall-cmd --reload
success

# 测试
[root@client ~]# curl -k https://www.laoma.cloud/

# 重定向http请求到https
[root@www ~]# vim /etc/httpd/conf.d/vhost-Rewrite.conf
<VirtualHost *:80>
    DocumentRoot /var/www/html
    ServerName www.laoma.cloud
    RewriteEngine On
    RewriteCond %{HTTPS} off
    RewriteRule ^(.*)$ https://%{HTTP_HOST}%{REQUEST_URI} [R=301,L]
</VirtualHost>

[root@www ~]# systemctl restart httpd

# 测试
[root@client ~]# curl http://www.laoma.cloud/
支持动态脚本
CGI(公共网关接口)定义了Web服务器与外部内容生成程序交互的方式,这些程序通常被称为CGI程序或CGI脚本。
By default, CGI is allowed under the "/var/www/cgi-bin" directory。
使用 perl
bash
[root@www ~]# yum -y install perl perl-CGI

# 准备新目录
[root@www ~]# mkdir /var/www/html/cgi-enabled

#准备测试页
[root@www ~]# vim /var/www/html/cgi-enabled/index.cgi
#!/usr/bin/perl
print "Content-type: text/html\n\n";
print "<html>\n<body>\n";
print "<div style=\"width: 100%; font-size: 40px; font-weight: bold; text-align: laomaer;\">\n";
print "CGI Test Page";
print "\n</div>\n";
print "</body>\n</html>\n";

# 准备配置文件
[root@www ~]# vim /etc/httpd/conf.d/cgi-enabled.conf
# create new
# processes .cgi and .pl as CGI scripts
<Directory "/var/www/html/cgi-enabled">
    Options +ExecCGI
    AddHandler cgi-script .cgi .pl
</Directory>

[root@www ~]# systemctl restart httpd

# 设置SELinux
[root@www ~]# chcon -R -t httpd_sys_script_exec_t /var/www/html/cgi-enabled
[root@www ~]# semanage fcontext -a -t httpd_sys_script_exec_t /var/www/html/cgi-enabled

[root@www ~]# chmod 705 /var/www/html/cgi-enabled/index.cgi

# 测试
[root@client ~]# curl http://www.laoma.cloud/cgi-enabled/index.cgi
使用 PHP
bash
[root@www ~]# yum -y install php
[root@www ~]# systemctl restart httpd
[root@www ~]# vim /var/www/html/index.php
<html>
<body>
<div style="width: 100%; font-size: 40px; font-weight: bold; text-align: laomaer;">
<?php
   print Date("Y/m/d");
?>
</div>
</body>
</html>

# 测试
[root@client ~]# curl http://www.laoma.cloud/index.php
使用 Python Scripts
bash
[root@www ~]# yum -y install python3

# the settings below is the one for CGI
[root@www ~]# grep -n "^ *ScriptAlias" /etc/httpd/conf/httpd.conf
247: ScriptAlias /cgi-bin/ "/var/www/cgi-bin/"

# 配置访问其他位置
[root@www ~]# vim /etc/httpd/conf.d/cgi-enabled.conf
# create new
# processes .py as CGI scripts
<Directory "/var/www/html/cgi-enabled">
    Options +ExecCGI
    AddHandler cgi-script .py
</Directory>

[root@www ~]# systemctl restart httpd

# 设置SELinux
[root@www ~]# chcon -R -t httpd_sys_script_exec_t /var/www/html/cgi-enabled
[root@www ~]# semanage fcontext -a -t httpd_sys_script_exec_t /var/www/html/cgi-enabled

# 创建测试页
[root@www ~]# vim /var/www/html/cgi-enabled/index.py
#!/usr/bin/env python3
print ("Content-type: text/html\n\n")
print ("<html>\n<body>")
print ("<div style=\"width: 100%; font-size: 40px; font-weight: bold; text-align: laomaer;\">")
print ("Python Script Test Page")
print ("</div>\n</body>\n</html>")

[root@www ~]# chmod 705 /var/www/html/cgi-enabled/index.py

# 测试
[root@client ~]# curl http://www.laoma.cloud/cgi-enabled/index.py
使用 Ruby Scripts
bash
[root@www ~]# yum -y install ruby

# the settings below is the one for CGI
[root@www ~]# grep -n "^ *ScriptAlias" /etc/httpd/conf/httpd.conf
247: ScriptAlias /cgi-bin/ "/var/www/cgi-bin/"

 [root@www ~]# vim /etc/httpd/conf.d/cgi-enabled.conf
# create new
# processes .rb as CGI scripts
<Directory "/var/www/html/cgi-enabled">
    Options +ExecCGI
    AddHandler cgi-script .rb
</Directory>

[root@www ~]# systemctl restart httpd

# 设置SELinux
[root@www ~]# chcon -R -t httpd_sys_script_exec_t /var/www/html/cgi-enabled
[root@www ~]# semanage fcontext -a -t httpd_sys_script_exec_t /var/www/html/cgi-enabled

[root@www ~]# vim /var/www/html/cgi-enabled/index.rb
#!/usr/bin/ruby
print "Content-type: text/html\n\n"
print "<html>\n<body>\n"
print "<div style=\"width: 100%; font-size: 40px; font-weight: bold; text-align: laomaer;\">\n"
print "Ruby Script Test Page"
print "\n</div>\n"
print "</body>\n</html>\n"

[root@www ~]# chmod 705 /var/www/html/cgi-enabled/index.rb

# 测试
[root@client ~]# curl http://www.laoma.cloud/cgi-enabled/index.py
配置认证
配置基本认证
bash
#目录示例/var/www/html/auth-basic
# create new
[root@www ~]# vim /etc/httpd/conf.d/auth_basic.conf
<Directory /var/www/html/auth-basic>
    AuthType Basic
    AuthName "Basic Authentication"
    AuthUserFile /etc/httpd/conf/.htpasswd
    require valid-user
</Directory>

# add a user : create a new file with "-c" ( add the "-c" option only for the initial registration )
[root@www ~]# htpasswd -c /etc/httpd/conf/.htpasswd laoma
New password:redhat     # set password
Re-type new password:redhat     # confirm
Adding password for user laoma

[root@www ~]# mkdir /var/www/html/auth-basic

# create a test page
[root@www ~]# vim /var/www/html/auth-basic/index.html
<html>
<body>
<div style="width: 100%; font-size: 40px; font-weight: bold; text-align: laomaer;">
Test Page for Basic Auth
</div>
</body>
</html>

[root@www ~]# systemctl restart httpd

# 测试
[root@client ~]# curl http://www.laoma.cloud/auth-basic
配置操作系统账户认证
提前配置好https
bash
#目录示例/var/www/html/auth-pam

# install from EPEL
[root@www ~]# yum --enablerepo=epel -y install mod_authnz_external pwauth

# add to the end
[root@www ~]# vim /etc/httpd/conf.d/authnz_external.conf
<Directory /var/www/html/auth-pam>
    SSLRequireSSL
    AuthType Basic
    AuthName "PAM Authentication"
    AuthBasicProvider external
    AuthExternal pwauth
    require valid-user
</Directory>

[root@www ~]# mkdir /var/www/html/auth-pam

# create a test page
[root@www ~]# vim /var/www/html/auth-pam/index.html
<html>
<body>
<div style="width: 100%; font-size: 40px; font-weight: bold; text-align: laomaer;">
Test Page for PAM Auth
</div>
</body>
</html>

[root@www ~]# systemctl restart httpd

# 测试
[root@client ~]# curl http://www.laoma.cloud/auth-pam/
配置LDAP认证
提前准备好 LDAP 服务器和配置好https
bash
# install from EPEL
[root@www ~]# yum --enablerepo=epel -y install mod_authnz_external pwauth
[root@www ~]# yum -y install mod_ldap

[root@www ~]# vim /etc/httpd/conf.d/auth_ldap.conf
# add follows to the end
<Directory /var/www/html/auth-ldap>
    SSLRequireSSL
    AuthName "LDAP Authentication"
    AuthType Basic
    AuthBasicProvider ldap
    AuthLDAPURL ldap://www.laoma.cloud/dc=srv,dc=world?uid?sub?(objectClass=*)
    Require ldap-filter objectClass=posixAccount
</Directory>

# create a test page
[root@www ~]# mkdir /var/www/html/auth-ldap
[root@www ~]# vim /var/www/html/auth-ldap/index.html
<html>
<body>
<div style="width: 100%; font-size: 40px; font-weight: bold; text-align: laomaer;">
Test Page for LDAP Auth
</div>
</body>
</html>

[root@www ~]# systemctl restart httpd

# 测试
[root@client ~]# curl http://www.laoma.cloud/auth-ldap
Nginx
Nginx是一款高性能的HTTP和反向代理服务器,能够选择高效的epoll、kqueue、eventport最为网络I/O模型,在高连接并发的情况下,能够支持高达5万个并发连接数的响应,而内存、CPU等系统资源消耗却非常低,运行非常稳定。
安装 nginx
bash
# 安装 nginx
[root@server 15:20:05]# yum -y install nginx

# 启动 nginx
[root@server 15:20:37]# systemctl enable nginx --now

# 准备主页
[root@server 15:20:42]# mv /usr/share/nginx/html/index.html{,.ori}
[root@server 15:20:51]# echo Hello World From Nginx > /usr/share/nginx/html/index.html

# 防火墙
[root@server 15:21:11]# firewall-cmd --add-service=http --permanent
success
[root@server 15:21:13]# firewall-cmd --reload
success

[root@client ~ 17:10:45]# curl http://www.zzhpersonal.com
# windows客户端修改C:\Windows\System32\drivers\etc\hosts
# Linux或Unix修改 /etc/hosts
# 添加如下记录
10.1.8.10 www.zzhpersonal.com
启用 UserDir
bash
# 配置 nginx
[root@server ~ 15:54:18]# vim /etc/nginx/nginx.conf
# add into [server] section
server {
    location ~ ^/~(.+?)(/.*)?$ {
        alias /home/$1/public_html$2;
        index  index.html index.htm;
    }
}
[root@server ~ 15:55:21]# systemctl restart nginx

# If SELinux is enabled, change boolean setting.
[root@server ~ 16:05:11]# setsebool -P httpd_enable_homedirs on

# Create a test page with a common user to make sure it works normally.
[root@server ~ 16:05:23]# chmod 711 /home/zzh
[root@server ~ 16:05:35]# mkdir ~/public_html
[root@server ~ 16:05:41]# chmod 755 ~/public_html
[root@server ~ 16:05:46]# vim ~/public_html/index.html
<html>
<body>
<div style="width: 100%; font-size: 40px; font-weight: bold; text-align: zzher;">
Nginx UserDir Test Page
</div>
</body>
</html>

# 测试
[root@server ~ 16:07:35]# curl http://www.zzhpersonal.com/~zzhpersonal/
虚拟主机
同一个web服务器提供多个站点。
根据名称
bash
[root@server ~ 16:11:44]# vim /etc/nginx/conf.d/vhost-name.conf
bash
server {
    server_name  web1.zzhpersonal.com;
    root         /usr/share/nginx/web1;
}
server {
    server_name  web2.zzhpersonal.com;
    root         /usr/share/nginx/web2;
}
根据 port
bash
[root@server ~ 16:12:33]# vim /etc/nginx/conf.d/vhost-port.conf
bash
server {
    listen       8081;
    server_name  www.zzhpersonal.com;
    root         /usr/share/nginx/8081;
}
server {
    listen       8082;
    server_name  www.zzhpersonal.com;
    root         /usr/share/nginx/8082;
}
配置SSL/TLS
生成证书
bash
#--1--生成私钥
[root@server ~ 16:13:12]# openssl genrsa -out www.key 2048

#--2--生成请求文件csr
[root@www ~]# openssl req -new -key www.key -out www.csr -subj "/C=CN/ST=JS/L=NJ/O=LM/OU=DEVOPS/CN=www.laoma.cloud/emailAddress=laoma@laoma.cloud"
#CN的值必须是网站域名

#--3--使用自己的私钥对请求文件签名,以生成证书
[root@www ~]# openssl x509 -req -days 3650 -in www.csr -signkey www.key -out www.crt
配置站点
bash
[root@server ~ 16:14:58]# mkdir /etc/ssl/certs/www.zzhpersonal.com
[root@server ~ 16:15:12]#  mv www* /etc/ssl/certs/www.zzhpersonal.com
[root@server ~ 16:15:23]# vim /etc/nginx/conf.d/ssl.conf
server {
    listen       443 ssl http2 default_server;
    listen       [::]:443 ssl http2 default_server;
    server_name  www.laoma.cloud;
    root         /usr/share/nginx/html;
    # 证书
    ssl_certificate "/etc/ssl/certs/www.laoma.cloud/www.crt";
    # 私钥
    ssl_certificate_key "/etc/ssl/certs/www.laoma.cloud/www.key";
}

[root@server ~ 16:16:39]# systemctl restart nginx

# 配置HTTP重定向到https.
[root@server ~ 17:15:35]# vim /etc/nginx/nginx.conf
    server {
        listen       80 default_server;
        listen       [::]:80 default_server;
        server_name  www.laoma.cloud;
        root         /usr/share/nginx/html;
        # 添加 重定向
        return       301 https://$host$request_uri;
    }
[root@server ~ 17:15:49]# systemctl restart nginx

# 防火墙设置
[root@server ~ 17:16:34]# firewall-cmd --add-service=https --permanent
success
[root@server ~ 17:16:41]# firewall-cmd --reload
success

# 测试
[root@server ~ 17:16:46]# curl http://www.zzhpersonal.com/
[root@server ~ 17:16:59]# curl -k https://www.zzhpersonal.com/
配置基本认证
用户名和密码使用plain text发送,所以最好配置SSL/TLS。
bash
#安装工具
[root@server ~ 17:17:22]# yum -y install httpd-tools
[root@server ~ 17:18:16]# vim /etc/nginx/conf.d/ssl.conf
# add into the [server] section
server {
    .....
    location /auth-basic/ {
        auth_basic            "Basic Auth";
        auth_basic_user_file  "/etc/nginx/.htpasswd";
    }
}

[root@server ~ 17:18:49]# systemctl restart nginx

# add user for Basic authentication
[root@server ~ 17:19:10]# htpasswd -c /etc/nginx/.htpasswd zzh
New password:
Re-type new password:
Adding password for user zzh

# create a test page
[root@server ~ 17:19:10]# mkdir /usr/share/nginx/html/auth-basic
[root@server ~ 17:19:46]# vim /usr/share/nginx/html/auth-basic/index.html
<html>
<body>
<div style="width: 100%; font-size: 40px; font-weight: bold; text-align: zzher;">
Test Page for Basic Authentication
</div>
</body>
</html>

# 测试
[root@client ~ 17:22:19]# curl http://www.zzhpersonal.com/auth-basic/
支持动态脚本
使用 PHP
bash
# 安装PHP和php-fpm,建议把其他的扩展包一起安装
[root@www ~]# yum install -y php php-fpm

# 建议把其他的扩展包一起安装
[root@www ~]# yum install -y php-gd php-common php-pear php-mbstring php-mcrypt

# 查看 php 版本
[root@www ~]# php -v

# 测试 php 是否正常
[root@www ~]# echo "<?php echo 'PHP Test Page'.\"\n\"; ?>" > php_test.php
[root@www ~]# php php_test.php
PHP Test Page

# 准备测试页,使用phpinfo查看详细信息
[root@www ~]# echo "<?php phpinfo(); ?>" > /usr/share/nginx/html/info.php

# 测试
[root@client ~]# curl http://www.laoma.cloud/info.php
使用 FastCGI
bash
# install from EPEL
[root@www ~]# yum install -y fcgiwrap
[root@www ~]# vim /etc/nginx/fcgiwrap.conf
# for example, enable CGI under [/cgi-bin]
location /cgi-bin/ {
    gzip off;
    root  /usr/share/nginx;
    fastcgi_pass  unix:/var/run/fcgiwrap.socket;
    include /etc/nginx/fastcgi_params;
    fastcgi_param SCRIPT_FILENAME  $document_root$fastcgi_script_name;
}

[root@www ~]# mkdir -m 755 /usr/share/nginx/cgi-bin
[root@www ~]# vim /etc/nginx/conf.d/ssl.conf
# add settings into [server] section of a site definition

server {
        .....
        include fcgiwrap.conf;
}

[root@www ~]# systemctl restart nginx
bash
# Create Systemd file for FastCGI Wrap service and Start them.
[root@www ~]# vim /usr/lib/systemd/system/fcgiwrap.service
bash
[Unit]
Description=Simple CGI Server
After=nss-user-lookup.target
Requires=fcgiwrap.socket

[Service]
EnvironmentFile=/etc/sysconfig/fcgiwrap
ExecStart=/usr/sbin/fcgiwrap ${DAEMON_OPTS} -c ${DAEMON_PROCS}
User=nginx
Group=nginx

[Install]
Also=fcgiwrap.socket
bash
[root@www ~]# vim /usr/lib/systemd/system/fcgiwrap.socket
bash
[Unit]
Description=fcgiwrap Socket

[Socket]
ListenStream=/run/fcgiwrap.socket

[Install]
WantedBy=sockets.target
bash
[root@www ~]# systemctl enable --now fcgiwrap

# If SELinux is enabled, change policy.
[root@www ~]# vim nginx-www.te
module nginx-server 1.0;

require {
        type httpd_t;
        type var_run_t;
        class sock_file write;
}

#============= httpd_t ==============
allow httpd_t var_run_t:sock_file write;

[root@www ~]# checkmodule -m -M -o nginx-server.mod nginx-server.te

checkmodule: loading policy configuration from nginx-server.te
checkmodule: policy configuration loaded
checkmodule: writing binary representation (version 19) to nginx-server.mod
[root@www ~]# semodule_package --outfile nginx-server.pp --module nginx-server.mod

[root@www ~]# semodule -i nginx-server.pp
测试
bash
# 准备测试文件
# Create a test scripts with a language (example below is Python3) under the directory you set CGI executable ([/usr/share/nginx/cgi-bin] on this example) and Access to it to verify CGI works normally.
[root@www ~]# vim /usr/share/nginx/cgi-bin/index.cgi
#!/usr/bin/python3
print("Content-type: text/html\n")
print("<html>\n<body>")
print("<div style=\"width: 100%; font-size: 40px; font-weight: bold; text-align: laomaer;\">")
print("CGI Script Test Page")
print("</div>")
print("</body>\n</html>")

[root@www ~]# chmod 755 /usr/share/nginx/cgi-bin/index.cgi

# 测试
[root@client ~]# curl http://www.laoma.cloud/cgi-bin/index.cgi
部署反向代理
客户端访问代理服务器,代理服务器会将客户端请求发送给真实服务器。
反向代理实现了隐藏内部服务器。
角色说明
-
代理服务器 proxy 10.1.8.20
-
真实服务器 server 10.1.8.10
代理服务器配置
bash
# 配置解析
[root@proxy ~]# echo '10.1.8.10 www.laoma.cloud' >> /etc/hosts

# 安装 nginx
[root@proxy ~]# yum -y install nginx

# 启动 nginx
[root@proxy ~]# systemctl enable --now nginx

# 防火墙
[root@proxy ~]# firewall-cmd --add-service=http --permanent
[root@proxy ~]# firewall-cmd --reload

# 配置代理,server部分更改如下
[root@proxy ~]# vim /etc/nginx/nginx.conf
# change [server] section like follows

    server {
        listen      80 default_server;
        listen      [::]:80 default_server;
        server_name _;
        root         /usr/share/nginx/html;

        #添加如下内容
        proxy_redirect      off;
        proxy_set_header    X-Real-IP $remote_addr;
        proxy_set_header    X-Forwarded-For $proxy_add_x_forwarded_for;
        proxy_set_header    Host $http_host;

        ......

        #新增 location 规则
        location /proxy/ {
            proxy_pass http://www.laoma.cloud/;
        }
    }
[root@proxy ~]# systemctl restart nginx

# If SELnux is enabled, change boolean setting.
[root@proxy ~]# setsebool -P httpd_can_network_connect on
真实服务器配置
bash
# 安装nginx
[root@www ~]# yum -y install nginx

# 启动nginx
[root@www ~]# systemctl enable --now nginx

# 防火墙
[root@www ~]# firewall-cmd --add-service=http --permanent
[root@www ~]# firewall-cmd --reload

# 准备测试页
[root@www ~]# echo hello laoma > /usr/share/nginx/html/test.html

# 测试效果
[root@client ~]# curl http://www.laoma.cloud/test.html