Go 复合数据类型
往期博客
1. 数组
Go 语言中的数组是一个固定长度的数据结构,存储统一类型的元素序列。长度在创建时指定,且无法更改。数组中的元素可以通过索引访问。
1.1 基础使用方式
[长度]类型关键字
数组初始化必须设置长度!!!
go
// var关键字声明
var intArr [5]int
fmt.Println(intArr)

// 短变量方式声明
intList := [5]int{1, 2, 3, 4, 5}
fmt.Println(intList) // [1 2 3 4 5]
// 索引访问
fmt.Println(intList[2]) // 3
1.2 传递方式
数据是值传递,函数内部修改数组不影响原数组
go
func array() {
	intList := [5]int{1, 2, 3, 4, 5}

	updateArray(intList)
	fmt.Println("修改方法外部:", intList)
  // 修改方法外部: [1 2 3 4 5]
}


func updateArray(arr [5]int) {
	arr[0] = 100
	fmt.Println("修改方法内部:", arr)
  // 修改方法内部: [100 2 3 4 5]
}
值传递会引发值拷贝的问题,如果数据量特别大,在拷贝的时候可能会有较大的性能损耗,在go语言中,解决这个问题的办法就是切片。
2. 切片
切片是一种动态数组,可以自动扩缩容。切片的底层其实是底层数组的引用。切片是一个结构体,包含三个元素:指向底层数组的指针、切片的长度、切片的容量。
2.1 初始化
[]类型关键字
刚刚介绍数组的时候,提到数组初始化必须指定长度,这也是因为切片初始化和数组初始化的代码类似,但是切片不需要指定长度。Go语言会认为没有指定长度的就是一个切片。
go
// var 关键字初始化
var slice []int
// 追加元素
slice = append(slice, 1, 2, 3)
slice = append(slice, 4)
slice = append(slice, 5)
fmt.Println(slice) // [1 2 3 4 5]
// 追加并创建新的切片
newSlice := append(slice, 6)
fmt.Println(newSlice) // [1 2 3 4 5 6]

// make 关键字初始化
/// 1.指定类型、长度。容量默认和长度一致
makeSlice := make([]int, 5)
makeSlice[0] = 1
makeSlice[3] = 2
fmt.Println(makeSlice, "长度:", len(makeSlice), "容量:", cap(makeSlice))
// [1 0 0 2 0] 长度: 5 容量: 5

/// 2. 指定容量
	makeSliceCap := make([]int, 5, 10)
	makeSliceCap[1] = 10
	makeSliceCap[4] = 10
	fmt.Println(makeSliceCap, "长度:", len(makeSliceCap), "容量:", cap(makeSliceCap))
// [0 10 0 0 10] 长度: 5 容量: 10

// 短变量声明
shortSlice := []int{5, 4, 3, 2, 1}
	fmt.Println(shortSlice, "长度:", len(shortSlice), "容量:", cap(shortSlice))
// [5 4 3 2 1] 长度: 5 容量: 5
2.2 切片化
接触过python的开发者应该知道python中有一个数组切片操作,go语言中也支持,使用[start:end]形式对数组进行切片,使用方式如下
go
// 初始切片
s := []int{0, 1, 2, 3, 4, 5, 6, 7, 8, 9}
fmt.Println("初始切片:", s, "len=", len(s), "cap=", cap(s))

// 1. s[n]:获取索引项
fmt.Println("s[3] =", s[3])
// 输出: 3

// 2. s[:]:全切片拷贝
sFull := s[:]
fmt.Println("s[:] =", sFull)
// 输出: [0 1 2 3 4 5 6 7 8 9]

// 3. s[low:]:从low到结尾
sLow := s[3:]
fmt.Println("s[3:] =", sLow, "len=", len(sLow), "cap=", cap(sLow))
// [3 4 5 6 7 8 9] len= 7 cap= 7

// 4. s[:high]:从开头到high
sHigh := s[:6]
fmt.Println("s[:6] =", sHigh, "len=", len(sHigh), "cap=", cap(sHigh))
// [0 1 2 3 4 5] len= 6 cap= 10

// 5. s[low:high]:指定范围
sRange := s[2:6]
fmt.Println("s[2:6] =", sRange, "len=", len(sRange), "cap=", cap(sRange))
// [2 3 4 5], len=4, cap=8

// 6. s[low:high:max]:限制容量
sCapLimit := s[2:6:8] // len=6-2=4, cap=8-2=6
fmt.Println("s[2:6:8] =", sCapLimit, "len=", len(sCapLimit), "cap=", cap(sCapLimit))| 操作 | 含义 |
|---|---|
| sn | 切片s中索引位置为n的项 |
| s: | 从切片s的索引位置0到len(s)-1处所获得的切片 |
| slow: | 从切片s的索引位置low到len(s)-1处所获得的切片 |
| s:high | 从切片s的索引位置0到high处所获得的切片,len=high |
| slow:high | 从切片s的索引位置low到high处所获得的切片,len=high-low |
| slow:high:max | 从切片s的索引位置low到high处所获得的切片,len=high-low,cap=max-low |
切片实际上是对已经存在的数组进行切片操作,从同一个数组/切片创建的新切片指向的底层数组是一样的,修改一个会修改其他所有
go
arr := [10]int{1, 2, 3, 4, 5, 6, 7, 8, 9, 10}
fmt.Println(arr)
// [1 2 3 4 5 6 7 8 9 10]
slice := arr[2:5]
fmt.Println(slice, len(slice), cap(slice))
// [3 4 5] 3 8
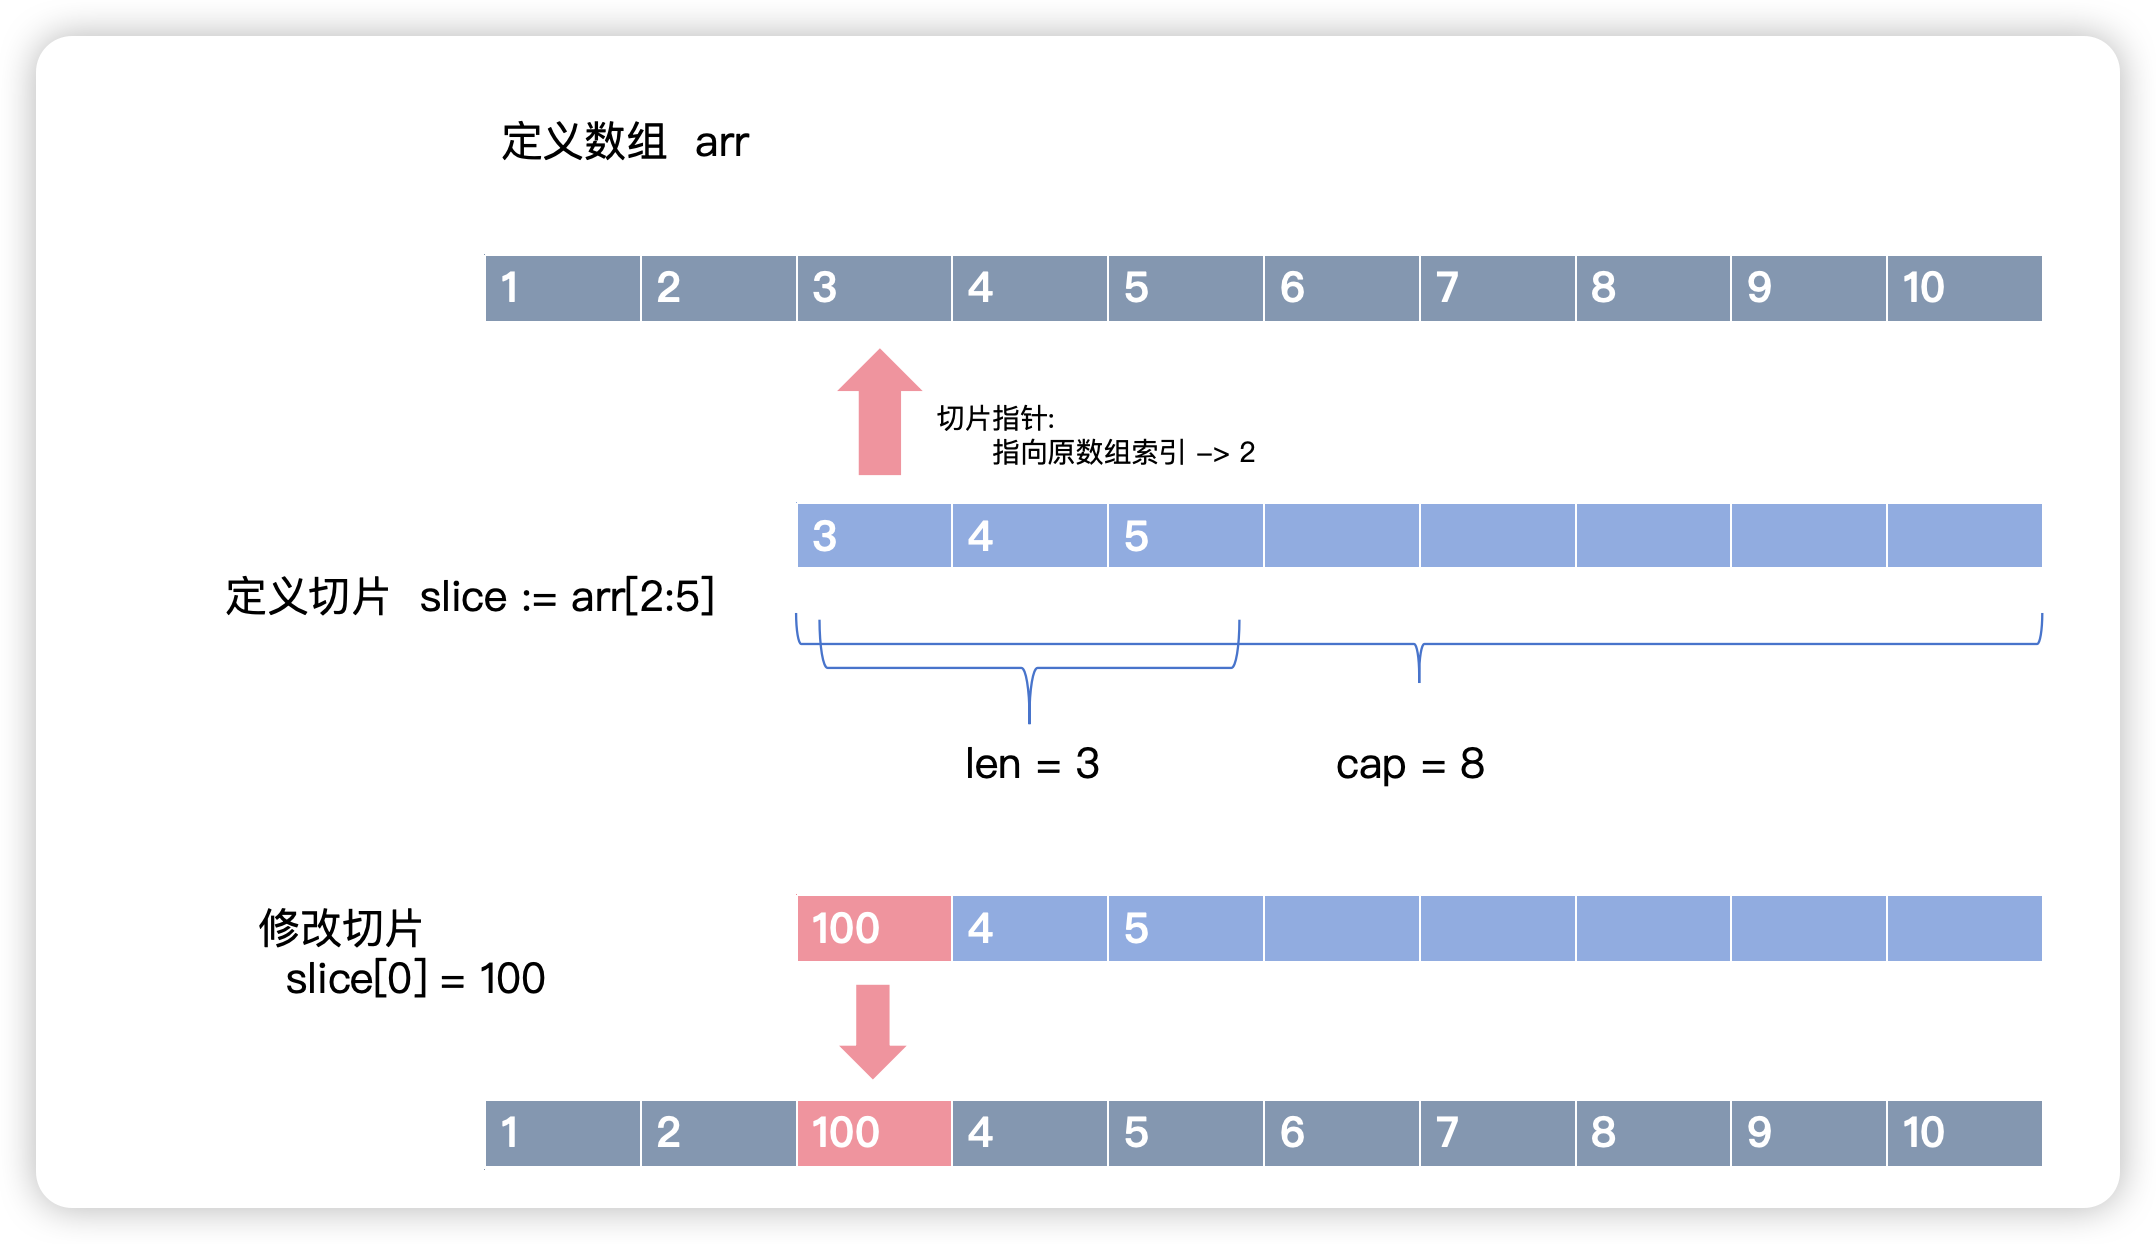
slice[0] = 100
fmt.Println(arr, slice)
// [1 2 100 4 5 6 7 8 9 10] [100 4 5]
arr[3] = 200
fmt.Println(arr, slice)
// [1 2 100 200 5 6 7 8 9 10] [100 200 5]如图定义了一个 arr 数组,然后对他创建一个 slice 切片,其中切片索引 0 指向arr[2],切片长度为 3,切片的容量就是从索引2到数组末尾的可用空间,也就是容量为 8。
修改切片中的元素,指向的原数组也会相应改变。反之修改原数组,指向他的切片也会改变
2.3 扩容
go
arr := [10]int{1, 2, 3, 4, 5, 6, 7, 8, 9, 10}
fmt.Println(arr)
// [1 2 3 4 5 6 7 8 9 10]
slice := arr[2:5]
fmt.Println(slice, len(slice), cap(slice))
// [3 4 5] 3 8

// 第一次append
slice = append(slice, 100, 200, 300)
fmt.Println("======= 扩容前 ========")
fmt.Println(slice, len(slice), cap(slice))
// [3 4 5 100 200 300] 6 8
fmt.Println(arr, slice)
// [1 2 3 4 5 100 200 300 9 10] [3 4 5 100 200 300]

// 第二次append
slice = append(slice, 400, 500, 600, 700, 800)
fmt.Println("======= 扩容后 ========")
fmt.Println(slice, len(slice), cap(slice))
// [3 4 5 100 200 300 400 500 600 700 800] 11 16
fmt.Println(arr, slice)
// [1 2 3 4 5 100 200 300 9 10] [3 4 5 100 200 300 400 500 600 700 800]
切片初始化和上一小节一样,长度为3,容量为8
第一次通过append函数进行元素追加,追加三个元素,长度为6,未超过容量8,因此直接修改底层数组。arr[5]、arr[6]、arr[7] 被覆盖为 100,200,300,证明切片与数组共享内存
第二次追加了5个元素,总长度需求 = 11,超过当前容量(cap=8),触发扩容机制:
- 分配新数组(通常按
2×旧容量规则,此处8→16) - 复制旧数据到新数组
- 追加新元素
- 切片指针指向新数组
原数组 arr 不再变化,证明切片已脱离原数组
切片扩容源码
源码位于
runtime包下的slice.go文件
go
// oldPtr -> 指向原切片底层数组的指针
// newLen -> 新切片的长度
// oldCap -> 原切片的容量
// num    -> 追加的元素数量
// et     -> 切片元素类型的元数据
func growslice(oldPtr unsafe.Pointer, newLen, oldCap, num int, et *_type) slice {
  // 计算原切片的长度
  oldLen := newLen - num
  // 竞态检测
  if raceenabled {
   callerpc := sys.GetCallerPC()
   racereadrangepc(oldPtr, uintptr(oldLen*int(et.Size_)), callerpc, abi.FuncPCABIInternal(growslice))
  }
  // 内存消毒检测
  if msanenabled {
   msanread(oldPtr, uintptr(oldLen*int(et.Size_)))
  }
  // 地址消毒检测
  if asanenabled {
   asanread(oldPtr, uintptr(oldLen*int(et.Size_)))
  }
  // 边界检测
  if newLen < 0 {
   panic(errorString("growslice: len out of range"))
  }

  // 零大小元素特殊处理
  if et.Size_ == 0 {
   return slice{unsafe.Pointer(&zerobase), newLen, newLen}
  }
  // 容量计算策略 (核心,见下方源码)
  newcap := nextslicecap(newLen, oldCap)

  // 内存对齐优化
  var overflow bool
  var lenmem, newlenmem, capmem uintptr
  noscan := !et.Pointers()
  switch {
  case et.Size_ == 1:
   lenmem = uintptr(oldLen)
   newlenmem = uintptr(newLen)
   capmem = roundupsize(uintptr(newcap), noscan)
   overflow = uintptr(newcap) > maxAlloc
   newcap = int(capmem)
  case et.Size_ == goarch.PtrSize:
   lenmem = uintptr(oldLen) * goarch.PtrSize
   newlenmem = uintptr(newLen) * goarch.PtrSize
   capmem = roundupsize(uintptr(newcap)*goarch.PtrSize, noscan)
   overflow = uintptr(newcap) > maxAlloc/goarch.PtrSize
   newcap = int(capmem / goarch.PtrSize)
  case isPowerOfTwo(et.Size_):
   var shift uintptr
   if goarch.PtrSize == 8 {
    shift = uintptr(sys.TrailingZeros64(uint64(et.Size_))) & 63
   } else {
    shift = uintptr(sys.TrailingZeros32(uint32(et.Size_))) & 31
   }
   lenmem = uintptr(oldLen) << shift
   newlenmem = uintptr(newLen) << shift
   capmem = roundupsize(uintptr(newcap)<<shift, noscan)
   overflow = uintptr(newcap) > (maxAlloc >> shift)
   newcap = int(capmem >> shift)
   capmem = uintptr(newcap) << shift
  default:
   lenmem = uintptr(oldLen) * et.Size_
   newlenmem = uintptr(newLen) * et.Size_
   capmem, overflow = math.MulUintptr(et.Size_, uintptr(newcap))
   capmem = roundupsize(capmem, noscan)
   newcap = int(capmem / et.Size_)
   capmem = uintptr(newcap) * et.Size_
  }
  if overflow || capmem > maxAlloc {
   panic(errorString("growslice: len out of range"))
  }

  // 内存分配策略
  var p unsafe.Pointer
  if !et.Pointers() {
   p = mallocgc(capmem, nil, false)
   memclrNoHeapPointers(add(p, newlenmem), capmem-newlenmem)
  } else {
   p = mallocgc(capmem, et, true)
   if lenmem > 0 && writeBarrier.enabled {
    bulkBarrierPreWriteSrcOnly(uintptr(p), uintptr(oldPtr), lenmem-et.Size_+et.PtrBytes, et)
   }
  }

  // 数据迁移
  memmove(p, oldPtr, lenmem)

  return slice{p, newLen, newcap}
}


// newLen -> 新切片的长度
// oldCap -> 旧切片的容量
func nextslicecap(newLen, oldCap int) int {
    // 超大需求扩容:新的长度大于两倍旧的容量,直接采用所需的容量
    if newLen > 2*oldCap {
        return newLen
    }


    const threshold = 256
    // 小切片扩容:容量小于256的小切片,直接给双倍容量
    if oldCap < threshold {
        return 2 * oldCap
    }

    // 大切片扩容:渐进式的扩容,根据旧的容量基数进行扩容
    newcap := oldCap
    for newcap < newLen {
        newcap += (newcap + 3*threshold) / 4
    }
    return newcap
}
通过观察源码,频发触发扩容会消耗很多性能,因此建议在初始化的时候通过make,显式指定一个长度/容量
3. map
map是一种关联数据类型,也被称为哈希表或字典。map的所用是将一个键和值关联起来,以便快速的通过键找到对应的值
3.1 基础使用
map[键类型]值类型
使用var关键定义map,在赋值前必须用make进行初始化,否则会出现异常:panic: assignment to entry in nil map
go
// var 关键字定义
var names map[int]string
// make初始化
names = make(map[int]string)
// 必须在make之后赋值
names[1] = "小明"
fmt.Println(names)
// map[1:小明]

students := map[int]string{
  1: "张三",
  2: "李四",
  3: "王五",
  4: "赵六",
}
students[5] = "小七"
fmt.Println(students)
// map[1:张三 2:李四 3:王五 4:赵六 5:小七]

ages := make(map[int]int)
ages[1] = 18
ages[2] = 19
ages[3] = 20
fmt.Println(ages)
// map[1:18 2:19 3:20]

// 删除
fmt.Println(students[1])
// 张三
delete(students, 1)
fmt.Println(students[1])
//

// 遍历
for k, v := range students {
  fmt.Println(k, v)
}
// 2 李四
// 3 王五
// 4 赵六
// 5 小七
其中map是无序的,所以每次遍历的结果顺序都可能不一样
3.2 修改
map和数组不一样,它是引用类型,所以在方法中修改也会影响到原map
go
func main() {
  students := map[int]string{
    1: "张三",
    2: "李四",
    3: "王五",
    4: "赵六",
  }
  fmt.Println(students)
  // map[1:张三 2:李四 3:王五 4:赵六]


  updateMap(students, 2, "小明")
  fmt.Println("方法外 -> ", students)
  // 方法外 ->  map[1:张三 2:小明 3:王五 4:赵六]
}

func updateMap(mapVal map[int]string, key int, value string) {
  mapVal[key] = value
  fmt.Println("方法中 -> ", mapVal)
  // 方法中 ->  map[1:张三 2:小明 3:王五 4:赵六]
}
4. 结构体
结构体是一种复合类型,用于将多个不同类型的数据组合在一起,可以聚合各种类型的变量。
4.1 定义
type 自定义结构体名 struct{}
go
type student struct {
  id    int
  name  string
  age   int
  score float32
}
4.2 初始化
go
// 零值初始化
var a student
fmt.Println(a) // {0  0 0}

// 短变量声明初始化
b := student{
  id:    1,
  name:  "小王",
  score: 90.0,
}
fmt.Println(b) // {1 小王 0 90}

// 初始化后直接赋值
b.name = "小明"
b.age = 18
fmt.Println(b) // {1 小明 18 90}
4.3 访问
go
// '.'直接访问
fmt.Println(b.name) // 小明
fmt.Println(b.age) // 18

// 指针访问
p := &b
fmt.Println(p.name) // 小明
fmt.Println(p.score) // 90

// 修改指针指向的对象,原对象也会变化
p.name = "小张"
fmt.Println(b.name, p.name) // 小张 小张