🕺 行为型设计模式:对象协作的舞蹈家
💡 温馨提示:本文将以轻松有趣的方式带你探索行为型设计模式的世界,就像在观看一场精彩的"对象舞蹈表演"一样!
🚪 传送门 :在开始我们的"对象协作之旅" 之前,建议先通过这个 🎨 Java设计模式详解:让代码优雅如诗的秘密武器 了解设计模式的基础概念和整体架构,然后通过 🏭 创建型设计模式:对象诞生的艺术与智慧 学习对象创建的艺术,再通过 🏗️ 结构型设计模式:代码架构的魔法师 了解对象组合的艺术,这样能让你更好地理解本文内容!就像跳舞要先学会走路一样!💃
🎪 引言:为什么我们需要行为型设计模式?
arduino
🕺 场景:混乱的对象舞蹈现场 🕺
┌─────────────────────────────────────┐
│  💻 程序员小王的一天 💻              │
│                                     │
│  😵 对象间通信像鸡同鸭讲!          │
│  🔥 算法选择像选择困难症!          │
│  🐛 状态管理像迷宫一样复杂!        │
│                                     │
│  💡 突然,行为型设计模式舞者出现了! │
│  🕺 "让我来编排你们的协作舞蹈!"     │
└─────────────────────────────────────┘行为型设计模式就像是"对象协作"的标准舞蹈编排,让对象之间的通信变得优雅、灵活、高效。
本文将带你探索十一种行为型设计模式,就像观看十一个不同的"对象舞蹈表演"一样精彩!
🎯 本文你将学到什么?
🎬 行为型设计模式舞蹈团 🎬
┌─────────────────────────────────────┐
│  🕺 十一位协作舞者登场!            │
│                                     │
│  👀 观察者:一对多通知机制          │
│  🎯 策略者:算法选择专家            │
│  📝 命令者:请求封装大师            │
│  🔄 状态者:状态变化艺术家          │
│  📋 模板者:算法框架设计师          │
│  🔍 迭代者:集合遍历专家            │
│  ⛓️ 责任链:请求处理链              │
│  🤝 中介者:对象交互协调员          │
│  👁️ 访问者:元素操作专家            │
│  💾 备忘录:状态保存专家            │
│  🗣️ 解释器:语言解释专家            │
│                                     │
│  🚀 准备好开始舞蹈之旅了吗?        │
└─────────────────────────────────────┘
👀 第一部分:观察者模式(Observer Pattern)
arduino
👀 观察者舞者的登场 👀
┌─────────────────────────────────────┐
│  👀 观察者:我是一对多通知专家!    │
│                                     │
│  📢 主题:"我有新消息!"            │
│  👀 观察者:"我来通知大家!"        │
│  📢 主题:"状态变化了!"            │
│  👀 观察者:"我来更新大家!"        │
│                                     │
│  💡 核心思想:一对多通知机制        │
└─────────────────────────────────────┘
🏗️ 观察者模式UML类图
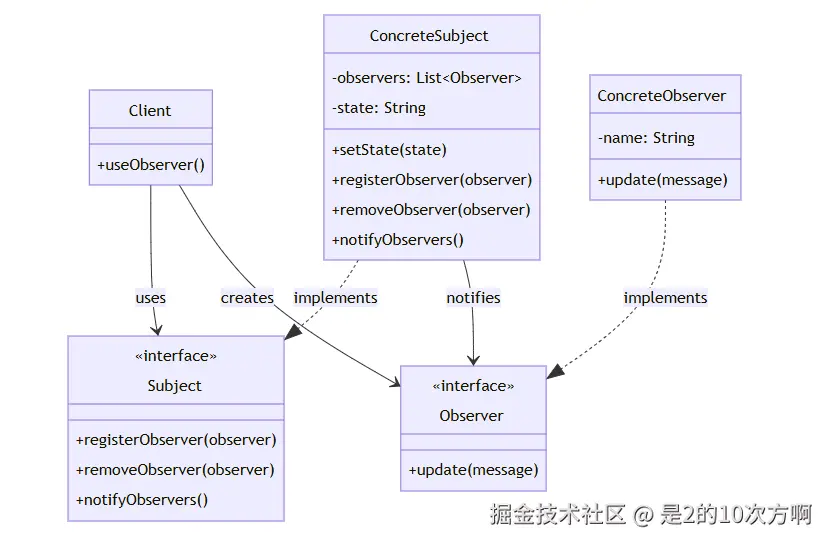
1.1 🎭 什么是观察者模式?
一句话理解:当一个对象状态改变时,自动通知所有依赖它的对象,就像新闻发布一样!
定义:定义对象间的一种一对多的依赖关系,当一个对象的状态发生改变时,所有依赖于它的对象都得到通知并被自动更新。
应用场景:事件处理系统、消息推送、数据绑定、日志记录、GUI事件处理
1.2 🛠️ 观察者模式的实现
1.2.1 🏗️ 基本结构
💡 小贴士:观察者模式就像新闻发布系统,主题是新闻社,观察者是各个新闻频道!
核心组件:
- Subject(主题) :被观察的对象,维护观察者列表
- Observer(观察者) :观察主题的对象,接收通知
- ConcreteSubject(具体主题) :具体的被观察对象
- ConcreteObserver(具体观察者) :具体的观察者实现
1.2.2 🚀 多种实现方式
| 实现方式 | 特点 | 推荐度 |
|---|---|---|
| 推模式 | 主题主动推送数据给观察者 | ⭐⭐⭐⭐ |
| 拉模式 | 观察者主动从主题获取数据 | ⭐⭐⭐ |
| 事件驱动 | 基于事件的松耦合实现 | ⭐⭐⭐⭐⭐ |
推模式实现:
typescript
// 推模式:主题主动推送数据给观察者
public interface PushObserver {
    void update(String data); // 直接接收数据
}

public class PushSubject {
    private List<PushObserver> observers = new ArrayList<>();
    private String state;

    public void setState(String state) {
        this.state = state;
        notifyObservers(); // 推送状态给所有观察者
    }

    public void notifyObservers() {
        for (PushObserver observer : observers) {
            observer.update(state); // 直接推送数据
        }
    }

    public void addObserver(PushObserver observer) {
        observers.add(observer);
    }
}

public class PushConcreteObserver implements PushObserver {
    private String name;

    public PushConcreteObserver(String name) {
        this.name = name;
    }

    @Override
    public void update(String data) {
        System.out.println(name + " 收到推送数据: " + data);
    }
}拉模式实现:
typescript
// 拉模式:观察者主动从主题获取数据
public interface PullObserver {
    void update(); // 不传递数据,观察者自己获取
}

public class PullSubject {
    private List<PullObserver> observers = new ArrayList<>();
    private String state;

    public void setState(String state) {
        this.state = state;
        notifyObservers();
    }

    public void notifyObservers() {
        for (PullObserver observer : observers) {
            observer.update(); // 只通知,不传递数据
        }
    }

    public String getState() {
        return state; // 观察者通过此方法获取数据
    }

    public void addObserver(PullObserver observer) {
        observers.add(observer);
    }
}

public class PullConcreteObserver implements PullObserver {
    private String name;
    private PullSubject subject;

    public PullConcreteObserver(String name, PullSubject subject) {
        this.name = name;
        this.subject = subject;
    }

    @Override
    public void update() {
        String data = subject.getState(); // 主动拉取数据
        System.out.println(name + " 拉取到数据: " + data);
    }
}事件驱动实现:
csharp
// 事件驱动:基于事件的松耦合实现
public class NewsEvent {
    private String news;
    private long timestamp;

    public NewsEvent(String news) {
        this.news = news;
        this.timestamp = System.currentTimeMillis();
    }

    public String getNews() { return news; }
    public long getTimestamp() { return timestamp; }
}

public interface EventObserver {
    void onEvent(NewsEvent event);
}

public class EventSubject {
    private Map<String, List<EventObserver>> eventObservers = new HashMap<>();

    public void addObserver(String eventType, EventObserver observer) {
        eventObservers.computeIfAbsent(eventType, k -> new ArrayList<>()).add(observer);
    }

    public void publishEvent(String eventType, NewsEvent event) {
        List<EventObserver> observers = eventObservers.get(eventType);
        if (observers != null) {
            for (EventObserver observer : observers) {
                observer.onEvent(event);
            }
        }
    }
}

public class EventConcreteObserver implements EventObserver {
    private String name;

    public EventConcreteObserver(String name) {
        this.name = name;
    }

    @Override
    public void onEvent(NewsEvent event) {
        System.out.println(name + " 收到事件: " + event.getNews() +
                         " (时间: " + new Date(event.getTimestamp()) + ")");
    }
}
1.2.3 🎯 标准实现示例
typescript
// 观察者接口 - 定义观察者的行为
public interface Observer {
    void update(String message);
}

// 主题接口 - 定义主题的行为
public interface Subject {
    void registerObserver(Observer observer);  // 注册观察者
    void removeObserver(Observer observer);    // 移除观察者
    void notifyObservers();                    // 通知所有观察者
}

// 具体主题 - 实现主题接口
public class ConcreteSubject implements Subject {
    private List<Observer> observers = new ArrayList<>();  // 观察者列表
    private String state;                                  // 主题状态

    @Override
    public void registerObserver(Observer observer) {
        observers.add(observer);
        System.out.println("观察者 " + observer + " 已注册");
    }

    @Override
    public void removeObserver(Observer observer) {
        observers.remove(observer);
        System.out.println("观察者 " + observer + " 已移除");
    }

    @Override
    public void notifyObservers() {
        System.out.println("主题状态变化,通知所有观察者...");
        for (Observer observer : observers) {
            observer.update(state);
        }
    }

    // 设置状态并通知观察者
    public void setState(String state) {
        this.state = state;
        System.out.println("主题状态设置为: " + state);
        notifyObservers();  // 状态变化时自动通知
    }
}

// 具体观察者 - 实现观察者接口
public class ConcreteObserver implements Observer {
    private String name;  // 观察者名称

    public ConcreteObserver(String name) {
        this.name = name;
    }

    @Override
    public void update(String message) {
        System.out.println(name + " 收到通知: " + message);
    }

    @Override
    public String toString() {
        return name;
    }
}
1.2.4 📰 实际应用示例
💡 场景:新闻社发布新闻,各个新闻频道自动接收并报道!
问题:新闻社需要及时通知所有订阅的新闻频道
typescript
// 新闻发布系统 - 具体主题
public class NewsAgency implements Subject {
    private List<Observer> observers = new ArrayList<>();  // 新闻频道列表
    private String news;                                   // 最新新闻

    @Override
    public void registerObserver(Observer observer) {
        observers.add(observer);
        System.out.println("新闻频道 " + observer + " 已订阅");
    }

    @Override
    public void removeObserver(Observer observer) {
        observers.remove(observer);
        System.out.println("新闻频道 " + observer + " 已取消订阅");
    }

    @Override
    public void notifyObservers() {
        System.out.println("📢 新闻社发布新闻,通知所有频道...");
        for (Observer observer : observers) {
            observer.update(news);
        }
    }

    // 发布新闻
    public void publishNews(String news) {
        this.news = news;
        System.out.println("📰 新闻社发布新闻: " + news);
        notifyObservers();
    }
}

// 新闻频道 - 具体观察者
public class NewsChannel implements Observer {
    private String name;  // 频道名称

    public NewsChannel(String name) {
        this.name = name;
    }

    @Override
    public void update(String news) {
        System.out.println("📺 " + name + " 频道报道: " + news);
    }

    @Override
    public String toString() {
        return name;
    }
}

// 使用示例
public class ObserverPatternDemo {
    public static void main(String[] args) {
        // 创建新闻社
        NewsAgency newsAgency = new NewsAgency();

        // 创建新闻频道
        NewsChannel cctv = new NewsChannel("CCTV");
        NewsChannel bbc = new NewsChannel("BBC");
        NewsChannel cnn = new NewsChannel("CNN");

        // 频道订阅新闻社
        newsAgency.registerObserver(cctv);
        newsAgency.registerObserver(bbc);
        newsAgency.registerObserver(cnn);

        System.out.println("\n=== 发布第一条新闻 ===");
        newsAgency.publishNews("重大新闻:人工智能技术取得突破性进展!");

        System.out.println("\n=== BBC取消订阅 ===");
        newsAgency.removeObserver(bbc);

        System.out.println("\n=== 发布第二条新闻 ===");
        newsAgency.publishNews("科技新闻:新型电动汽车即将上市!");
    }
}
🎯 第二部分:策略模式(Strategy Pattern)
arduino
🎯 策略舞者的登场 🎯
┌─────────────────────────────────────┐
│  🎯 策略者:我是算法选择专家!      │
│                                     │
│  💰 客户:"我要用支付宝支付!"      │
│  🎯 策略者:"我来切换策略!"        │
│  💰 客户:"我要用微信支付!"        │
│  🎯 策略者:"继续切换策略!"        │
│                                     │
│  💡 核心思想:算法可以互相替换      │
└─────────────────────────────────────┘
🏗️ 策略模式UML类图

2.1 🎭 什么是策略模式?
一句话理解:定义一系列算法,让它们可以互相替换,就像选择不同的支付方式一样!
定义:定义一系列的算法,把它们一个个封装起来,并且使它们可以互相替换。
应用场景:支付方式选择、排序算法选择、压缩算法选择、游戏角色技能选择
2.2 🛠️ 策略模式的实现
2.2.1 🏗️ 基本结构
💡 小贴士:策略模式就像游戏中的技能选择,玩家可以根据需要切换不同的技能!
核心组件:
- Strategy(策略) :算法的抽象接口
- ConcreteStrategy(具体策略) :具体的算法实现
- Context(上下文) :使用策略的客户端
2.2.2 🚀 多种实现方式
| 实现方式 | 特点 | 推荐度 |
|---|---|---|
| 接口策略 | 通过接口定义策略 | ⭐⭐⭐⭐⭐ |
| 枚举策略 | 使用枚举简化策略 | ⭐⭐⭐⭐ |
| 函数式策略 | 使用Lambda表达式 | ⭐⭐⭐⭐⭐ |
接口策略实现:
ini
// 接口策略:通过接口定义策略
public interface SortStrategy {
    void sort(int[] array);
}

public class BubbleSortStrategy implements SortStrategy {
    @Override
    public void sort(int[] array) {
        System.out.println("使用冒泡排序");
        for (int i = 0; i < array.length - 1; i++) {
            for (int j = 0; j < array.length - 1 - i; j++) {
                if (array[j] > array[j + 1]) {
                    int temp = array[j];
                    array[j] = array[j + 1];
                    array[j + 1] = temp;
                }
            }
        }
    }
}

public class QuickSortStrategy implements SortStrategy {
    @Override
    public void sort(int[] array) {
        System.out.println("使用快速排序");
        quickSort(array, 0, array.length - 1);
    }

    private void quickSort(int[] array, int low, int high) {
        if (low < high) {
            int pi = partition(array, low, high);
            quickSort(array, low, pi - 1);
            quickSort(array, pi + 1, high);
        }
    }

    private int partition(int[] array, int low, int high) {
        int pivot = array[high];
        int i = low - 1;
        for (int j = low; j < high; j++) {
            if (array[j] <= pivot) {
                i++;
                int temp = array[i];
                array[i] = array[j];
                array[j] = temp;
            }
        }
        int temp = array[i + 1];
        array[i + 1] = array[high];
        array[high] = temp;
        return i + 1;
    }
}

public class SortContext {
    private SortStrategy strategy;

    public void setStrategy(SortStrategy strategy) {
        this.strategy = strategy;
    }

    public void executeSort(int[] array) {
        strategy.sort(array);
    }
}枚举策略实现:
ini
// 枚举策略:使用枚举简化策略
public enum SortStrategyEnum {
    BUBBLE_SORT {
        @Override
        public void sort(int[] array) {
            System.out.println("使用冒泡排序");
            for (int i = 0; i < array.length - 1; i++) {
                for (int j = 0; j < array.length - 1 - i; j++) {
                    if (array[j] > array[j + 1]) {
                        int temp = array[j];
                        array[j] = array[j + 1];
                        array[j + 1] = temp;
                    }
                }
            }
        }
    },

    QUICK_SORT {
        @Override
        public void sort(int[] array) {
            System.out.println("使用快速排序");
            quickSort(array, 0, array.length - 1);
        }

        private void quickSort(int[] array, int low, int high) {
            if (low < high) {
                int pi = partition(array, low, high);
                quickSort(array, low, pi - 1);
                quickSort(array, pi + 1, high);
            }
        }

        private int partition(int[] array, int low, int high) {
            int pivot = array[high];
            int i = low - 1;
            for (int j = low; j < high; j++) {
                if (array[j] <= pivot) {
                    i++;
                    int temp = array[i];
                    array[i] = array[j];
                    array[j] = temp;
                }
            }
            int temp = array[i + 1];
            array[i + 1] = array[high];
            array[high] = temp;
            return i + 1;
        }
    },

    MERGE_SORT {
        @Override
        public void sort(int[] array) {
            System.out.println("使用归并排序");
            mergeSort(array, 0, array.length - 1);
        }

        private void mergeSort(int[] array, int left, int right) {
            if (left < right) {
                int mid = (left + right) / 2;
                mergeSort(array, left, mid);
                mergeSort(array, mid + 1, right);
                merge(array, left, mid, right);
            }
        }

        private void merge(int[] array, int left, int mid, int right) {
            int[] temp = new int[right - left + 1];
            int i = left, j = mid + 1, k = 0;

            while (i <= mid && j <= right) {
                if (array[i] <= array[j]) {
                    temp[k++] = array[i++];
                } else {
                    temp[k++] = array[j++];
                }
            }

            while (i <= mid) temp[k++] = array[i++];
            while (j <= right) temp[k++] = array[j++];

            for (i = 0; i < k; i++) {
                array[left + i] = temp[i];
            }
        }
    };

    public abstract void sort(int[] array);
}

public class EnumSortContext {
    private SortStrategyEnum strategy;

    public void setStrategy(SortStrategyEnum strategy) {
        this.strategy = strategy;
    }

    public void executeSort(int[] array) {
        strategy.sort(array);
    }
}函数式策略实现:
ini
// 函数式策略:使用Lambda表达式
@FunctionalInterface
public interface SortFunction {
    void sort(int[] array);
}

public class FunctionalSortContext {
    private SortFunction sortFunction;

    public void setSortFunction(SortFunction sortFunction) {
        this.sortFunction = sortFunction;
    }

    public void executeSort(int[] array) {
        sortFunction.sort(array);
    }

    // 预定义的排序策略
    public static final SortFunction BUBBLE_SORT = array -> {
        System.out.println("使用冒泡排序");
        for (int i = 0; i < array.length - 1; i++) {
            for (int j = 0; j < array.length - 1 - i; j++) {
                if (array[j] > array[j + 1]) {
                    int temp = array[j];
                    array[j] = array[j + 1];
                    array[j + 1] = temp;
                }
            }
        }
    };

    public static final SortFunction QUICK_SORT = array -> {
        System.out.println("使用快速排序");
        quickSort(array, 0, array.length - 1);
    };

    private static void quickSort(int[] array, int low, int high) {
        if (low < high) {
            int pi = partition(array, low, high);
            quickSort(array, low, pi - 1);
            quickSort(array, pi + 1, high);
        }
    }

    private static int partition(int[] array, int low, int high) {
        int pivot = array[high];
        int i = low - 1;
        for (int j = low; j < high; j++) {
            if (array[j] <= pivot) {
                i++;
                int temp = array[i];
                array[i] = array[j];
                array[j] = temp;
            }
        }
        int temp = array[i + 1];
        array[i + 1] = array[high];
        array[high] = temp;
        return i + 1;
    }
}
2.2.3 🎯 标准实现示例
csharp
// 策略接口 - 定义算法的抽象
public interface Strategy {
    void algorithmInterface();
}

// 具体策略A - 实现算法A
public class ConcreteStrategyA implements Strategy {
    @Override
    public void algorithmInterface() {
        System.out.println("🎯 执行策略A的算法");
    }
}

// 具体策略B - 实现算法B
public class ConcreteStrategyB implements Strategy {
    @Override
    public void algorithmInterface() {
        System.out.println("🎯 执行策略B的算法");
    }
}

// 上下文 - 使用策略的客户端
public class Context {
    private Strategy strategy;  // 当前使用的策略

    public Context(Strategy strategy) {
        this.strategy = strategy;
    }

    // 设置策略
    public void setStrategy(Strategy strategy) {
        this.strategy = strategy;
        System.out.println("🔄 策略已切换");
    }

    // 执行策略
    public void contextInterface() {
        System.out.println("🚀 开始执行策略...");
        strategy.algorithmInterface();
    }
}
2.2.4 💰 实际应用示例
💡 场景:电商平台支持多种支付方式,用户可以根据需要选择不同的支付策略!
问题:需要支持多种支付方式,并且可以灵活切换
java
// 支付策略接口 - 定义支付行为的抽象
public interface PaymentStrategy {
    void pay(double amount);
}

// 支付宝支付策略
public class AlipayStrategy implements PaymentStrategy {
    @Override
    public void pay(double amount) {
        System.out.println("💰 使用支付宝支付: " + amount + " 元");
        System.out.println("📱 跳转到支付宝支付页面...");
        System.out.println("✅ 支付宝支付成功!");
    }
}

// 微信支付策略
public class WechatStrategy implements PaymentStrategy {
    @Override
    public void pay(double amount) {
        System.out.println("💰 使用微信支付: " + amount + " 元");
        System.out.println("📱 跳转到微信支付页面...");
        System.out.println("✅ 微信支付成功!");
    }
}

// 银行卡支付策略
public class BankCardStrategy implements PaymentStrategy {
    @Override
    public void pay(double amount) {
        System.out.println("💰 使用银行卡支付: " + amount + " 元");
        System.out.println("💳 请输入银行卡信息...");
        System.out.println("✅ 银行卡支付成功!");
    }
}

// 购物车 - 使用支付策略的上下文
public class ShoppingCart {
    private PaymentStrategy paymentStrategy;  // 当前支付策略

    // 设置支付策略
    public void setPaymentStrategy(PaymentStrategy paymentStrategy) {
        this.paymentStrategy = paymentStrategy;
        System.out.println("🔄 支付方式已切换");
    }

    // 结账
    public void checkout(double amount) {
        if (paymentStrategy == null) {
            System.out.println("❌ 请先选择支付方式!");
            return;
        }
        System.out.println("🛒 开始结账,金额: " + amount + " 元");
        paymentStrategy.pay(amount);
        System.out.println("🎉 订单完成!");
    }
}

// 使用示例
public class StrategyPatternDemo {
    public static void main(String[] args) {
        // 创建购物车
        ShoppingCart cart = new ShoppingCart();

        // 创建不同的支付策略
        PaymentStrategy alipay = new AlipayStrategy();
        PaymentStrategy wechat = new WechatStrategy();
        PaymentStrategy bankCard = new BankCardStrategy();

        System.out.println("=== 使用支付宝支付 ===");
        cart.setPaymentStrategy(alipay);
        cart.checkout(100.0);

        System.out.println("\n=== 使用微信支付 ===");
        cart.setPaymentStrategy(wechat);
        cart.checkout(200.0);

        System.out.println("\n=== 使用银行卡支付 ===");
        cart.setPaymentStrategy(bankCard);
        cart.checkout(300.0);
    }
}
📝 第三部分:命令模式(Command Pattern)
arduino
📝 命令舞者的登场 📝
┌─────────────────────────────────────┐
│  📝 命令者:我是请求封装大师!      │
│                                     │
│  🎮 遥控器:"我要开灯!"            │
│  📝 命令者:"我来封装请求!"        │
│  🎮 遥控器:"我要关灯!"            │
│  📝 命令者:"继续封装请求!"        │
│                                     │
│  💡 核心思想:将请求封装为对象      │
└─────────────────────────────────────┘
🏗️ 命令模式UML类图
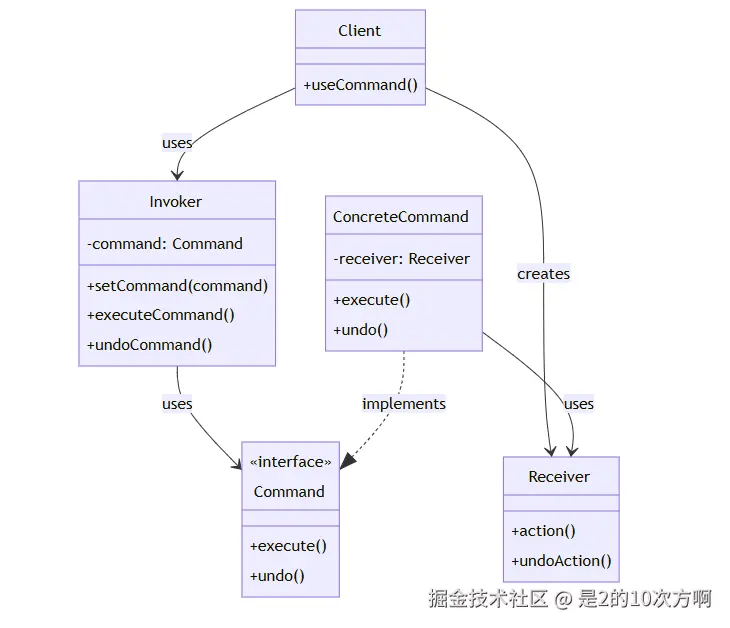
3.1 🎭 什么是命令模式?
一句话理解:将请求封装为对象,支持撤销和重做,就像遥控器一样!
定义:将一个请求封装为一个对象,从而使你可用不同的请求对客户进行参数化。
应用场景:遥控器系统、撤销/重做功能、宏命令、日志记录、事务处理
3.2 🛠️ 命令模式的实现
3.2.1 🏗️ 基本结构
💡 小贴士:命令模式就像遥控器,每个按钮对应一个命令,可以轻松实现撤销重做!
核心组件:
- Command(命令) :封装请求的接口
- ConcreteCommand(具体命令) :具体的命令实现
- Receiver(接收者) :执行命令的对象
- Invoker(调用者) :使用命令的客户端
3.2.2 🚀 多种实现方式
| 实现方式 | 特点 | 推荐度 |
|---|---|---|
| 简单命令 | 一个命令对应一个接收者 | ⭐⭐⭐⭐ |
| 宏命令 | 一个命令包含多个子命令 | ⭐⭐⭐⭐⭐ |
| 撤销重做 | 支持命令的撤销和重做 | ⭐⭐⭐⭐⭐ |
简单命令实现:
csharp
// 简单命令:一个命令对应一个接收者
public interface SimpleCommand {
    void execute();
}

public class Light {
    public void turnOn() {
        System.out.println("电灯打开");
    }

    public void turnOff() {
        System.out.println("电灯关闭");
    }
}

public class LightOnCommand implements SimpleCommand {
    private Light light;

    public LightOnCommand(Light light) {
        this.light = light;
    }

    @Override
    public void execute() {
        light.turnOn();
    }
}

public class LightOffCommand implements SimpleCommand {
    private Light light;

    public LightOffCommand(Light light) {
        this.light = light;
    }

    @Override
    public void execute() {
        light.turnOff();
    }
}

public class SimpleRemoteControl {
    private SimpleCommand command;

    public void setCommand(SimpleCommand command) {
        this.command = command;
    }

    public void pressButton() {
        command.execute();
    }
}宏命令实现:
csharp
// 宏命令:一个命令包含多个子命令
public interface MacroCommand extends SimpleCommand {
    void addCommand(SimpleCommand command);

    void removeCommand(SimpleCommand command);
}

public class MacroCommandImpl implements MacroCommand {
    private List<SimpleCommand> commands = new ArrayList<>();

    @Override
    public void addCommand(SimpleCommand command) {
        commands.add(command);
    }

    @Override
    public void removeCommand(SimpleCommand command) {
        commands.remove(command);
    }

    @Override
    public void execute() {
        System.out.println("执行宏命令,包含 " + commands.size() + " 个子命令");
        for (SimpleCommand command : commands) {
            command.execute();
        }
    }
}

public class TV {
    public void turnOn() {
        System.out.println("电视打开");
    }

    public void turnOff() {
        System.out.println("电视关闭");
    }
}

public class Stereo {
    public void turnOn() {
        System.out.println("音响打开");
    }

    public void turnOff() {
        System.out.println("音响关闭");
    }

    public void setVolume(int volume) {
        System.out.println("音响音量设置为: " + volume);
    }
}

public class TVOnCommand implements SimpleCommand {
    private TV tv;

    public TVOnCommand(TV tv) {
        this.tv = tv;
    }

    @Override
    public void execute() {
        tv.turnOn();
    }
}

public class StereoOnCommand implements SimpleCommand {
    private Stereo stereo;

    public StereoOnCommand(Stereo stereo) {
        this.stereo = stereo;
    }

    @Override
    public void execute() {
        stereo.turnOn();
        stereo.setVolume(11);
    }
}撤销重做实现:
ini
// 撤销重做:支持命令的撤销和重做
public interface UndoableCommand extends SimpleCommand {
    void undo();
}

public class LightOnCommandWithUndo implements UndoableCommand {
    private Light light;

    public LightOnCommandWithUndo(Light light) {
        this.light = light;
    }

    @Override
    public void execute() {
        light.turnOn();
    }

    @Override
    public void undo() {
        light.turnOff();
    }
}

public class LightOffCommandWithUndo implements UndoableCommand {
    private Light light;

    public LightOffCommandWithUndo(Light light) {
        this.light = light;
    }

    @Override
    public void execute() {
        light.turnOff();
    }

    @Override
    public void undo() {
        light.turnOn();
    }
}

public class CeilingFan {
    public static final int HIGH = 3;
    public static final int MEDIUM = 2;
    public static final int LOW = 1;
    public static final int OFF = 0;

    private String location;
    private int speed;

    public CeilingFan(String location) {
        this.location = location;
        this.speed = OFF;
    }

    public void high() {
        speed = HIGH;
        System.out.println(location + " 风扇设置为高速");
    }

    public void medium() {
        speed = MEDIUM;
        System.out.println(location + " 风扇设置为中速");
    }

    public void low() {
        speed = LOW;
        System.out.println(location + " 风扇设置为低速");
    }

    public void off() {
        speed = OFF;
        System.out.println(location + " 风扇关闭");
    }

    public int getSpeed() {
        return speed;
    }
}

public class CeilingFanHighCommand implements UndoableCommand {
    private CeilingFan ceilingFan;
    private int prevSpeed;

    public CeilingFanHighCommand(CeilingFan ceilingFan) {
        this.ceilingFan = ceilingFan;
    }

    @Override
    public void execute() {
        prevSpeed = ceilingFan.getSpeed();
        ceilingFan.high();
    }

    @Override
    public void undo() {
        switch (prevSpeed) {
            case CeilingFan.HIGH:
                ceilingFan.high();
                break;
            case CeilingFan.MEDIUM:
                ceilingFan.medium();
                break;
            case CeilingFan.LOW:
                ceilingFan.low();
                break;
            default:
                ceilingFan.off();
                break;
        }
    }
}

public class RemoteControlWithUndo {
    private UndoableCommand[] onCommands;
    private UndoableCommand[] offCommands;
    private UndoableCommand undoCommand;

    public RemoteControlWithUndo() {
        onCommands = new UndoableCommand[7];
        offCommands = new UndoableCommand[7];

        UndoableCommand noCommand = new NoCommand();
        for (int i = 0; i < 7; i++) {
            onCommands[i] = noCommand;
            offCommands[i] = noCommand;
        }
        undoCommand = noCommand;
    }

    public void setCommand(int slot, UndoableCommand onCommand, UndoableCommand offCommand) {
        onCommands[slot] = onCommand;
        offCommands[slot] = offCommand;
    }

    public void onButtonWasPushed(int slot) {
        onCommands[slot].execute();
        undoCommand = onCommands[slot];
    }

    public void offButtonWasPushed(int slot) {
        offCommands[slot].execute();
        undoCommand = offCommands[slot];
    }

    public void undoButtonWasPushed() {
        undoCommand.undo();
    }
}

public class NoCommand implements UndoableCommand {
    @Override
    public void execute() {
        // 什么都不做
    }

    @Override
    public void undo() {
        // 什么都不做
    }
}
3.2.3 🎯 标准实现示例
csharp
// 命令接口 - 定义命令的行为
public interface Command {
    void execute();
    void undo();
}

// 接收者 - 执行具体操作的对象
public class Receiver {
    public void action() {
        System.out.println("接收者执行操作");
    }

    public void undoAction() {
        System.out.println("接收者撤销操作");
    }
}

// 具体命令 - 实现命令接口
public class ConcreteCommand implements Command {
    private Receiver receiver;

    public ConcreteCommand(Receiver receiver) {
        this.receiver = receiver;
    }

    @Override
    public void execute() {
        receiver.action();
    }

    @Override
    public void undo() {
        receiver.undoAction();
    }
}

// 调用者 - 使用命令的客户端
public class Invoker {
    private Command command;

    public void setCommand(Command command) {
        this.command = command;
    }

    public void executeCommand() {
        command.execute();
    }

    public void undoCommand() {
        command.undo();
    }
}
3.2.4 🎯 实际应用示例
csharp
// 电器接口
public interface Device {
    void turnOn();
    void turnOff();
}

// 电灯
public class Light implements Device {
    @Override
    public void turnOn() {
        System.out.println("电灯打开");
    }

    @Override
    public void turnOff() {
        System.out.println("电灯关闭");
    }
}

// 开灯命令
public class LightOnCommand implements Command {
    private Light light;

    public LightOnCommand(Light light) {
        this.light = light;
    }

    @Override
    public void execute() {
        light.turnOn();
    }

    @Override
    public void undo() {
        light.turnOff();
    }
}

// 关灯命令
public class LightOffCommand implements Command {
    private Light light;

    public LightOffCommand(Light light) {
        this.light = light;
    }

    @Override
    public void execute() {
        light.turnOff();
    }

    @Override
    public void undo() {
        light.turnOn();
    }
}

// 遥控器
public class RemoteControl {
    private Command[] onCommands;
    private Command[] offCommands;
    private Command undoCommand;

    public RemoteControl() {
        onCommands = new Command[7];
        offCommands = new Command[7];

        Command noCommand = new NoCommand();
        for (int i = 0; i < 7; i++) {
            onCommands[i] = noCommand;
            offCommands[i] = noCommand;
        }
        undoCommand = noCommand;
    }

    public void setCommand(int slot, Command onCommand, Command offCommand) {
        onCommands[slot] = onCommand;
        offCommands[slot] = offCommand;
    }

    public void onButtonWasPushed(int slot) {
        onCommands[slot].execute();
        undoCommand = onCommands[slot];
    }

    public void offButtonWasPushed(int slot) {
        offCommands[slot].execute();
        undoCommand = offCommands[slot];
    }

    public void undoButtonWasPushed() {
        undoCommand.undo();
    }
}
本文使用 markdown.com.cn 排版