1.装饰模式定义
装饰模式(Decorator) ˈdekəreɪtər:动态的给一个对象添加一些额外的职责,就增加功能来说,装饰模式比生成子类更加灵活
1.1 UML图:
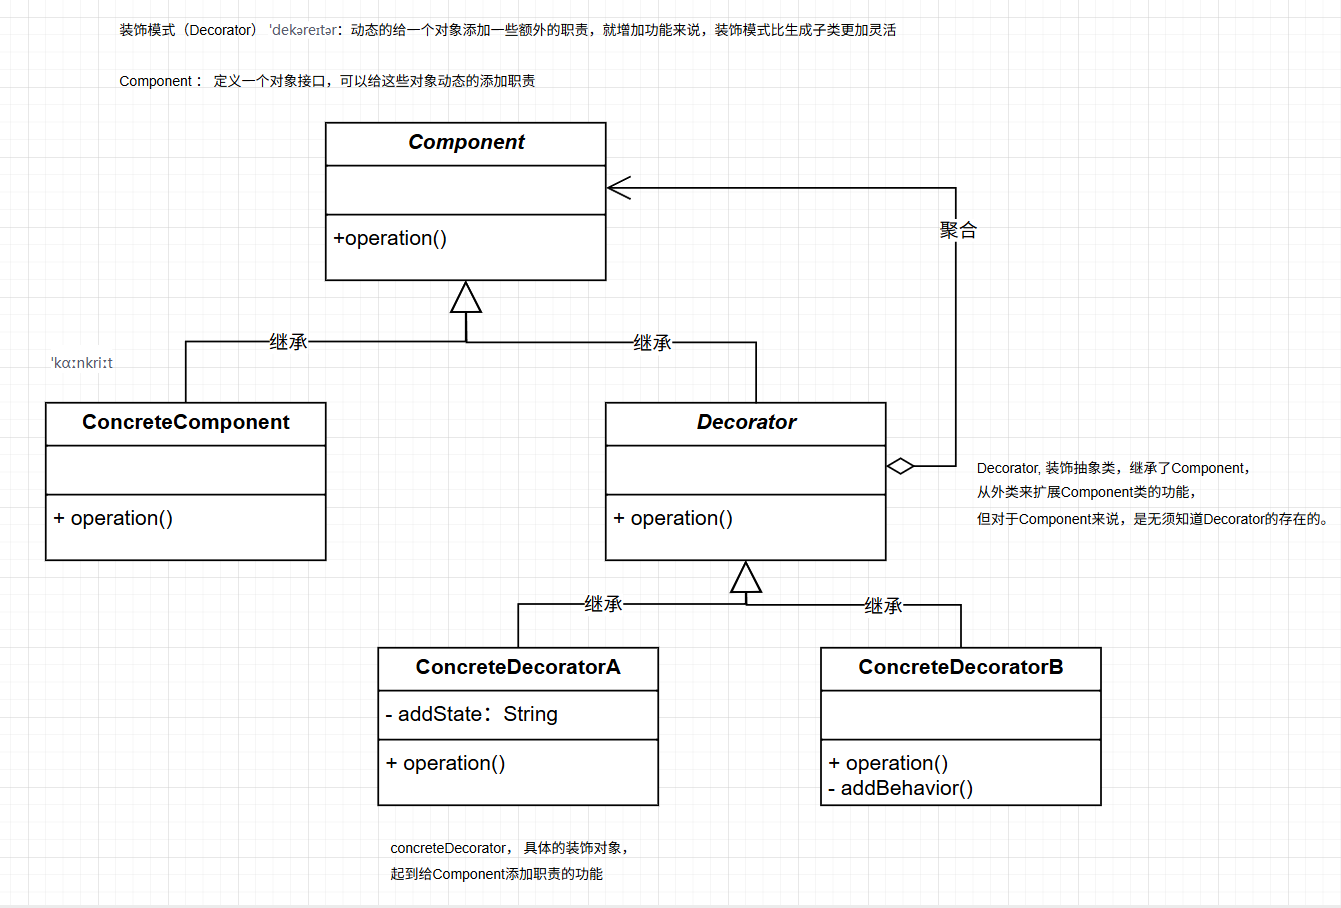
共计4个对象:
- Component(组件): 定义了一个抽象接口,用于具体组件和装饰器共享。
- ConcreteComponent(具体组件): 实现了Component接口的具体类,是被装饰的对象。
- Decorator(装饰器): 也实现了Component接口,并持有一个Component对象的引用,这是装饰的核心。
- ConcreteDecorator(具体装饰器): 扩展了Decorator类,负责具体的装饰操作。
1.2 核心代码:
java
package decorator.pattern.basedemo;
public class BaseDemo {
public static void main(String[] args){
System.out.println("**********************************************");
System.out.println("decorator basedemo");
System.out.println();
ConcreteComponent c = new ConcreteComponent();
ConcreteDecoratorA d1 = new ConcreteDecoratorA();
ConcreteDecoratorB d2 = new ConcreteDecoratorB();
// 首先用d1来包装c
d1.SetComponent(c);
//再用有来包装d1
d2.SetComponent(d1);
// 执行顺序 c d1 d2
d2.Operation();
System.out.println();
System.out.println("**********************************************");
}
}
//Component类
abstract class Component {
public abstract void Operation();
}
//ConcreteComponent类
class ConcreteComponent extends Component {
public void Operation() {
System.out.println("具体对象:");
}
}
//Decorator类
abstract class Decorator extends Component {
protected Component component;
//装饰一个Component对象
public void SetComponent(Component component) {
this.component = component;
}
//重写Operation(),实际调用component的Operation方法
public void Operation() {
if (component != null) {
component.Operation();
}
}
}
//ConcreteDecoratorA类
class ConcreteDecoratorA extends Decorator {
private String addedState;//本类独有子段,以区别于ConcreteDecoratorB类
public void Operation() {
super.Operation();//首先运行了原有Component的Operation()
this.addedState = "具体装饰对象A的独有操作";//再执行本类独有功能
System.out.println(this.addedState);
}
}
//ConcreteDecoratorB类
class ConcreteDecoratorB extends Decorator {
public void Operation() {
super.Operation();//首先运行了原有Component的Operation()
this.AddedBehavior();//再执行本类独有功能
}
//本类独有方法,以区别于ConcreteDecoratorA类
private void AddedBehavior() {
System.out.println("具体装饰对象B的独有操作");
}
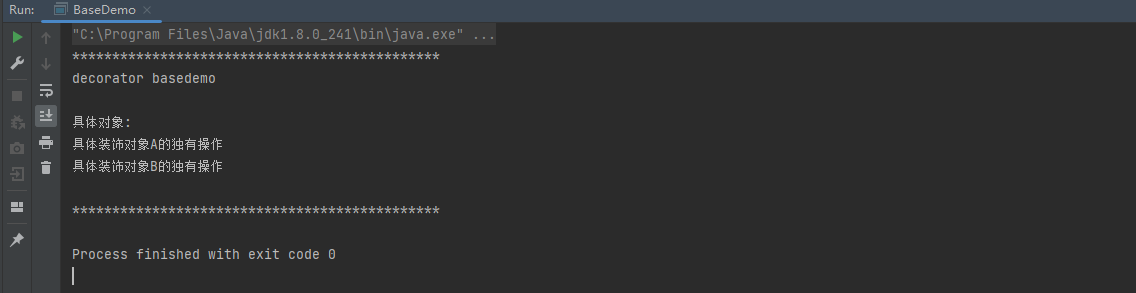
}执行结果:
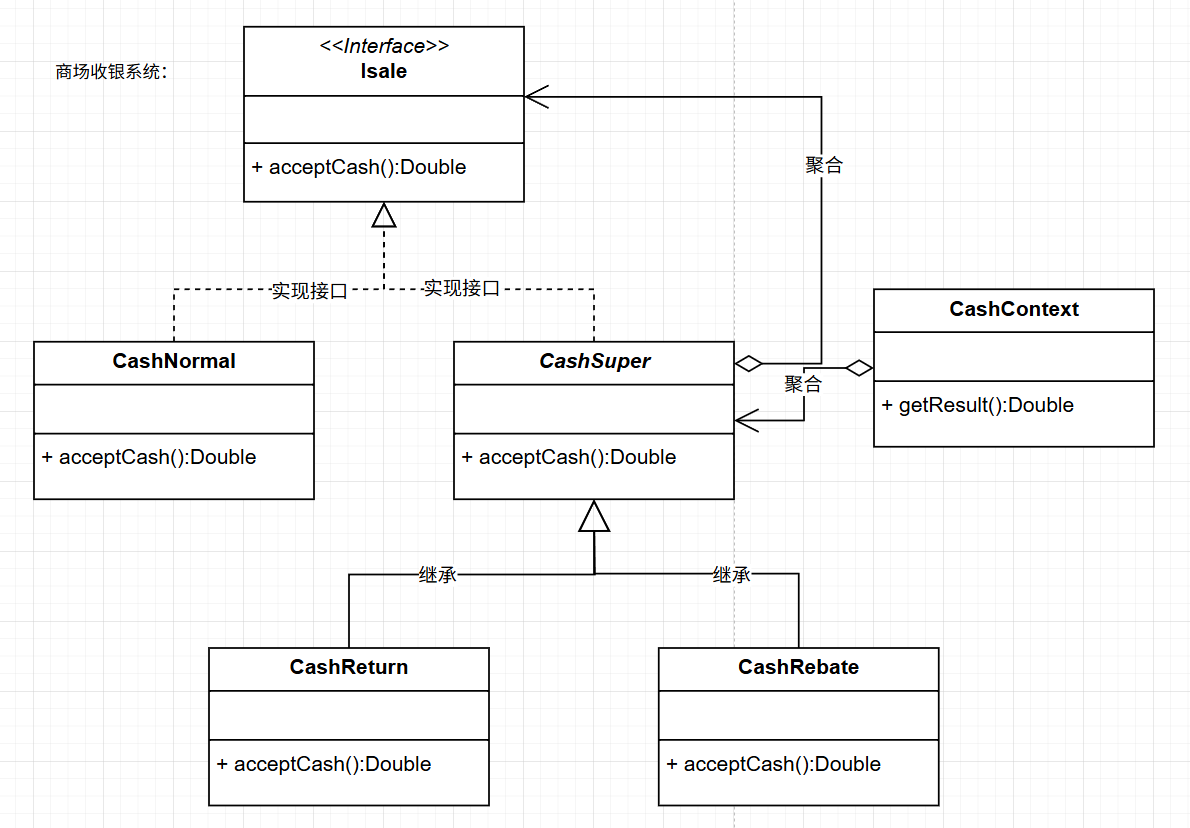
2.装饰模式举例:
业务场景:需要实现一个商场收银系统,有三种策略,
- 正常结账
- 打折
- 满减
- 先打折再满减
2.1 代码设计UML图如下:
2.2 核心代码:
Isale接口
java
public interface ISale {

   public double acceptCash(double price,int num);

}
CashNormal:
java
public class CashNormal implements ISale {
    //正常收费,原价返回
    public double acceptCash(double price,int num){
        return price * num;
    }
}
CashSuper
java
public class CashSuper implements ISale {

    protected ISale component;

    //装饰对象
    public void decorate(ISale component) {
        this.component=component;
    }

    public double acceptCash(double price,int num){
        double result = 0d;
        if (this.component != null){
            //若装饰对象存在,则执行装饰的算法运算
            result = this.component.acceptCash(price,num);
        }
        return result;
    }
}
CashRebate
java
public class CashRebate extends CashSuper {

    private double moneyRebate = 1d;
    //打折收费。初始化时必需输入折扣率。八折就输入0.8
    public CashRebate(double moneyRebate){
        this.moneyRebate = moneyRebate;
    }

    //计算收费时需要在原价基础上乘以折扣率
    public double acceptCash(double price,int num){
        double result = price * num * this.moneyRebate;
        return super.acceptCash(result,1);
    }

}
CashReturn
java
public class CashReturn extends CashSuper {

    private double moneyCondition = 0d; //返利条件
    private double moneyReturn = 0d;    //返利值

    //返利收费。初始化时需要输入返利条件和返利值。
    //比如"满300返100",就是moneyCondition=300,moneyReturn=100
    public CashReturn(double moneyCondition,double moneyReturn){
        this.moneyCondition = moneyCondition;
        this.moneyReturn = moneyReturn;
    }

    //计算收费时,当达到返利条件,就原价减去返利值
    public double acceptCash(double price,int num){
        double result = price * num;
        if (moneyCondition>0 && result >= moneyCondition)
            result = result - Math.floor(result / moneyCondition) * moneyReturn;
        return super.acceptCash(result,1);
    }

}
CashContext:
java
public class CashContext {

    private ISale cs;   //声明一个ISale接口对象

    //通过构造方法,传入具体的收费策略
    public CashContext(int cashType){
        switch(cashType){
            case 1:
                this.cs = new CashNormal();
                break;
            case 2:
                this.cs = new CashRebate(0.8d);
                break;
            case 3:
                this.cs = new CashRebate(0.7d);
                break;
            case 4:
                this.cs = new CashReturn(300d,100d);
                break;
            case 5:
                //先打8折,再满300返100
                CashNormal cn = new CashNormal();
                CashReturn cr1 = new CashReturn(300d,100d);
                CashRebate cr2 = new CashRebate(0.8d);
                cr1.decorate(cn);   //用满300返100算法包装基本的原价算法
                cr2.decorate(cr1);  //打8折算法装饰满300返100算法
                this.cs = cr2;      //将包装好的算法组合引用传递给cs对象
                break;
            case 6:
                //先满200返50,再打7折
                CashNormal cn2 = new CashNormal();
                CashRebate cr3 = new CashRebate(0.7d);
                CashReturn cr4 = new CashReturn(200d,50d);
                cr3.decorate(cn2);  //用打7折算法包装基本的原价算法
                cr4.decorate(cr3);  //满200返50算法装饰打7折算法
                this.cs = cr4;      //将包装好的算法组合引用传递给cs对象
                break;
        }
    }

    public double getResult(double price,int num){
        //根据收费策略的不同,获得计算结果
        return this.cs.acceptCash(price,num);
    }
}
客户端测试类:
java
import java.util.Scanner;
public class demotest {
public static void main(String[] args){
System.out.println("**********************************************");
System.out.println("装饰模式");
System.out.println();
int discount = 0; //商品折扣模式
double price = 0d; //商品单价
int num = 0; //商品购买数量
double totalPrices = 0d;//当前商品合计费用
double total = 0d; //总计所有商品费用
Scanner sc = new Scanner(System.in);
do {
System.out.println("商品折扣模式如下:");
System.out.println("1.正常收费");
System.out.println("2.打八折");
System.out.println("3.打七折");
System.out.println("4.满300送100");
System.out.println("5.先打8折,再满300送100");
System.out.println("6.先满200送50,再打7折");
System.out.println("请输入商品折扣模式:");
discount = Integer.parseInt(sc.nextLine());
System.out.println("请输入商品单价:");
price = Double.parseDouble(sc.nextLine());
System.out.println("请输入商品数量:");
num = Integer.parseInt(sc.nextLine());
System.out.println();
if (price>0 && num>0){
//根据用户输入,将对应的策略对象作为参数传入CashContext对象中
CashContext cc = new CashContext(discount);
//通过Context的getResult方法的调用,可以得到收取费用的结果
//让具体算法与客户进行了隔离
totalPrices = cc.getResult(price,num);
total = total + totalPrices;
System.out.println();
System.out.println("单价:"+ price + "元 数量:"+ num +" 合计:"+ totalPrices +"元");
System.out.println();
System.out.println("总计:"+ total+"元");
System.out.println();
}
}
while(price>0 && num>0);
System.out.println();
System.out.println("**********************************************");
}
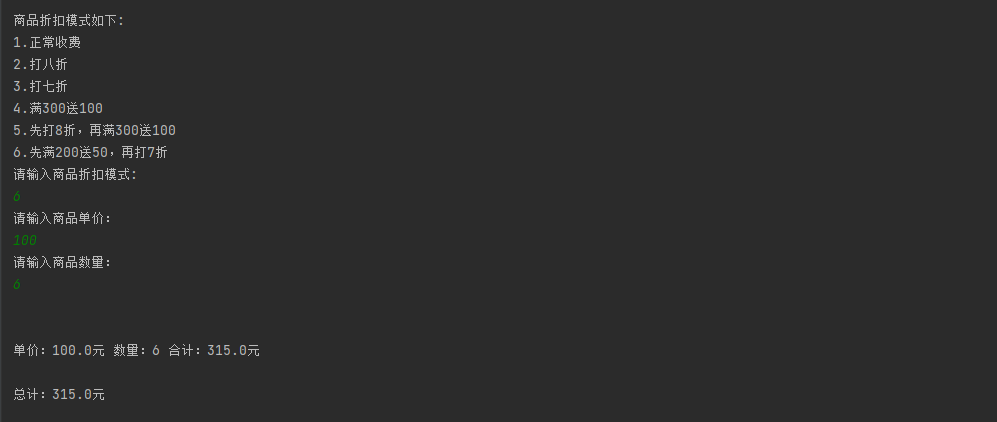
}输出结果:
3. 装饰模式的优缺点;
- 优点:
- 采用装饰模式扩展对象的功能比采用继承方式更加灵活。
- 可以设计出多个不同的具体装饰类,创造出多个不同行为的组合。
- 缺点:
- 装饰模式增加了许多子类,如果过度使用会使程序变得很复杂。
4.装饰模式的应用场景
类纵向层次比较多时适用。
比如 人的装饰 上衣,下衣,鞋子,三种抽象装饰类, 各有子类,如果采用继承,就会产生 上衣数 * 下衣数*鞋子数 个子类,会导致子类数量爆炸。 装饰模式则写成独立的子类,根据具体情况使用即可。
-
动态地添加或修改对象的功能
- 当需要动态地为一个对象添加额外的功能,而且希望这些功能可以灵活组合时,装饰模式是一个很好的选择。这样可以避免使用大量子类来实现所有可能的组合,而是使用装饰器来动态地添加这些功能。
-
避免使用继承导致的类爆炸
- 经常会发现在类的层次结构中添加新功能导致的子类爆炸问题。装饰模式通过将功能分离到单独的装饰器类中,避免了这种情况的发生。
-
保持类的简单性和单一责任原则
- 使用装饰模式可以将一些复杂的功能分离到单独的装饰器类中,使得原始类保持简单和具有单一职责。
-
在运行时动态地添加或删除功能
- 装饰模式允许在运行时动态地添加或删除对象的功能,这对于某些情况下的配置和扩展非常有用。
经典使用方案
Java I/O库中的输入输出流
装饰模式在 Java 语言中的最著名的应用莫过于 Java I/O 标准库的设计了。基本的InputStream或OutputStream可以通过添加额外的功能,比如缓冲、加密或压缩等,而无需修改它们的代码。
例如,InputStream 的子类 FilterInputStream,OutputStream 的子类 FilterOutputStream,Reader 的子类 BufferedReader 以及 FilterReader,还有 Writer 的子类 BufferedWriter、FilterWriter 以及 PrintWriter 等,它们都是抽象装饰类。
下面代码是为 FileReader 增加缓冲区而采用的装饰类 BufferedReader 的例子:
java
	BufferedReader in=new BufferedReader(new FileReader("filename.txtn));
	String s=in.readLine();
GUI界面组件
在GUI编程中,经常需要动态地添加新的功能或外观到用户界面组件上。比如,一个简单的文本框可以通过装饰模式来添加滚动条、边框、背景色等功能,而无需修改原始文本框类的代码。
Web开发中的过滤器
在Web开发中,过滤器常常用于对请求或响应进行处理,比如身份验证、日志记录、数据压缩等。使用装饰模式可以轻松地添加新的过滤功能,同时保持代码的灵活性和可维护性。
5.装饰模式扩展
装饰模式所包含的 4 个角色不是任何时候都要存在的,在有些应用环境下模式是可以简化的,如以下两种情况。
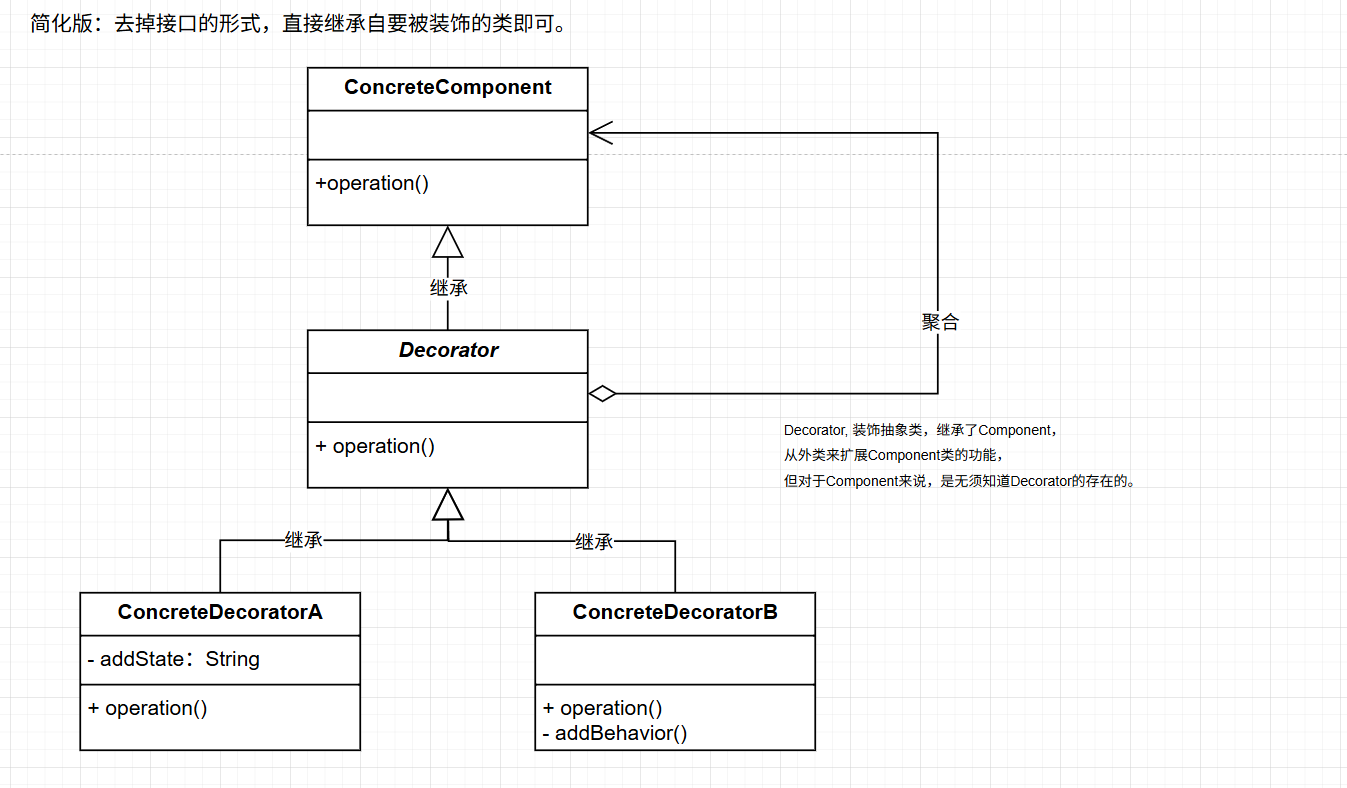
装饰者模式的简化
1.去掉接口的形式,直接继承自要被装饰的类即可。
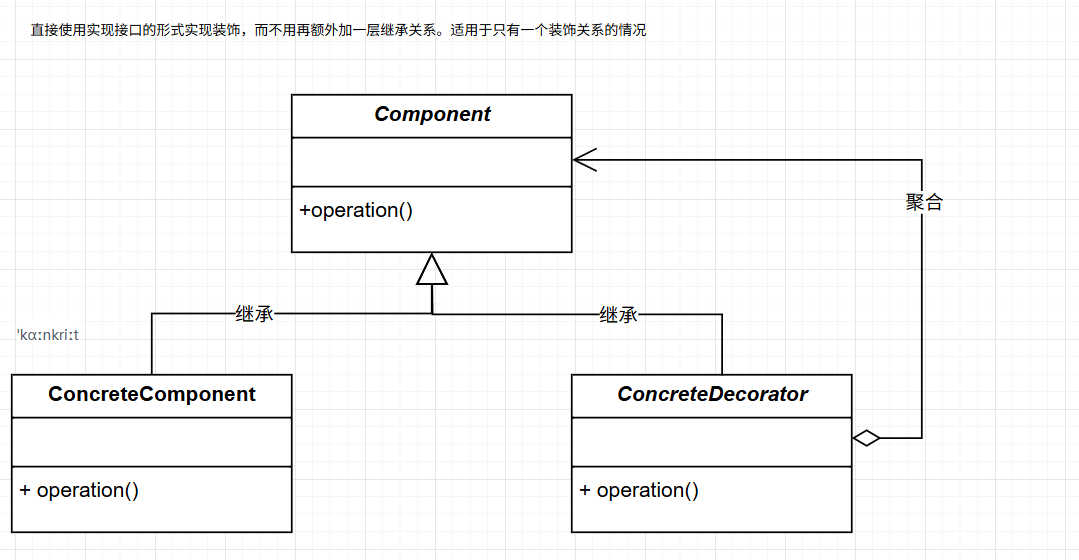
2.直接使用实现接口的形式实现装饰,而不用再额外加一层继承关系。适用于只有一个强化关系的情况
透明度的要求:
装饰者模式要求程序不应该声明需要被装饰的实体类,而是应该声明抽象接口。
半透明的装饰模式:
当发现工人接口并不能满足所有的要求的时候,要想实现透明度要求,必须在接口中添加新方法,所以很多实现的装饰者模式都是采取"半透明"的方式,即装饰者类可以对接口进行拓展,同时声明的时候,可以选择以装饰者类为准。 就是不在Component接口中增加方法,而是在装饰者类中进行方法扩展。
6. 总结
动态地将职责动态附加到对象上。想要扩展功能, 装饰者提供有别于继承的另一种选择。
要点
1、继承属于扩展形式之一,但不见得是达到弹性设计的最佳方案。
2、在我们的设计中,应该允许行为可以被扩展,而不须修改现有的代码。
3、组合和委托可用于在运行时动态地加上新的行为。
4、除了继承,装饰者模式也可以让我们扩展行为。
5、装饰者模式意味着一群装饰者类, 这些类用来包装具体组件。
6、装饰者类反映出被装饰的组件类型(实际上,他们具有相同的类型,都经过接口或继承实现)。
7、装饰者可以在被装饰者的行为前面与/或后面加上自己的行为,甚至将被装饰者的行为整个取代掉,而达到特定的目的。
8、你可以有无数个装饰者包装一个组件。
9、 装饰者一般对组建的客户是透明的,除非客户程序依赖于组件的具体类型。