在Coze上搭建工作流很方便,你有没有想过将你做好的工作流用在外部系统中呢?比如:自己做 AI 相关的产品,自己搭一套大模型不现实,有没有什么办法直接调用 Coze 上搭建好的工作流呢?答案是"当然可以",本文就带你一步步实现外部系统调用 Coze 工作流。
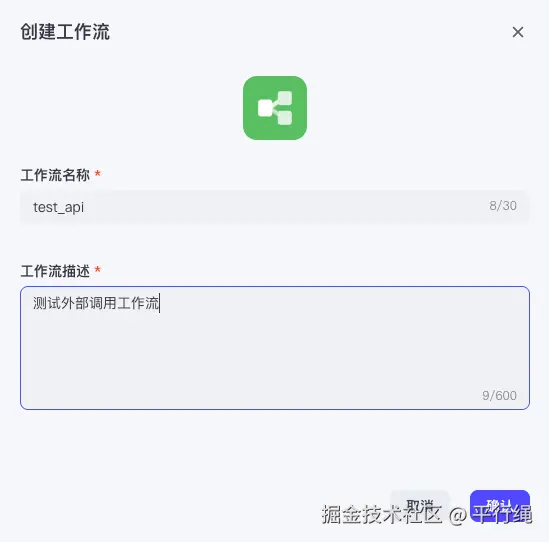
创建测试工作流
创建一个用来测试的工作流,名字就叫test_api
工作流的内容,很简单,调用一下就输出当前的时间
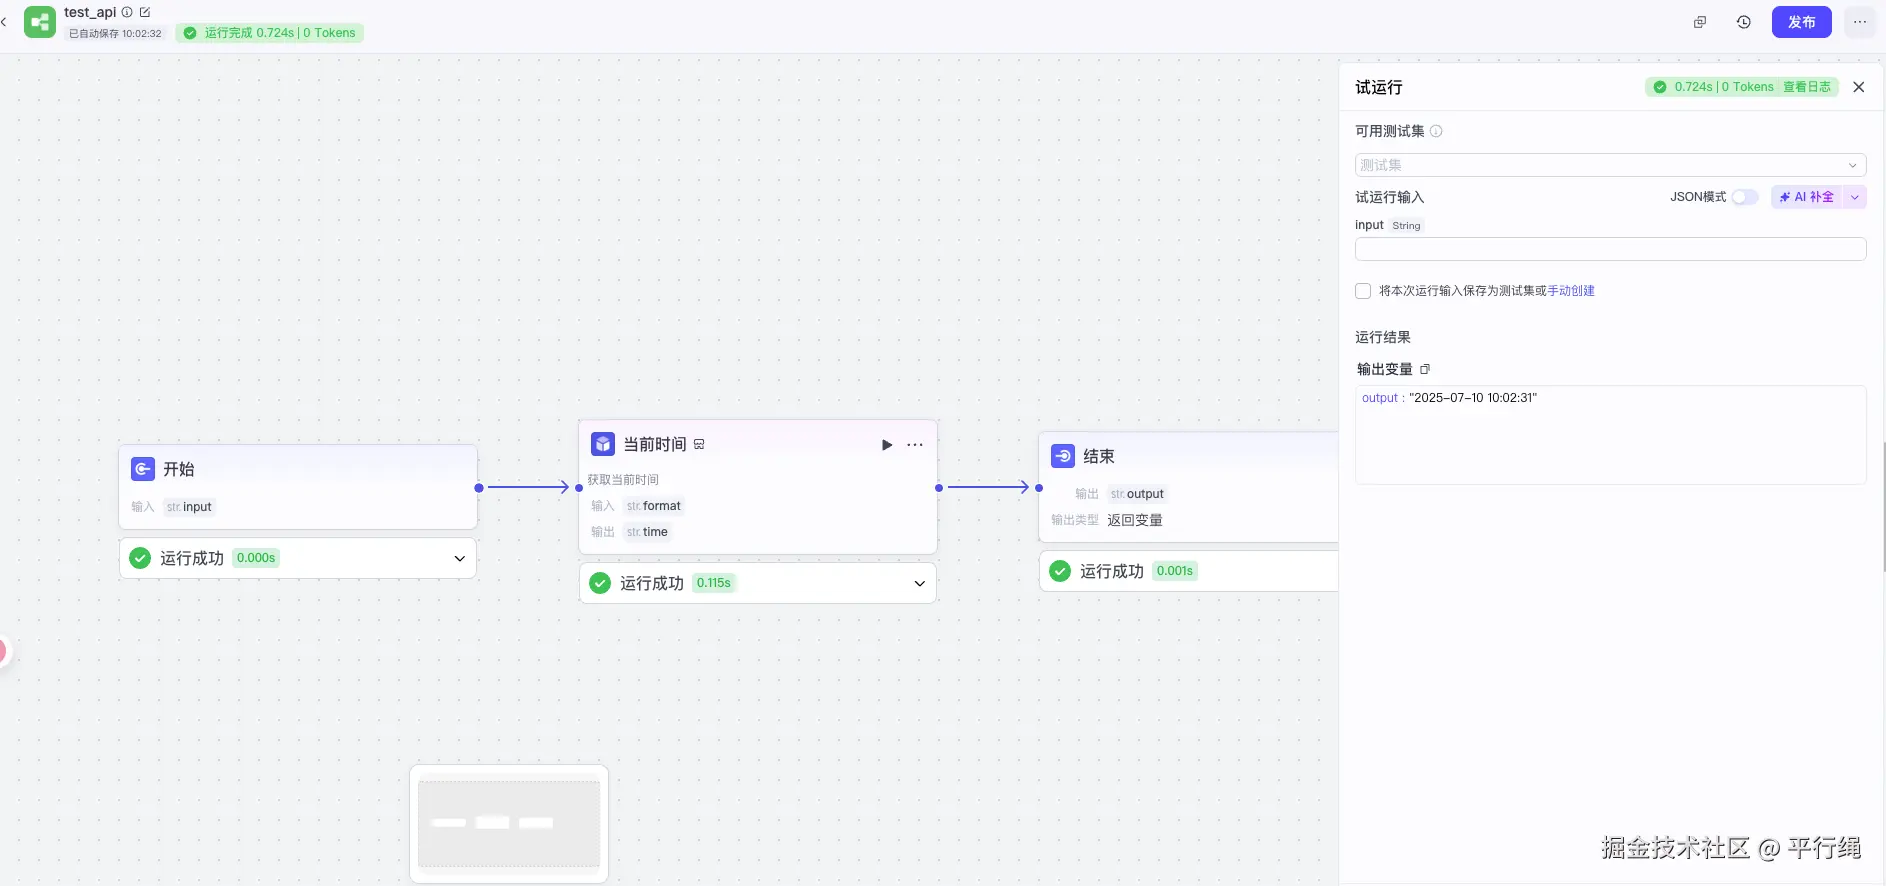
发布工作流,继续下一步。
外部系统调用工作流
前面的测试工作流已经搭好了,接下来就是通过 Coze 提供的 API 来调用搭建好的工作流,参考下 Coze 的文档
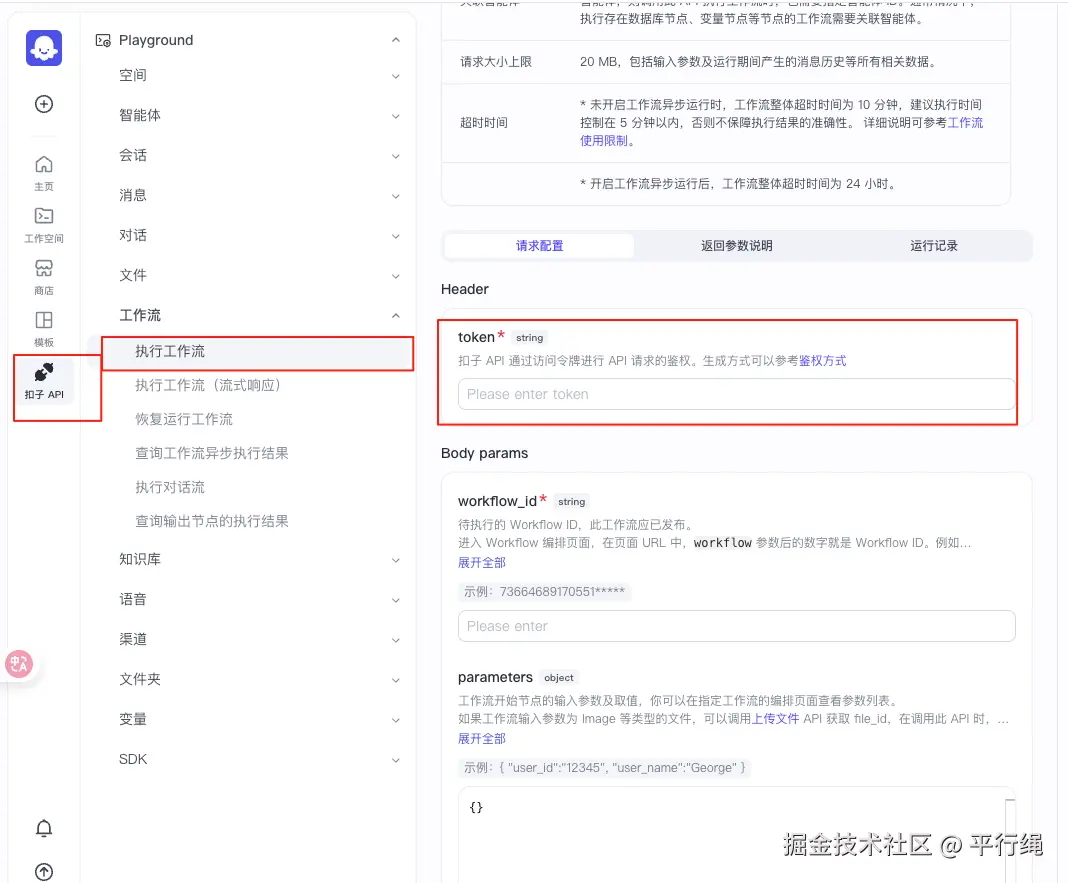
如何查看文档,上图已经标出来了。调用 Coze API 的关键点是上图框出来的 token,那这个 token 怎么获取呢?继续看下文。
选择鉴权方式
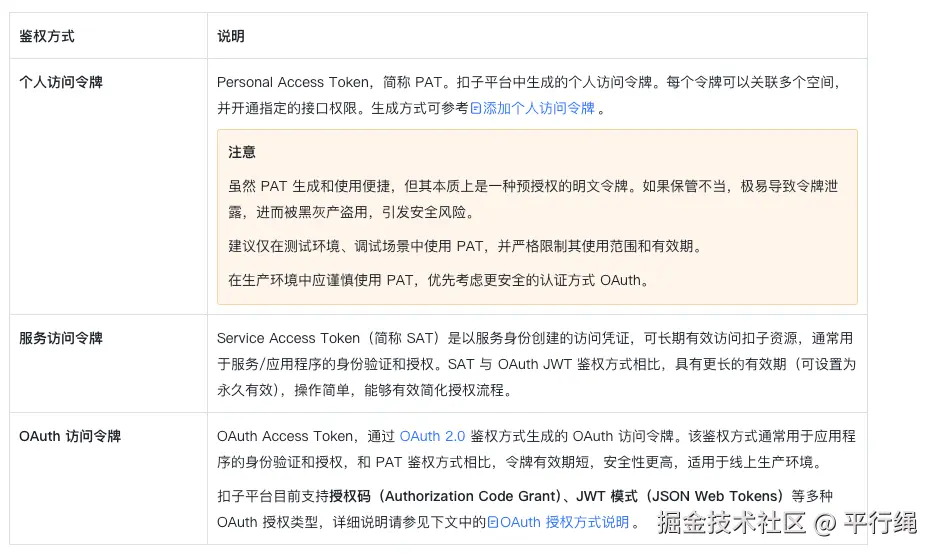
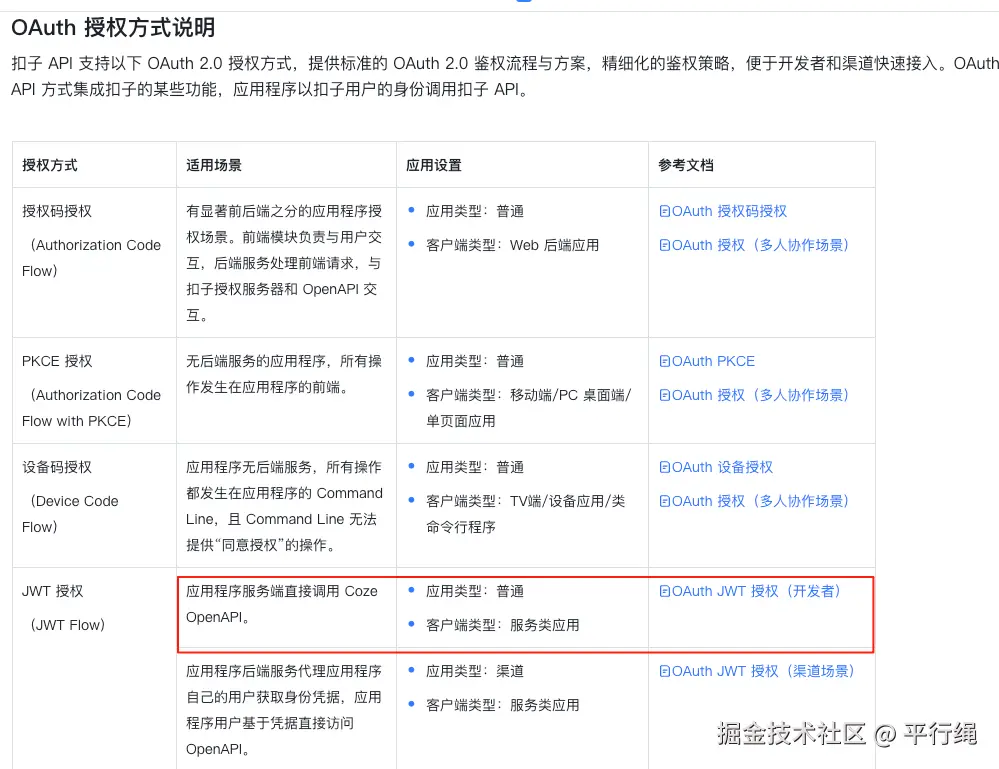
查看鉴权方式方式相关文档,链接是:www.coze.cn/open/docs/d...,鉴权方式有 3 种,如下图:
这三种方式如何选择呢?官方给出了选择参考图
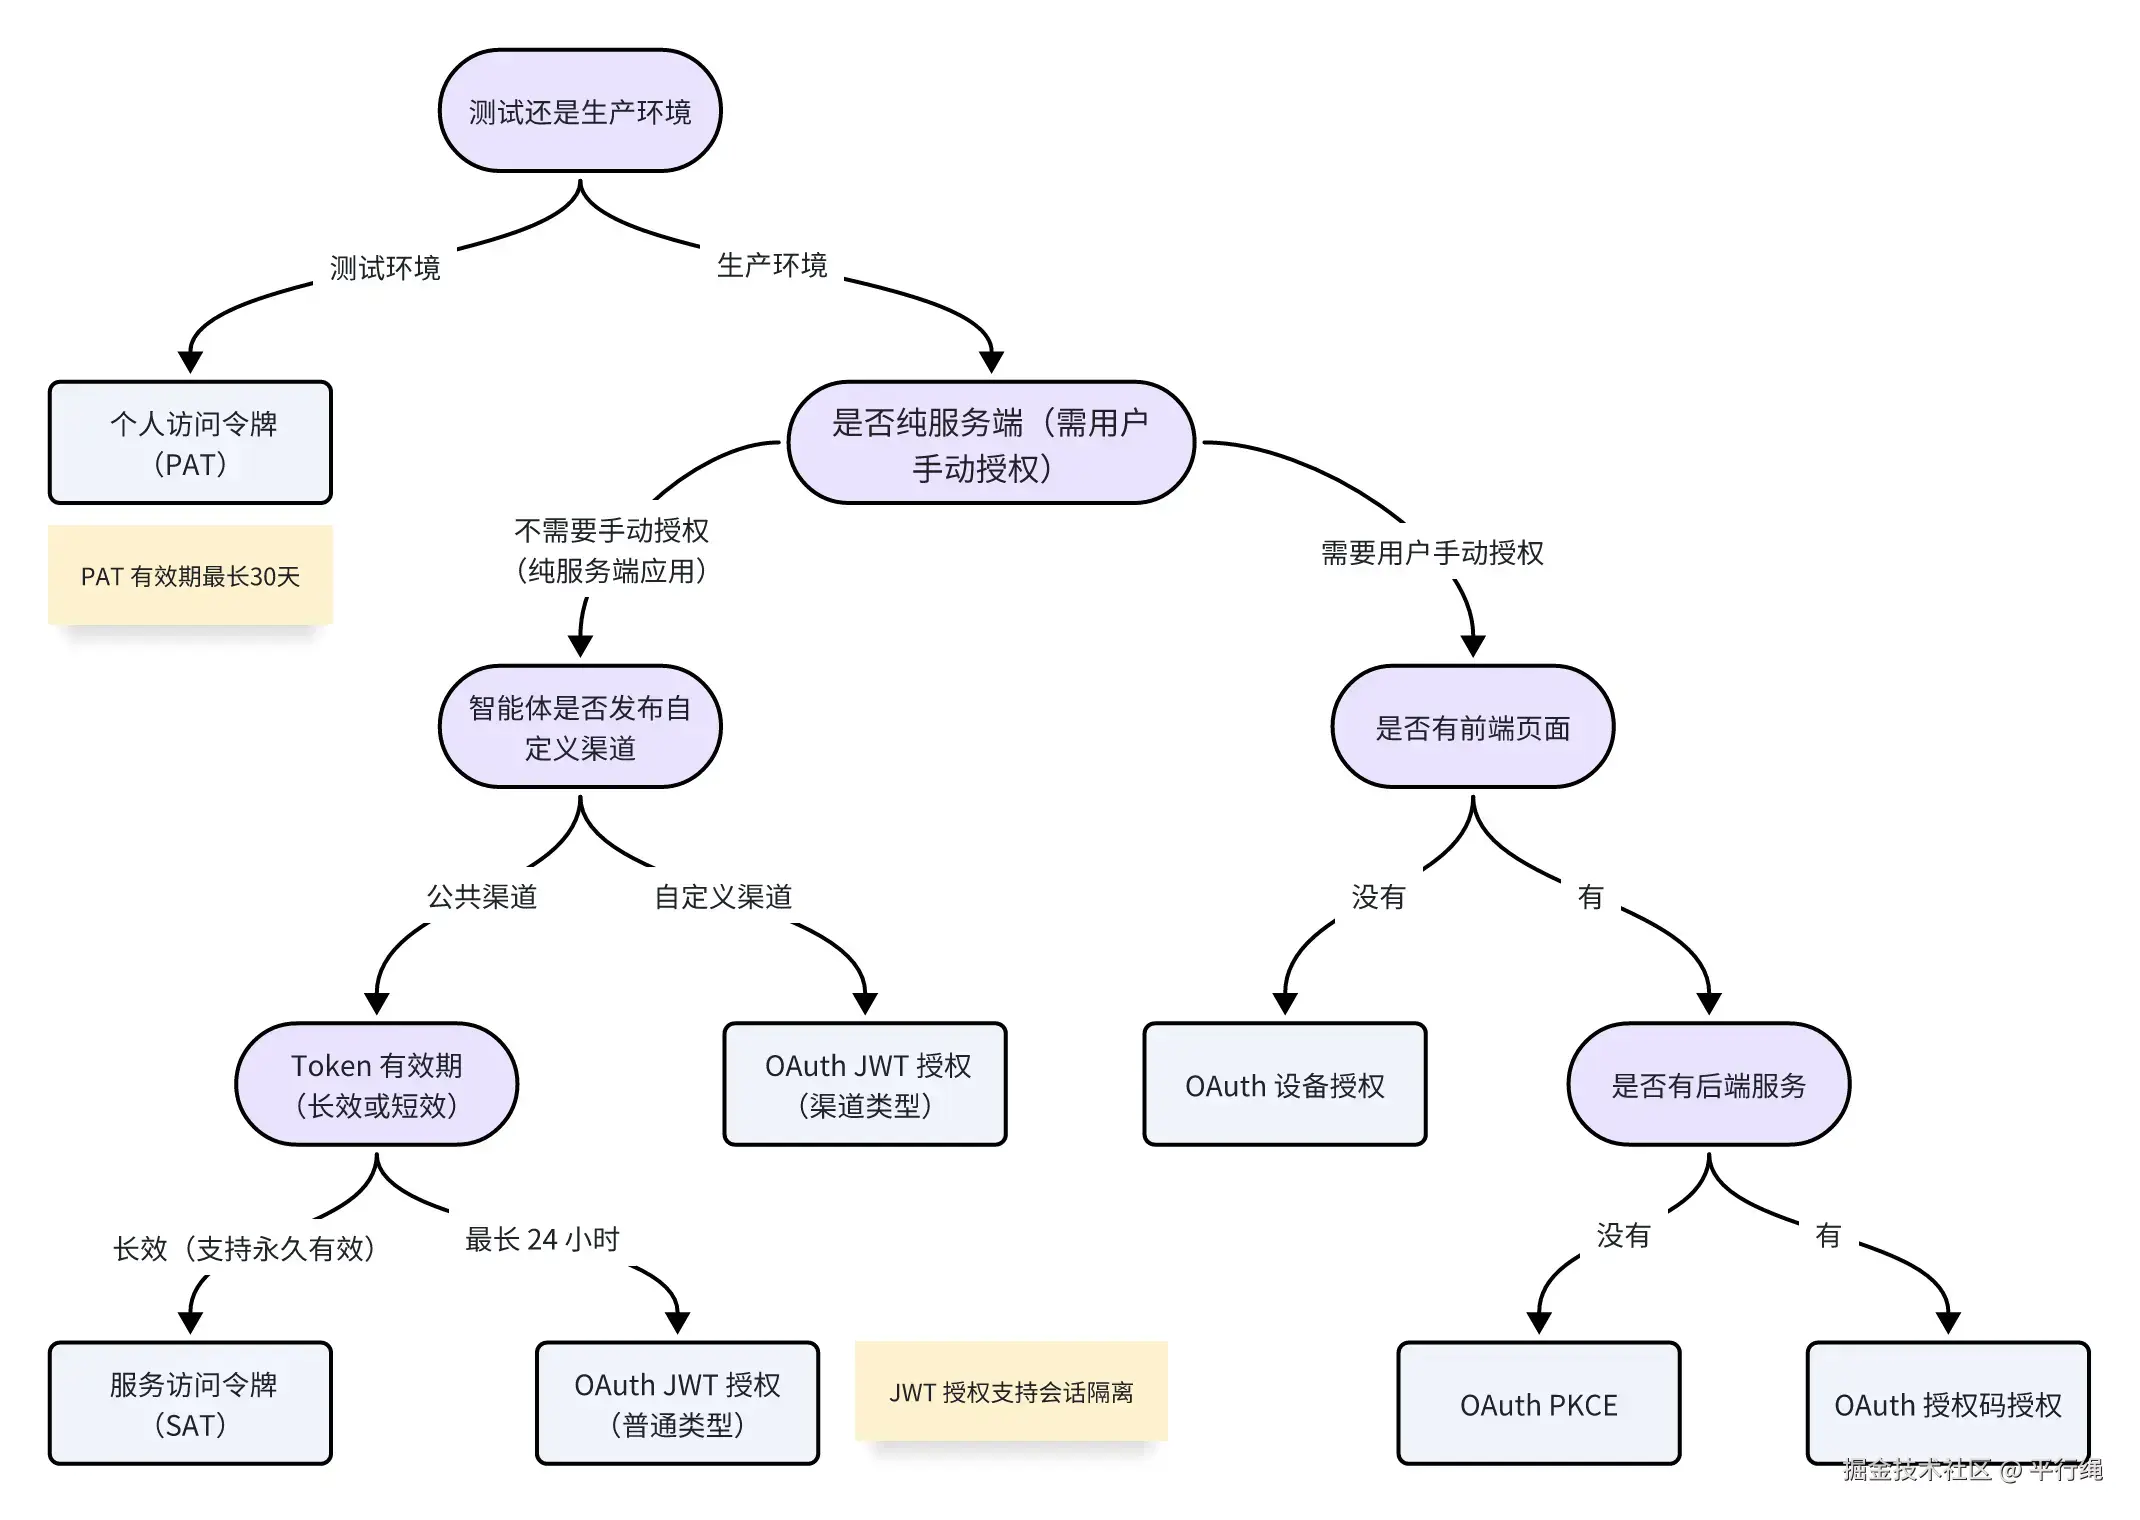
你可以根据这个参考图选择适合自己的鉴权类型。一般的话,都是用自己的服务器和 Coze API 进行交互的,选择OAuth JWT 授权比较合适
这里就以OAuth JWT 授权来介绍,看下如何授权。
OAuth JWT 授权
如何通过OAuth JWT 授权,文档:www.coze.cn/open/docs/d... 中有详细的说明。主要有下面几步
- 在扣子平台创建 OAuth 应用并完成授权。
- 应用程序通过公钥和私钥签署 JWT。
- 应用程序通过 API,获取访问令牌,具体请参见通过 JWT 获取 Oauth Access Token 。
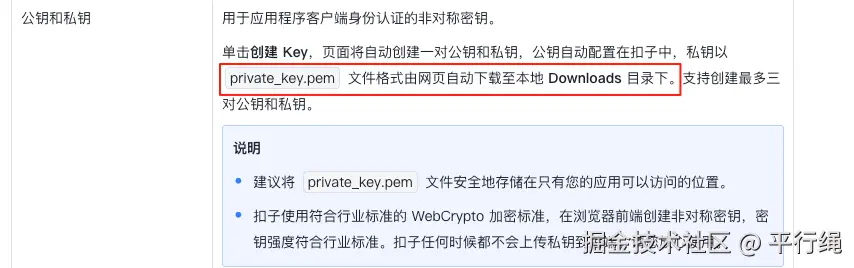
第 1 步,参考官方文档进行设置就可以,需要注意的是要将私钥保存到本地,后面要用到。
第 2 步和第 3 步,合在一起看,直接看官方给出的示例代码,如下
java
package example.auth;

import java.io.IOException;
import java.nio.charset.StandardCharsets;
import java.nio.file.Files;
import java.nio.file.Paths;

import com.coze.openapi.client.auth.OAuthToken;
import com.coze.openapi.service.auth.JWTOAuth;
import com.coze.openapi.service.auth.JWTOAuthClient;
import com.coze.openapi.service.service.CozeAPI;

/*
This example is about how to use the service jwt oauth process to acquire user authorization.

Firstly, users need to access https://www.coze.com/open/oauth/apps. For the cn environment,
users need to access https://www.coze.cn/open/oauth/apps to create an OAuth App of the type
of Service application.
The specific creation process can be referred to in the document:
https://www.coze.com/docs/developer_guides/oauth_jwt. For the cn environment, it can be
accessed at https://www.coze.cn/docs/developer_guides/oauth_jwt.
After the creation is completed, the client ID, private key, and public key id, can be obtained.
For the client secret and public key id, users need to keep it securely to avoid leakage.
* */
public class JWTOAuthExample {

  public static void main(String[] args) {

    // The default access is api.coze.com, but if you need to access api.coze.cn,
    // please use base_url to configure the api endpoint to access
    String cozeAPIBase = System.getenv("COZE_API_BASE");
    if (cozeAPIBase == null || cozeAPIBase.isEmpty()) {
      cozeAPIBase = "api.coze.cn";
    }
    String jwtOauthClientID = System.getenv("COZE_JWT_OAUTH_CLIENT_ID");
    String jwtOauthPrivateKey = System.getenv("COZE_JWT_OAUTH_PRIVATE_KEY");
    String jwtOauthPrivateKeyFilePath = System.getenv("COZE_JWT_OAUTH_PRIVATE_KEY_FILE_PATH");
    String jwtOauthPublicKeyID = System.getenv("COZE_JWT_OAUTH_PUBLIC_KEY_ID");
    //    jwtOauthPublicKeyID+="123";
    JWTOAuthClient oauth = null;
    try {
      jwtOauthPrivateKey =
          new String(
              Files.readAllBytes(Paths.get(jwtOauthPrivateKeyFilePath)), StandardCharsets.UTF_8);
    } catch (IOException e) {
      e.printStackTrace();
    }

    /*
    The jwt oauth type requires using private to be able to issue a jwt token, and through
    the jwt token, apply for an access_token from the coze service. The sdk encapsulates
    this procedure, and only needs to use get_access_token to obtain the access_token under
    the jwt oauth process.
    Generate the authorization token
    The default ttl is 900s, and developers can customize the expiration time, which can be
    set up to 24 hours at most.
    * */
    try {
      oauth =
          new JWTOAuthClient.JWTOAuthBuilder()
              .clientID(jwtOauthClientID)
              .privateKey(jwtOauthPrivateKey)
              .publicKey(jwtOauthPublicKeyID)
              .baseURL(cozeAPIBase)
              .build();
    } catch (Exception e) {
      e.printStackTrace();
      return;
    }

    try {
      OAuthToken resp = oauth.getAccessToken();
      System.out.println(resp);
    } catch (Exception e) {
      e.printStackTrace();
    }
    /*
    The jwt oauth process does not support refreshing tokens. When the token expires,
    just directly call get_access_token to generate a new token.
    * */
    CozeAPI coze =
        new CozeAPI.Builder()
            .auth(JWTOAuth.builder().jwtClient(oauth).build())
            .baseURL(cozeAPIBase)
            .build();
    // you can also specify the scope and session for it
  }
}
上面的代码的作用就是获取鉴权需要的 token,token 获取成功后,就可以调用相关的 API 来执行工作流了。
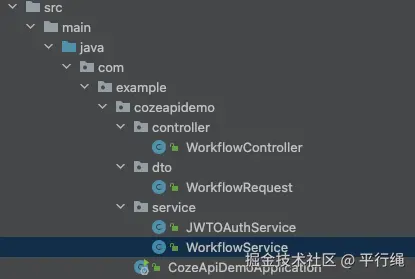
外部调用API执行工作流
文章到这里已经获取到鉴权需要的 token 了,就可以直接调用 Coze 工作流了,我服务端使用的是 SpringBoot 框架,已经将代码整理好了,就直接看代码。先看下配置内容
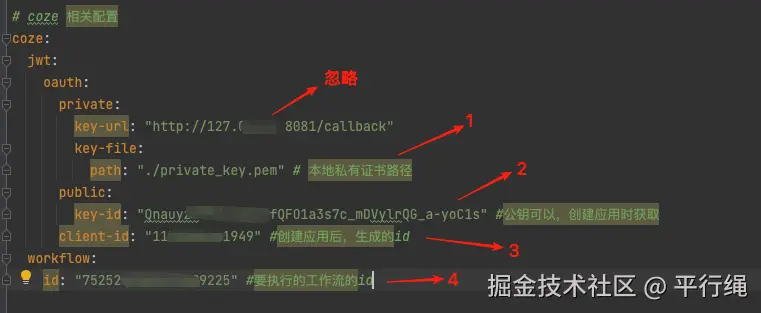
介绍下这里的 1,2,3,4 是怎么来的。
- 1:是创建 key 的时候生成的私钥文件,需要我们保存下来。
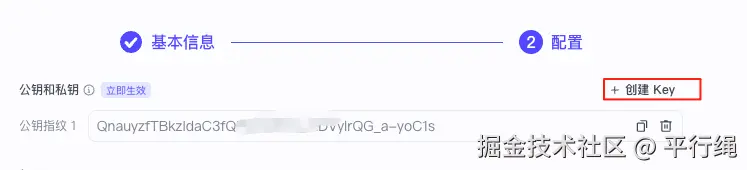
- 2:就是上面👆创建 key 生成的公钥指纹。
- 3:应用创建完成后生成的应用 ID。

- 4:工作流 id,进入你自己工作流界面,链接最后的内容。

知道配置文件中的每个内容是怎么来的就可以了。
我已经将外部调用 Coze API执行工作流整理成了一个 Demo 项目,下载后,修改相关内容运行即可。
把项目运行起来,调用接口测试下,如下
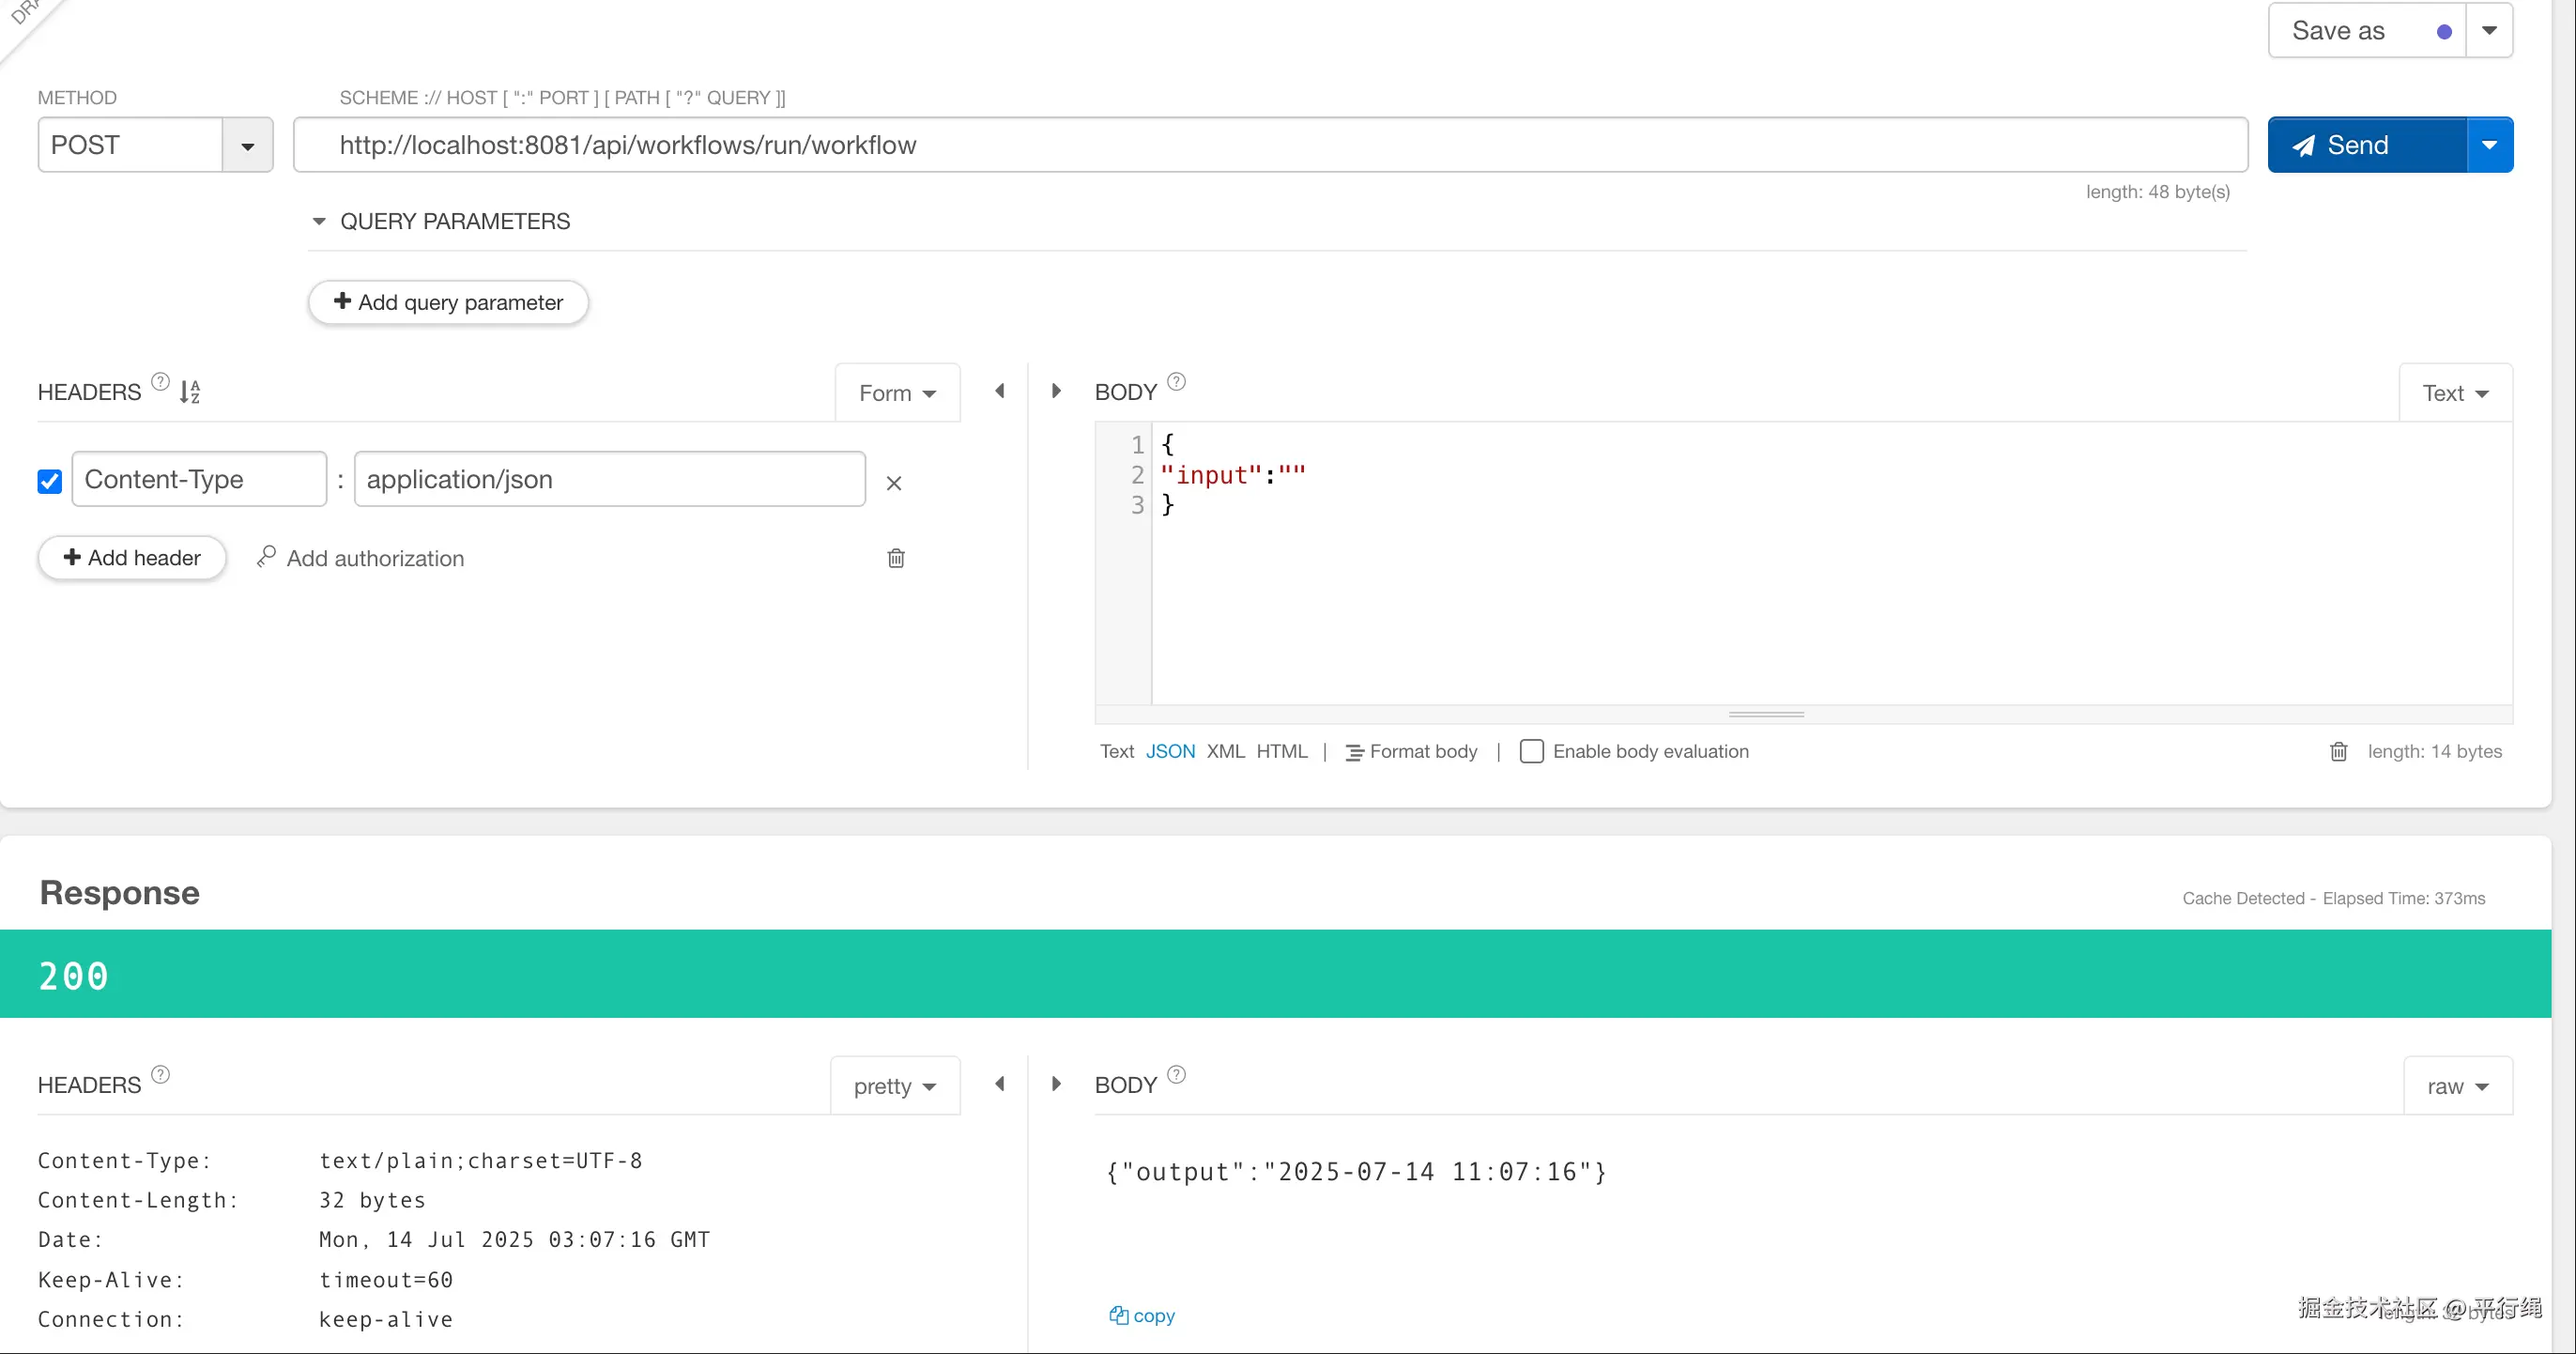
成功获取工作流执行的结果。
搞定,收工。
结束语
不得不说有了 Coze 后,方便了很多,让一些没能力部署自己大模型的公司,也可以用上 AI 了。