基于 Android 12 源码
涉及文件:
system/core/rootdir/init.rc
system/core/rootdir/init.zygote64.rc
system/core/rootdir/init.zygote32.rc
frameworks/base/cmds/app_process/app_main.cpp
frameworks/base/core/jni/AndroidRuntime.cpp
frameworks/base/core/java/com/android/internal/os/ZygoteInit.java
Zygote 进程是由 init 进程通过解析 init.rc 文件而创建的。在 init.rc 中,有以下关键代码段,负责触发 Zygote 进程的启动:
rc
on late-init
    # ... 其他 late-init 动作 ...
    # Now we can start zygote for devices with file based encryption
    trigger zygote-start
这个 trigger zygote-start 语句是一个事件触发器,当 late-init 事件发生时,它会触发 zygote-start 事件。
当 zygote-start 事件被触发后,init 会开始寻找定义了该事件的 service(服务)
在 Android 12 中,Zygote 服务的定义位于特定的 .rc 文件中,以支持不同的架构:
init.zygote64.rc: 针对 64 位设备,定义了 64 位 Zygote 服务。init.zygote32.rc: 针对 32 位设备,定义了 32 位 Zygote 服务。init.zygote64_32.rc: 针对 64 位设备但需要兼容 32 位应用程序的情况,定义了 64 位和 32 位 Zygote 服务。
以 init.zygote64.rc 为例:
rc
service zygote /system/bin/app_process64 -Xzygote /system/bin --zygote --start-system-server
    class main
    priority -20
    user root
    group root readproc reserved_disk
    socket zygote stream 660 root system
    socket usap_pool_primary stream 660 root system
    onrestart exec_background - system system -- /system/bin/vdc volume abort_fuse
    onrestart write /sys/power/state on
    onrestart restart audioserver
    onrestart restart cameraserver
    onrestart restart media
    onrestart restart netd
    onrestart restart wificond
    writepid /dev/cpuset/foreground/tasks
    critical window=${zygote.critical_window.minute:-off} target=zygote-fatal
当 zygote-start 事件发生时,这些代码就会被执行,-Xzygote: 告诉 app_process 这个进程是 Zygote。--start-system-server: 告诉 Zygote 进程在自身启动完成后,立即启动 System Server 进程。
这里 /system/bin/app_process64是由源码编译生成的二进制,不要纠结为什么找不到该文件,而frameworks/base/cmds/app_process/app_main.cpp才是 Zygote 的原生入口,无论 app_process32 还是 app_process64,它们的 C++ 主函数入口都是 app_main.cpp 中的 main() 函数。
main 函数源码:
c++
int main(int argc, char* const argv[])
{
    // ...

    // AppRuntime 是 AndroidRuntime 的子类(定义在 app_main.cpp 中)。
    // 初始化 JNI 环境 > 启动 ART/Dalvik 虚拟机 > 注册 JNI 方法 > 最终调用 Java 类的 main() 方法
    // argv[0] 是可执行文件路径(如/system/bin/app_process64)
    AppRuntime runtime(argv[0], computeArgBlockSize(argc, argv));
    // Process command line arguments
    // ignore argv[0]
    argc--;
    argv++;

    const char* spaced_commands[] = { "-cp", "-classpath" };
    // Allow "spaced commands" to be succeeded by exactly 1 argument (regardless of -s).
    bool known_command = false;


    // 下面代码是把以 - 开头的参数(如 -Xzygote、-Dxxx)作为 虚拟机参数,添加到 runtime 中。
    // 这些参数会传递给 ART 虚拟机(类似 JVM 的 -Xmx, -XX: ..)
    int i;
    for (i = 0; i < argc; i++) {
        if (known_command == true) {
          runtime.addOption(strdup(argv[i]));
          // The static analyzer gets upset that we don't ever free the above
          // string. Since the allocation is from main, leaking it doesn't seem
          // problematic. NOLINTNEXTLINE
          ALOGV("app_process main add known option '%s'", argv[i]);
          known_command = false;
          continue;
        }

        for (int j = 0;
             j < static_cast<int>(sizeof(spaced_commands) / sizeof(spaced_commands[0]));
             ++j) {
          if (strcmp(argv[i], spaced_commands[j]) == 0) {
            known_command = true;
            ALOGV("app_process main found known command '%s'", argv[i]);
          }
        }

        if (argv[i][0] != '-') {
            break;
        }
        if (argv[i][1] == '-' && argv[i][2] == 0) {
            ++i; // Skip --.
            break;
        }

        runtime.addOption(strdup(argv[i]));
        // The static analyzer gets upset that we don't ever free the above
        // string. Since the allocation is from main, leaking it doesn't seem
        // problematic. NOLINTNEXTLINE
        ALOGV("app_process main add option '%s'", argv[i]);
    }

    // Parse runtime arguments.  Stop at first unrecognized option.
    bool zygote = false;
    bool startSystemServer = false;
    bool application = false;
    String8 niceName;
    String8 className;

    // 解析参数
    // 最关键的分支,通过设置 zygote 变量决定进程是 Zygote 还是普通应用!
    ++i;  // Skip unused "parent dir" argument.
    while (i < argc) {
        const char* arg = argv[i++];
        if (strcmp(arg, "--zygote") == 0) {
            zygote = true;
            niceName = ZYGOTE_NICE_NAME;
        } else if (strcmp(arg, "--start-system-server") == 0) {
            startSystemServer = true;
        } else if (strcmp(arg, "--application") == 0) {
            application = true;
        } else if (strncmp(arg, "--nice-name=", 12) == 0) {
            niceName.setTo(arg + 12);
        } else if (strncmp(arg, "--", 2) != 0) {
            className.setTo(arg);
            break;
        } else {
            --i;
            break;
        }
    }

    Vector<String8> args;
    if (!className.isEmpty()) {
        // 非 Zygote 模式:启动普通应用

        // We're not in zygote mode, the only argument we need to pass
        // to RuntimeInit is the application argument.
        //
        // The Remainder of args get passed to startup class main(). Make
        // copies of them before we overwrite them with the process name.
        args.add(application ? String8("application") : String8("tool"));
        runtime.setClassNameAndArgs(className, argc - i, argv + i);

        if (!LOG_NDEBUG) {
          String8 restOfArgs;
          char* const* argv_new = argv + i;
          int argc_new = argc - i;
          for (int k = 0; k < argc_new; ++k) {
            restOfArgs.append(""");
            restOfArgs.append(argv_new[k]);
            restOfArgs.append("" ");
          }
          ALOGV("Class name = %s, args = %s", className.string(), restOfArgs.string());
        }
    } else {
         // Zygote 模式

        // We're in zygote mode.
        maybeCreateDalvikCache();

        if (startSystemServer) {
            args.add(String8("start-system-server"));
        }

        char prop[PROP_VALUE_MAX];
        if (property_get(ABI_LIST_PROPERTY, prop, NULL) == 0) {
            LOG_ALWAYS_FATAL("app_process: Unable to determine ABI list from property %s.",
                ABI_LIST_PROPERTY);
            return 11;
        }

        String8 abiFlag("--abi-list=");
        abiFlag.append(prop);
        args.add(abiFlag);

        // In zygote mode, pass all remaining arguments to the zygote
        // main() method.
        for (; i < argc; ++i) {
            args.add(String8(argv[i]));
        }
    }

    // 设置进程名,默认 static const char ZYGOTE_NICE_NAME[] = "zygote";
    if (!niceName.isEmpty()) {
        runtime.setArgv0(niceName.string(), true /* setProcName */);
    }

    // 启动 Java 层,准备起飞~
    // Java层入口为 ZygoteInit.main()
    if (zygote) {
        runtime.start("com.android.internal.os.ZygoteInit", args, zygote);
    } else if (className) {
        runtime.start("com.android.internal.os.RuntimeInit", args, zygote);
    } else {
        fprintf(stderr, "Error: no class name or --zygote supplied.\n");
        app_usage();
        LOG_ALWAYS_FATAL("app_process: no class name or --zygote supplied.");
    }
}
runtime 源码位置位于 frameworks/base/core/jni/AndroidRuntime.cpp这是 Android 原生(C++)代码的一部分,属于 JNI 框架层。
runtime.start 源码:
c++
void AndroidRuntime::start(const char* className, const Vector<String8>& options, bool zygote)
{
    // ...

    // ========================================================================
    // STEP 1: 初始化 JNI 调用环境(JniInvocation)
    // ========================================================================
    JniInvocation jni_invocation;
    jni_invocation.Init(NULL);  // 初始化 JNI 层调用框架(加载 libart.so 等)

    JNIEnv* env;
    // 调用 startVm() 实际启动 ART 虚拟机
    if (startVm(&mJavaVM, &env, zygote, primary_zygote) != 0) {
        ALOGE("startVm failed");
        return;
    }

    // 虚拟机创建成功后的回调
    onVmCreated(env);

    // ========================================================================
    // STEP 2: 注册所有系统级 JNI 方法
    // 如:android.os, android.app, android.content 等包下的 native 函数
    // ========================================================================
    if (startReg(env) < 0) {
        ALOGE("Unable to register all android natives\n");
        return;
    }
    // 示例:注册后,Java 层调用 android.os.SystemClock.uptimeMillis()
    //      才能正确跳转到 native 对应的 C++ 函数

    // ========================================================================
    // STEP 3: 构造 Java 层 main(String[] args) 所需的参数数组
    // ========================================================================
    jclass stringClass;
    jobjectArray strArray;  // 对应 String[]
    jstring classNameStr;   // 对应 className 参数

    // 查找 java.lang.String 类
    stringClass = env->FindClass("java/lang/String");
    assert(stringClass != NULL);

    // 创建 String 数组,长度 = 参数个数 + 1(+1 是主类名)
    strArray = env->NewObjectArray(options.size() + 1, stringClass, NULL);
    assert(strArray != NULL);

    // 第一个元素:主类名(如 com.android.internal.os.ZygoteInit)
    classNameStr = env->NewStringUTF(className);
    assert(classNameStr != NULL);
    env->SetObjectArrayElement(strArray, 0, classNameStr);

    // 后续元素:传入的 options 参数(如 start-system-server, --abi-list=...)
    for (size_t i = 0; i < options.size(); ++i) {
        jstring optionsStr = env->NewStringUTF(options.itemAt(i).string());
        assert(optionsStr != NULL);
        env->SetObjectArrayElement(strArray, i + 1, optionsStr);
    }

    // ========================================================================
    // STEP 4: 查找并调用 Java 主类的 main() 方法
    //           实现从 Native 到 Java 的"点火"
    // ========================================================================
    char* slashClassName = toSlashClassName(className != NULL ? className : "");
    // 将点号分隔类名转为斜杠分隔,如 com.example.App → com/example/App

    // 查找 Java 类
    jclass startClass = env->FindClass(slashClassName);
    if (startClass == NULL) {
        ALOGE("JavaVM unable to locate class '%s'\n", slashClassName);
    } else {
        // 获取 main 方法的 Method ID
        // 签名:([Ljava/lang/String;)V → 接收 String[],返回 void
        jmethodID startMeth = env->GetStaticMethodID(startClass, "main",
            "([Ljava/lang/String;)V");
        if (startMeth == NULL) {
            ALOGE("JavaVM unable to find main() in '%s'\n", className);
        } else {
            // 正式调用 Java 层 main 方法!
            // 控制权从此转移到 Java 层 🛫
            env->CallStaticVoidMethod(startClass, startMeth, strArray);
            // !!!无限循环开始,后续代码不会被执行!!!
            // 程序"进入" Java 层,永不返回

            // 可选:检查是否有未捕获异常
#if 0
            if (env->ExceptionCheck())
                threadExitUncaughtException(env);
#endif
        }
    }
    free(slashClassName);  // 释放转换后的类名字符串

    // ========================================================================
    // STEP 5: 收尾工作(正常情况下不会执行到这里)
    //           因为 main() 是无限循环,不会返回
    // ========================================================================
    ALOGD("Shutting down VM\n");

    // 尝试分离当前线程(主线程)
    if (mJavaVM->DetachCurrentThread() != JNI_OK)
        ALOGW("Warning: unable to detach main thread\n");

    // 销毁虚拟机(通常不会执行)
    if (mJavaVM->DestroyJavaVM() != 0)
        ALOGW("Warning: VM did not shut down cleanly\n");
}
虚拟机已经被启动,通过 JNI 调用 Java 代码,Java 代码就可以在虚拟机跑起来了,接下来完全进入 Java 代码内容,呜呜呜~,终于到能看懂的代码了
接下来就来到了 ZygoteInit.java,源码位置:
frameworks/base/core/java/com/android/internal/os/ZygoteInit.java
在线查看:android.googlesource.com/platform/fr...
入口函数 main() 源码分析:
c++
    @UnsupportedAppUsage
    public static void main(String[] argv) {
        ZygoteServer zygoteServer = null;

        // Mark zygote start. This ensures that thread creation will throw
        // an error.
        // 🔹 防止在 Zygote 初始化过程中创建线程
        //    因为 fork() 前不能有多余线程(否则会导致 fork 安全问题)
        //    调用此方法后,任何尝试创建线程的操作都会抛出异常
        ZygoteHooks.startZygoteNoThreadCreation();

        // Zygote goes into its own process group.
        try {
            Os.setpgid(0, 0);  // setpgid(pid, pgid): pid=0 表示当前进程
        } catch (ErrnoException ex) {
            throw new RuntimeException("Failed to setpgid(0,0)", ex);
        }

        Runnable caller;
        try {
            // Store now for StatsLogging later.
            // 判断是否是"运行时重启"(如 system_server 崩溃后重启)
            // sys.boot_completed=1 表示系统已启动完成
            final long startTime = SystemClock.elapsedRealtime();
            final boolean isRuntimeRestarted = "1".equals(
                    SystemProperties.get("sys.boot_completed"));

            // 根据是 32 位还是 64 位 Zygote 选择不同的 trace tag
            String bootTimeTag = Process.is64Bit() ? "Zygote64Timing" : "Zygote32Timing";
            TimingsTraceLog bootTimingsTraceLog = new TimingsTraceLog(bootTimeTag,
                    Trace.TRACE_TAG_DALVIK);
            bootTimingsTraceLog.traceBegin("ZygoteInit");
            RuntimeInit.preForkInit();

            // 解析启动参数
            boolean startSystemServer = false; // 是否启动 system_server
            String zygoteSocketName = "zygote"; // Zygote socket 名称
            String abiList = null; // 支持的 ABI 列表(如 arm,x86,arm64)
            boolean enableLazyPreload = false; // 是否延迟预加载

            // 🔹 解析命令行参数(来自 app_process 的启动参数)
            for (int i = 1; i < argv.length; i++) {
                if ("start-system-server".equals(argv[i])) {
                    startSystemServer = true; // 标记:需要 fork system_server
                } else if ("--enable-lazy-preload".equals(argv[i])) {
                    enableLazyPreload = true;  // 延迟预加载(节省启动时间)
                } else if (argv[i].startsWith(ABI_LIST_ARG)) {
                    abiList = argv[i].substring(ABI_LIST_ARG.length());
                } else if (argv[i].startsWith(SOCKET_NAME_ARG)) {
                    zygoteSocketName = argv[i].substring(SOCKET_NAME_ARG.length());
                } else {
                    throw new RuntimeException("Unknown command line argument: " + argv[i]);
                }
            }

            // 判断是否为主 Zygote(即 zygote 或 zygote64)
            final boolean isPrimaryZygote = zygoteSocketName.equals(Zygote.PRIMARY_SOCKET_NAME);
            if (!isRuntimeRestarted) {
                if (isPrimaryZygote) {
                    FrameworkStatsLog.write(FrameworkStatsLog.BOOT_TIME_EVENT_ELAPSED_TIME_REPORTED,
                            BOOT_TIME_EVENT_ELAPSED_TIME__EVENT__ZYGOTE_INIT_START,
                            startTime);
                } else if (zygoteSocketName.equals(Zygote.SECONDARY_SOCKET_NAME)) {
                    FrameworkStatsLog.write(FrameworkStatsLog.BOOT_TIME_EVENT_ELAPSED_TIME_REPORTED,
                            BOOT_TIME_EVENT_ELAPSED_TIME__EVENT__SECONDARY_ZYGOTE_INIT_START,
                            startTime);
                }
            }

            // 必须提供 ABI 列表,否则无法知道支持哪些指令集
            if (abiList == null) {
                throw new RuntimeException("No ABI list supplied.");
            }

            // In some configurations, we avoid preloading resources and classes eagerly.
            // In such cases, we will preload things prior to our first fork.
            // 🔹 预加载核心资源(类、资源、共享库)
            //    如果未启用"延迟预加载",则在此处立即执行
            if (!enableLazyPreload) {
                bootTimingsTraceLog.traceBegin("ZygotePreload");
                EventLog.writeEvent(LOG_BOOT_PROGRESS_PRELOAD_START,
                        SystemClock.uptimeMillis());

                 // 执行预加载(核心优化:让所有应用共享这些已加载的类)
                preload(bootTimingsTraceLog);
                EventLog.writeEvent(LOG_BOOT_PROGRESS_PRELOAD_END,
                        SystemClock.uptimeMillis());
                bootTimingsTraceLog.traceEnd(); // ZygotePreload
            }

            // Do an initial gc to clean up after startup
            // 🔹 执行一次 GC,清理启动期间产生的垃圾对象
            //    因为 preload() 加载了大量类,可能产生临时对象
            bootTimingsTraceLog.traceBegin("PostZygoteInitGC");
            gcAndFinalize();// 显式触发 GC 和 finalize
            bootTimingsTraceLog.traceEnd(); // PostZygoteInitGC

            bootTimingsTraceLog.traceEnd(); // ZygoteInit

            // 🔹 初始化 native 层状态(如注册 fork hook、设置信号处理等)
            Zygote.initNativeState(isPrimaryZygote);

            // 🔹 允许线程创建(Zygote 初始化阶段结束)
            //    之前调用 startZygoteNoThreadCreation() 禁止了线程创建
            ZygoteHooks.stopZygoteNoThreadCreation();

            // 🔹 创建 ZygoteServer,用于监听 socket 连接
            //    它会监听来自 ActivityManagerService 的启动请求
            zygoteServer = new ZygoteServer(isPrimaryZygote);

            // 🔹 尝试 fork 出 system_server 进程(系统服务宿主)
            if (startSystemServer) {
                // forkSystemServer() 在父进程(Zygote)中返回 null
                // 在子进程(system_server)中返回一个 Runnable 任务
                Runnable r = forkSystemServer(abiList, zygoteSocketName, zygoteServer);

                // {@code r == null} in the parent (zygote) process, and {@code r != null} in the
                // child (system_server) process.
                if (r != null) {
                    r.run();
                    return;// 子进程执行完后退出,不再继续下面的 select loop
                }
                 // 注意:父进程(Zygote)继续向下执行
            }

            Log.i(TAG, "Accepting command socket connections");

            // The select loop returns early in the child process after a fork and
            // loops forever in the zygote.
            // 🔹 进入无限循环,监听 socket
            //    - 在 Zygote 父进程中:永远循环,等待 fork 请求
            //    - 在 fork 出的子进程中:立即返回一个 Runnable 任务
            caller = zygoteServer.runSelectLoop(abiList);
        } catch (Throwable ex) {
            Log.e(TAG, "System zygote died with fatal exception", ex);
            throw ex;
        } finally {
            // 异常清理:关闭 socket(正常流程不会执行到这里)
            if (zygoteServer != null) {
                zygoteServer.closeServerSocket();
            }
        }

        // We're in the child process and have exited the select loop. Proceed to execute the
        // command.

        // 🔹 只有在子进程中才会执行到这里(caller != null)
        //    caller 是从 runSelectLoop() 返回的 Runnable 任务
        //    通常是启动某个应用进程的初始化逻辑
        if (caller != null) {
            caller.run();
        }
    }
ZygoteInit.main() 是 Android 的"生命之源"------它预加载万物,孵化系统,静候召唤,永不停歇。
这里有一点反直觉的代码,ZygoteInit.main() ****只被执行一次,而 这段代码却有两个分支,一个是子进程一个是父进程的:
scss
            // 🔹 尝试 fork 出 system_server 进程(系统服务宿主)
            if (startSystemServer) {
                // forkSystemServer() 在父进程(Zygote)中返回 null
                // 在子进程(system_server)中返回一个 Runnable 任务
                Runnable r = forkSystemServer(abiList, zygoteSocketName, zygoteServer);

                // {@code r == null} in the parent (zygote) process, and {@code r != null} in the
                // child (system_server) process.
                if (r != null) {
                    r.run();
                    return;// 子进程执行完后退出,不再继续下面的 select loop
                }
                 // 注意:父进程(Zygote)继续向下执行
            }
相当于 forkSystemServer 返回了两个值!一个为 null 一个不为 null,神不神奇,其实 forkSystemServer 仍只会返回一个值,开机的时候 系统服务一定会被创建,Zygote 更会被创建,代表着 forkSystemServer 之上的代码仍会被执行一次,forkSystemServer 及以下的代码会被执行两次。
why?神奇之处就在与 多进程,fork() 之后,这个方法的后续代码会被两个进程执行,举个例子,把 fork 当成克隆,想象科学家有一个"启动程序":
markdown
1. 准备实验材料
2. 克隆一个自己(fork)
3. 如果我是克隆人(r != null):
     执行任务:去火星
     完成后死亡
4. 如果我是原版(r == null):
     继续在地球等待,准备下一次克隆
这就是Linux 的 fork() 行为,神奇所在:
在 C 语言里你可能见过这样的写法:
c
pid_t pid = fork();
if (pid == 0) {
    // 子进程逻辑
} else if (pid > 0) {
    // 父进程逻辑
}
一次调用,两次返回!
这里最神奇的就是:
- 只有 一次调用
fork(),但它会在 父进程返回子进程 PID ,在 子进程返回 0 。 - 所以,父子进程都会"继续执行 fork() 之后的代码",但执行路径不同。
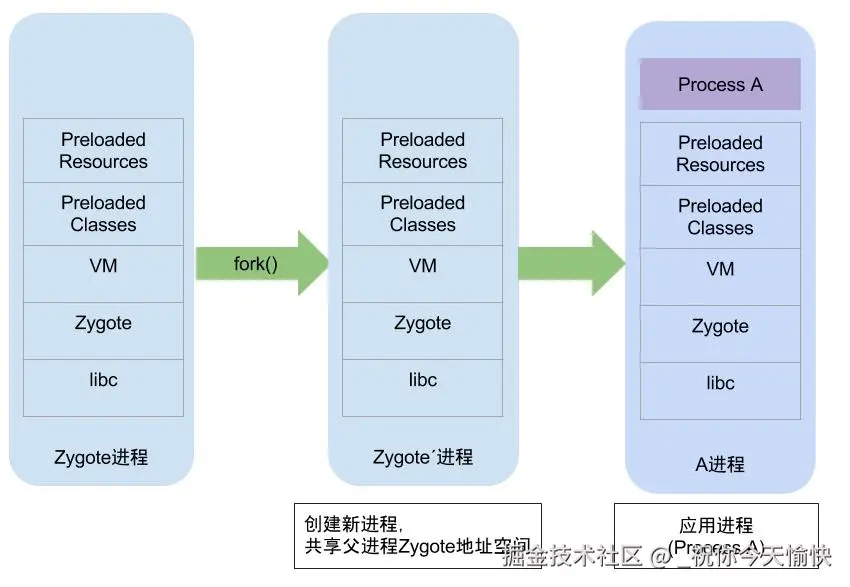
zygote进程内加载了preload()方法中的所有资源,当需要fork新进程时,采用copy on write技术,如下:
完整流程图:
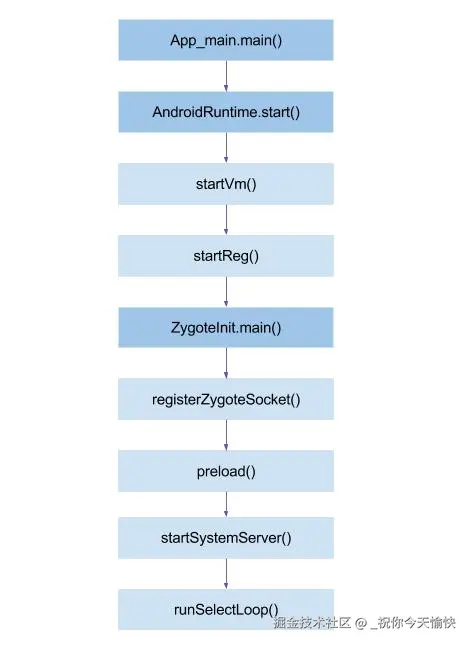
- 解析init.zygote.rc中的参数,创建AppRuntime并调用AppRuntime.start()方法;
- 调用AndroidRuntime的startVM()方法创建虚拟机,再调用startReg()注册JNI函数;
- 通过JNI方式调用ZygoteInit.main(),第一次进入Java世界;
- registerZygoteSocket()建立socket通道,zygote作为通信的服务端,用于响应客户端请求;
- preload()预加载通用类、drawable和color资源、openGL以及共享库以及WebView,用于提高ap启动效率;
- zygote完毕大部分工作,接下来再通过startSystemServer(),fork得力帮手system_server进程,也是上层framework的运行载体。
- zygote功成身退,调用runSelectLoop(),随时待命,当接收到请求创建新进程请求时立即唤醒并执行相应工作。